SA502AC - Scarifier Vonroc - Free user manual and instructions
Find the device manual for free SA502AC Vonroc in PDF.

| Brand | Vonroc |
| Model | SA502AC |
| Product type | Electric scarifier |
| Power | 1500 W |
| Idle speed | 3600 rpm |
| Cutting width | 360 mm |
| Cutting depth | -12 / -9 / -6 / -3 / +10 mm (5 positions) |
| Grass bag capacity | 35 L |
| Weight | 11.0 kg |
| Protection level | IPX4 |
| Protection class | Class II (double insulation) |
| Sound pressure level (LpA) | 78 dB(A) (uncertainty K=3 dB) |
| Sound power level (LWA) | 100 dB(A) guaranteed |
| Vibration (hand-arm) | 3.5 m/s² (uncertainty K=1.8 m/s²) |
| Power supply | Mains electric (cable) |
| Voltage | Corresponds to rating plate (230 V ~ 50 Hz typical) |
| Minimum extension cord cross-section | 1.5 mm² |
| Main functions | Scarifying, aerating, raking lawn |
| Accessories included | Scarifying blade, spring tine rake, grass bag, wall mount |
| Maintenance | Clean with mild soap and damp cloth; replace worn blades in pairs |
| Safety | Double insulation, safety button, hold-to-run on/off switch |
| Warranty | In accordance with legislation, excludes normal wear and misuse |
Frequently Asked Questions - SA502AC Vonroc
User questions about SA502AC Vonroc
0 question about this device. Answer the ones you know or ask your own.
Ask a new question about this device
Download the instructions for your Scarifier in PDF format for free! Find your manual SA502AC - Vonroc and take your electronic device back in hand. On this page are published all the documents necessary for the use of your device. SA502AC by Vonroc.
USER MANUAL SA502AC Vonroc
natural_image
White icon of a utility vehicle with a diagonal line, no text or symbols presentEN Original Instructions 07
DE Übersetzung Der Originalbetriebsanleitung 13
NL Vertaling van de oorspronkelijke gebruiksaanwijzing
FR Traduction de la notice originale 27
ES Traducción del manual original 34
IT Traduzione delle istruzioni originali 41
SV Översättning av bruksanvisning i original 48
FI Översättning av bruksanvisning i original 54
NO Översättning av bruksanvisning i original 60
DA Oversættelse af den originale brugsanvisning 66
PL Tłumaczenie instrukcji oryginalnej 72
RO Traducere a instructiunilor originale 79
PT Tradução do manual original 85
HU Eredeti használati utasítás fordítása 92
CS Překlad původního návodu 98
TR Orijinal talimatların çevirisi 104
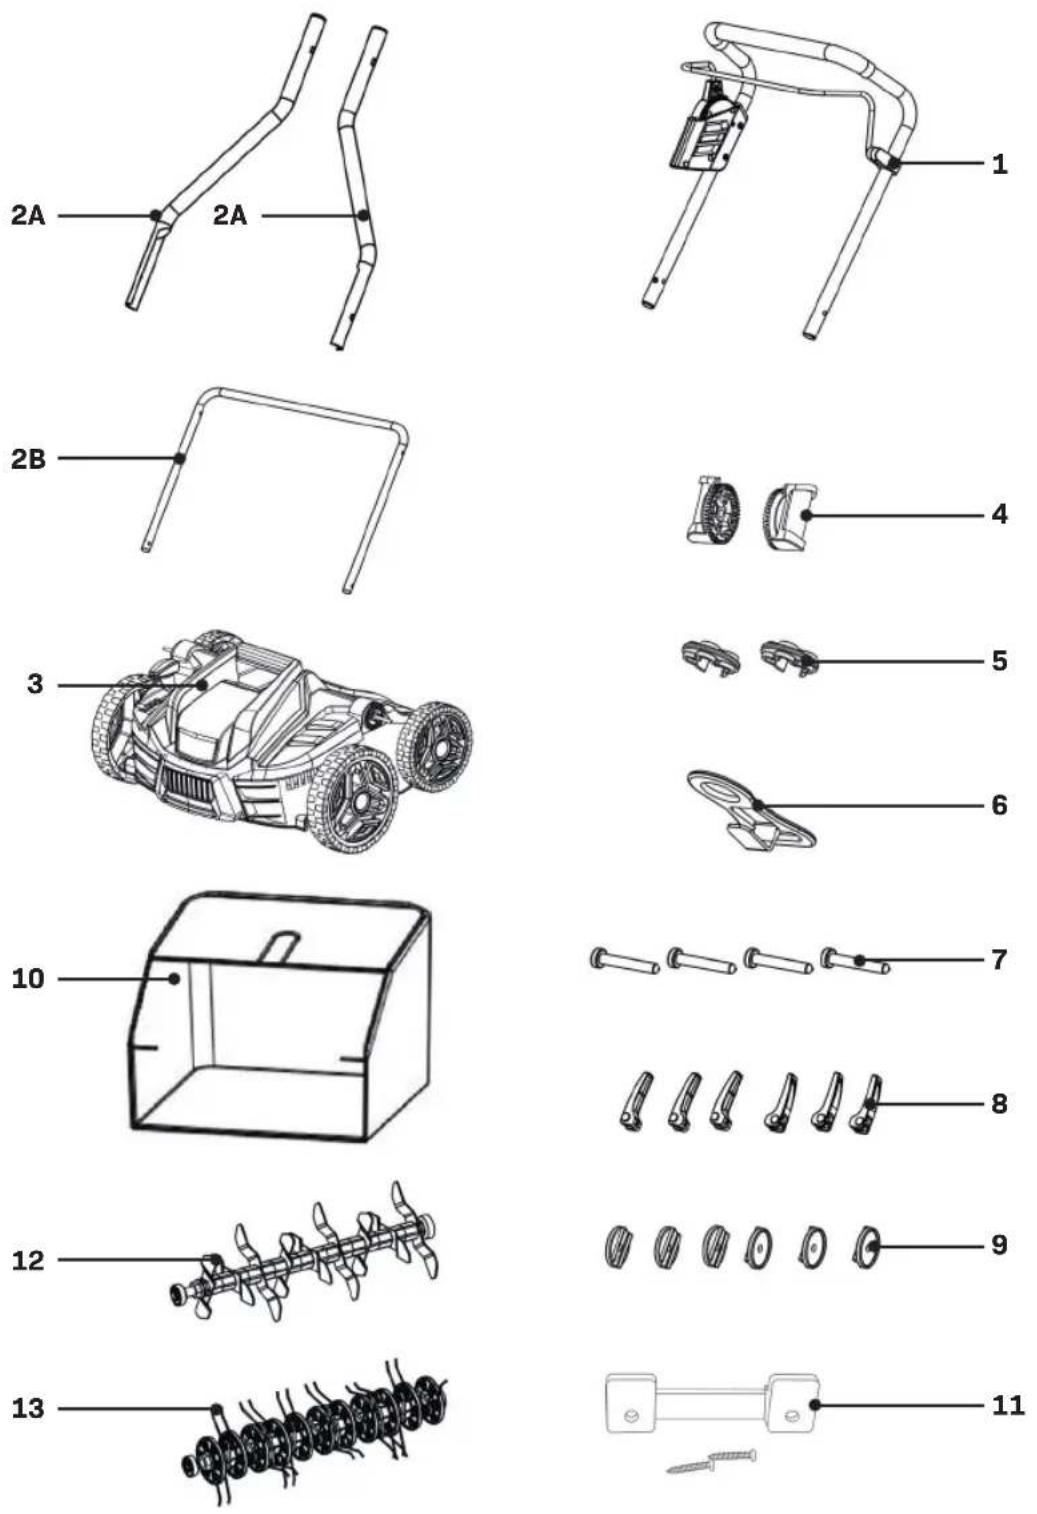
PACKAGE CONTENTS
D
natural_image
Line drawing of a rectangular electronic device with a central slot and a labeled point '5' (no text or symbols on the device itself)E

F
G1
G2
H
|

natural_image
Technical line drawing of a vehicle chassis with motors and suspension components (no text or labels)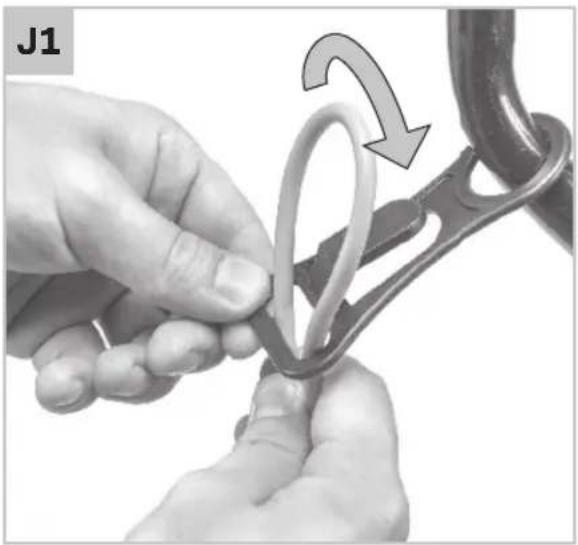
natural_image
Close-up of hands using a metal clamp to tie a loop, with an arrow indicating the motion (no text or symbols)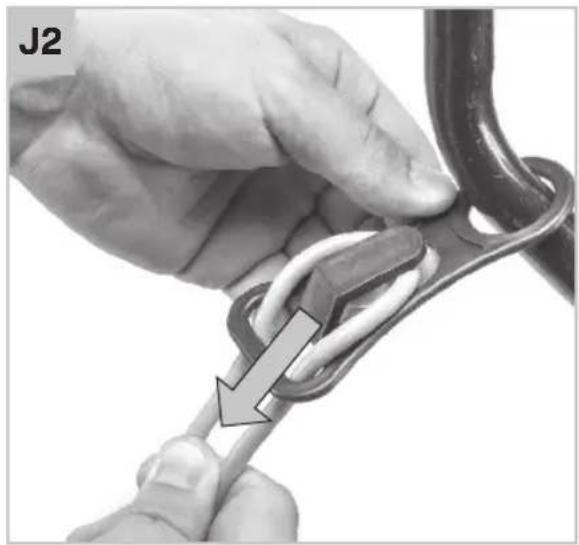
natural_image
Close-up of hands tying a knot using a spring, showing the rope being twisted (no text or symbols visible)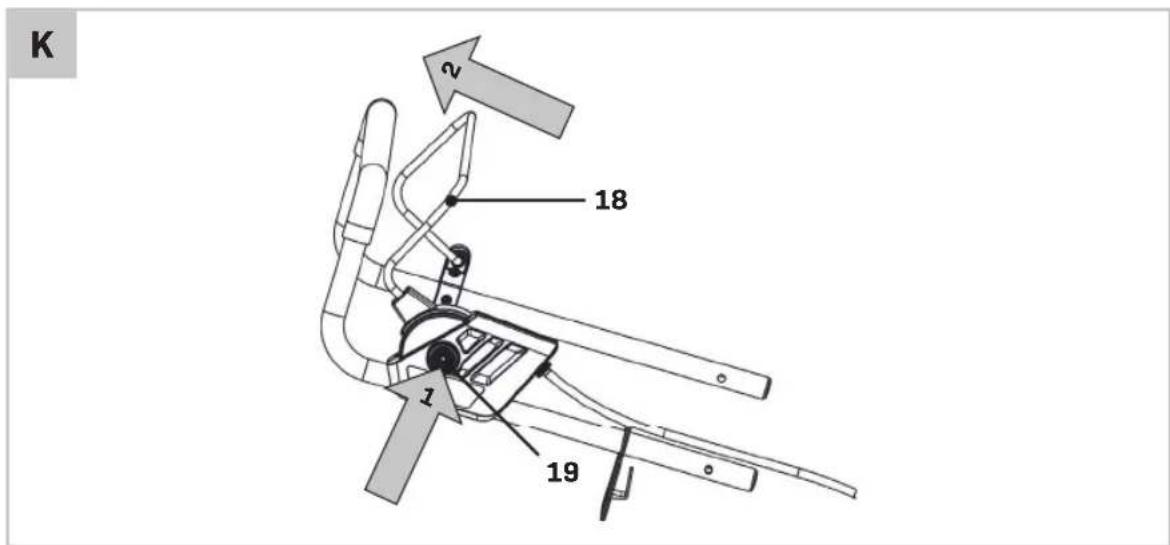
natural_image
Diagram of a mechanical or fluidic system with two interconnected components and directional flow arrows (no text or symbols)1. SAFETY INSTRUCTIONS
Read the enclosed safety warnings, the additional safety warnings and the instructions. Failure to follow the safety warnings and the instructions may result in electric shock, fire and/or serious injury. Save the safety warnings and the instructions for future reference.
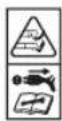
The following symbols are used in the user manual or on the product:
Read the user manual.

Denotes risk of personal injury, loss of life or damage to the tool in case of non-observance of the instructions in this manual.
Risk of electric shock.

Wear hearing protection.
Wear eye protection.
WARNING - Beware of sharp tines, keep fi ngers and toes away. Remove plug from mains before maintenance, adjusting, cleaning or if the cord is entangled or damaged. Tines continue to rotate after the motor is switched off.

Wait until all machine components have completely stopped before touching them. The blades continue to rotate after the machine is switched off, a rotating blade can cause injury.

Keep the powercord away from the cutting blades.

Do not use in the rain or leave the mower outdoors while it is raining.
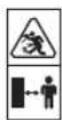
Keep bystanders away.

Double insulated for additional protection.

Conforms to all relevant European Directives.

Do not dispose of the product in unsuitable containers.

The guaranteed sound power level LWA = 100 dB(A).

Read the user manual.
GENERAL POWER TOOL SAFETY WARNINGS

WARNING! Read all safety warnings and all instructions. Failure to follow the warnings and instructions may result in electric shock, fi re and/or serious injury.
SPECIFIC SAFETY INSTRUCTIONS
- Never allow children or people unfamiliar with these instructions to use the product. Local regulations may restrict the age of the operator. When not in use store the product out of reach of children.
- Never allow children, persons with physical, sensory or mental limitations or a lack of experience and/or know-ledge and/or people unfamiliar with these instructions to use the product. Local regulations may restrict the age of the operator.
- Never operate the product when you are tired, ill or under the influence of alcohol, drugs or medicine.
- Never work while people, especially children, or pets are nearby.
- Children should be supervised to ensure that they do not play with the product.
- The user is responsible for accidents or hazards occurring to other people or their property.
- Always wear hearing protection and safety glasses when working with the product.
- Do not wear open rubber shoes or sandals when using the product. Always wear sturdy shoes and long trousers. Do not use barefoot.
- Thoroughly inspect the area where the product is to be used and remove all stones, sticks, wires, bones and other foreign objects.
- Before using, always visually inspect to see that the tines and tine assembly are not worn, damaged or loose.
- Replace worn or damaged tine and assemblies in sets to preserve balance. On multi-tined
EN
VONROC
machines, take care as rotating one time can cause other times to rotate.
- Walk, never run.
- Rake/Verticut only in daylight or in good artificial light.
- If possible, avoid using the product on wet grass or take additional precautions to avoid slipping.
- Do not rake/verticut excessively steep slopes.
- Working on banks can be dangerous. Always be sure of your footing on slopes or wet grass. Rake/Verticut across the face of slopes never up and down.- Exercise extreme caution when changing direction on slopes.
- Use extreme caution when stepping back or pulling the machine towards you do not overreach and keep balance at all times.
- Always push the product forward when raking/verticutting the lawn and never pull it towards the body.
- Wait until the tines/blades stop if the machine has to be tilted for transportation when crossing surfaces other than grass and when transporting the product to and from the area to be raked/verticut.
- Never operate the machine with defective guards or shields, or without safety devices, for example defl ectors and/or grass box in place.
- Switch on the motor according to the instructions with feet well away from rotating parts.
- Do not tilt the product when starting or switching on the motor, except if the machine has to be tilted for starting in long grass. In this case, do not tilt it more than absolutely necessary and tilt only the part which is away from the operator. Always ensure that both hands are in the operating position before returning the machine to the ground.
- Do not put hands or feet near or under rotating parts.
- Always stand clear of the discharge zone when operating the machine.
- Never pick up or carry the machine while the motor is running.
- When storing, make sure that all 4 wheels of the garden tool stand on the ground/fl oor.
- Only lift the garden tool with the carrying handle. Use the carrying handle with care.
- Do not modify the machine. Unauthorized modification scan impair the safety of your machine, lead to increased noise and vibrations, and poor performance.
- Be careful during adjustment of the product
to prevent entrapment of the feet and hands between moving tines/blades and fixed parts of the machine.
- Avoid operating the product in bad weather conditions especially when there is a risk of lightning.
- Regularly inspect the machine including the supply cable and any extension cables for damaged casings, cable sheaths, exposed wires and cable grips. Do not connect damaged cables to the supply or touch a damaged cable before it is disconnected from the supply. A damaged cable can lead to contact with live parts. Beware electric shock hazard when inspecting for potential contact between water and electricity.
- Do not touch the tines before the machine is disconnected from the supply and the tines have come to a complete stop.
- Keep supply cables and extension cables away from the tines. The tines can cause damage to the cables and lead to contact with live parts. Be-ware electric shock hazard when inspecting for potential contact between water and electricity.
ADDITIONAL SAFETY WARNINGS
- Please read this in conjunction with the instruction manual.
- Use extreme caution when stepping back or pulling the machine towards you do not overreach and keep balance at all times.
- Regularly inspect the machine including the supply cable and any extension cables for damaged casings, cable sheaths, exposed wires and cable grips. Do not connect damaged cables to the supply or touch a damaged cable before it is disconnected from the supply. A damaged cable can lead to contact with live parts. Beware electric shock hazard when inspecting for potential contact between water and electricity.
- Keep supply cables and extension cables away from the tines. The tines can cause damage to the cables and lead to contact with live parts. Beware electric shock hazard when inspecting for potential contact between water and electricity.
- Only use this product when connected into a socket which is protected by a circuit-breaker that would be actuated by a 30 mA residual current.
- For electrical safety use a Residual Current Device (RCD) with a tripping current of not more than 30 mA. Always check your RCD every time you use it.
-
Remove the plug from the socket:
-
Whenever you leave the machine.
- Before clearing a blockage.
- Before checking, cleaning or working on the machine.
- After striking a foreign object. Inspect the machine for damage and change the blade as necessary.
- If the machine starts to vibrate abnormally (check immediately).
- Connecting to the mains
- The voltage of the power source must correspond with the data on the type plate of the product.
- Only use this product when connected into a socket which is protected by a circuit-breaker that would be actuated by a 30 mA residual current.
- Only use or replace power supply cables for this unit which correspond to the types indicated by the manufacturer. Get in touch with VONROC customer service for more information.
- If the supply cord is damaged, it must be replaced by a special cord or assembly available from the manufacturer or its service agent.
- Never touch the mains plug with wet hands.
- Do not run over, crush or pull the power supply cord or extension cord, otherwise it may be damaged. Protect the cable from heat, oil and sharp edges.
- The extension lead must have a cross section in accordance with the operating instructions and be protected against splashed water. The connection must not be in water.
- Always wear gardening gloves when handling or working near the sharp blade/tines.
Electrical safety
Warning! When using electric tools, basic safety precautions should always be followed to reduce the risk of fire, electric shock and personal injury. Read all these instructions before attempting to operate this product and save these instructions.

Always check that the voltage of the power supply corresponds to the voltage on the rating plate.

The machine is double insulated; therefore no earth wire is required.
Replacing cables or plugs
If the replacement of the supply cord is necessary, this has to be done by the manufacturer or his agent in order to avoid a safety hazard.
Using extension cables
Only use an approved extension cable suitable for the power input of the machine. The minimum conductor size is 1.5 mm ^2 . When using a cable reel always unwind the reel completely.
2. MACHINE INFORMATION
Intended use
This product is intended for domestic environments, e.g. for private gardens at home. The garden tool is designed for lawn raking, verticutting or aerating. The garden tool is intended for use at ground level. The tool may not be used to trim bushes, hedges or shrubs, to cut scaling vegetation, planted roofs, or balcony-grown grass, to clean (vacuum) dirt and debris off walkways, or to chop up tree or hedge clippings. Moreover, the tool may not be used as a power cultivator to level out high areas such as molehills. The equipment is to be used only for its prescribed purpose. Any other use is deemed to be a case of misuse.
TECHNICAL SPECIFICATIONS
| Model No. SA502AC | |
| Power | 1500 |
| No load speed 3600/min | |
| Cutting width 360 mm | |
| Cutting depth -12/-9/-6/-3/+10mm | |
| Grass box capacity 35 L | |
| Weight 11.0 kg | |
| Protection level IPX4 | |
| Protection class Class II | |
| LpA at operator's position | 78dB(A), uncertainty K=3dB |
| Sound pressure level (LPA) | 77.4dB(A) uncertainty K=2.34dB |
| Sound power level (LWA) | 97.4dB(A) uncertainty K=2.34dB |
| Guaranteed sound power level | 100dB(A) |
| Vibration | Max. ah: 3.5m/s2K=1.8 m/s2 |
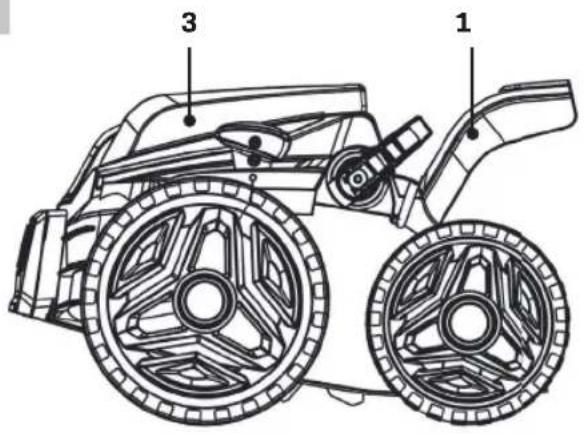
DESCRIPTION
The numbers in the following text refer to the pictures on pages 2-5.
- Upper handle
2A Middle handle
2B Lower handle - Machine
- Angle adjustment bracket
- Cable holder
- Cable strain relief
- Bolt
- Lever
- Washer
- Grass catcher
- Wall bracket with screws
- Scarifi er
- Raker
- Cable
- Grass catcher lid
- Carrying handle
- Wheel
- On/off switch
- Safety button
- Depth adjustment lever
- Wing bolt
- Retaining clamp
- Handle bolt
3. ASSEMBLY
Study each fi gure and identify the components required with reference to the fi gure ‘package contents’ and the contents table above.
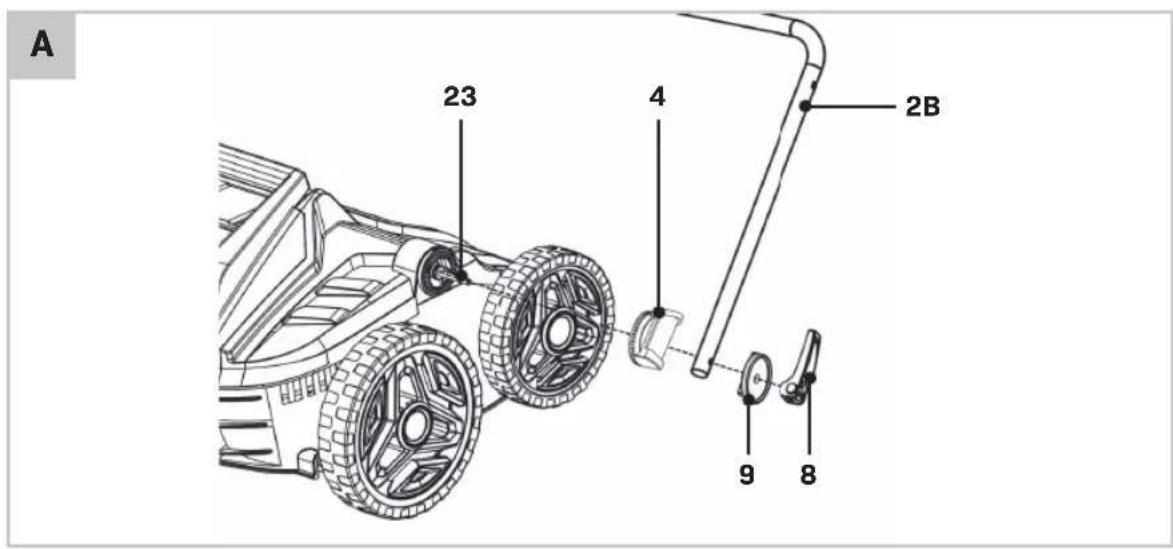
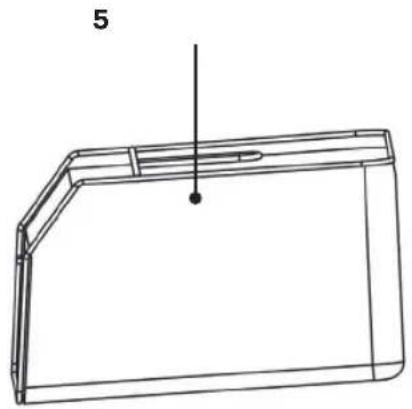
Attaching the handle (Fig. A, B, C)
- Push lower handle (2B) into angle adjustment bracket (4) and subsequently slide it over the bolt (23) protruding from the machine body (3).
- Align the threaded part of the bracket and the machine. Add a washer on the bolt (23) and
now mount the lever (8). Tighten in clockwise direction.
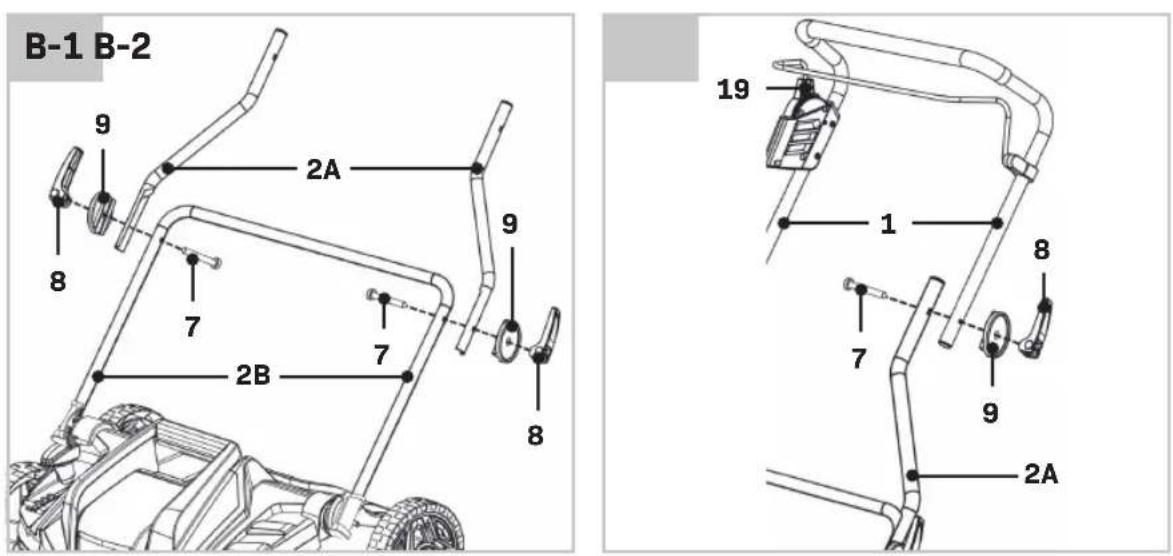
-
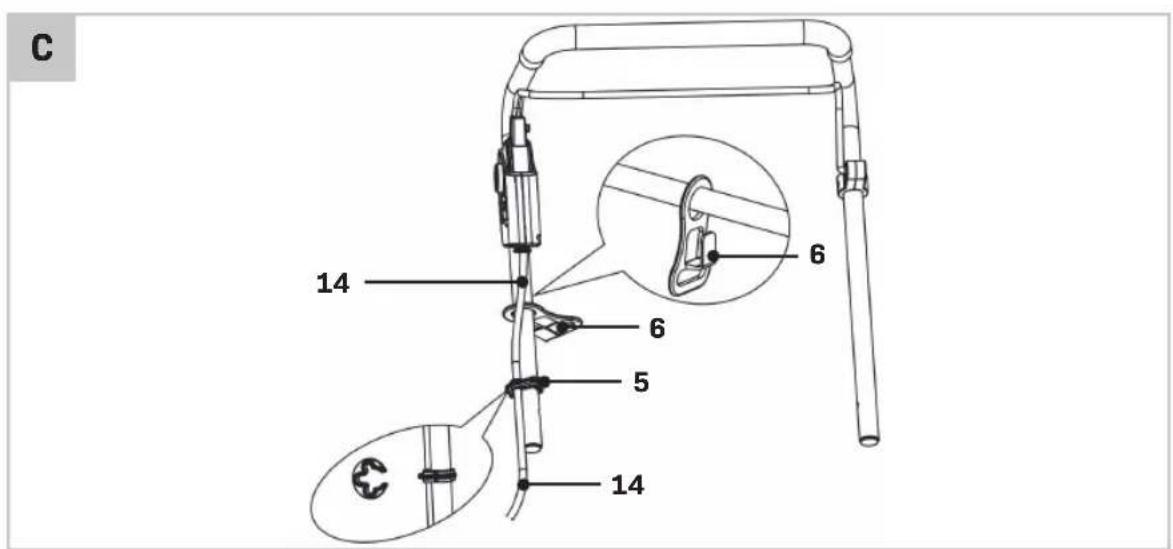
Put the cable strain relief (6) on the right side of the upper handle (1) as shown on figure C.
-
Now attach the upper handle (1) to the lower handle (2), using the supplied bolts (7), washers (9) and levers (8) as shown on figure B. Make sure the safety switch (19) assembly is on the right side when standing behind the lawn mower.
- Fixate the cable (14) to the handle by using the cable holders (5), as shown on figure C.
- A properly assembled machine can be seen on figure E.
Note: When handle knobs are loosened, the handle can be folded down for storing the machine. Ensure that the power cable is not caught.
Assembling the grass catcher (Fig. D)
- Ensure the metal bar frame is pre-assembled properly into the grass catcher (10).
- Lift the grass catcher lid (15) and attach the grass catcher onto the machine (3). Ensure the holders on the grass box align properly with the indents of the machine body.
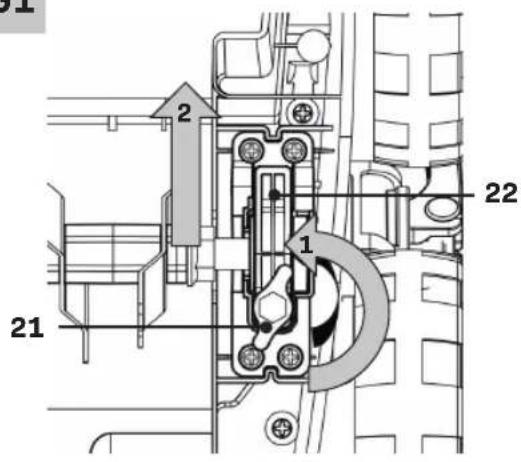
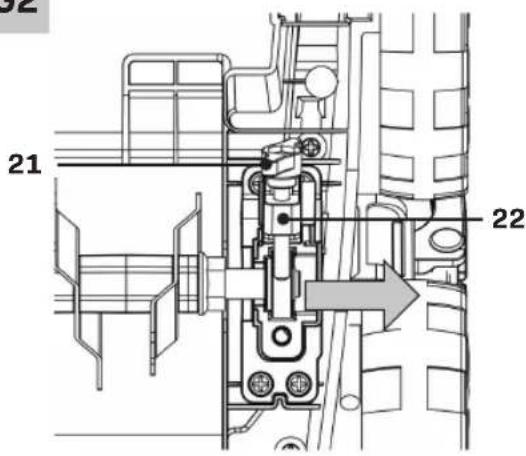
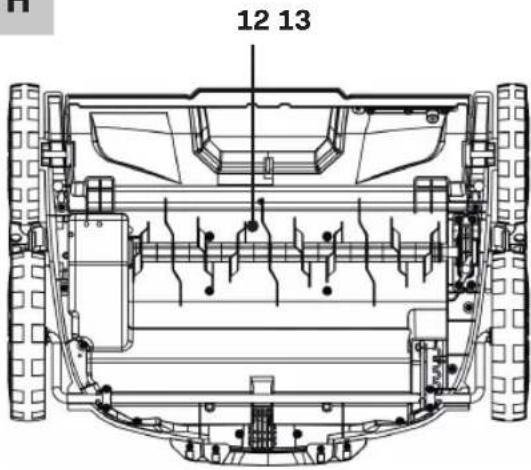
Replacing the blade (Fig. E, G, H)

Disconnect from the mains electricity supply.

Wear strong gloves.
- Turn the machine (3) on its side and release the blade retaining clamp (22) by turning the wing bolt (21) anti-clockwise.
- Fold the retaining clamp (22) upwards and pull the blade towards you to lift out the blade drive socket.
- To replace, insert blade into drive socket and other end into blade retaining clamp (22) and tighten the wing bolt (21) by turning clockwise.
Note: The raker blade (13) must only be used in highest three working depths. If you are to use it too deep, the effi ciency will be reduced and spring damage may occur after prolonged use. The springs are made to remove the grass and moss from the surface. It is not necessary to go deeper into the soil. The lowest two working depths are used for the scarifi er blade (12) for heavier moss removal and scarifying.
4. OPERATION

Always ensure that the machine is in a safe working condition. Inspect and check safety devices and guards and check all nuts, bolts and screws are secure.

Make sure you know how to stop the machine and ensure you are familiar with emergency stop.

Start the machine following the instructions and stay clear of the machine's moving parts.
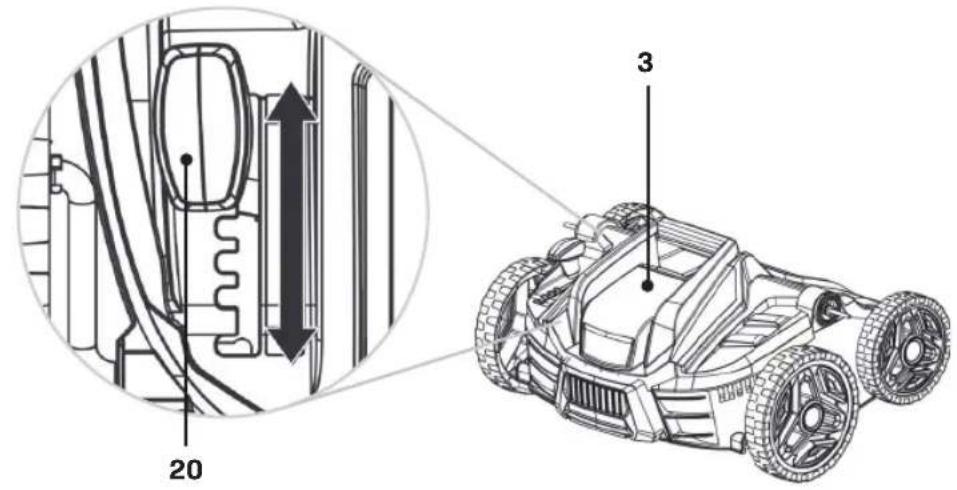
Adjusting the working depth (Fig. F)
The working depth is adjustable to 5 heights:
-12mm, -9mm, -6mm, -3mm and +10mm.
Be careful not to use the machine at too deep a setting. If there is excessive strain on the motor, it will lose speed and be less efficient. To adjust the working depth:
- Pull the height adjustment lever (20) outwards (away from the machine housing).
- Whilst holding the height adjustment lever (20) in outwards position, push it forward or backward to the desired working depth.
- Release the lever (20) and ensure it engaged in the slot properly.
Securing the power cord (Fig. E, J)
Mount the cable into the cable strain relief (6) as shown on figure J.
Switching the machine on/off (Fig. E, K)
- To start the machine, press and hold the safety button (19) and press the on/off switch (18). Whilst holding the on/off switch (18), you can release pressure on the safety button (19).
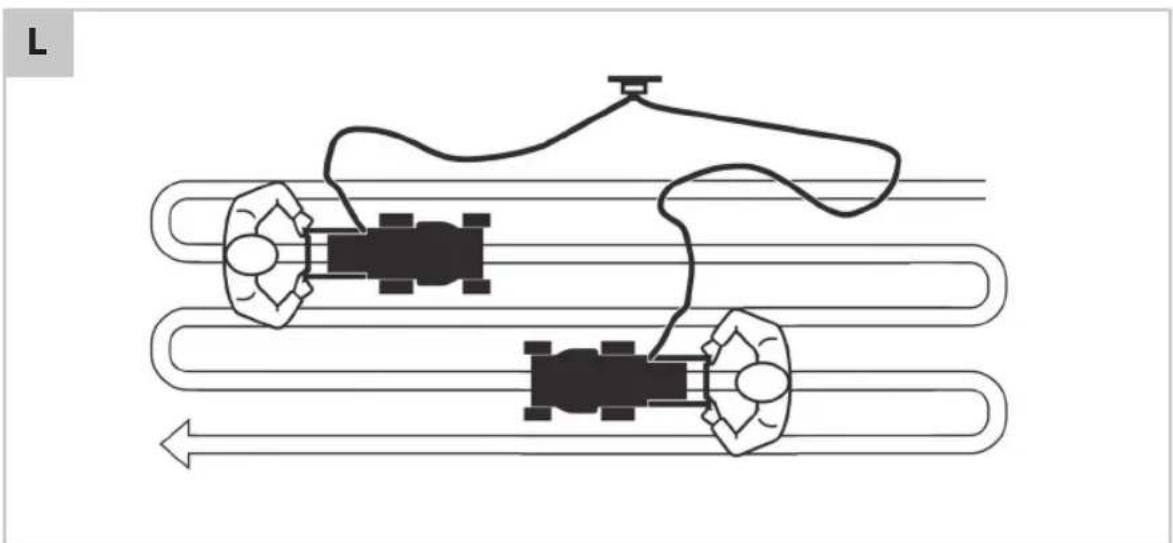
- To stop the machine, release the on/off switch (18) and wait until cutting blade stops rotating. Always work your way away from the cables to avoid cutting them, as shown on figure L.
Using the scarifi er blade (Fig. H)
- By scarifying you remove the hardened surface, grass felt and fl at-growing weeds and the crusted over grassroots are loosened up. The lawn will start to breathe again and assimilate the nourishing substances, oxygen and water. This also prevents the establishing of bacteria in the lawn during the winter.
- Cut the grass to a height of about 40mm before scarifying. The lawn must be dry when using the machine. The best time for scarifying is any time during the vegetative season, from April through to September. Scarify it at least once a year. We recommend using a fertilizer straight after airing if you want a green carpet like lawn.
Using the raker blade (Fig. I)
- By raking you remove the dead matter, moss and weed which disfi gures a lawn. The build up of dead grass provides a mat of absorbent fi bres which prevents water getting through to the ground.
- Do not force your rake through grass that is longer than 75mm. The lawn must be dry when using the machine. It's recommend that this is used at the beginning and the end of each grass cutting season to give your lawn a thorough raking. This could also be used after each mowing to remove any grass cutting that may be left by your mower.
Proper use (Fig. L)
- For best results, place the machine on the edge of the lawn and work in forward direction. Then turn at the end of each run and mow in the opposite direction, slightly overlapping the previously cut strip. Also refer to figure L.
- Make sure that the lawn is clear of stones, sticks, wire or other objects that could damage the product or its product.
- Circle around flower beds. When reaching a flower bed in the middle of the lawn, cut a row or two around the circumference of the bed.
- Pay special attention when changing direction.
- Always work along inclines (not up and down). You can prevent the machine from slipping down by holding a position at an angle upwards.
- Empty the grass catcher regularly.
- For best results, your lawn should be scarified every 4-6 weeks.
- We recommend scarifying the lawn in Spring and Autumn.
- We recommend aerating the lawn during the entire growing period.
Storage
Store the machine in a secure, dry place out of the reach of children. Do not place other objects on top of the machine.
EN
- To store the machine, fold the upper and lower handle downwards towards the machine.
- A wall bracket (11) is included with the delivery to mount the machine onto a wall when preferred. Use the provided screws to mount the wall bracket. Use appropriate wall plugs if necessary.
5. MAINTENANCE
Your machine has been designed to operate over a long period of time with minimum of maintenance. Continuous satisfactory operation depends upon proper machine care and regular cleaning.
- Keep the machine clean and dry.
- Regularly use a blunt scraper to remove grass and dirt from the machine.
- To clean the machine, use only mild soap and a damp cloth. Never let any liquid get inside the tool and never immerse any part of the tool into liquid. Do not use any abrasive or solvent - based cleaner.
Stop the blade(s) if the machine has to be tilted for transportation when crossing surfaces other than grass, and when transporting the machine to and from the area to be used.
Do not start the machine when standing in front of the discharge opening.
Always allow the machine to cool down before storing. Replace worn or damaged parts for safety. Use only genuine replacement parts and accessories.
ENVIRONMENT

The crossed out wheelie bin symbol means that this product shall not be disposed of with normal household waste. Electronic and Electrical Equipment not included in the selective sorting process are potentially dangerous for the environment and human health due to the presence of hazardous substances. Please dispose of responsibly at an approved waste or recycling facility.
Only for EC countries
Do not dispose of power tools into domestic waste. According to the European Guideline 2012/19/EU for Waste Electrical and Electronic Equipment and its implementation into national right, power tools that
are no longer usable must be collected separately and disposed of in an environmentally friendly way.
WARRANTY
VONROC products are developed to the highest quality standards and are guaranteed free of defects in both materials and workmanship for the period lawfully stipulated starting from the date of original purchase. Should the product develop any failure during this period due to defective material and/or workmanship then contact VONROC directly.
The following circumstances are excluded from this guarantee:
- Repairs and or alterations have been made or attempted to the machine by unauthorized service centers;
- Normal wear and tear;
- The tool has been abused, misused or improperly maintained;
- Non-original spare parts have been used.
This constitutes the sole warranty made by company either expressed or implied. There are no other warranties expressed or implied which extend beyond the face hereof, herein, including the implied warranties of merchantability and fi tness for a particular purpose. In no event shall VONROC be liable for any incidental or consequential damages. The dealers remedies shall be limited to repair or replacement of nonconforming units or parts.
The product and the user manual are subject to change. Specifications can be changed without further notice.
2. INFORMATIE OVER HET APPARAAT
Bedoeld gebruik
DECLARATION OF CONFORMITY SA502AC - SCARIFIER AERATOR
(EN) We declare under our sole responsibility that this product is in conformity with directive 2011/65/EU of the European parliament and of the council of 8 June on the restriction of the use of certain hazardous substances in electrical and electronic equipment is in conformity and accordance with the following standards and regulations:
Measured sound power level: 97.4dB(A)
Guaranteed sound power level: 100 dB(A)
Conformity assessment method to Annex V Directive 2000/14/EC amended by 2005/88/EC.
The notified body involved: TÜV SÜD Industrie Service GmbH, Certification Body of the Notified Body 0036
EN 60335-1, EN 50636-2-92, EN 62233, EN 55014-1, EN 55014-2, EN 61000-3-2, EN 61000-3-3, 2006/42/EC, 2014/30/EU, 2000/14/EC ANNEX V & 2005/88/EC, 2012/19/EU, 2011/65/EU
Zwolle, 01-09-2024 H.G.F Rosberg
CEO
VONROC • Lingenstraat 6 • 8028 PM Zwolle • The Netherlands

VONROC®
BUILD YOUR FUTURE
©2024 VONROC
WWW.VONROC.COM
2409-26