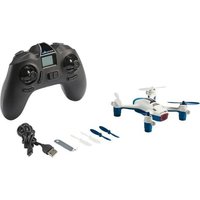
Pure 23921 - Drone Revell - Free user manual and instructions
Find the device manual for free Pure 23921 Revell in PDF.


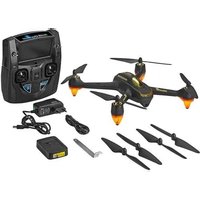
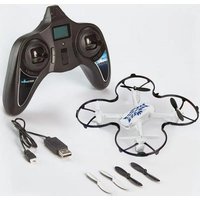
| Type | Drone quadcopter |
| Brand | Revell |
| Model | Pure 23921 |
| Drone power | Li-Po battery 3.7 V / 2 Wh (rechargeable via USB) |
| Remote control power | 4 AAA 1.5 V batteries (not included) |
| Charging time | Approximately 80 minutes |
| Flight time | 5 to 7 minutes |
| Automatic altitude hold | Yes (pressure sensor) |
| Flight modes | Mode 1 and Mode 2 (programmable) |
| Special functions | Headless mode, flip function, two speeds |
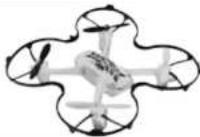
| Protection | Protection ring included |
| Minimum recommended age | 14 years (adult supervision required) |
| Use | Indoor and outdoor in dry, windless weather |
| Maintenance | Clean with a damp cloth; protect from water and heat |
| Safety | Pay constant attention; avoid people, animals, obstacles |
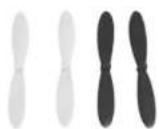
| Spare parts | Replaceable rotors (propellers); extraction tool provided |
| Repairability | Use only original Revell parts |
| Manufacturer | Revell GmbH, www.revell-control.de |
Frequently Asked Questions - Pure 23921 Revell
User questions about Pure 23921 Revell
0 question about this device. Answer the ones you know or ask your own.
Ask a new question about this device
Download the instructions for your Drone in PDF format for free! Find your manual Pure 23921 - Revell and take your electronic device back in hand. On this page are published all the documents necessary for the use of your device. Pure 23921 by Revell.
USER MANUAL Pure 23921 Revell
natural_image
Four-panel image of a drone with a decorative pattern on its body (no text or symbols visible)23921
Revell
Control
QUADROCOPTER
PURE

www.revell-control.de
© 2016 Revell GmbH, Henschelstr. 20-30, D-32257 Bünde. A subsidiary of Hobbico, Inc. REVELL IS THE REGISTERED TRADEMARK OF REVELL GMBH, GERMANY. Made in China.
USER MANUAL


V 01.06
Inhalt
Table of contents
Contenuto
Modell Model Modèle Model Modelo Modello
Ersalzrolorsel
Spare rotor set
Ensemble rotor de rechange
Reserverotorset
USB charger, Accessories, protective ring
natural_image
Diagram of a drone with a mechanical component inserted, showing no text or symbols4A
natural_image
Diagram showing cable connection with two arrows indicating direction (no text or symbols present)3
7
text_image
2A 7A 7B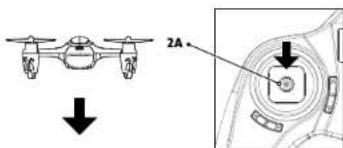
text_image
2A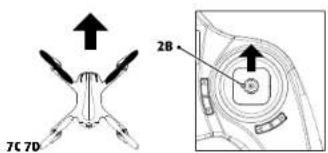
text_image
7C 7D 2B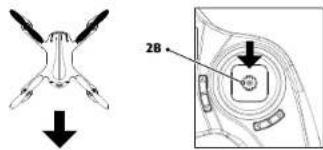
text_image
Technical diagram showing a mechanical component with labeled parts and directional arrows, including a 2B indicator.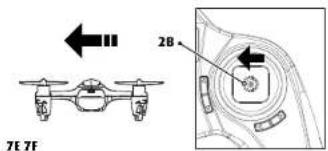
text_image
2B 7E 7F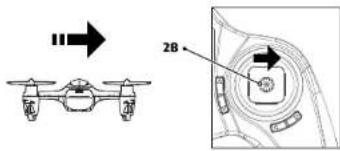
text_image
2B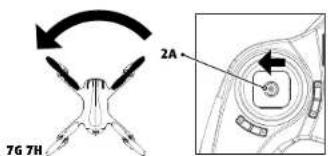
text_image
7G 7H 2A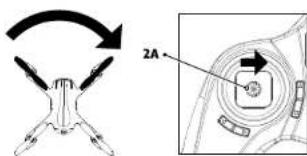
text_image
2A5
text_image
2A 0,3 Sec. 7I 2A 2 Sec. 7J 2B 7K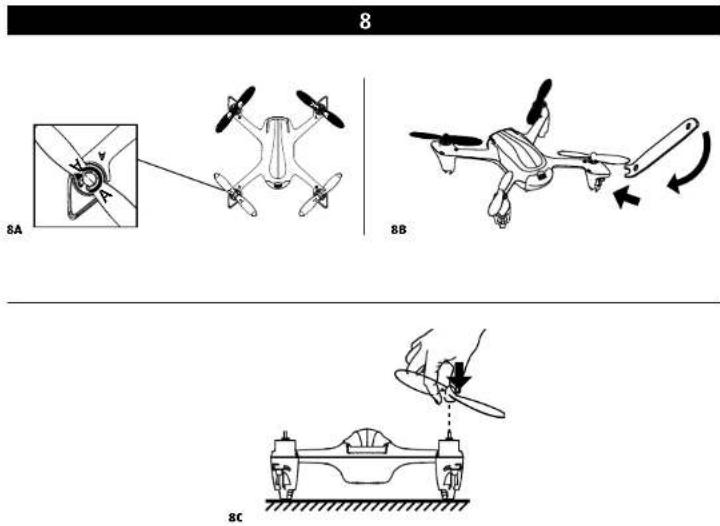
text_image
8 8A 8B 8C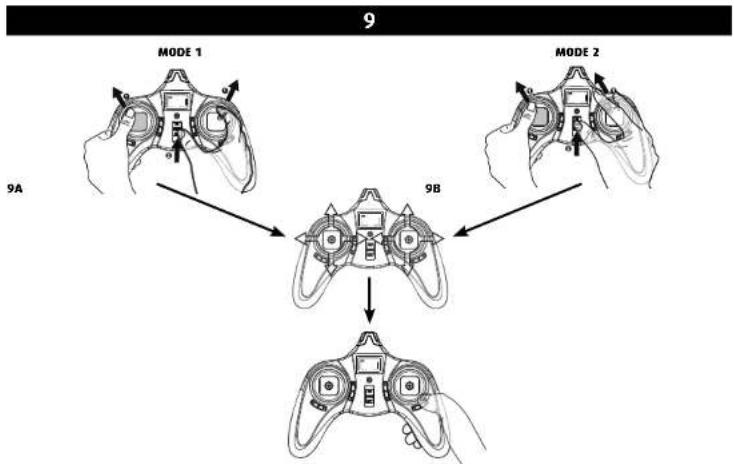
flowchart
graph TD
    A["MODE 1"] --> B["9A"]
    C["MODE 2"] --> D["9B"]
    E["Device 9B"] --> F["Device 9"]
text_image
2A 2B 1 Sec. 2C 2D 2E 2B 2 Sec. 10C 2A 2B 1 Sec. 2A 2B 10D (1.) 10D (2.) 10D (3.) 10D (4.)
text_image
MODE 2 MODE 123921
.Revel
Control
QUADROCOPTER
PURE
WICHTIGE MERKMALE
Quadrokopter
With a new assistant that ensures the quadrocopter automatically maintains its altitude
- With sturdy protective ring - With headless mode, flip function and two speed levels
Safety instructions:
• Before commissioning for the first time, make sure that you have read and understood the entire manual.
- This model is suitable for pilots who are at least 14 years of age. Adult supervision is required when flying it.
- This model is suitable for use indoors and in outdoor areas when there is no precipitation or wind.
- Keep your hands, face and loose clothing away from the model during operation.
- Switch off the remote control and model when they are not in use.
- Remove the batteries from the remote control when it is not in use.
• Always maintain visual contact with the model in order to avoid losing control of it. Inattentive and careless use can lead to considerable damage.
- Please keep this operating manual safe for later use.
• The user should only operate this model in accordance with the instructions for use in this operating manual.
- Do not use the model near people, animals, bodies of water or power lines.
- This model is not suitable for people with physical or mental disabilities. We recommend that people who are unfamiliar with model helicopters operate the model under the guidance of an experienced user.
• In general, it must be ensured that the model cannot injure anyone in consideration of potential malfunctions and defects.
• The product may only be repaired or modified with approved original parts. Otherwise, the model can be damaged or pose a danger.
• In order to prevent risks, always operate the model from a position which provides an easy line of retreat, if necessary.
Safety instructions for flying models:
- You are operating your aircraft in the general air traffic. As the pilot, you are responsible for your model. You are liable for your model and any damage resulting from its operation.
- If you want to use your aircraft commercially, you need an ascent permit.
- Before commissioning for the first time, familiarize yourself with the functions of the model.
- Check that the product is working correctly before every flight.
- Observe the instructions of the manufacturer at all times.
• Always note the wind and weather conditions and any hindrances. - You must always swerve away from manned aircraft immediately and land right away.
- Do not fly over private property owned by other people, crowds of people, military objects, hospitals, power plants, correctional facilities and similar.
- Do not fly close to airfields (<1.5 km).
-
Never fly without direct visual contact with the model, it must be in the direct field of vision at all times. It is illegal to control a model using only a video image.
-
Failure to observe these safety instructions may make you liable to prosecution!
• Information and additional help is available from the Association for Unmanned Air Vehicles under "http://www.uavdach.org" - Flying models outdoors has required mandatory liability insurance since 2005. Contact your private liability insurer and make sure that your new and earlier models are included in your insurance coverage. Request written confirmation and keep this in a safe place. Alternatively, the DMFV offers a trial membership free of charge online at www.dmfv.aero. This includes insurance.
Remote control safety instructions:
- We recommend new alkali manganese batteries for the remote control. Single-use batteries for this remote control and other electrical devices operated in the home can be replaced with environmentally-friendly rechargeable batteries. - As soon as the remote control no longer functions reliably, new batteries should be inserted and/or the batteries should be charged.
Safety instructions for batteries:
- Rechargeable batteries must be removed from the remote control prior to recharging.
• Non-rechargeable batteries may not be charged. - Rechargeable batteries may only be charged under the supervision of an adult.
• The combination of different types of batteries as well as new and used batteries must be avoided. - Only recommended batteries or those of an equivalent type may be used.
- Batteries must be inserted according to the correct polarity (+ and -).
- Depleted batteries must be removed from the remote control.
• The connection terminals may not be short-circuited.
- Remove the batteries from the remote control if they are not to be used for an extended period of time.
Charging unit safety instructions:
- Non-rechargeable batteries may not be charged.
- This charging unit is not suitable for people (including children) with physical or mental limitations, or those with insufficient knowledge and experience of charging units, unless under supervision or following proper directions from a parent or legal guardian.
• Children must be supervised - the charging unit is not a lovy!
• The charging unit for the LiPo battery is specially designed for the charging of the model battery. The charging unit may only be used to charge the model battery, not other batteries.
• Transformers, mains adapters or chargers that are used together with the model must be checked regularly for damage to cables, plugs, housings and other parts and any damages must be repaired before the devices may be used again.
The model is equipped with a rechargeable lithium polymer battery. Please observe the following safety instructions:
- Never throw LiPo batteries into a fire or store them in a hot location.
- Only use the supplied charger to charge the battery. The use of a different charger may lead to the permanent damage of the battery and neighbouring parts, as well as physical injury!
- Never use a charger for NiCd/NiMH batteries!
• Always ensure that the charging process takes place on a fireproof surface in a fire-resistant environment. - Do not leave the battery unsupervised during the charging process.
- Never disassemble or alter the battery contacts. Do not damage or puncture the battery cells. There is a risk of explosion!
- The LiPo battery must be kept out of reach of children.
Required batteries for the model:
Power supply:
Rated output-
1×DC3.7V/2Wh
rechargeable
LiPo battery (included)
Capacity: 520 mAh
- When disposing of batteries, they must be discharged or their capacity must be fully depleted. Cover exposed terminals with adhesive tape in order to prevent short-circuiting!
Maintenance and care:
- Please only use a clean, damp cloth to wipe off the model.
- Protect the model and batteries from direct sunlight and/or direct heat.
- Never allow the remote control and charging unit to come into contact with water, because the electronics will be damaged as a result.
Technical changes and differences in color reserved!
Battery requirement for the remotecontrol:
Power supply:
DC6
Batteries:
4×15V "AAA"
(not included)

1 MODEL
1A Rotors
1B Status LED
1C Battery compartment
2 REMOTE CONTROL
2AControl for thrust and rotation. Briefly press vertically: Headless mode Longer vertical pressing: Flip function
2B Control for forward/backwards and banking. Briefly press vertically: Second speed level
2C Trim for rotation
2D Trim for forwards/backwards
2E Trim for sideways
2F ON/OFF switch
2G Display
2H Only with control mode 1: Trim for forwards and backwards
3 INSERTING BATTERIES (REMOTE CONTROL)
3A Unscrew and remove the cover.
3B Insert 4 x 1.5 V AAA batteries and pay attention to the polarity, as shown in the battery compartment.
3C Close the battery cover and secure with the screw.
4 CHARGING THE MODEL
Attention: The battery and motor must cool down for 15 to 30 minutes before charging and alter every flight. Otherwise they can be damaged. The charging process must be constantly monitored. Always ensure that the charging process takes place on a fireproof surface in a fire-resistant environment.
4A
- Remove the battery from the model to charge it.
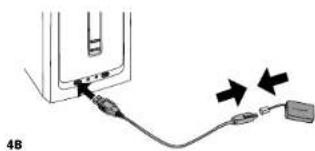
4B
- Insert the USB plug of the USB charging cable into any USB interface on a computer or similar device with output of at least 500 mA.
- Then connect the battery to the plug of the USB charger.
• An LED on the USB charger is illuminated during charging. - The charging process is finished once the LED on the USB charger goes out.
The model can fly for approx. 5-7 minutes after a charge time of approx. 80 minutes.
Warning notice: The battery does not normally heat up while charging. If it should become warm or even hot and/or changes to the surface begin to appear, immediately discontinue the charging process!
5 START PREPARATION
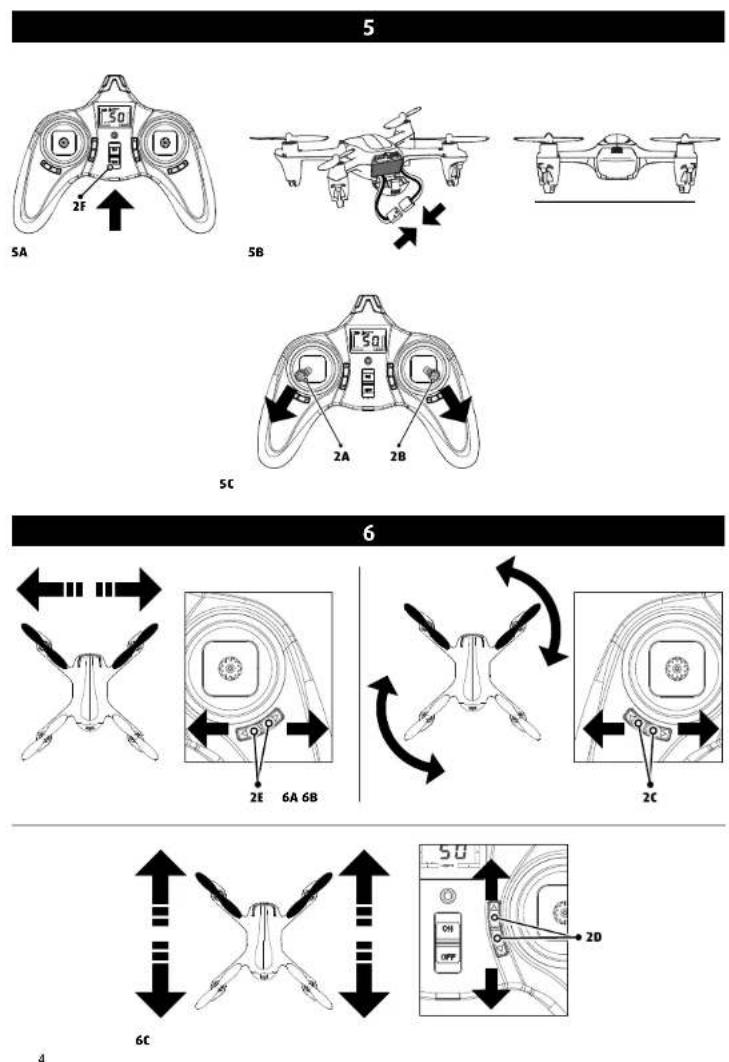
5A To start the model, first switch on the remote control, then insert the battery into the battery compartment of the model.
5B Then connect the plug of the battery to the connection jack in the model and place the model on a flat, level and stable surface. After a brief initialisation phase, the status LEDs illuminate continuously and the model is ready for use.
5C To start the rotors, move the control for thrust and rotation 2A to the bottom left and move the control for forward/backwards and banking 2B to the bottom right at the same time. Attention: With both controllers in the bottom inside or outside position, the rotors switch off instantly, even while in the air. In order to switch off the rotors after landing, move the control for thrust and rotation 2A all the way down and hold.
5D Attention: A protective ring is included with the model. In order to assembly the ring, all four rotors must be removed. Then the protective ring is fit in place from above and firmly pressed down. Never fly without the protective ring mounted.
Once you have finished flying, switch the model off first and then the remote control. Unplug the battery from the model and remove the battery from the model.
6 TRIM ADJUSTMENT OF THE CONTROL
The model must be switched on first in order to connect it to the remote control. Its adjustment is simple, but it requires some patience and a feel for it. Please observe the following instructions precisely: Carefully move the thrust control up and raise the helicopter approximately 0.5 to 1 metre in altitude.
6A If the model automatically moves slowly or quickly to the left or right ... gradually press the trim for sideways flight (2E) in the opposite direction.
6B If the model moves by itself slowly or quickly around its own axis ... press the trim adjustment for rotation (2C) incrementally in the opposite direction.
6C If the model automatically moves slowly or quickly forwards or backwards ... gradually press the forwards/backwards trim (2D) in the opposite direction.
7 FLIGHT CONTROL
The model is equipped with an automatic altitude control assistant that makes it possible to learn how to control the model quickly and easily. The assistant is a sensor that can measure the air pressure to within 10 centimetres of the exact altitude and thereby automatically keep the quadrocopter at the specified altitude. Therefore, beginners can concentrate on forward/backwards and banking.
Attention: Due to outside influences, the pressure inside the model may change, causing the model to automatically rise or lower. This is not a defect. Briefly actuating the control for thrust and rotation 2A is sufficient to counteract this.
Note: Only minimal corrections of the controls are necessary for a smooth flying behavior of the model! The direction indication applies when the model is viewed from behind. If the model is flying forwards towards the pilot, it must be moved in the opposite direction.
Switch on the model as shown in point 5 and start the rotators by moving the controls 2A and 2B to the bottom outside.
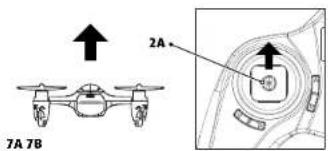
7A Take off or increase altitude by carefully moving the control for thrust and rotation (2A) forward.
7B Land or decrease altitude by moving the control for thrust and rotation (2A) backward.
7C Fly forward by moving the controller for forward/backward and sideways flight (2B) carefully forward.
7D Fly backward by moving the controller for forward/backward and sideways flight (2B) carefully backward.
7E Fly to the left by moving the controller for forward/backward and sideways flight (2B) carefully to the left.
7F Fly to the right by moving the controller for forward/backward and sideways flight (2B) carefully to the right.
7G Turn the model around to the left by moving the control for thrust and rotation (2A) to the left.
7H Turn model around to the right by moving the control for thrust and rotation (2A) to the right.
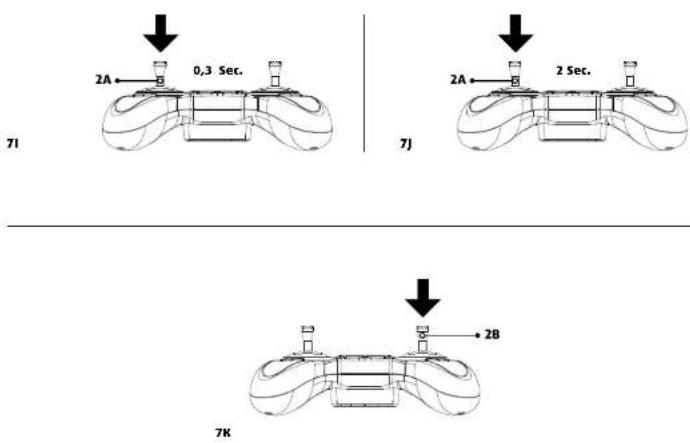
71 A vertical, short press (about 0.3 seconds) of control 2A activates the headless mode. Headless mode supports beginners in the initial stages. Regardless of where the quadrocopter turns, the direction of flight always corresponds exactly to the direction specified with the control for forwards/backwards and sideways movement (2B). An example: If the model were to be turned 180° and flown towards the operator, the operator would have to "convert" the forwards/backwards and sideways movement accordingly. This is no longer necessary if headless mode is activated, as the internal processor always converts the control directions automatically. Pressing the 2A button again deactivates the mode.
Attention: The model „notes“ the forwards direction during each switch-on. This means that the operator must not turn when controlling the model, as this would change the concept of „forwards“ and “right/left” in relation to the model. If the operator changes position and wants to use headless mode - or if the control direction is no longer correct due to a collision, the model must be restarted.
7) A longer vertical press (about 2 seconds) of control 2A activates the flip function. The next movement with control 2B allows the model to complete a 360^ flip in the corresponding direction. In the process, ensure a safety altitude of about 2 metres and a sufficiently charged battery.
7K Briefly pressing vertically on control 2B activates the 2nd speed level. The remote control issues two short beeps as confirmation. Pressing the button again switches back to the first speed level.
BATTERY STATUS:
- The battery is empty if the model begins to lose thrust. Land in order to avoid crashing.
INSTRUCTIONS FOR SAFE FLYING
GENERAL FLYING TIPS:
• Always place the model on a level surface. An inclined surface can, under certain circumstances, have a negative impact on the starting behavior of the model.
• Always operate the controls slowly and with a gentle touch.
- Always maintain visual contact with the model and do not look at the remote control!
- Move the thrust control down again somewhat as soon as the model lifts off from the ground. Maintain llying altitude by adjusting the thrust controller.
- If the model lowers, move the thrust control slightly upward again.
- If the model climbs, move the thrust control down slightly.
- To fly along a curve, tapping the directional controller very slightly in the respective direction often suffices.
There is a general tendency during preliminary attempts at flight to operate the model's controls too aggressively. Always operate the controls slowly and carefully. Never last and fitfully.
- Beginners should first master trimming before attempting to master the thrust controller. The model does not necessarily have to fly straight at the beginning - initially, it is more important to maintain a constant height of approximately one meter above the ground by repeatedly tapping the thrust control. Only then should the pilot practice steering the model left and right.
8 CHANGING THE PROPELLERS
If the rotor blades on the model are damaged, they must be replaced. To do so, proceed as follows:
8A Ensure the correct arrangement of the rotors during installation.
8B Use the accompanying removal tool to pull off the rotors.
8C Carefully press the new rotor on the motor shaft.
9 ADVANCED SETTINGS
Switching between Flight mode 1 and 2
The term flight mode refers to the assignment of the controls:
Mode 1
Mode 2
Control 2A: Forward/backwards and rotation Control 2A: Thrust and rotation Control 2B: Thrust and banking Control 2B: Forwards/backwards and banking
9A Switching to Mode 1:
- Hold control 2A to the top left and control 2B to the top right
- Simultaneously switch the ON/OFF switch 2F to ON (the model remains off)
• To calibrate the controls rotate 2A and 2B completely at least twice - Then press and hold a trim button for at least two seconds
9B Switching to Mode 2:
- Hold control 2A and 2B to the top left
- Simultaneously switch the ON/OFF switch 2F to ON (the model remains off)
• To calibrate the controls rotate 2A and 2B completely at least twice - Then press and hold a trim button for at least two seconds
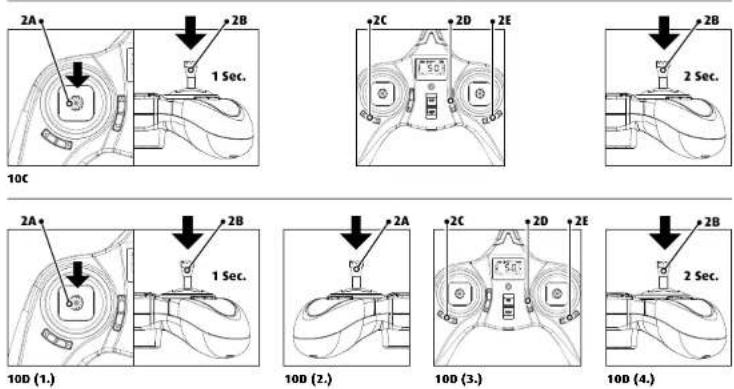
9C Reversal of the control direction of the controls
The control direction of the controls can be adjusted in the setup menu. Only use this function if you have already gathered adequate experience operating the model (Mode 2, the model is switched on).
- Hold the control for thrust 2A all the way down
- Simultaneously press the control for forward/backwards 2B down vertically for at least one second.
- The display shows SE. Now the control directions of the axes are reversed with the trim buttons.
- To save the settings and exit the menu, press the control for forward/backwards 2B down vertically for at least 2 seconds
9D Sensitivity of the controls
The flying speed of the model can be adapted by changing the sensitivity of the controls. Only use this function if you have already gathered adequate experience with the model (Mode 2, the model switched on):
- Hold the control for thrust 2A all the way down and hold. Press the control for forward/backwards 2B down vertically for at least one second. When SE appears in the display, release all controls.
- Now push the control for thrust 2A down vertically. Each time it is pressed again, you switch between rotation, forwards/backwards and banking. Three blinking dots in the trim strip indicate what can currently be changed.
- By pressing the appropriate trim button, the sensitivity can be adjusted between a value of 20 (slow) and 60 (last).
- To save the settings and exit the menu, press the control for forward/backwards 2B down vertically for at least 2 seconds.
9E Recalibration of the sensors
Sometimes it is necessary to recalibrate the gyro sensors of the model. Before starting the recalibration, the battery must be fully charged and the rotors must be inspected for damage. If the model continuously drills in one direction and the trim does not provide sufficient compensation, proceed as follows:
Mode 2:
• The model and remote control are switched on and paired
- Switch to the second speed level by pressing control 2B
- Now hold control 2A to the bottom right and simultaneously move control 2B back and forth
- When the status LEDs blink, the process is finished
Mode 1:
- The model and remote control are switched on and paired
- Switch to the second speed level by pressing control 2B down vertically
- Now hold control 2A to the bottom right and simultaneously hold control 2B down and move quickly back and forth
- When the status LEDs blink, the process is finished
TROUBLESHOOTING
Problem: The propellers do not move.
Cause: A) No connection has been established.
B) The battery is too weak or depleted.
Remedy: A) Switch everything off and switch on again in the correct sequence.
B) Charge the battery
Problem: The model stops and descends during flight for no apparent reason.
Cause: · The battery is too weak.
Remedy: · Charge the battery
Problem: The model cannot be controlled with the remote control.
Cause: A) The ON/OFF switch is in the "OFF" position.
B) The batteries were not inserted correctly.
c) The batteries do not have enough power.
Remedy: A) Set the ON/OFF switch to the „ON“ position.
B) Check whether the batteries are inserted correctly.
c) Insert new batteries
Problem: The model only turns on its vertical axis or rolls over when started.
Cause: · Incorrect arrangement of the propellers.
Remedy: · Install the propellers and arms as outlined in the manual.
Problem: The model will no longer fly loops.
Cause: · Battery too weak
Remedy: · Charge the battery.
Problem: The model overturns when starting.
Cause: · The rotors are mounted incorrectly.
Remedy: · Mount rotors A and B according to the assembly instructions.
Additional tips and tricks can be found online at www.revell-control.de
SERVICE NOTES
Go to www.revell-control.de for ordering information and tips on replacing spare parts, plus other useful information on all Revell Control models.

23921

Control
QUADROCOPTER
PURE
CARACTÉRISTIQUES PRINCIPALES
Quadricoptère
Batterie Li-Po rechargeable (incluse)
Capacité : 520 mAh
INDICATIONS DE SERVICE
Electrical and electronic waste
ordinance: After the end of use, remove all batteries and separately dispose of all electrically operated devices at the communal collection centres for electrical and electronic waste. Dispose of the remaining parts with household waste. Thank you for your cooperation!
Attention: Risk from heat development and rotating parts during operation! Adult supervision is required!
Revell GmbH hereby declares that this product conforms with the basic requirements and the additional applicable provisions of Directive 1999/5/EC. The Declaration of Conformity can be found at www.revell-control.de.