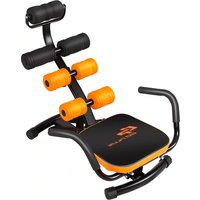
SP35737 - Fitness Equipment COSTWAY - Free user manual and instructions
Find the device manual for free SP35737 COSTWAY in PDF.


| Product Type | Abdominal and Hyperextension Exercise Bench |
| Brand | COSTWAY |
| Model | SP35737 |
| Color | Not specified (as seen, usually black/gray) |
| Main Material | Steel |
| Approximate Dimensions (Folded) | 120 x 50 x 20 cm |
| Approximate Dimensions (Unfolded) | 120 x 50 x 80 cm |
| Net Weight | Approximately 10 kg |
| Maximum User Weight | 100 kg |
| Power Supply | None (manual device) |
| Usage | Indoor only, on a flat and stable surface |
| Main Functions | Hyperextensions, abdominal exercises, lower back work |
| Adjustments | Height-adjustable head support via quick release button; tilting handles |
| Difficulty Level | Beginner to advanced |
| Maintenance and Cleaning | Wipe with a damp cloth after use; regularly check bolts |
| Safety | Clear space of 0.5 m around; wear fitted clothing; stop if pain; consult a doctor before program |
| Assembly Required | Yes, with tool provided; follow instructions |
| Spare Parts | Contact COSTWAY customer service; requires photo of box for identification |
| Warranty | Not specified in the manual |
| Manual Included | French, English, German, Spanish, Italian, Polish (downloadable PDF) |
Frequently Asked Questions - SP35737 COSTWAY
User questions about SP35737 COSTWAY
0 question about this device. Answer the ones you know or ask your own.
Ask a new question about this device
Download the instructions for your Fitness Equipment in PDF format for free! Find your manual SP35737 - COSTWAY and take your electronic device back in hand. On this page are published all the documents necessary for the use of your device. SP35737 by COSTWAY.
USER MANUAL SP35737 COSTWAY
Scan QR code for assembly instructions
Sit Up Bench
Haltelbank
Banc De Musculation
Banco de Abdominales
USA office: Fontana AUS office: Truganina GBR office: Ipswich ITA office: Milano POL office: Gdańsk
THIS INSTRUCTION BOOKLET CONTAINS IMPORTANT SAFETY INFORMATION. PLEASE READ AND KEEP FOR FUTURE REFERENCE.
EN

Before You Start
⚠️ Please read all instructions carefully.
⚠ Retain instructions for future reference.
Separate and count all parts and hardware.
Read through each step carefully and follow the proper order.
We recommend that, where possible, all items are assembled near to the area in which they will be placed in use, to avoid moving the product unnecessarily once assembled.
Always place the product on a flat, steady and stable surface.
Keep all small parts and packaging materials for this product away from babies and children as they potentially pose a serious choking hazard.
DE

Vor dem Beginnen
- It is important to read this entire manual before assembling and using the equipment. Safe and efficient use can only be achieved if the equipment is assembled, maintained and used properly. It is your responsibility to ensure that all users of the equipment are informed of all warnings and precautions.
- Before starting any exercise program you should consult your doctor to determine if you have any physical or health conditions that could create a risk to your health and safety, or prevent you from using the equipment properly. Your doctor's advice is essential if you are taking medication that affects your heart rate, blood pressure or cholesterol level.
- Be aware of your body's signals. Incorrect or excessive exercise can damage your health. Stop exercising if you experience any of the following symptoms: Pain, tightness in your chest, irregular heartbeat, extreme shortness of breath, feeling light headed, dizzy or nauseous. If you do experience any of these conditions you should consult your doctor before continuing with your exercise program.
- Keep children and pets away from the equipment. The equipment is designed for adult use only.
- Use the equipment on a solid, flat level surface with a protective cover for your floor or carpet. For safety, the equipment should have at least 0.5 meter of free space all around it.
- Before using the equipment, check the nuts and bolts are securely tightened.
- The safety level of the equipment can only be maintained if it is regularly examined for damage and/or wear and tear.
- Always use the equipment as indicated. If you find any defective components whilst assembling or checking the equipment, or if
you hear any unusual noise coming from the equipment during use, stop. Do not use the equipment until the problem has been rectified.
- Wear suitable clothing whilst using the equipment. Avoid wearing loose clothing which may get caught in the equipment or that may restrict or prevent movement.
- Maximum weight of user is 100kg.
- The equipment is not suitable for therapeutic use.
- Care must be taken when lifting or moving the equipment so as not to injure your back. Always use proper lifting techniques and/or use assistance.
- Check all moveable accessories before use each time. If anything is broken or loose, please repair it immediately, then you may continue to use.
- A warning indicating that injuries to health may result from incorrect or excessive training.
Assembly Instruction
- Unpack the carton and place all parts on the floor carefully.
- Remove the packing material and check there's no missing parts.
natural_image
Technical line drawing of a mechanical conveyor system with rollers and levers (no text or symbols)
1:1

1:1

1:1

1:2

1:2

1:2

1:2

x1
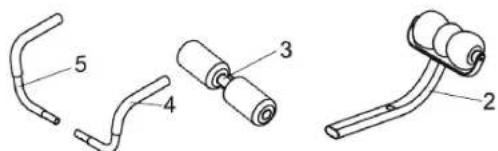
PARTS LIST
| NO. | DESCRIPTION | QTY | NO. | DESCRIPTION | QTY | |
| 1 | Main frame | 1 | 8 | Knob | 1 | |
| 2 | Head support | 1 | 9 | Bolt | 2 | |
| 3 | Backrest | 1 | 10 | Nut | 2 | |
| 4 | Left handle | 1 | 11 | Washer | 2 | |
| 5 | Right handle | 1 | 12 | Spring washer | 2 | |
| 6 | Quick release knob | 1 | 13 | Tool | 1 | |
| 7 | Pin | 1 |
1
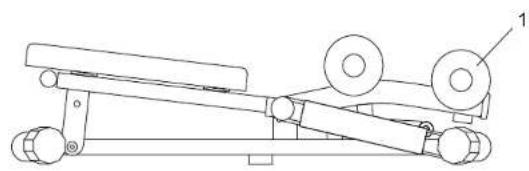
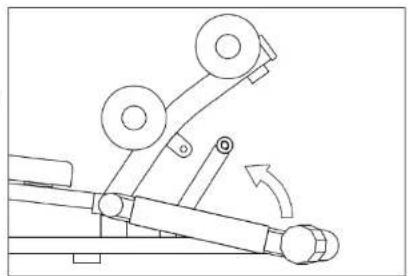
Unfold the Main frame (1) and lock it with the Pin (7).
natural_image
Technical line drawing of a mechanical device with two wheels and a rotating shaft (no text or symbols)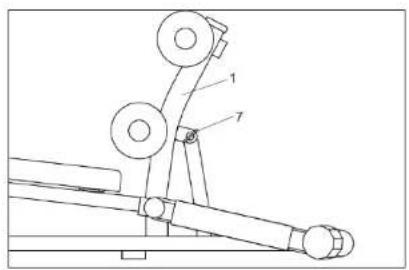
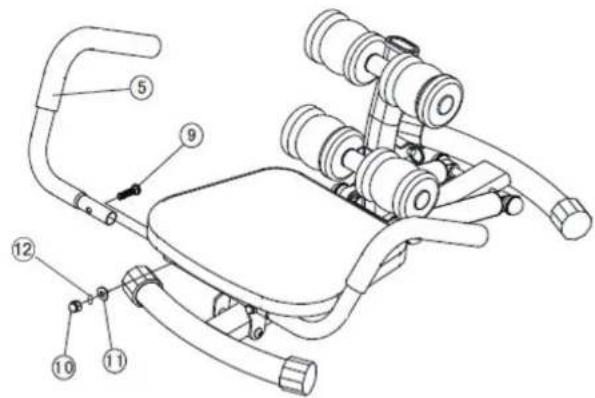
2 Insert the Right handle (5) into the Main frame (1) and tighten Bolt (9), Nut (10), Washer (11) and Spring Washer (12) by tool (13).
3 Insert the Left handle (4) into the Main frame (1) and tighten Bolt (9), Nut (10), Washer (11) and Spring Washer (12) by tool (13).
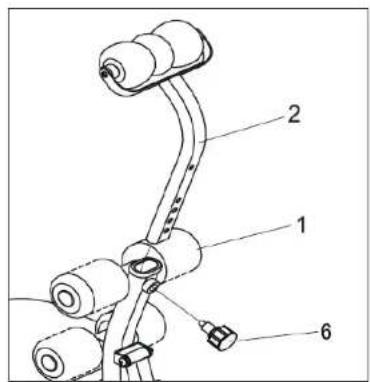
4 Insert the Head support (2) into the Main frame (1) and tighten it with Quick release knob (6).
5
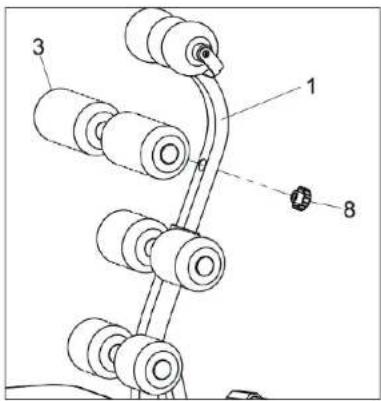
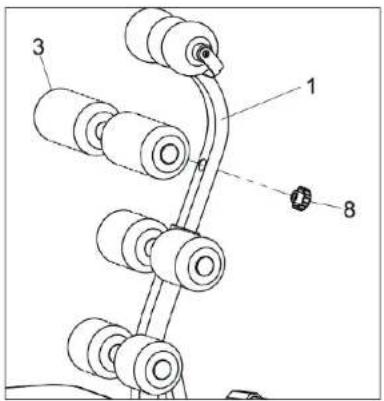
Insert the Backrest (3) into the Main frame (1) and tighten it with Knob (8).
EXERCISE INSTRUCTIONS
Using this equipment will provide you with several benefits. It will improve your physical fitness, tone your muscles and, in conjunction with a calorie-controlled diet, help you lose weight.
1. THE WARM UP PHASE
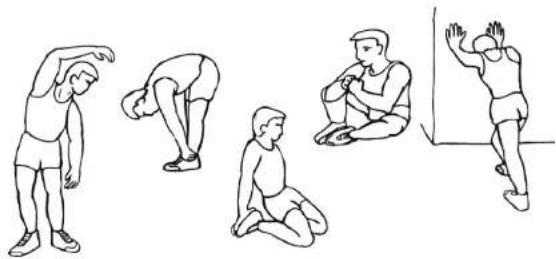
This stage helps to get the blood flowing around the body and the muscles working properly. It will also reduce the risk of cramp and muscle injury. It is advisable to do a few stretching exercises as shown below. Each stretch should be held for approximately 30 seconds, do not force or jerk your muscles into a stretch - if it hurts, STOP.
natural_image
Illustration of five different stretching poses with different angles (no text or symbols)2. THE EXERCISE PHASE
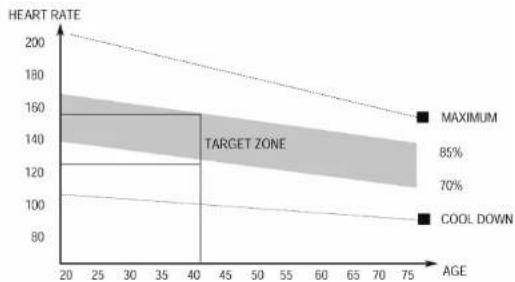
This is the stage where you put the effort in. After regular use, the muscles in your legs will become more flexible. Work to your own level but it is important to maintain a steady tempo throughout. The rate of work should be sufficient to raise your heart beat into the target zone shown on the graph.
line
| AGE | HEART RATE | | --- | ---------- | | 20 | 160 | | 40 | 120 | | 75 | 100 |This stage should last for a minimum of 12 minutes though most people start at about 15-20 minutes.
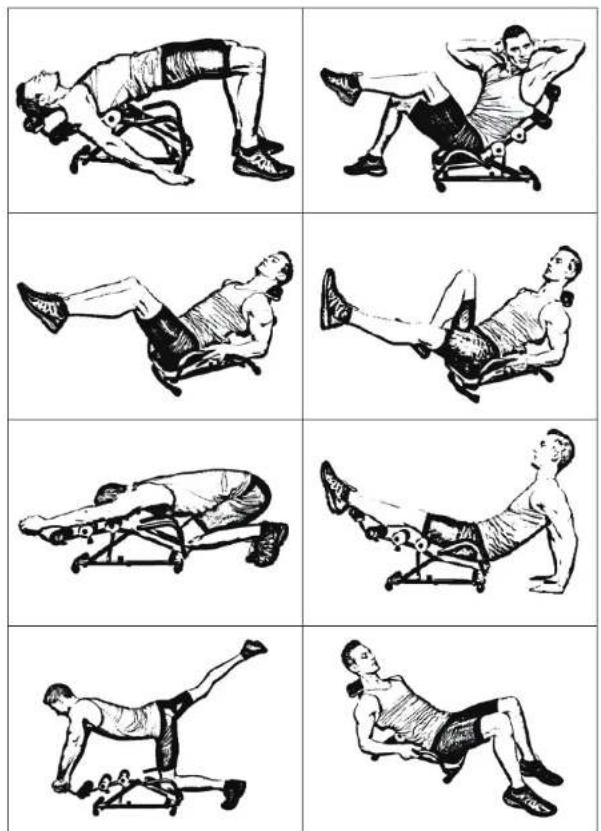
EXERCISE SESSION
DE
natural_image
Technical line drawing of a mechanical device with two wheels and a rotating arm (no text or symbols)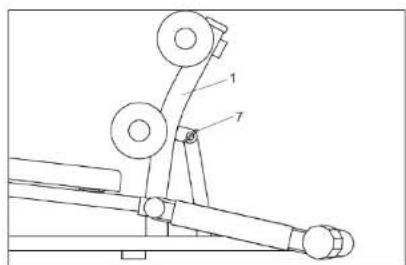
5
ÜBUNGSANLEITUNG
natural_image
Illustration of five sequential stretching exercises in different poses (no text or symbols)2. DIE ÜBUNGSPHASE
natural_image
Mechanical diagram showing a lever mechanism with pulleys and rotating components (no text or symbols)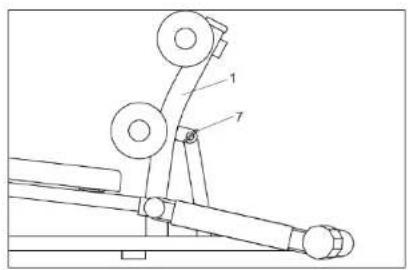
5
Insert the Backrest (3) into the Main frame (1) and tighten it with Knob (8).
INSTRUCTIONS D'EXERCICE
natural_image
Illustration of five different stretching poses in various positions (no text or symbols)2. LA PHASE D'EXERCICE
line
| Age | Cardiaque | | --- | --- | | 20 | 160 | | 40 | 120 | | 75 | 100 |natural_image
Four types of mechanical tools or connectors, numbered 2 to 5, shown in different orientations (no text or symbols present)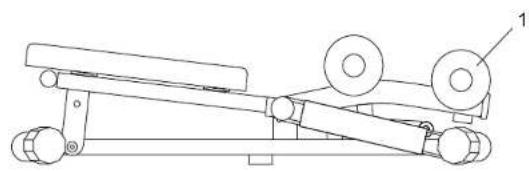
natural_image
Technical line drawing of a mechanical conveyor system with rollers and levers (no text or symbols)
1:1

1:1

1:1

1:2

1:2

1:2

1:2

x1
LISTA DE PIEZAS
natural_image
Technical line drawing of a mechanical device with two wheels and a lever mechanism (no text or symbols)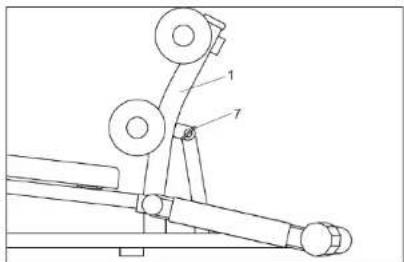
natural_image
Technical line drawing of a mechanical device with two labeled components (no text or symbols present)5
INSTRUCCIONES PARA EL EJERCICIO
natural_image
Illustration of five sequential stretching exercises in different poses (no text or symbols)2. FASE DE EJERCICIO
natural_image
Technical line drawing of a mechanical device with two wheels and a rotating arm (no text or symbols)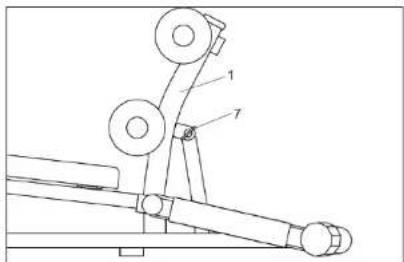
natural_image
Technical line drawing of a mechanical device with two labeled components (no text or symbols present)5
natural_image
Illustration of five sequential stretching poses with different angles (no text or symbols)line
| ETÀ | CARDIACA | | --- | -------- | | 20 | 160 | | 40 | 120 | | 75 | 80 |natural_image
Mechanical diagram showing a lever mechanism with pulleys and rotating components (no text or symbols)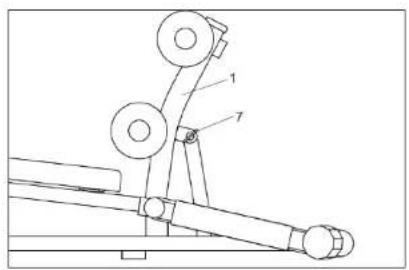
5
TRENING
natural_image
Illustration of five different stretching poses in various positions (no text or symbols)2. FAZA TRENINGU
DO NOT discard the box / original packaging.
In case a return is required, the item must be returned in original box. Without this your return will not be accepted.
⚠️ Take a photo of the box markings.
A photo of the markings (text) on the side of the box is required in case a part is needed for replacement. This helps our staff identify your product number to ensure you receive the correct parts.
Take a photo of the damaged part (if applicable).
A photo of the damage is always required to file a claim and get your replacement or refund processed quickly. Please make sure you have the box even if it is damaged.
Send us an email with the images requested.
Email us directly from marketplace where your item was purchased with the attached images and a description of your claim.
DE


Brand : COSTWAY
Model : SP35737
Category : Fitness Equipment