FH10070 - Fitness Equipment COSTWAY - Free user manual and instructions
Find the device manual for free FH10070 COSTWAY in PDF.


| Product type | Portable training kit with expanders |
| Brand | Costway |
| Model | FH10070 |
| Kit dimensions (folded) | Approx. 33.5 x 22.5 x 2 cm |
| Base plate dimensions (unfolded) | Approx. 86 x 3 x 50.5 cm (L x H x D) |
| Total kit weight | Approx. 5.95 kg |
| Maximum user weight | 110 kg |
| Maximum stretch length of expanders | 200 cm at 90 N |
| Main materials | Elastomer expanders, metal and plastic parts |
| Usage | Indoor, private domestic use (age 14+) |
| Power supply | Manual, no batteries |
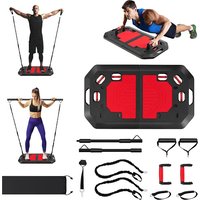
| Main functions | Exercises for biceps, abs, legs, shoulders, squats, push-ups |
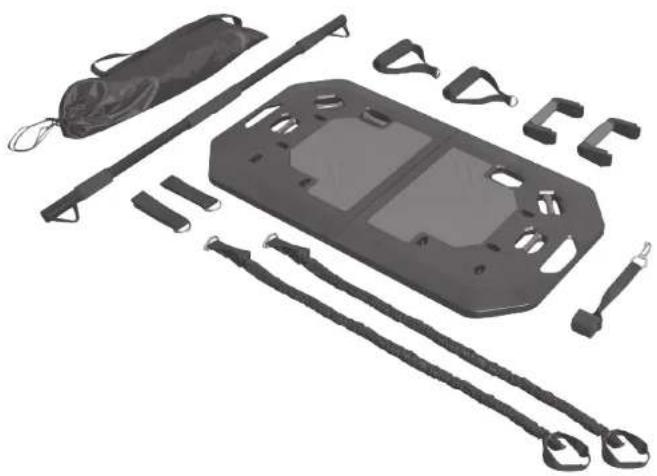
| Included accessories | Base plate, gym stick, door anchor, 2 handles, 2 foot straps, 2 press handles, 2 expanders, 4 clips, carabiner, door panel, carrying bag |
| Care and cleaning | Wipe with a damp cloth; do not use harsh cleaning products |
| Storage | At room temperature, away from moisture and direct sunlight |
| Safety | Check condition before each use; keep a clear space of 0.6 m around; use on a flat, non-slip surface; do not stretch beyond 200 cm; never wrap expanders around your neck; attach the anchor only to doors opening outward |
| Spare parts and repairability | Use only original parts; consumable parts (handles) should be checked before each use |
| General information | Compliant with standard EN ISO 20957-1; manufacturing date: 06/2022 |
Frequently Asked Questions - FH10070 COSTWAY
User questions about FH10070 COSTWAY
0 question about this device. Answer the ones you know or ask your own.
Ask a new question about this device
Download the instructions for your Fitness Equipment in PDF format for free! Find your manual FH10070 - COSTWAY and take your electronic device back in hand. On this page are published all the documents necessary for the use of your device. FH10070 by COSTWAY.
USER MANUAL FH10070 COSTWAY
With your Inspiring rating, COSTWAY will be more consistent to offer you EASY SHOPPING EXPERIENCE, GOOD PRODUCTS and EFFICIENT SERVICE!
DE
AU office: Truganina
DE office: Hamburg
FR office: Saint Vigor d'Ymonville
PL office: Gdańsk
EN
FR
GIANTEX
natural_image
Collection of black athletic equipment including a skis, harness, and support structure (no text or symbols visible)USER'S MANUAL/MANUEL DE L'UTILISATEUR
FH10070
Push Up Board Set / Ensemble de Plaque de Fitness
THIS INSTRUCTION BOOKLET CONTAINS IMPORTANT SAFETY INFORMATION. PLEASE READ AND KEEP FOR FUTURE REFERENCE.
A
C
D
natural_image
Line drawing of a vehicle chassis frame with internal compartments and mounting brackets (no text or symbols)E
natural_image
Line drawing of a person cleaning a door with a tool (no text or symbols)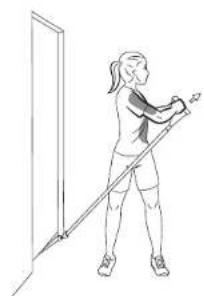
natural_image
Line drawing of a person stretching with a resistance bar, no text or symbols present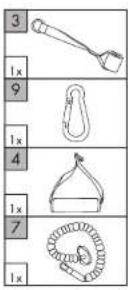
H
natural_image
Line drawing of a person cleaning a door with a tool (no text or symbols)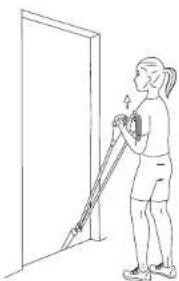
natural_image
Line drawing of a person using a resistance band to lift a door (no text or symbols)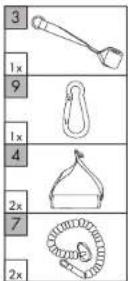
I
natural_image
Line drawing of a person standing next to a door, no text or symbols present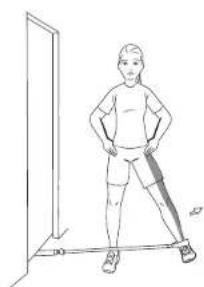
natural_image
Line drawing of a person standing next to a door, holding hands on hips (no text or symbols)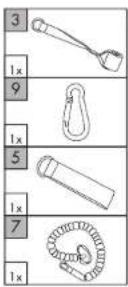
J
natural_image
Line drawing of a person performing a resistance band exercise (no text or symbols)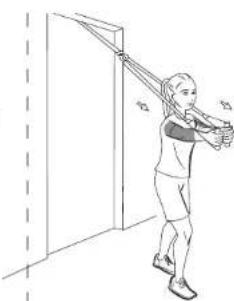
natural_image
Line drawing of a person stretching with a resistance band (no text or symbols)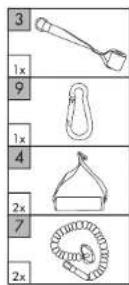
K
natural_image
Line drawing of a person standing on a table with a badminton racket and numbered records (no text or symbols)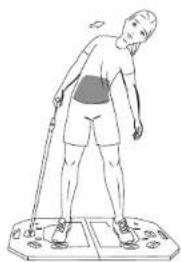
natural_image
Line drawing of a person standing on a balance scale with a stick and feet, no text or symbols present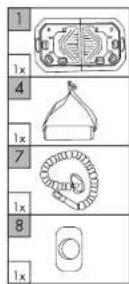
L
natural_image
Line drawing of a person standing on a platform with legs and feet (no text or symbols)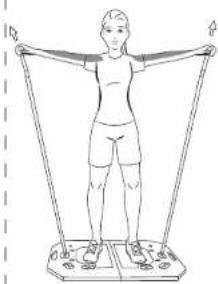
natural_image
Line drawing of a person standing on a resistance band using a barbell (no text or symbols)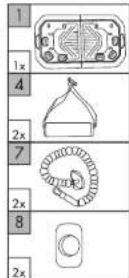
M
natural_image
Line drawing of a person performing a bar exercise on a horizontal bar (no text or symbols)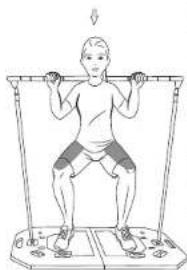
natural_image
Line drawing of a person performing a pull-up exercise on a bar (no text or symbols)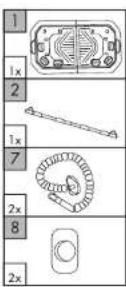
N
natural_image
Line drawing of a person performing a plank exercise on a fitness mat (no text or symbols)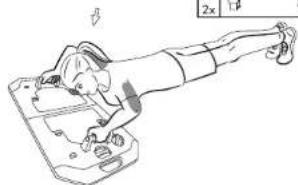
0
You have chosen to purchase a high-quality product. Familiarise yourself with the product before using it for the first time. Read the following instructions for use carefully.
Use the product only as described and only for the given areas of application. Store these instructions for use carefully. When passing the product on to third parties, please also hand over all accompanying documents.
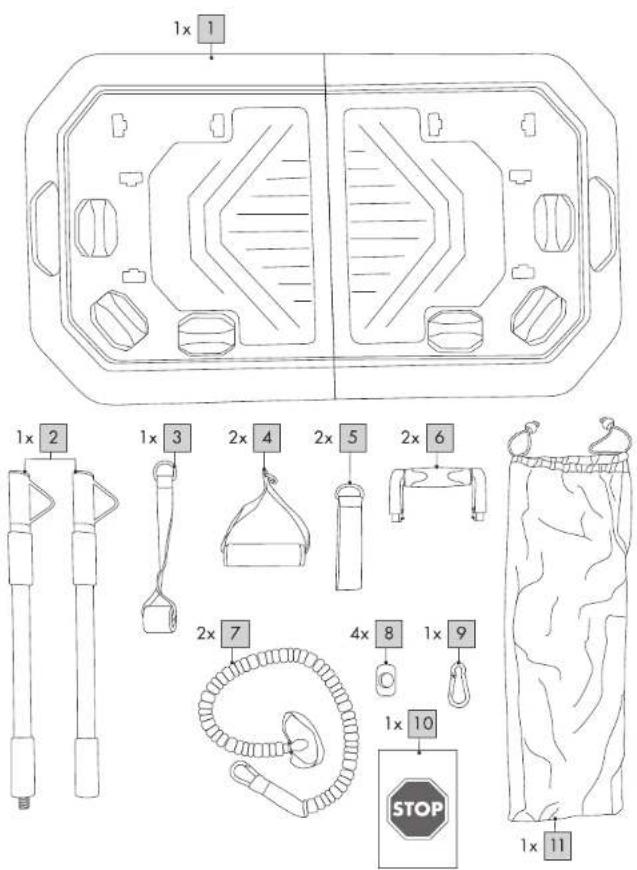
Package contents(Fig. A)
1 x base plate ( 1 )
1x gymnastics pole,2-pc.(2)
1 x door anchor (3)
2 x handle (4)
2 x foot strap (5)
2 x press-up grip (6)
2 x expander (7)
4x clip (8)
1 x carabiner (9)
1x door sign ( 10)
1 x carry bag (11)
1 x instructions for use
Technical data
Maximum possible stretch length: 200cm at 90N
The force tolerance range is a maximum of 20%(+/-).
Exercise device form A corresponds to EN ISO20957-1.
Maximum possible stretch length
Max. user weight: 110kg
Portable Workout Set total mass: about 5.95 kg
Portable Workout Set total surface area: about 33.5*22.5*2 cm
Base plate dimensions (unfolded): approx.86 x 3 x 50.5cm (W x H x D)
Date of manufacture (month /year): 06/2022
Intended use
This fitness product is intended for private use and is not suitable for medical or commercial use.
The product is suitable for indoor use only.
The product is not suitable for children under 14 years of age.
EN E
Safety information
Risk of injury!
Consult your doctor before you start exercising.
Make sure you are healthy enough to exercise.
Always remember to warm up before exercising and exercise according to your current performance ability. Overexertion and excessive exercise can lead to serious injuries. Stop exercising immediately and contact a doctor if you experience pain, weakness or fatigue.
Always keep the instructions for use with the exercise instructions readily available.
Pregnant women should only exercise after consulting with their doctor.
The product must only be used by one person at a time.
The product is not suitable for therapeutic purposes.
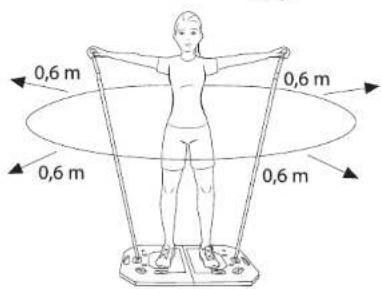
keep a clear space to approx 0.6m around the exercise area (Fig. O.)
-Do not pull the expanders beyond the maximum possible stretch length of 200cm.
- Exercise on a flat, non-slip surface only.
- Do not use the product near steps or landings
- when closing the carabiner, keep your fingers and other body parts clear of the closure
- Never wrap the expanders around your head, neck or chest. Risk of strangulation!
-Do not use the expanders for other purposes (eg.as a tension cable, towing rope or similar).
- The elastomers in the expander must be protected from direct sunlight.
- Warning! Fasten the door anchor to doors only!
- Warning! Risk of injury! Only fasten the door anchor to doors that open outwards (away from you! Never mount the door anchor on doors that open inwards (towards you). The door could open, which can result in serious injuries!
- Warning! Risk of injury! Always lock the door onto which you are fastening the door anchor!
- Warning! Always use the door sign provided when you are exercising!
Make sure that it is positioned on the other side of the door in a way that is easy to read.
-Check the product for damage or wear before each use. Only use the product if it is in perfect condition!
Extra caution - risk of injury for children!
- Do not allow children to use this product unsupervised.
Instruct them in the correct use of the product and maintain supervision. Only permit the child to use the product if their mental and physical development allows it. This product is not a toy.
Dangers due to wear and tear Check the product for damage or wear before each use. Only use the product if it is in perfect condition!
- The safety of the product can only be guaranteed if it is regularly inspected for damage and wear and tear. If damaged, it must no longer be used.
- Parts that are particularly susceptible to wear and tear, such as the handles, must be checked for damage before each use.
Use only original replacement parts.
- Protect the product from extreme temperatures sun and dampness. Improper storage and use of the product could lead to premature wear and tear, which could result in injury.
-Do not fasten the expanders to areas with sharp edges, e.g. door hinges. Nylon tears when it scrapes against sharp edges.
Beware of material damage
- Never let the expanders fall or snap back
against the door. Otherwise this may damage the door.
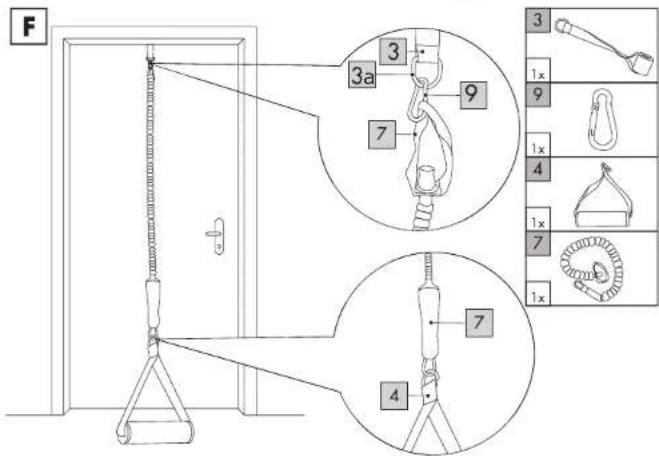
Assembly instructions for the expanders with door anchor(Fig. F)
-Choose an exercise area of approx. 3.00x 1.80m (L x W).
- Fasten the door anchor (3) at a height between 1.80 and 2.30m.
- Exercise on a flat, non-slip surface only.
EN E
- Fasten the expanders (7) to the door anchoring (3a) with a carabiner(9). Make sure that you attach the large loops of the expanders to the door anchor.
- Only mount the door anchor on doors that open outwards (away from you).
- Place the door anchor over the door, in the middle.
- Lock the door.
-warning! Risk of injury! Always lock the door!
Always use the door sign (10) provided!
- Ensure that the door onto which you are fastening the door anchor is stable and sturdy and can support your body weight, and that the door anchor is firmly positioned. Tug hard on the expander a few times to make sure.
Using the product
Fastening expanders to the base plate (Fig. B)
-
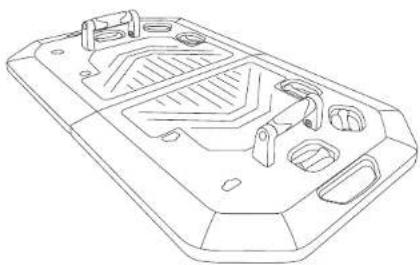
Unfold the base plate (1) and lay it down with the underside facing upwards.
-
Guide the expander(7) with the carabiner end downwards through one of the three openings (1a) on one side of the base plate.
Note: ensure that the expander is correctly positioned! The expander must always be positioned on a castor in the opening.
- Fasten the large hoop of the expander at a fastening point (1 b) of your choosing.
Note: the further from the opening you fasten the large hoop of the expander, the greater the expander's resistance becomes.
-
Place a clip (8) on the fastening point.
-
Firmly press on the clip to fix the expander in place
Note: ensure that the clip is properly aligned.
Note: if you wish to use two expanders during an exercise, repeat the steps on the other side of the base plate as well.
- Turn the base plate over.
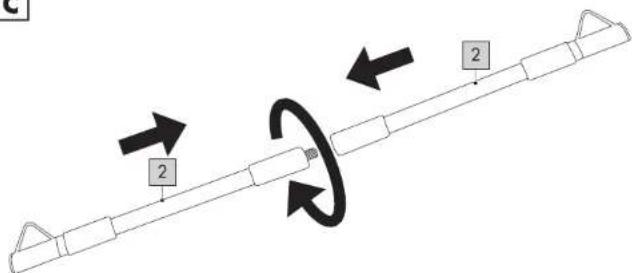
Assembling the gymnastics pole(Fig.c) screw both parts of the gymnastics pole(2) together.
Mounting and removing the pressup grips (Fig.D)
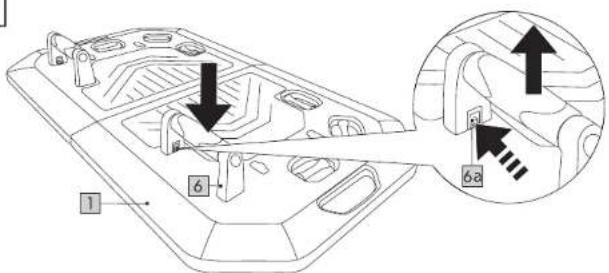
You can mount the press-up grips (6) in two positions.
- Insert the press-up grips into the base plate (1) until they audibly lock in place.
- To release the press-up grips, press the inside buttons(6a) and pull the press-up grips out.
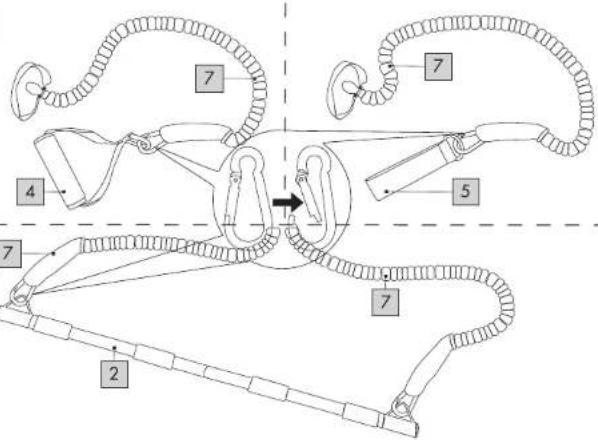
Fastening handles, foot straps or gymnastics pole to expanders (Fig.E) Depending on the exercise, use the handles (4).
the foot straps (5) or the gymnastics pole (2).
- Connect them to the expanders(7) with the Carabiners.
Fastening expanders to the door(Fig. F)
Top of the door
- Fasten the door sign (10) to the outside of the door in a location then is clearly visible. This is the side that opens out (away from you).
- Place the door anchor (3) in the middle of the top edge of the open door in order to mount the anchor to the top.
- Lock the door.
- Fasten one or both expanders (7) as needed to the door anchor ring (3a) with the carabiner (9).
Note: tug hard a few times on the expander to check that the door anchor is firmly clamped to the door. Make sure that you fasten the large hoop of the expander to the door anchor ring.
Bottom of the door
- Fasten the door sign(10) to the outside of the door. This is the side that opens out (away from you).
- Push the door anchor strap under the door.
- Lock the door.
- Fasten one or both expanders (7) as needed to the door anchor ring (3a) with the carabiner (9).
Note: tug hard a few times on the expander to check that the door anchor is firmly clamped to the door. Make sure that you fasten the large hoop of the expander to the door anchor ring.
EN E
General exercise instructions
Exercise procedure
- wear comfortable sports clothing and athletic shoes.
- warm up before each exercise session and end the session gradually.
- Take sufficient breaks between the exercises and keep yourself sufficiently hydrated.
-If you are a beginner, never exercise with too much intensity. increase the intensity of the exercise sessions slowly. - Perform all exercises smoothly, not jerkily fast.
- Be sure to breathe steadily.
Exhale during exertion and inhale upon release. - MainTain correct body posture while exercising.
Warming up
Take sufficient time before each exercise session to warm up. Some simple exercises to do this are described below.
You should repeat each exercise 2 to 3 times.
Neck muscles
- Turn your head slowly to the left and to the right.
Repeat this movement 4 to 5 times. - Rotate your head slowly, first in one direction then in the other.
Arms and shoulders
- Clasp your hands behind your back and pull them upwards carefully. If you bend your upper body forwards at the same time, all your muscles will be maximally warmed up.
- Rotate both your shoulders forwards at the same time and then change direction after one minute.
- Pull your shoulders up to your ears and then let them drop again.
- Circle your right and left arms alternately forwards and then, after one minute, backwards.
Important: don't forget to keep breathing steadily! Leg muscles
- Stand on one leg and lift the other leg. with the knee bent, approx 20cm off the floor.
- Rotate your raised fool first in one direction, then change direction after a few seconds.
- Switch legs and repeat this exercise,
- Lift your legs one after another and take a few steps on the spot. Make sure you only lift your legs to a height where you are still able to maintain your balance well.
Exercise suggestions
Below are some of the many possible exercises.
Strengthening the oblique abdominal muscles (Fig. G)
For this exercise use the door anchor (3), one expander(7), one handle (4) and the carabiner (9).
Fasten the expander to the bottom of the door as described in the section .Fastening expanders to the door (Fig. F)".
Connect the handle to the other end of the expander with the carabiner.
Starting position:
- Stand with your right side to the door, feet hip-width apart. Place equal weight on both feet.
- Grab the handle with both hands. Your hands are resting on your right thigh and your knees are slightly bent.
- Tense your abdominal and buttock muscles and straighten your upper body.
- Tense your arms and rotate your upper body far to the left with your elbows raised. Your head turns with your body, as if you are looking over your left shoulder. Make sure that you only move your upper body and your arms. Your pelvis remains straight.
- Maintain abdominal muscle tension throughout and keep your head aligned with your spine.
End position:
EN E
-
Pull your shoulder blades towards your spine and keep your shoulders lowered. Your upper arms remain against your body.
-
Stay in this position for a moment and then slowly go back to your starting position.
-
Repeat the exercise 10 to 15 times in three sets. Then perform the exercise with the other leg towards the door.
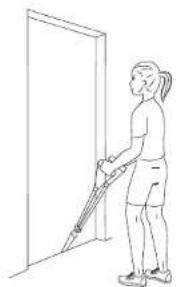
Important: perform the exercise slowly and keep your pelvis straight. Biceps (Fig. H)
For this exercise use the door anchor (3), two expanders(7). two handles (4) and the carabiners (9).
- Fasten the expanders to the bottom of the door as described in the section, Fastening expanders to the door(Fig.F)".
Connect the handles to the other end of the expanders with the carabiners.
Starting position:
-
Stand upright, facing the door.
-
Your feet are hip-width apart and your body is straight.
Note: make sure that you are about an arm's length away from the door.
- Grab each handle with one hand and keep your arms stretched downwards at your sides.
End position:
-
Tense your arm muscles.
-
Pull the expanders upwards by bending your arms and simultaneously moving your forearms upwards. Your upper arms remain against your body.
-
Return to the starting position.
-
Repeat the exercise 10 to 15 times in three sets.
Important: make sure that your upper body is upright, your shoulder blades are pulled downwards, and your upper arms remain parallel to your body.
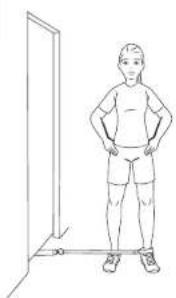
Outside leg(Fig. I)
For this exercise use the door anchor (3), one expander(7), one foot strap (5) and the carabiner(9).
- fasten the expander to the bottom of the door as described in the section "Fastening expanders to the door (Fig. F)".
- Connect the foot strap to the other end of the expander with the carabiner.
Starting position
-
Fasten one foot strap to your left leg.
-
Stand with your side to the door, so that your right leg is closer to the door than your left leg.
Note: the expander should be stretched out straight and pass in front of your right leg.
- Shift your weight to your right leg.
End position
-
Tense your abdominal and buttock muscles.
-
Slowly move your left leg out to the side with the expander. Make sure that your upper body remains straight and your knees are slightly bent.
-
Return your left leg to the starting position.
-
Repeat the exercise 10 to 12 times and then switch sides.
Important: make sure that your upper body is upright and the movement is performed from your hip joint.
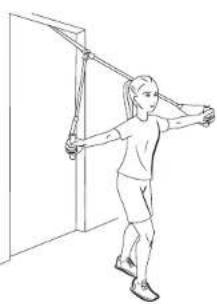
Flies (Fig.J)
For this exercise use the door anchor (3), two expanders (7), two handles (4) and the carabiners (9).
- Fasten the expanders to the top of the door as described in the section "Fastening expanders to the door(Fig.F)"
- Connect the handles to the other end of the expanders with the carabiners.
Starting position
- Take one handle in each hand and turn around with your back facing the door.
EN E
-
Take a few steps forward until you have reached an appropriate angle of resistance.
-
Take one step forward with your right foot and stretch your arms out to the sides at shoulder height.
End position
-
Tense your arm, buttock and abdominal muscles.
-
Slowly stretch your arms forwards until they meet.
Your arms are at chest height. Maintain body tension during the forward movement.
-
Return to the starting position.
-
Repeat the exercise 15 times in three sets, and then switch legs.
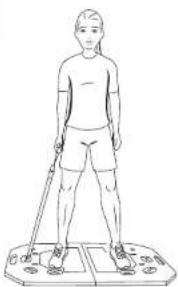
Important: make sure that your upper body remains straight. Lateral trunk (Fig. K)
For this exercise use the base plate (1). one expander (7), one clip (8) and one handle (4). Fasten the expanders to the bottom of the base plate as described in the section, Fastening expanders to the base plate (Fig B)".
Connect the handle to the other end of the expander with the carabiner.
Starting position
-
Stand on the base plate with your feet hip-width apart. Your toes are pointing forwards and your knees are slightly bent.
-
Grab the handle with one hand hold your arms straight down at your sides.
End position
-
Tense your buttock, arm and abdominal muscles.
-
Lean your upper body as for to the side as possible. When doing so, make sure that your head is aligned with your spine
-
Hold this position briefly and then return to the starting position.
-
Repeat the exercise 8 to 12 times in three sets and then switch sides.
Important: perform the movement slowly and keep your upper body straight.
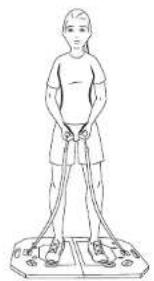
Deltoids (Fig. L)
For this exercise use the base plate (1) two expanders (7), two clips (8) and two handles (4). Fasten the expanders to the bottom of the base plate as described in the section Fastening expanders to the base plate (Fig B) ^™
Connect the handles to the other end of the expanders with the carabiners.
Starting position
-
Stand on the base plate with legs slightly bent and feet hip-width apart, and place equal weight on your feet. Your upper body is upright.
-
Grab each handle with one hand. The backs of your hands are facing outwards. Your arms are slightly bent.
End position
- Tense your abdominal, leg and buttock muscles and pull your arms to the side up to shoulder height. The backs of your hands are facing upwards. Your wrist remains straight. Pull your shoulder blades towards your spine.
Your head is aligned with your spine and your shoulders are lowered.
-
Stay in this position for a moment and then slowly go back to your starting position.
-
Repeat the exercise 10 to 15 times in three sets.
Important: make sure that your pelvis remains straight. Lift your arms up only to shoulder height.
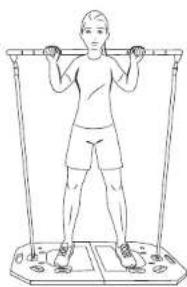
Squats (Fig. M)
For this exercise use the base plate (1), two expanders (7). two clips (8) and the gymnastics pole (2).
Fasten the expanders to the bottom of the base plate as described in the section Fastening expanders to the base plate(Fig B)".
Attach the expanders to the ends of the gymnastics pole with the carabiners.
Starting position
- Stand on the base plate with your feet hipwidth apart. Your toes are pointing forwards and your knees are slightly bent.
EN E
- Grab the gymnastics pole with your arms bent, pull it behind your head so shoulder height.
End position
-
Tense your buttock, arm and abdominal muscles
-
Extend your buttocks out behind you and bend our knees. Make sure your upper body is titled slightly forwards. Your knees do not extend past the tips of your toes.
-
Hold this position briefly and then return to the starting position.
-
Repeat the exercise B to 12 times in three sets.
Important: perform the movements slowly and hold your back straight throughout the entire exercise.
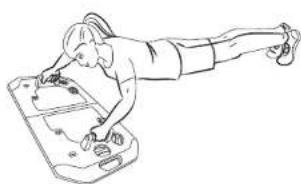
Press-up (Fig. N)
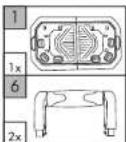
use the base plate (1) and both press-up grips(6) for this exercise. Insert the press-up grips into the side positions on the base plate as described in the section, "Mounting and removing the Pressup grips (Fig.D)".
Starting position
-
Get into the press-up position and place the product under you at chest height.
-
Support yourself with both hands on the product.
-
Your body is straight and forms a line. Tighten your abdominal muscles.
-
Only the tips of your toes are touching the floor. End position
-
Bend your arms and lower your upper body in a controlled movement until your upper arms are parallel to your upper body. Keep your upper arms against your body and your head aligned with your spine.
-
Push your body back up and return to the starting position without fully straightening your arms.
-
Repeat the exercise 10 to 25 times in three sets. Important: be very careful to maintain your body tension the whole time.
Stretching
Take sufficient time to stretch after each exercise session. Some simple exercises to do this are shown below.
You should perform each exercise 3 times per side for 15-30 seconds. Neck muscles
-
Stand in a relaxed posture.
-
Pull your head gently to one side twine your hand, first to the left and then to the right.
This exercise stretches the sides of your neck.
Arms and shoulders
-
Stand up straight with your knees slightly bent.
-
Bend your right arm behind your head until your right hand is between your shoulder blades.
-
Grip your right elbow with your left hand and
-
pull it backwards.
-
Change sides and repeat the exercise.
Leg muscles
-
Stand upright and lift one foot off the floor.
-
Rotate it slowly, first in one direction then the other.
-
Switch feet after a while.
Important: make sure your thighs remain parallel to one another While doing so, push your pelvis forwards and keep your upper body straight.
Storage, cleaning
When not in use, always store the product clean and dry at room temperature, Only clean the product with a damp cloth and wipe dry afterwards.
IMPORTANT! Never clean the product with harsh cleaning agents. Disposal
Dispose of the product and the packaging in an environmentally friendly manner.
The recycling code is used to identify various materials for recycling, The code Consists of the recycling symbol-which is meant to reflect the recycling symbol-which is meant
To reflect the recycling cycle- and a number which identifies the material.
FR FI
Félicitations!

Brand : COSTWAY
Model : FH10070
Category : Fitness Equipment