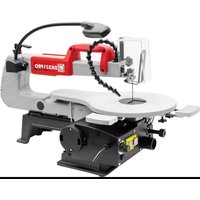
DKS2 1PRO - Saw Holzmann - Free user manual and instructions
Find the device manual for free DKS2 1PRO Holzmann in PDF.


| Product type | Scroll saw |
| Brand | Holzmann |
| Model | DKS2 1PRO |
| Power supply | 230 V / 50 Hz |
| Motor power | 120 W |
| Stroke speed | 500 - 1700 min⁻¹ |
| Stroke height | 21 mm |
| Blade length | 127 mm |
| Max. cutting height (90°) | 57 mm |
| Max. cutting height (45°) | 27 mm |
| Throat | 406 mm |
| Table tilt | 0° - 45° |
| Dimensions (L x W x H) | 655 x 285 x 365 mm |
| Weight | 12 kg |
| Dust extraction connection | Ø 35 mm |
| Max. work table | 320 x 482 mm |
| Sound level (LWA) | 79.9 dB(A) |
| Sound pressure level (LPA) | 66.9 dB(A) |
| Integrated lighting | Lamp |
| Integrated blower | Yes |
| Blade guard | Yes |
| Speed regulator | Continuous (500 - 1700 min⁻¹) |
| Compatible materials | Wood and similar materials |
| Recommended maintenance | Cleaning after each use, lubrication every 20 h |
| Spare parts | Available through Holzmann customer service |
| Warranty | 2 years non-commercial use, 1 year commercial use |
Frequently Asked Questions - DKS2 1PRO Holzmann
User questions about DKS2 1PRO Holzmann
0 question about this device. Answer the ones you know or ask your own.
Ask a new question about this device
Download the instructions for your Saw in PDF format for free! Find your manual DKS2 1PRO - Holzmann and take your electronic device back in hand. On this page are published all the documents necessary for the use of your device. DKS2 1PRO by Holzmann.
USER MANUAL DKS2 1PRO Holzmann
natural_image
Exterior view of a DKS21PRO manual milling machine with red handle and black base (no visible text or symbols)1 INHALT / INDEX / INDICE
1 INHALT / INDEX / INDICE 2
2 SICHERHEITSZEICHEN / SAFETY SIGNS / SEÑALES DE SEGURIDAD / SYMBOLES DE SÉCURITÉ / SEGNALI DI SICUREZZA 4
3 VORWORT (DE) 6
4 TECHNIK 7
12.1 Intended Use....20
12.2 Security instructions.... 21
12.3 Remaining risk factors.... 22
13 ASSEMBLY 23
13.1 Assembly 23
14 OPERATION 26
14.1 Operation instructions....26
14.2 Operation 26
15 MAINTENANCE 28
15.1 Maintenance plan 28
15.2 Cleaning 28
15.3 Disposal 28
16 TROUBLE SHOOTING 29
17 PREFACIO (ES) 30
18 CARACTERÍSTICAS TÉCNICAS 31
EN EC-CONFORM: This product complies with EC-directives
READ THE MANUAL! Read these operating instructions carefully and familiarize
EN yourself well with the operating elements of your machine in order to be able to operate and maintain it properly and thus prevent damage to man and machine.
ATTENTION! Ignoring the safety signs and warnings applied on the machine as
EN well as ignoring the security and operating instructions can cause serious injuries and even lead to death.
EN Protective clothing!
EN Stop and pull out the power plug before any break and engine maintenance!
EN Warning about cut injuries!
natural_image
Product catalog image showing various mechanical components including clips, fasteners, and a ring (no visible text or labels)natural_image
Sequence of five black-and-white images showing a robotic arm tool interacting with a mechanical component, no text or symbols visible.natural_image
Mechanical assembly diagram showing motor components and mounting features (no text or symbols)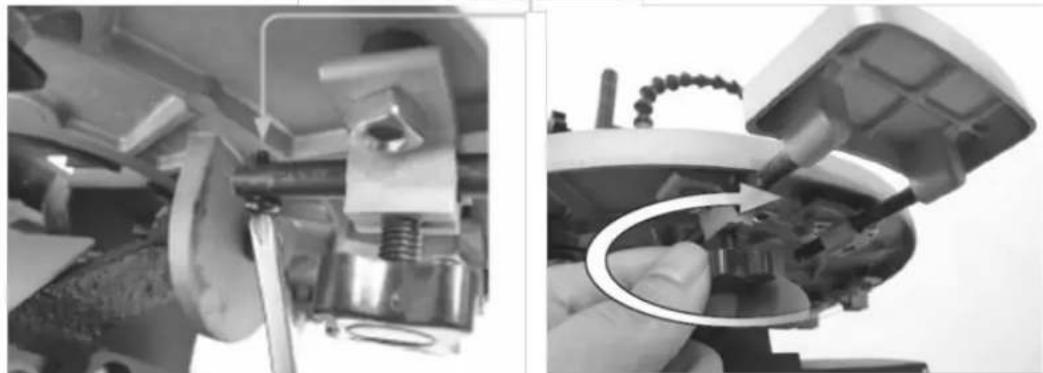
natural_image
Mechanical assembly diagram showing a disassembly of a mechanical component into a housing, with no visible text or symbols.Staubgebläse:
natural_image
Two-panel image showing a hand holding a black bead-like device and a microscope with test tubes (no visible text or symbols)natural_image
Four-panel sequence showing a hand holding a small electronic component, with arrows indicating motion or rotation (no text or symbols)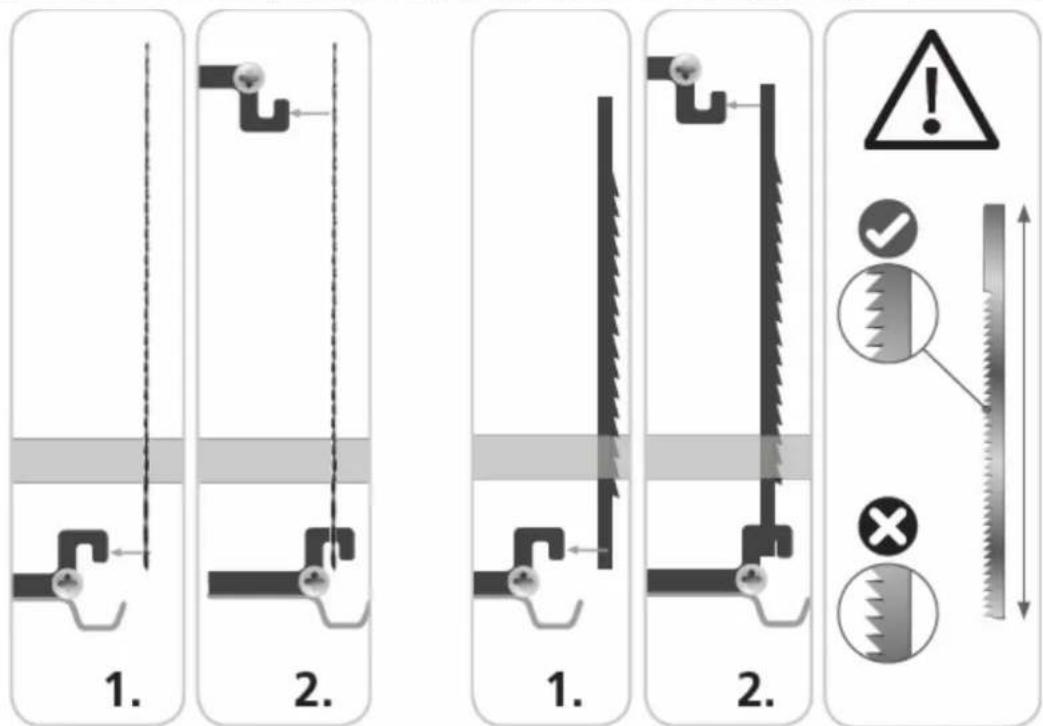
natural_image
Four-panel sequence showing hand tool application: adding a component, moving a device, adjusting a key, and adjusting a clip (no text or symbols visible)natural_image
Two views of a manual machine on a workbench, showing front and side views with no visible text or symbols.7 BETRIEB
natural_image
Close-up of a hand pressing a control panel with an 'O' button and a dial, no visible text or symbolsnatural_image
Four-panel mechanical assembly diagram showing progressive assembly steps with no visible text or symbolsArbeitslampe:
Ein: I
Aus: 0
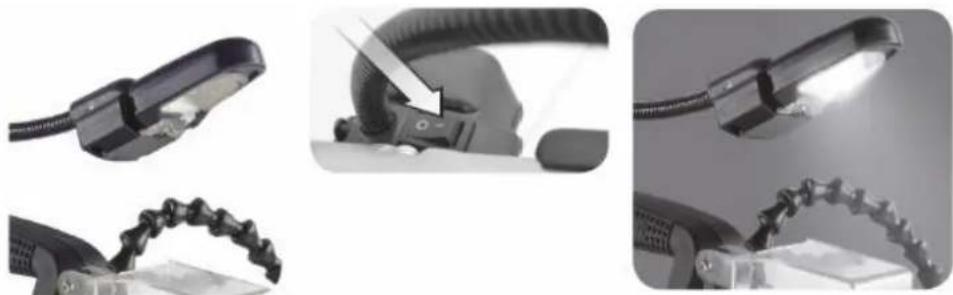
Absauganschluss:
natural_image
Close-up of a mechanical component with a cylindrical pipe fitting and mounting holes (no visible text or symbols)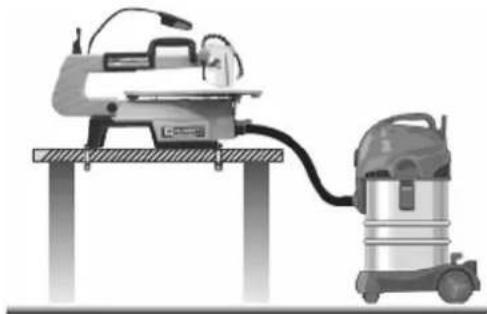
natural_image
Illustration of a manual machine on a workbench next to a vacuum cleaner (no text or symbols present)Staubgebläse:
natural_image
Close-up of a transparent glass container with a black handle, placed on a circular surface (no visible text or symbols)Sägebandschutz:
natural_image
Mechanical device with rotating arrow and mechanical components (no visible text or symbols)Innenschnitt:
natural_image
Two-panel image showing a hand holding a small object and a connected cylindrical device with an infinity symbol (no text or symbols visible)8.2 Reinigung

HINWEIS
This manual contains information and important instructions for the installation and correct use of the scroll saw DKS 21PRO.
Following the usual commercial name of the device (see cover) is substituted in this manual with the name "machine".
This manual is part of the product and shall not be stored separately from the product. Save it for later reference and if you let other people use the product, add this instruction manual to the product.

Please read and obey the security instructions!
Before first use read this manual carefully. It eases the correct use of the product and prevents misunderstanding and damages of product and the user's health.
Due to constant advancements in product design, construction pictures and content may diverse slightly. However, if you discover any errors, inform us please.
Technical specifications are subject to changes!
Please check the product contents immediately after receipt for any eventual transport damage or missing parts.
Claims from transport damage or missing parts must be placed immediately after initial product receipt and unpacking before putting the product into operation.
Please understand that later claims cannot be accepted anymore.
Copyright
© 2016
This document is protected by international copyright law. Any unauthorized duplication, translation or use of pictures, illustrations or text of this manual will be pursued by law. Court of jurisdiction is the Landesgericht Linz or the competent court for 4170 Haslach, Austria!
Customer service contact
| DKS 21PRO | |||
| 1 | Blade tension knob | 10 | Dust collector plug |
| 2 | Carry handle | 11 | Fixing hole |
| 3 | Light | 12 | Tool storage box |
| 4 | Saw blade guard | 13 | Table insert |
| 5 | Dust blower | 14 | Work table |
| 6 | Table extension | 15 | Downholder |
| 7 | Blade | 16 | Lubrication hole |
| 8 | ON-OFF-switch | 17 | Blade fixing |
| 9 | Table tilt fixing knob | 18 | Speed controller (infinitely variable) |
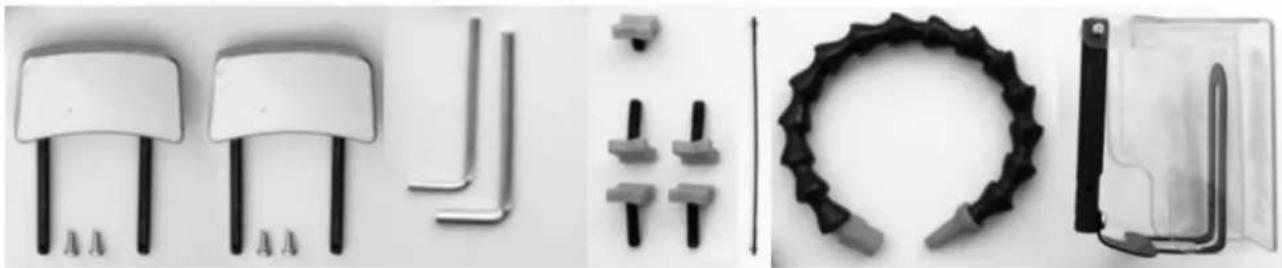
11.2 Delivery content
natural_image
Product catalog image showing various mechanical components including clips, fasteners, and a ring (no visible text or labels)11.3 Technical details
| DKS 21PRO | |
| Voltage | 230 V / 50 Hz |
| Motor power | 120 W |
| Stroke speed | 500 - 1700 min ^-1 |
| Stroke height | 21 mm |
| Blade length | 127 mm |
| Cutting height max. 90° / 45° | 57 / 27 mm |
| Throat | 406 mm |
| Table tilt range | 0° - 45° |
| Dust collector plug | ∅ 35mm |
| Weight | 12 kg |
| Machine dimension | 655 x 285 x 365 mm |
| Work table max. | 320 x 482 mm |
| Sound power level LWA | 79,9 dB(A) k = 3dB(A) |
| Sound pressure level LPA | 66,9 dB(A) k= 3dB(A) |
12 SAFETY
12.1 Intended Use
The machine must only be used for its intended purpose! Any other use is deemed to be a case of misuse.
To use the machine properly you must also observe and follow all safety regulations, the assembly instructions, operating and maintenance instructions lay down in this manual.
All people who use and service the machine have to be acquainted with this manual and must be informed about the machine's potential hazards.
It is also imperative to observe the accident prevention regulations in force in your area.
The same applies for the general rules of occupational health and safety.
The machine is used for:
Cutting edged wood or wood-like workpieces.
Any manipulation of the machine or its parts is a misuse, in this case HOLZMANN-MASCHINEN and its sales partners cannot be made liable for ANY direct or indirect damage.

WARNING
- Use only blades allowable for this machine!
- Never use a damaged blade!
HIGHEST RISK OF INJURY!
Ambient conditions
The machine may be operated:
humidity
max. 70%
temperature
+5°C to +40°C (+41°F to +104°F)
The machine shall not be operated outdoors or in wet or damp areas.
The machine shall not be operated in areas exposed to increased fire or explosion hazard.
Prohibited use
- The operation of the machine outside the stated technical limits described in this manual is forbidden.
• The operation of the machine without provided protective devices is prohibited.
• The use of the machine not according with the required dimensions is forbidden. - The use of the machine not being suitable for the use of the machine and not being certified is forbidden.
- Any manipulation of the machine and parts is forbidden.
- The use of the machine for any purposes other than described in this user-manual is forbidden.
• The unattended operation on the machine during the working process is forbidden! - It is not allowed to leave the immediate work area during the work is being performed.
- Round workpieces may only be cut with suitable holding devices.
12.2 Security instructions
Missing or non-readable security stickers have to be replaced immediately!
The locally applicable laws and regulations may specify the minimum age of the operator and limit the use of this machine!
To avoid malfunction, machine defects and injuries, read the following security instructions!


natural_image
Three blue circular icons representing professional and technical roles: helmet, robot arm, and circuit symbol (no text or labels)- Keep your work area dry and tidy! An untidy work area may cause accidents. Avoid slippery floor.
• Make sure the work area is lighted sufficiently!
• Work only in a well ventilated area! - Do not overload the machine!
- Keep hands and fingers away from the running blade!
- Always stay focused when working. Reduce distortion sources in your working environment. The operation of the machine when being tired, as well as under the influence of alcohol, drugs or concentration influencing medicaments is forbidden
- Wear suitable work clothes! Do not wear loose clothing or jewelry as they might be caught and cause severe accidents!
- Wear a hair net if you have long hair.
- Loose objects can become entangled and cause serious injuries!
- Only one person shall operate the machine
- The machine must be operated only by trained persons (knowledge and understanding of this manual), which have no limitations of motor skills compared with conventional workers.
- Do not allow other people, particularly children, to touch the machine or the cable. Keep them away from your work area!
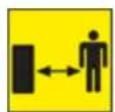
- Make sure there is nobody present in the dangerous area. The minimum safety distance is 2m
- Use personal safety equipment: ear protectors, safety goggles, work wear and dust mask when working with or on the machine!
- Never leave the machine running unattended! Before leaving the working area switch the machine off and wait until the machine stops.
- Always disconnect the machine prior to any actions performed at the machine.
- Avoid unintentional starting
- Do not use the machine with damaged switch
- The plug of an electrical tool must strictly correspond to the socket. Do not use any adapters together with earthed electric tools
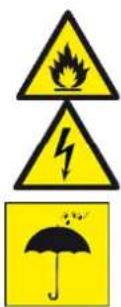
• Each time you work with an electrically operated machine, caution is advised! There is a risk of electric shock, fire, cutting injury; - Protect the machine from dampness (causing a short circuit)
- Use power tools and machines never in the vicinity of flammable liquids and gases (danger of explosion)
- Check the cable regularly for damage
- When working with the machine outdoors, use extension cables suitable for outdoor use
- Do not use the cable to carry the machine or to fix the work piece
- Protect the cable from heat, oil and sharp edges
- Avoid body contact with earthed components

- Before starting the machine remove any adjusting wrenches and screwdrivers
- Sharp edges can cause severe cut injuries
- Keep any machine that is not being used out of reach of children
12.3 Remaining risk factors

WARNING
It is important to ensure that each machine has remaining risks. In the execution of all work (even the simplest) greatest attention is required. A safe working depends on you!
Even if the machine is used as required it is still impossible to eliminate certain residual risk factors totally. The following hazards may arise in connection with the machine's construction and design:
- Risk of injury to the hands / fingers by the blade during operation.
- Risk of injury due to sharp edges of the workpiece, especially in non-fixed with a suitable tool / device workpiece.
- Risk of injury: hair and loose clothing, etc. can be captured and wound up! Safety regulations must be observed with regard to clothing.
- Risk of injury due to contacting with live electrical components.
• Risk of injury due to dust emissions, treated with harmful agents workpieces - Risk of injury to the eye by flying debris, even with safety goggles.
- Risk of injury to the hearing by prolonged labor without hearing protection.
Risk of injury due to kickback:
Kickback is a sudden reaction to a jamming, grinding or staggered blade. This causes the ejection of the workpiece to the direction of the operator.
These risk factors can be minimized through obeying all security and operation instructions, proper machine maintenance, proficient and appropriate operation by persons with technical knowledge and experience.
13 ASSEMBLY
Please check the product contents immediately after receipt for any eventual transport damage or missing parts. Claims from transport damage or missing parts must be placed immediately after initial machine receipt and unpacking before putting the machine into operation. Please understand that later claims cannot be accepted anymore.
13.1 Assembly
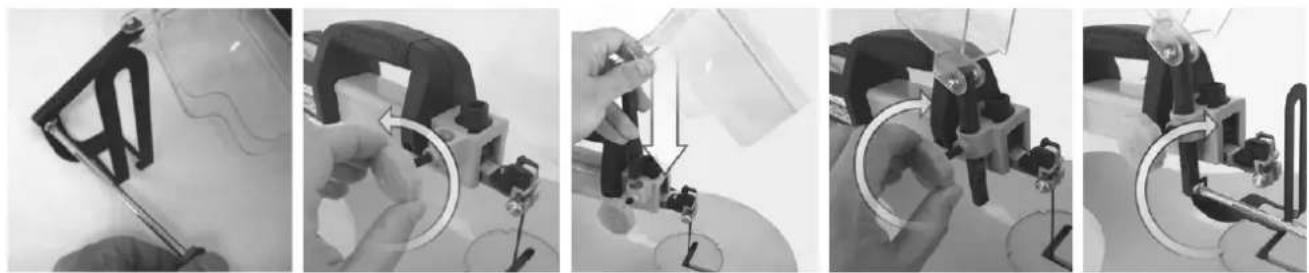
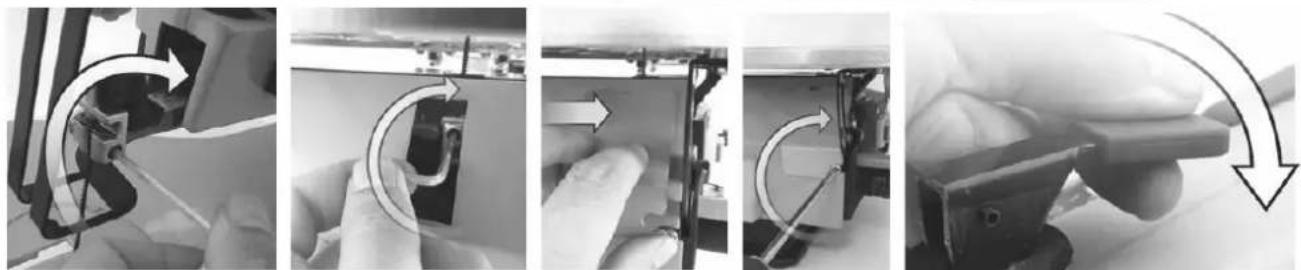
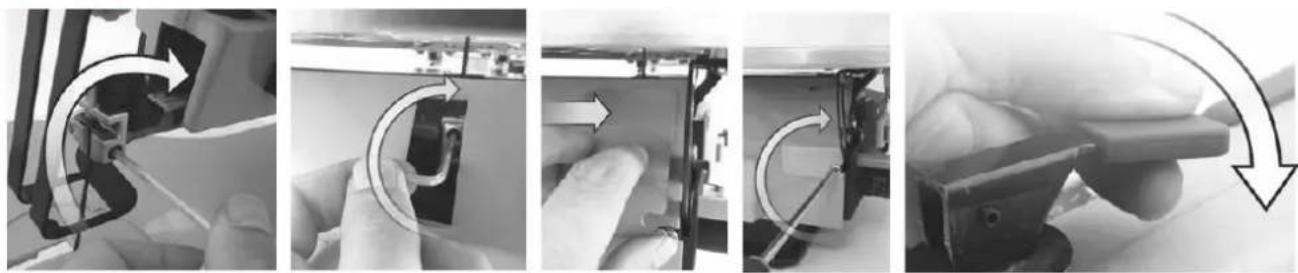
Saw blade guard and downholder:
Assemble the workpiece downholder to the clamp as shown in the images. This must be fixed first to the machine with the toggle screw
Fix the saw blade guard with the screw and nut.
natural_image
Sequence of five black-and-white images showing a robotic arm tool interacting with a mechanical component, no text or symbols visible.Table extensions:
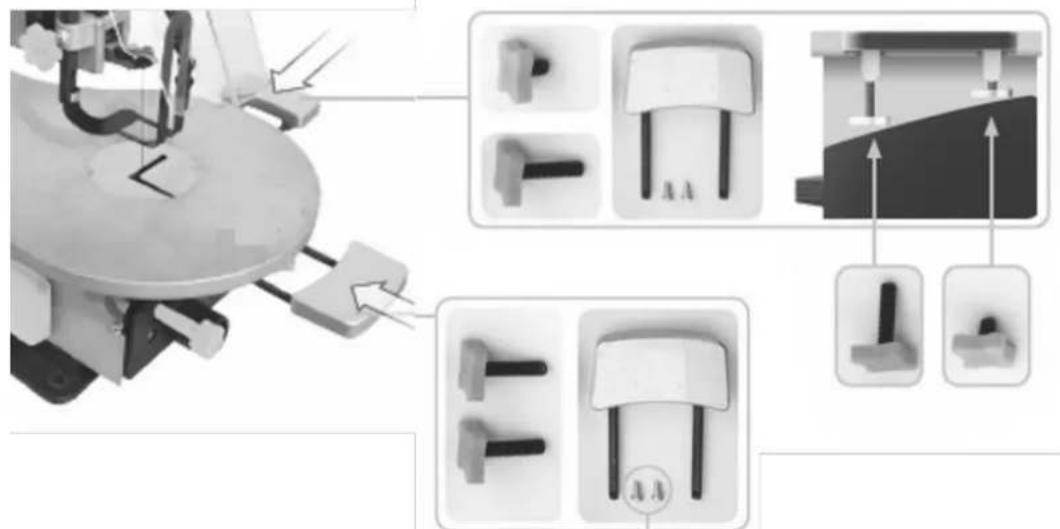
Fix the table extensions to the work table as shown in the images.
natural_image
Mechanical assembly diagram showing motor components and mounting features (no text or labels)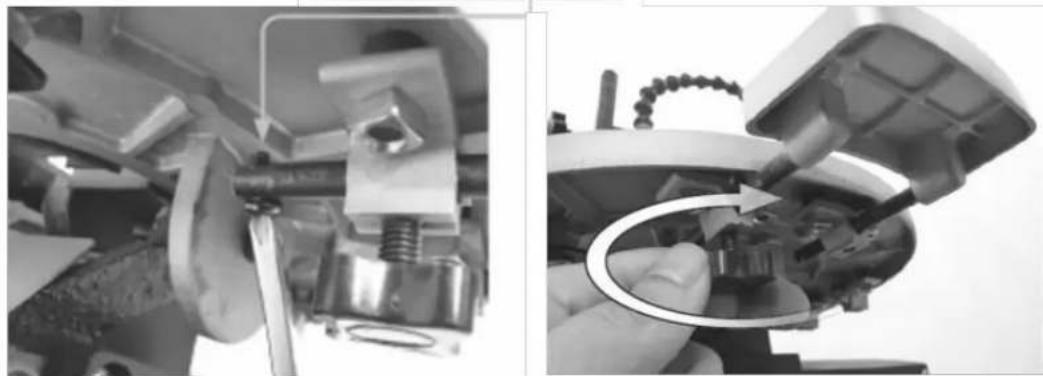
natural_image
Mechanical assembly diagram showing a clamping mechanism and a close-up of a mechanical component (no visible text or symbols)Dust blower:
Insert the hose of the dust blower to the plug as shown in the images.
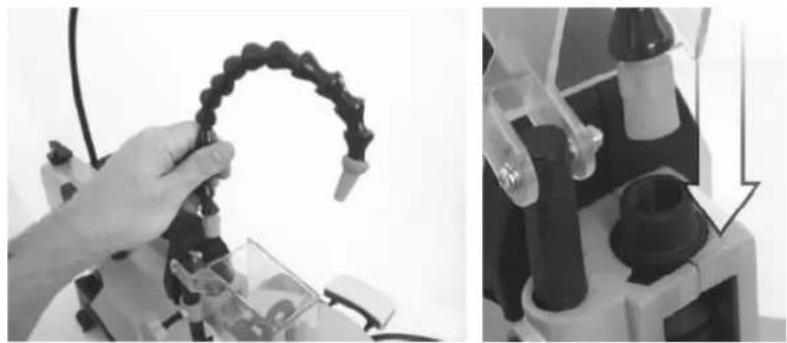
natural_image
Close-up of a hand holding a black bead-like object next to a microscope (no visible text or symbols)Saw blade without pin:
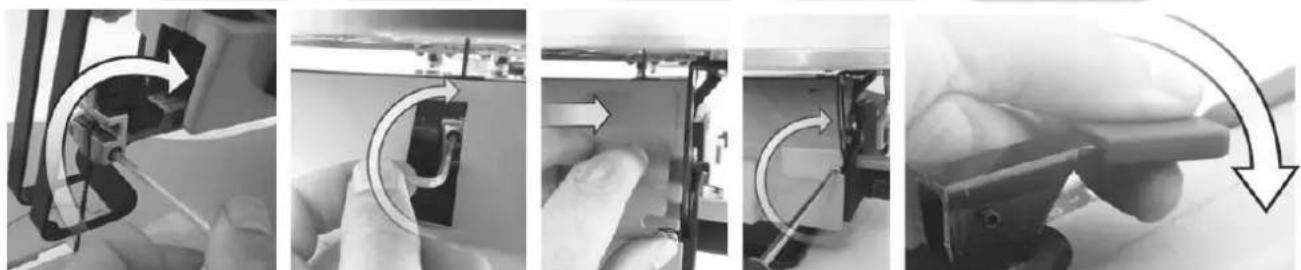
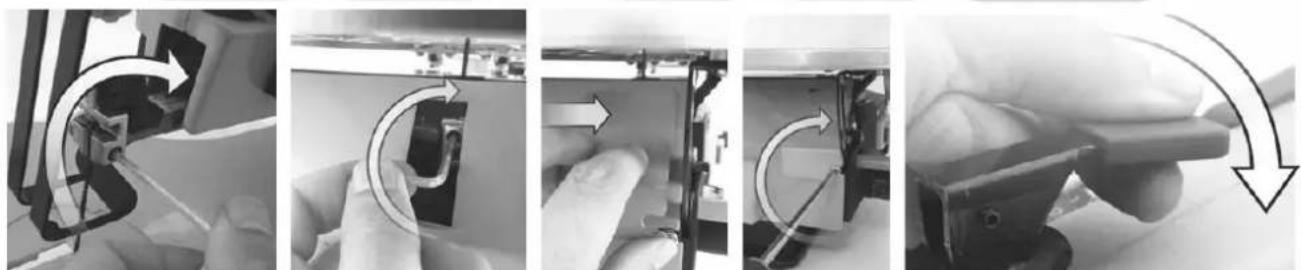
Remove the table insert upwards. Pull blade tension knob back upwards and release the tension by turning counterclockwise. Loosen the upper and lower blade fixing.
Insert blade. Tighten the upper and lower blade fixing. Tighten blade by turning the blade tension knop clockwise. Fold the blade tension knop. Replace table insert.
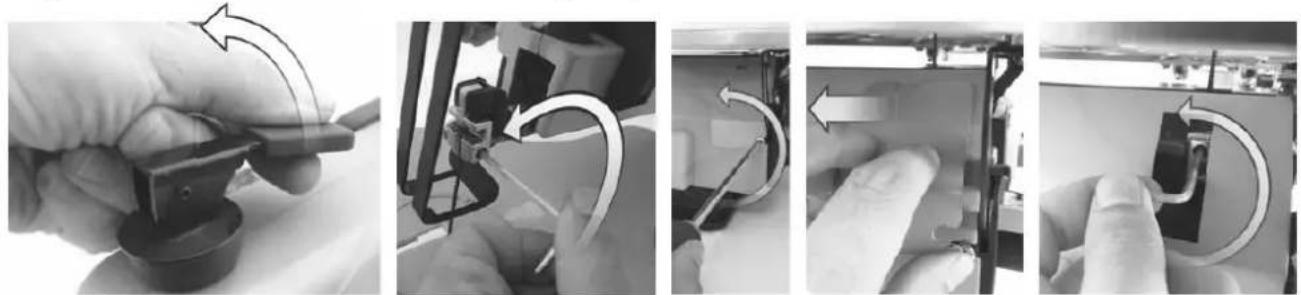
natural_image
Four-panel sequence showing a hand holding a small electronic component, with arrows indicating motion or rotation (no text or symbols)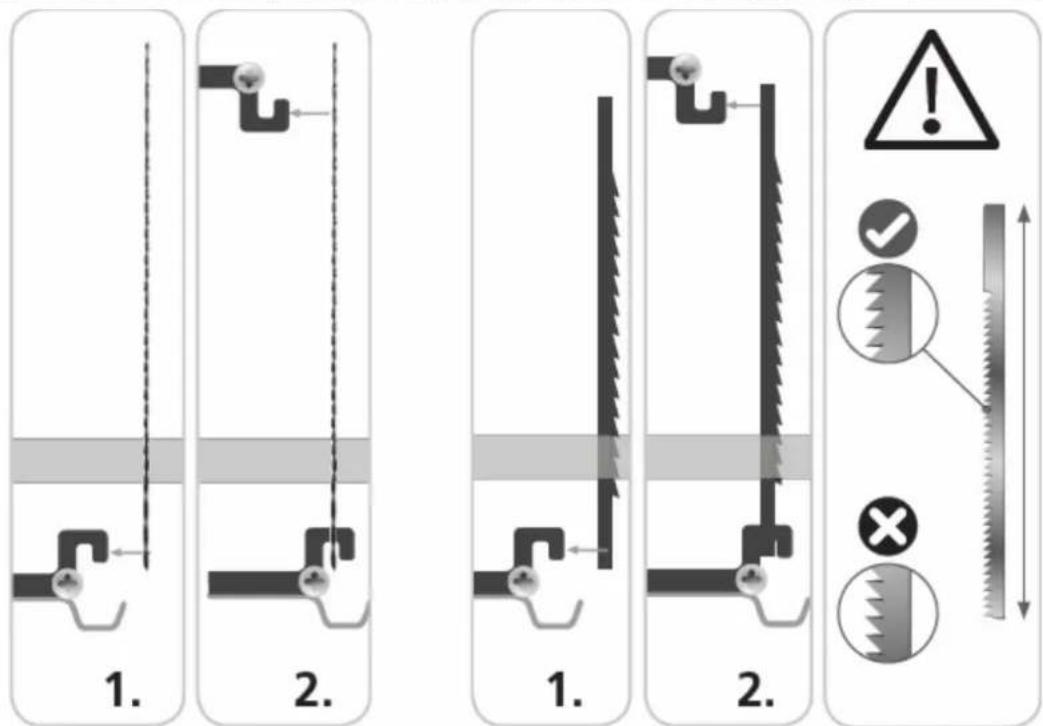
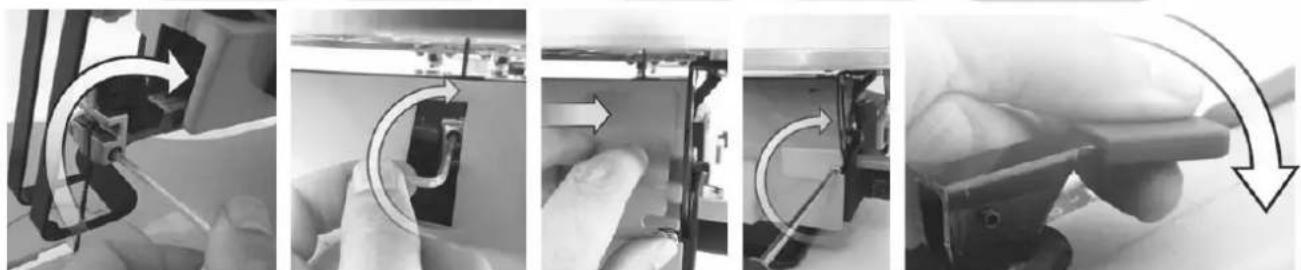
natural_image
Four-panel sequence showing hand tool application: adding a component, moving a device, adjusting a key, and adjusting a clip (no text or symbols visible)Saw blade with pin:
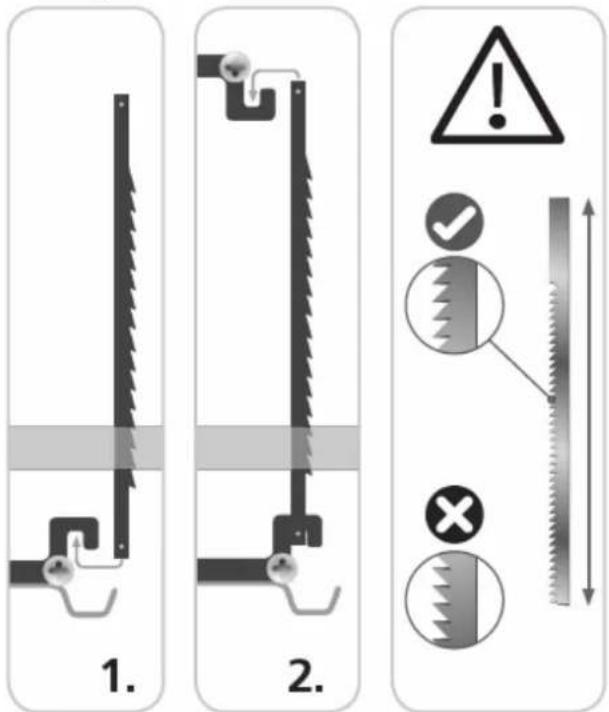
It is the same procedure as with saw blades without pins. Only the pin must be inserted exactly into the bracket of the blade fixing.
Mount on a workbench:
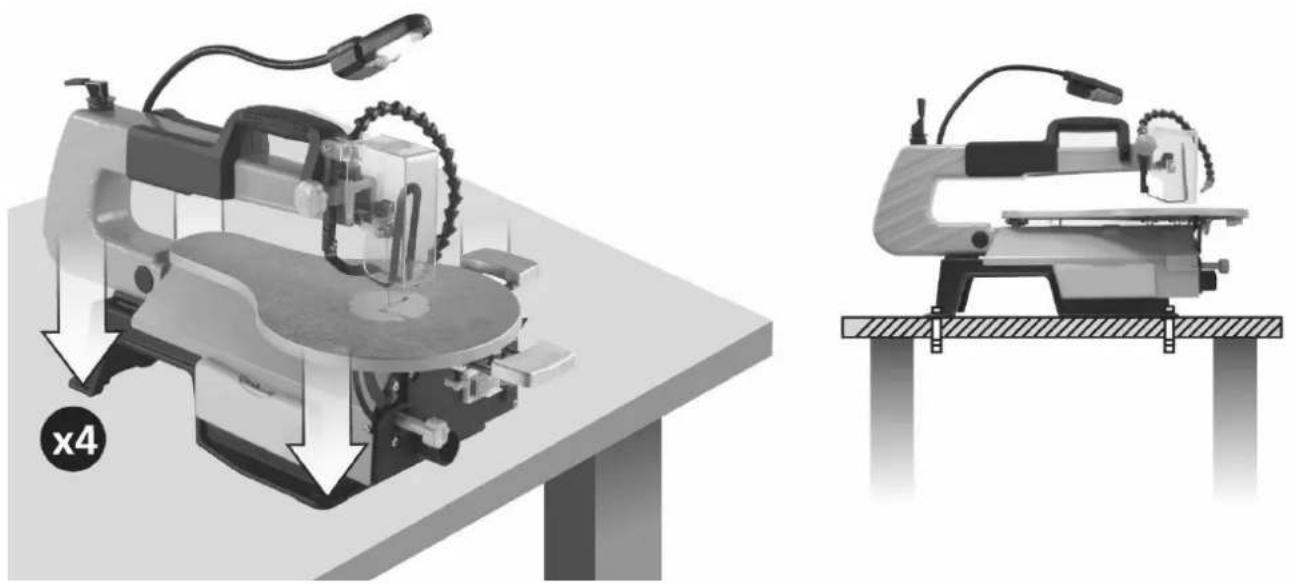
To reduce vibrations, it is recommended to assemble the machine with the four fixing holes on a massive workbench
natural_image
Two views of a manual machine on a workbench, showing front and side views with no visible text or symbols.14 OPERATION
Device to be operated in a perfect state only. Inspect the device visually every time it is to be used. Check in particular the safety equipment, electrical controls, electric cables and screwed connection for damage and if tightened properly. Replace any damaged parts before operating the device.
14.1 Operation instructions

WARNING
Perform all machine settings with the machine being disconnected from the power supply!

NOTICE
• Check the saw blade to tight fit and free run
- Do not cut small workpieces which can not safely hold by hand
- Do not start the machine when the workpiece is touching the saw blade
- Clamp the saw blade always so that the teeth point towards worktable
• The teeth cut the workpiece only during the downward stroke
• Guide the workpiece slowly into the blade.
- During cutting of thick workpieces is of particular note that the blade is not bent or twisted.
- Check the to be cut workpiece for foreign objects as nails and screws.
14.2 Operation
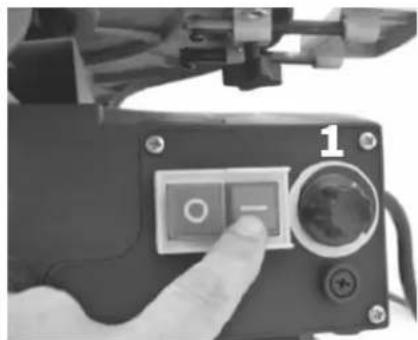
On/Off switch:
Push green button (I): On
Push red button (0): Off
natural_image
Close-up of a hand pressing a control panel with an 'O' button and a dial, no visible text or symbolsSpeed controller:
With the cutting speed controller (1), the stroke rate can be set according to the material to be cut.
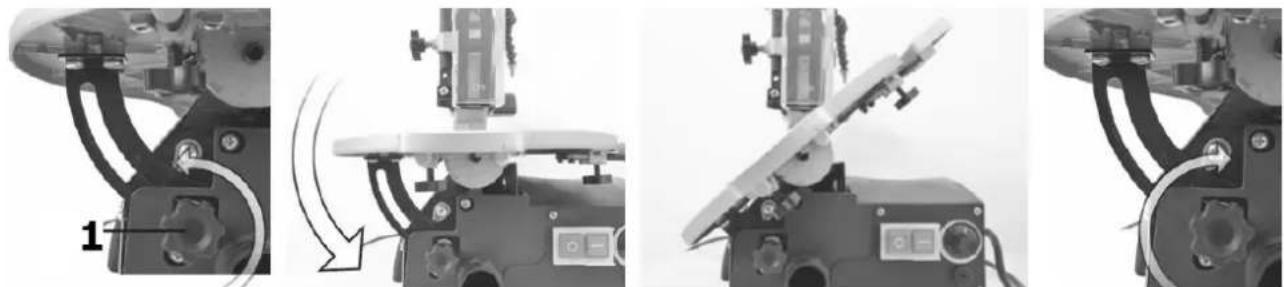
Setting worktable angle:
Loosen table tilt fixing knob (1). Set worktable to desired angle and retighten the table tilt fixing knob.
natural_image
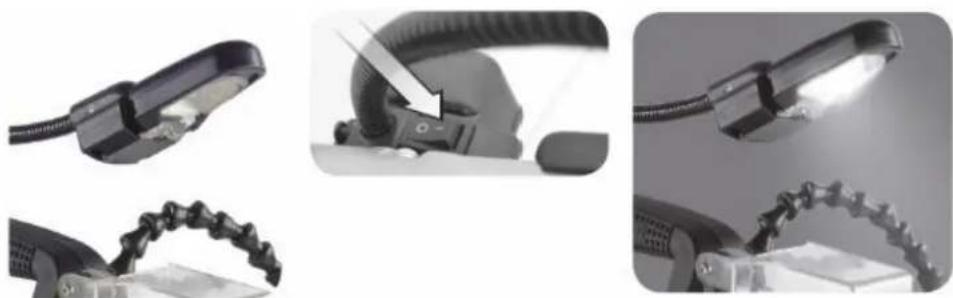
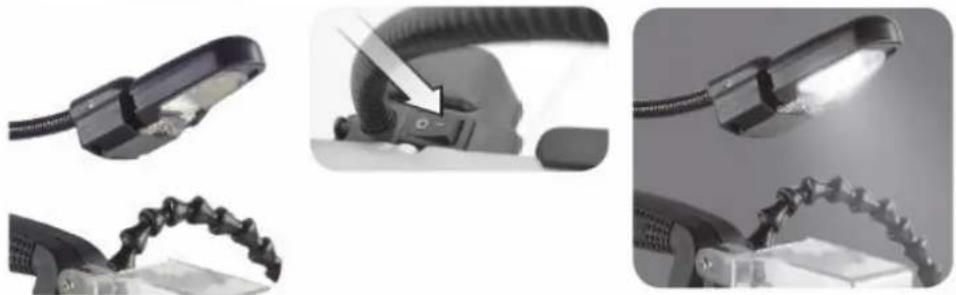
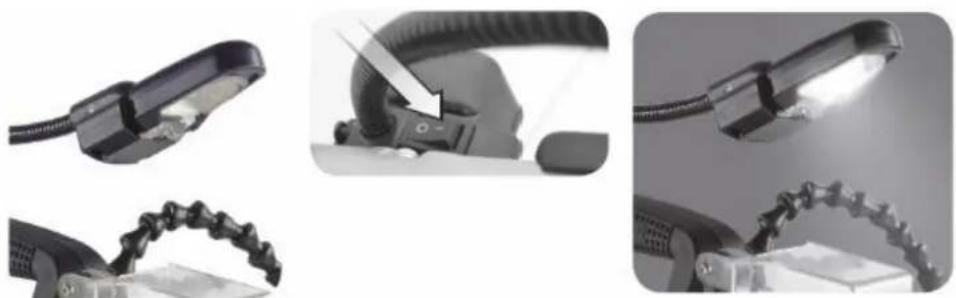
Four-panel mechanical assembly diagram showing progressive assembly steps with no visible text or symbolsWork lamp:
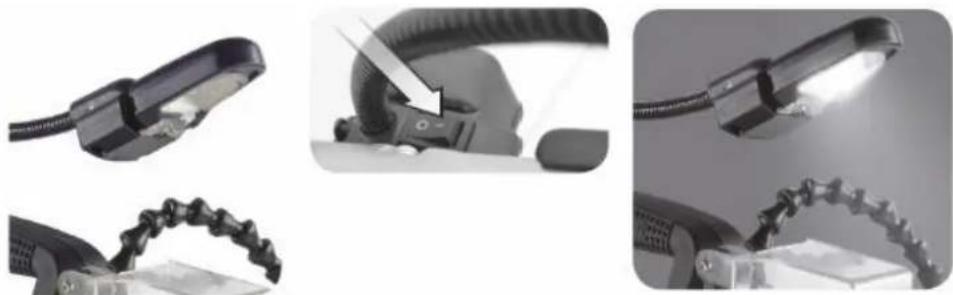
On: I
Off: 0
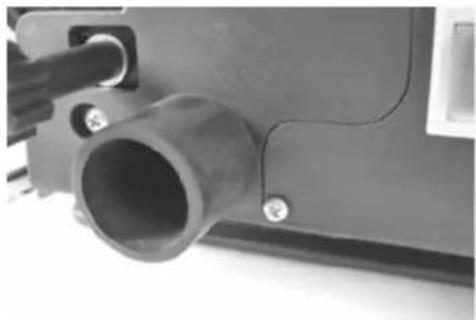
Dust collector plug:
Operate only with connected dust collector
natural_image
Close-up of a mechanical component with a cylindrical pipe fitting and mounting holes (no visible text or symbols)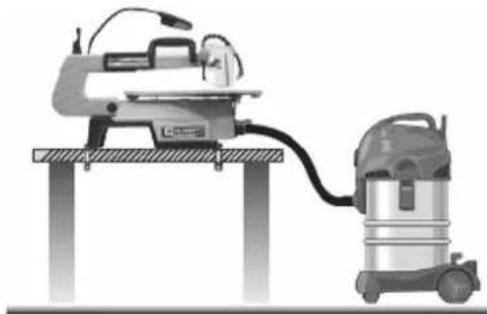
natural_image
Illustration of a manual machine on a workbench next to a vacuum cleaner (no text or symbols present)Dust blower:
Set the dust blower nozzle so, that the cutting line will always be free of dust and will be seen very well.
natural_image
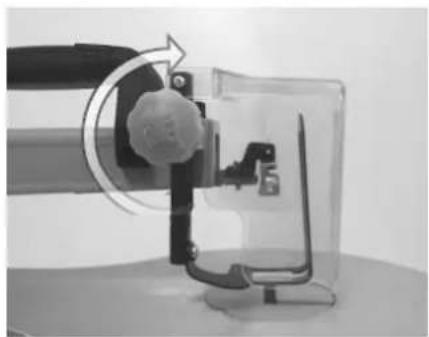
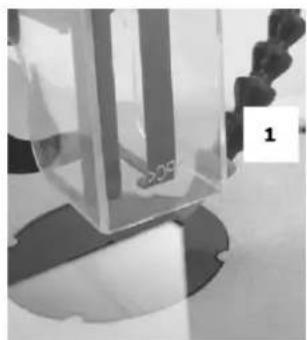
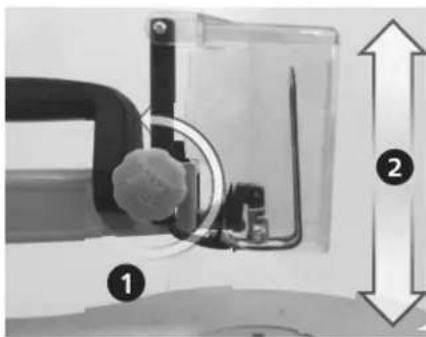
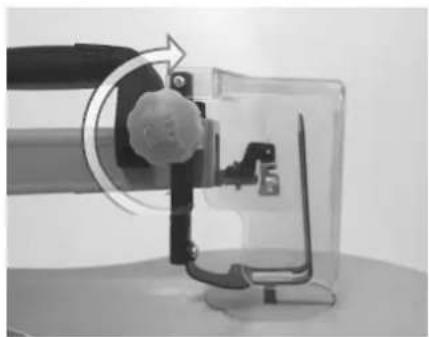
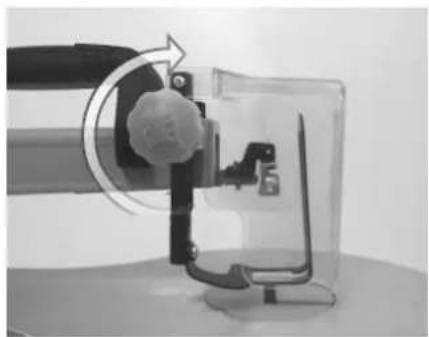
Close-up of a transparent glass container with a black handle, placed on a circular base (no visible text or symbols)Saw blade guard:
Set the saw blade guard as near as possible to the workpiece.
natural_image
Mechanical device with rotating arrow and mechanical components (no visible text or symbols)Inside cut:
This saw is suited also to inside cuts not starting at the edge of the work piece.
Proceed as follows:
- Drill a 6 mm hole in the workpiece
- Remove the saw blade.
- Place the bore hole over the saw blade slot in the worktable.
• Install the saw blade through the hole in the work piece and through the work blade slot, and fasten the blade to the holders.
- When you have completed the inside cut, remove the saw blade and then remove the workpiece from the work table.
1 PREFACIO
15 MAINTENANCE
ATTENTION
Perform all maintenance machine settings with the machine being disconnected from the power supply!
Serious injury due to unintentional or automatic activation of the machine!
The machine does not require extensive maintenance. If malfunctions and defects occur, let it be serviced by trained persons only.
Clean your machine regularly after every usage – it prolongs the machines lifespan and is a pre-requisite for a safe working environment.
Repair jobs shall be performed by respectively trained professionals only!
Check regularly the condition of the security stickers. Replace them if required.
Check regularly the condition of the machine.
Store the machine in a closed, dry location.
15.1 Maintenance plan
After each workshift:
- remove wood chips and dust from the device
After 20 hours of operation:
- Lubricate bearing and shaft
Open the lubrication hole and lubricate the bearing and the shaft
15.2 Cleaning
The usage of certain solutions containing ingredients damaging metal surfaces as well as the use of scrubbing agents will damage the machine surface!
Clean the machine surface with a wet cloth soaked in a mild solution
15.3 Disposal
Do not dispose the machine in residual waste. Contact your local authorities for information regarding the available disposal options. When you buy at your local dealer for a replacement unit, the latter is obliged to exchange your old.
16 TROUBLE SHOOTING
BEFORE YOU START WORKING FOR THE ELIMINATION OF DEFECTS, DISCONNECT THE MACHINE FROM THE POWER SUPPLY.
| Trouble | Possible cause | Solution |
| Motor does not run | Switch defective | Repair switch |
| Power supply is off | Repair power supply | |
| Fuse is defective | Change fuse | |
| Electric contactor is defective | Repair or change electric contactor | |
| Main cable defeditive | Change main cable | |
| Saw blades break | Tension incorrectly set | Set correct tension |
| To much pressure | Feed the workpiece more slowly | |
| Workpiece feeding | Avoid exerting pressure from the side | |
| Vibrations | Machine incorrect mounted | Mount machine correct |
| Motor is loosen | Tighten the motor screws | |
| Working table is loosen | Tighten the fixing screw |
MANY POTENTIAL SOURCES OF ERROR CAN BE CLEARED BY THE EXPERTLY CONNECTION TO THE ELECTRICITY GRID.

NOTICE
Should you in necessary repairs not able to properly to perform or you have not the prescribed training for it always attract a workshop to fix the problem.
17 PREFACIO (ES)
Estimado Cliente,
natural_image
Collection of mechanical components and parts, including clamps, bolts, and a ring (no visible text or symbols)18.3 Datos técnicos
natural_image
Close-up of a hand holding a black bead-like device next to a microscope (no visible text or symbols)Hoja de sierra sin pinza:
natural_image
Four-panel sequence showing a hand holding a small mechanical component, with arrows indicating motion or rotation (no text or symbols)
natural_image
Four-panel sequence showing hand operating a device with arrows indicating rotation or adjustment (no text or symbols)natural_image
Two views of a machine tool on a workbench, showing front and side views with no visible text or symbols.21 FUNCIONAMIENTO
natural_image
Close-up of a hand pressing a control panel with a dial and handle (no visible text or symbols)natural_image
Mechanical assembly diagram showing four sequential steps of a robotic arm tool (no text or symbols visible)Luz de trabajo:
On: I
Off: 0
natural_image
Three-panel image showing a lighting fixture with clips and a chain strap, no visible text or symbols.Toma de aspiración:
natural_image
Two technical diagrams: one showing a pipe fitting with a valve, the other showing a vacuum cleaner on a workbench (no text or symbols visible)Soplador:
natural_image
Close-up of a transparent container with small beads and a curved surface, possibly a mechanical or laboratory setup (no visible text or symbols)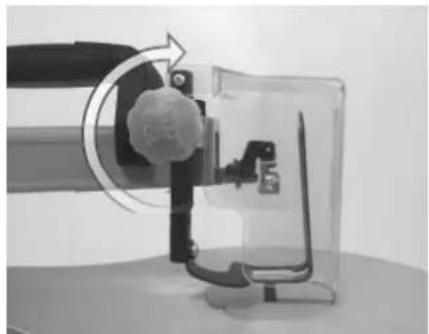
natural_image
Mechanical device with rotating arrow and internal components (no visible text or symbols)Corte interior:
natural_image
Close-up of a hand holding a small electronic component connected to a battery (no visible text or symbols)22.2 Limpieza

NOTA
natural_image
Product catalog image showing various mechanical components including clips, fasteners, and a ring (no visible text or labels)natural_image
Sequence of five black-and-white images showing a robotic arm and mechanical assembly, no text or symbols present.Rallonges de table:
Souffleuse:
natural_image
Two-panel image showing a hand holding a black bead-like object and a close-up of a mechanical device with tubes and components (no visible text or symbols)Lame de scie sans goupille:
natural_image
Four-panel sequence showing a hand holding a small mechanical component, with arrows indicating motion or rotation (no text or symbols)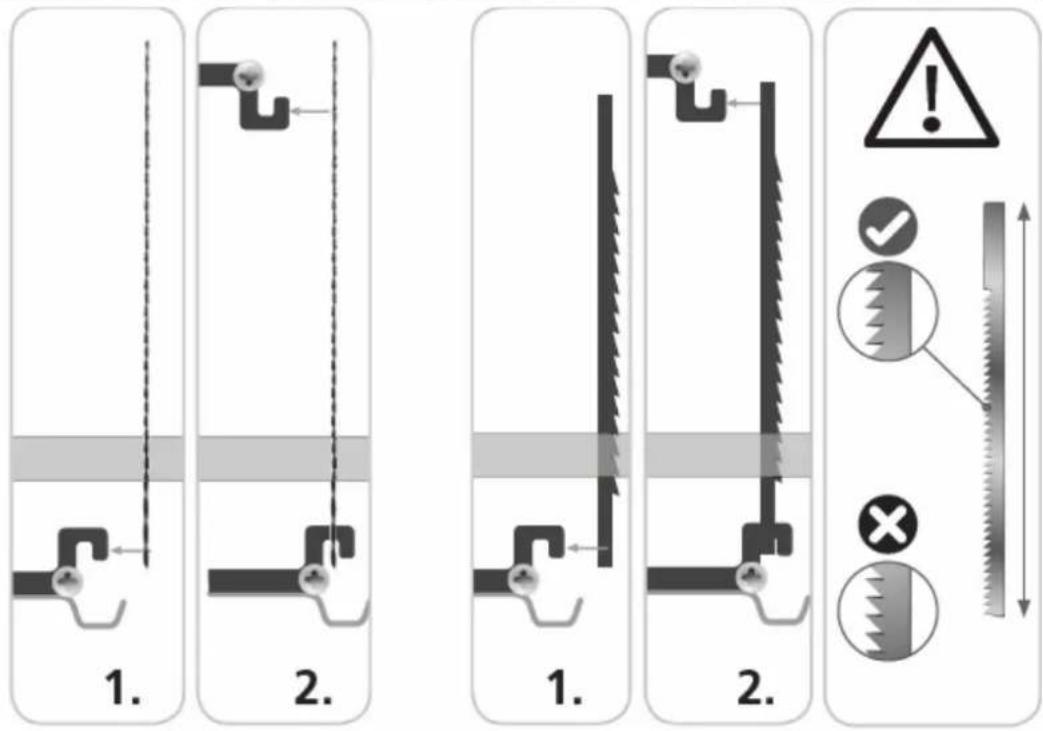
natural_image
Four-panel sequence showing hand operating a device with curved arrows indicating rotation or adjustment (no text or symbols)natural_image
Technical illustration of a machine with two views: one showing a cutting machine and the other showing a workbench (no text or symbols present)28 FONCTIONNEMENT
natural_image
Close-up of a hand pressing a control panel with an 'O' button (no text or symbols visible)natural_image
Mechanical assembly steps showing a robotic arm with tool positioning and motion arrows (no text or symbols)Lampe de travail:
ON: I
Off: 0
Buse d'aspiration:
natural_image
Close-up of a mechanical component with a cylindrical pipe fitting and mounting holes (no visible text or symbols)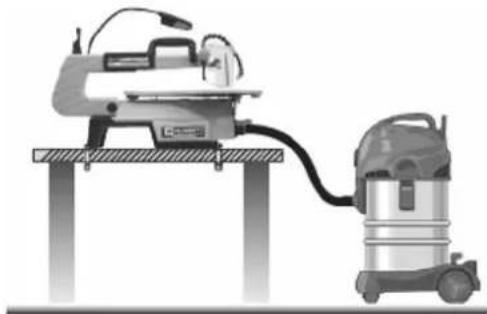
natural_image
Illustration of a manual machine on a workbench next to a vacuum cleaner (no text or symbols present)Souffleuse:
natural_image
Close-up of a transparent glass container with a black handle, placed on a circular base (no visible text or symbols)Protection de lame de scie:
natural_image
Mechanical device with rotating arrow and mechanical components (no visible text or symbols)Coupe intérieure:
natural_image
Three-panel image showing a hand holding a small object, with a battery and a wire being inserted (no visible text or symbols)29.2 Nettoyage

REMARQUE
natural_image
Product catalog image showing various mechanical components including clips, bolts, and a ring (no visible text or labels)32.3 Dati tecnici
natural_image
Sequence of five black-and-white images showing a robotic arm tool interacting with a mechanical component, no text or symbols visible.Prolunghe da banco:
natural_image
Two-panel image showing a hand holding a black bead-like device and a microscope with test tubes (no visible text or symbols)Lama senza perno:
natural_image
Four-panel sequence showing a hand holding a small electronic component, with arrows indicating motion or rotation (no text or symbols)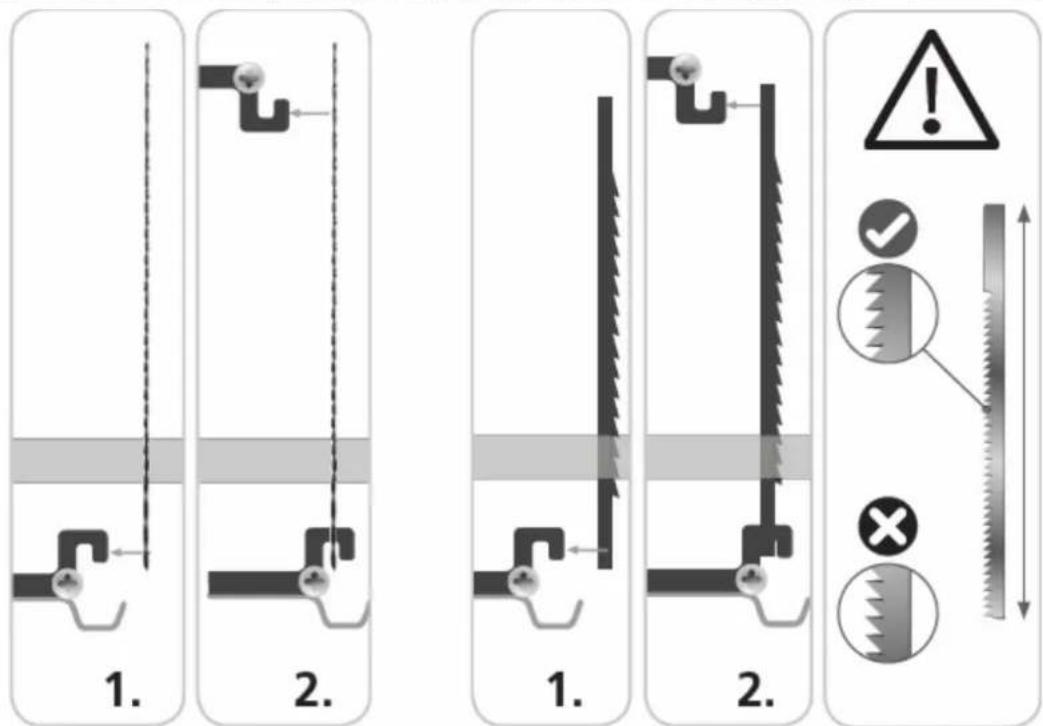
natural_image
Four-panel sequence showing hand tool application: adding a component, moving a device, adjusting a key, and adjusting a clip (no text or symbols visible)Lama con perno:
natural_image
Two views of a manual machine on a workbench, showing front and side views with no visible text or symbols.35 USO
natural_image
Close-up of a hand pressing a control panel with an 'O' button and a dial, no visible text or symbolsnatural_image
Four-panel mechanical assembly diagram showing progressive assembly steps with no visible text or symbolsLampada da lavoro:
On: I
Off: 0
natural_image
Close-up of a mechanical component with a cylindrical pipe fitting and mounting holes (no visible text or symbols)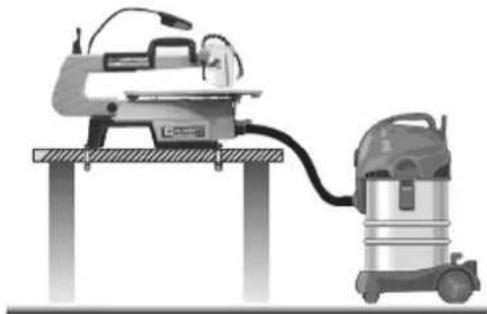
natural_image
Illustration of a manual machine on a workbench next to a vacuum cleaner (no text or symbols present)natural_image
Close-up of a transparent glass container with a black handle, placed on a circular base (no visible text or symbols)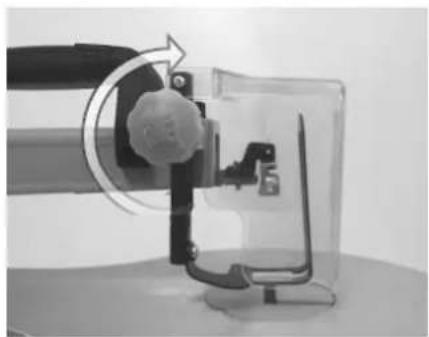
natural_image
Mechanical device with rotating arrow and mechanical components (no visible text or symbols)Taglio interno:
natural_image
Three-panel image showing a mechanical component being handled, with a close-up of the tool interacting with a battery (no visible text or symbols)36.2 Pulizia

NOTA
(EN) With Holzmann spare parts, you use spare parts that are ideally matched to your machine.
The optimum fitting accuracy of the parts shortens the installation time and extends the service life of the machine.
NOTICE

The installation of parts other than original spare parts leads to the loss of the guarantee! Therefore: When replacing components/parts, only use spare parts recommended by the manufacturer.
When you place a spare parts order please use the service formula you can find in the last chapter of this manual. Always take a note of the machine type, spare parts number and part name. We recommend to copy the spare parts diagram and mark the spare part you need.
Or use the electronic ordering opportunity via the spare parts catalogue or spare parts request form on our homepage
You find the order address in the preface of this operation manual.
39
EU-KONFORMITÄTSERKLÄRUNG/CE-CERTIFICATE OF CONFORMITY / / DECLARACIÓN DE CONFORMIDAD CE / DÉCLARATION DE CONFORMITÉ UE / DICHIARAZIONE DI CONFORMITÀ CE
CE
Inverkehrbringer / Distributor
For mechanical and electrical components Company Holzmann Maschinen GmbH garants a warranty period of 2 years for DIY use and a warranty period of 1 year for professional/industrial use - starting with the purchase of the final consumer (invoice date).
In case of defects during this period which are not excluded by paragraph 3, Holzmann will repair or replace the machine at its own discretion.
2.) Report:
In order to check the legitimacy of warranty claims, the final consumer must contact his dealer. The dealer has to report in written form the occurred defect to Holzmann. If the warranty claim is legitimate, Holzmann will pick up the defective machine from the dealer. Returned shippings by dealers which have not been coordinated with Holzmann will not be accepted. A RMA number is an absolute must-have for us - we won't accept returned goods without an RMA number!
3.) Regulations:
a) Warranty claims will only be accepted when a copy of the original invoice or cash voucher from the trading partner of Holzmann is enclosed to the machine. The warranty claim expires if the accessories belonging to the machine are missing.
b) The warranty does not include free checking, maintenance, inspection or service works on the machine. Defects due to incorrect usage through the final consumer or his dealer will not be accepted as warranty claims either.
c) Excluded are defects on wearing parts such as carbon brushes, fangers, knives, rollers, cutting plates, cutting devices, guides, couplings, seals, impellers, blades, hydraulic oils, oil filters, sliding jaws, switches, belts, etc.
d) Also excluded are damages on the machine caused by incorrect or inappropriate usage, if it was used for a purpose which the machine is not supposed to, ignoring the user manual, force majeure, repairs or technical manipulations by not authorized workshops or by the customer himself, usage of non-original Holzmann spare parts or accessories.
e) After inspection by our qualified staff, resulted costs (like freight charges) and expenses for not legitimated warranty claims will be charged to the final customer or dealer.
f) In case of defective machines outside the warranty period, we will only repair after advance payment or dealer's invoice according to the cost estimate (incl. freight costs) of Holzmann.
g) Warranty claims can only be granted for customers of an authorized Holzmann dealer who directly purchased the machine from Holzmann. These claims are not transferable in case of multiple sales of the machine.
4.) Claims for compensation and other liabilities:
The liability of company Holzmann is limited to the value of goods in all cases.
Claims for compensation because of poor performance, lacks, damages or
loss of earnings due to defects during the warranty period will not be accepted.
Holzmann insists on its right to subsequent improvement of the machine.
SERVICE
After Guarantee and warranty expiration specialist repair shops can perform maintenance and repair jobs. But we are still at your service as well with spare parts and/or product service. Place your spare part / repair service cost inquiry by filing the SERVICE form on the following page and send it:
via Mail to info@holzmann-maschinen.at
or use the online complaint.- or spare parts order formula provided on our homepage www.holzmann-maschinen.at under the category service/news.
We monitor the quality of our delivered products in the frame of a Quality Management policy.
Your opinion is essential for further product development and product choice. Please let us know about your:
- Impressions and suggestions for improvement.
- experiences that may be useful for other users and for product design
- Experiences with malfunctions that occur in specific operation modes
We would like to ask you to note down your experiences and observations and send them to us via FAX, E-Mail or by post:

- INHALT / INDEX / INDICE
- VORWORT (DE) 6
- ASSEMBLY 23
- OPERATION 26
- MAINTENANCE 28
- TROUBLE SHOOTING 29
- PREFACIO (ES) 30
- CARACTERÍSTICAS TÉCNICAS 31
- Staubgebläse:
- BETRIEB
- Arbeitslampe:
- Absauganschluss:
- Sägebandschutz:
- Innenschnitt:
- Reinigung
- HINWEIS
- Please read and obey the security instructions!
- Copyright
- Customer service contact
- Technical details
- SAFETY
- Intended Use
- WARNING
- Ambient conditions
- Prohibited use
- Security instructions
- Missing or non-readable security stickers have to be replaced immediately!
- The locally applicable laws and regulations may specify the minimum age of the operator and limit the use of this machine!
- Remaining risk factors
- ASSEMBLY
- Assembly
- Saw blade guard and downholder:
- Table extensions:
- Dust blower:
- Saw blade without pin:
- Saw blade with pin:
- Mount on a workbench:
- OPERATION
- Operation instructions
- NOTICE
- Operation
- On/Off switch:
- Speed controller:
- Setting worktable angle:
- Work lamp:
- Dust collector plug:
- Saw blade guard:
- Inside cut:
- PREFACIO
- MAINTENANCE
- ATTENTION
- Maintenance plan
- After each workshift:
- After 20 hours of operation:
- Cleaning
- Disposal
- TROUBLE SHOOTING
- PREFACIO (ES)
- Estimado Cliente,
- Datos técnicos
- Hoja de sierra sin pinza:
- FUNCIONAMIENTO
- Luz de trabajo:
- Toma de aspiración:
- Soplador:
- Corte interior:
- Limpieza
- NOTA
- Rallonges de table:
- Souffleuse:
- Lame de scie sans goupille:
- FONCTIONNEMENT
- Lampe de travail:
- Buse d'aspiration:
- Protection de lame de scie:
- Coupe intérieure:
- Nettoyage
- REMARQUE
- Dati tecnici
- Prolunghe da banco:
- Lama senza perno:
- Lama con perno:
- USO
- Lampada da lavoro:
- Taglio interno:
- Pulizia
- 39
- EU-KONFORMITÄTSERKLÄRUNG/CE-CERTIFICATE OF CONFORMITY / / DECLARACIÓN DE CONFORMIDAD CE / DÉCLARATION DE CONFORMITÉ UE / DICHIARAZIONE DI CONFORMITÀ CE
- 2.) Report:
- 3.) Regulations:
- 4.) Claims for compensation and other liabilities:
- SERVICE
Brand : Holzmann
Model : DKS2 1PRO
Category : Saw