
WT 230 - Dehumidifier Aerial - Free user manual and instructions
Find the device manual for free WT 230 Aerial in PDF.

| Product Type | Air dehumidifier (ambient air clothes dryer) |
| Brand | Aerial |
| Model | WT 230 |
| Dimensions (H x W x D) | 810 x 639 x 345 mm |
| Weight | 40 kg |
| Power supply | 230 V / 50 Hz |
| Maximum current consumption | 569 W |
| Protection rating | IP 22 |
| Air flow rate | 750 m³/h |
| Refrigerant | R407c (0.35 kg) |
| Sound level | 61 dB(A) |
| Operating temperature range | +3°C to +32°C |
| Operating relative humidity range | 40% to 95% RH |
| Main functions | Room dehumidification, clothes drying (ready to store, ready to iron, extra-dry programs), automatic defrost |
| Operating modes | Continuous dehumidification (ES), timed drying |
| Condensate drainage | Drain hose connection (15 x 2 mm), direct drainage |
| Installation | Wall mounting with supplied rail |
| Maintenance and cleaning | Regular cleaning of air filter, visual inspection of drain hose, exterior cleaning with damp cloth |
| Safety | Integrated safety devices, instructions: do not use in explosive, aggressive or dusty atmospheres |
| Spare parts and repairability | Use only genuine parts (air filter, power cord). Repairs by manufacturer or authorized personnel. |
| Warranty | 2 years |
| General information | Compliant with EU directives 2006/42/EC, 2014/35/EU, 2014/30/EU. User manual available in multiple languages. |
Frequently Asked Questions - WT 230 Aerial
User questions about WT 230 Aerial
0 question about this device. Answer the ones you know or ask your own.
Ask a new question about this device
Download the instructions for your Dehumidifier in PDF format for free! Find your manual WT 230 - Aerial and take your electronic device back in hand. On this page are published all the documents necessary for the use of your device. WT 230 by Aerial.
USER MANUAL WT 230 Aerial
natural_image
Front view of a dual-chamber air conditioning unit (no visible text or symbols on the device body)WT 230
WT 240
WT 250
WT 280
EN Instructions for use 29
natural_image
Technical drawing of a rectangular device with three vertical slots and dimension annotations (309, 345) — no readable text or symbols beyond measurement labels.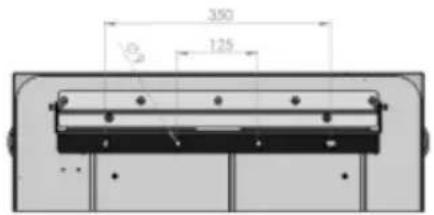
N = Blau = Nullleiter
PE = Grün-gelb =
Schutzleiter
L1 = Braun = Phase
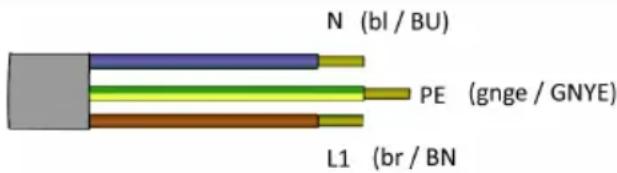
Abb. 4: Anschließen
Abb. 5: Bedientableau
natural_image
Simple line drawing of a trash bin with no text or symbolsThis instruction manual shall not be reproduced, copied and distributed, neither in parts nor completely, without the manufacturer's written permit.
All rights reserved.
The instruction manual is based on the technical and product-specific parameters. The manufacturer reserves the right to add supplementary information to the instruction manual.
Using a device outside the specified conditions and contrary to its designated use will lead to the forfeiture of all warranty claims.
As of: 10_2020
1 Notes on this instruction manual 31
Target groups 31
Conventions 31
Designated use 32
2 Safety 32
Safety devices 32
Hazards from accessories 32
Authorized operator 33
User 33
Safety instructions 33
3 Model 34
4 Construction 34
5 Transport and installation 35
Transport 35
Package contents 36
Operating conditions 36
Erection and installation 37
Select place of installation 37
Wall mounting 38
Model with mains plug: Connection 39
Model without mains plug: Connection by electrical professional 40
Installation of condensate drain hose 41
6 Operation and operator control 41
Operating elements 42
Operating modes 42
Commissioning 43
Operation 44
7 Maintenance and care 46
Maintenance work 46
8 Troubleshooting 47
Error messages 48
Faults 49
9 Decommissioning, storage and disposal 50
Decommissioning 50
Storage 50
Disposal 50
10 Specifications 51
11 EC Declaration of Conformity 52
1 Notes on this instruction manual
This instruction manual is part of the product. It contains all important information on how to transport, install, operate, store and dispose of the device from AERIAL properly and safely. Keep this instruction manual in a safe place.
Target groups
This instruction manual addresses the users and operators of the devices manufactured by AERIAL. They must have read and understood the instruction manual. The physical and psychological preconditions for proper and safety-conscious handling of the devices must always be guaranteed.
The “Connection by electrical professionals” chapter is intended only for trained electrical professionals (e.g. electricians).
Conventions
Warnings
In this instruction manual you will find information intended to warn you of possible hazards at the beginning of a specific action.

Type and source of hazard
This symbol in connection with the signal word "DANGER" refers to a life-threatening situation. Failure to observe this warning will result in serious, fatal injury.
This arrow marks precise steps to avert danger which must always be performed.

Type and source of hazard
This symbol in connection with the signal word "WARNING" refers to a dangerous situation. Failure to observe this warning can result in life-threatening injury and death.
This arrow marks precise steps to avert danger which must be performed.
Type and source of hazard
This symbol in connection with the word "CAUTION" warns of minor or moderate injury and potential material damage.
- Measures to prevent personal injury or material damage are described here.

In this box you find tips and information concerning the use of the device.
Designated use
The indoor air laundry dryers WT 230/240/250/280 are intended for air dehumidification and laundry drying in closed rooms.
The indoor air laundry dryers are designed exclusively for use at atmospheric pressure. Operating the dehumidifiers within the limits of designated use also involves observing the specified operating conditions (refer to page 36). Any use of the device going beyond the designated use specified above is considered contrary to its designated use.
Misuse is concerned if the WT indoor air laundry dryer is used for purposes not included in designated use. In these cases the manufacturer does not assume any liability for personal and material damage.
2 Safety
Safety devices
The WT series indoor air laundry dryers were subjected to thorough safety testing. Improper operation or misuse will cause danger to
■ the operator,
■ the machine and other material property of the user,
■ efficient operation of the machine.
All persons involved in the installation, commissioning, operation, maintenance and servicing of the devices must
■ be properly qualified,
■ closely observe the instructions set out in this manual.
Hazards from accessories
Waste water hoses, power cables and air filters must be properly installed and must not disable the protection devices of the indoor air laundry dryers. The operating elements must always be accessible.
Authorized operator
Indoor air laundry dryers may only be operated by persons commissioned and instructed by the user. In the working area the operator is responsible to third parties. For all activities on the device the responsibilities must be clearly defined and observed. Unclear competencies are a safety risk.
User
The user must
■ make the instruction manual accessible to the operator,
■ make sure that the operator has read and understood the instruction manual.
Safety instructions
The devices must not be used under the following conditions:
In rooms with potentially explosive atmospheres.
■ in rooms with aggressive atmospheres, e.g. ammonia, wood acids.
In rooms with water with a pH value below 7.0 or above 7.4.
In case of low pH values there is risk of corrosion on all metals and risk of damage to mortar-containing materials (joints). Higher pH values cause mucous membrane irritations and increased lime deposits.
In rooms with salt or liquids with a salt content > 1%.
■ In moist areas of indoor swimming pools.
■ in rooms with ozone-treated air.
■ in rooms with high solvent concentration.
■ in rooms with extreme dust load.
■ The laundry dryer must always be stored in a dry environment.

Please note that excessive additional air movements in the room may impair the function of the laundry dryer because they could disturb the air flow of the laundry dryer.
In addition the following must be observed when using the indoor air laundry dryer:
■ Only trained electrical professionals (e.g. electricians) are permitted to work on electrical components, especially when connecting to the electric circuit.
■ The device must always be transported by two people, or suitable lifting gear must be used.
■ Original spare parts or spare parts approved by the manufacturer shall exclusively be used.
3 Model
The indoor air laundry dryer is available in two models and various sizes. The two models can be identified by their item numbers (on the identification plate) and differ as follows:
| Item number | Model |
| 0116-0230-032 | With mains plug (for use outside of the EU) |
| 0116-0240-031 | |
| 0116-0250-032 | |
| 0116-0280-032 | |
| 0116-0230-034 | Without mains plug, for fixed installation by an electrical professional (for use in the EU) |
| 0116-0240-032 | |
| 0116-0250-034 | |
| 0116-0280-034 |
4 Construction
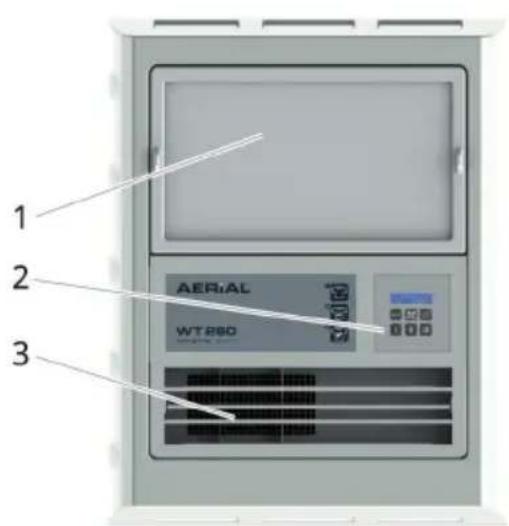
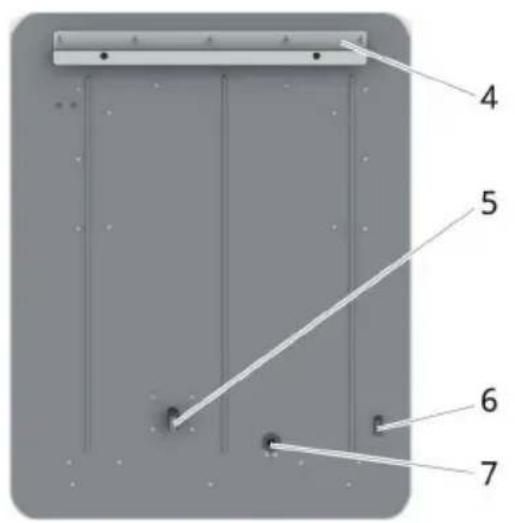
Fig. 1: AERIAL WT series - overview
| 1 | Air intake area with air filter | 5 | Condensate drain pipe |
| 2 | Operating panel | 6 | On / Off switch |
| 3 | Air outlet with three baffle plates | 7 | Power cable outlet |
| 4 | Rail for wall mounting |
How long the indoor air laundry dryer must be used to dry a room or a certain amount of laundry or to reach a certain humidity depends on the ambient conditions in the room in which the device is installed.
5 Transport and installation
Transport
Danger to life due to electric shock
DANGER
Touching live parts can lead to death.
Before moving the indoor air laundry dryer, always switch it off at the on/off switch and, depending on the model, pull the mains plug out of the socket or have it disconnected from the electrical circuit by a trained electrical professional (e.g. electrician).
Cutting and crushing hazard
WARNING
When the air filter has been removed cutting injuries from the sharp edges of the heat exchanger may occur.
- Two people are needed to carry the indoor air laundry dryer, or suitable lifting gear must be used for transport.
- Wear protective gloves when changing the air filter.
Do not reach into the inlet screen.
Danger of injury
WARNING
The indoor air laundry dryer is heavy. Loss of stability or uncontrolled movements may cause serious injuries and material damage.
- Lift the device with a colleague and use suitable lifting and transport equipment.
In case of wall mounting use suitable holders and fastening elements according to the weight.
Material damage
CAUTION
Pulling the power cable may damage the cable.
Before transporting the indoor air laundry dryer, depending on the model, always pull out the mains plug or have all electrical connections disconnected from the electrical circuit by a trained electrical professional (e.g. electrician).
- Transport the indoor air laundry dryer to the place of installation using suitable lifting gear or have it carried by two persons.
- Remove the packaging material completely and dispose of according to the local regulations.
- Check the delivery for completeness.
Package contents
■ Indoor air laundry dryer
■ Wall mounting rail with mounting bolts and sound insulation anchors
■ One instruction manual
Operating conditions
Series WT 230/240/250/280 indoor air laundry dryers are suitable for use in residential buildings, cellars, garages, water works and storage rooms. They work without problems in the temperature range from +5 to +32 °C and at a relative humidity in the range from 40% to 99%.
Erection and installation
The series WT 230/240/250/280 indoor air laundry dryers are designed for stationary use and wall mounting.

The indoor air laundry dryer may only be used for the purpose of air dehumidification and laundry drying.
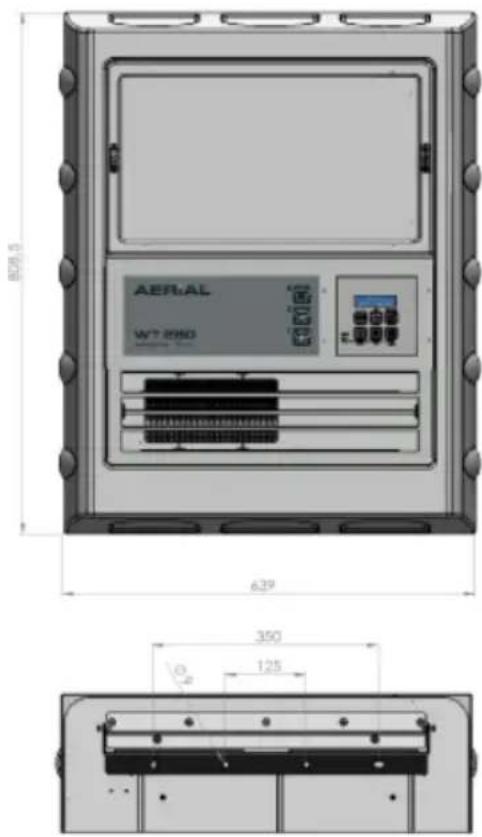
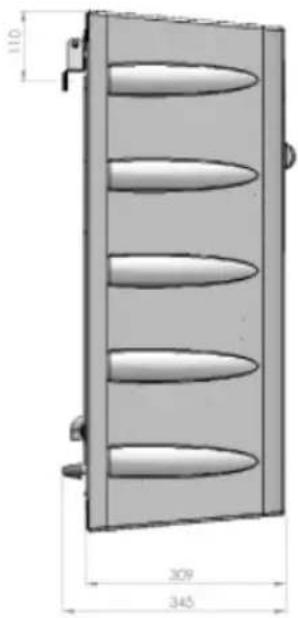
natural_image
Technical drawing of a rectangular device with three vertical slots and a side-mounted bracket, showing dimension annotations (no text or symbols beyond measurements)Fig. 2: Dimensional drawing
Select place of installation
When selecting the place of installation ensure
that an outlet for draining off the condensate is available (refer to section
"Installation of condensate drain hose", from page 41 onwards).
that there is a suitable socket or a suitable power connection close by depending on the model (see section "Connection", from page 39).
that optimum air circulation in the entire room is guaranteed.
■ that the drying racks are placed longitudinally or radially to the air outlet of the indoor air laundry dryer.
Danger of damage to the device
Insufficient air circulation can result in damage to the device and inefficient operation.
Install the indoor air laundry dryer in such a way that free air circulation is ensured.
- Ensure that air filter and air outlet are not covered.
The free space in front of the front panel must be at least 0.5 metres.
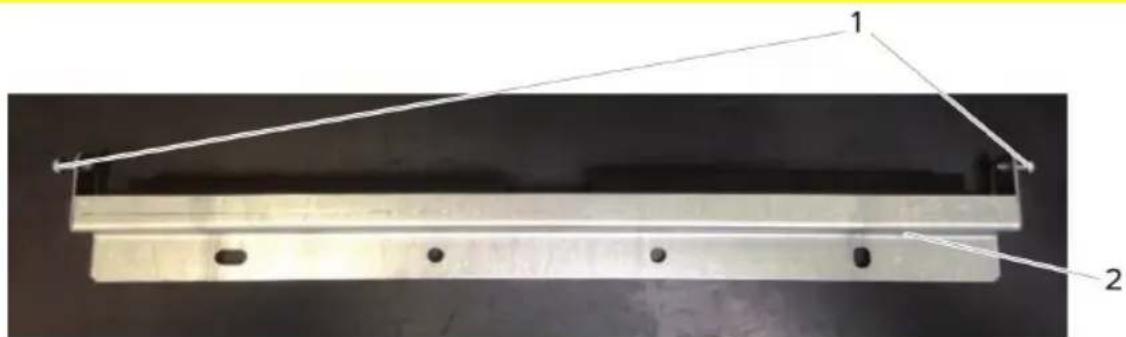
Wall mounting
natural_image
Metal mechanical component with two labeled parts (1 and 2), no visible text or symbols on the structure itself.Fig. 3: Wall rail
| 1 | Fixing bolts |
| 2 | Wall rail |
The scope of delivery includes one wall rail (Fig. 3) and suitable bolts and sound insulation anchors.

Danger of loss of stability or dropping from the wall
The indoor air laundry dryer is heavy. A fall or uncontrolled movements may cause serious injuries and material damage.
In case of wall mounting use suitable provided rail and fastening elements suitable for the weight.
- Attach the wall rail straightly aligned (use spirit level!) and securely to a suitable wall using four bolts.

Above the rail, a clearance of about 30 cm to the ceiling is required to enable mounting of the indoor air laundry dryer in the wall rail without problems.
- Lift the indoor air laundry dryer from the top into the wall rail in such a way that the mounting bar on the rear side (page 34,34 Fig 1, item 4) engages in the wall rail.
Damage to the device
The indoor air laundry dryer must be aligned along all axes.
Check the position of the indoor air laundry dryer using a spirit level.
- Fix the indoor air laundry dryer using the two lateral fixing screws on the wall rail.
Model with mains plug: Connection

Danger to life due to electric shock
Prior to commissioning the technical data of the indoor air laundry dryer must be compared with the conditions prevailing in the room of installation!
Use exclusively the original power cable! In case of loss or damage original power cables are available from your supplier.
- Work on electrical parts of the indoor air laundry dryer may only be carried out by the manufacturer or by authorised qualified electricians.
The following items must be checked prior to electrical connection of the indoor air laundry dryer:
Is the mains voltage in conformity with the voltage of the device?
■ Are socket and supply system sufficiently fused?
■ Has an RCCB been installed?
Is the appliance coupler suitable for the building socket outlet?
■ Is the socket outlet used grounded properly?
- Connect the power cable of the indoor air laundry dryer to a suitable power outlet.
Model without mains plug: Connection by electrical professional
This chapter is intended only for trained electrical professionals (e.g. electricians).

Danger to life due to electric shock
Prior to commissioning the technical data of the indoor air laundry dryer must be compared with the conditions prevailing in the room of installation!
Use exclusively the original power cable! In case of loss or damage original power cables are available from your supplier.
The device must only be connected by a trained electrical professional (e.g. electrician).
- Work on electrical parts of the indoor air laundry dryer may only be carried out by the manufacturer or by authorised qualified electricians.
The following items must be checked prior to electrical connection of the indoor air laundry dryer:
Is the mains voltage in conformity with the voltage of the device?
■ Is the supply system sufficiently fused?
■ Has an RCCB been installed?
- Make sure that the cables cannot be live, e.g. by switching off the relevant fuse.
- Use a suitable voltage detector to ensure that none of the cables are live.
-
Connect the electric cable of the indoor air laundry dryer to the electric circuit as directed.
-
Connect earth wire;
- Connect neutral wire;
- Connect phase.
$$ N = \text { blue } = \text { neutral wire } $$
$$ \begin{array}{l} \text { PE } = \text { green / yellow } = \text { earth } \ \text { wire } \end{array} $$
$$ L 1 = \text { brown } = \text { phase } $$
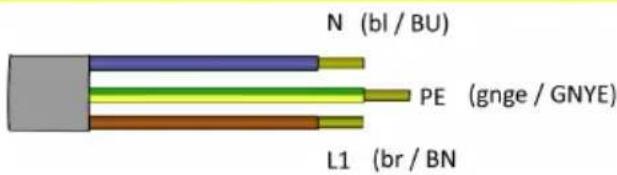
Fig. 4: Connection
- Restore the power supply and check that it is working.
Installation of condensate drain hose
Material damage
In case of incorrect installation of the condensate drain hose water may flow into the room.
- Ensure that the condensate can always be reliably collected or discharged.
A slope of 5 cm minimum per metre of hose must be guaranteed.
The series WT 230/240/250/280 indoor air laundry dryers are equipped with a drain pipe for connecting a condensate drain hose 15 × 2 ~mm (page 34, Fig. 1, item 5).
- Connect the drain hose to the drain pipe.
- Attach the drain hose safely to an outlet.
- Ensure that the hose is laid with a slope of at least 5 cm per metre of hose from the device.
6 Operation and operator control
Danger of injury and damage to appliance
Inadmissible ambient conditions and improper operation of the device may constitute a risk.
Read the instruction manual before commissioning the indoor air laundry dryer.
Operating elements
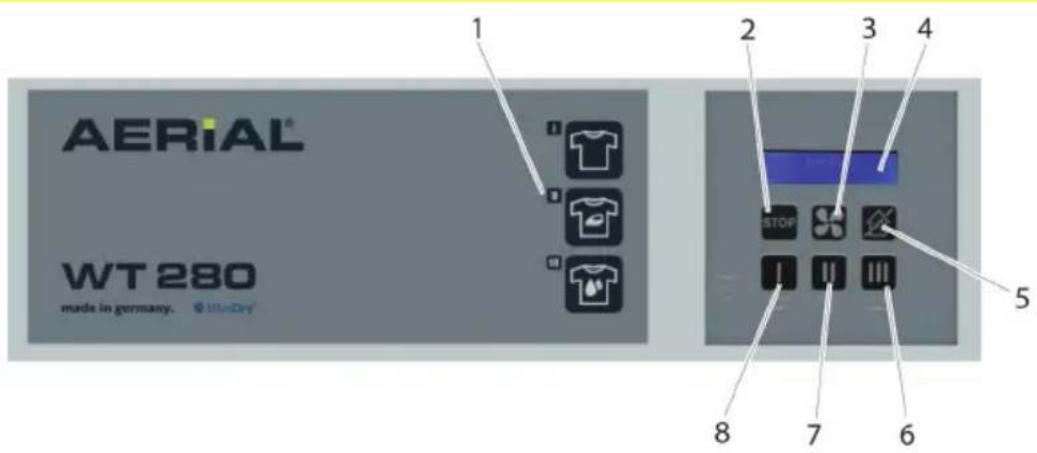
Fig. 5: Operating panel
| 1 | Drying program symbols | 4 | Display |
| 2 | Stop button | 5 | ES button (room dehumidification mode) |
| 3 | Fast drying button | 6, 7, 8 | Program selection buttons |
Operating modes
Room dehumidification
The "Room dehumidification" mode is activated and set via the ES button, see section Operation, page 44.
Laundry dryer
All laundry dryer programs and the functions of the buttons on the operating panel are described in the section Operation, page 44.
Automatic defrosting
During dehumidification ice may build up on the evaporator. The series WT 230/240/250/280 indoor air laundry dryers are equipped with an automatic hot-gas defrosting system.
Commissioning
To commission the indoor air laundry dryer proceed as follows:
- Mount the indoor air laundry dryer, see page 35.
- Make sure that the indoor air laundry dryer is connected, see page 35.
- Make sure that the drain hose has been fitted correctly and is laid into a drain (see section "Installation of condensate drain hose", from page 41).

For drying and keeping rooms with wood furnishing or paintings, antiques etc. dry, a minimum moisture of 55 – 60% must be observed. For living space, climate conditions of 20 – 25 °C and 50 – 60% relative humidity are recommended. In case of doubt please contact your technical advisor.
- Switch on the indoor air laundry dryer via the On/Off switch (s. page 34, Fig.1, item 6). The following indication appears in the display:
Ready 57%
- Select a program or drying mode on the operating panel.

In addition you can steer the drying air manually to different directions via the pivotable baffle plates.

For detailed information concerning operation of the indoor air laundry dryer please refer to the chapter Operation, page 44.
Operation
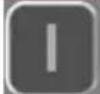
| Button | Press briefly | Press for 5 s | Display |
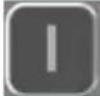 | Program"cupboard dry" | cupboard dry37% P1=46% | |
 | Time-limited drying:30 min. | Drying30 min | |
 | Program"iron dry" | iron dry37% P2=58% | |
 | Time-limited drying: | 60 min. | Drying60 min |
 | Program"predried" | predried37% P3=65% | |
 | Time-limited drying:90 min. | Drying90 min | |
 | Switch unit off:1. Compressor off□2. Fan off | Unitswitches offIndicator flashes | |
 | Operating hours,serial number ofelectronics system | 234 hSN:12345678 | |
 | Fast drying button | green LED on, when active |
Setting the language
| Button | Press briefly | Press for 5 s | Display |
 | Switch off unit | Unit switches off | |
 | Open language selection | Language German | |
 | Select language (DE, FR, IT, EN) | Language English | |
 | Save language selection | Language english |
Set room dehumidification
| Button | Press briefly | Display |
 | Press 1 xdesired room humidity = 35% | Ready37% ES 35% |
| ES button | Press 2 xdesired room humidity = 40% | Ready37% ES 40% |
| Press 3 xdesired room humidity = 45% | Ready37% ES 45% | |
| etc. after pressing 7 x:terminate ES mode | Ready37% |
Calibrate hygrostat

Correct calibration of the hygrostat requires special knowledge. Please ask the person commissioned and instructed by the user (e.g. caretaker).
| Step | Button | Function | Display | ||
| 1 |  | Switch off unit | Unit switches off | ||
| 2 |  + +  (press for 5 sec.) (press for 5 sec.) | Open hygrostat calibration | Calibrating HY | ||
| 3 |  | Select program to be calibrated | Calibrating P2 56% | ||
| 4 |  | Increase calibration value step by step | Calibrating P2 58% | ||
| 5 |  | Reduce calibration value step by step | Calibrating P2 54% | ||
| 6 |  | Save calibration value | Saved | ||
7 Maintenance and care
Maintenance work
Cleaning intervals depend largely on the operating conditions. Therefore check your indoor air laundry dryer after every drying process.
In order to guarantee trouble-free functioning of the indoor air laundry dryer it must be cleaned at regular intervals, and in particular the air filter must be checked. Proceed as follows:
■ Remove and clean the air filter, replace it if necessary (see page 34, Fig. 1, item 1).

Danger of injury by electric shock and risk of material damage
The indoor air laundry dryer may only be repaired by trained specialised staff. Within the warranty period, any work on the dehumidifier shall only be carried out by the manufacturer or persons commissioned by the manufacturer. Any work carried out by unauthorized persons shall lead to the forfeiture of all warranty claims!

Cutting and crushing hazard
When the air filter has been removed cutting injuries from the sharp edges of the heat exchanger may occur.
- Two people are needed to carry the indoor air laundry dryer, or suitable lifting gear must be used for transport.
- Wear protective gloves when changing the air filter.
Do not reach into the inlet screen.
■ Visual inspection: drain pipe and connected hose.
■ Clean casing on the outside with a moist cloth.
■ Insert a new or clean filter. Only use an original filter to ensure that the indoor air laundry dryer works properly.
8 Troubleshooting
If problems arise with the indoor air laundry dryer please check the following points. Should the fault not be located please contact your technical advisor.

Danger of injury by electric shock and risk of material damage
The indoor air laundry dryer may only be repaired by trained specialised staff. Within the warranty period, any work on the dehumidifier shall only be carried out by the manufacturer or persons commissioned by the manufacturer. Any work carried out by unauthorized persons shall lead to the forfeiture of all warranty claims!
| WARNING | Danger of injury due to contact with hot components of the cooling circuit ➡ Work on inside components may only be carried out by the manufacturer or personnel authorised by the manufacturer. |
| WARNING | Danger of injury from flammable refrigerants and toxicity ➡ Work on inside components may only be carried out by the manufacturer or personnel □ authorised by the manufacturer. |
| WARNING | Danger of suffocation due to refrigerant leakage in closed rooms during maintenance work ➡ Work on inside components may only be carried out by the manufacturer or personnel □ authorised by the manufacturer. |
| WARNING | Danger of injury from rotating fan blade ➡ Repairs or maintenance work may only be carried out by the manufacturer or personnel authorised by the manufacturer. |
Error messages
| Display message | Meaning | Remedial action |
| Error | Sensor problem | Get in touch with AERIAL Service |
| Error 1 | Problem with refrigeration circuit | Get in touch with AERIAL Service |
| Room temperature <3°C - >30°C | Ambient temperature outside the operating range | Adapt room conditions |
Faults
| Problem | Possible cause | Remedial action |
| Low or no dehumidifying performance | The air filter is severely soiled. Air intake of indoor air laundry dryer is too low. | Clean the filter (page 34, Fig.1, item 1) or insert a new one.Check the filter before each use.Use only original air filters, since unsuitable air filters will impair the air flow. |
| Device is out of operation. Fan and compressor do not work. | Indoor air laundry dryer switched off | Switch the indoor air laundry dryer on (s. page 34, Fig.1, item 6). |
| Indoor air laundry dryer without power supply | Have the power cable, the plug connection, the plug socket and the building fusing checked by an expert. | |
| Unexpectedly long drying time | The indoor air laundry dryer is not correctly dimensioned for the application. | The air exchange rate, the number of persons in the room, the quantity of wet clothes and any open water surfaces are decisive for the humidity load of the room. Ask your specialised dealer to calculate the capacity required for your application. |
| There is a lot of humidity in the walls, the floor etc. | In this case the indoor air laundry dryer will need some time to remove the water and achieve an acceptable value in the room. |
9 Decommissioning, storage and disposal
Decommissioning
If you do not need the indoor air laundry dryer for a longer period of time you can shut it down for some time. To do so proceed as follows:
- Switch off the indoor air laundry dryer via the On/Off switch (s. page 35, Fig.1, item 6).
- Model with mains plug: Pull the power plug
- Cover the indoor air laundry dryer with a cloth.
Storage
To store the indoor air laundry dryer proceed as follows:
- Store the indoor air laundry dryer in conformity with the specified operating conditions (refer to page 36).
Disposal
natural_image
Simple line drawing of a wheelbarrow with diagonal lines crossing it, no text or symbols presentPlease do not dispose of these indoor air laundry dryers with the domestic waste, nor in the countryside.
We dispose of these AERIAL indoor air laundry dryers for you, free of charge and environmentally friendly. Please contact us.
Alternatively, your local disposal company will dispose of the indoor air laundry dryer in an environmentally friendly manner.
10 Specifications

The components installed in an indoor air laundry dryer decide on its dehumidifying performance. Since these components can never be completely identical the actual performance according to DIN EN 810 may deviate by up to 5% from the specified performance.
| General data | ||
| Power supply | 230 V/50 Hz | |
| Protection class IP 22 | ||
| Protection for indoor swimming pools | RCCB to be installed by user | |
| Operating conditions | + 3 °C to + 32 °C | 40% r. h. to 95% r. h. |
| Type | Unit | WT 230 | WT 240 | WT 250 | WT 280 |
| Air circulation rate | cbm/h | 750 | 830 | 870 | 920 |
| Power consumption | watt max. | 569 | 570 | 887 | 1390 |
| Refrigerant R407c | in kg | 0.35 | 0.35 | 0.55 | 0.68 |
| GWP: 1.774/ CO2 | in t | 0.62 | 0.62 | 0.975 | 1.21 |
| Noise level | dB (A) | 61 | 61 | 60 | 66 |
| Dimensions □ H x W x D | mm 810/639/345 | ||||
| Weight | kg | 40 | 40 | 42 | 43 |
| Condensate drain: | Direct condensate drain via hose |
| Installation | Wall mounting |
| Warranty period | 2 years |
11 EC Declaration of Conformity
EC Declaration of Conformity
according to EC machinery directive 2006/42/EC, Annex II, 1. A
| Manufacturer | Person established within the Community who is authorised to compile the technical documents |
| Dantherm GmbH • Systeme zur LuftbehandlungOststraße 148D - 22844 Norderstedt | Manfred FöhlischDantherm GmbH • Systeme zur LuftbehandlungOststraße 148D - 22844 Norderstedt |
Description and identification of the machine
| Product | Indoor air laundry dryer |
| Type | Aerial WT 220-230-250-280 |
| Project number | Aerial WT 220-230-250-280 |
| Function | The laundry dryer serves for drying laundry and dehumidifying air at atmospheric pressure in enclosed indoor rooms. It can prevent the formation of condensation water, remove excessive humidity and keep humidity at a defined constant level. |
It is expressly declared that the machine is in conformity with all relevant provisions of the following EC directives or regulations:
| 2006/42/EG | Directive 2006/42/EC of the European Parliament and of the Council of May 17, 2006 on machinery and amending Directive 95/16/EC (revised version)(1)Published in in L 157/24 dated 09-06-2006 |
| 2014/35/EU | Directive 2014/35/EU of the European Parliament and of the Council of February 26, 2014 on the harmonisation of the laws of the Member States relating to the making available of electrical equipment designed for use within certain voltage limits on the marketPublished in in L 96/357 dated 29-03-2014 |
2014/30/EU
Directive 2014/30/EU of the European Parliament and of the Council of February 26, 2014 on the harmonisation of the laws of the Member States relating to electromagnetic compatibility (revised version) Published in in L 96/79 dated 29-03-2014
Reference to the applied harmonised standards as referred to in Article 7(2):
EN ISO 12100:2010-11
Safety of machinery - General principles for design - Risk assessment and risk reduction (ISO 12100:2010)
EN 60335-2-40/
Safety of electric appliances for domestic use and similar purposes - Part 2-40: Particular requirements for electrical heat pumps, air-conditioners and dehumidifiers
A1:2006-04
Safety of machinery - Electrical equipment of machines - Part 1: General requirements
EN 60204-
1:2006/A1:2009
Safety of machinery - Safety-related parts of control systems - Part 1: General principles for design (ISO 13849-1:2015)
EN ISO 13849-1:2015
Norderstedt, 3-11-2017
Place, date

Signature
Manfred Föhlisch
natural_image
Technical drawing of a rectangular panel with three recessed blades, showing dimensions 110 and 309 (no text or symbols beyond measurement labels)natural_image
Metallic rectangular object with two holes and a connecting wire, labeled 1 and 2 (no text or symbols on the object itself)natural_image
Simple line drawing of a wheel with diagonal lines crossing it, no text or symbols presentnatural_image
Technical drawing of a rectangular device with three vertical slots and dimension labels (309, 345) indicating width and height measurements.natural_image
Metallic rectangular object with two holes and a connecting wire, labeled 1 and 2 (no text or symbols on the object itself)Fig. 3: Rail mural
Fig. 4 : raccordement
natural_image
Simple line drawing of a wheel with diagonal lines crossing it, no text or symbols presentnatural_image
Technical drawing of a rectangular device with three vertical oval cutouts and dimension labels (309, 345) indicating width and height measurements.Fig. 2: Måltegning
natural_image
Metal mechanical component with two labeled parts (1 and 2), no visible text or symbols on the structure itself.Fig. 3: Veggskinne
Fig. 4: Tilkobling
Fig. 5: Kontrollpanel
natural_image
Simple line drawing of a wheel with cross-bracing lines, no text or symbols presentnatural_image
Front view of an Aerial WT 280 air conditioner unit with control panel and display (no text or symbols on main body)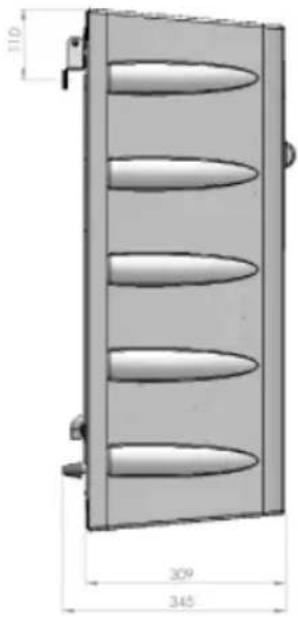
natural_image
Technical drawing of a rectangular panel with three recessed vats and a side-mounted bracket, showing dimensional annotations (309, 345) without any readable text or symbols.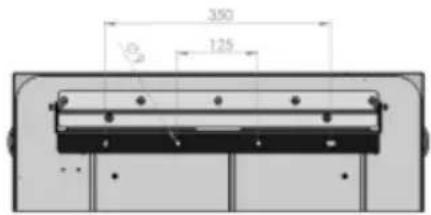
natural_image
Metal beam with two holes and a triangular support, labeled 1 and 2 (no text or symbols on the beam itself)Rys. 4: Podłączanie
natural_image
Simple line drawing of a wheelbarrow with diagonal lines crossing, no text or symbols present- Notes on this instruction manual 31
- Safety 32
- Model 34
- Construction 34
- Transport and installation 35
- Operation and operator control 41
- Maintenance and care 46
- Troubleshooting 47
- Decommissioning, storage and disposal 50
- Specifications 51
- EC Declaration of Conformity 52
- Notes on this instruction manual
- Target groups
- Conventions
- Warnings
- Type and source of hazard
- Designated use
- Safety
- Safety devices
- Hazards from accessories
- Authorized operator
- User
- The user must
- Safety instructions
- Model
- Construction
- Transport and installation
- Transport
- Danger to life due to electric shock
- DANGER
- Cutting and crushing hazard
- WARNING
- Danger of injury
- Material damage
- CAUTION
- Package contents
- Operating conditions
- Erection and installation
- Select place of installation
- Danger of damage to the device
- Danger of loss of stability or dropping from the wall
- Damage to the device
- Model with mains plug: Connection
- Model without mains plug: Connection by electrical professional
- Installation of condensate drain hose
- Operation and operator control
- Danger of injury and damage to appliance
- Operating elements
- Operating modes
- Room dehumidification
- Laundry dryer
- Automatic defrosting
- Commissioning
- Maintenance and care
- Maintenance work
- Danger of injury by electric shock and risk of material damage
- Troubleshooting
- Decommissioning, storage and disposal
- Decommissioning
- Storage
- Disposal
- Specifications
- EC Declaration of Conformity
- EC Declaration of Conformity
- It is expressly declared that the machine is in conformity with all relevant provisions of the following EC directives or regulations:
- Reference to the applied harmonised standards as referred to in Article 7(2):
Brand : Aerial
Model : WT 230
Category : Dehumidifier