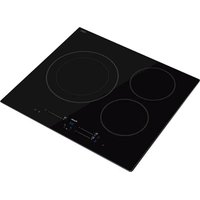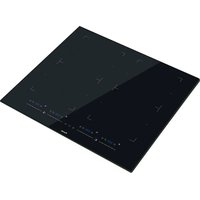
PI-3211 - Cooker Pando - Free user manual and instructions
Find the device manual for free PI-3211 Pando in PDF.


User questions about PI-3211 Pando
0 question about this device. Answer the ones you know or ask your own.
Ask a new question about this device
Download the instructions for your Cooker in PDF format for free! Find your manual PI-3211 - Pando and take your electronic device back in hand. On this page are published all the documents necessary for the use of your device. PI-3211 by Pando.
USER MANUAL PI-3211 Pando
PI-3110 / PI-3111 PI-3150 / PI-3151 PI-3210 / PI-3211

The Global Kitchen Partner
natural_image
Simple line drawing of a trash bin with no text or symbols
DEL MEDIOAMBIENTE Y TRATAMIENTO DEL RESIDUO
GARANTÍA DEL PRODUCTO....44
natural_image
Diagram of a steam locomotive emitting smoke from a platform, with no text or symbols present.Olla de hierro
text_image
Diagram showing two hand-drawn symbols: a checkmark on a horizontal line and an X on a vertical line, likely indicating correct or incorrect conditions.natural_image
Simple line drawing of a cooking pot with a coiled tube (no text or symbols)natural_image
Three identical cooking pots with crossed-out kitchen pan symbols, no text or labels presentnatural_image
Four identical illustrations of a cooking pot with crossed x marks, shown in different positions (no text or symbols)text_image
Diagram showing two cooking pots with crossed arrows indicating heating or cooling conditions, likely illustrating a cooking or cooking process.natural_image
Pure geometric diagram with concentric circles and alignment markers on a dark background (no text or symbols)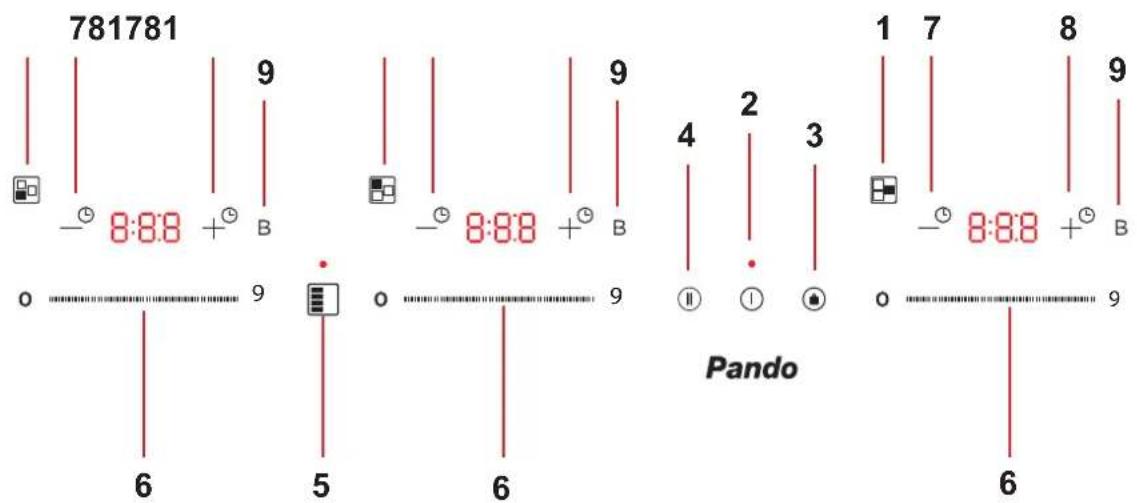
text_image
781781 9 - 8:88 + B 0 9 Pando 1 7 8 9 - 8:88 + B 0 9 6 5 6 6 9 6 9 Pandonatural_image
Line drawing of a cooking pot on a stove with a lid, no text or symbols present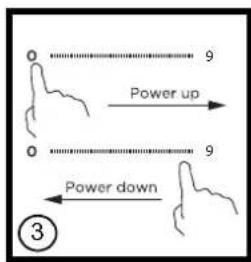
text_image
0 9 Power up 0 9 Power down ③text_image
0 9 Power down
text_image
0 9 Power downNota:
text_image
Diagram showing a finger pointing at a control panel and a vertical sequence of numbers on the right.natural_image
Simple line drawing of a hand holding a circular object with the number 'II' on it, no text or symbols present.natural_image
Technical diagram showing a mechanical assembly with a spring and threaded rod, no text or symbols presentVentilación
natural_image
Illustration of a hand using a tool to mark a black cross on a white surface (no text or symbols)
text_image
2 mmtext_image
E C D F A1 B1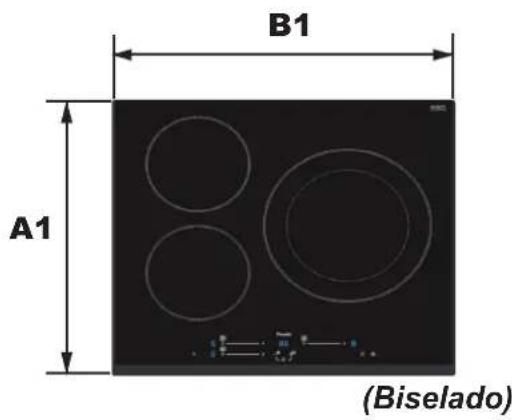
text_image
B1 A1 (Biselado)text_image
E I C D F A2 B2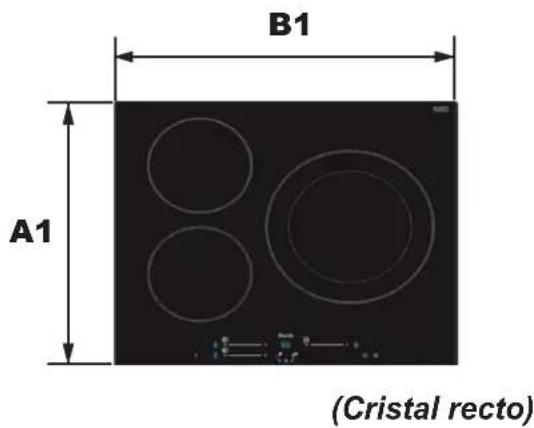
text_image
B1 A1 (Cristal recto)text_image
E C D F A1 B1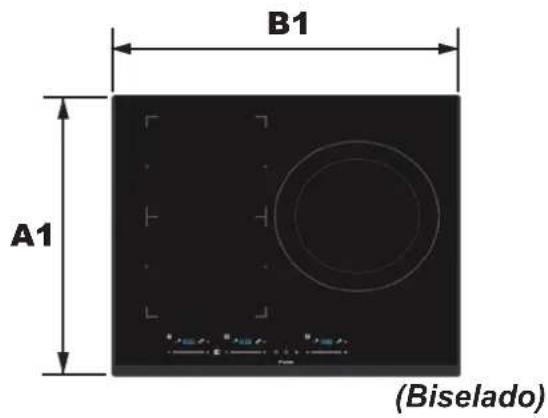
text_image
B1 A1 (Biselado)text_image
E I C D F A2 B2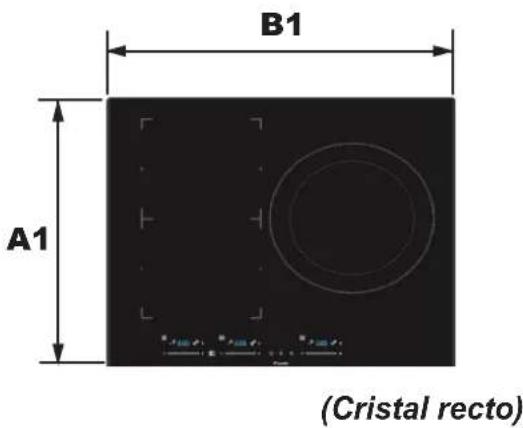
text_image
B1 A1 (Cristal recto)text_image
E C D F A1 B1
text_image
B1 A1(Biselado)
text_image
E I C D F A2 B2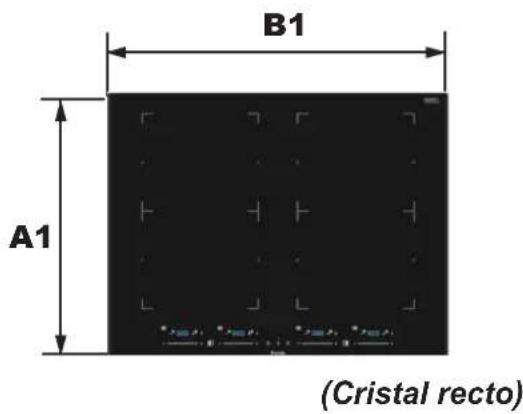
text_image
B1 A1 (Cristal recto)natural_image
Simple line drawing of a trash bin with no text or symbols
text_image
Diagram showing two hand-drawn symbols: a checkmark and an X, likely indicating correct and incorrect conditions.natural_image
Simple line drawing of a cooking pot with a coiled tube (no text or symbols)natural_image
Three identical cooking pots with crossed-out X marks, placed on a surface (no text or symbols)natural_image
Four identical illustrations of a cooking pot with crossed X marks, shown from different angles (no text or symbols)text_image
Diagram showing two cooking pots with crossed arrows indicating pressure or movement, likely illustrating a cooking or heating mechanism.natural_image
Three circular ovens on a dark electrical stove, with a digital display showing 'Panda' and measurement scales (no text or symbols on the ovens themselves)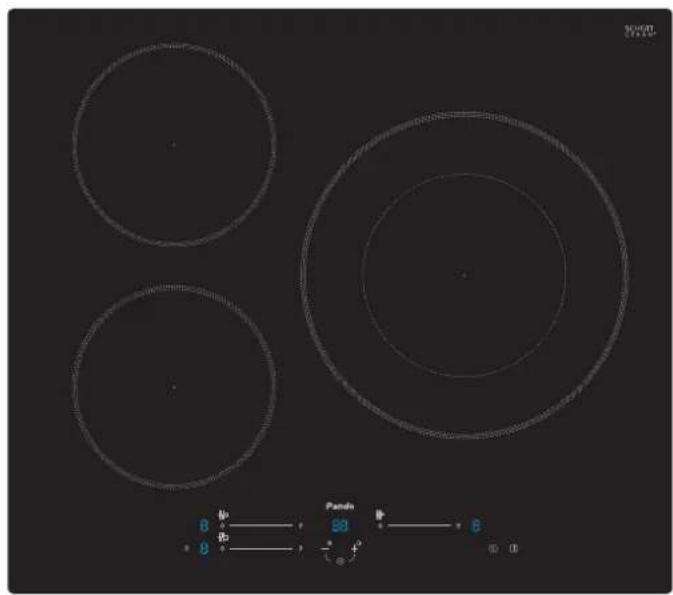
text_image
30107 Panda 8 —— —— 23 —— —— 8 8 —— —— —— 0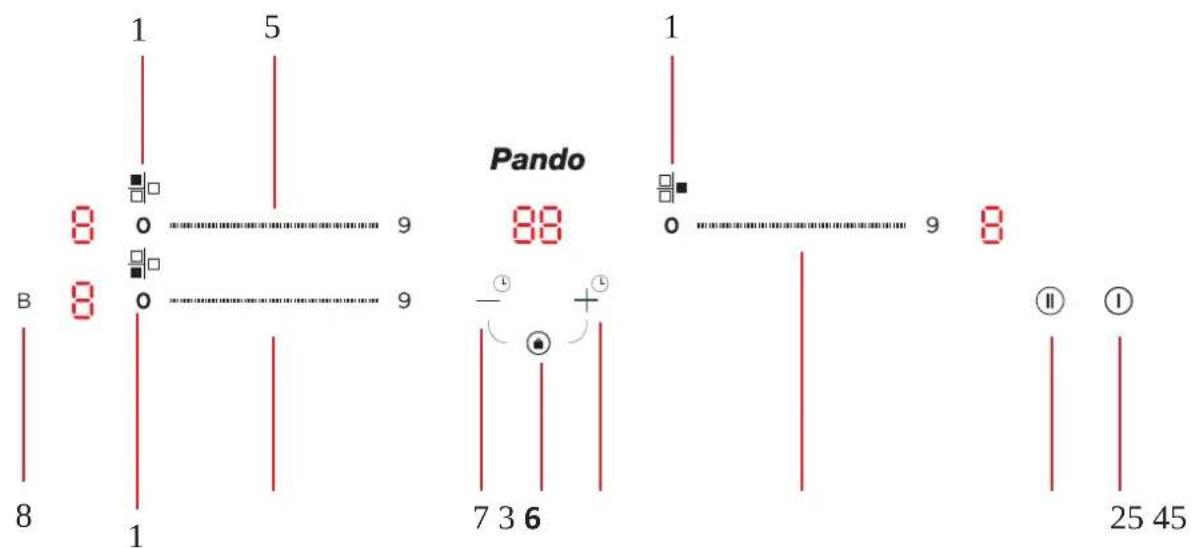
text_image
1 5 8 0 9 B 8 0 9 8 1 Pando 88 - + - 7 3 6 1 9 8 25 45natural_image
Pure electrical circuit lines without any symbols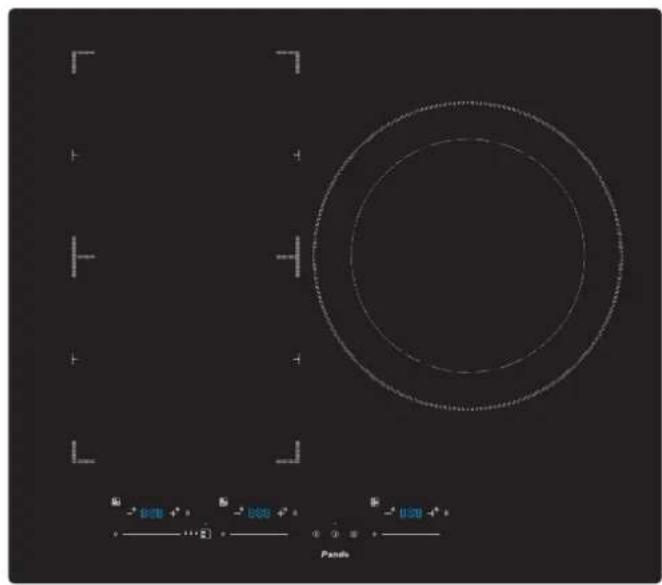
natural_image
Pure geometric diagram with concentric circles and alignment markers on dark background (no text or symbols)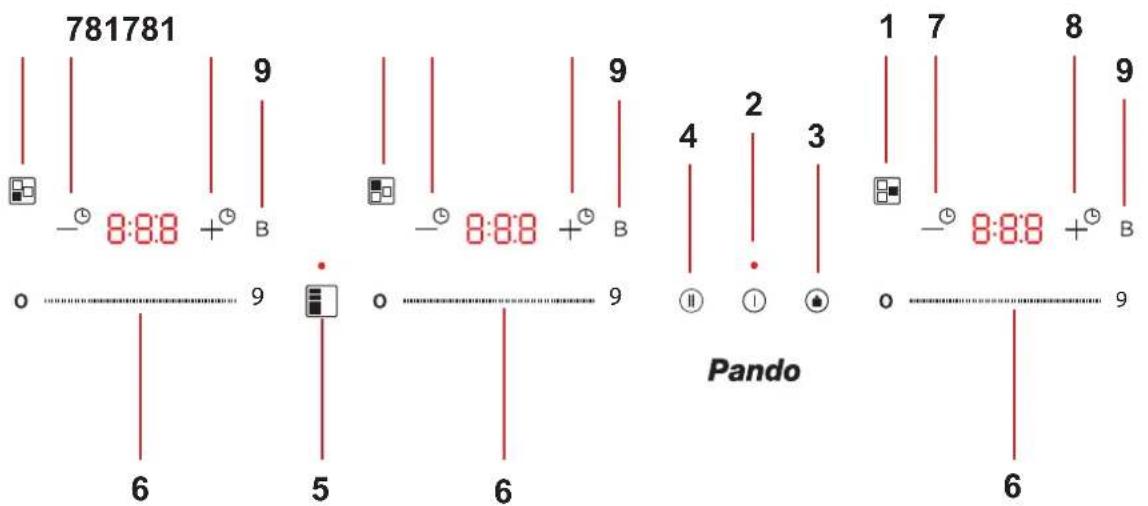
text_image
781781 9 - 8:8.8 + B 0 9 Pando 1 7 8 9 - 8:8.8 + B 0 9 6 5 6 9 6 6 6natural_image
Simple line drawing of a cooking pot on a stand, no text or symbols present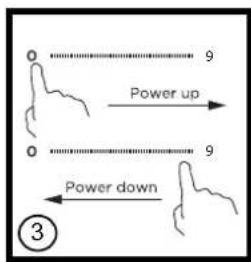
text_image
0 9 Power up 0 9 Power down ③text_image
0 9 Power down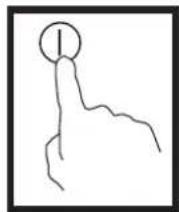
text_image
0 Power down 9Note:
text_image
Diagram showing a hand pointing at a small icon with an arrow, next to a vertical sequence of numbers 5 and 3.natural_image
Simple line drawing of a hand holding a circle with the number 'II' above it, no text or symbols present.natural_image
Technical diagram showing a mechanical assembly with a spring and threaded rod, no text or symbols presentVentilação
natural_image
Illustration of a hand holding a tool near a mechanical component with a black mark (no text or symbols)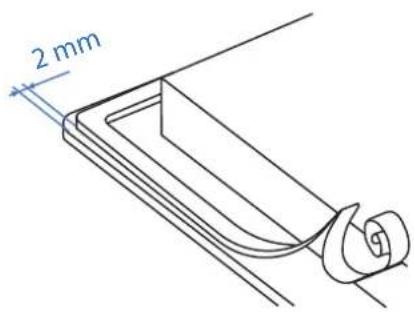
text_image
2 mmtext_image
E C D F A1 B1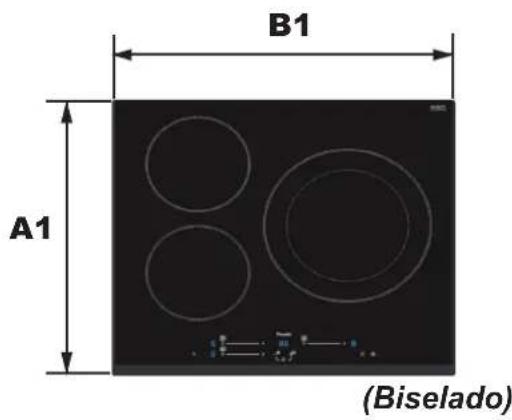
text_image
B1 A1 (Biselado)text_image
E I C D F A2 B2
text_image
B1 A1 (Cristal recto)text_image
E C D A1 F B1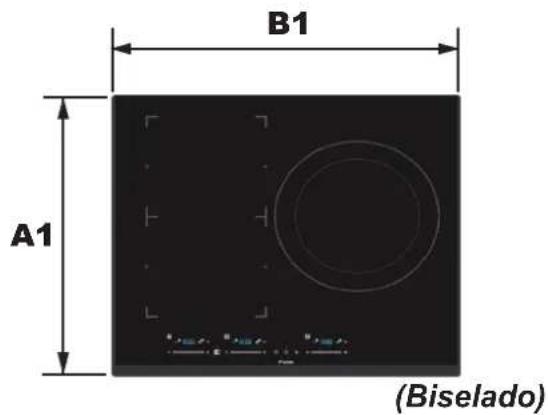
text_image
B1 A1 (Biselado)text_image
E I C D F A2 B2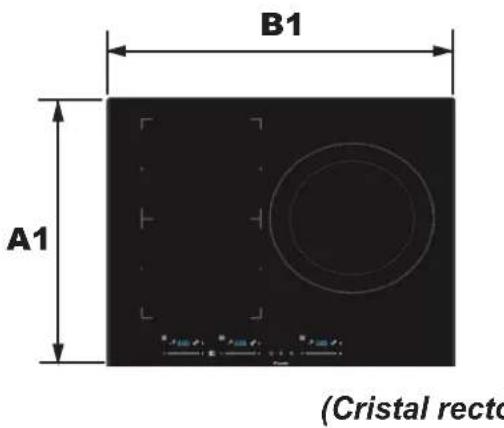
text_image
B1 A1 (Cristal rectotext_image
E C D F A1 B1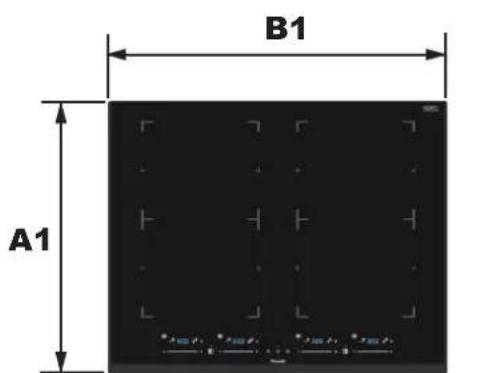
text_image
B1 A1(Biselado)
text_image
E I C D F A2 B2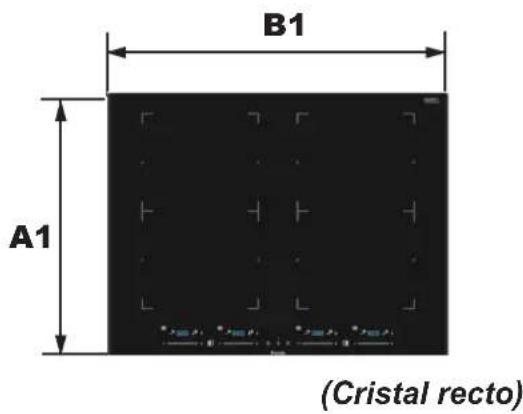
text_image
B1 A1 (Cristal recto)natural_image
Simple line drawing of a trash bin with no text or symbols
PROTECTION DE L'ENVIRONNEMENT ET TRAITEMENT DES DÉCHETS
GARANTIE DES PRODUITS....128
AVIS DE SÉCURITÉ
VOTRE SÉCURITÉ EST IMPORTANTE POUR NOUS. VEUILLEZ LIRE ATTENTIVEMENT CES INFORMATIONS AVANT D'UTILISER LE CUISEUR.
natural_image
Diagram of a steam locomotive emitting smoke from a platform, with no text or symbols present.Casserole en fonte
text_image
Diagram showing two hand-drawn symbols: a checkmark on a horizontal line and an X on a horizontal line, likely indicating correct or incorrect conditions.natural_image
Simple line drawing of a cooking pot with a coiled tube (no text or symbols)natural_image
Three identical cooking pots with crossed-out X marks, no text or symbols presentnatural_image
Four identical illustrations of a cooking pot with crossed X marks, shown in different positions (no text or symbols)text_image
Diagram showing two cooking pots with crossed arrows indicating heating or cooling conditions, likely illustrating a cooking or cooking process.CONSEILS DE CUISSON : Dimensions
natural_image
Three concentric circles on a dark background, with a control panel labeled 'Panda' and a small icon below (no readable text or symbols in the diagram itself)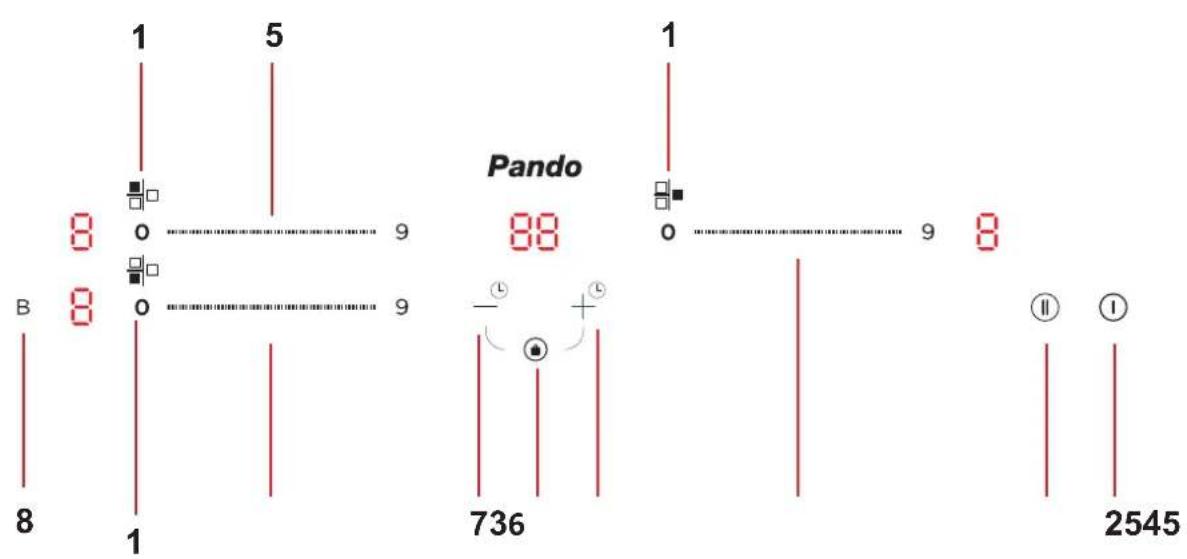
text_image
1 5 8 0 9 Pando 8 8 8 B 8 0 9 736 2545text_image
TARELL Pands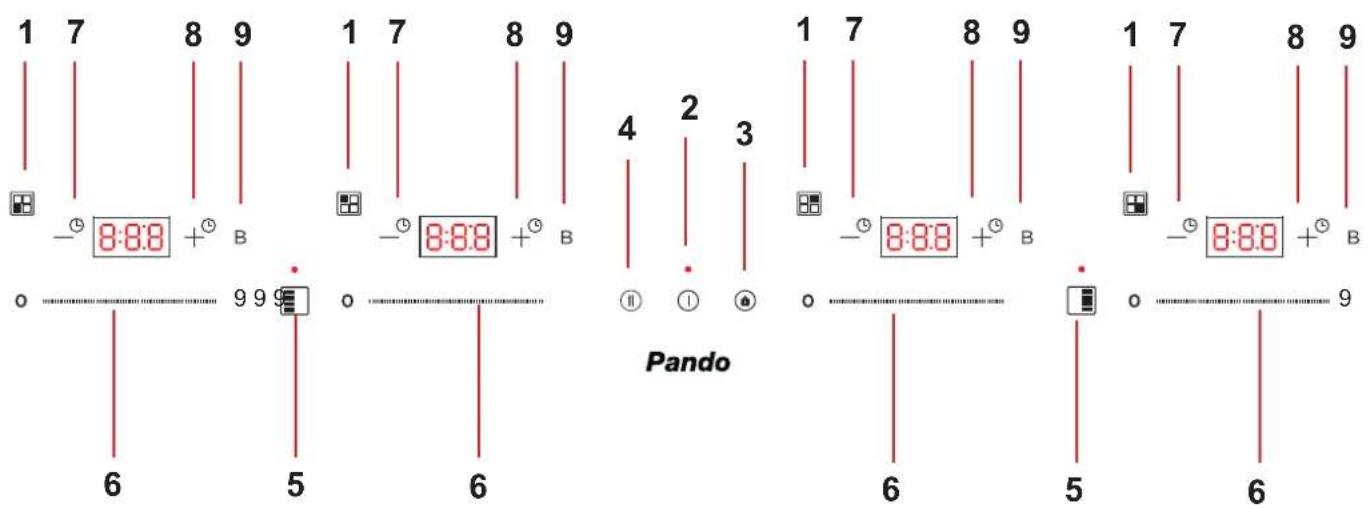
text_image
1 7 8 9 1 7 8 9 -① 8:8B +① B -① 8:8B +① B 4 2 3 ⑪ ① Pando 1 7 8 9 1 7 8 9 -① 8:8B +① B -① 8:8B +① B 6 5 6 6 5 6natural_image
Simple line drawing of a cooking pot on a stand, no text or symbols present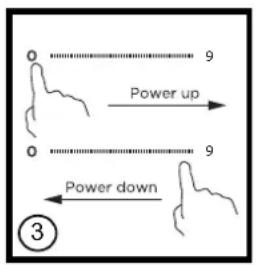
text_image
0 9 Power up 0 9 Power down ③text_image
0 9 Power down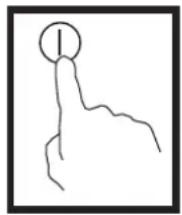
natural_image
Simple line drawing of a hand holding a circular object with a vertical line (no text or symbols)Attention aux surfaces chaudes
text_image
0 Power down 9Nota:
text_image
Diagram showing a finger pointing at a control panel and a vertical sequence of numbers on the right.natural_image
Simple line drawing of a hand holding a circle with the number 'II' above it, no text or symbols present.natural_image
Technical diagram showing a mechanical assembly with a spring and threaded rod, no text or symbols presentVentilation
text_image
E C D F A1 B1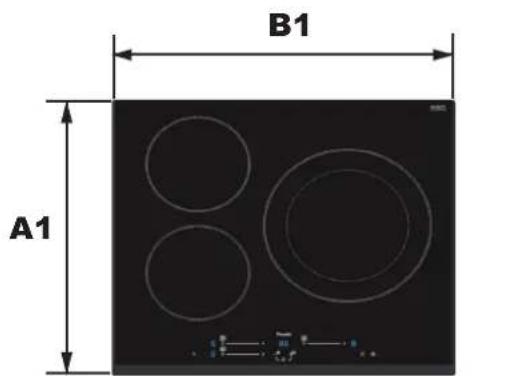
text_image
B1 A1(biseauté)
text_image
E I C D F A2 B2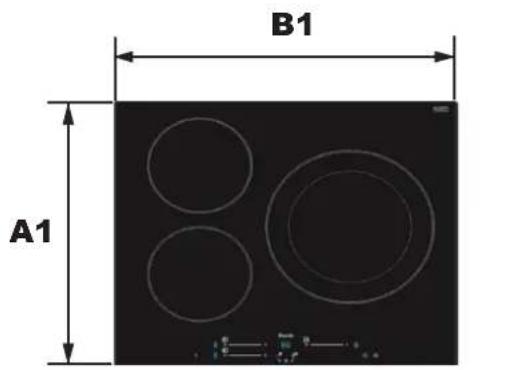
text_image
B1 A1(Verre droit)
text_image
E C D A1 F B1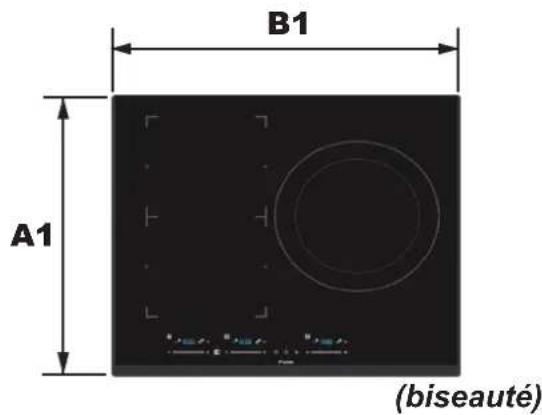
text_image
B1 A1 (biseauté)text_image
E I C D F A2 B2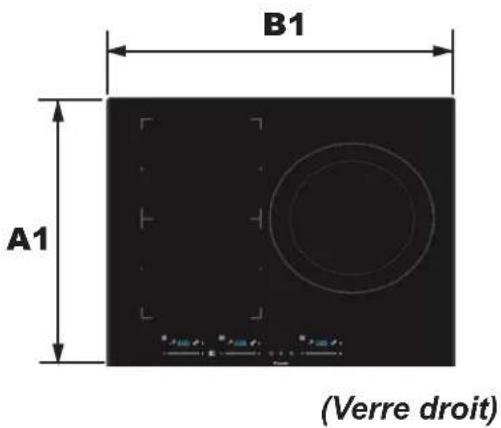
text_image
B1 A1 (Verre droit)text_image
E C D F A1 B1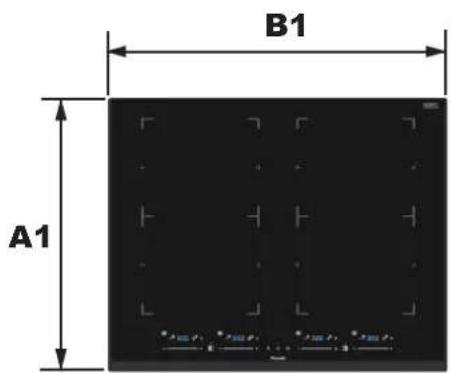
text_image
B1 A1(biseauté)
text_image
E I C D F A2 B2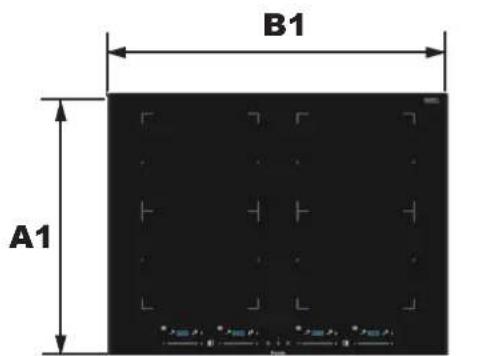
text_image
B1 A1(Verre droit)
GARANTIE DES PRODUITS
Pando reserves the right to change or cancel any measures of the articles in the manual without prior notice, without affecting the essential characteristics of functionality and safety, and is not responsible for any errors or omissions that may occur in the manual.
Technical specifications valid except for typographical errors, omission, or printing. The images and content of this manual are the exclusive property of Pando - INOXPAN S.L., and any appropriation of images and total or partial reproduction without prior written authorization is strictly prohibited.
THE IMAGES SHOWN IN THIS MANUAL ARE NOT CONTRACTUAL.
Pando's Technical Management reserves the right to modify, alter, or improve the technical drawings displayed in this manual without prior notice.
The paper version of this manual cannot be updated in real-time, to ensure the latest version of your product's instructions, we recommend consulting the digital version at www.pando.es
Dear customer... First of all, we would like to thank you for your confidence you have placed your trust in us by purchasing one of our products. We are sure that you have made the right decision.
At Pando, not only do we offer top quality products, but we also have a large team of professionals who will assist and advise you with any queries you may have during installation or operation.
We invite you to visit our website (www.pando.es) to get to know us better and where you will be able to see our full range of products with complete commercial and technical information.
We also show you our collection of essential appliances in any home. Appliances such as our collection of high-performance Ovens and Microwaves, Induction and Gas Hobs that will allow you to take your recipes to another level, Wine cellars and ageing cellars to maintain and preserve your wines in the best conditions and integrated dishwashers with the latest technology.
All this under a brand with a very long history of more than 40 years in the market, which produces its products as a true craftsman. Our products reflect the best of our experience in order to satisfy all your needs.
We sincerely hope that you will have fun, experience and enjoy the comfort and capabilities of what is already your new kitchen ally.
Many Thanks
El equipo de Pando
ENVIRONMENTAL PROTECTION
The symbol on the product or its packaging indicates that this product cannot be disposed of like normal domestic waste. The product must be handed over at a collection point for recycling electrical and electronic equipment. If you ensure that this product is correctly disposed of, you will help to avoid the possible negative environmental and public health effects that could arise from incorrect disposal. For more detailed information about recycling this product, please contact your city authorities, the domestic waste service or the establishment where you purchased it. This electrical appliance is marked in compliance with European Directive 2012/19/EU on electrical and electronic appliance waste (WEEE).
COLLECTION OF
HOUSEHOLD APPLIANCES
natural_image
Simple line drawing of a trash bin with no text or symbols
ENVIRONMENTAL PROTECTION AND WASTE TREATMENT
DISPOSAL OF THE PACKAGING. The packaging is marked with in Green Dot.
In its commitment to the protection of the environment and in compliance with the provisions of the European Directive 94/62 / EC on packaging and packaging waste and the derived Law 22/2011 on Contaminated Residues and Soils, Pando entrusts entities of social economy an Integrated Management System, responsible for the periodic collection at the consumer's home or in its vicinity of used packaging and packaging waste for subsequent treatment.
To remove all packaging materials such as cardboard, expanded polyurethane, and film, use the appropriate containers.
This ensures the correct treatment and reuse of packaging materials.
ÍNDICE
SAFETY WARNINGS....134
Use of the device:....136
Precautions during cleaning:....136
Before using your induction hob....140
Operation....140
Touch controls 140
DISPLAY PI3110 - 3111....142
DISPLAY PI3150 - 3151....143
DISPLAY PI3210 - 3211....144
How to use your induction hob....145
Start of cooking 145
End of cooking 145
Beware of hot surfaces 145
Using the Booster function....146
Locking the controls 146
Timer control 146
Flexible zone/bridge (Solo para modelos PI 3150 - 3151 - 3210 - 3211)......148
Pause 148
Cooking Guidelines....149
Cooking tips 149
Detection of small items....149
Temperature settings 150
Care and cleaning....151
Tips and suggestions....152
Fault visualisation and inspection....153
Specific for PI3110 - 3111....154
Specific for PI3150 - 3151....154
Specific for PI3210 - 3211 ....155
Installation....156
Before Installing the Hob....156
Ventilation....157
Scope of delivery Model PI - 3110 ....160
Scope of delivery Model PI - 3111....160
Scope of delivery Model PI - 3150....161
Scope of delivery Model PI - 3151 161
Scope of delivery Model PI - 3210 162
Scope of delivery Model PI - 3211 162
After installing the hob....163
Mains Power Board Connection ....164
TECHNICAL SPECIFICATIONS ....166
PRODUCTWARANTY....170
SAFETY WARNINGS
YOUR SAFETY IS IMPORTANT TO US. PLEASE READ THIS INFORMATION CAREFULLY BEFORE USING THE COOKER.
It will not be covered by warranty:
- If the power cable is damaged, it must be replaced by the manufacturer, its service agent or similarly qualified persons in order to avoid further danger. It must be carried out by a sat de pando specialist. If any damage occurs during this process that has been carried out by an unauthorised user or unauthorised personnel, it will not be covered by the warranty, even if it remains valid!
- If you repair or replace any part of the appliance unless specifically recommended in the manual. Any other repairs must be carried out by a sat pando specialist. If any damage occurs during this process that has been carried out by an unauthorised user or personnel, it will not be covered by the warranty, even if it is still valid! If you cook on a broken or cracked cooking surface.
- If the cooktop surface is broken or cracked, immediately disconnect the appliance from the mains.
(wall switch) and contact the manufacturer. It must be carried out by a pando sat specialist. If any damage occurs during this process that has been carried out by an unauthorised user or personnel, it will not be covered by the warranty, even if it is still valid!
Incorrect installation of the appliance may invalidate any warranty or liability claims.
Safety instructions important:
Make this information available to the person responsible for the installation of the appliance.
- To avoid hazards, this appliance must be installed in accordance with these installation instructions.
- Remove all packaging, labels and stickers from the ceramic glass.
- Never leave the appliance unattended when in use.
- The appliance must not be used on top of a dishwasher or tumble dryer: the water vapours given off could damage the electronics.
-
Do not transform or modify the appliance.
-
Do not place or leave magnetisable objects (e.g. credit cards, memory cards) or electronic devices (e.g. computers, MP3 players) near the device as they may be affected by its electromagnetic field.
- Never use the appliance to heat or warm the room.
- The appliance must only be used if it is mounted and installed on an approved and suitable piece of furniture or work surface.
- It is intended for domestic use only (food preparation), to the exclusion of any other domestic, commercial or industrial use.
- Do not use the plate as a support or work surface.
- Do not use extension cords for connection to the mains.
- This appliance is not intended for operation with an external timer or remote control.
-
This appliance can be used by children aged from 8 years and above and persons with reduced physical, sensory or mental capabilities or lack of experience if they have been given supervision when using the appliance and understand the hazards involved.
-
Children or persons with a disability that limits their ability to use the appliance must have a responsible and competent person instruct them in its use. The instructor must be convinced that they can use the appliance without danger to themselves or their environment.
- Children must not play with the device. Cleaning and maintenance must not be carried out by unsupervised children. Do not allow children to play with the appliance or to sit, stand or climb on it. Do not store objects of interest to children in cabinets above the appliance. Children climbing on the hob could be seriously injured. Do not leave children unattended or unattended in the area where the appliance is in use.
- Metal objects such as knives, forks, spoons and lids must not be placed on the hob surface as they may become hot.
Use of the device:
- After use, always turn off the coo-king zones and hob as described in this manual (i.e. using the touch controls). Do not rely on the pot detection function to turn off the coo-king zones when removing pots.
- Keep a constant eye on stews that use fats and oils, as they are susceptible to rapid ignition.
- Never leave the appliance unattended when in use. Boiling produces smoke and fat spillage which can ignite.
- Never leave objects or utensils on the appliance.
- Do not drop heavy objects on the hob.
- Do not stand on the hob.
- Make sure that no electrical cables, fixed or mobile, from the appliance touch the glass or hot pan.
- Do not place any metal objects, except for the containers to be heated. In the event of accidental ignition or residual heat, this object, depending on the material, may melt or start to burn.
- Do not use plastic or aluminium containers: they could melt on hot hobs.
- Never cover the appliance with a cloth or a protective sheet, as it could become very hot and ignite.
-
Always make sure that the cooking pan is centred in the cooking zone. The bottom of the pan should cover the cooking zone as much as possible.
-
This appliance can be used by children aged from 8 years and above and persons with reduced physical, sensory or mental capabilities or lack of experience and knowledge of the product if they have been given supervision and instruction concerning use of the appliance in a safe way and understand the hazards involved.
- Do not use pans with serrated edges or drag pans across the Induction Cooktop glass surface as this may scratch the glass.
- Do not use scouring pads or other abrasive cleaning agents to clean the hob as they may scratch the induction glass.
- WARNING: The appliance and its accessible parts become hot during use.
- Care must be taken not to touch the heating elements.
Precautions during cleaning:
- Do not use a steam cleaner to clean the hotplate.
- Unplug the cooktop before cleaning or maintenance.
Danger of electric shock:
Disconnect the appliance from the mains before carrying out any work or maintenance on it.
(Failure to comply with this warning can result in electric shock or death).
Caution: If the surface is cracked, turn off the appliance to avoid the possibility of electric shock.
- This appliance must be connected to a circuit incorporating an isolation switch which provides a complete disconnection from the power supply.
- Connection to a good earth wiring system is essential and mandatory.
Modifications to the domestic electrical installation may only be carried out by a qualified electrician must only be carried out by a qualified electrician. IF ANY DAMAGE DURING THIS PROCESS THAT WAS DONE BY AN UNAUTHORISED USER OR BY AN UNAUTHORISED USER OR UNAUTHORISED PERSONNEL, IT WILL NOT BE COVERED BY THE WARRANTY, EVEN IF IT IS STILL VALID!
Cutting hazard:
- Be careful: the edges of the panel are sharp.
- The sharp blade of a worktop scraper is exposed when the safety cover is retracted. Use with extreme care and always store in a safe place out of the reach of children.
- Failure to use caution may result in injury or cuts.
Danger of hot surface:
- During use, accessible parts of this appliance will become hot enough to cause burns.
- Do not allow your body, clothing or any object other than a suitable cooking utensil to come into contact with the induction glass until the surface is cool.
- Keep children away.
- Failure to comply with this advice may result in burns and scalds.
- Pan handles may be hot to the touch. Check that pan handles do not protrude from other cooking zones that are lit. Keep handles out of the reach of children.
- WARNING: Fire hazard: do not store objects on cooking surfaces.
- The cooking process must be supervised. A short cooking process must be continuously monitored.
- WARNING: Unattended cooking on a greasy or oily hob can be dangerous and may cause a fire. NEVER attempt to extinguish the fire with water, turn off the appliance and cover the flame, e.g. with a lid or fire blanket.
Precautions to avoid damaging the appliance:
- Pans with an unpolished base (un-glazed cast iron,...) or a damaged base can damage the glass ceramic.
- The presence of sand or other abrasive materials may damage the glass ceramic.
- Avoid dropping objects, even small ones, on the glass ceramic.
- Do not strike the edges of the glass with pans.
- Make sure that the appliance is ventilated according to the manufacturer's instructions.
- Do not place or leave empty pans on the hob.
- Do not allow sugar, synthetic materials or aluminium foil to touch hot areas. These substances may cause cracks or other changes to the glass ceramic surface when they cool down: switch off the appliance and remove them immediately from the cooking zone while it is still hot (caution: danger of burns).
- WARNING: Fats and oils on the hob can catch fire.
- It is important to take great care when using fats or oils for cooking/frying and to monitor the cooking process at all times.
-
It is important to be very careful when using fats or oils for cooking/frying and to monitor the cooking process at all times.
-
CAUTION: The cooking process must be supervised at all times. at all times. A short cooking time must be monitored continuously.
- WARNING: Danger of fire. Do not place or store objects on the hob.
- Do not store objects on the hob.
- Never place hot containers on the control panel.
- If there is a drawer under the built-in appliance, make sure that there is sufficient distance (2 cm) between the contents of this drawer and the bottom of the appliance to ensure good ventilation.
- Do not place flammable objects (e.g. sprays) in the drawer under the hob. Any cutlery trays must be made of heat-resistant material.
Precautions in case of appliance failure:
- If a fault is detected, the appliance must be switched off and the power supply must be disconnected.
- In the event of chipping or cracks in the glass ceramic hob, it is imperative that the appliance is disconnected from the mains and the customer service department is notified.
• Repairs may only be carried out by qualified personnel. -
Do not open the appliance yourself under any circumstances.
-
If a fault is detected, the appliance must be switched off and the power supply must be disconnected.
- In the event of chipping or cracks in the glass ceramic hob, it is imperative that the appliance is disconnected from the mains and the customer service department is notified.
• Repairs may only be carried out by qualified personnel. - Do not open the appliance yourself under any circumstances.
- WARNING: If the surface is cracked, switch off the appliance to avoid the possibility of electric shock.
Other precautions:
• Always ensure that the cooking vessel is centred in the cooking zone. The bottom of the pan should cover the cooking zone as much as possible.
- For users with a pacemaker, the magnetic field may influence the function of the pacemaker. We recommend that you seek advice from your supplier or doctor.
- Do not use plastic or aluminium containers: they may melt on the hot cooker.
- Disposal of this device requires a special procedure.
- Check with your local authority for recycling possibilities. Never put out a fire with water. Switch off the cooking area. Carefully smother the flames with a lid, extinguishing cap or other similar means.
THE USE OF UNSUITABLE POTS OR CONTAINERS, OR THE USE OF AN GLASS ADAPTER FOR INDUCTION MAY CAUSE A MALFUNCTION OR BREAKDOWN AND WOULD LEAD TO THE WOULD RESULT IN PREMATURE TERMINATION OF THE WARRANTY. PREMATURE TERMINATION OF THE WARRANTY. THE MANUFACTURER ASSUMES MANUFACTURER ASSUMES NO LIABILITY FOR DAMAGE TO THE COOKTOP OR ITS THE COOKTOP OR ITS SURROUNDINGS.
Before using your induction hob
- Read this guide, paying particular attention to the "Safety warnings" section.
- Remove any protective film that may still be on your induction hob.
- Wipe it with a damp cloth and then dry it.
Operation
Induction cooking is a safe, advanced, efficient and economical cooking technology. It works by means of electromagnetic vibrations that generate heat directly in the pan, rather than indirectly through heating the glass surface. The glass is heated only because the frying pan eventually heats it.
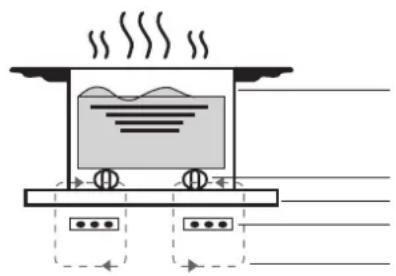
natural_image
Diagram of a steam locomotive emitting smoke from a platform, with no text or symbols present.Iron pot
Magnetic circuit
Ceramic glass plate
Induction coil
Induced currents
Touch controls
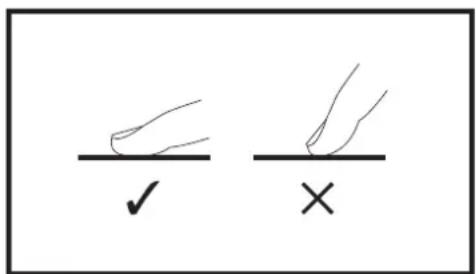
- Controls respond to touch, so there is no need to apply pressure.
- Use your fingertip, not the tip.
- You will hear a beep each time a touch is registered.
- Make sure that the knobs are always clean, dry and that there are no objects (e.g. a utensil or cloth) covering them. Even a thin film of water can hinder the operation of the controls.
text_image
Diagram showing two hand-drawn symbols: a checkmark on a horizontal line and an X on a vertical line, likely indicating correct or incorrect conditions.COOKING TIPS: Quality of pans
- Only use cookware with a base suitable for induction cooking. Look for the induction symbol on the packaging or on the bottom of the pan.
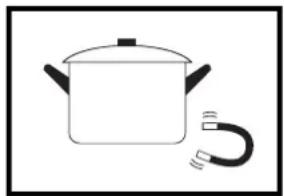
- You can check whether your cookware is suitable by performing a magnetic test. Move a magnet towards the base of the pan. If it is attracted, the pan is suitable for induction cooking.
natural_image
Simple line drawing of a cooking pot with a coiled tube (no text or symbols)If you do not have a magnet:
- Put some water in the pan you want to test.
- If it does not flash on the display and the water gets hot, the pot is suitable.
Cookware made of the following materials is not suitable: pure stainless steel, aluminium or copper, without magnetic base, glass, wood, porcelain, ceramic and earthenware. Do not use cookware with serrated edges or curved bases.
natural_image
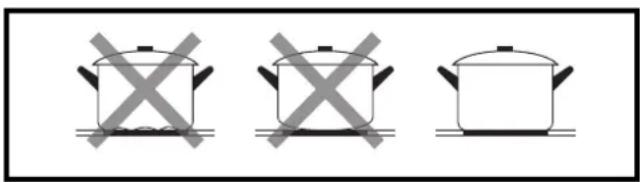
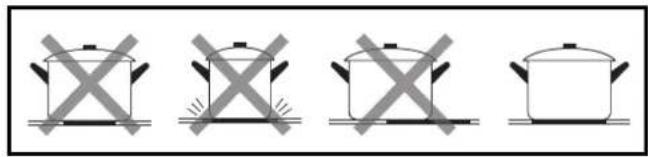
Three identical cooking pots with crossed-out handles, no text or symbols presentMake sure that the base of the pan is smooth, lies flat against the glass and is the same size as the cooking zone. Size as the cooking zone. Use pans with a diameter that is as large as the of the selected zone. Using a slightly wider pan will maximise the use of energy. Using a smaller pan may result in lower efficiency than expected. A pan smaller than 140 mm may not be detected by the hob.
Always centre the pan on the cooking zone.
natural_image
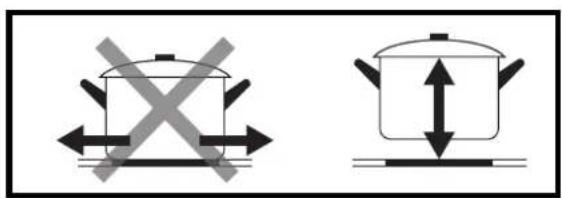
Four identical illustrations of a cooking pot with crossed X marks, shown in different positions (no text or symbols)Always lift frying pans from the induction hob, do not slide them, as they could scratch the glass.
text_image
Diagram showing two cooking pots with crossed arrows indicating pressure or movement, likely illustrating a cooking or heating process.COOKING TIPS: Dimensions
The cooking zones adapt automatically, up to a certain limit, to the diameter of the pan. However, the bottom of the pan must have a minimum diameter corresponding to the corresponding cooking zone. To get the best performance from your hob, place the pan in the centre of the cooking zone.
| Cooking zone | Pot base diameter | |
| ∅ Mínimo (mm) | ∅ Máximo (mm) | |
| A-B-C-D 100 | 220 | |
| Flexi Bridge zones | 210 220 x | 380 |
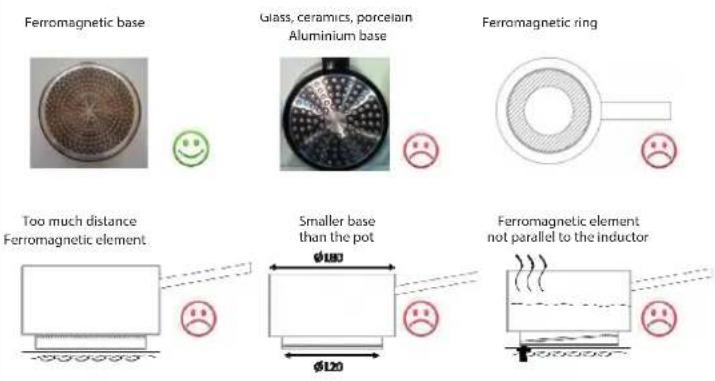
Suitable materials: steel, enamelled steel, cast iron, stainless steel with ferro-magnetic base, aluminium with ferro-magnetic bottom
Unsuitable materials: aluminium and stainless steel with non-ferro-magnetic bottom, copper, brass, glass, ceramics, porcelain, etc.
text_image
Ferromagnetic base Glass, ceramics, porcelain Aluminium base Ferromagnetic ring Too much distance Ferromagnetic element Smaller base than the pot φ100 φ120 Ferromagnetic element not parallel to the inductorManufacturers specify whether their products are induction compatible.
NOTE: Overheating of an empty pot with a curved or logoed bottom or a recess stamped in the centre could damage the inductor.
SONIDOS DURANTE EL USO:
- Noises during firing. May be due to the quality of the ferritic base of the vessels.
- A faint “click click” sound is heard. This sound is normal. It is a safety indicator which detects the presence of the pan on the inductor. It is activated automatically when the hob is switched on and during cooking.
- A slight humming sound is heard. This is a normal sound that comes from the transmission of energy from the inductor to the base of the vessel (electromagnetic waves).
If the pan or frying pan is not detected, it is possible that the cookware is not suitable for induction. Bear in mind the above recommendations to avoid any problems or inconveniences when cooking.

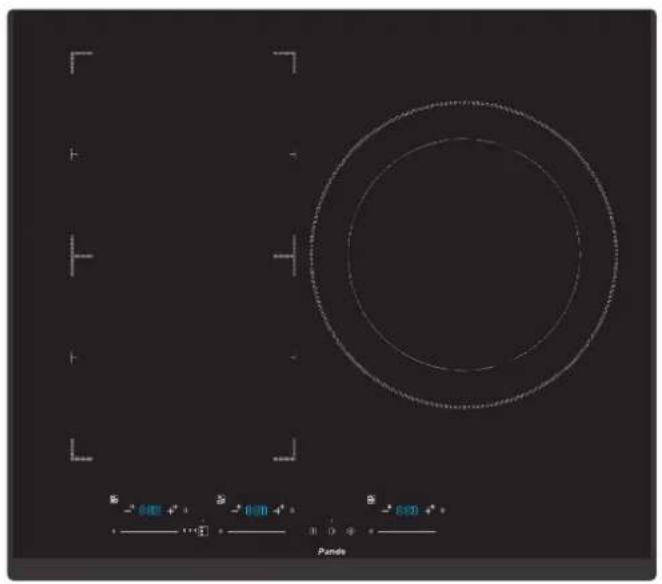
DISPLAY PI3110 - 3111
BEVELING

natural_image
Three circular ovens on a dark electrical stove, with a digital display showing 'Panda' and measurement scales (no text or symbols on the ovens themselves)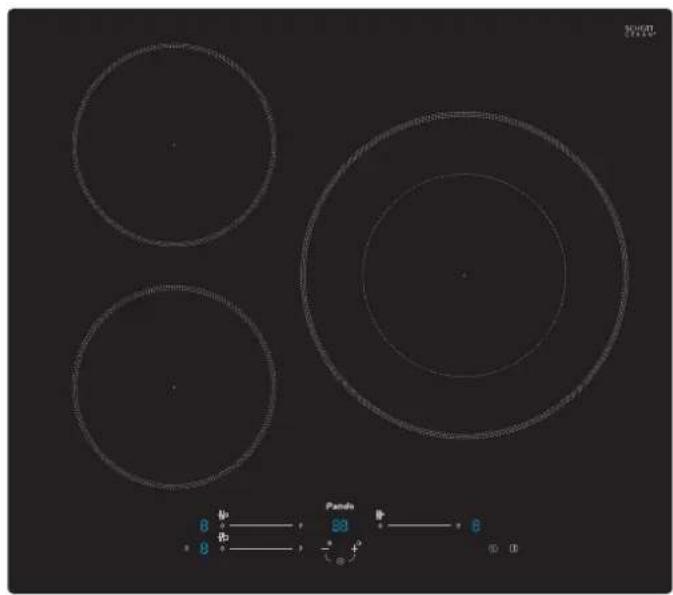
- Cooking zone indicator icon
- ON/OF control
- Blocking
-
Pause
-
Power slider touch control
- Decrease of timer time
- Increasing the timer time
- Booster
DISPLAY PI3150 - 3151
BEVELING
text_image
5 5.00 + 5 5.00 + 5 5.00 + 5 Pands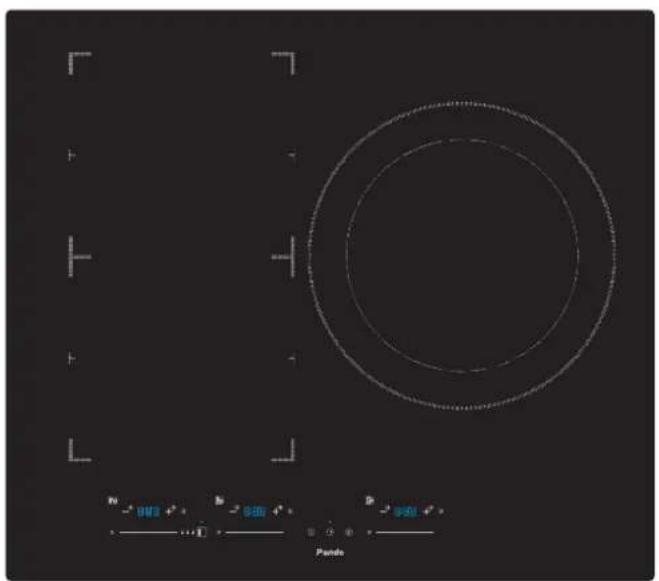
text_image
Punds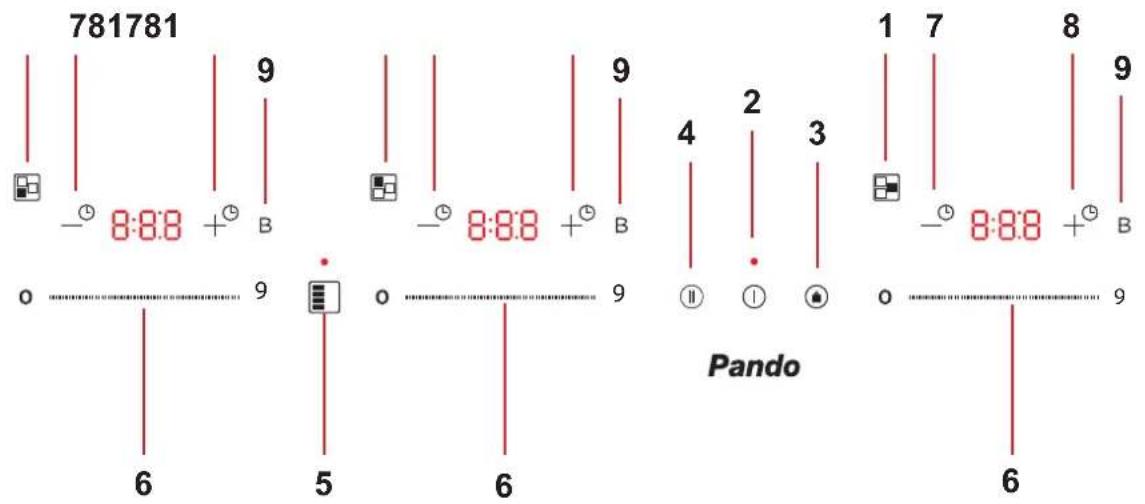
text_image
781781 9 - 8:8:8 + B 0 9 6 5 6 9 Pando 4 2 3 ① ① ② 1 7 8 9 - 8:8:8 + B 0 9 6- Cooking zone indicator icon
- ON/OF control
- Blocking
- Pause
-
Activation/Deactivation of the flexible/Brigde
-
Power slider touch control
- Decrease of timer time
- Increasing the timer time
- Booster
DISPLAY PI3210 - 3211
BEVELING
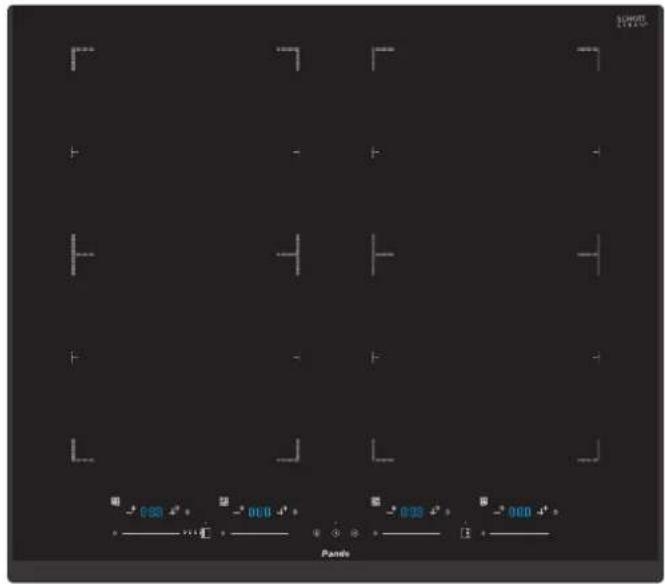
text_image
Ponds 0.00 0.00 0.00 0.00 - - - - - - - - - - - - - - - - - - - - - - - - - - - - - - - - - - - - - - - - - - - - - - - - - - - - - - - -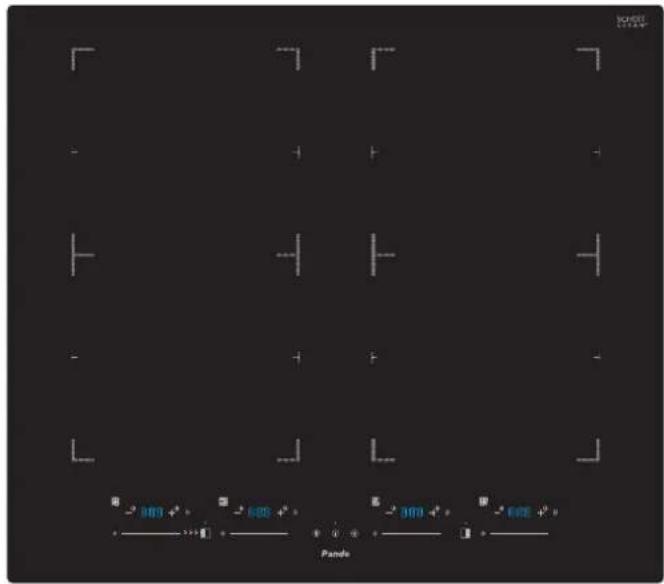
text_image
TARELL Pands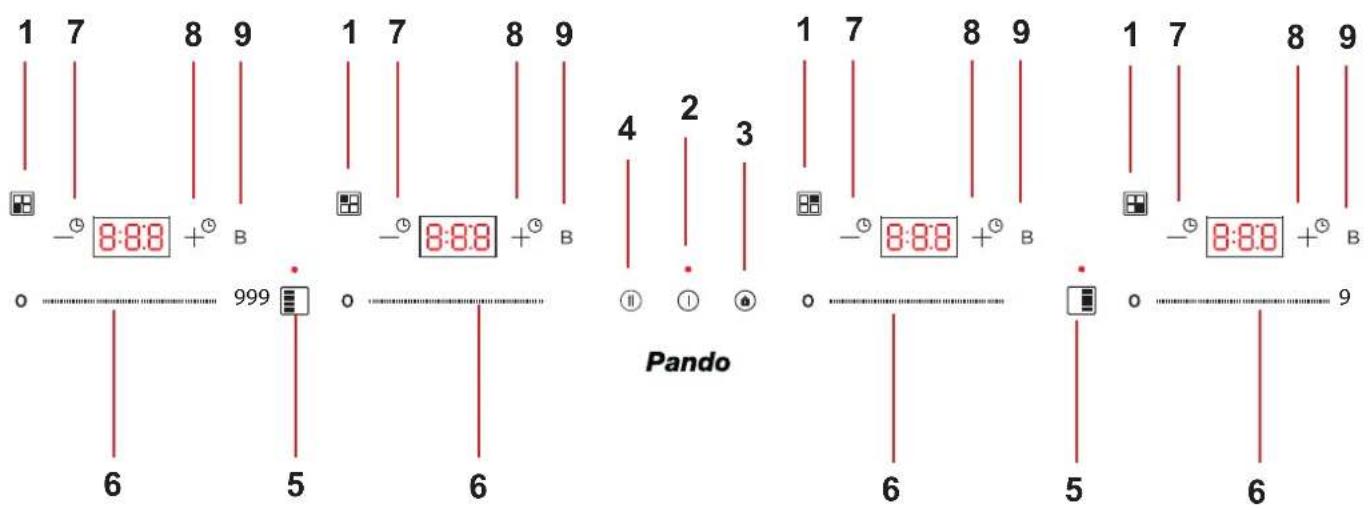
text_image
1 7 8 9 1 7 8 9 -① 8:8B +① B -① 8:8B +① B 0 999 0 6 Pando 1 7 8 9 1 7 8 9 -① 8:8B +① B -① 8:8B +① B 0 6 5 6 6 6 6 5 6- Cooking zone indicator icon
- ON/OF control
- Blocking
- Pause
-
Activation/Deactivation of the flexible/Brigde
-
Power slider touch control
- Decrease of timer time
- Increasing the timer time
- Booster
How to use your induction hob
Start of cooking
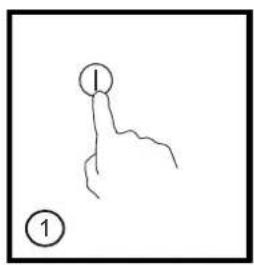
Press the ON/OFF sensor for three seconds. After switching on, the buzzer will beep and all displays will show “-” or “--”, indicating that the induction hob has entered standby mode. Place a suitable container on the cooking zor you wish to use.
Set the desired power level, using the power adjustment slider:
- If you do not choose a temperature setting within 1 minute, the induction hob will automatically switch off and you will have to start again.
- You can change the temperature setting at any time
text_image
① ①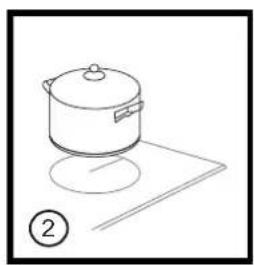
natural_image
Simple line drawing of a cooking pot on a stand, no text or symbols present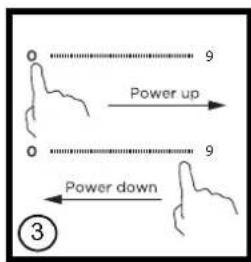
text_image
0 9 Power up 0 9 Power down ③If the display flashes alternately with the temperature setting it means that:
- You have not placed a frying pan on the correct cooking zone.
- The pan you are using is not suitable for induction cooking.
- The pan is too small or not properly centred on the cooking zone.
- No heating occurs unless there is a suitable pan on the cooking zone.
- The display will automatically switch off after 2 minutes if a suitable pan is not placed on the cooking zone.
End of cooking
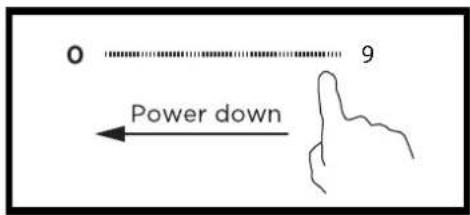
Switch off the cooking zone by moving it to "0" or Press the ON/OFF sensor key for three seconds.
text_image
0 9 Power down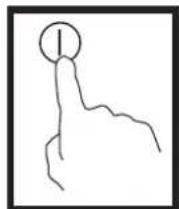
Beware of hot surfaces
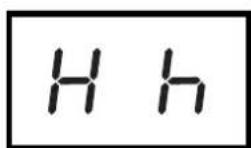
The residual heat indicator will display H indicating which cooking zone is hot to the touch. It will disappear when the surface has cooled down to a safe temperature. It can also be used as an energy saving function if you want to heat more pans, use the hotplate that is still hot.
Using the Booster function
Activate the booster function
Once the desired power level has been set, press sensor B, the power value indicator changes and the maximum heating power is reached.
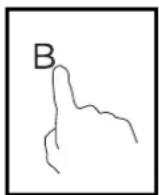
Deactivate the booster function
To cancel the booster function press sensor B again or slide the slider to 0.
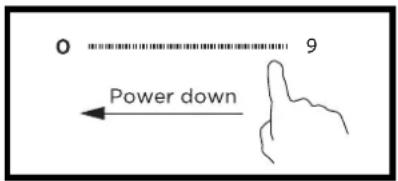
text_image
0 Power down 9Note:
- The BOOSTER function can be used on all cooking zones.
- The cooking zone returns to its original setting after 10 minutes.
- When the booster function of the 1st cooking zone is activated, start the 2nd cooking zone, and the 1st cooking zone will automatically change to level 9 and vice versa.
Locking the controls
- You can lock the controls to prevent unintentional use (e.g. children accidentally switching on the cooking zones).
- When the controls are locked, all controls except the ON/OFF control are disabled.
To lock the controls
Press and hold the icons — ^① and + ^② simultaneously for a few seconds until the hob emits a beep indicating that the locking function has started and the “Lo” icon starts flashing.
To unlock the controls
Press and hold down both the — ^⑨ and + icons for a moment.
ATTENTION
When the hob is in lock mode, all controls are disabled except ON/OFF, you can always switch off the induction hob with the ON/OFF control in case of emergency, but you must unlock the hob first in the next operation.
Timer control
- Models PI-3150,3151 and PI-3210,3211 have independent time increase and decrease buttons for each cooking zone.
- Pressing the timer setting sensor will display:
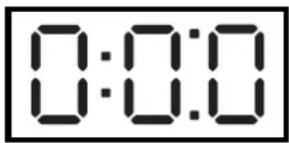
text_image
0:0:0 0:0:0- Press the key to increase or decrease the time.
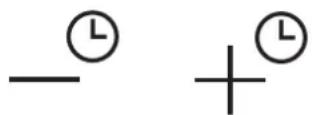
- If you have the timer already set and then activate the flex/bridge mode, the timer will be deactivated and you will have to set it again (only for PI 3150 - 3151 - 3210 - 3211 models).
• The maximum adjustable time is 9:59.
• After programming the cooking time, the display will only show the remaining time.
Tables of automatic safety shutdown times
The automatic switch-off is a safety protection function for your induction hob. It switches off automatically if you ever forget to turn off the hob. The preset operating times for different power levels are shown in the table below.
PI 3110 - 3111
| Power level | 1 2 3 | 4 5 6 7 8 9 | |||||
| Default working timer (Time) | 8 8 8 4 4 4 | 2 2 2 |
PI 3150 - 3151
| Power level | 1Pause 2 3 | 4 5 6 | 7 8 9 | ||||||
| Default working timer (Time) | 8 8 8 | 6 6 4 | 4 2 2 | 1.5 |
PI 3210 - 3211
| Power level | 1Pause 2 3 | 4 5 6 7 8 9 | |||||||
| Default working timer (Time) | 8 8 8 | 6 6 4 4 | 2 | 2 |
When the pan is removed, the induction hob can stop heating immediately and the hob switches off automatically after 2 minutes.

Persons with a cardiac pacemaker should consult their physician before using this unit.

Flexible zone/bridge (Solo para modelos PI 3150 - 3151 - 3210 - 3211)
This zone can be used as a single zone or as two different zones, depending on the cooking requirements at any given time.
The flexible zone consists of two independent inductors which can be controlled separately. When operating as a single zone, the part that is not covered by the cookware is automatically switched off after one minute.
Cooking utensils is automatically switched off after one minute.
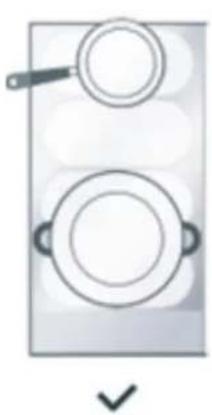
To ensure correct detection of the pans and even heat distribution, the pans must be positioned correctly:
At the front or rear of the flexible zone when the cookware is less than 22 cm.
- Anywhere with larger pots
- To activate the bridge zone press the sensor with the icon
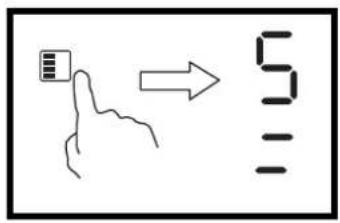
text_image
Diagram showing a hand pointing at a small icon with an arrow, next to a vertical sequence of numbers 5 and 3.The power adjustment works like any other normal zone.
If the pot is moved from the front to the back (or vice versa), the flex zone automatically detects the new position, maintaining the same power.
To add another pot, press the dedicated keys again, to detect the cookware.
As two independent zones
To use the flex zone as two different zones with different powers, press the Flex zone knob.
Pause
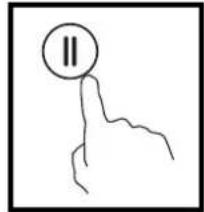
- When the cooking zones are in operation, touch the "II" key. control, all the displays will show " " and heating by level 2 at this point only the " II " and " " controls can be operated.
- Touch "II" again, the displays show the original setting and the cooking zones continue to heat up.
natural_image
Simple line drawing of a hand holding a circle with the number 'II' above it, no text or symbols present.Examples of good and bad placement:
natural_image
Simple line drawing of a two-cup pot with a handle and checkmark below (no text or symbols)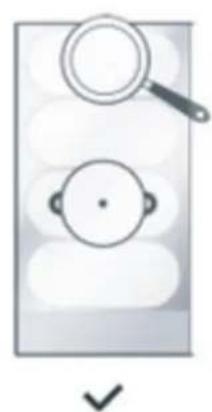
natural_image
Simple line drawing of a magnifying glass hovering above two circular objects, with a checkmark below (no text or symbols)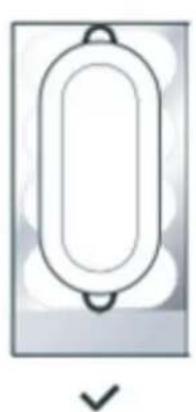
natural_image
Simple line drawing of an oval object with a handle and base, no text or symbols present.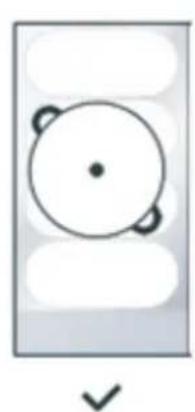
natural_image
Simple diagram of a circular object with four small protrusions, no text or symbols present.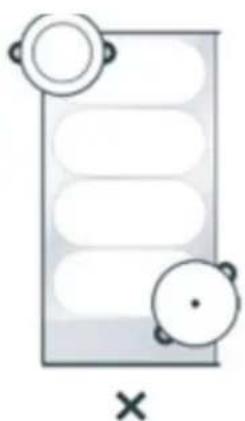
natural_image
Simple line drawing of a document with two circular items and an 'X' mark below (no text or symbols on the document itself)Cooking Guidelines
Be careful when frying, as oil and fat heat up very quickly, especially when using PowerBoost. At extremely high temperatures, oil and fat ignite spontaneously, posing a serious fire hazard.
Cooking tips
When food starts to boil, reduce the temperature. Using a lid will reduce cooking time and save energy by retaining heat.
Minimise the amount of liquid or fat to reduce coo-king times.
Start cooking on high heat and reduce heat when food is very hot.
▶ Simmer the rice
- Simmering occurs below boiling point, at about 85 °C, when bubbles only occasionally rise to the surface of the cooking liquid. It is the key to delicious soups and tender stews, because the flavours develop without overcooking the food. You should also cook thickened egg and flour-based sauces below boiling point.
- Some tasks, including cooking rice by the absorption method, may require a setting higher than the lowest setting to ensure that the food is cooked properly in the recommended time.
▶ Grilled fillet steak
For cooking juicy and tasty steaks:
-
Allow the meat to stand at room temperature for about 20 minutes before cooking.
-
Heat a heavy frying pan.
-
Brush both sides of the steak with oil. Drizzle a small amount of oil into the hot pan, then lower the meat into the hot pan.
-
Turn the fillet only once during cooking. The exact cooking time will depend on the thickness of the steak and how well done you want it. The time can vary between 2 and 8 minutes per side. Press the steak to measure the degree of doneness: the firmer it is, the more done it is.
- Let the steak rest on a warm plate for a few minutes to relax and tenderise before serving.
Para saltear
- Choose an induction-compatible flat wok or a large frying pan.
- Have all ingredients and equipment ready. Cooking should be quick. If cooking large quantities, cook the food in several smaller batches.
- Preheat the pan briefly and add two tablespoons of oil.
- Cook the meat first, set aside and keep warm.
- Sauté the vegetables. When they are hot but crisp, lower the cooking zone, return the meat to the pan and add the sauce.
- Gently stir the ingredients to make sure they are heated through.
- Serve immediately.
Detection of small items
When an improperly sized or non-magnetic frying pan (e.g. aluminium), or any other small object (e.g. knife, fork, key) is left on the hob, the hob automatically switches to standby mode in 1 minute. The fan will continue to cook on the induction hob for a further 1 minute.
Temperature settings
The settings given below are for guidance only. The exact setting will depend on a number of factors, including the cookware and the amount you cook.
Experiment with the induction hob to find the settings that suit you best.
| THERMAL SETTING | FUNCTIONS |
| 1-2 | Gentle heating for small quantities of food. |
| Melt chocolate, butter and foods that burn quickly. | |
| Simmering/heating. | |
| 3-4 | Reheating |
| Fast simmering. | |
| Rice cooker | |
| 5-6 Pancakes | |
| 7-8 | Sautéed |
| Cooking pasta. | |
| 9 / B | Sautéed. |
| Abrasador. | |
| Bring the soup to the boil | |
| Boiling water |
Care and cleaning
| WHAT? | How? | Important! |
| Everyday dirt of the glass (fingerprints, marks, food stains or non-gaseous spills on the glass). | 1. Switch off the power supply to the hob.2. Apply a hob cleaner while the glass still tempered (but not hot!).3. Rinse and dry with a clean cloth paper.4. Switch the hob back on. | - When the power to the hob is switched off, there will be no "hot surface" indication, but the cooking zone may still be hot! Extreme caution should be exercised.- Strong scouring pads, some nylon scouring pads and strong/abrasive cleaning products can scratch glass. Always read the label to check your cleaner or pad is suitable.- Never leave cleaning residues on the hob: the glass may become stained. |
| Boiled, melted and hot sugary spills on glass | Remove them with a spatula or raz blade scraper suitable for induction gla cooktops, but be careful of hot surfac in the cooking zone:1. Switch off the power supply to the hob at the wall.2. Hold the blade or utensil at a 30 angle and scrape the dirt or spilla onto a cool area of the hob.3. Wipe off any dirt or spillage with kitchen towel or paper towel.4. Follow steps 2 to 4 for "Daily dirt of the glass". | - Remove stains left by melted and sugary food or spills as soon as possible. If left to cool or the glass, they may be difficult to remove. remove or even permanently damage the surface of the glass.- Cutting hazard: when the safety cover retracts, the blade of a scraper is razor-sharp. Use with extreme caution care and safe storage at all times y out of the reach of children. |
| Overflow of touch controls | 1. Switch off the power supply to the hob.2. Absorb the spill3. Clean the touch control area with clean, damp sponge or cloth.4. Dry the area completely with a paper towel.5. 5. Switch the hob back on. | - The hob can beep off and the touch controls can be switched on and off. may not work as long as there is liquid on them. Be sure to dry the touch contr area before switching the hob back on. |
Tips and suggestions
| PROBLEM | POSSIBLE CAUSES | WHAT TO DO |
| The induction hob cannot be switched on. | There is no power. | Make sure that the induction hob is connected to the power supply.and that it is switched on.Check for power, (power outage in your home or area) you have checked everything and the problem persists, call a qualified technician. |
| Touch controls do not respond. | The controls are locked. | Unlock the controls. See section "Refer to the instructions for use of the induction hob". |
| Touch controls are difficult to operate. | There may be a slight film of water on the controls. | Make sure the touch control area is dry and use your fingertip when touching the controls. |
| The glass is scratching. Kitchen | en utensils with rough edges.Not suitable, abrasive scouring pad or cleaning products used. | Use cookware with flat, smooth bases. See "Cooking tips" - See "Care and cleaning". |
| Some frying pans make crackling or popping noises. | This may be due to the construction of your cookware (layers of different metals vibrating together in a different). | This is normal for kitchen utensils and does not indicate a fault. |
| The induction cooktop emits a slight buzzing sound when used on a high heat setting. | This is due to the technology of induction cooking. | This is normal, but the noise should attenuate or disappear. completely by reducing the heat setting. |
| Fan noise from the induction hob. | The cooling fan integrated in your induction cooktop has been switched on to prevent the electronic components from overheating.switch off. | This is normal and does not require any action. Do not disconnect the induction hob power supply from the wall while the fan is operating. |
| The pans do not heat up and appears on the display. | The induction hob cannot detect the frying pan because it is not suitable for induction cookers.The induction hob does not detect the frying pan because it is too small for the cooking zone. or is not well focused on it. | Use cookware that is suitable for use in the cooker. induction. See section "Cooking tips".Centre the pan and ensure that the base of the pan matches the size of the cooking zone. |
| The induction hob or a cooking zone has been switched off unexpectedly, a tone sounds and an error code is displayed.(usually alternating with one or two digits on the display of the cooking timer). | Technical failure. | Note the error letters and numbers, change the power supply to the induction hob on the wall, and contact a PANDO SAT.MUST BE PERFORMED BY A PANDO SAT SPECIALIST IF ANY DAMAGE OCCURS DURING THIS PROCESS THAT HAS BEEN CARRIED OUT BY A USER OR A PANDO SAT SPECIALIST, PLEASE CONTACT A PANDO TAS.UNAUTHORISED PERSONNEL WILL NOT BE COVERED BY THE WARRANTY, EVEN IF IT IS STILL VALID! |
Fault visualisation and inspection
| FAIL | PROBLEM | SOLUTION |
| The LED does not light up when the unit is plugged in. | No power is supplied. | Check that the plug is securely fitted into the socket and that the socket is working. |
| Connected accessory power supply board and display board fail. | Check the connection. | |
| The accessory power supply board is damaged. | Please contact the technical service. | |
| The display board is damaged. | ||
| Some buttons do not work or the LED display is not normal. | The display board is damaged. | |
| The cooking mode indicator lights up, but heating does not start. | High hotplate temperature. | Ambient temperature may be too high. The air inlet or outlet may be blocked.If the problem persists, contact technical support. |
| Something is wrong with the fan. | ||
| The power supply board is damaged. | ||
| The heating suddenly stops during operation and "u" flashes on the display. | Pan Type is wrong. | Use the appropriate pot (see instruction manual). |
| The diameter of the pot is too small. | ||
| The pan has overheated; | The unit is overheated. Wait for the temperature to return to normal.Press the "ON/OFF" button to reset the unit. | |
| Heating zones on the same side (such as the first and second zone) would show "u". | Failure in the connection of the power board and the display board; | Check the connection. |
| The display board of the communication part is damaged. | Please contact the technical service. | |
| The main board is damaged. | ||
| The fan motor sounds abnormally. | The fan motor is damaged. |
Specific for PI3110 - 3111
| FAULT CODE | PROBLEM | SOLUTION |
| Automatic recovery | ||
| E1 | The supply voltage is higher than the nominal voltage. | Check if the power supply is normal.Switch on after the power supply food is normal. |
| E2 | Switch on after the power supply food is normal. | |
| E3 | High board sensor temperature ceramics. (1#) | Wait for the temperature of the ceramic h to return to normal.Touch the "ON/OFF" button to restart the unit. |
| E4 | High board sensor temperature ceramics. (2#) | |
| E5 | High temperature of IGBT. (1#) | Wait for the IGBT temperature to return to normal.Touch the "ON/OFF" button to reset the unit.Check for any obstruction in the ventilatio If the problem persists call the service technical. |
| E6 | High temperature of the IGB (2#) | |
Specific for PI3150 - 3151
| PROBLEM | POSSIBLE CAUSES WHAT TO DO | |
| E1, E2, E7 | Temperature sensor failure | Contact the supplier. |
| E3、E4 | Failure of the temperature sensor of the IGBT. | Contact the supplier. |
| EU | The connection between the display board and the main board fails, or touch IC communication fails. | Contact the supplier. |
| EL/EH | Abnormal supply voltage | Check if the power supply is normal. |
| C1 | Ceramic glass plate temperature sensor Is high | Please restart after the induction hob cools down. |
| C2 | IGBT temperature sensor It is high | |
| F5 | Fan malfunction | Contact the supplier. |
| EF | Two or more keys are triggered for an extended period of time. | Clean up of the area of operations |
Specific for PI3210 - 3211
Troubleshooting for zones 1 and 2
| PROBLEM | POSSIBLE CAUSES | WHAT TO DO |
| E1,E2,E7,C1 | Temperature sensor failure | Contact the supplier. |
| E3,E4 | allo of the temperature sensor of the IGBT. | Contact the supplier. |
| EU | Failure of the connection between the display and the main board | Contact the supplier. |
| EL,EH | Abnormal supply voltage | Check if the power supply is normal. Switch on after the is normal. |
| C3 | Temperature sensor of the glass ceramic hob Is high | Please restart after the induction hob cools down. |
| C2 | IGBT temperature sensor It is high |
Troubleshooting for zones 3 and 4
| Fault code | Problem Solution | |
| Self-Recovery | ||
| EL | The supply voltage is higher than the nominal voltage. | Check if the power supply is normal.Switch on after the power supply food is normal. |
| EH | The supply voltage is lower than the nominal voltage. | |
| C1,C3 | High temperature of the ceramic plate sensor. | Wait for the temperature of the ceramic hob to return to normal.Touch the "ON/OFF" button to reset the unit. |
| C2 | High temperature of IGBT . (1#) | Wait for the IGBT temperature to return to normal.Touch the "ON/OFF" button to reset the unit.Check if the fan is working properly; if it i not, call the SAT Pando technical service. |
Installation
Before Installing the Hob
- Ensure that the work surface is square and level, and there are no structural or other obstructions that interfere with the space requirements.
- Certify that the work surface is of a heat-resistant and insulating material.
- If the hob is installed above an oven, check that it has a built-in cooling fan.
- Ensure that the installation will meet all clearance requirements and applicable standards and regulations.
- Ensure that a suitable isolation switch providing total disconnection from the mains supply is incorporated in the permanent wiring, mounted and fitted in accordance with local wiring rules and regulations.
- The isolating switch must comply with electrical regulations and provide 3 mm contact separation on all poles.
- The isolating switch must be easily accessible to the customer with the hob installed.
- If in doubt about the installation, please consult. SAT PANDO
Precautions
- The induction hob must be installed by qualified personnel or technicians. We have professionals at your service. Please never carry out the operation on your own.
- The hob SHALL NOT be installed directly above a dishwasher, refrigerator, freezer, washing machine or clothes dryer, as moisture may damage the electronics of the hob.
- The wall and induced heating zone above the table surface must withstand the heat.
- To avoid any damage to the adhesive they must be heat resistant.
- A steam cleaner should not be used.
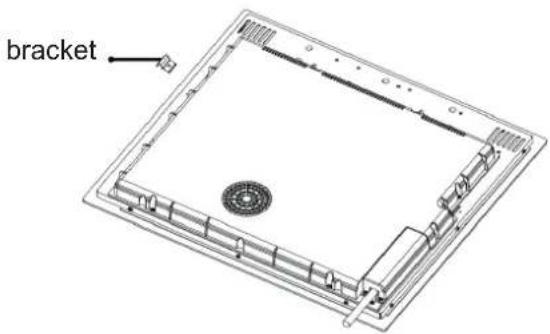
Before placing the staples.
The appliance should be placed on a stable and smooth surface (use the packaging).
Adjustment of the staple position.
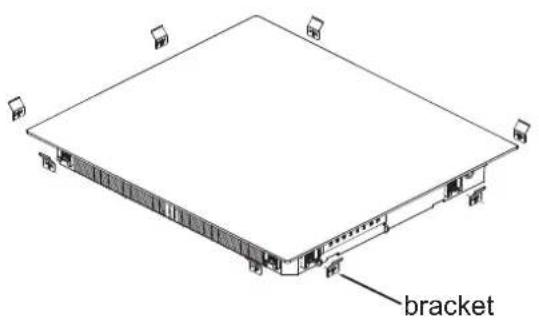
Secure the countertop to the work surface by inserting 2 to 8 staples on the underside of the board (see image) prior to installation.
Adjust the staple position to accommodate different tabletop thicknesses.
PI3150-3151 PI3210-3211
text_image
bracket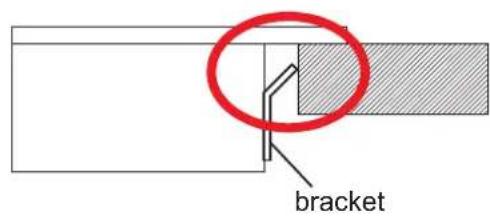
text_image
bracketPI3110-3111
text_image
bracket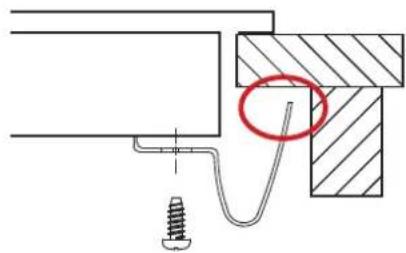
natural_image
Technical diagram showing a mechanical assembly with a spring and threaded rod, no text or symbols presentVentilation
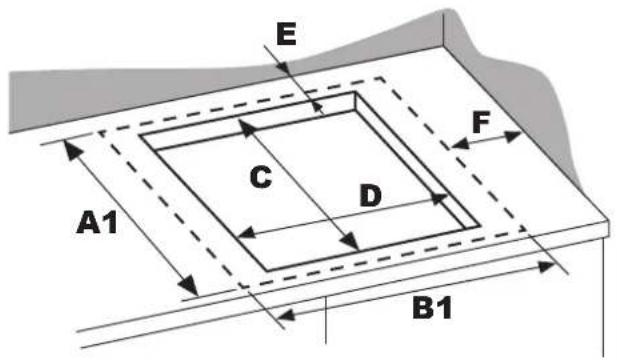
Cut out the work surface according to the dimensions shown in the drawing.
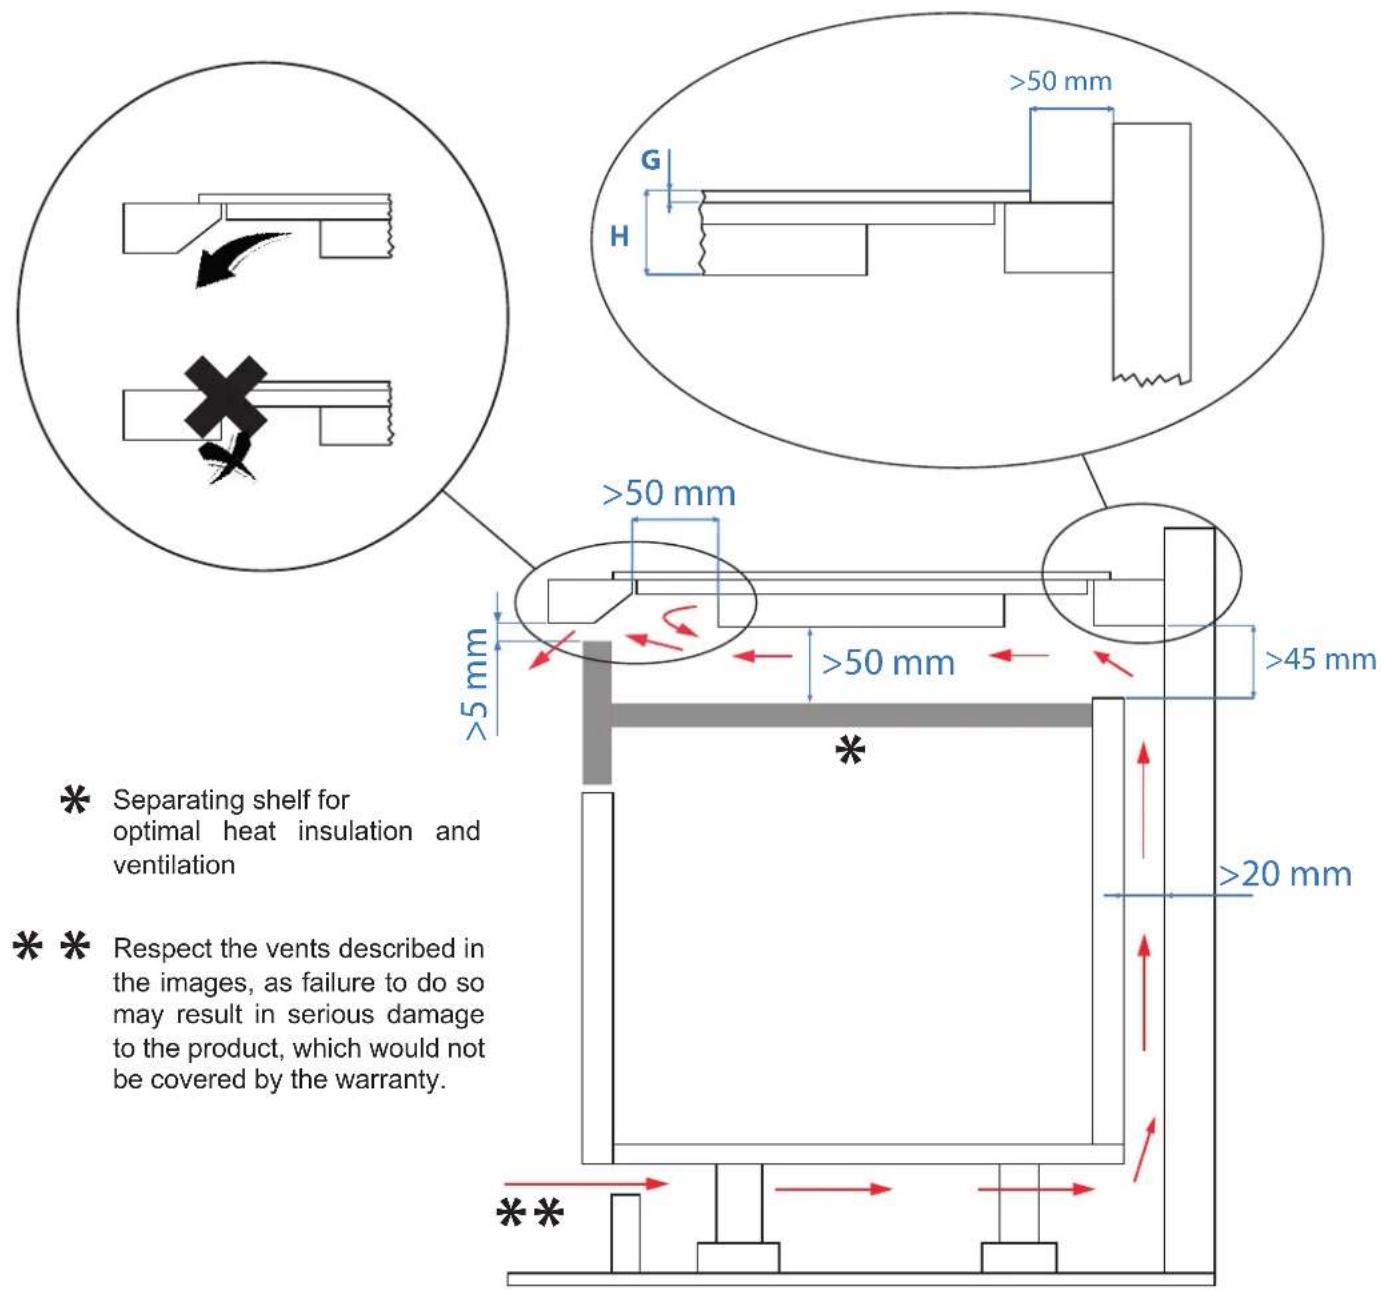
For installation and use, a minimum clearance of 5 cm around the hole must be maintained. Make sure that the thickness of the work surface is at least 30 mm. Select a heat-resistant and insulating work surface material (wood and other similar fibrous or hygroscopic materials should not be used as work surface material unless impregnated) to avoid electric shocks and major deformations caused by heat radiation from the hob. As shown below:

WARNING: Ensure adequate ventilation.
Make sure that the induction hob is well ventilated and that the air inlet and outlet are not blocked. To avoid accidental contact with the overheated underside of the hob, or receiving an unexpected electric shock during work, it is necessary to place a wooden insert, fixed with screws, at a minimum distance of 50 mm from the underside of the hob. Observe the following requirements.
There are ventilation holes around the outside of the hob. MUST ensure that these holes are not blocked by the hob when fitting the hob.
- Please note that the glue that joins the plastic or wood material to the cabinet must be able to withstand temperatures of not less than 150^ C to prevent the paneling from peeling off.
- Therefore, the back wall and the adjacent and surrounding surfaces must be able to withstand a temperature of 90^ C.
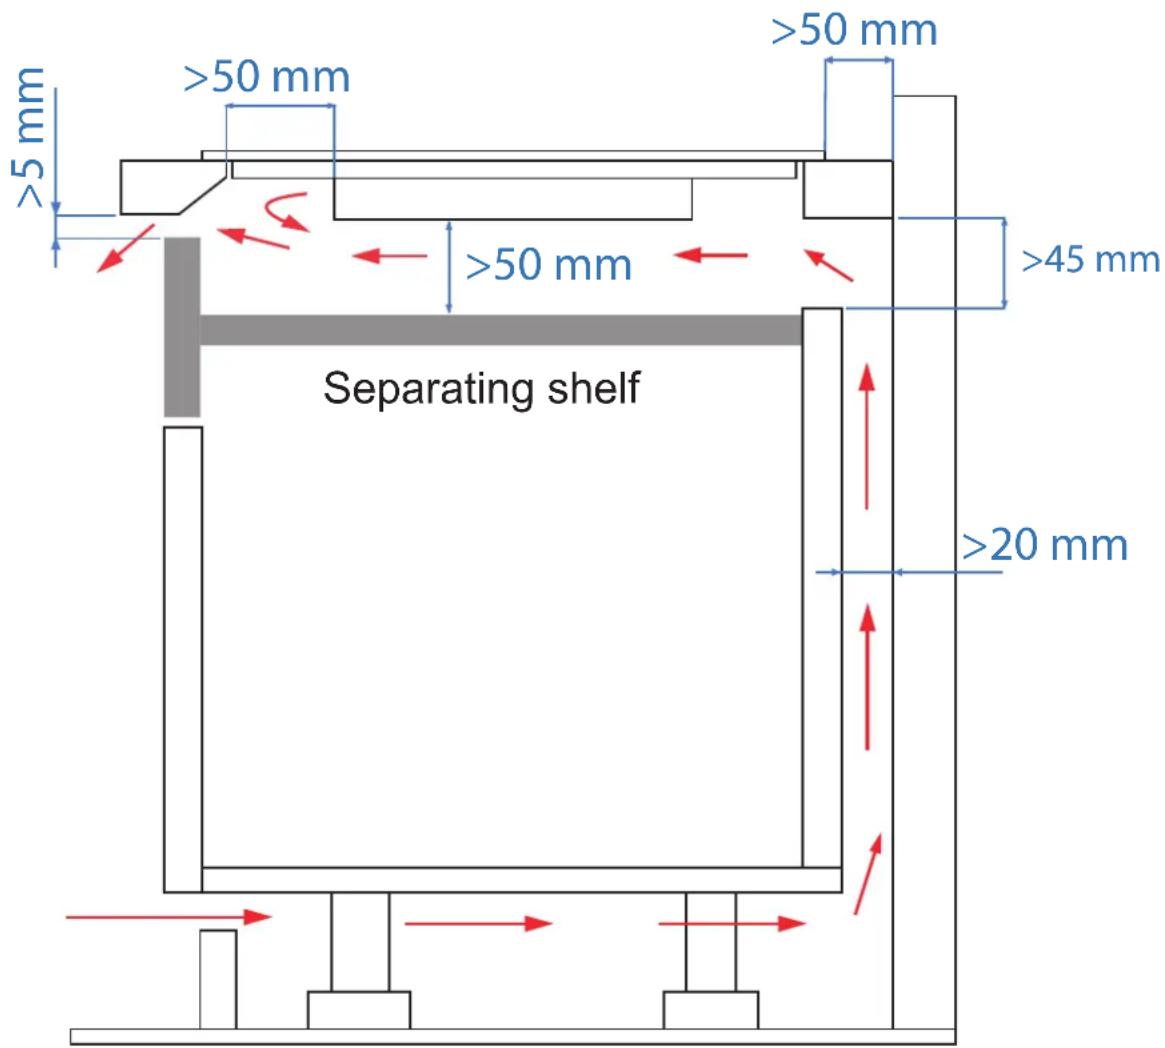
text_image
>50 mm >50 mm >50 mm >45 mm Separating shelf >20 mmCORRECT AND NECESSARY VENTILATION
INSTALLATION DIAGRAM
text_image
Separating shelf for optimal heat insulation and ventilation Respect the vents described in the images, as failure to do so may result in serious damage to the product, which would not be covered by the warranty. >50 mm >50 mm >45 mm >20 mm **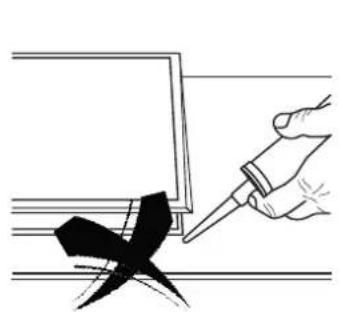
natural_image
Illustration of a hand using a tool to mark a black cross on a white surface (no text or symbols)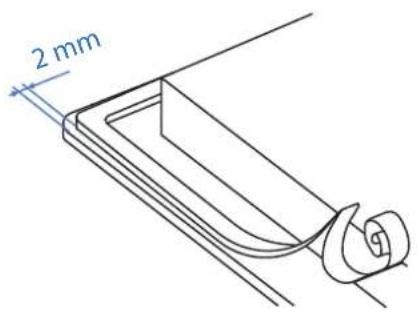
text_image
2 mmThe joint between the hob and the worktop must NOT be made with sealants or silicone. The use of these types of products in the installation may damage the product and make it difficult for the service technician to access or remove. Damage or expenses resulting from non-compliance will not be covered by the product warranty.
The perimeter edge must be finished with the gasket included in the product by gluing it to the lower edge of the panel 2 mm from the outer edge, after removing the protective film.
Scope of delivery Model PI - 3110
text_image
E C D F A1 B1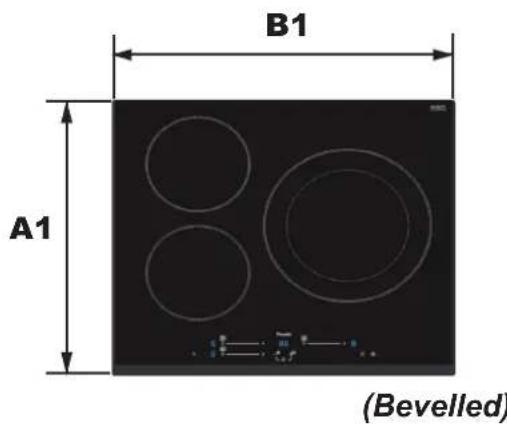
text_image
B1 A1 (Bevelled)| Glass size Size of | the cut Glass thickness | Total height product | |||||
| A1 B1 C | D E F G H | ||||||
| 520 590 | 495 ± 1 565 | ± 1 50 50 4 | 60 | ||||
Scope of delivery Model PI - 3111
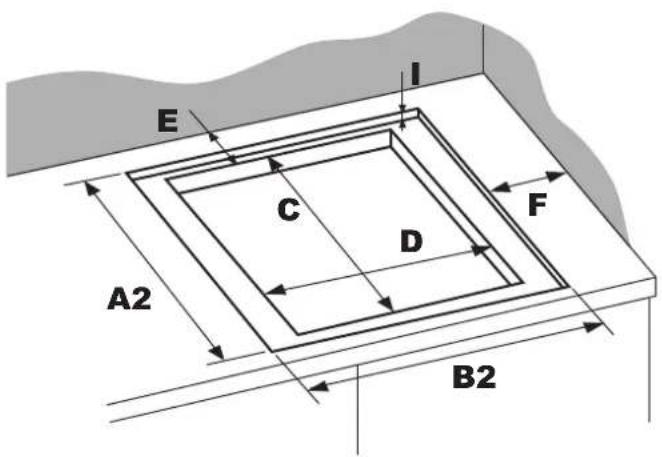
text_image
E I C D F A2 B2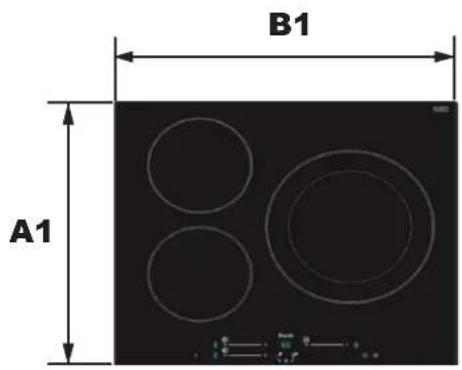
text_image
B1 A1(Straight glass)
| Glass size Size of the cut Glass thickness | Total height product | Installation of glass recessedo | ||||||||
| A1 | B1 | C | D | E | F | G | H | A2 | B2 | I |
| 520 | 590 | 495 ± 1 | 565 ± 1 | 50 | 50 | 4 | 60 | 524 | 594 | 5 |
Scope of delivery Model PI - 3150
text_image
E C D F A1 B1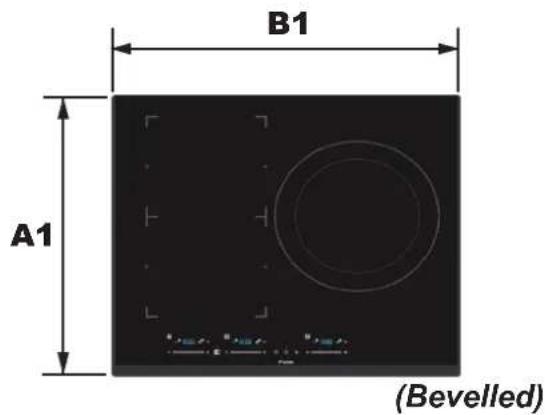
text_image
B1 A1 (Bevelled)| Glass size | Size of the cut | Glass thickness | Total height product | ||||
| A1 | B1 | C | D | E | F | G | H |
| 520 | 590 | 480 ± 1 | 560 ± 1 | 50 | 50 | 4 | 50 |
Scope of delivery Model PI - 3151
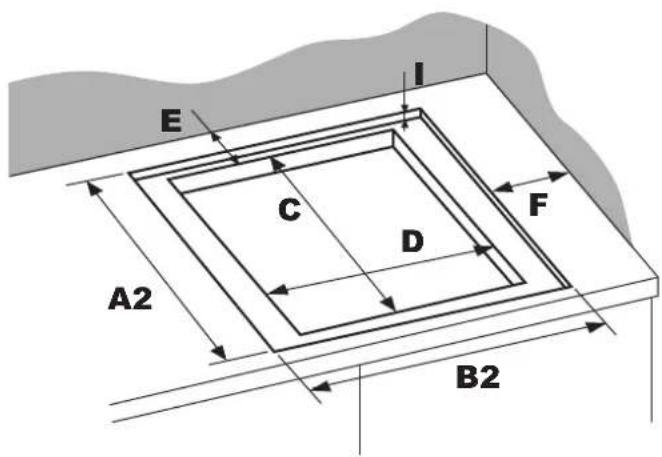
text_image
E I C D F A2 B2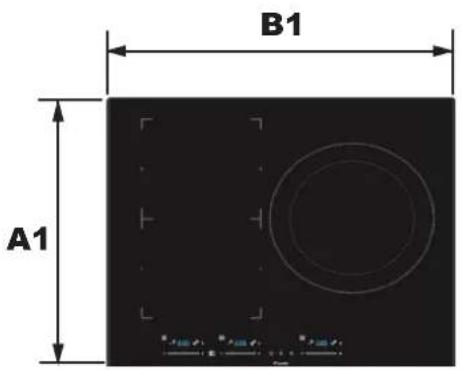
text_image
B1 A1(Straight glass)
| Glass size Size | of the cut Glass thickness | Total height product | Installation of glass recessed | |||||||
| A1 B1 | C D E F G | H A2 B2 I | ||||||||
| 520 | 590 | 480 ± 1 | 560 ± 1 | 50 | 50 | 4 | 50 | 524 | 594 | 5 |
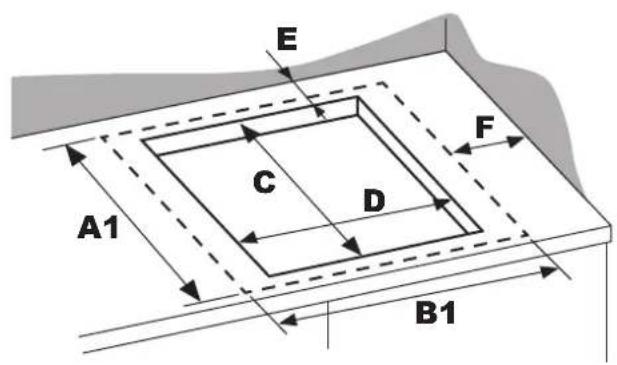
Scope of delivery Model PI - 3210
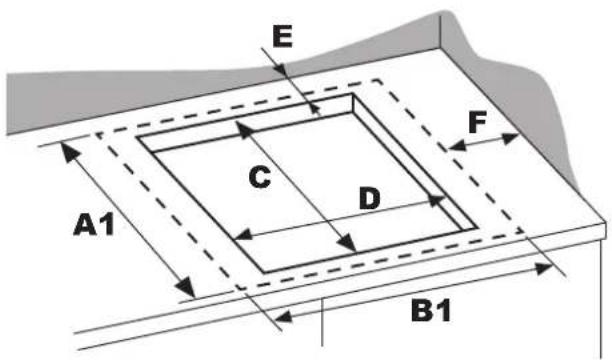
text_image
E C D F A1 B1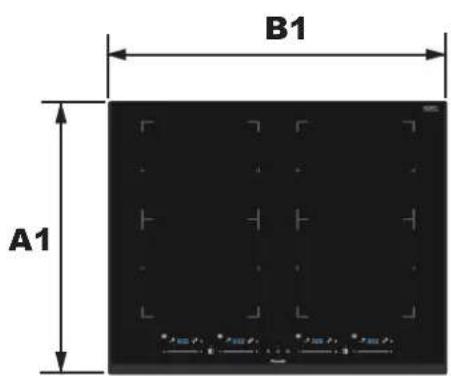
text_image
B1 A1(Bevelled)
| Glass size | Size of the cut | Glass thickness | Installation of glass recessed | ||||
| A1 | B1 | C | D | E | F | G | H |
| 520 | 590 | 480 ± 1 | 560 ± 1 | 50 | 50 | 4 | 50 |
Scope of delivery Model PI - 3211
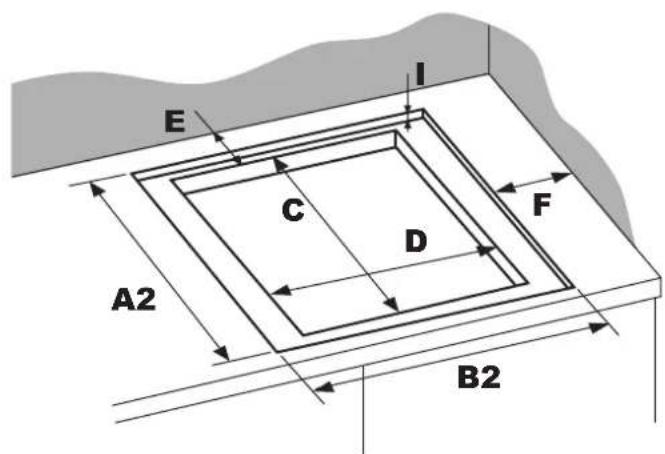
text_image
E I C D F A2 B2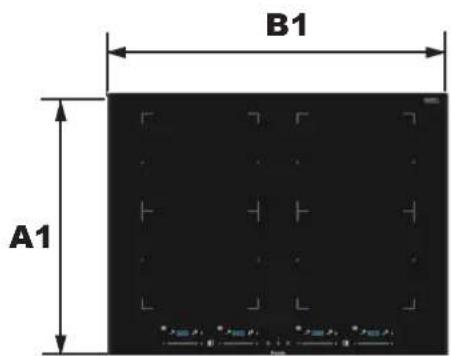
text_image
B1 A1(Straight glass)
| Glass size Size | of the cut Glass thickness | Total height product | Installation of glass recessed | |||||||
| A1 B1 | C D E F G | H A2 B2 I | ||||||||
| 520 | 590 | 480 ± 1 | 560 ± 1 | 50 | 50 | 4 | 50 | 524 | 594 | 5 |
After installing the hob
- The power cord is not accessible through cabinet doors or drawers.
• There is an adequate flow of fresh air from the outside of the cabinet to the base of the hotplate. - If the hotplate is installed above a drawer or cabinet, a thermal protection barrier is installed under the base of the hotplate.
- The customer can easily access the isolation switch.
Mains Power Board Connection
This hob must only be connected to the mains by a suitably qualified person.
Before connecting the hob to the mains, check that:
- The domestic electrical installation is suitable for the power consumed by the hob.
- The voltage corresponds to the value indicated on the rating plate.
- The power cable cross-sections can withstand the load specified on the rating plat
When connecting the hob to the mains, do not use adapters, reducers or shunts, as these can cause overheating and fire.
The power cable must not touch any hot parts and must be positioned so that its temperature does not exceed 75^ C at any time.
Check with an electrician whether the domestic wiring system is suitable without alterations.
Any modifications must only be carried out by a qualified electrician or SAT PANDO.
- If the cable is damaged or needs to be replaced, the operation must be carried out by the after-sales agent with specific tools to avoid any accidents.
- If the appliance is connected directly to the mains, an omnipolar circuit breaker with an opening of at least 3 mm between the contacts must be installed.
- The installer must ensure that the correct electrical connection has been made and that it complies with safety regulations.
- The cable must not be bent or compressed.
- The cable must be checked periodically and replaced by authorised technicians.
The bottom surface and the power cable The bottom surface and the power cable of the cooktop must not must not be accessible after installation. installation.
| Web | Connection | Cable | Cable | Protective gauges |
| 220-240V~ 50-60Hz | L1+N1L1+NL2+N2L2+N | 5x1.5mm^2 | H07RN-F | 16A |
| 220-240V~ 50-60Hz | L1&L2+N1&N2L1&L2+N | 5x2.5mm^2 | 32A | |
| 400V~ 50-60Hz | L1+L2; N1&N2L1+L2; N1 | 4x2.5mm^2 | 16A | |
| * Calculado con el coeficiente de simultaneidad según la norma EN 60 335-2-6.* Calculated with the simultaneity coefficient according to the standard EN 60 335-2-6. | ||||
| Símbolo | Conexión | Color Cable |
| Tierra / Earth | Amarillo / Verde - Yellow / Green | |
| L1 | Fase / Phase | Negro / Black |
| L2 | Fase / Phase | Marrón / Brown |
| N1 | Neutro / Neutral | Azul / Blue |
| N2 | Neutro / Neutral | Gris / Grey |
PI-3110* / 3111* / 3150 / 3151 / 3210 / 3211
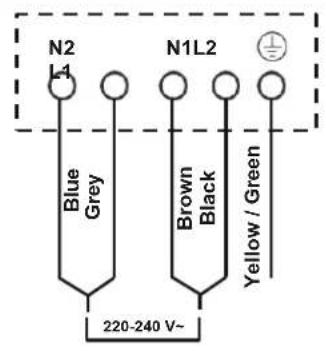
text_image
N2 L1 Blue Grey N1L2 Brown Black Yellow / Green 220-240 V~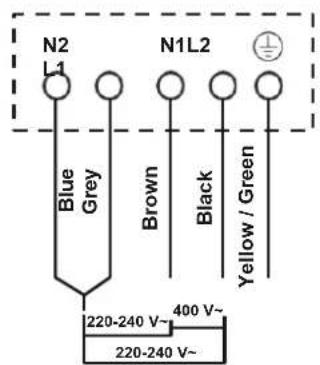
text_image
N2 L1 Blue Grey Brown Black Yellow / Green N1L2 400 V~ 220-240 V~ 220-240 V~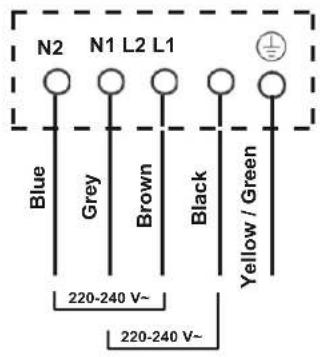
text_image
N2 N1 L2 L1 Blue Grey Brown Black Yellow / Green 220-240 V~ 220-240 V~*220-240 V\~ / 400V\~ 50/60Hz
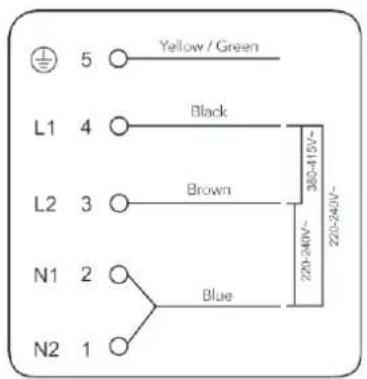
text_image
5 Yellow / Green L1 4 Black L2 3 Brown N1 2 Blue N2 1 220-240V~ 220-240V~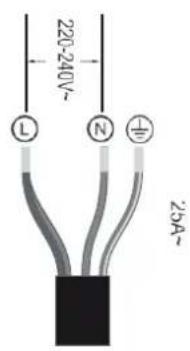
text_image
220-240V~ L N ½A~ 23A~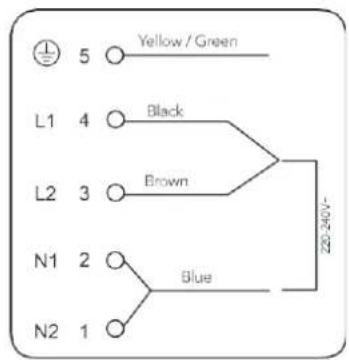
text_image
5 Yellow / Green L1 4 Black L2 3 Brown N1 2 Blue N2 1 22-240V-* Modelo /PI-3110 / 3111 Cable Gris no instalado
TECHNICAL SPECIFICATIONS
| MODELOS | PI - 3110PI - 3111 |
| Specifications - EN | DATA / DATA |
| INSTALLATION | |
| Voltage (V) | 220 - 240 |
| Frequency (Hz) | 50 - 60 |
| TECHNICAL CHARACTERISTICS | |
| Cooking surfaceCrystal Schoot | |
| Firing zone A - silk-screen printing dimension (mm) | ∅180 |
| Cooking zone A - power (W) | 1.500 |
| Cooking zone A - Boost power (W) | 2.100 |
| Firing zone B - screen printing dimension (mm) | ∅180 |
| Cooking zone B - power (W) | 1.500 |
| Cooking zone B - Boost power (W) | 2.100 |
| Firing zone C - screen printing dimension (mm) | Double ring ∅ 290 mm |
| Cooking zone C - power (W) | 3.000 |
| Cooking zone C - Boost power (W) | 3.800 |
| AESTHETIC FEATURES | |
| Control panel colour | Azul / Blue |
| Bevelled tempered glass ceramic glass | PI 3110 |
| Tempered glass, straight edge tempered glass | PI 3111 |
| FUNCTIONS | |
| Constant and uninterrupted cooking | √ |
| Timer 99 min | √ |
| Bridge zone0 | |
| Power adjustment10 | |
| Frying pan detection | √ |
| Low noise cooling fan | √ |
| Automatic safety shutdown | √ |
| Residual heat indicators | √ |
| Security lock | √ |
| Full induction | √ |
| MODELS | PI - 3150PI - 3151 |
| Specifications - EN | DATA / DATA |
| INSTALLATION | |
| Voltage (V) | 220 - 240 |
| Frequency (Hz) | 50 - 60 |
| TECHNICAL CHARACTERISTICS | |
| Cooking surface Crystal Schoot | |
| Firing zone A - screen printing dimension (mm) | 205 x 185 |
| Cooking zone A - power (W) | 2.000 |
| Cooking zone A - Boost power (W) | 3.200 |
| Firing zone B - screen printing dimension (mm) | 205 x 185 |
| Cooking zone B - power (W) | 2.000 |
| Cooking zone B - Boost power (W) | 3.200 |
| Firing zone C - screen printing dimension (mm) | ∅ 280 |
| Cooking zone C - power (W) | 2.800 |
| Cooking zone C - Boost power (W) | 3.700 |
| AESTHETIC FEATURES | |
| Control panel colour Azul / Blue | |
| Bevelled tempered glass ceramic glass | PI 3150 |
| Tempered glass ceramic glass with straight edge | PI 3151 |
| FUNCTIONS | |
| Constant and uninterrupted cooking | √ |
| Timer 99 min | √ |
| Bridge zone | 2 |
| Power adjustment 10 | |
| Frying pan detection | √ |
| Low noise cooling fan | √ |
| Automatic safety shutdown | √ |
| Residual heat indicators | √ |
| Security lock | √ |
| Full induction | √ |
| Flexible zone circuit control panel | √ |
| MODELS | PI - 3210PI - 3211 |
| Specifications - EN | DATA / DATA |
| INSTALLATION | |
| Voltage (V) | 220 - 240 |
| Frequency (Hz) | 50 - 60 |
| TECHNICAL CHARACTERISTICS | |
| Cooking surface Crystal Schoot | |
| Firing zone A screen printing dimension(mm) | 205 x 185 |
| Cooking zone A - power (W) | 2.200 |
| Cooking zone A - Boost power (W) | 3.200 |
| Firing zone B - silk-screen printing dimension(mm) | 205 x 185 |
| Cooking zone B - power (W) | 2.200 |
| Cooking zone B - Boost power (W) | 3.200 |
| Firing zone C - screen printing dimension (mm) | 205 x 185 |
| Cooking zone C - power (W) | 2.200 |
| Cooking zone C - Boost power (W) | 3.200 |
| Firing zone D - screen printing dimension (mm) | 205 x 185 |
| Cooking zone D - power (W) | 2.200 |
| Cooking zone D - Boost power (W) | 3.200 |
| AESTHETIC FEATURES | |
| Control panecolour | Azul / Blue |
| Bevelled tempered glass ceramic glass | PI 3210 |
| Tempered glass with straightedges | PI 3211 |
| FUNCTIONS | |
| Constant and uninterrupted cooking | ✓ |
| Timer 99 min | ✓ |
| Bridge zone | 2 |
| Power adjustment | 10 |
| Frying pan detection | ✓ |
| Low noise cooling fan | ✓ |
| Automatic safety shutdown | ✓ |
| Residual heat indicators | ✓ |
| Security lock | ✓ |
| Full induction | ✓ |
| Flexible zone circuit control panel | ✓ |
PRODUCT WARRANTY
INOXPAN S.L., thanks you for choosing and placing your trust in a product of our brand Pand o, which is distinguished by its Quality, Design and Innovation, being faithful to its origins and commitments.
CONDITIONS OF GUARANTEE PANDO:
This appliance is guaranteed for 3 years from the date of purchase. This warranty exclusively covers the Pando product against any manufacturing defect that aff ects its proper functioning. In order for the warranty to be valid, it is essential to present the invoice or purchase receipt together with a photo of the label or registration number of the product to the Pando Authorised Service technician.
During this period, the Company undertakes to replace or repair free of charge any defective part due to a defect or manufacturing defect in the appliance, until it is working properly, as well as the necessary labour and expenses incurred as a result of such repair or replacement.
EXCLUSIONS FROM THE WARRANTY PANDO:
It will not be covered by the guarantee of the product or ind uc tion, and could be cause for cancellation of the same, and in these cases the user will be responsible for the costs of materials, labour and travel of the technical service, in the following cases:
- The installation, servicing, cleaning or maintenance of the device.
- If the installation of the induction hob has not been carried out by an Authorised Professional, Qualified Electrician or Pando Technical Service personnel, who meet the requirements of the safety standards and electrical power regulations.
- Any breakdown, malfunction or malfunction caused by incorrect installation or use.
- Breakdowns or damage caused by failure to observe or follow the safety instructions, recommendations for use and maintenance in the equipment manuals.
• Where the product is intended for commercial or non-residential use, for which it is not intended. - Malfunctions or damage to the appliance due to non-compliance with the instructions described in the user manual, installation and ventilation instructions for the appliance.
- Breakdowns or damage caused by transport or transfer, and handling of the appliance by unauthorised personnel not authorised by this company or the Pand brand or.
• Stains, discolouration, dents, dings, dents, scratches, scratches or glass breakage. - Presence of foreign bodies foreign to the apparatus, inside or outside the product.
- The product is not accessible because there are elements that prevent easy and safe access. The means required for the authorised Pando technician to access the appliance shall be at the user's expense and responsibility.
- Improper handling of product wiring and connections.
- Faults or damage to the product caused by incorrect power supply or electrical connection.
- Breakdowns or damage caused by variations in the electricity supply or fortuitous and natural causes of atmospheric or geological origin such as storms, lightning, earthquakes, floods, etc.
- Appliances from resale, second-hand, trade-in, trade-in of the original owner of the appliance or from exhibitions which are more than three years old from the date of manufacture.
INOXPAN, S.L., is expressly excluded from any liability for any direct or indirect damage to persons or things caused by a product improperly installed, handled, used and/or maintained.
Official Auto riz ado Pando Technical Service Contact Data
| ESPAÑA, PORTUGAL AND ANDORRA OTHER COUNTRIES: | |||
| www.pando.es/asistencia-tecnica/ |  | https://www.pando.es/en/after-sales-services/ |  |
Pol. Ind. El Cros
text_image
QR code image containing encoded data, no visible human-readable textSERVICIO POST VENTA España, Portugal y Andorra
text_image
QR code with a central logo featuring crossed hammer and sickle symbols
Environmental Management System Certification
UNE-EN ISO 14001:2015
ES20/208675