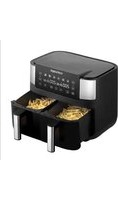
FR8000 - Deep fryer Concept - Free user manual and instructions
Find the device manual for free FR8000 Concept in PDF.


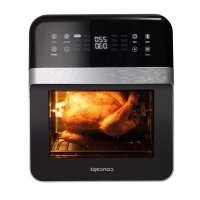
| Product type | Hot air fryer (oil-free) |
| Brand | Concept |
| Model | FR8000 |
| Power supply | 220-240 V ~50/60 Hz |
| Power | 2850 W |
| Total capacity | 2 x 4 L (two baskets) |
| Temperature range (cooking) | 80 - 200 °C |
| Temperature range (drying) | 40 - 80 °C |
| Cooking timer | 1 - 60 minutes |
| Drying timer | 1 - 24 hours |
| Preset programs | 6 (potatoes/fries, chicken, fish, dessert, vegetables, dried fruits) |
| Special functions | Synchronous cooking, synchronous finish, interior light, automatic pause when removing basket |
| Material | Heat-resistant plastic body, non-stick baskets with cooking plate |
| Cleaning | Baskets and plates washable with warm soapy water, non-abrasive sponge; exterior damp cloth |
| Safety | Automatic shut-off, overheating protection, hot surfaces indicated |
| Included accessories | 2 frying baskets, 2 cooking plates |
Frequently Asked Questions - FR8000 Concept
User questions about FR8000 Concept
0 question about this device. Answer the ones you know or ask your own.
Ask a new question about this device
Download the instructions for your Deep fryer in PDF format for free! Find your manual FR8000 - Concept and take your electronic device back in hand. On this page are published all the documents necessary for the use of your device. FR8000 by Concept.
USER MANUAL FR8000 Concept
FR8000
CZ
HULVDEFR ENSKPL
ITES
RO
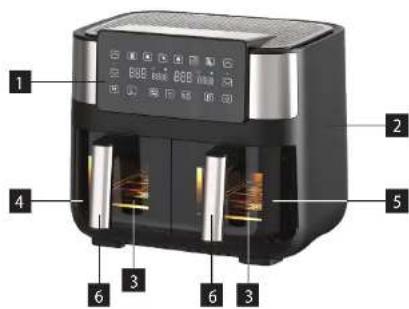
A - POPIS PRODUKTU/ A - PRODUCT DESCRIPTION
B - POPIS OVLÁDACÍHO PANELU/ B - CONTROL PANEL DESCRIPTION

concept
CZ
Poděkování
OCHRANA ŽIVOTNĚHO PROSTREDIA
ZAPROGRAMOWANE PROGRAMY
A/ PRODUKTA APRAKSTS
Thank you for purchasing a Concept product. We wish you much joy with your new appliance every day you use it. Please read the instruction manual carefully before Initial use. To refer to this manual any time you need to, we recommend you to keep it in a safe place. And please pass it to any future owner of the appliance.
| Technical specifications | |
| Voltage 220-240 V–50-60 Hz | |
| Input 2 850 W | |
| Capacity 2 x 4 l | |
| Adjustable temperature cooking 80-200°C / drying 40-80°C | |
| Timer cooking 1-60 min / drying 1-24 h | |

Caution!
Hot surface
IMPORTANT
Before connecting to the mains, make a visual check to ensure that the unit is intact and that no damage occurred during transport.
IMPORTANT SAFETY PRECAUTIONS
- Do not use the appliance in any other way than as described in this manual.
- Remove all the covering and marketing materials from the appliance before the first use.
- Make sure the mains voltage corresponds to the values on the rating plate of the product.
- Place the appliance on a stable, flat surface away from other heat sources.
- When disconnecting the appliance from the wall outlet, never pull the power cord, grasp the plug end and disconnect it by removing it from the receptacle.
- Do not allow children or unauthorized people to handle the appliance, use it out of their reach.
- Persons with reduced mobility, reduced sensory perception, mental disadvantage or persons not familiar with the operation must use the appliance only under the supervision of responsible person, who is familiar with the instructions.
- Pay extra attention if the appliance is used near children.
- Do not use the appliance as a toy.
-
Never put your fingers, pencils or other objects through the air outlet grille.
-
Do not cover the appliance.
- Before assembly and disassembly, disconnect the power cord from the wall outlet.
- Before cleaning and after use of the appliance, switch the appliance off and disconnect it from the mains.
- Keep the appliance clean, do not allow foreign objects to into the grid openings. It could cause serious injury, short circuit, damage to the appliance or cause fire.
- Do not use the appliance with a damaged cord or plug and have it repaired immediately by an authorized service centre.
- Do not use the appliance if it is not working properly, has been dropped, damaged or immersed in liquid. Have it checked and repaired by an authorized service centre.
- The appliance is only suitable for home use and is not intended for commercial use.
- Do not use the appliance outdoors.
- Do not touch the appliance with wet hands.
- Do not immerse the power cord, plug or appliance in water or any other liquid.
- Do not repair the appliance yourself. Contact an authorized service centre.
- Do not place anything on top of the appliance while it is in operation and do not cover the air outlets. Never touch the inside of the appliance when it is in operation!
- Do not place any items onto the appliance.
- Do not connect the appliance to an external time switch.
- Do not use accessories other than those recommended by the manufacturer. Always place the food to be fried on the frying plate at the bottom of the fryer.
- Do not place the appliance at the wall or any other appliances when in operation.
- Leave minimum 10 cm free space on the sides as well as the rear and upper side of the appliance to allow for adequate ventilation.
EN
concept
concept
EN
- This appliance can be used by children aged from 8 years and above and persons with reduced physical, sensory or mental capabilities or lack of experience and knowledge if they have been given supervision or instruction concerning the use of the appliance in a safe way and understand the hazards involved. Cleaning and maintenance performed by the user must not be carried out by children unless they are 8 years old and under supervision. Children aged under 8 years of age must be kept away from the appliance and its power cord. Do not let children play with the appliance.
- Do not touch hot surfaces.
- Do not let the power cord hang freely over the edge of a table or kitchen unit. Do not let the power cord touch hot surfaces.
- Do not place the appliance near a gas or electric burner.
- NOTICE: The surfaces of the appliance may be very hot. Hold the appliance by the handle only and wear protective equipment such as a kitchen glove.
- Pay special attention to prevent water or other liquid from entering the appliance. This could cause an electric shock.
- Always place food on the frying plate in the appliance container to avoid contact with the heating element.
- Never touch the inner surfaces of the appliance during operation or immediately after switching off. Allow the appliance to cool down sufficiently.
- Do not plug in or operate the appliance with wet hands.
- During frying with hot air, hot steam is released through the air outlets, keep your hands and face at a safe distance from the water vapour coming from the air outlets. Be careful of hot steam and air when removing the fryer from the appliance.
- If you see dark smoke coming out of the appliance during operation, switch it off immediately and contact an authorized service centre.
- Before cleaning the appliance allow it to cool down for at least 30 minutes.
Damages from failure to follow the manufacturer's instructions are not covered by the warranty.
A/ PRODUCT DESCRIPTION
1 Control panel
2 Appliance body
3 Frying plate
4 Frying pan left
5 Frying pan right
6 Handle
1 Temperature setting buttons
2 Start/pause button
3 Left pot button
4 Left vessel display
5 Synchronous finish button
6. Interior light on/off button
7 Button for synchronous
preparation of both vessels
8 Display of the right vessel
9 Right vessel button
10 Off/on button
11 Time setting buttons
12 Programs
OPERATING INSTRUCTIONS
WARNING
- Before putting a new appliance into operation, you should wipe the outside of the appliance with a damp cloth for hygiene reasons and wash the fryers and frying plates in warm water with a little detergent.
- Do not fill the fryer with oil or frying fat. This is an oil-free fryer that uses hot air.
- Place the appliance on a stable surface.
- Carefully remove the frying containers from the appliance and insert a frying plate into each frying container.
- Place the food on the frying plate inside the frying container and slide the frying container back into the appliance.
- Note: Never use the fryer without the frying plate inserted. The "MAX" line is shown inside the fryer. Do not overfill the fryer if this line has been reached.
- Plug the appliance into a mains socket. An audible signal will sound to indicate that the fryer is now in standby mode.
- Press the off/on button to switch the fryer on. The digital display with several icons will light up. When you press L (left container), R (right container) or L=R (left and right container), the complete display with all icons lights up. After you have made the L, R or L=R selection, select the setting for that fryer. The icon of the respective container will flash. Each time you touch any button, you will be alerted by an audible signal.
Menu
- There are 6 intelligent programs built into this fryer for you to use. All of them have a preset time and a preset temperature. You can select the cooking/drying mode by touching the icon button of the specific program. The icon of the selected program will flash and the display will show the preset cooking time and preset temperature. To start the selected programme, press the start/pause button. If you decide to cook at a different temperature or time, you can increase or decrease the time or temperature accordingly.
- Note: Before selecting the programme, first specify the vessel for which you want to select the setting - by pressing the L (left vessel), R (right vessel) or L=R button if you want to set synchronous preparation of both vessels.
Timer and temperature settings
- The cooking timer has a range of 1-60 minutes. The timer for drying (e.g. fruit, mushrooms) has a range of 1-24 hours.
- The adjustable temperature for cooking is 80-200°C, for drying the temperature range is 40-80°C.
• Note: The cooking time and temperature can also be adjusted during the cooking process (first select L or R). - Once you have made your fryer selection and program selection, press or hold the time setting button to decrease or increase the time from the preset time at 1 minute intervals (1 hour for the drying program).
- Press or hold the temperature setting button to decrease or increase the temperature from the preset in 5°C intervals.
Start/pause button
- When you have finished setting the cooking time and temperature, press the start/pause button to start the fryer. The selected icons are lit, the others are off.
- You can pause the fryer at any time during cooking by pressing the start/pause button (if you want to pause only one zone, select the zone first = the display of the paused zone will flash) and press the button again to resume the cooking process.
EN
concept
concept
EN
- Note: If you press the start/pause button while cooking and no action is taken within 5 minutes, the appliance switches to standby mode (only the off/on button is lit).
Button for synchronous preparation of both vessels
This function is used to cook larger quantities of the same food or to cook different types of food using the same program, temperature and time.
-
Press the button (3) to select zone L, which will flash.
-
Select the desired cooking programme.
-
Use the button (1) to set the desired temperature.
-
Use the button (11) to set the desired time.
-
Press the synchronous cooking button (7) to copy the setting of the left zone (L) to the right zone (R).
-
Press the start/pause button (2) to start cooking in both zones.
Note: If you first press the L=R button (7) and then the program selection button, both containers will be in the same setting.
Left and right cooking settings
• The two zones start cooking at the same time but end at different times.
- Repeat steps 1-4 to set the left pot (L) and then repeat steps 1-4 to set the right pot (R).
- Press the start/pause button to start cooking in both pots.
Synchronous completion button
This function is used to finish cooking in both zones at the same time. Independent of temperature, cooking time or program.
-
Press the button (3) to select zone L, which will flash.
-
Select the desired cooking programme.
-
Use the button (1) to set the desired temperature.
-
Use the button (11) to set the desired time.
-
Press button (9) to select zone R, which will flash.
-
Select the desired cooking programme.
-
Use the button (1) to set the desired temperature.
-
Use the button (11) to set the desired time.
-
Press the synchronous completion button (5), the button will light up when the program starts.
-
Press the start/pause button (2) to start cooking in the zone with the longer cooking time.
-
The second zone display will show "Hold". The second zone is activated when the same time remains in both zones.
Note: This function is not suitable for the drying programme.
Off and on button
- If you press the off/on button during operation, an audible signal sounds and the fryer switches off.
AUTOMATIC SHUTDOWN - PAUSE FUNCTION AFTER REMOVING THE CONTAINER
- It is recommended to stir/tum the food halfway through cooking for some dishes. At any time during operation, the frying container[s] can be removed.
- When the fryer is removed, the power to the fryer is automatically switched off and "Out" is displayed on the display of the removed fryer.
- After inserting the frying container back into the body of the appliance within 90 seconds, the fryer resumes its original settings.
- In Synchronous Prep or Synchronous Finish mode, both zones pause when one container is removed and the display of the removed container will show "Out". If the container is not reinserted within 90 seconds, the unremoved container will automatically resume operation after 90 seconds. The side of the removed container will not heat up and the synchronous functions will be inactive (the 5 or 7 icon will not light).
- If one or both containers are not reinserted within 5 minutes, the side without the container switches to standby mode (the display stops flashing and goes off after 5 minutes) and the side where the container has not been removed automatically resumes operation after 90 seconds.
Interior light on/off button
Pressing the on/off button for the internal lighting (6) illuminates the interior of the container, so that it is not necessary to remove the container to check the cooking process. Press the button (6) repeatedly to switch off the lighting.
Note: The fan icon lights up while the program is running. After the fan stops running, the fan icon will turn off.
Note: OFF
- You will be alerted 5 times with an audible signal when the set preparation time has elapsed. The fan continues to run for approximately 20 seconds after switching off and the display shows "Cool". After the fan stops running, the display shows "End" and after 5 minutes the appliance goes into standby mode (only the off/on icon is lit). Check that the food is ready. Remove the frying pan from the appliance and place it on a heat-resistant mat. Remove the food.
- Do not use sharp kitchen tools to avoid damaging the non-stick surface! If the food is not yet ready, simply slide the container back into the appliance and adjust the cooking time by a few extra minutes. The fryer can be used to prepare the next batch immediately. After switching off the appliance, disconnect it from the mains.
WARNING: Do not turn the frying pan upside down while the frying plate is still inside, as any excess oil that may have accumulated at the bottom of the pan will spill out onto the food and the hot frying plate may fall down!
PRESET PROGRAMS
| Program Time (min) Temperature (°C) | ||
| Potatoes and Fries 20 200 | ||
| Chicken | 25 | 200 |
| Fish | 16 | 180 |
| Desert | 15 | 160 |
| Vegetables | 16 | 160 |
| Fruit drying | 8h | 60 |
Note: These settings are approximate. If you start cooking when the fryer is still cold, extend the cooking time by approx. 3 minutes.
All of these programmes except the fruit drying programme can be set between 1-60 minutes and a temperature range of 80-200°C. The fruit drying programme can be set between 1-24 hours and a temperature range of 40-80°C.
PROBLEM SOLVING
| FAILURE | POSSIBLE CAUSE | REMEDY |
| The appliance does not work. | The fryer not connected to power mains. | Connect the fryer to power mains. |
| The program was not started using the start/pause button. | Make sure you have pressed the start/pause button, see the Owner's Manual. | |
| The food has not been fully fried. | The fryer container is too full. | Reduce the quantity of ingredients in the glass container, thus making the frying equal. |
| The set preparation time is too short. | Extend the preparation time. | |
| Temperature set too low. | Increase the temperature. |
EN
concept
concept
EN
| Some ingredients have not been evenly fried. | Some ingredients must be shaken or mixed during preparation. | The ingredients in the fryer must be shaken or mixed, during, frying. |
| After removing from the fryer, the food is not crispy. | The relevant type of food is only intended for use in classic fryers. | Spraying foods with a small amount of oil can increase crispiness. |
| The frying pan cannot be inserted properly into the fryer. | The fryer is too full. Do not fill the container more than the "MAX" mark inside the container. | |
| The frying plate is not inserted correctly in the container. | Push the frying plate onto the bottom of the container until the silicone feet touch the bottom. | |
| White smoke comes out of the fryer. | Fatty ingredients are being fried. | When frying fatty ingredients, much oil in the fryer comes into the containers. The oil generates white smoke and the containers can heat up more than usually. |
| Rest of the fat from recent use of the fryer still remaining on the containers. | White smoke has been caused by heating up the fat in a container. Clean the glass container thoroughly after each use. | |
| Raw potato fries are fried unevenly in the fryer. | Inappropriate potato type used. Use fresh potatoes. | |
| The raw potato fries were not properly rinsed. | Rinse the raw potato fries properly to remove the starch before frying. | |
| Raw potato fries are not crispy when removed from the fryer. | The crispiness of the fries depends on the amount of oil and water in the fries. | Before adding the oil, remember dry the raw potato fries. |
| To make the fries crispier, cut them into smaller into smaller pieces. | ||
| Add oil to have the chips more crispy. | ||
CLEANING AND MAINTENANCE
Do not use coarse and chemically aggressive substances such as: sharp objects, scrapers, chemical solvents, thinners, etc.
BEFORE CLEANING, ALWAYS ALLOW MINIMUM 30 MINUTES TO COOL DOWN THE APPLIANCE.
Note: To make the fryer cool faster, remove the fryer container(s).
• After every use, disconnect the appliance and clean it.
- Wipe the outer surface of the device with a damp cloth.
- Wash the fryer container in warm water, using soap and nonabrasive sponge. To remove stuck-on food residue from the container or frying plate, fill the container with water and detergent and leave to stand for 10 minutes, then wash with a soft sponge.
- Clean the inner surface of the air fryer using dry napkin or nonabrasive sponge.
SERVICE CENTRE
Extensive maintenance or repair, which requires access to internal parts of the product, has to be performed by a qualified specialist or the service centre.
ENVIRONMENTAL CONCERNS
• Packaging materials and old appliances should be recycled.
- Packaging materials may be disposed of as sorted waste.
- Dispose the plastic bags made of polyethylene (PE) of as sorted waste.
Recycling of the appliance at the end of its lifespan:

This appliance is labelled in accordance with European Directive 2012/19/EU concerning used electrical and electronic appliances (waste electrical and electronic equipment - WEEE). The symbol on the product or on its packaging indicates that this product may not be treated as household waste. Instead it should be taken to the appropriate collection point for the recycling of electrical and electronic equipment. By ensuring this product is disposed of correctly, you will help prevent potential negative consequences for the environment and human health, which could otherwise be caused by inappropriate waste handling of this product. The disposal of such material has to be done according to the recycling regulations. For more detailed information about recycling of this product, please contact your local council, your household waste disposal service or the shop where you purchased the appliance.

The product meets all the necessary requirements of the EU directives applicable to the specific product.
Changes in text, design, and technical specifications are subject to change without prior notice and we reserve the right to change them.
DE
concept
concept
DE
Danksagung

Attention!
Surface chaude
IMPORTANT:
A/DESCRIPTION DU PRODUIT

- concept
- Poděkování
- OCHRANA ŽIVOTNĚHO PROSTREDIA
- A/ PRODUKTA APRAKSTS
- IMPORTANT
- IMPORTANT SAFETY PRECAUTIONS
- A/ PRODUCT DESCRIPTION
- OPERATING INSTRUCTIONS
- WARNING
- Menu
- Timer and temperature settings
- Start/pause button
- EN
- Button for synchronous preparation of both vessels
- Left and right cooking settings
- Synchronous completion button
- Off and on button
- AUTOMATIC SHUTDOWN - PAUSE FUNCTION AFTER REMOVING THE CONTAINER
- Interior light on/off button
- Note: OFF
- CLEANING AND MAINTENANCE
- BEFORE CLEANING, ALWAYS ALLOW MINIMUM 30 MINUTES TO COOL DOWN THE APPLIANCE.
- SERVICE CENTRE
- ENVIRONMENTAL CONCERNS
- Recycling of the appliance at the end of its lifespan:
- Danksagung
- IMPORTANT:
- A/DESCRIPTION DU PRODUIT
Brand : Concept
Model : FR8000
Category : Deep fryer