
FR-2025 - Deep fryer Concept - Free user manual and instructions
Find the device manual for free FR-2025 Concept in PDF.


User questions about FR-2025 Concept
0 question about this device. Answer the ones you know or ask your own.
Ask a new question about this device
Download the instructions for your Deep fryer in PDF format for free! Find your manual FR-2025 - Concept and take your electronic device back in hand. On this page are published all the documents necessary for the use of your device. FR-2025 by Concept.
USER MANUAL FR-2025 Concept
FR2025
CZ
SK PL RUHU
EN DE ES RO


natural_image
Diagram of a car interior showing seatbelt, dashboard, and door handle (no text or symbols)(obr. 1)
natural_image
Diagram of a mechanical component with arrows indicating direction (no text or symbols)(obr. 2)
natural_image
Line drawing of a car's front grille and dashboard (no text or symbols)(obr. 3)
natural_image
Pure mechanical component diagram without any text, numbers, or symbols(obr. 4)

natural_image
Line drawing of a boat hull with two upward arrows indicating direction (no text or symbols)(obr. 5)
natural_image
Diagram of a mechanical component with an upward arrow indicating motion or force (no text or symbols present)(obr. 6)
natural_image
Diagram of a car interior showing seat, dashboard, and door handle (no text or symbols)(obr. 1)
natural_image
Diagram of a mechanical component with arrows indicating direction (no text or symbols)(obr. 2)
natural_image
Line drawing of a car interior showing structural components and a mesh grille (no text or symbols)(obr. 3)
natural_image
Line drawing of a mechanical component with an arrow indicating direction (no text or symbols)(obr. 4)
natural_image
Line drawing of a boat hull with two upward arrows indicating direction (no text or symbols)(obr. 5)
natural_image
Diagram of a mechanical component with an upward arrow indicating motion or force (no text or symbols present)(obr. 6)
natural_image
Line drawing of a car interior showing seat, dashboard, and handle (no text or symbols)(rys. 1)

natural_image
Diagram of a mechanical or fluidic component with no visible text, numbers, or symbols(rys. 2)
natural_image
Technical line drawing of a car interior showing steering wheel, handle, and mesh grille (no text or symbols)(rys. 3)
natural_image
Line drawing of a mechanical component with an arrow indicating direction (no text or symbols)(obr. 4)
natural_image
Line drawing of a boat hull with directional arrows indicating movement (no text or symbols)(obr. 5)
natural_image
Diagram of a mechanical component with an upward arrow indicating motion or force (no text or symbols present)(obr. 6)
natural_image
Diagram of a car interior showing seatbelt, dashboard, and door handle (no text or symbols)(1. ábra)
natural_image
Diagram of a mechanical component with internal channels and an arrow indicating direction (no text or symbols)(2. ábra)
natural_image
Line drawing of a car interior showing steering wheel, dashboard, and mesh grille (no text or symbols)(3. ábra)
natural_image
Line drawing of a mechanical component with an arrow indicating direction (no text or symbols)(4. ábra)
natural_image
Line drawing of a boat hull with two upward arrows indicating direction (no text or symbols)(5. ábra)
natural_image
Diagram of a mechanical component with an upward arrow indicating motion or force (no text or symbols present)(6. ábra)
natural_image
Diagram of a car interior showing dashboard and seat compartments with no text or symbols(рис. 1)

natural_image
Diagram of a mechanical component with arrows indicating direction (no text or symbols)(рис. 2)
natural_image
Line drawing of a car interior with a mesh grille and handle (no text or symbols)(рис. 3)
natural_image
Pure mechanical component diagram without any text, numbers, or symbols(рис. 4)
natural_image
Line drawing of a boat hull with two upward arrows indicating direction (no text or symbols)(рис. 5)
natural_image
Diagram of a mechanical component with an upward arrow indicating motion or force (no text or symbols present)(рис. 6)
Thank you for buying a Concept product. We hope you will be satisfied with our product throughout its service life.
Please read these instructions carefully before you switch on your appliance and keep them for future reference. Make sure other people using the product are familiar with these instructions.
| Technical parameters | |
| Voltage 230V/50-60Hz | |
| Power input 2100 W |
IMPORTANT NOTICES:
- Make sure the mains voltage corresponds to the values on the rating plate. Use an earthed socket only.
- Do not immerse the electrical parts into water or any other liquid.
- Before you fill the deep fryer with oil or fat and connect it to the power, make sure all parts are completely dry and no water drops have remained in the frying bin.
- Connect the fryer to the power only after filling it with oil or fat. The level of oil or fat must always be within the range indicated by the minimum and maximum marks. Before you start frying, make sure each time that there is enough oil or fat in the fryer.
- Only use oils or fats suitable for frying. If you wish to put a new dose of hardened fat in the frying bin, first melt the fat on your stove and then pour it in the fryer, which is switched off. Only then do you switch the deep fryer on.
- Make sure not to overfill the basket because hot oil or fat might boil over the bin.
- When using the fryer, keep it out of the reach of children and pay attention to it constantly.
- Do not move a fryer that is switched on or has hot contents in it.
- Do not touch hot surfaces. Use the handles and buttons.
- Make sure the steam-ducting grid in the lid is not blocked.
- When you finish deep frying, set the temperature controller to minimum, disconnect the fryer from the power and do not touch it until it cools down. You may pour the oil out of the fryer bin only after it has cooled down completely. When pouring the oil out, do not leave the bin in the fryer, but remove it and then pour the contents out.
• Always disconnect the fryer from the power and let it cool down after use or before maintenance. - When you disconnect the fryer, never do so by pulling on the cable, but take hold of the plug. Do not leave the power cord hanging loose.
- Make sure that the fryer and cable do not touch any hot surfaces.
- Only use the deep fryer for the purpose described in the instructions for use. Only use the fryer together with the original accessories supplied. The fryer has been designed for household use only.
- Do not use the fryer if you discover that the plug or cord is faulty. Contact an authorized service centre.
Non-compliance with the manufacturer's instructions invalidates your right to guaranty repair.
PRODUCT DESCRIPTION
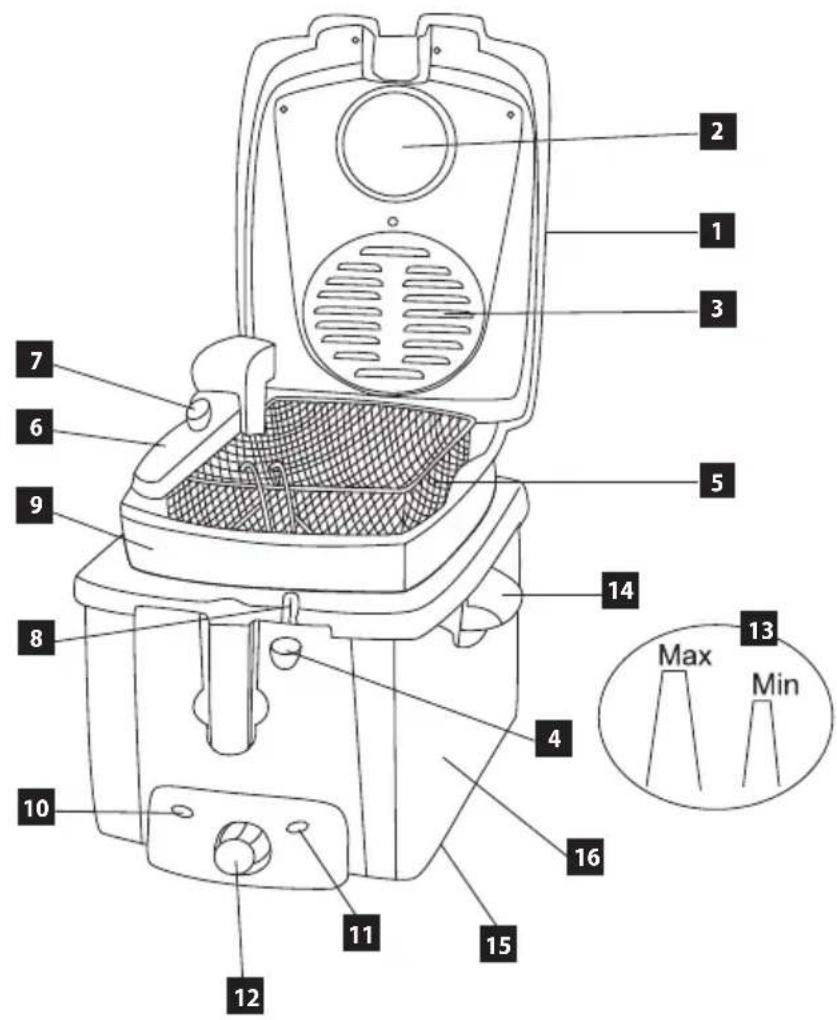
- Upper removable lid with a permanent filter
- Lid peep-hole
- Steam-ducting grid
- Button to open the lid
- Basket
- Basket handle
- Basket handle button
- Lid lock
- Removable bin
- Power-on light (red)
- Thermostat light (green)
- Temperature controller
- Maximum and minimum oil level marks on the bin side
- Handles for moving
- Anti-slip feet
- Shell
CAUTION!
- Make sure before first use that the product shows no damage. Remove all packaging.
- Clean the outside of the appliance with a damp cloth.
- Remove the permanent filter prior to cleaning the lid.
- Wash the basket, fryer bin and lid in hot water with detergent, rinse and let dry.
- The control panel is to be cleaned with a damp cloth only.
- Assemble the parts. The oil level marks should be on the back of the fryer bin.
- When opening the lid during frying, a quantity of hot steam will escape; please keep a safe distance.
• Always dry the food before frying. French fries or frozen food might cause excessive oil frothing and boiling over.
OPERATING INSTRUCTIONS
- Put the deep fryer on a level and steady surface. Take the entire feed cord out of the storage space. Make sure it does not touch any close sources of heat.
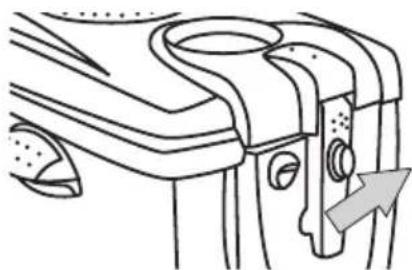
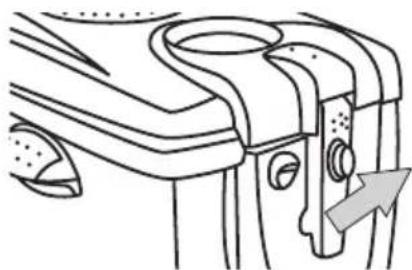
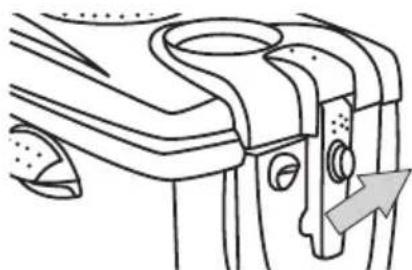
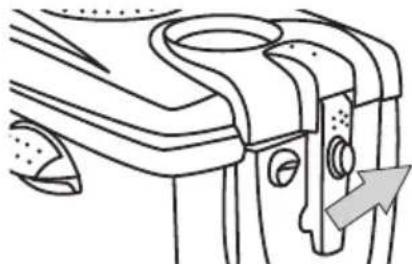
- Press the lid-opening button (Fig 1) and the lid will spring open.
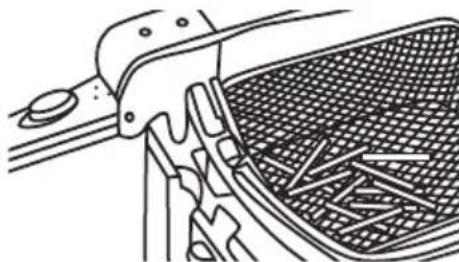
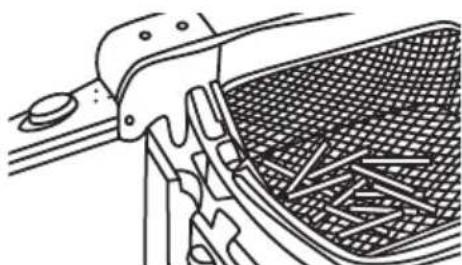
- Tilt out the basket handle (Fig 2) and remove the basket.
- Pour oil in the fryer bin and make sure to keep the oil level under the maximum oil level mark (approximately 2.5 liters).
- Set the temperature controller to minimum and connect the fryer to the power. The red power-on light will come on.
- Select the required temperature according to the food. The green thermostat light will come on. Once it turns off, the oil has reached the set temperature.
Note: The oil will heat sooner if you close the fryer lid.
-
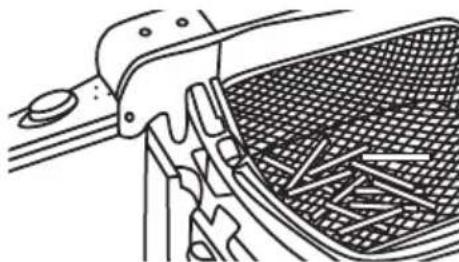
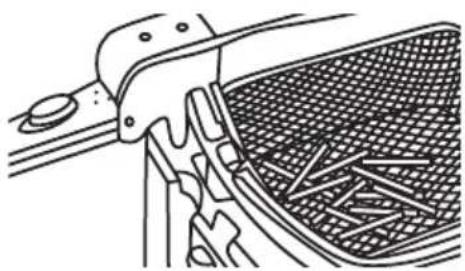
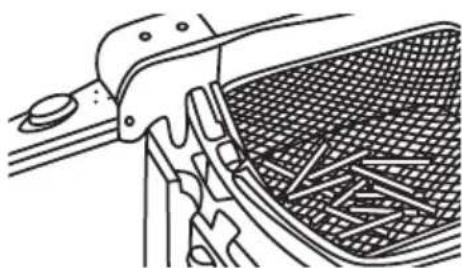
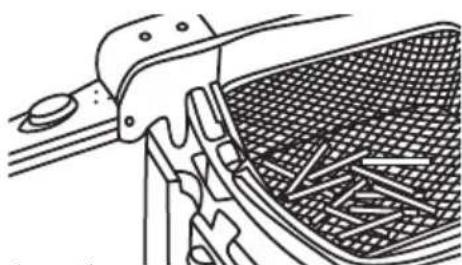
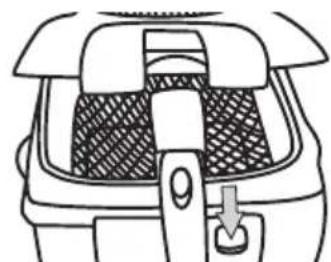
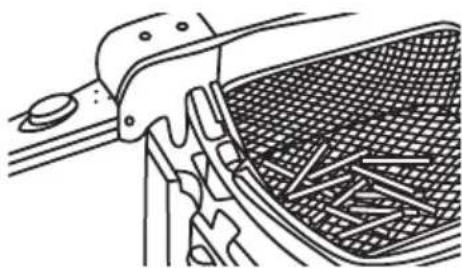
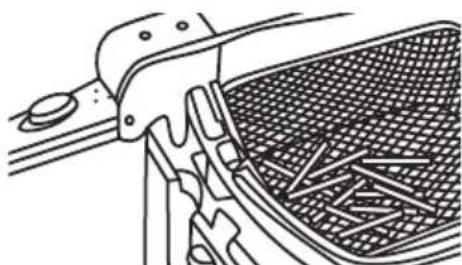
Place the basket in the drip position, open the fryer and insert the food in the basket (Fig 3). Return the basket to the drip position, close the lid and slowly start immersing the basket in the hot oil.
-
Set the temperature controller to minimum when you finish frying.
-
Lift the basket to the drip position and open the lid carefully.
-
Empty the basket and place it back in the fryer.
-
Disconnect the fryer from the power.
natural_image
Diagram of a car interior showing seat, dashboard, and seatbelt (no text or labels)(Fig 1)

natural_image
Diagram of a mechanical component with arrows indicating direction (no text or symbols)(Fig 2)

natural_image
Technical line drawing of a car interior showing structural components and exhaust grating (no text or symbols)(Fig 3)
Note: For better protection against oil spitting, we recommend closing the lid first and only then immersing the entire basket in the hot oil. After you finish frying, first lift the basket to the drip position, wait a while to let the oil drip, then open the lid slowly.
PRACTICAL ADVICE
- You should immerse only food in the hot oil or fat that is completely dry; this will reduce power consumption and preserve the life of the oil.
- Rinse French fries in water and dry prior to frying to prevent them from sticking together.
- Food with a high content of water, such as potatoes, should be fried in two steps as follows: Heat the oil to the maximum temperature and immerse the French fries for one minute. Then let them dry. Wait until the oil reaches the maximum temperature again, re-immverse the French fries and fry until golden brown.
- Frozen food need not be defrosted, but it is recommended to prepare it in two steps as well.
- Food coated in batter may stick to the basket. This may be prevented as follows. Immerse the empty basket in hot oil, and very slowly put the coated pieces in the immersed basket using kitchen tongs, for instance. Take care to prevent the oil from spitting out of the fryer.
APPROXIMATE FRYING VALUES FOR CERTAIN FOODS
| Food Weight (g) Oil temperature (°C) Frying time (min) | ||
| French fries | 600 180 8-12 | |
| Frozen French fries | 600 180 10-14 | |
| Chicken 400 170 10-15 | ||
| Frozen chicken | 400 170 15-20 | |
| Fish 400 160 5-8 | ||
| Frozen fish | 400 160 8-11 | |
| Vegetables 300 140 6-10 | ||
| Mushrooms 300 140 8-12 |
REFILLING THE OIL
The life of the oil or fat depends on the number and kind of deep frying events. Food remains as deposits at the bottom of the fryer bin. These deposits should be removed regularly by filtering the oil through dense mesh or absorbent paper. When storing the deep fryer, you should always close the lid to prevent dust or other particles from degrading the oil or fat. Refill the oil as soon as it gets dark starts to give off a different smell or gives the food a bad taste. Never add fresh oil or fat into used oil or fat.
Degraded oil and fat should not be poured into the toilet or kitchen sink. Pour it into a closed container and dispose of it accordingly.
MAINTENANCE AND CLEANING
Prior to any cleaning, make sure the fryer has cooled down, is not connected to the power, and the feed cable is stored in place.
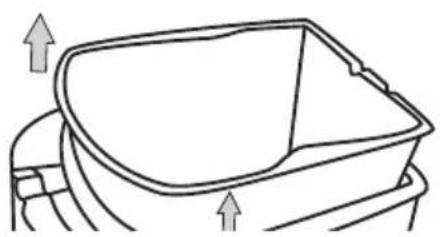
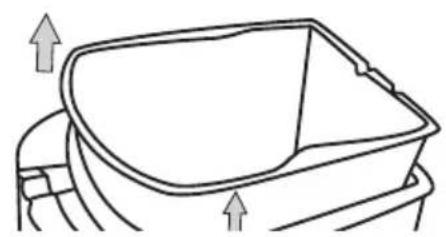
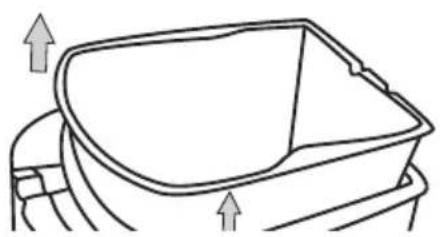
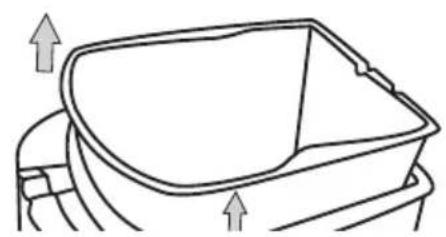
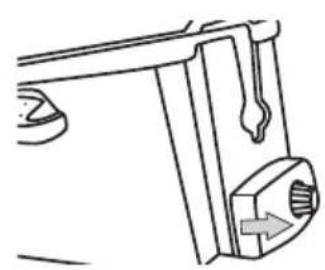
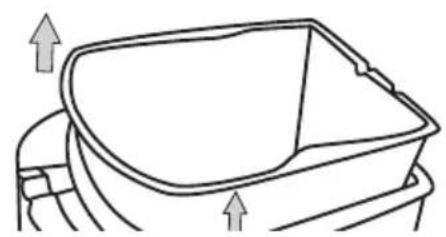
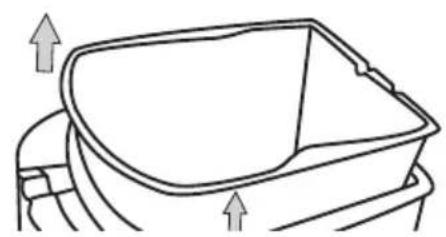
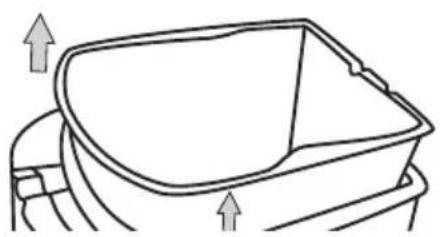
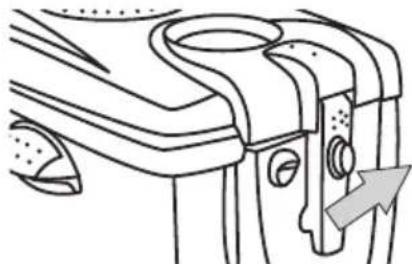
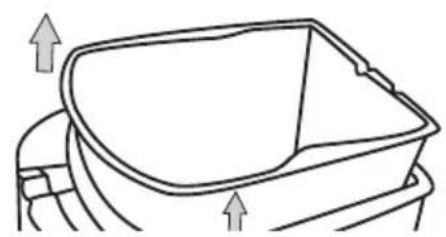
- Remove the lid as well as the removable electric control module; see Fig 4. Take out the basket and the bin (Fig 5). Pour the oil or fat into a closed container for later disposal.
natural_image
Pure mechanical component diagram without any text, numbers, or symbols(Fig 4)
natural_image
Line drawing of a boat hull with two upward arrows indicating direction (no text or symbols)(Fig 5)
natural_image
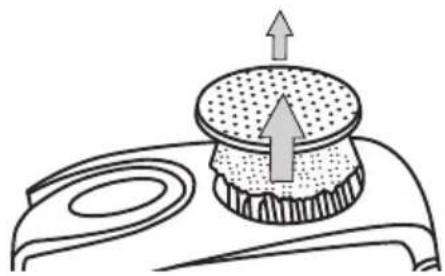
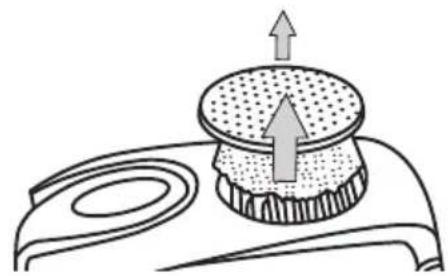
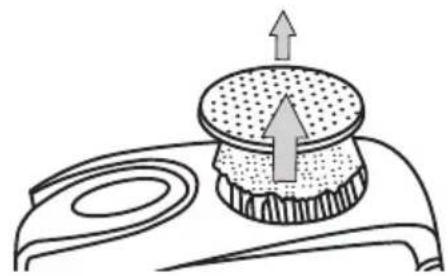
Diagram of a mechanical component with an upward arrow indicating motion or force (no text or symbols present)(Fig 6)
When refilling oil, it is helpful to wash the bin and the basket in warm water with detergent. All parts (except the control unit) could be cleaned in dishwasher. Prior to assembling the deep fryer, make sure all the parts have dried completely.
-
Wipe the removable control module with a damp cloth or absorbent paper. Do not immerse this part into water or any other liquid. Clean the part on a dry surface so that the part cannot accidentally fall and become damaged.
-
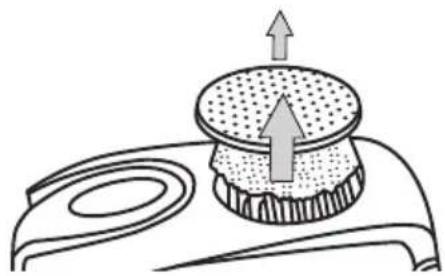
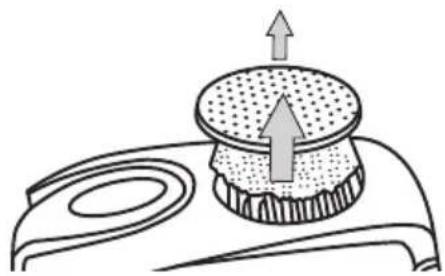
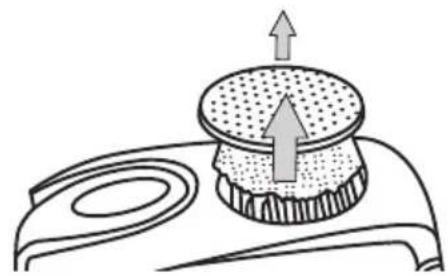
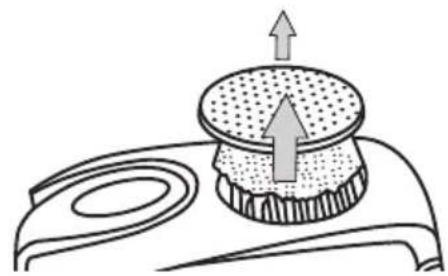
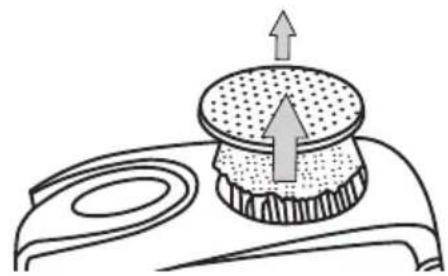
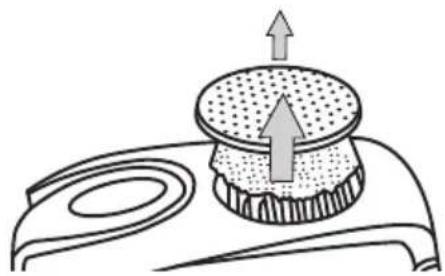
The deep fryer has a lid with a permanent filter. This filter should be washed regularly. The lid itself may be washed in a dishwasher. Follow this sequence. Remove the lid, press the grid lock on the upper side, remove the grid, and remove the filter (Fig 6). Put the filter into warm water with detergent and leave for several minutes to soak. Then rinse the filter in fresh water and let it dry properly.
REPAIR & MAINTENANCE
Any extensive maintenance or repair that requires access to the inner parts of the product must be performed by an expert service centre.
ENVIRONMENTAL PROTECTION
- Packaging materials and obsolete appliances should be recycled.
- The transport box may be disposed of as sorted waste.
- Polyethylene bags shall be handed over for recycling.
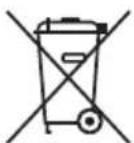
Appliance recycling at the end of its service life:
A symbol on the product or its packaging indicates that this product should not go into household waste. It must be taken to the collection point of an electric and electronic equipment recycling facility. By making sure this product is disposed of properly, you will help prevent the negative effects on the environment and human health that would otherwise result from inappropriate disposal of this product. You can learn
more about recycling this product from your local authorities, a household waste disposal service or in the shop where you bought this product.
natural_image
Diagram of a car interior showing seat, dashboard, and door handle (no text or symbols)(Abb. 1)
natural_image
Diagram of a mechanical component with arrows indicating direction (no text or symbols)(Abb. 2)
natural_image
Line drawing of a car interior showing structural components and exhaust grating (no text or symbols)(Abb. 3)
natural_image
Line drawing of a mechanical component with an arrow indicating direction (no text or symbols)(Abb. 4)
natural_image
Line drawing of a boat hull with two upward arrows indicating direction (no text or symbols)(Abb. 5)
natural_image
Diagram of a mechanical component with an upward arrow indicating motion or force (no text or symbols present)(Abb. 6)
natural_image
Diagram of a car interior showing seat, dashboard, and door handle (no text or symbols)(fig. 1)

natural_image
Diagram of a mechanical component with arrows indicating direction (no text or symbols)(fig. 2)
natural_image
Technical line drawing of a car interior showing structural components and exhaust planks (no text or symbols)(fig. 3)
natural_image
Line drawing of a mechanical component with an arrow indicating direction (no text or symbols)(fig. 4)
natural_image
Line drawing of a boat hull with two upward arrows indicating direction (no text or symbols)(fig. 5)
natural_image
Diagram of a mechanical component with an upward arrow indicating motion or force (no text or symbols present)(fig. 6)
natural_image
Diagram of a car interior showing seat, dashboard, and door handle (no text or symbols)(fig. 1)
natural_image
Diagram of a mechanical component with arrows indicating direction (no text or symbols)(fig. 2)
natural_image
Line drawing of a car interior showing steering wheel, dashboard, and mesh grille (no text or symbols)(fig. 3)
natural_image
Pure mechanical component diagram without any text, numbers, or symbols(fig. 4)
natural_image
Line drawing of a boat hull with directional arrows indicating movement (no text or symbols)(fig. 5)
natural_image
Diagram of a mechanical component with an upward arrow indicating motion or force (no text or symbols present)(fig. 6)
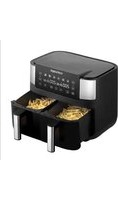
Brand : Concept
Model : FR-2025
Category : Deep fryer