
KDH 203424 - Humidifier Koenic - Free user manual and instructions
Find the device manual for free KDH 203424 Koenic in PDF.

| Product type | Air dehumidifier |
| Brand | Koenic |
| Model | KDH 203424 |
| Power supply | 220-240 V ~ 50 Hz |
| Maximum power | 475 W / 2.7 A |
| Protection class | IPXO |
| Fuse | 250 V TX, 3.15 A |
| Dehumidification capacity | 11 L/day (27°C, 60% RH) 20 L/day (30°C, 80% RH) |
| Refrigerant | R290, 0.065 kg |
| Water tank | Removable, manual draining or via drain hose |
| Functions | Timer (0.5 to 24 h), automatic comfort mode, 3 fan speeds, humidity setting 35-80% RH or continuous operation |
| Display | LED screen with status indicators |
| Maintenance | Clean filter every 2 weeks, clean tank every 7 days |
| Safety | Overload protection, automatic shut-off when tank is full, compressor restart delay 3 min, flammable refrigerant |
| Spare parts | Air filter, water tank, drain hose |
| Repairability | Repairs by qualified professional only |
| Recommended room size | At least 4 m² |
Frequently Asked Questions - KDH 203424 Koenic
User questions about KDH 203424 Koenic
0 question about this device. Answer the ones you know or ask your own.
Ask a new question about this device
Download the instructions for your Humidifier in PDF format for free! Find your manual KDH 203424 - Koenic and take your electronic device back in hand. On this page are published all the documents necessary for the use of your device. KDH 203424 by Koenic.
USER MANUAL KDH 203424 Koenic
natural_image
White portable air purifier device with gray casing and front panel (no visible text or symbols)| Bing et al. 27 | — |
| Eng et al. 28-30 | — |
| Liu et al. 40-57 | — |
| Punjab 39-75 | — |
| Hague et al.-56 | — |
| Lu et al. 57-106 | — |
| Kashan 10-125 | — |
| Rosa 129-145 | — |
| Liu et al.-8-9 | — |
natural_image
Three-panel illustration showing a white medical device with red arrows indicating joint alignment or movement (no text or symbols present)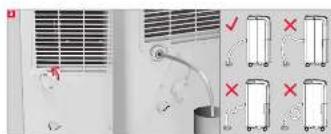
Deutsch
Sicherheitshinweise
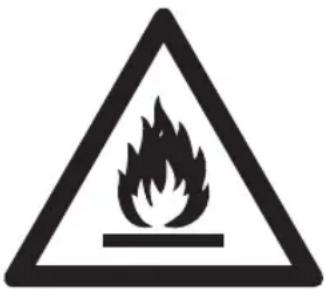
Caution: Risk of fire/ flammable materials.

This symbol indicates that ignoring instructions may cause death or serious injury.
WARNING: To prevent death or injury to the user or other people and property damage, the following instructions must be followed. Incorrect operation due to ignoring of instructions may cause death, harm or damage.
IMPORTANT NOTE: Read this manual carefully before installing or operating your product. Make to save this manual for future reference.

Appliance KDH 203424, should be installed, operated and stored in a room with a floor area than 4 m^2 .
• Installation must be performed according to the installation instructions. Improper installation can cause water leakage, electrical shock, or fire.
- Use only the included accessories and parts, and specified tools for the installation. Using non-standard parts can cause water leakage, electrical shock, fire, and injury or property damage.
English
Safety instructions
- Make sure that the outlet you are using is grounded and has the appropriate voltage. The power cord is equipped with a three-prong grounding plug to protect against shock. Voltage information can be found on the nameplate of the unit.
- Your unit must be used in a properly grounded wall receptacle. If the wall receptacle you intend to use is not adequately grounded or protected by a time delay fuse or circuit breaker (the fuse or circuit breaker needed is determined by the maximum current of the unit. The maximum current is indicated on the nameplate located on unit), have a qualified electrician install the proper receptacle.
- Install the unit on a flat, sturdy surface. Failure to do so could result in damage or excessive noise and vibration.
- The unit must be kept free from obstruction to ensure proper function and to mitigate safety hazards.
- DO NOT modify the length of the power cord or use an extension cord to power the unit.
- DO NOT share a single outlet with other electrical appliances to avoid overloads. Improper power supply can cause fire or electrical shock.
- DO NOT install your product in a wet room such as a bathroom or laundry room. Too much exposure to water can cause electrical components to short circuit.
Safety instructions
- DO NOT install the unit in a location that may be exposed to combustible gas, as this could cause fire.
- The unit has wheels to facilitate moving. Make sure not to use the wheels on thick carpet or to roll over objects, as these could cause tipping.
- DO NOT operate a unit that it has been dropped or damaged.
- The appliance with electric heater shall have at least 1 meter space to any combustible materials.
- Do not touch the unit with wet or damp hands or when standing barefoot on a wet floor.
- If the product is knocked over during use, turn off the unit and unplug it from the main power supply immediately. Visually inspect the unit to ensure there is no damage. If you suspect the unit has been damaged, contact a technician or customer service for assistance.
- In a thunderstorm, the power must be cut off to avoid damage to the machine due to lightning.
- Your product should be used in such a way that it is protected from moisture. e.g. condensation, splashed water, etc. Do not place or store your product where it can fall or be pulled into water or any other liquid. Unplug immediately if it occurs.
- All wiring must be performed strictly in accordance with the wiring diagram located inside of the unit.
English
Safety instructions
- The unit's circuit board (PCB) is designed with a fuse to provide overcurrent protection. The specifications of the fuse are printed on the circuit board.
- This appliance can be used by children aged from 8 years and above and person with reduced physical, sensory or mental capabilities or lack of experience and knowledge if they are being supervised, or have received instruction concerning use of the appliance in a safe way and understand the hazards involved. Children shall not play with the appliance. Cleaning and user maintenance shall not be carried out by children without supervision.
- Children should be supervised to ensure that they do not play with the appliance. Children must be supervised around the unit at all times.
- If the supply cord is damaged, it must be replaced by the manufacturer, its service agent or similarly qualified persons in order to avoid a hazard.
- Prior to cleaning or other maintenance, the appliance must be disconnected from the supply mains.
- Do not remove any fixed covers. Never use this appliance if it is not working properly, or if it has been dropped or damaged.
- Do not run the power supply cord under carpeting. Do not cover it with throw rugs, runners, or similar coverings. Do not route it under furniture or appliances. Keep it from areas that are frequently entered and make sure it will not be tripped over.
Safety instructions
- Do not operate the unit with a damaged cord, plug, power fuse or circuit breaker. Discard the unit or return it to an authorized service facility for examination and/or repair.
- To reduce the risk of fire or electric shock, do not use the device with any solid-state speed control device.
- The appliance shall be installed in accordance with national wiring regulations.
- Contact the authorized service technician for repair or maintenance of this unit.
- Contact the authorized installer for installation of this unit.
- Do not cover or obstruct the inlet or outlet grilles.
- Do not use this product for functions other than those described in this instruction manual.
- Before cleaning, turn off the power and unplug the unit.
- Disconnect the power if strange sounds, smell, or smoke occurs.
- Do not press the buttons on the control panel with anything other than your fingers.
- Do not remove any fixed covers. Never use this appliance if it is not working properly, or if it has been dropped or damaged.
English
Safety instructions
- Do not operate or stop the unit by inserting or pulling out the power cord plug.
- Do not use hazardous chemicals for cleaning or let them come into contact with the unit. Do not use the unit in the presence of inflammable substances or vapour such as alcohol, insecticides, petrol, etc.
- Always transport your product in a vertical position and place it on a stable, level surface during use.
- Always contact a qualified person to carry out repairs. If the power supply cord is damaged, it must be replaced with a new power supply cord, which must be obtained from the product manufacturer and the damaged one must not be repaired.
- Only unplug from the power socket by the plug itself. Do not pull on the cord.
- Turn off the product when not in use.
Safety instructions
Warnings (concerning the R290 refrigerant)
- Do not use means to accelerate the defrosting process or for cleaning, other than those recommended by the manufacturer.
- The appliance shall be stored in a room without continuously operating ignition sources (for example: open flames, an operating gas appliance or an operating electric heater).
- Do not pierce or burn the appliance.
- Compliance with national gas regulations shall be observed.
- Keep ventilation openings clear of obstruction.
- The appliance shall be stored so as to prevent mechanical damage from occurring.
- The appliance shall be stored in a well-ventilated area where the room size corresponds to the room area as specified for operation.
- Any person who is involved with working on or breaking into a refrigerant circuit should hold a current valid certificate from an industry-accredited assessment authority, which authorises their competence to handle refrigerants safely in accordance with an industry recognised assessment specification.
English
Safety instructions
- Servicing shall only be performed as recommended by the equipment manufacturer. Maintenance and repair requiring the assistance of other skilled personnel shall be carried out under the supervision of the person competent in the use of flammable refrigerants.
- Transport of equipment containing flammable refrigerants. See transport regulations
- Marking of equipment using signs. See local regulations
- Disposal of equipment using flammable refrigerants. See national regulations.
- Storage of equipment/appliances.
The storage of equipment should be in accordance with the manufacturer's instructions.
- Cabling
Check that cabling will not be subject to wear, corrosion, excessive pressure, vibration, sharp edges or any other adverse environmental effects. The check shall also take into account the effects of aging or continual vibration from sources such as compressors or fans.
Safety instructions
• Detection of flammable refrigerants
Under no circumstances shall potential sources of ignition be used in the searching for or detection of refrigerant leaks. A halide torch (or any other detector using a naked flame) shall not be used.
Note about non fluorinated gases
- Non fluorinated greenhouse gases are contained in hermetically sealed equipment. For specific information on the type, the amount and the CO_2 equivalent in tonnes of the non fluorinated greenhouse gas (on some models), please refer to the relevant label on the unit itself.
• Installation, service, maintenance and repair of this unit must be performed by a certified technician.
- Product uninstallation and recycling must be performed by a certified technician.
English
Safety instructions
- Read this user guide carefully before first use. It contains important safety information as well as instructions for the use and care of the device. Save the guide for later reference and include it with the device when transferring it to a third party.
- To avoid dangerous situations, do not use the product for any purpose other than those described in the instructions. Improper use is dangerous and voids the warranty.
-
Read this instruction manual carefully before using the product. Familiarise yourself with the operation, adjustments and functions of the controls. Internalise and follow the safety and operation instructions in order to avoid possible risks and hazards.
-
Use and assemble the product only as described with in this manual.
- Keep children and pets away during installation. They might swallow up bits and pieces – danger of suffocation.
- Only use proper tools to install this product.
- Ensure to tighten screws well but do not over tighten them.
- Important! Check to ensure that the product is in a serviceable condition before use. The product shall not be used if it shows any signs of damage or it's suspected to be defect.
Explanation of symbols displayed on the unit
 | WARNINGThis symbol shows that this product uses a flammable refrigerant. If the refrigerant is leaking and exposed to an external ignition source, there is a risk of fire. | |
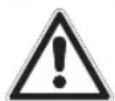
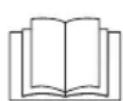
 | CAUTION This symbol shows that the instruction manual should be read carefully. | |
 | CAUTION This symbol shows that a service personnel should be handling this equipment with reference to the installation manual. | |
 | CAUTION This symbol shows that information is available such as the instruction manual or installation manual. | |
English
Congratulations!
Thank you for your purchase of a KOENIC product. Please read this manual carefully and keep it for future reference.
Intended use
This appliance is designed to dehumidify indoor rooms. This product is not for commercial use. It is only designed for household use. Any other use might lead to damage of the product or personal injury.
The Imtron GmbH assumes no liability for damage to the product, for property damage or for personal injury due to careless or improper usage of the product, or usage of product which does not meet the manufacturer's specified purpose.
Before first time use
Remove the product and accessories carefully from the original packaging. It is recommended to keep the original packaging for storage. If you wish to dispose of the original packaging, please observe applicable legal provisions.
Should you have any questions regarding proper disposal, contact your local waste management center.
Inspect the delivery contents for completeness and damages. Should the delivery contents be incomplete or damaged, contact your sales outlet immediately.
After unpacking, please refer to chapter
Cleaning and care.
Disposal
Refrigerants must be evacuated and disposed of by a qualified specialist in accordance with federal and local regulations before the appliance is scraped.
Delivery Content
1 x Portable Dehumidifier
1 x Drainage hose
1 x User manual
Technical data
Power supply: 220 - 240V\~ 50Hz
Maximum power input: 475W/2.7A
Protection class : IPX0
Fuse: 250V TX, 3.15AL
Dehumidify capacity: 11L/day (27°C/60%RH) 20L/day (30°C/80%RH)
Refrigerant: R290/0.065kg
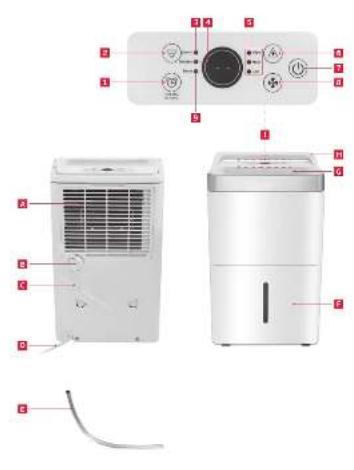
Controls and components
A Detachable air inlet grill
B Condensation water outlet with plug
c Power cord holder
D Power cord with plug
E Condensation water hose
F Removable water tank
G Air outlet
H Handle
Operation panel
-
Timer key
-
Key-
-
Status LED Comf.
-
Water tank status LED Tank full
-
Fan speed status LEDs
-
Key +
-
On/off button
-
Fan speed key
-
Status LED Timer
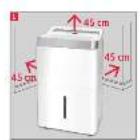
Installation
Placement
Fig. 1 When choosing an installation place, consider the following points:
• Observe all safety warnings!
- Ensure the minimum surrounding distance in every direction of 45 cm and 100 cm to other electrical products.
- Ensure there are no obstacles obstructing the airflow.
Note:
If the product has been transported in a horizontal position, it must not be plugged in for 6 hours, in order to avoid damages of the cooling system.
Condensation water tank
Fig. 2 The condensation water tank is the standard water collection container. The device can only be operated when it is inserted.
If the condensation water outlet is closed on the back, the water tank is automatically filled during operation.
- If the water tank is full, the device stops operation but the fan continues to run for a few minutes, the Tank full status LED flashes and an acoustic signal sounds.
- Pull the water tank out using the two recessed handles and pour it out into a suitable drain (bathtub, etc.).
- Push the emptied water tank into the device as far as it will go and make sure that it is locked in and is seated correctly. The Tank full status LED turns off and operation continues.
Note:
Clean the water tank every 7 days. Remove any scale, deposits, or film that has formed on the sides of the tank or on interior surfaces, and wipe all surfaces dry.

Warning
Micro-organisms that may be present in the water or in the environment where the appliance is used or stored, can grow in the water reservoir.
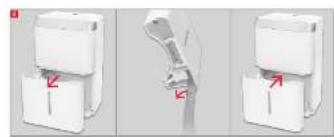
Drainage hose
Fig. 3 In very humid rooms or for longer periods of operation, the drain can be carried out via the condensation water hose so that the tank no longer needs to be emptied.
- Push the separately provided condensation water hose as far as possible onto the upper drain.
- Insert the other end of the condensation hose into a suitable container or nearby drain, with the end of the hose below the condensation drain. Ensure that the connected container is big enough, respectively, that the outlet hose is securely fastened to the drain.
Caution:
When using the condensation hose, the device will run. Please note that the hose must not be kinked and must run sloping downwards along its entire length, otherwise water could flow back into the device and damage it.
Note:
• Always cover the drain outlets when not in use.
- Observe the decommissioning instructions in the respective section, if the product is not to be used for a longer period of time.
English
Operation
Switch appliance on or off
Fig. 4 Press the on / standby button to turn on the device.
A signal tone sounds, the display and the fan speed status LED light up and the device works with the last setting.
- Press the on / standby button again to turn off the device. The display and all LEDs turn off.
- The fan will continue to run for another 20 seconds, which is shown on the display.
Adjust functions and humidity
Fig. 5 • With the device switched on, press the + or - buttons to set the desired humidity from 35 to 80 %rH or continuous operation (CO) which is shown on display.
- To set the desired fan speed, press the fan speed button several times if necessary. The setting is indicated by the fan speed status LEDs. There are 3 fan speeds to choose from.
- The device has an automatic comfort mode. To activate comfort mode, press and hold the timer button for 3 seconds. The corresponding status LED Comf. turns on.
To switch off comfort mode, press and hold the timer button again for 3 seconds. In comfort mode:
- the humidity is regulated depending on the room temperature.
- the humidity cannot be adjusted using the + or - buttons.
- the fan level is low and cannot be adjusted.
- the display is first dimmed and then switched off after 1 minute.
- you can press the timer button to turn on the display. After 1 minute it will turn off again.
Timer function
Fig. 6 The device is equipped with a timer function from 0.5 to 24 hours, with which the device can be switched on or off.
Switch on appliance with timer
- Switch on the device on/standby button, set the desired function or humidity and switch the device back to standby mode.
- Press the timer button and then the + or - buttons to set the desired time from 0.5 to 24 hours in 0.5 and 1 hour steps.
- The timer is activated 5 seconds after the last entry, the time counts down and when the time has elapsed the device switches on with the last settings.
Note:
Press the timer button again to deactivate the timer.
Switch off appliance with timer
- With the device switched on, press the timer button and then the + or - buttons to set the desired time from 0.5 to 24 hours in 0.5 and 1 hour steps.
- The timer is activated 5 seconds after the last entry, the time counts down and when the time has elapsed the device switches off.
Note:
Press the timer button again to deactivate the timer.
Note:
- After a power break or when the product is switched into standby and on again in a short time, the refrigerating compressor will resume work after 3 minutes (delayed start). This is to prevent the cooling circuit from damages.
- If the product is tilted over, switch it into standby and unplug immediately. Wait at least 6 hours before operating the product again to avoid damages on the refrigerating circuit.
• Always switch the product into standby before unplugging.
Cleaning & care
Switch the product into Standby and unplug in order to disconnect from the mains.
Note:
Clean the product every two weeks. Clean the outer surfaces of the product with a damp cloth soaked in neutral detergent. Dry it with a lint-free cloth. Do not use chemical, alkaline, abrasive or other aggressive detergents as they might be harmful to the surfaces.
Fig. 7 Remove the air filter. Clean the air filter in warm water (below 40 °C) with neutral detergent.
Fig. 8 Let the air filter dry thoroughly before re-attaching.
- Do not open the housing of the product and do not insert any objects into the air vents.
- This product does not contain any parts that can be repaired or serviced by the consumer. Contact a qualified specialist to have it checked and repaired as necessary.
Decommissioning
Drain all water from the product and dry it to prevent mold. Switch the product into standby. Unplug and fix the power cord around the brackets to the back of the product. Pull off the condensation water tube and put the plug into the condensation water outlet.
Transportation
Fig. 9 Wait at least 6 hours after moving the device before operating the product to avoid damages on the refrigerating circuit.
Note:
The product is heavy. Therefore move the product whenever possible by pushing or pulling it, rolling on the castors. When lifting is unavoidable, use the recessed handles and lift with two people. Do not move the product during operation.
English
Troubleshooting
If there are any problems during operation, please refer to the following table. If the problems cannot be solved as indicated under Solution, please contact your sales agent.

Warning
Only perform the steps described within this instruction manually. All further inspection, maintenance and repair work must be performed by an authorised service centre or a similarly qualified specialist.
| Problem Possible cause | Solution | |
| Dehumidifier does not start | The dehumidifier is unplugged | Make sure the dehumidifier's plug is pushed completely into the outlet |
| The fuse is blown / circuit breaker is tripped | Check the house fuse/circuit breaker box and replace fuse or reset breaker | |
| Dehumidifier has reached its present level or the bucket is full | The dehumidifier automatically turns off when either condition occurs. Change to a lower setting or empty the water bucket and replace properly | |
| Bucket is not in the proper position | The bucket must be in place and securely seated for the dehumidifier to operate | |
| Power Failure There is a protective time delay (up to 3 min.) to prevent tripping of the compressor overload. For this reason, the unit may not start normal dehumidify for 3 min after it is powered back on | ||
| Dehumidifier does not dry the air as it should | Not enough time allowed for unit to remove moisture | When first installed, allow at least 24 hours to maintain the desired dryness |
| Airflow is restricted Make sure | there are no curtains, blinds, or furniture blocking the front or back of the dehumidifier. See the CHOOSING A LOCATION section | |
| Dirty filter Follow the instructions for cleaning the filter | ||
| The Humidity Control may not be set low enough | For drier air, press the “-” button to lower the percent humidity desired in the room, or set the dehumidifier to Cont. for maximum dehumidify | |
| Doors and windows may not be closed tightly | Check that all doors, windows, and other openings are securely closed | |
| Clothes dryer may be blowing moist air into the room | Install the dehumidifier away from the dryer.The dryer should be vented outside | |
| Room temperature is too low | Moisture removal is best at higher room temperatures. Lower room temperatures will reduce the moisture removal rate.This model is designed to operate at temperatures above 5 °C (41 °F) | |
| Appliance runs too long | The area is too large The capacity of the appliance can not meet the area of the room | |
| Doors and windows are open | Close the door and window | |
| Frost appears on heat-exchanger | Appliance run recently or the room temperature is too low | It is normal, frost usually disappear in 60 min |
| Fan noise | The air is passing through the appliance | This is normal |
| Water on the floor | The drain connection may be aging or loose | Check the drain connection and the appliance is placed level |
| The drain pipe is connected, but the water is not drained | If use the bucket, remove the drain pipe and put back the drain cover; or install the drain pipe correctly | |
Note:
Murmur of water is heard when the product is operating. It is a normal sound of the coolant circulating in the system.
Protection and error codes
Code Cause
EH Humidity sensor failure
E2 Temperature sensor failure
E3 Gas leakage
Note:
Contact the service centre if errors occur repeatedly.
Note:
- This product contains non-fluorinated greenhouse gas (hermetically sealed) which is dangerous for the environment and contributes to global warming if released to the atmosphere.
• Refrigerant type: R290
• Global warming potential (GWP): 3
- Refrigerant leakage contributes to climate change. Refrigerant with lower global warming potential (GWP) would contribute less to global warming than a refrigerant with higher GWP, if leaked to the atmosphere.
- This product contains a refrigerant fluid with a GWP equal to 3. This means that if 1 kg of this refrigerant fluid would be leaked to the atmosphere, the impact on global warming would be 3 times higher than 1 kg of CO₂, over a period of 100 years. Never try to interfere with the refrigerant circuit yourself or disassemble the product yourself and always ask a professional.
- Deutsch
- Sicherheitshinweise
- English
- Safety instructions
- Warnings (concerning the R290 refrigerant)
- • Detection of flammable refrigerants
- Note about non fluorinated gases
- Congratulations!
- Intended use
- Before first time use
- Cleaning and care.
- Disposal
- Delivery Content
- Technical data
- Controls and components
- Installation
- Placement
- Note:
- Condensation water tank
- Warning
- Drainage hose
- Caution:
- Operation
- Switch appliance on or off
- Adjust functions and humidity
- Timer function
- Switch on appliance with timer
- Switch off appliance with timer
- Cleaning & care
- Decommissioning
- Transportation
- Troubleshooting
- Protection and error codes
- Code Cause
Brand : Koenic
Model : KDH 203424
Category : Humidifier