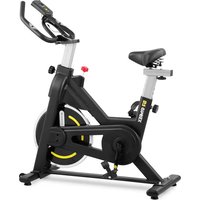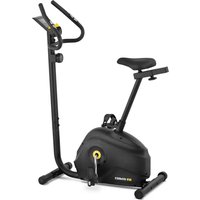
GR-MG78 - Exercise bike Gymrex - Free user manual and instructions
Find the device manual for free GR-MG78 Gymrex in PDF.


| Product type | Exercise bike |
| Model | GR-MG78 |
| Dimensions (L x W x H) | 980 x 470 x 1310 mm |
| Weight | 21.4 kg |
| Maximum user weight | 110 kg |
| Display type | LCD |
| Display dimensions | 215 x 158 mm |
| Power supply | 2 AA batteries (not included) |
| Resistance levels | 8 |
| Flywheel weight | 4 kg |
| Seat adjustment range (height) | 720 to 885 mm |
| Accuracy class | C (minimum accuracy) |
| Usage class | H (domestic) |
| Heart rate monitor | Yes (handlebar sensor) |
| Display functions | Time, speed, distance, calories, pulse, ODO |
| Programmable settings | Time, distance, calories |
| Frame material | Steel |
| Cleaning and maintenance | Soft damp cloth, no corrosive products |
| Ambient temperature | Do not exceed 40°C |
| Warranty | Check supplier warranty |
Frequently Asked Questions - GR-MG78 Gymrex
User questions about GR-MG78 Gymrex
0 question about this device. Answer the ones you know or ask your own.
Ask a new question about this device
Download the instructions for your Exercise bike in PDF format for free! Find your manual GR-MG78 - Gymrex and take your electronic device back in hand. On this page are published all the documents necessary for the use of your device. GR-MG78 by Gymrex.
USER MANUAL GR-MG78 Gymrex
text_image
Technical diagram of a stationary exercise machine with numbered components for identification.text_image
Labeled diagram of a stationary exercise bike with numbered parts for identification.text_image
Labeled diagram of a stationary exercise bike with numbered parts for identificationtext_image
Labeled diagram of a stationary exercise machine with numbered parts for identification.natural_image
Technical line drawing of a mechanical device with no visible text or symbolsnatural_image
Technical line drawing of a mechanical exercise machine with levers and wheels (no text or symbols)natural_image
Line drawing of a stationary exercise bike with an inset showing the device's handle and arm (no text or symbols present)natural_image
Technical line drawing of a stationary exercise bike with attached mechanical components (no text or symbols)natural_image
Line drawing of an outdoor exercise bike with a highlighted seat and mechanical components (no text or symbols)3.3.2. Model GR-MG75 / GR-MG78 / GR-MG79
natural_image
Technical line drawing of a mechanical exercise machine with two zoomed-in views (no text or symbols)natural_image
Line drawing of an exercise machine with a vertical pole and attached lever, shown in two views (red boxes), no text or symbols present.natural_image
Line drawing of an exercise bike with side-mounted legs and headrests, shown with two views of the seat (no text or symbols present)natural_image
Technical line drawing of a mechanical assembly with two views (top: vertical rod, bottom: curved pipe or bracket, right: straight pipe with connectors)natural_image
Line drawing of a mechanical device with a lever and adjustment knob, no text or symbols presentnatural_image
Line drawing of an exercise bike with a highlighted component (no text or symbols)natural_image
Line drawing of an exercise bike with two red circled components, no text or symbols present| Parameter specification | Parameter value | ||
| Product name | Stationary exercise bike | ||
| Model | GR-MG74 | GR-MG75 | GR-MG78 |
| Dimensions [mm] | 790 x 420 x 1180 | 800 x 470 x 1180 | 980 x 470 x 1310 |
| Display type | LCD | ||
| Display size [mm] | 200 x 200 | 240 x 170 | 215 x 158 |
| Weight [kg] | 14 | 20 | 21.4 |
| Maximum working load (kg) | 110 | ||
| Seat adjustment height | 6 detents (770 to 855 mm) | 9 detents (720 to 950 mm) | 720 to 885 mm |
| Battery type | 2 x AA | ||
| Resistance levels | 8 | 8 | 8 |
| Accuracy class | C (minimum measurement accuracy) | ||
| Application class | H (private home use) | ||
| Flywheel weight [kg] | 1.5 | 4 | 4 |
| Parameter specification | Parameter value |
| Product name | Stationary exercise bike |
| Model | GR-MG79 |
| Supply voltage [VAC] / Frequency [Hz] | 230/50 |
| Power supply type | AC 9.0 V / 0.5 A |
| Power supply protection class | II |
| Power supply IP code | IP20 |
| Dimensions [mm] | 1020 x 500 x 1390 |
| Display type | LCD |
| Display size [mm] | 253 x 183 |
| Weight [kg] | 25 |
| Maximum working load (kg) | 110 |
| Seat adjustment height | 7 detents (760 to 935 mm) |
| Resistance levels | 24 |
| Accuracy class | C (minimum measurement accuracy) |
| Application class | H (private home use) |
| Flywheel weight [kg] | 4 |
1. General overview
This manual is intended to assist you in safe and reliable use. The product is designed and manufactured strictly according to technical specifications using the latest technology and components, and maintaining the highest quality standards.
READ THE MANUAL CAREFULLY AND UNDERSTAND IT BEFORE USE.
To ensure long and reliable operation of the product, operate and maintain it correctly and strictly in compliance with this manual. The technical data and specifications in this manual are up-to-date. The manufacturer reserves the right to modifications for the purpose of quality improvement. Considering the technological progress and the feasibility of noise reduction, the product is designed and built so that risks resulting from noise emissions are minimised as far as possible.
Explanation of symbols
 | The product meets the requirements of relevant safety standards. |
 | Read the manual before use. |
 | Recyclable product. |
 | CAUTION! or WARNING! or REMEMBER! indicates a specific instruction (general warning sign). |
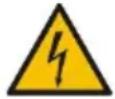 | CAUTION! Risk of electric shock (applies to the power supply model GR-MG79) |
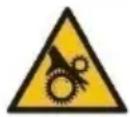 | CAUTION! Rotating parts! |
 | Protection class II appliances with double electrical insulation (applies to the power supply model GR-MG79). |

For indoor use only.

CAUTION! The figures in this manual are illustrative only and may vary in some details from the actual appearance of the product.
The original version of the manual is in German language. Other language versions are translations from German.
2. Operating safety

CAUTION! Read all safety warnings and all instructions. Failure to follow the warnings and instructions may result in electric shock, fire and/or serious injury or death.
The term “appliance” or “product” in the warnings and instructions refers to the stationary exercise bike.
2.1. Electrical safety
* CAUTION! Follow the electrical safety rules when the appliance is powered from the mains (applies to model GR-MG79).
a) The appliance power cord plug must fit into the mains outlet. Do not modify the plug in any way. Original power cord plugs and matching mains outlets reduce the risk of electric shock.
b) Do not use the power cord in any unintended way. Never use it to carry the appliance or to unplug it from the mains outlet. Keep the power cord away from sources of heat, oil, sharp edges or moving parts. Damaged or tangled cords increase the risk of electric shock.
c) Do not use the power supply if the power cord is damaged or shows evidence of wear. Have a damaged power cord replaced by a qualified electrician or the manufacturer's technical service.
d) To avoid electric shock, do not immerse the power cable, its plug or the power supply in water or other liquid. Do not use the power supply on wet surfaces.
2.2. Workplace safety
a) Keep the workplace tidy and well lit.
b) If in doubt as to whether the appliance is working, contact the manufacturer's technical service.
c) Repairs to the appliance shall only be carried out by the manufacturer's service. Do not attempt to repair the product on your own!
d) Check the condition of the safety warning stickers regularly. Replace them if they are illegible.
e) Keep this manual for future reference. If the product is to be handed over to a third party, hand it over with this user manual.
f) Keep packaging components and small installation parts out of the reach of children.
g) Keep the appliance away from children and animals.
2.3. Personal safety
a) Do not operate the product if you are tired, ill or under the influence of alcohol, drugs or medication which might significantly impair your ability to operate the product.
b) The product may only be operated by persons who are physically fit, capable of handling the product and who have been adequately trained, who have read these instructions and have received training in health and safety.
c) The product is not intended to be used by individuals (including children) with reduced mental, sensory or intellectual capacity or lack of experience and/or knowledge, unless they are supervised by an individual responsible for their safety or have been given instructions by the responsible individual on how to operate the machine.
d) Be careful and use common sense when operating the product.
e) Do not overestimate your capabilities. Maintain proper body balance at all times during operation. This allows for better control of the product in unexpected situations.
f) Do not wear loose clothing or jewellery. Keep hair, clothing and gloves away from moving parts. Loose clothing, jewellery or long hair can be caught by moving parts.
g) The appliance is not a toy. Children must be supervised to ensure that they do not play with it.
2.4. Safe use of the product
a) Do not overload the product.
b) Do not use the appliance if the power switch does not function properly (does not switch on or off). Appliances which cannot be controlled with their power switches are dangerous, shall not be operated and must be repaired.
c) Keep unused appliances out of the reach of children and anyone unfamiliar with the appliance or this manual. Appliances are dangerous in the hands of inexperienced users.
d) Keep the product in good working order. Before each use, check for generally evident damage and damage to any of the moving parts (inspect for cracks in parts and components or any other condition that may affect the safe operation of the product). If damaged, have the product repaired before use.
e) Keep the product out of the reach of children.
f) The product shall be repaired and maintained by qualified personnel using original spare parts only. This will ensure safe operation of the product.
g) To ensure the designed operational integrity of the product, do not remove the factory-installed covers or loosen any bolts.
h) When transporting and handling the machine from storage to the place of use, follow the health and safety regulations for manual handling that apply in the country of operation of the machine.
i) Avoid stopping the appliance with heavy loads. This can cause overheating of the drive elements and result in damage to the appliance.
j) Clean the appliance regularly to prevent permanent deposits of dirt.
k) The appliance is not a toy. Cleaning and maintenance shall not be performed by children without adult supervision.
I) Never attempt to tamper with the product to change its parameters or structure.
m) Keep the appliance away from sources of fire and heat.
n) Exceeding the maximum user weight limit may cause damage to the product.
o) Before exercising with this product, consult a physician for any contraindications.
p) Always do a warm-up before using this product and make sure that the bike is not damaged in any way affecting safe operation; inspect for all wear of the components. If any component requires replacement, do not operate the product until all defective components are replaced.
q) If any disturbing symptoms are experienced during exercise, like chest pain, dizziness, shortness of breath, etc., immediately stop your workout and consult a physician.
r) Place the appliance on a sound, dry, and flat surface. Keep at least 0.6 m of clearance around the product.
s) Do not use the appliance within one hour before or after any meal, or adverse effects could be experienced.
t) Only one individual may use this product at the same time.
u) Do not place this product on thick carpets. Otherwise correct circulation of air below the product will be obstructed.
v) Do not attempt to use this product without consulting a physician in prior if you:
• have any medical contraindications or feel unwell;
• have a serious disorder;
- suffer from osteoporosis;
• have any of the following disorders: arterial hypertension, cardiac disorders, cerebral atherosclerosis, or cerebral phlebothrombosis;
• have a heart pacemaker or any other medical device implanted.
w) Do not attempt to start this product if it has not been properly deployed.
x) Do not strain yourself beyond your limits while exercising. Excessive physical effort may result in an accident while operating this appliance and cause a harm to health.
y) Do not rest your full body weight against the handlebar.
z) Do not apply any mechanical pressure to the appliance.
aa) The HR (heart rate) monitor accuracy can be reduced by a large number of factors, including low battery or incorrect hold of the monitor's sensor contacts. The readings of the monitor shall not be used to guide any medical treatment.
bb) This appliance is not suitable for special training which require monitoring accuracy down to one kilometre or calorie burnt.

CAUTION!
Although the appliance has been designed to be safe and has been provided with adequate safeguards, and despite the use of additional safety measures, there is still a low, residual risk of accident or injury during its operation. Caution and common sense are advised when using the product.
3. Rules of use
This product is intended for physical exercise by simulating a bicycle.
The product is not intended for any medical or therapeutic treatment or application.
The product is intended for private home use only!
The user is responsible for any damage caused by non-intended use.
3.1. Appliance overview
GR-MG74
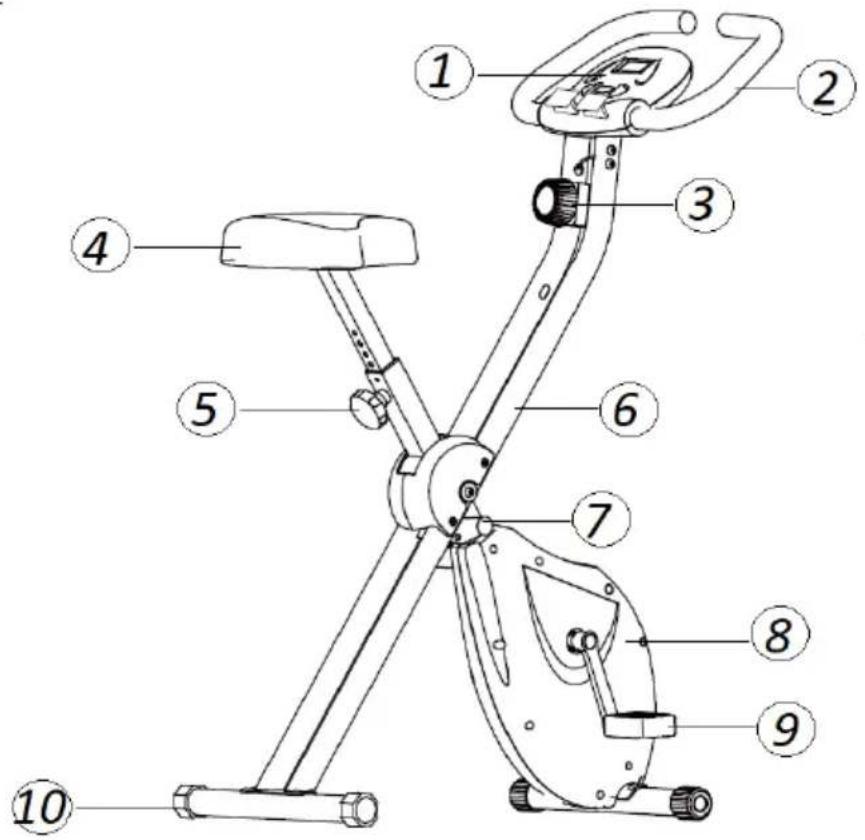
text_image
Technical diagram of a stationary exercise machine with numbered components for identification- Display control panel
- Handlebar
- Resistance setting dial
- Seat
- Seat height setting clamp
- Main frame
- Ball pin
- Flywheel assembly cowl
- Pedal
- Support leg
GR-MG75
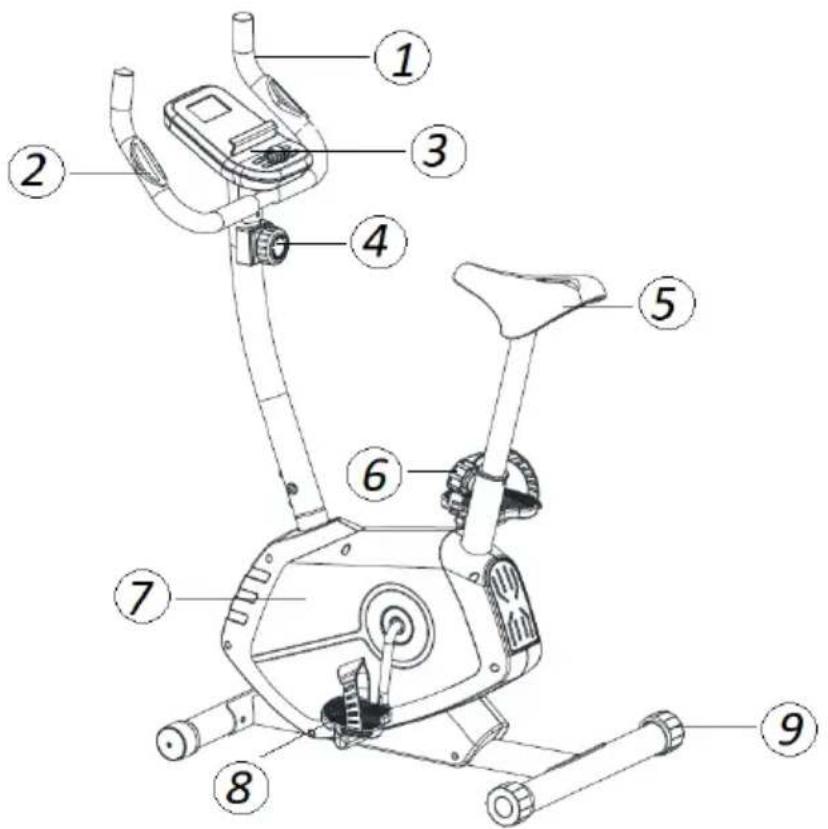
text_image
Labeled diagram of a stationary exercise bike with numbered parts for identification.- Handlebar
- HR monitor
- Display control panel
- Resistance setting dial
- Seat
- Seat height setting clamp
- Flywheel assembly cowl
- Pedal
- Support leg
GR-MG78
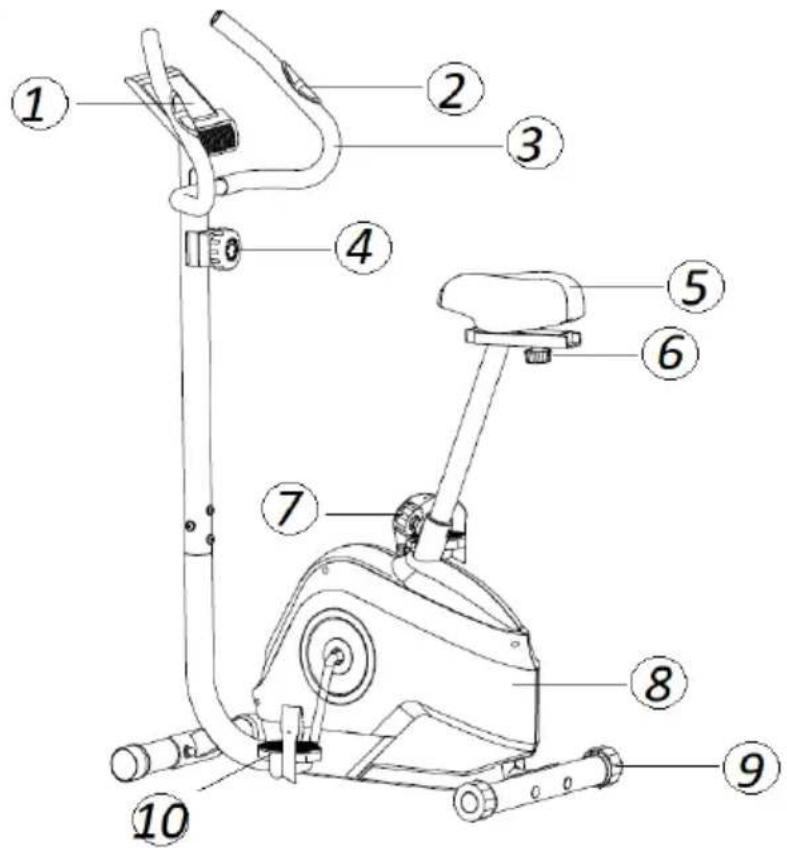
text_image
Labeled diagram of an exercise bike with numbered parts for identification- Display control panel
- HR monitor
- Handlebar
- Resistance setting dial
- Seat
6/7. Seat front/back setting clamp - Flywheel assembly cowl
- Support leg
- Pedal
GR-MG79
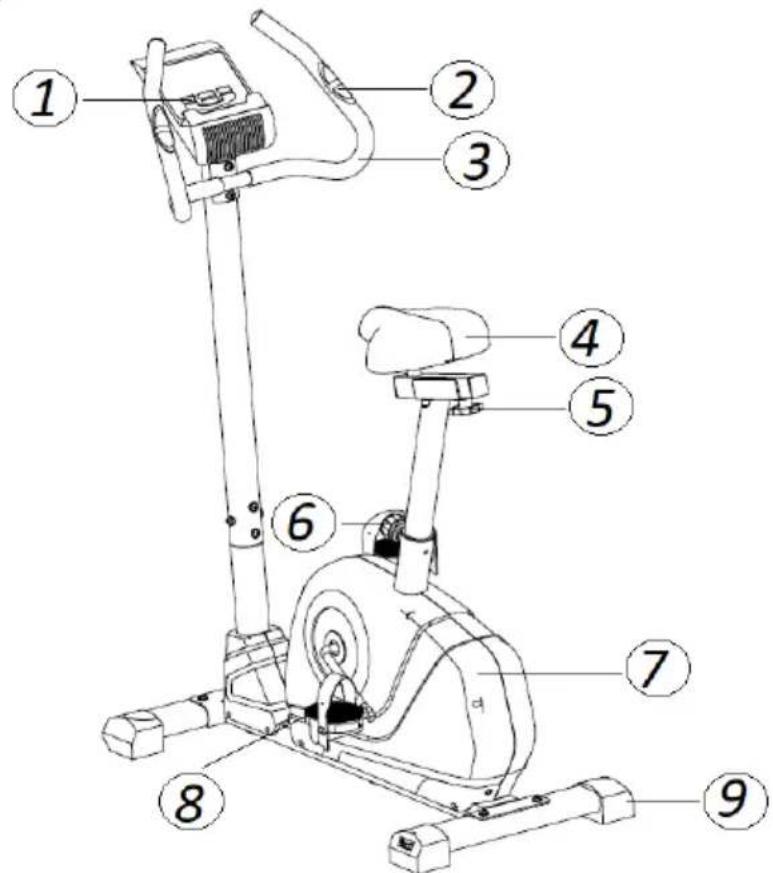
text_image
Labeled diagram of a stationary exercise machine with numbered parts for identification.- Display control panel
- HR monitor
- Handlebar
- Seat
5/6. Seat front/back setting clamp - Flywheel assembly cowl
- Pedal
- Support leg
3.1.1. CONTROL PANEL OVERVIEW:
(a) GR-MG74:
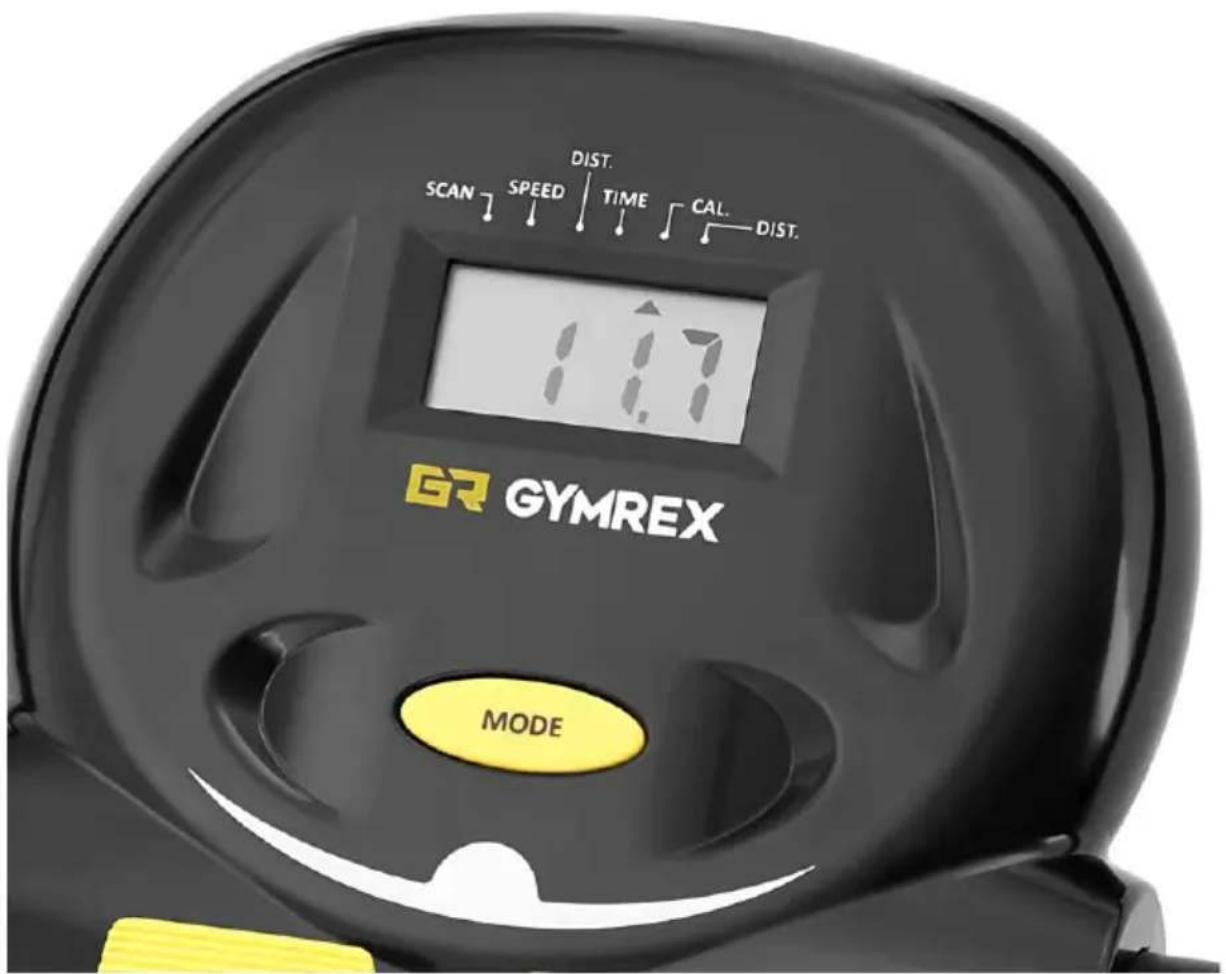
text_image
SCAN SPEED DIST. TIME CAL. DIST. 1:17 GYMREX MODE- SCAN – setting display
- SPEED – speed display
- DIST. – distance display
- TIME – time display
• CAL. – burnt calorie display - MODE – function button
(b) GR-MG75:
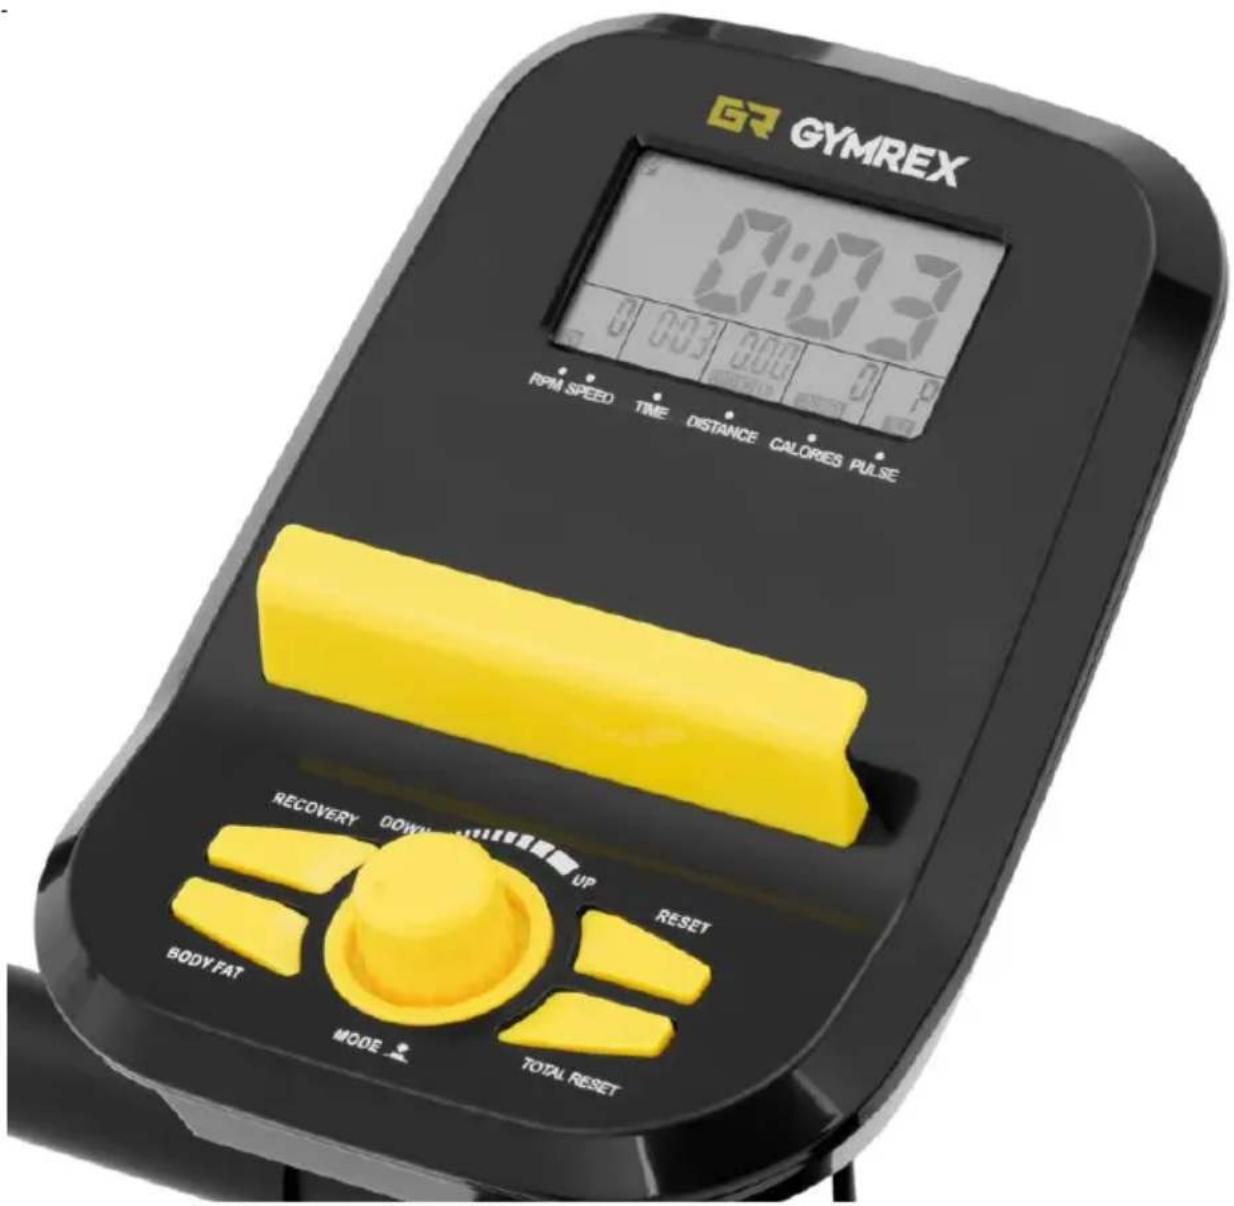
text_image
GYMREX 0:03 RPM SPEED TIME DISTANCE CALORES PULSE RECOVERY DOWN UP RESET BODY FAT MODE TOTAL RESET- RPM / SPEED – speed display
- TIME – time display
• DISTANCE – distance display
• CALORIES – burnt calorie display - PULSE – HR monitor display
- RECOVERY – starts the HR measurement mode
- BODY FAT – starts the body fat measurement mode
- DOWN – reduces the value
- UP – increases the value
- RESET – resets the value to zero
- TOTAL RESET – restarts the entire unit
- MODE – function button
(c) GR-MG78:
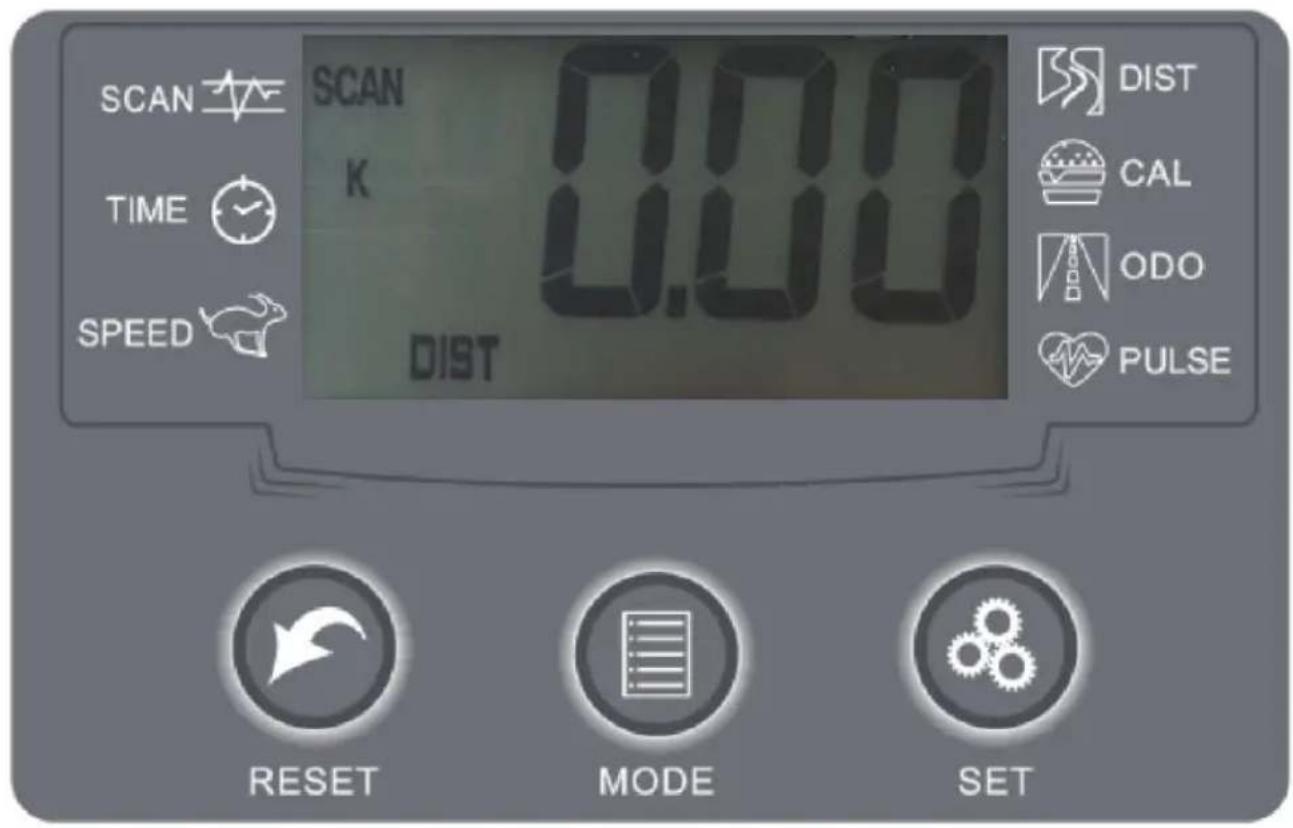
text_image
SCAN TIME SPEED SCAN K 0.00 DIST DIST CAL ODO PULSE RESET MODE SET- SCAN – setting mode
- TIME – time
- SPEED – speed
- DIST – distance
- CAL – calories
- ODO – distance in miles
- PULSE – heart rate
- RESET – resets the value
- MODE – function button
- SET – confirms the setting
(d) GR-MG79:
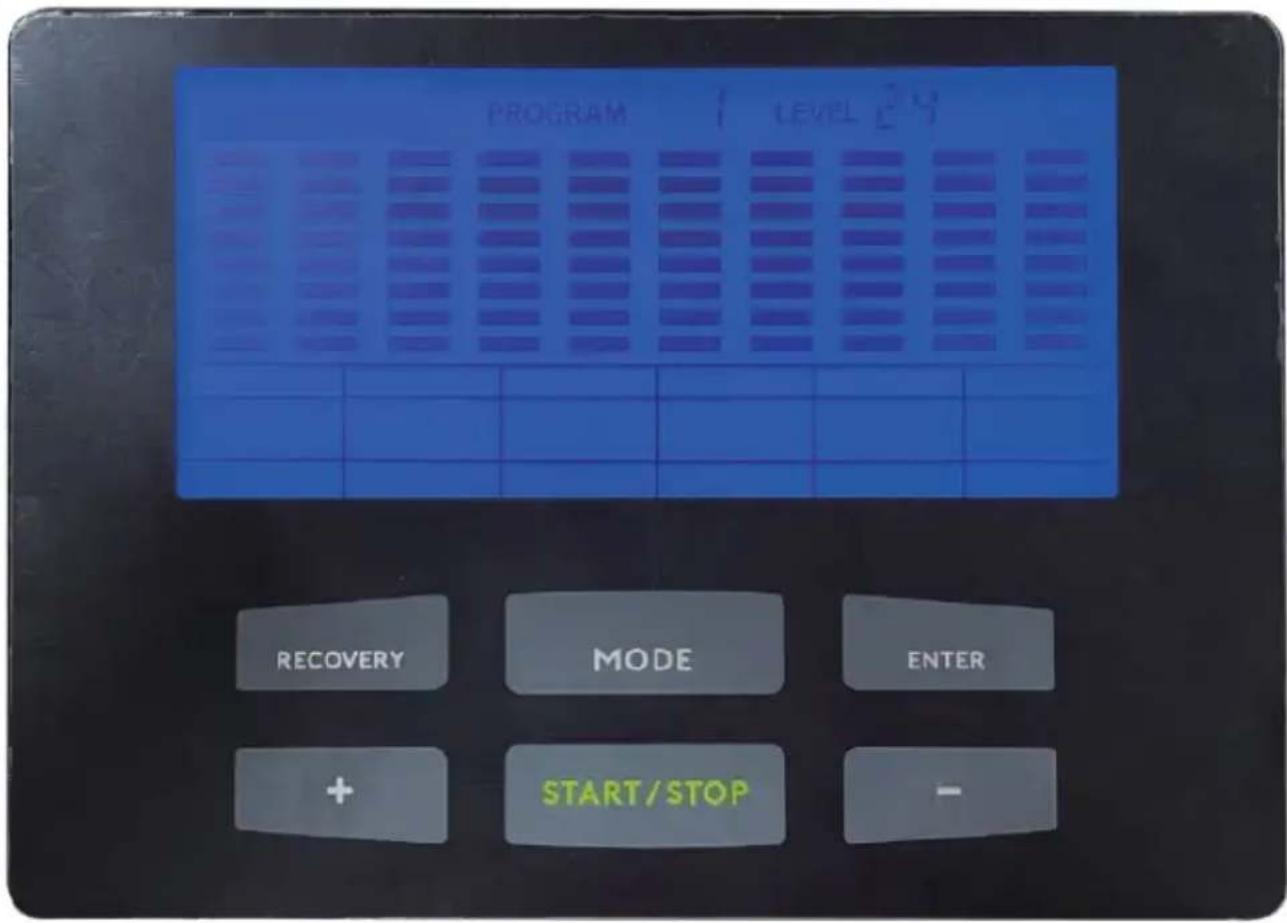
text_image
PROGRAM LEVEL 2-3 RECOVERY MODE ENTER + START/STOP -- RECOVERY – HR measurement mode
- MODE – function button
- ENTER – confirm/save/next
• + - increases the value -
- reduces the value
- START/STOP – starts/stop the unit
3.2. Preparations for operation
POSITIONING THE APPLIANCE
The maximum ambient temperature and relative humidity limits not to be exceeded are +40°C and 85% RH, respectively. Position the appliance where good air circulation is ensured. Maintain a minimum clearance of 10 cm from all sides of the appliance. Keep the appliance away from any hot surfaces. Always operate the appliance on a level, firm, clean, fireproof, and dry surface and out of the reach of children and individuals with reduced mental, sensory and intellectual capacities.
3.3. Installing the appliance
3.3.1. Model GR-MG74
- Remove the ball pin [7]. Deploy the main frame and secure in position by reinserting the ball pin into the respective hole.
natural_image
Technical line drawing of a mechanical device with no visible text or symbols- Attach the support legs to the respective mating pins (the rear support leg goes to the back of the flywheel assembly cowl and the front support leg goes to the frame lower end).
natural_image
Technical line drawing of a mechanical exercise apparatus with no visible text or symbols- Insert the handlebar tips with the control panel into the respective holes and tighten to secure. Connect the wiring.
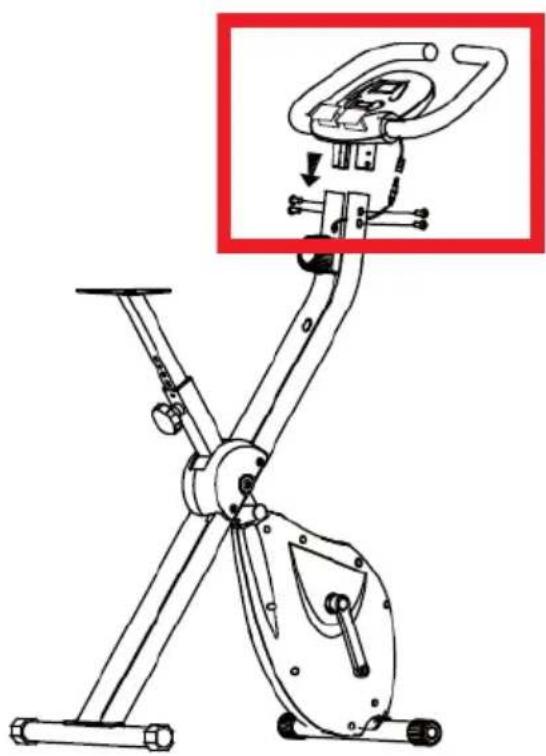
natural_image
Line drawing of a stationary exercise machine with a close-up inset showing the device's internal structure (no text or symbols present)- Thread in the pedal platform ends into the holes in the crank levers on both sides of the flywheel assembly cowl and secure with the nuts included.
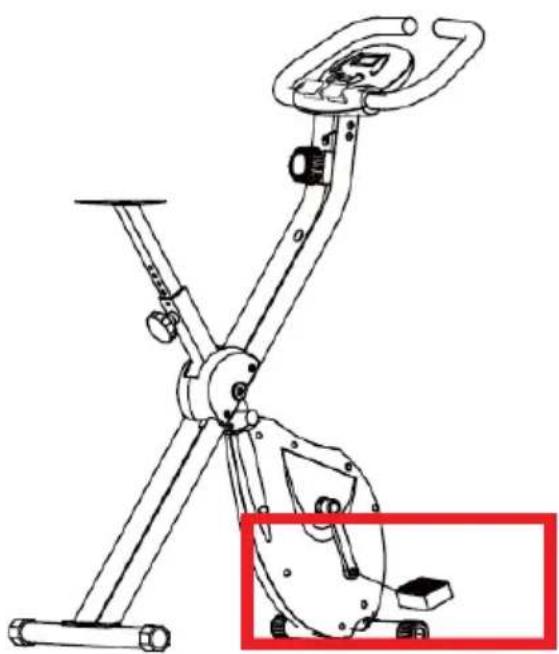
natural_image
Line drawing of a stationary exercise bike with attached sensor and control panel (no text or symbols)- Operate the seat height setting clamp to drop the seat all the way down. Attach the seat cushion to the trilobed baseplate at the end of the seat post.

natural_image
Line drawing of a stationary exercise bike with an inset showing the seat and legs (no text or symbols)3.3.2. Model GR-MG75 / GR-MG78 / GR-MG79
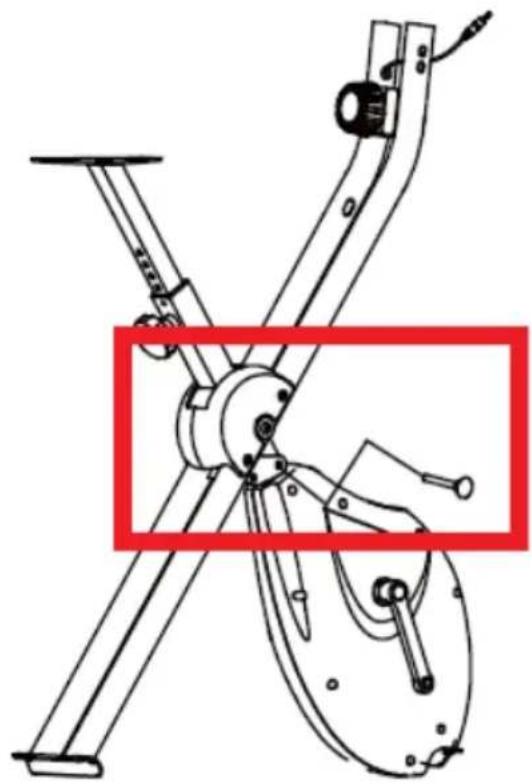
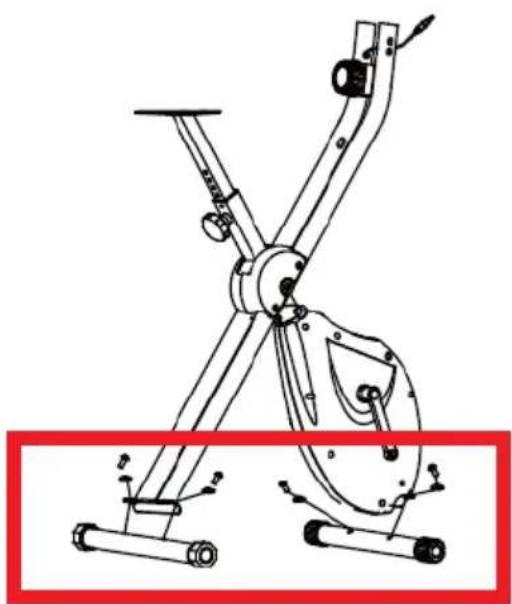
- Secure the support legs to the respective pins in the front and the back of the flywheel assembly cowl.
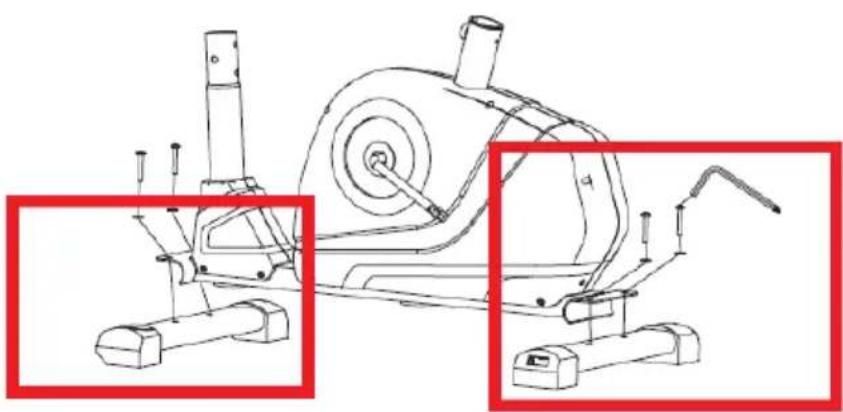
natural_image
Technical line drawing of a mechanical exercise machine with two zoomed-in views (no text or symbols)- Install and secure the handlebar post.
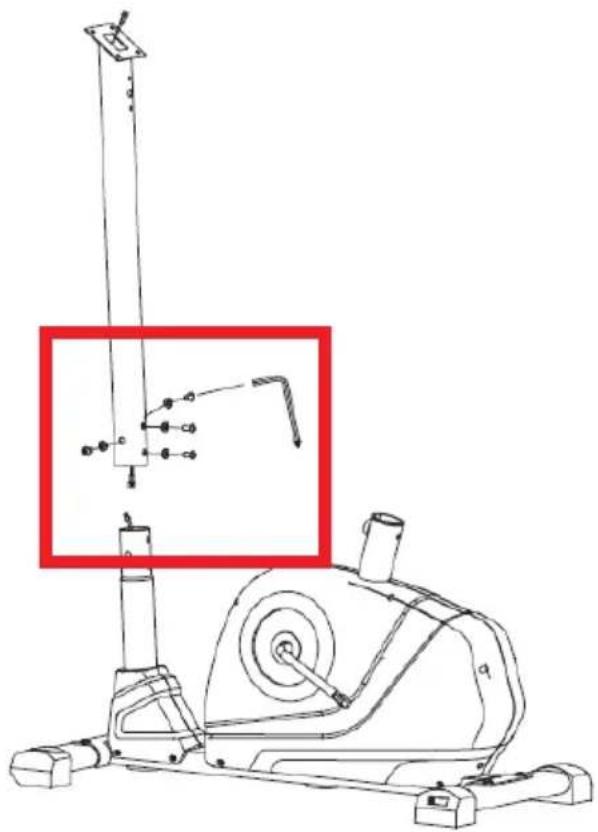
natural_image
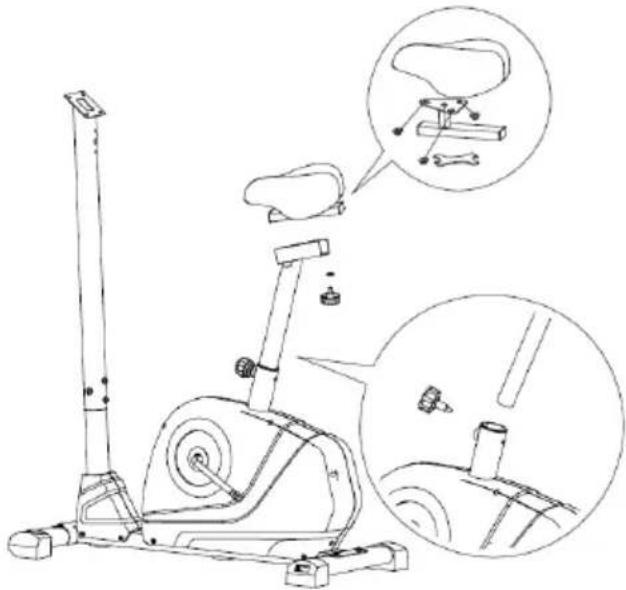
Line drawing of a stationary exercise machine with a vertical pole and attached lever, shown in two views (red boxes), no text or symbols present.- Secure the seat post. Secure the seat height by operate the seat height setting clamp.
- Attach the seat cushion to the trilobed baseplate at the end of the seat post.
natural_image
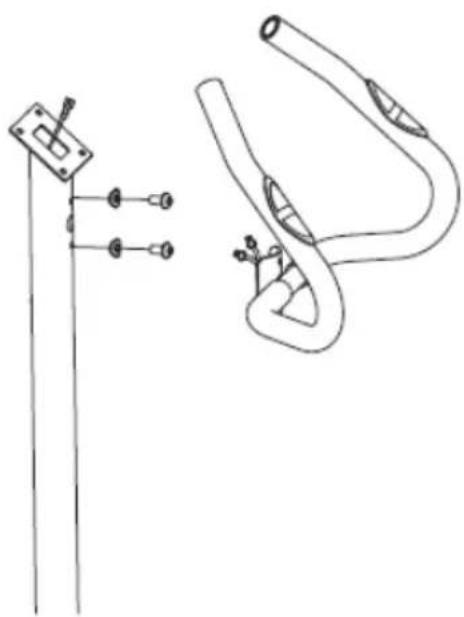
Line drawing of an exercise bike with labeled components and zoomed-in detail (no text or symbols)- Attach the handlebar to its post.
natural_image
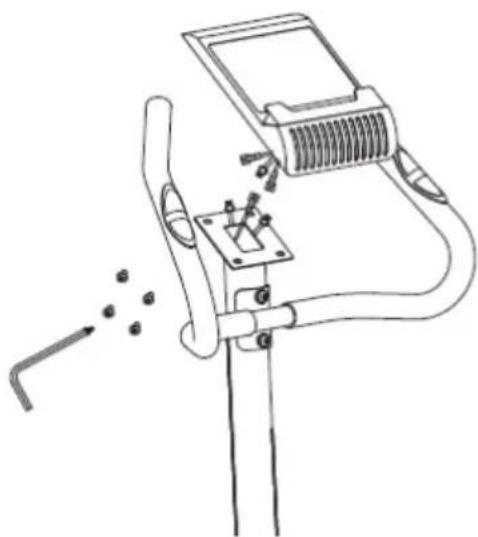
Technical line drawing of a mechanical assembly with two views (top: vertical rod, bottom: curved pipe or bracket, right: straight pipe with connectors)- Secure the display control panel to the square baseplate at the end of the handlebar post.
natural_image
Line drawing of a mechanical device with a lever and adjustment knob, no text or symbols present-
For model GR-MG75 / GR-MG78: Plug the harness connectors extending from the frame tube to the respective receptacles on the back of the control panel: "SENSOR" and "PULSE".
-
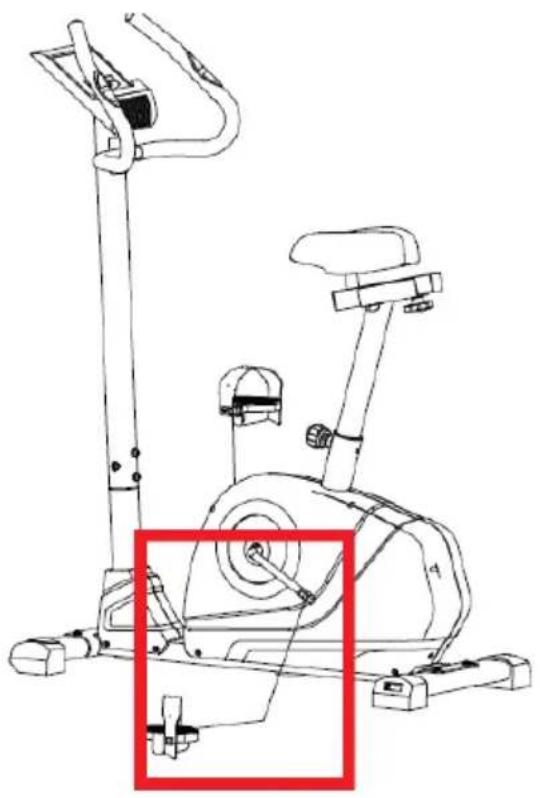
Thread in the pedal platform ends into the holes in the crank levers on both sides of the flywheel assembly cowl and secure with the nuts included.
natural_image
Line drawing of an exercise bike with a highlighted component (no text or symbols)3.4. Operating the appliance
- Install the batteries in the battery holder in the back of the control panel – mind the polarity. The display will show all settings at the same time.
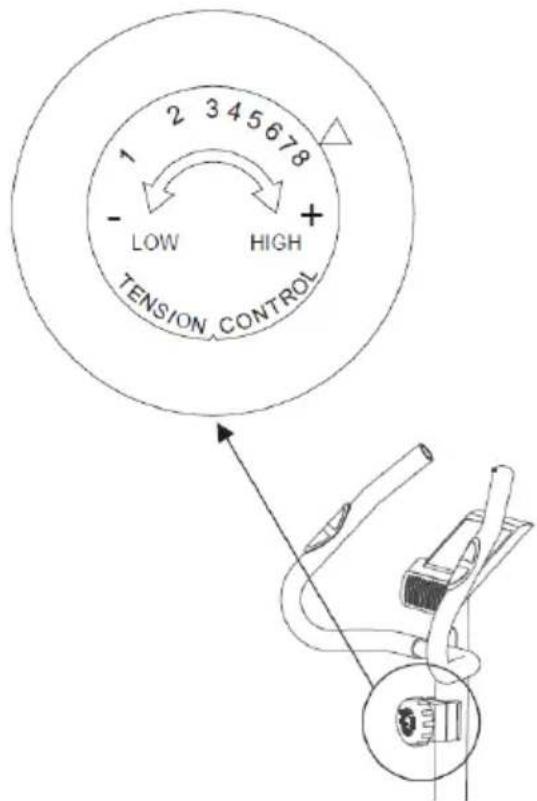
- Manually set the resistance level of the flywheel assembly by operating the resistance setting dial – the arrow tip on the dial is to be set at the desired level (one of the eight available).
text_image
2 3 4 5 6 7 8 - LOW HIGH + TENSION_CONTROL-
Operate the seat setting clamp to adjust the seat:
-
Undo the setting clamp knob.
- Pull up the seat post and set in position by engaging the setting clamp knob into the respective detent in the tube.
-
Tighten the setting clamp to secure the seat in position.
-
Press the MODE button. The arrow with each press of the MODE button:
w cycle between the display settings
-
Two arrows are at SCAN and TIME at the same: the training time;
• One arrow is at TIME: again, the training time;
• One arrow is at SPEED: achieved riding speed;
• One arrow is at DIST (to the left): counts the metres covered so far;
• One arrow is at CAL: the calories burnt during the training session;
• One arrow is at DIST (to the right): simulated the kilometres covered so far. -
Place your feet firmly on the pedals and secure them in the pedal straps. Start your training with the resistance set. Adjust as required.
- After 4 minutes of inactivity, the display will revert to standby mode.
- Press and hold the MODE button for 3 seconds to reset the settings.
CAUTION! If the product will not be used for a long time, remove the batteries and fold down the product using the ball pin.
3.4.2. Model GR-MG75:
- Install the batteries in the battery holder in the back of the control panel – mind the polarity. The display will read "0" for every setting.
text_image
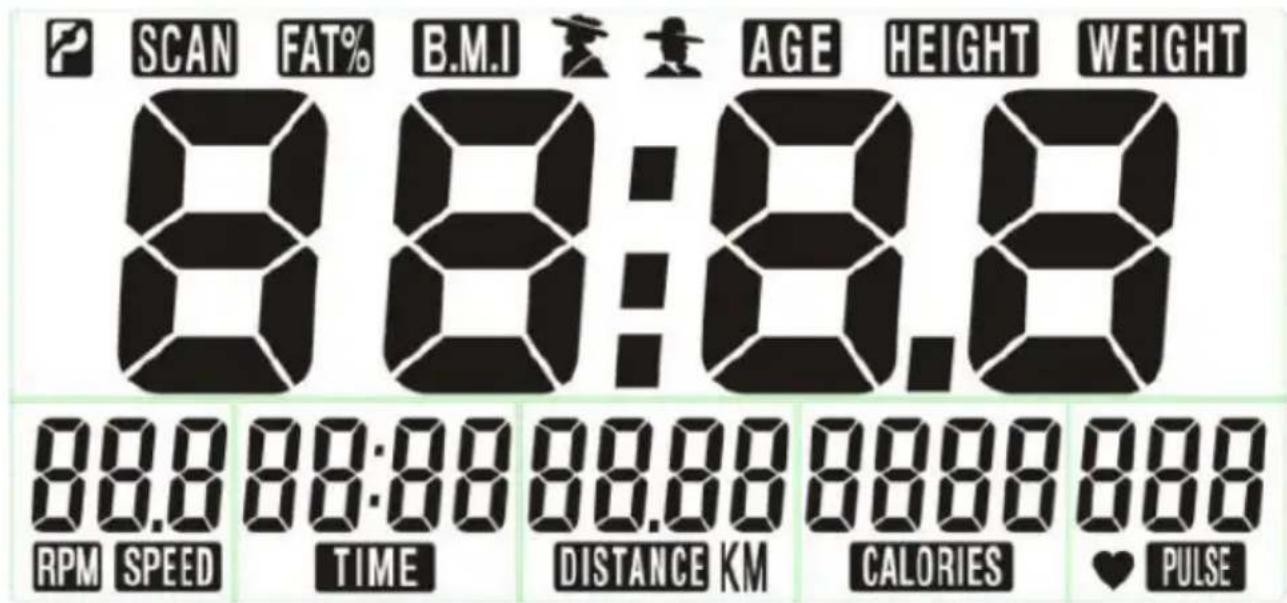
SCAN FAT% B.M.I AGE HEIGHT WEIGHT 8:00:00 88.8 88:88 88.88 88.88 88 RPM SPEED TIME DISTANCE KM CALORIES ♥ PULSE- Press the MODE dial. First, the control panel prompts you to enter your body height, body weight, and age. The prompt messages are displayed in the top bar: HEIGHT, WEIGHT, AGE.
text_image
SCAN 8:8:8.8 0:0 SPEED 0:00 TIME 0:00 DISTANCE KM CALORIES 0 PULSE P-
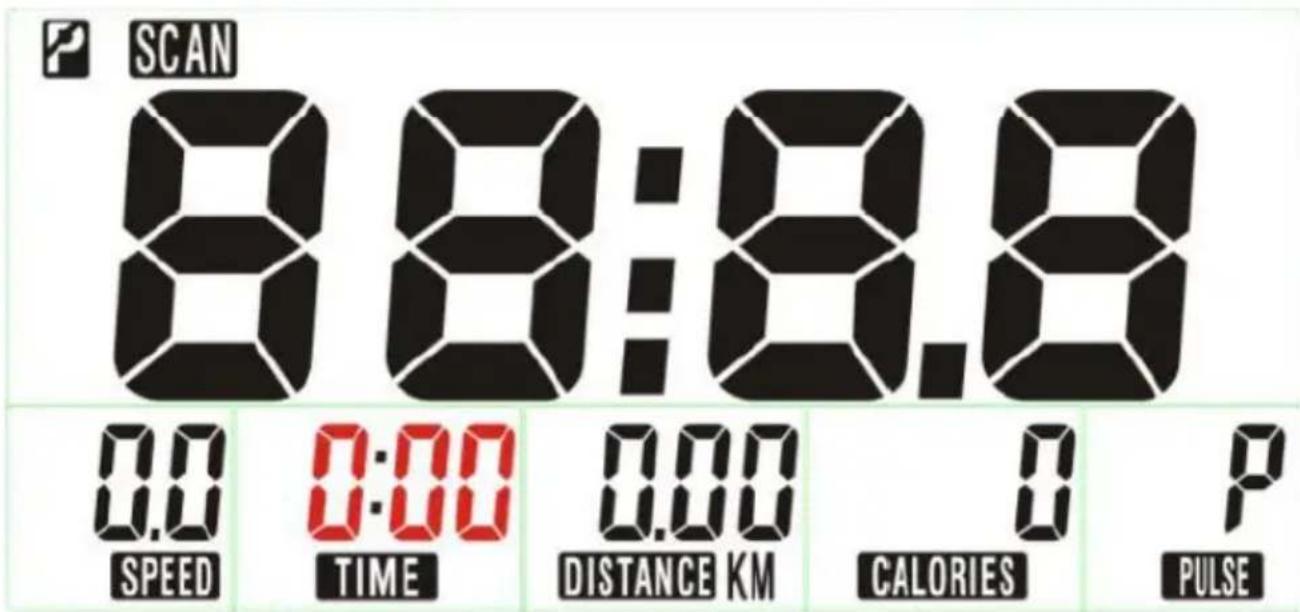
Having made your inputs, the top bar will display "SCAN". The setting to be input begins to flash. Each setting value can be input by operating the dial: turn it counter-clockwise (towards DOWN) to reduce the value; turn it clockwise (towards UP) to increase the value.
-
Confirm by pressing the MODE dial. The display control panel goes to the next setting. You can enter every setting as required, apart from speed.
| Time (minutes) | 0:00 to 99:00 |
| Distance (kilometres) | 0.00 to 99.50 |
| Calories | 0 to 9990 |
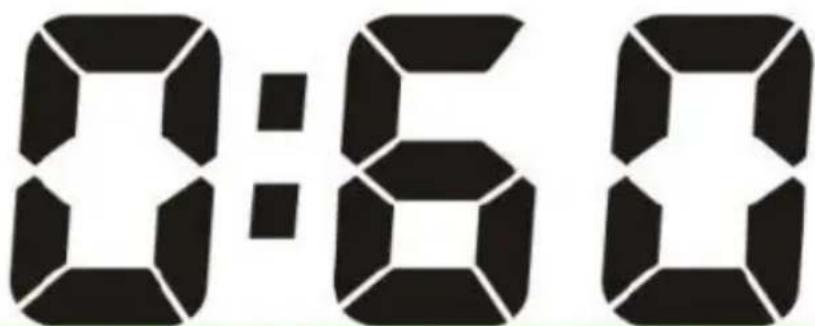
- Press RECOVERY to start measuring your HR. In this mode, only the time and HR are displayed. The time begins to be counted down from 0:60 (60 seconds) to zero.
text_image
0:60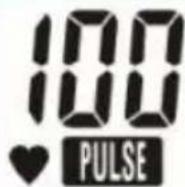
When the time countdown ends, the display reads message F1 to F6 to rate the HR result: F1 is very good, F6 is very poor.
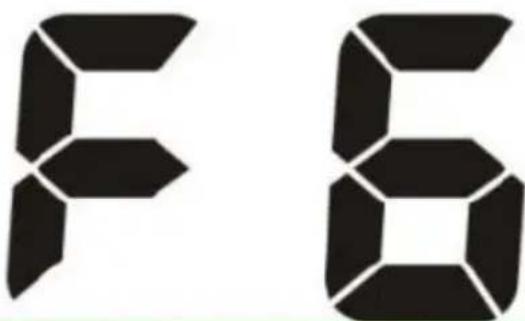
text_image
F6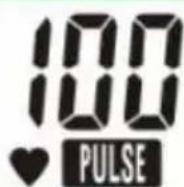
Press RECOVERY again to exit this mode before it ends.
-
Press BODY FAT to measure the body fat tissue. You need to hold both sensor contacts on the handlebar with your hands to obtain a result. After 8 seconds, the display reads a change of the BMI and the body fat percentage.
-
Press and hold the RESET button for 2 seconds to reset all the settings made.
- Press TOTAL RESET to reset and restart the display control panel.
- Manually set the resistance level of the flywheel assembly by operating the resistance setting dial – the arrow tip on the dial is to be set at the desired level (one of the eight available).
-
Operate the seat setting clamp to adjust the seat:
-
Undo the setting clamp knob.
- Pull up the seat post and set in position by engaging the setting clamp knob into the respective detent in the tube.
-
Tighten the setting clamp to secure the seat in position.
-
Place your feet firmly on the pedals and secure them in the pedal straps. Start your training and adjust the settings as desired.
-
After 4 minutes of inactivity, the display will revert to standby mode.
CAUTION! If the product will not be used for a long time, remove the batteries and fold down the product.
3.4.3. Model GR-MG78:
- Install the batteries in the battery holder in the back of the control panel – mind the polarity. The display will read "0" for every setting.
- After a short while, the display switches to the setting input mode. Press the MODE button. The first setting to input is TIME.
- Use the SET button to input the setting value: each press increases the value by one increment – one minute for time and 10 m for distance. The values cannot be reduced until the display rolls over. If you make a wrong input, re-enter the setting by operating the MODE button.
- The next settings to input are distance (DIST) and calories burnt (CAL).
| Parameter designation | Setting range |
| Time (minutes) | 0:00 to 99:00 |
| Distance (kilometres) | 0.00 to 999.0 |
| Calories | 0 to 9990 |
- Press the RESET button during your training to reset the settings made to zero.
- Manually set the resistance level of the flywheel assembly by operating the resistance setting dial – the arrow tip on the dial is to be set at the desired level (one of the eight available).
- Operate the seat setting clamps to adjust the seat.
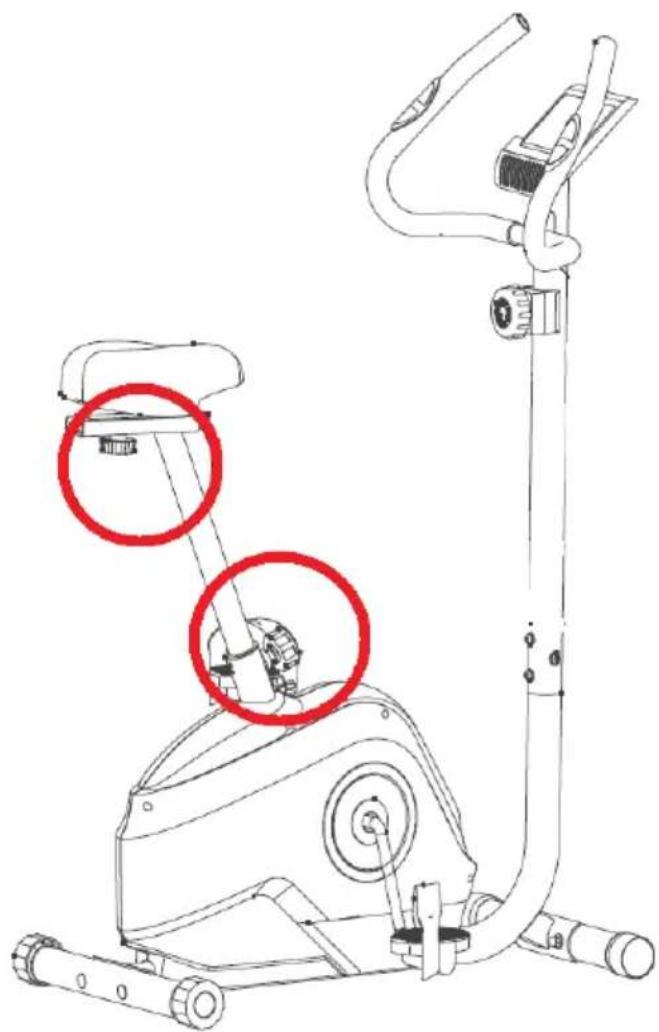
natural_image
Line drawing of an exercise bike with two red circled components, no text or symbols present- Place your feet firmly on the pedals and secure them in the pedal straps. Start your training.
- After 4 minutes of inactivity, the display will revert to standby mode.
CAUTION! If the product will not be used for a long time, remove the batteries and fold down the product.
3.4.4. Model GR-MG79:
- Connect the power supply to the socket in the back of the control panel and to a mains outlet.
- Operate the seat setting clamps to adjust the seat.
- Input the operating settings on the display control panel:
(a) Program 1 – user-defined settings:
- With the appliance powered on, press "+" or "-" as required. The first setting value (time) is increased or reduced, respectively.
- Press ENTER to save the setting and enter the next setting input.
-
Repeat the procedure above until all prompted and required settings are input.
-
Press START/STOP to start operating according to the input settings.
(b) Programs 2 to 9 – predefined programs: - Press START/STOP.
- Choose the program by operating the “+” or “-” buttons. The resistance level is shown under LEVEL (1 to 24). Confirm by pressing ENTER.
- When displaying the settings of the selected program, all settings except for SPEED can be adjusted by pressing “+” or “-”. To input the next setting, press ENTER.
- Press START/STOP to start operating.
(c) Program 10 – Steady power (W):
The program automatically controls the resistance level when using the product in the function of speed so that the power input from the user is steady.
- Press START/STOP.
- Choose Program 10 by operating the “+” or “-” buttons and confirm by pressing ENTER.
-
The settings, including the steady power level, can be adjusted by pressing “+” or “-”.
(d) Program 11 – Body analysis: -
Press START/STOP.
- Choose Program 11 by operating the “+” or “-” buttons and confirm by pressing ENTER.
- Operate “+” or “-” to input the settings shown in the successive prompts: gender, height, weight, and age.
- Confirm each prompt by pressing ENTER, which navigates to the next setting.
- Having completed the input of the settings, hold the handlebar by the sensor contacts and use your other hand to press START/STOP.
- After 15 seconds, the display will read the following: Body Fat (%), BMR, BMI, Body Type: the product can detect 6 body types according to the body fat percentage:
- Males: 1 (7–9.9%); 2 (10–12.9%); 3 (13–16.9%); 4 (17–19.9%); 5 (20–24.9%); 6 (body fat at 25% or higher)
- Females: 1 (14–16.9%); 2 (17–19.9%); 3 (20–23.9%); 4 (24–27.9%); 5 (27–29.9%); 6 (body fat at 30% or higher)
- Press START/STOP again to close Program 11 and return to the normal display.
(e) Program 12 – Target HR:
- Press START/STOP.
- Choose Program 12 by operating the “+” or “-” buttons and confirm by pressing ENTER.
- Operate the “+” or “-” buttons to enter the TARGET HR and the subsequent parameters as prompted. Confirm by pressing ENTER.
- Press START/STOP to start operating.
- If the actual HR falls below the target HR, the product will modify the flywheel assembly resistance to compensate and keep the HR steady on the target. The HR is measured every 20 seconds.
(e) Programs 13 to 15 – Maximum HR:
Programs 13 to 15 use the user's age input to indicate that the maximum HR is achieved:
| Program 13 | From: 60% x (220 – age) |
| Program 14 | From: 75% x (220 – age) |
| Program 15 | From: 85% x (220 – age) |
- Press START/STOP.
- Choose Program 13, 14 or 15 by operating the “+” or “-” buttons and confirm by pressing ENTER.
- Input the settings as prompted to, including age.
- Press START/STOP to start operating.
- If the actual HR falls below the target HR, the product will modify the flywheel assembly resistance to compensate and keep the HR steady on the target. The HR is measured every 20 seconds.
(g) Programs 16 to 19 – User's program settings:
- Press START/STOP.
- Choose Program 16, 17, 18 or 19 by operating the “+” or “-” buttons and confirm by pressing ENTER.
- Enter the settings as prompted to.
| Parameter designation | Setting range |
| Time (minutes) | 05:00 to 99:00 |
| Distance (kilometres) | 0.10 to 99.90 |
| Calories | 1 to 999.0 |
- Press START/STOP to start operating.
CAUTION! The display control panel counts down the time to zero. When the time counts down but other settings were not achieved in the training, like the distance or the calories, press START/STOP again to resume.
-
Place your feet firmly on the pedals and secure them in the pedal straps. Start your training.
-
Press RECOVERY to start measuring your HR. After 1 minute, the display reads the result with a message from F1 to F6: F1 is very good, F6 is very poor.
CAUTION! When your training session is done, disconnect the power supply from the mains and fold the product.
3.5. Cleaning and maintenance
a) Before cleaning and when the appliance is not in use, unplug it from the mains and remove the batteries.
b) Use non-corrosive agents only for cleaning the surfaces.
c) After each cleaning, dry all components well before the appliance is used again.
d) Store the appliance in a dry and cool place, protected from moisture and direct sunlight.
e) Do not spray the appliance with a stream of water and do not immerse it in water.
f) Regularly inspect the appliance for technical defects and damage.
g) Remove the battery from the appliance if you do not intend to use it for a long time.
h) After each training session, use a soft cloth damp with water and some disinfectant (if required) to clean the handlebar and the seat.
i) Do not clean with any sharp and/or metal implements (e.g. a wire brush or a metal scraper) as these may damage the surface of the appliance.
j) Do not clean the unit with acidic substances, medical products, thinners, fuel, oil or other chemicals as they may damage it.
SAFE DISPOSAL OF DISPOSABLE/RECHARGEABLE BATTERIES
The appliance is intended for AA batteries.
Remove the spent batteries from the appliance in the reverse order of installation.
Hand the batteries over to a dedicated battery disposal service.
DISPOSAL OF WASTE APPLIANCES
At the end of its service life, this product must not be disposed of with mixed household waste; return it to a collector/recycler of waste electrical and electronic equipment. This is shown by the symbol placed on the product, the user manual or the packaging. The materials used in the appliance can be reused according to their classification identifications. By reuse, recycling or applying other forms of use of waste appliances, you make a significant contribution to the protection of our environment.
Local administration will provide you with the information about the nearest disposal locations for the appliance.
3.6. Troubleshooting
| Problem | Possible cause | Remedy |
| For GR-MG74 / GR-MG75 / GR-MG78: The display is faded or flashing. | Low battery. | Replace the batteries. |
| The product is wobbly or tilting. | Uneven surface.The support legs are incorrectly installed. | Move the bike to a level surface.Retighten or reinstall the support legs properly. |
| The handlebar is rattling. | The bolts between the handlebar and the post/tube became loose over time or have not been tightened well. | Retighten the bolts. |
| The product makes unusual noise. | The bolts are overtightened. | Release the bolts a bit. |
| No resistance during the training. | Flywheel failure.Resistance setting dial failure.Failed bearing. | Inspect and replace.Inspect and replace.Inspect and replace. |
Dane techniczne
text_image
Labeled diagram of a stationary exercise machine with numbered parts for identificationtext_image
Labeled diagram of a stationary exercise bike with numbered parts for identification.text_image
Labeled diagram of an exercise bike with numbered parts for identificationtext_image
Labeled diagram of a stationary exercise machine with numbered parts for identification.natural_image
Technical line drawing of a mechanical device with no visible text or symbolsnatural_image
Technical line drawing of a mechanical exercise apparatus with no visible text or symbolsnatural_image
Line drawing of a stationary exercise machine with a close-up inset showing mechanical components (no text or symbols)natural_image
Technical line drawing of a stationary exercise bike with attached sensor and control panel (no text or symbols)natural_image
Line drawing of a stationary exercise bike with an inset showing the seat and legs (no text or symbols)3.3.2. Model GR-MG75 / GR-MG78 / GR-MG79
natural_image
Technical line drawing of a mechanical exercise machine with two zoomed-in views (no text or symbols)natural_image
Technical line drawing of a mechanical assembly with two views (top: vertical rod, bottom: curved pipe or bracket, right: straight pipe with connectors)natural_image
Line drawing of a mechanical device with a lever and adjustment knob, no text or symbols presentnatural_image
Line drawing of an exercise bike with two red-circled components, no text or symbols presenttext_image
Technical diagram of a stationary exercise machine with numbered parts for identificationtext_image
Labeled diagram of a stationary exercise bike with numbered parts for identification.text_image
Labeled diagram of an exercise bike with numbered parts for identificationtext_image
Labeled diagram of a stationary exercise machine with numbered parts for identification.natural_image
Technical line drawing of a mechanical device with no visible text or symbolsnatural_image
Technical line drawing of a mechanical exercise machine with articulated limbs and mounting feet (no text or symbols)natural_image
Line drawing of a stationary exercise machine with a close-up inset showing the device's internal structure (no text or symbols present)natural_image
Technical line drawing of a stationary exercise bike with attached sensor and control panel (no text or symbols)natural_image
Line drawing of a stationary exercise bike with an inset showing the seat and legs (no text or symbols)3.3.2. Model GR-MG75 / GR-MG78 / GR-MG79
natural_image
Technical line drawing of a mechanical exercise machine with two zoomed-in views (no text or symbols)natural_image
Line drawing of a stationary exercise machine with a vertical pole and attached lever, shown in two views (red boxes), no text or symbols present.natural_image
Line drawing of an exercise bike with labeled components and zoomed-in detail (no text or symbols)natural_image
Technical line drawing of a vertical pole with three circular connectors and a curved mechanical component (no text or symbols)natural_image
Line drawing of a mechanical device with a lever and adjustment knob, no text or symbols presentnatural_image
Line drawing of an exercise bike with a highlighted component (no text or symbols)natural_image
Line drawing of an exercise bike with two red-circled components, no text or symbols presenttext_image
Labeled diagram of a stationary exercise machine with numbered parts for identificationtext_image
Labeled diagram of a stationary exercise bike with numbered parts for identification.text_image
Labeled diagram of an exercise bike with numbered parts for identificationtext_image
Labeled diagram of a stationary exercise machine with numbered parts for identification.natural_image
Technical line drawing of a mechanical device with no visible text or symbolsnatural_image
Technical line drawing of a stationary exercise machine with levers and wheels (no text or symbols)natural_image
Line drawing of a stationary exercise machine with a close-up inset showing mechanical components (no text or symbols)natural_image
Line drawing of a stationary exercise bike with attached sensor and control panel (no text or symbols)natural_image
Line drawing of a stationary exercise bike with an inset showing the seat and legs (no text or symbols)natural_image
Technical line drawing of a mechanical exercise machine with two zoomed-in views (no text or symbols)natural_image
Line drawing of a stationary exercise machine with a vertical pole and attached lever, shown in two views (red boxes), no text or symbols present.natural_image
Line drawing of an exercise bike with side-mounted legs and headrests, shown with two views of the seat (no text or symbols present)natural_image
Technical line drawing of a mechanical assembly with two views (top: vertical rod, bottom: curved pipe or bracket, right: straight pipe with connectors)natural_image
Line drawing of a mechanical device with attached components and a tool, no text or symbols presentnatural_image
Line drawing of an exercise bike with a highlighted component (no text or symbols)natural_image
Line drawing of an exercise bike with two red circled components, no text or symbols presenttext_image
Labeled diagram of a stationary exercise machine with numbered parts for identificationtext_image
Labeled diagram of a stationary exercise bike with numbered parts for identification.text_image
Labeled diagram of an exercise bike with numbered parts for identificationtext_image
Labeled diagram of a stationary exercise machine with numbered parts for identification.natural_image
Technical line drawing of a mechanical device with no visible text or symbolsnatural_image
Technical line drawing of a stationary exercise machine with levers and wheels (no text or symbols)natural_image
Line drawing of a stationary exercise machine with a highlighted mechanical component (no text or symbols)natural_image
Technical line drawing of a stationary exercise bike with attached mechanical components (no text or symbols)natural_image
Line drawing of a stationary exercise bike with an inset showing the seat and legs (no text or symbols)3.3.2. Modelli GR-MG75 / GR-MG78 / GR-MG79
natural_image
Technical line drawing of a mechanical exercise machine with two zoomed-in views (no text or symbols)natural_image
Line drawing of a stationary exercise machine with a vertical pole and attached lever, shown in two views (red boxes), no text or symbols present.natural_image
Line drawing of an exercise bike with side-mounted legs and headrests, shown with two views of the seat (no text or symbols present)natural_image
Technical line drawing of a vertical pole with three circular connectors and a curved mechanical component (no text or symbols)natural_image
Line drawing of a mechanical device with a lever and adjustment knob, no text or symbols presentnatural_image
Line drawing of an exercise bike with a highlighted component (no text or symbols)natural_image
Line drawing of an exercise bike with two red circled components, no text or symbols presenttext_image
Labeled diagram of a stationary exercise machine with numbered parts for identificationtext_image
Labeled diagram of a stationary exercise bike with numbered parts for identification.text_image
Labeled diagram of an exercise bike with numbered parts for identificationtext_image
Labeled diagram of a stationary exercise machine with numbered parts for identification.natural_image
Technical line drawing of a mechanical device with no visible text or symbolsnatural_image
Technical line drawing of a mechanical exercise machine with levers and wheels (no text or symbols)natural_image
Line drawing of a stationary exercise bike with a highlighted mechanical component (no text or symbols)natural_image
Technical line drawing of a stationary exercise bike with attached mechanical components (no text or symbols)natural_image
Line drawing of a stationary exercise machine with a vertical pole and attached lever, shown in two views (red boxes), no text or symbols present.natural_image
Line drawing of an exercise bike with side-mounted legs and headrests, shown with two views of the seat (no text or symbols present)natural_image
Technical line drawing of a vertical pole with three circular connectors and a curved mechanical component (no text or symbols)natural_image
Line drawing of a mechanical device with attached components and a tool, no text or symbols presentnatural_image
Line drawing of an exercise bike with a highlighted component (no text or symbols)natural_image
Line drawing of an exercise bike with two red-circled components, no text or symbols presenttext_image
Labeled diagram of a stationary exercise machine with numbered parts for identificationtext_image
Labeled diagram of a stationary exercise bike with numbered parts for identification.text_image
Labeled diagram of a stationary exercise bike with numbered parts for identificationtext_image
Labeled diagram of a stationary exercise machine with numbered parts for identification.natural_image
Technical line drawing of a mechanical device with no visible text or symbolsnatural_image
Technical line drawing of a mechanical exercise machine with levers and wheels (no text or symbols)natural_image
Line drawing of a stationary exercise machine with a highlighted component (no text or symbols)natural_image
Technical line drawing of a mechanical device with two zoomed-in views (no text or symbols)natural_image
Line drawing of an outdoor stationary exercise machine with a vertical pole and attached lever, shown in two views (red boxes), no text or symbols present.natural_image
Line drawing of an exercise bike with side views and component details (no text or symbols)natural_image
Technical line drawing of a mechanical assembly with two views (top and side), no text or symbols present.natural_image
Line drawing of a mechanical device with attached components and a tool, no text or symbols presentnatural_image
Line drawing of an exercise bike with a highlighted circular component (no text or symbols)natural_image
Line drawing of an exercise bike with two red circled components, no text or symbols present-
program
-
program
-
program
text_image
Technical diagram of a stationary exercise machine with numbered components for identification.text_image
Labeled diagram of a stationary exercise bike with numbered parts for identification.text_image
Labeled diagram of a stationary exercise machine with numbered parts for identification.natural_image
Technical line drawing of a mechanical device with no visible text or symbolsnatural_image
Technical line drawing of a mechanical exercise machine with levers and wheels (no text or symbols)natural_image
Line drawing of a stationary exercise machine with a close-up inset showing the device's internal structure (no text or symbols present)natural_image
Technical line drawing of a stationary exercise bike with attached sensor and control panel (no text or symbols)natural_image
Line drawing of an outdoor exercise bike with a highlighted seat and mechanical components (no text or symbols)3.3.2. Model GR-MG75 / GR-MG78 / GR-MG79
natural_image
Technical line drawing of a mechanical exercise machine with two zoomed-in views (no text or symbols)natural_image
Line drawing of a stationary exercise machine with a vertical pole and attached lever, shown in two views (red boxes), no text or symbols present.natural_image
Line drawing of an exercise bike with labeled components and zoomed-in detail (no text or symbols)natural_image
Technical line drawing of a mechanical assembly with two views (top: vertical rod, bottom: curved pipe or bracket, right: straight pipe with connectors)natural_image
Line drawing of a mechanical device with a lever and adjustment knob, no text or symbols presentnatural_image
Line drawing of an exercise bike with a highlighted component (no text or symbols)natural_image
Line drawing of an exercise bike with two red-circled components, no text or symbols presentFor the disposal of the device please consider and act according to the national and local rules and regulations.
CONTACT
expondo Polska sp. z o.o. sp. k.