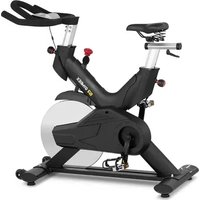
GR-MG120 - Exercise bike Gymrex - Free user manual and instructions
Find the device manual for free GR-MG120 Gymrex in PDF.


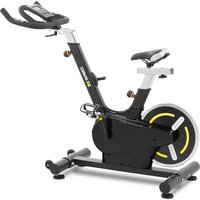
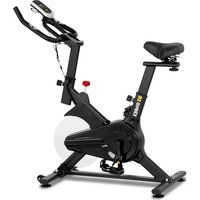
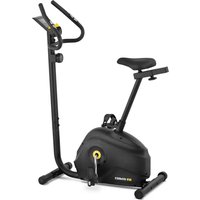
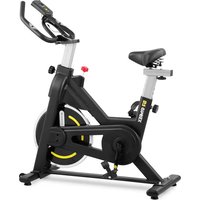
| Product Type | Exercise Bike |
| Brand | Gymrex |
| Model | GR-MG120 |
| Maximum User Weight | 120 kg |
| Dimensions (L x W x H) | 1080 x 530 x 1210 mm |
| Seat Height Range | 840 - 1050 mm |
| Handlebar Height Range | 940 - 1040 mm |
| Flywheel | 20 kg |
| LCD Panel Power Supply | 2 AAA 1.5V batteries |
| Standard / Class | EN ISO 20957 / H.C. |
| Frame Material | Steel |
| Adjustable Resistance | Yes, by tension knob |
| LCD Display Functions | Time, speed, distance, calories, ODO, pulse, auto scan |
| Pulse Sensor | Yes, on handlebar |
| Pedals | Reversible, with L/R marking |
| Transport Wheels | Yes |
| Leveling Feet | Yes, adjustable |
| Cleaning | Soft cloth, non-caustic products |
| Maintenance | Regular greasing of moving parts |
| Intended Use | Home and gym fitness |
Frequently Asked Questions - GR-MG120 Gymrex
User questions about GR-MG120 Gymrex
0 question about this device. Answer the ones you know or ask your own.
Ask a new question about this device
Download the instructions for your Exercise bike in PDF format for free! Find your manual GR-MG120 - Gymrex and take your electronic device back in hand. On this page are published all the documents necessary for the use of your device. GR-MG120 by Gymrex.
USER MANUAL GR-MG120 Gymrex
1 - Sitz
2 - Lenkrad
| Parameter description | Parameter value | ||||
| Product name | INDOOR CYCLING BIKE | ||||
| Model | GR-MG120 | GR-MG121 | GR-MG122 | GR-MG123 | GR-MG124 |
| Maximum user weight [kg] | 120 | 100 | |||
| Dimensions (Width / Depth / Height) [mm] | 1080x530x1210 | 1100x480x1130 | 1140x470x1220 | 1100x520x1180 | 1200x500x1200 |
| Seat height range from the ground [mm] | 840-1050 | 790-960 | 880-1010 | 840-1050 | |
| Handlebar height range from the ground [mm] | 940-1040 | 1080-1200 | 1020-1150 | 1100-1210 | |
| Flywheel [kg] | 20 | 6 | 8 | 13 | 18 |
| Power supply for the LCD panel | 2x1.5V AAA | ||||
| ISO standard/Device class | EN ISO 20957/ H.C. | ||||
| Parameter description | Parameter value | ||||
| Model | GR-MG125 | GR-MG126 | |||
| Maximum user weight [kg] | 120 | 130 | |||
| Dimensions (Width / Depth / Height) [mm] | 1010x470x1050 | 1500x570x1200 | |||
| Device weight [kg] | 29 | 43 | |||
| Seat height range from the ground [mm] | 800-970 | 880-1000 | |||
| Steering wheel height range from the ground [mm] | 1000-1100 | 1000-1060 | |||
| Flywheel [kg] | 8 | 13 | |||
| Power supply for the LCD panel | 2x1.5 V AA | 2x1.5V AAA | |||
| ISO standard/Device class | EN ISO 20957/ H.C. | ||||
1. General description
The manual is intended to assist in safe and reliable use. The product is designed and manufactured strictly according to technical specifications using the latest technology and components, and maintaining the highest quality standards.
CAREFULLY READ AND UNDERSTAND THIS MANUAL BEFORE STARTING THE WORK.
In order to ensure long and reliable operation of the device, it is necessary to take care of its correct operation and maintenance in accordance with the instructions of this manual. The technical data and specifications in this manual are up to date. The manufacturer reserves the right to make changes in order to improve quality. Taking into account technical progress and the possibility of reducing noise, the device has been designed and built in such a way that the risk resulting from noise emission is limited to the lowest level.
Symbol explanation
| CE | The product meets the requirements of the relevant safety standards. |
 | Please read the manual before use. |
 | Recyclable product. |
 | CAUTION! or WARNING! or REMEMBER! describing a given situation (general warning sign). |
 | For indoor use only. |

CAUTION! The illustrations in this manual are for illustrative purposes and in some details may differ from the actual product.
The original manual is the German version. The other language versions are translations from German.
2. Safety of use
Electric devices:
CAUTION! Read all safety warnings and all instructions. Failure to follow the warnings and instructions may result in electric shock, fire and/or serious injury or death.
The term “device” or “product” in the warnings and the description of the manual refers to the INDOOR CYCLING BIKE.
2.1. Safety at the workplace
a) Keep your working place tidy and well lit. Untidiness or poor lighting can lead to accidents. Be forward-looking, watch what you are doing and use common sense when using this equipment.
b) If in doubt whether the product is working properly or if it is damaged, contact the manufacturer's service.
c) The product may only be repaired by the manufacturer's service. It is not allowed to make repairs yourself!
d) Keep the operation manual for future reference. Should the device be passed on to third parties, the operation manual should also be handed over with it.
e) Keep packaging elements and small assembly parts out of the reach of children.
f) Keep the device away from children and animals.
2.2. Personal safety
a) It is forbidden to operate the device when you are tired, sick, under the influence of alcohol, drugs or medications that significantly limit the ability to operate the device.
b) The device is not intended to be used by people (including children), who are mentally, sensory or intellectually impaired or without adequate experience and/or knowledge, unless they are supervised by a person responsible for their safety or have been given instructions on how to operate the device.
c) The device may be operated by physically fit, capable and properly trained persons who have read this manual and have been instructed in occupational health and safety.
d) Be careful and use common sense when operating the device. A moment of inattention while operating the device may result in serious personal injury.
e) Do not overestimate your capabilities. Maintain body balance at all times when exercising. This allows better control of the device in unexpected situations.
f) Do not wear loose clothing or jewellery. Keep your hair, clothing and gloves away from moving parts. Loose clothes, jewellery or long hair can be caught in moving parts.
g) Remove any adjusting tools or wrenches before turning the device on. A tool or wrench left in a rotating part of the device can cause injury.
h) The device is not a toy. Children should be supervised to ensure that they do not play with the device.
2.3. Safe use of the device
a) Keep the device in good technical condition. Before each work check for general damage or damage related to moving parts (cracks in parts and components or any other conditions that may affect the safe operation of the device). If damaged, have the device repaired before use.
b) Repair and maintenance of devices should be performed by qualified persons using only original spare parts. This will ensure safe use.
c) To ensure the designed operational integrity of the device, do not remove factory-installed covers or loosen screws.
d) When transporting and moving the device from the place of storage to the place of use, observe the health and safety regulations of manual transport work applicable in the country where the devices are used.
e) It is forbidden to interfere with the construction of the device in order to change its parameters or construction.
f) Keep the devices away from sources of fire and heat.
g) Do not overload the device.
h) Exceeding the maximum allowed user weight may cause damage to the product.
i) Before starting exercise, consult a physician to determine if there are any medical contraindications.
j) Always warm up before using the device.
k) If you experience disturbing symptoms during exercise, e.g. chest pain, dizziness, shortness of breath, etc., stop training immediately and consult your doctor.
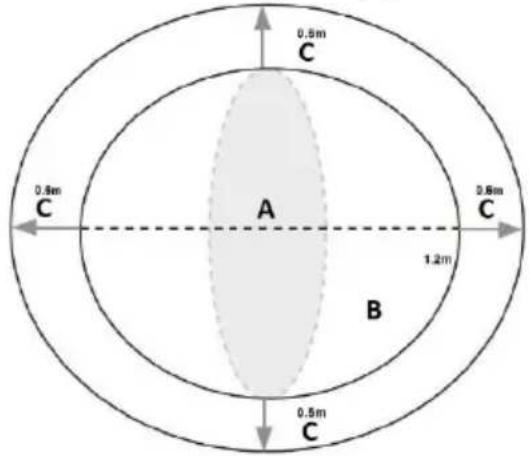
I) Place the device on a stable, dry and flat surface. It is recommended to leave a training space of 1.2m x 1.2m around the device and an additional free space of 0.6m x 0.6m.
m) It is not recommended to use the device without first consulting a doctor by:
- people with contraindications from a doctor or feeling unwell,
- people with serious medical conditions,
- people suffering from diseases such as: arterial hypertension, heart disease, cerebral atherosclerosis and cerebral venous thrombosis,
- people suffering from osteoporosis,
- people with a pacemaker or other implanted medical device.
n) Do not use the device one hour before or one hour after a meal as adverse effects may occur.
o) Keep the device away from moisture and dust.
p) One person can use the device at the same time.
q) Stop exercising when you feel tired or exhausted.
r) The equipment should not be used for therapeutic purposes.
CAUTION! Although the device has been designed to be safe, with adequate means of protection and despite the use of additional user safety elements, there is still a slight risk of accident or injury while working with the device. It is recommended to exercise caution and common sense when using it.
3. Operating rules
The device is designed to simulate cycling.
The product is intended only for use in supervised areas: fitness clubs, gyms, etc.
The user is responsible for any damage resulting from misuse.
3.1. Device description
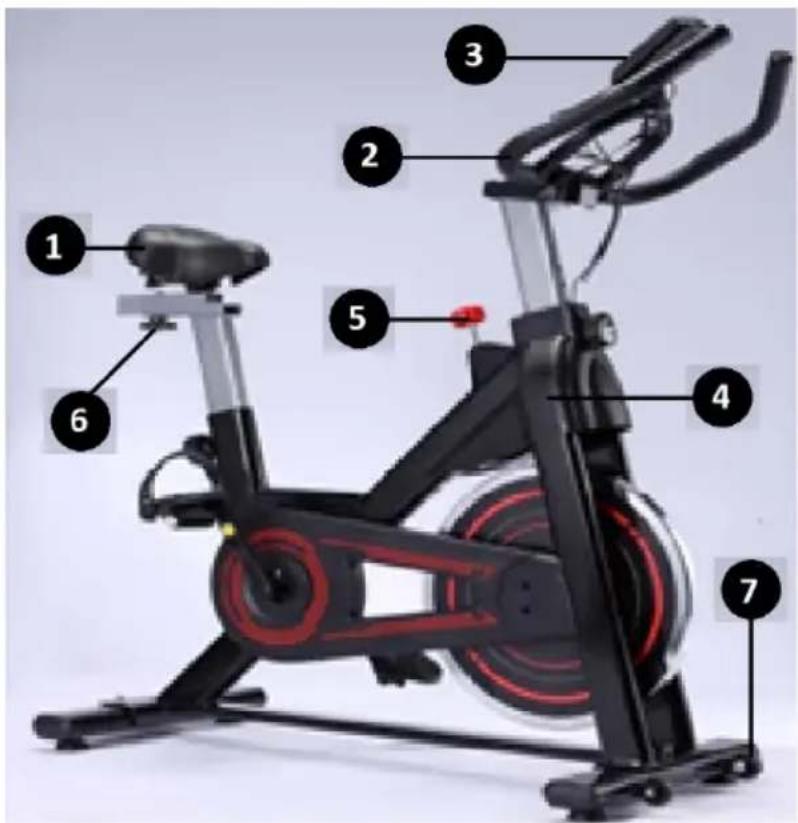
1 - Seat
2 - Handlebar
3 - LCD panel
4 - Frame
5 - Resistance knob/safety knob
6 - Seat lock
7 - Transport wheel
3.2. Preparation for operation
DEVICE PLACEMENT
The device (A) should be placed on a hard, flat and dry ground. The adjacent surface should be non-slip. It is recommended to leave a training space (B) of 1.2m x 1.2m around the device and an additional free space (C) of 0.6m x 0.6m.
APPLIANCE ASSEMBLY
The assembly of the device should follow the sequence shown in the illustrations below. Before starting the assembly, it is recommended to group the components.
STEP I
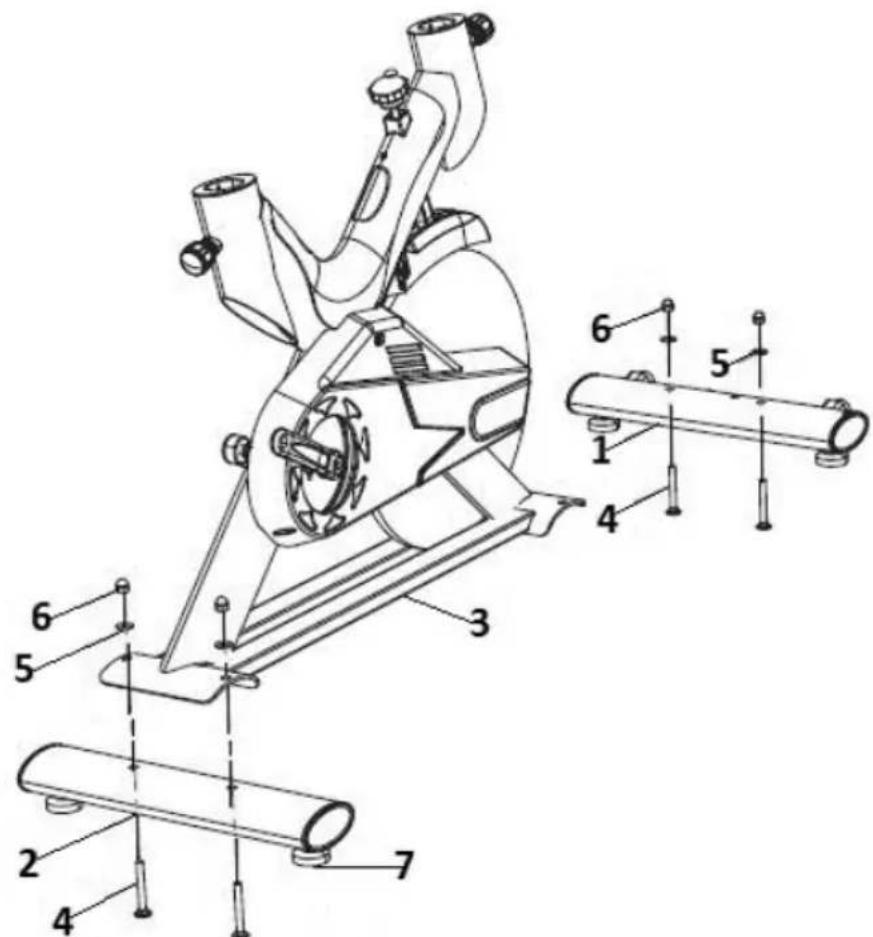
a) Attach the front stabilizer (1) to the main frame (3). Use screw (4), washers (5) and nuts (6) for this purpose.
GR-MG124 Model has an additional spring washer, mounted between the washer and the lock nut.
b) To mount the rear stabilizer (2), proceed similarly.
c) It is possible to level the device by turning the levelling bases (7) left or right.
STEP II
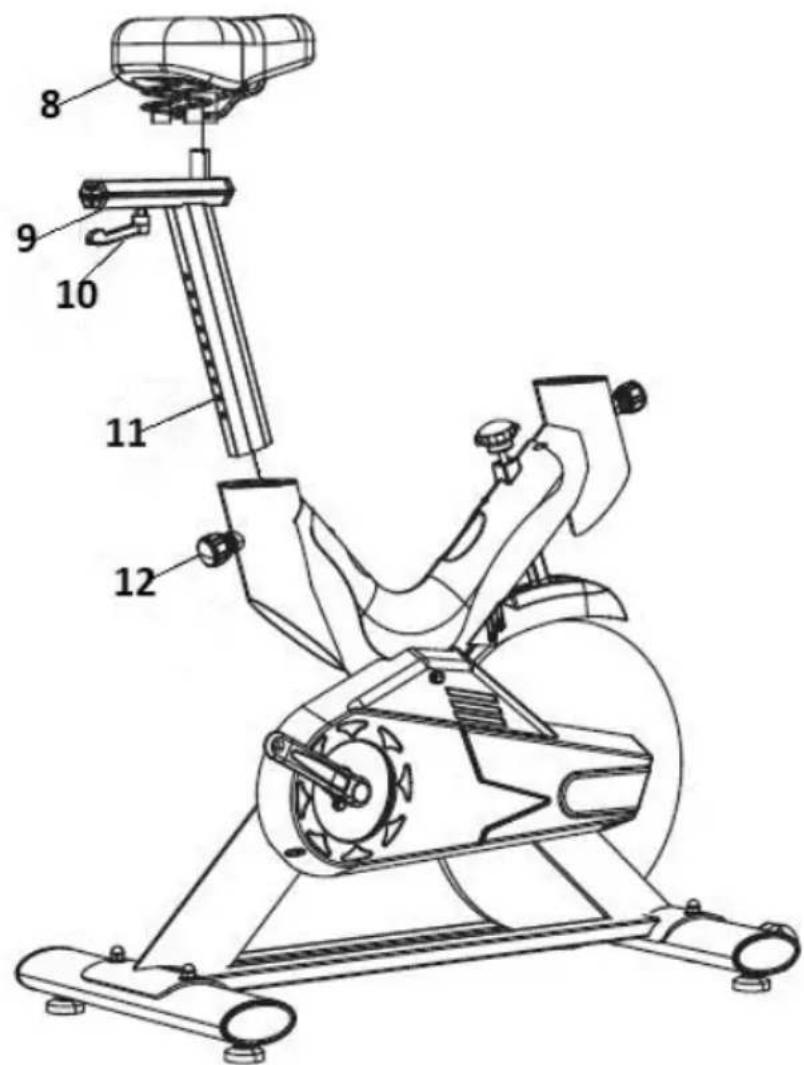
a) Loosen the seat adjustment knob (12) and remove it. Slide the seat bracket (11) into the hole axis of the main frame. Adjust the working height to your own needs, then lock it by inserting and tightening the adjustment knob.
b) Place the seat support (9) on the support (11) and lock it with the locking knob (10).
c) Install the seat (8) on the support (9). Lock in place by tightening the seat nuts on the sides.
CAUTION! Installation of the seat support may require the use of an additional washer between the support and the lock knob!
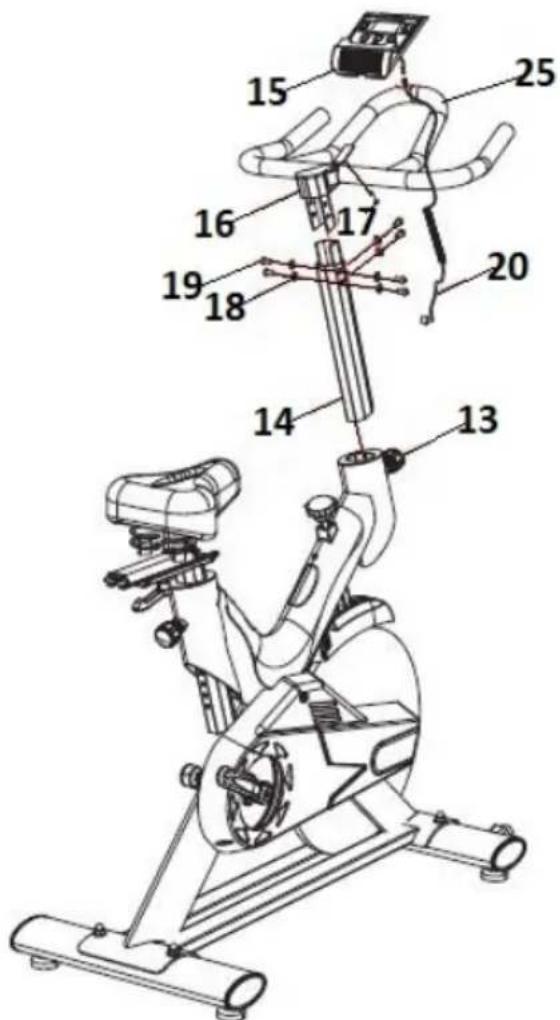
a) Loosen the handlebar height adjustment knob (13). Slide the front adjustment support (14) into the hole axis. Lock in place by tightening the knob. GR-MG126 Model Before installing the support in the frame hole, connect the LCD panel sensor wires located inside the frame.
b) Attach the handlebar (25) to the support (14) using the washers (18) and the mounting screws (19).
c) Place the LCD panel (15) in the central part of the handlebar (16) and fix it with screws (17). Connect the sensor cable (20) to the LCD panel (15) and the main frame of the device. GR-MG121, GR-MG124, GR-MG125 Model assemble the LCD panel base first. Then follow the same procedure.
GR-MG121, GR-MG122, GR-MG125 Model has a phone holder. To mount it, place it on the handlebar frame and press down.

CAUTION! When connecting the wires, the connecting parts should be on same side!
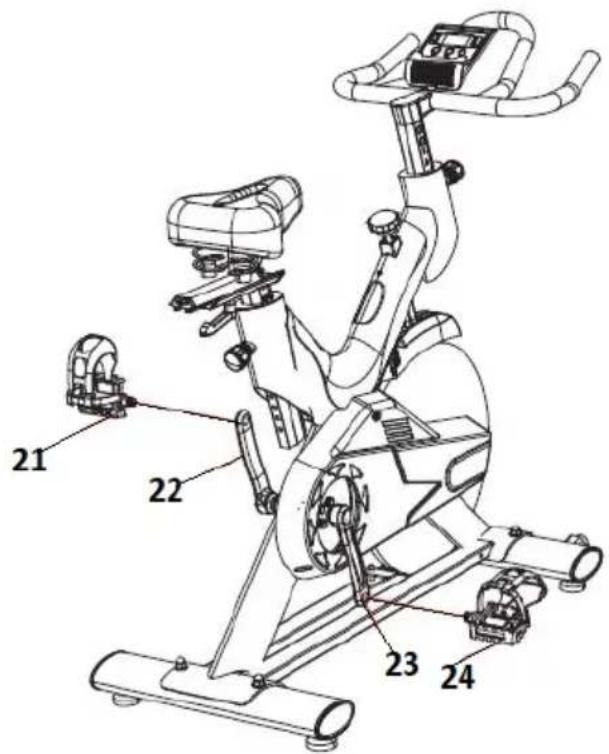
a) Attach the pedals (21, 24) to the device cranks (22, 23). Each pedal is marked with an "L" - for left and an "R" - for right. Mount the left pedal by turning it counter clockwise. Mount the right pedal by turning it clockwise. Make sure the pedals are installed on the correct sides.
CAUTION! The pedal nut must be properly tightened in the crank hole, otherwise the thread could be flattened!
CAUTION! Before mounting the pedals, the threads can be oiled. It will help to replace them later.
CAUTION! Install the pedals securely enough! After one week of use, tighten the pedals again! Regularly check the stability of the pedal mounting!
All connections of the device should be properly fastened and tightened. After carrying out the given assembly steps, you may start working with the device.
3.3. Working with the device
3.3.1. ADJUSTING THE SEAT
a) VERTICAL
Loosen the seat adjustment knob and remove it. Adjust the seat bracket to the desired height by aligning the holes. Lock the position by inserting the knob, tighten.
b) HORIZONTAL
Loosen the locking knob and remove it. Adjust the seat position to the desired position by moving it towards the handlebar or in the opposite direction. Align the adjustment holes. Lock by inserting the knob, tighten.
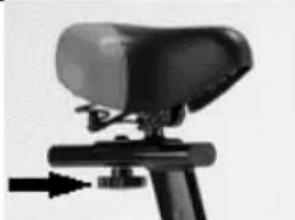
3.3.2. ADJUSTING THE HEIGHT OF THE HANDLEBAR AND THE WORKING RESISTANCE OF THE DEVICE
a) Loosen the handlebar height adjustment knob and remove it. Set the handlebar support at the required height. Aligning the holes, block by inserting the knob. Tighten.
b) To increase the working resistance of the device, turn the loading knob clockwise. Decrease the working resistance of the device by turning in the opposite direction.

CAUTION!
The resistance
knob is also
a safety
knob!
To stop the device immediately, press it!

CAUTION! Adjustment of the seat and handlebar should not be lower than minimum height of the device marked "STOP"!
3.3.3. LCD PANEL FUNCTIONS
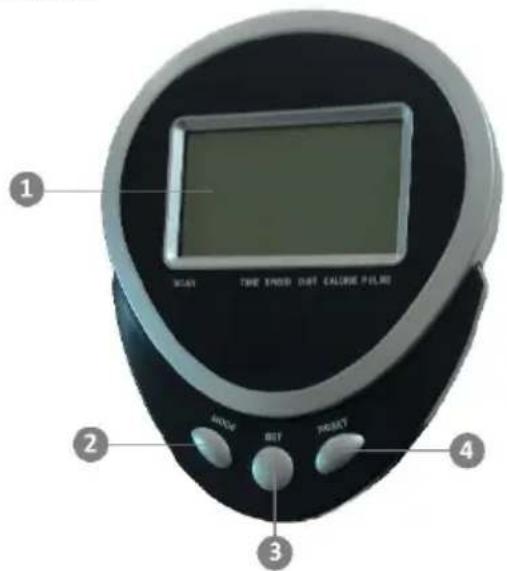
1 - Display
2 - "MODE" button
3 - "SET" button
4 - "RESET" button
CONTROL BUTTONS
a) MODE
Selection of the operation function of the device. Pressing and holding for 3 seconds resets the value. Not applicable (ODO).
b) SET
Sets the operating values of the device: time, speed, calories, distance, ODO
c) RESET
When pressed, the device value is reset to zero.
LCD PANEL FUNCTIONS
| Name | Position |
| TIME | Total exercise time |
| SPEED | Current speed |
| DISTANCE | Distance travelled |
| CALORIES | Number of calories burned |
| ODO | Total distance travelled (counted from the time the batteries were connected) |
| PULSE | Current heart rate. Place your hand over the sensor opening. After approx. 3 seconds the result should appear |
| SCAN | Automatic display of functions every 6 seconds. (TIME, SPEED, DISTANCE, CALORIE, ODO, PULSE |

CAUTION! GR-MG121, GR-MG122 Models have only a "MODE" button!

CAUTION! When the device is not used, the LCD will turn off after 4-5 minutes!
3.4. Cleaning and maintenance
a) Use only non-corrosive products for surface cleaning.
b) Store the device in a cool and dry place, protected from moisture and direct sunlight.
c) It is forbidden to spray the device with a stream of water or immerse the device in water.
d) Regularly inspect the device for serviceability and any damage.
e) Use a soft cloth for cleaning.
f) Do not leave the battery in the device when it will not be used for a long time.
g) Do not use sharp and/or metal objects (e.g. wire brush or metal spatula) for cleaning as these may damage the surface of the device material.
h) Do not clean the device with acidic substances, medical agents, thinners, fuel, oils or other chemicals as this may damage the device.
i) It is necessary to oil the ejection points of the device periodically.
j) Before each use, check the device fixings and tighten if necessary.
INSTRUCTIONS FOR SAFE DISPOSAL OF ACCUMULATORS AND BATTERIES.
The devices are equipped with AAA 1.5V and AA 1.5V batteries.
Remove used batteries from the device following the same procedure as for their installation.
Hand the batteries over to the institution responsible for their disposal.
DISPOSAL OF USED DEVICES.
At the end of its service life, this product must not be disposed of with normal household waste but must be taken to a collection point for recycling of electrical and electronic equipment. This is indicated by the symbol placed on the product, operating instructions or packaging. The materials used in this device are recyclable according to their labelling. You make an important contribution to protecting our environment by reusing, recycling or otherwise disposing of used equipment.
Please contact your local authority for the appropriate disposal point.
TROUBLESHOOTING
| The problem | Possible cause | Work |
| The display of the device is not working | 1. Discharged batteries2. Sensor cable is not connected to the LCD panel | 1. Replace the batteries with new ones2. Connect the sensor cable |
| The device display does not calculate training values | 1. Damaged sensor cable or LCD panel | 1. Check the sensor by measuring the heart rate. If there is no reading, replace the sensor cable with a new one2. Move the sensor cable in the frame. If there is no reading, replace the sensor cable and the LCD panel with a new one |
| The device is unstable | 1. The device bases are not level | 1. Level the device |
| The device rattles/squeaks | 1. Unstable ground2. No oiling of the mounts | 1. Check the surface on which the device is placed2. Loosen the mounts and oil them. Fasten with sufficient pressure |
Dane techniczne
3.3.2. REGULACJA WYSOKOŚCI KIEROWNICY I OBCIĄŻENIA PRACY URZĄDZENIA
1 - Sedlo
2 – Řídítka
3 - LCD panel
4 - Rám
3.3.2. NASTAVENÍ VÝŠKY ŘÍDÍTEK A PRACOVNÍ ZÁTĚŽE ZAŘÍZENÍ
1 - Siège
2 - Guidon
3 - Panneau LCD
4 - Cadre
ASSEMBLAGE DU PRODUIT
3.3.2. RÉGLAGE DE LA HAUTEUR DU GUIDON ET DE LA CHARGE DE SERVICE
1 - Sede
2 - Manubrio
3 - Panello LCD
4 - Telaio
3.3.2. REGOLAZIONE DELL'ALTEZZA DEL MANUBRIO E DEL CARICO
1 – Sillín
2 - Manillar
3 - Panel LCD
4 - Marco
3.3.2. AJUSTE DE LA ALTURA DEL MANILLAR Y CARGA DE TRABAJO DEL EQUIPO
1 – Ülés
2 – Kormány
3 - LCD panel
4 - Keret
3.3.2. KORMÁNYMAGASSÁG ÉS MÜKÖDÉSI TERHELÉS SZABÁLYOZÁSA
1 - Sæde
2 - Rat
3 - LCD - Panel
4 - Ramme
PLACERING AF PRODUKTET
3.3.2. RATH∅JDE OG BELASTNINGSJUSTERING PÅ PRODUKTET
LCD-PANEELIN TOIMINNOT
OUR CUSTOMERS' SATISFACTION IS OUR MAIN GOAL! PLEASE CONTACT US WITH QUESTIONS AT:
NASZYM GŁÓWNYM CELEM JEST SATYSFAKCJA KLIENTÓW W PRZYPADKU PYTAŃ PROSIMY O KONTAKT Z PRZEDSTAWICIELEM W DANYM KRAJU:
NAŠÍM HLAVNÍM CÍLEM JE SPOKOJENOST NAŠICH ZÁKAZNÍKŮ! V PŘÍPADĚ OTÁZEK NÁS PROSÍM KONTAKTUJTE NA:
NOTRE BUT PREMIER EST VOTRE SATISFACTION! POUR TOUTE QUESTION, CONTACTEZ NOUS SUR:
- GENERAL DESCRIPTION
- CAREFULLY READ AND UNDERSTAND THIS MANUAL BEFORE STARTING THE WORK
- SAFETY OF USE
- SAFETY AT THE WORKPLACE
- PERSONAL SAFETY
- SAFE USE OF THE DEVICE
- OPERATING RULES
- DEVICE DESCRIPTION
- PREPARATION FOR OPERATION
- DEVICE PLACEMENT
- APPLIANCE ASSEMBLY
- WORKING WITH THE DEVICE
- ADJUSTING THE SEAT
- ADJUSTING THE HEIGHT OF THE HANDLEBAR AND THE WORKING RESISTANCE OF THE DEVICE
- LCD PANEL FUNCTIONS
- CONTROL BUTTONS
- CLEANING AND MAINTENANCE
- DISPOSAL OF USED DEVICES
- DANE TECHNICZNE
- REGULACJA WYSOKOŚCI KIEROWNICY I OBCIĄŻENIA PRACY URZĄDZENIA
- NASTAVENÍ VÝŠKY ŘÍDÍTEK A PRACOVNÍ ZÁTĚŽE ZAŘÍZENÍ
- ASSEMBLAGE DU PRODUIT
- RÉGLAGE DE LA HAUTEUR DU GUIDON ET DE LA CHARGE DE SERVICE
- REGOLAZIONE DELL'ALTEZZA DEL MANUBRIO E DEL CARICO
- AJUSTE DE LA ALTURA DEL MANILLAR Y CARGA DE TRABAJO DEL EQUIPO
- KORMÁNYMAGASSÁG ÉS MÜKÖDÉSI TERHELÉS SZABÁLYOZÁSA
- PLACERING AF PRODUKTET
- RATH∅JDE OG BELASTNINGSJUSTERING PÅ PRODUKTET
Brand : Gymrex
Model : GR-MG120
Category : Exercise bike