USER MANUAL TAS287 MSW
The user manual is designed to assist in the safe and trouble-free use of the device. The product is designed and manufactured in accordance with strict technical guidelines, using state-of-the-art technologies and components. Additionally, it is produced in compliance with the most stringent quality standards.
DO NOT USE THE DEVICE UNLESS YOU HAVE THOROUGHLY READ AND UNDERSTOOD THIS USER MANUAL.
To increase the product life of the device and to ensure a trouble-free operation, use it in accordance with this user manual and regularly perform the maintenance tasks. The technical data and specifications in this user manual are up to date. The manufacturer reserves the right to make changes associated with quality improvement. Taking into account technological progress and noise reduction opportunities, the device was designed to reduce noise emission risks to the minimum.
Legend
CE The product satisfies the relevant safety standards.
Read the instructions before use
The product must be recycled.
WARNING! or CAUTION! or REMEMBER! Applicable to the given situation. (general warning sign).
Use ear protection. Exposure to loud noises may result in hearing loss.
Wear protective goggles.
Wear a dust mask (respiratory tract protection).
Wear protective gloves.
Wear foot protection.
Class II protection device with double insulation.
PLEASE NOTE! Drawings in this manual are for illustration purposes only and in some details may differ from the actual machine.
The original operation manual is in German. Other language versions are translations from German.
- Usage safety
Electrical equipment
ATTENTION! Read all safety warnings and all instructions. Failure to follow the warnings and instructions may result in an electric shock, fire and/or serious injury or even death.
Whenever "device" or 'product' are used in the warnings and instructions, it shall mean twist-a-saw. Do not use in very humid environments or in the direct vicinity of water tanks. Prevent the device from getting wet. Risk of electric shock! Do not cover air inlets / outlets. When in use, do not put your hands or other items inside the device! Do not exceed the maximum permissible operating pressure.
3.1 Electrical safety
a) The plug has to fit the socket. Do not modify the plug in any way. Using original plugs and matching sockets reduces the risk of electric shock.
b) Avoid touching earthed elements such as pipes, heaters, boilers and fridges. There is an increased risk of electric shock if the earthed device is exposed to rain, in direct contact with a wet surface or operating in a humid environment. Water ingression into the device increases the risk of damage to the device and of electric shock.
c) Use the cable only in accordance with its designated use. Never use it to carry the device or to pull the plug out of a socket. Keep the cable away from heat sources, oil, sharp edges or moving parts. Damaged or tangled cables increase the risk of electric shock.
d) If working with the device outside, make sure to use an extension lead suitable for external use. Using an extension lead suitable for external use reduces the risk of electric shock.
e) If using the device in a humid environment cannot be avoided, a residual current device (RCD) should be applied. The use of an RCD reduces the risk of electric shock.
3.2 Safety at the workplace
a) Make sure the workplace is orderly and well lit. A messy or poorly lit workplace may lead to accidents. Try to anticipate what may happen, observe what is going on and use common sense when working with the device.
b) Do not use the device in an explosion hazard zone, for example in the presence of flammable liquids, gasses or dust. The device generates sparks which may ignite dust or fumes.
c) Upon discovering damage or irregular operation, immediately switch the device off and report it to a supervisor without delay.
d) If there are any doubts as to the correct operation of the device, contact the manufacturer's support service.
e) Only the manufacturer's service point may repair the device. Do not attempt any repairs independently
f) If a fire starts, use solely powder or carbon dioxide (CO₂) fire extinguishers suitable for use on lin devices to put it out.
g) Children or unauthorised persons are forbidden from entering a work station. (A distraction may result in a loss of control over the device).
h) Use the EMERGENCY STOP if there is a risk of injury or death, accident of damage!
REMEMBER! When using the device, protect children and other bystanders.
3.3 Personal safety
a) Do not use the device when tired, ill or under the influence of alcohol, narcotics or medication which can significantly impair the ability to operate the device.
b) When working with the device, use common sense and stay alert. Temporary loss of concentration whilst using the device may lead to serious injuries.
c) Use personal protection equipment as required for working with the device, specified in section (Legend). The use of correct, approved personal protection equipment reduces the risk of suffering an injury.
d) To prevent the device from accidentally switching on, make sure the switch is on the OFF position before connecting to a power source.
c) Do not overestimate your abilities. When using the device, keep your balance and remain stable at all times. This will ensure better control over the device in unexpected situations.
Do not wear loose clothing or jewellery. Keep hair, clothes and gloves away from moving parts. Loose clothing, jewellery or long hair may get caught in moving parts.
g) If suction is to be connected to the device, check all connections and make sure they are tight. Using a de-dusting system may reduce the risk associated with dust.
h) Remove all adjusting tools or spanners before turning the device on. A tool or spanner left in the revolving part of the device may cause injury.
3.4 Safe device use
a) Do not overload the device. Use appropriate tools for the given task. A correctly selected device will perform the task for which it was designed better and in a safer manner.
b) Do not use the device if the ON/OFF switch does not function properly (does not switch the device on and off). Devices which cannot be switched on and off using the ON/OFF switch are hazardous, should not be operated and have to be repaired.
c) Make sure the plug is disconnected from the socket before attempting any adjustments, tool replacements or before putting the device aside.
d) When not in use, store in a safe place, away from children and people not familiar with the device, who have not read the user manual. The device may pose a hazard in the hands of inexperienced users.
e) Maintain the device in a good technical state. Before each use check for general damage and especially check for cracked parts or elements and for any other conditions which may impact the safe operation of the device, if damage is discovered, hand over the device for repair before use.
f) Keep the device out of the reach of children.
g) Device repair or maintenance should be carried out by qualified persons, only using original spare parts. This will ensure safe use.
h; To ensure the operational integrity of the device, do not remove factory fitted guards and do not looser any screws.
i) When transporting and handling the device between the warehouse and the destination, take into account the occupational health and safety principles for manual transport operations which apply in the country where the device will be used.
j) Avoid situations where the device halts during use due to excessive loading. This may result in overheating of the drive elements and device damage.
k) Do not touch articulated parts or accessories, unless the device has been disconnected from a power source.
Do not touch movable parts or accessories unless the power source has been disconnected.
m) Use your tool at lower input load than specified on the nameplate to increase working efficiency and decrease wear out.
n) Properly set the tool holder in the machine.
6) The tool becomes very hot during operation. Failure to follow safety recommendations and instructions may result in serious injuries or death!
- Use guidelines
SCOPE OF APPLICATION
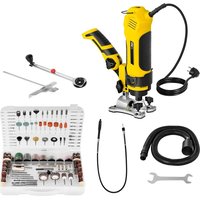
Twist a saw is designed for cutting cardboard and plasterboard, cutting construction materials, cutting out of holes, cutting ceramic tiles, grinding, abrasion, honing, polishing, etc. Twist a saw is a multifunctional device that can be used as: grinder, polisher, jigsaw, etc.
The user is liable for any damage resulting from non-intended use of the device.
4.1 Device description
Device and tool holder:
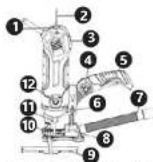
1. rotational speed control
2. hook
3. ON/OFF switch
4. knob fixing the side handle
5. secure handle
6. cutting depth limiter knob
7. suction pipe
8. cutting depth limiter
9. cutting width limiter
10. cutting width limiter knob
11. fixing the tool
12. spindle protection
Circular guid
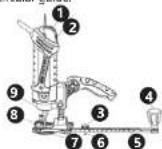
1. rotational speed cont
2. ON/OFF switch
3. knob for setting the diameter
4. holder of the guide for cutting out circles
5. scale
6. bit for cutting the wheel
7. setting disc
6. bit for cutting
9. bit locking screw
2.1.1.2018
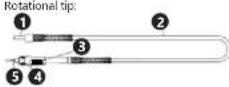
7. tip
2. flexible shaft
3. holde
4. lock
5. clamping grip
Elements required during work
| Tool Description: |
| Multifunction holder with cutting width | The use of the holder guarantees reliable and stable holding of the device. It is necessary to hold the holder with one hand and the rotating tool with the other hand. |
| Tool Description: |
| Multifunc-tion holder with cutting width | The cutting depth limiter is used to set the height of the cutting tips. The cutting width limiter is used to cut straight lines in relation to the edges. |
| Circular guide | The circular guide is used for precise cutting-out of circles (circumferences). |
| Tip for dust sucking-off | The tip for dust sucking-off enables to connect a vacuum cleaner with the device. |
| Rotational tip | The rotational tip is a long and flexible roller that leads to the head of the rotating tool. The blades are installed on the head which can be held in your hands, which gives you more control when working. The rotational tip must be used with small tips only. |
Replacement of the clamps (of the sleeve):
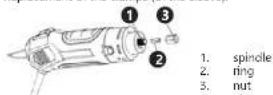
1. Remove the blades from the device.
2. Turn the nut counter-clockwise and remove it from
the spindle.
3. Remove the ring from the spindle and install a new
one. The ring can be installed from any side.
4. Install the nut and screw it on.
WARNING! Screwing the nut without the cutting tip causes reduction in the diameter of the ring what making it difficult to install a blade.
When storing the device, the ring must be stored without the cutting tip installed.
Installation of cutting tips:
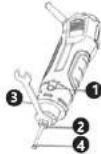
1. lack button
2. nut
3. spanner
4. cutting tip
1. Remove the plastic cover from the tip (if installed).
2. Press the lock button, then turn the nut until the
button will be blocked.
3. Loosen the nut. To this aim it is necessary to press the lock button and using a flat spanner (D16mm) to turn the nut counter clockwise.
4. If the cutting tip is installed, it is necessary to remove
5. Insert the cutting tip into the ring and then slide it out to a length of 1 - 3mm, the gap created will protect the tip against overheating.
WARNING! If the diameter of the installed tip is different from the previous one it is necessary to change and install an appropriate ring as well.
-
Make sure that the groaves on the blade are visible. Squeezing the ring on them may cause breaking of the tip.
-
After installing the tip in the ring it is necessary to press the lock button and tighten the nut as firmly as possible in clockwise direction.
-
Use a 16mm spanner to tighten the nut.
Mounting the multifunctional holder.
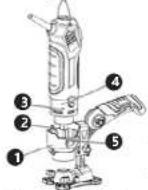
1. ring of the holder
2. ring knob
3. button
4. the bottom of the device
5. key
1. Loosen the ring knob.
2. Install the holder ring to the bottom of the device.
3. Align the button with the key.
4. When the button with key is on one level it is necessary to put the ring to the end. WARNING! The holder ring must be pressed as deep as possible.
5. Fasten the holder ring by clamping the knob
6. In order to remove the holder it is necessary to proceed in reverse order.
WARNING! Do not use the device without the multifunction holder!
Setting the secure holder:

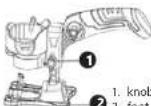
1. fastening knob
2. safe holde
The safe holder can be adjusted where it is needed.
The manner of placing the safe holder
• horizontally when the device is used as a saw
• vertically or at an angle if the device is used as
a jigsaw
• upside down, depending of the work performed
The method of mounting of the safe holder:
1. Loosen the fastening knob
2. Set the safe holder in the selected position
3. Turn the fastening knob
4.2 Preparing for use
Setting the cutting depth:
1. Loosen the foot of the cutting depth limiter and then set the desired height by moving the foot of the cutting depth limiter down or up.
2. Then tighten the foot of the cutting depth limiter.
3. Check the tip depth and make sure that the ring with the tip is safely fastened.
WARNING! The cutting tip should exceed the material cutting depth by 4 mm! Example: In order to cut a material with a width of 10mm, the cutting tip should protrude 14 mm beyond the bottom of the foot of the cutting depth limiter (4mm beyond the material)!
Installation of the circular guide:
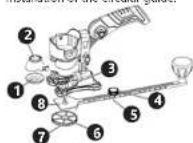
1. protectio
2. internal disk
3. base of the multifunctional holder
4. knob
5. pin
6. hub
7. external disk
8. hole of the jig saw guide
1. Install the multifunction holder.
2. Set the cutting depth limiter.
3. Unscrew the internal disk from the external disk.
4. Place the internal disk in the holder base. Make sure that the teeth of the inner disk are properly placed in the teeth of the holder base.
5. Place the hole of the jigsaw guide on the tread of the internal disk. Make sure that the pin will be pointing down.
6. Install the external disk on the internal disk and tighten it (do not overtighten). Make sure that the hub has been correctly seated in the hole.
7. Loosen the knob, set the radius of the circle and
tighten the knob
8. Install the appropriate blade and tighten.
Installation of the cutting width limiter.
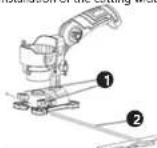
-
knob of the cutting width limiter
-
cutting width limiter
-
Loosen the knobs of the cutting width limiters.
-
Move the cutting width limiter on the base.
-
Then set the cutting width and tighten the knobs
of the cutting width limiters.
Installation of connections for sucking -off pollutants:
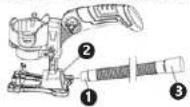
-
ring of the sucking-off device
-
hole of the sucking-off device
-
connection of the sucking-off device
Insert the tip of the ring of the sucking-off device into the hole of the sucking-off device and the end of the pipe of the vacuum cleaner must be inserted into the connection of the sucking-off device. WARNING! If the end of the connection of the sucking-off device does not fit to the vacuum cleaner pipe, it is necessary to use an adapter (e.g. a piece of rubber hose).
Installation of diamond bit (hole saw):
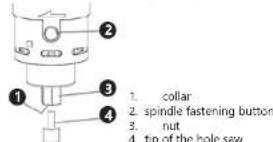
-
Make sure that the device is disconnected from the power supply.
-
Remove the cutting tip (if installed).
-
Make sure that the 06.35mm ring is installed in the spindle, and if not, install it.
-
Install the tip of the diamond bit (hole saw).
-
When the tip is properly installed in the flange press the spindle fastening button and then tighten the put by hand clockwise.
-
Use a 16mm spanner in order to tighten the nut, do not overtighten.
Tip installation for the hole saw tips:
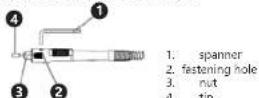
-
In order to prevent the spindle from rotating, insert the spanner into the fastening hole
-
Rotate the nut until the spanner slides into the hole.
-
Then loose the nut.
-
Insert the tip into the ring and tighten with the 10mm spanner.
Make sure that the installed tip is stable (e.g. by rotating the ring).
4.3 Device use
Switch on the device with the ON/OFF switch and adjust the rotational speed with the knob for adjustment of the rotational speed as required.
WARNING: The harder the material, the lower rotational speeds should be used. Use slower rotations for hard materials and wood, high rotational speeds must be used for drills for metal and grinding accessories.
Trial cuts:
Before performing the intended work, it is recommended to make trial cuts in order to eliminate errors, the test must be carried out on the same material that will be used for work.
In order to perform the cutting test, it is necessary to:
-
Draw a pattern on a piece of material.
-
Install the multi-function holder, cutting tip, adjust the cutting depth and set the correct rotational speed.
-
Hold the device firmly with both hands. The edge of the holder base must be placed at an angle of 45^ on the work surface:
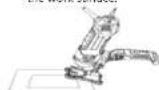
WARNING! The blade must not touch the material before switching on.
- Switch on the device.
WARNING! Hold the device firmly with both hands because the device will jump or turn to the left in the course of switching on!
-
When the device is already operating at its highest rotational speed it is necessary to gently introduce the blade into the material.
-
When the blade cuts through the material, move the device clockwise while applying light pressure.
WARNING: Cutting must be carried out clockwise with the exception of linings and cardboard gypsum panels.
-
After turning off the device it is necessary to wait until it stops completely and then remove it from the material.
Cutting out of holes in cardboard gypsum panels and claddings:
WARNING: It is not allowed to cut in places where there are electric cables! Make sure that they have been removed!
-
Before installing the cladding or cardboard gypsum panels, press the cables into the boxes as deeply as possible and mark the centre of the box on paper.
-
Set the cutting depth to a value 4 mm higher than the thickness of the cardboard-gypsum panel and while holding the device firmly in your hands switch it on.
-
When the device is operating at its highest rotational speed it is necessary to introduce the blade into the wall into the marking of the centre of the box:
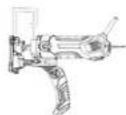
-
Move the blade clockwise until the tip touches the edge of the box.
-
The device must be moved up according to the shape of the can all the time pushing the device to the edge of the box. After reaching the upper edge of the box it is necessary to move the device to the left. While pressing the device against the edge of the box it is necessary to move the device counterclockwise until the shape has been cut out.
-
After turning off the device, wait until it is completely turned off and then remove it from the material.
Using the circular guide:
-
Mark the centre of the circle to be cut out and drill a hole with the diameter of 4.76 mm (3/16") for the needs of the axis.
-
Adjust the cutting tip so that it protrudes beyond the thickness of the material up to 4mm.
-
Set the appropriate radius of the circle.
-
Place the edge of the base of the multifunction holder at an angle of 45^ and set the pin to the hole.
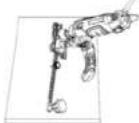
- Turn on the device
WARNING! The guide rail must not touch the material until the machine has reached its full rotational speed!
-
While the engine is already running at the highest rotational speed set the device to the vertical position and introduce the tip into the material.
-
When the device cuts the material through it must be moved clockwise, while exerting gentle pressure on it.
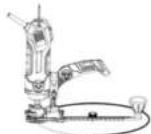
-
Cut the circle out while holding the device vertically and holding the base of the multi purpose holder flat on the material.
-
After turning off the device, wait until it completely stops and then remove it from the material.
Using the rotary tip:
-
Insert the cutting tip.
-
Turn the device on without touching the blade and holding the head of the rotating device.
-
Holding the device like a pencil, it is possible to groove, grind or polish the material. WARNING! When engraving and grooving, it is necessary to use the edge of the tip not its top!
WARNING! Always hold the rotating tip when it is turned on. Its jumping or falling down may result in serious injury!
WARNING! Do not place the device on flat surfaces, the device should be hanged on the hook above the workpiece, thanks to which the work will be more effective and the risk of overheating of the rod will be reduced!
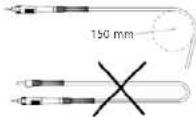
WARNING! Do not bend the rod of the rotating tip to a diameter less than 150mm (6") in order not to lead to overheating!
As far as possible rotating tips must be stored without bends.
4.4 Cleaning and maintenance
• Disconnect from electricity when cleaning equipment.
• Use cleaners without corrosive substances to clean each surface.
• Dry all parts well after cleaning before the device is used again.
• Store the unit in a dry, cool location, free from moisture and direct exposure to sunlight.
- Do not spray the device with a stream of water.
- Remove accumulated dust and contaminants regularly using compressed air followed by a soft and dry brush.
- Do not use solvents in plastic elements. Solvents such as petrol, thinner, benzene, alcohol, ammonium or oil may damage plastic elements. Use a soft cloth and mild detergent to clean those elements.
DANE TECHNICZNE
NAMEPLATE TRANSLATIONS

| 1 | 2 | 3 |
| DE | Hersteller | Produktionsjahr | Ordnungsnummer |
| EN | Manufacturer | Production Year | Serial No. |
| PL | Producent | Rok produkcji | Numer serii |
| CZ | Výrobce | Rok výroby | Sériové číslo |
| FR | Fabricant | Année de production | Numero de serie |
| IT | Produzione | Anno di produzione | Numero di serie |
| ES | Fabricante | Año de producción | Número de serie |

DE | EN | PL | FR | IT | ES | CZ

EG-Konformitätserklärung | EU Declaration of conformity | Deklaracja zgodności WE | Déclaration UE de conformité | Dichiarazione di conformità UE | Declaración UE de conformidad | Prohlásení o shodě ES, 2019/10-07/199
Verantwortungsträger (Name, Adresse) | Responsible entity (name, address) | Podmiot odpowiedzialny (nazwa, adres) | Entité responsable (nom, adresse) | Responsable dell'entita (denominazione, sede) | Responsable de la entidad (nombre, dirección) | Odpowiedźny subjekt (jméno, adresa): EXPONDO POLSKA SP. Z O.O. SP. K., ul. Nowy Kisielin – Innowacyjna 7, 66-002 Zielona Góra, Poland, EU
Mit voller Verantwortung erklare ich, dass | declare under his sole responsibility that the product | z gelna odpowiedzialności deklaruje, że | je declare et affinne que | sotto la mia exclusiva responsabilità, DICHIARO one | Bajo mi total responsabilidad, declaro que | Na svoj výlučnou odpovědnost prohlasuji, že:
Name | name | nazwa | dénomination | nombre | nombre | jménoTWIST-A-SAW | TWIST-A-SAW | TWIST-A-SAW | TWIST-A-SAW | TWIST-A-SAW | TWIST-A-SAW | TWIST-A-SAW | TWIST-A-SAW | TWIST-A-SAW | TWIST-A-SAW | TWIST-A-SAW | TWIST-A-SAW | TWIST-A-SAW | TWIST-A-SAW | TWIST-A-SAW | TWIST-A-SAW | TWIST-A-SAW | TWIST-A-SAA
Modell | model | model | modèle | modello | modelo | model | MSW-TAS287
Seriennummer | serial numer | numer servjny | numero de série | numero di serie | número de serie | sériove číslo: 000000000000 - 99999999999
die Grundanforderungen erfüllt | meets the following essential requirements | speinia zasadnicze wymagania | est conforme aux exigences réglementaires suivantes | ed e conforme alle seguenti direttive | y cumple con los siguientes requisitos básicos | solfuje zakladni pozadavky.
MD 2006/42/EC
• LMC 2014/30/UL.
• RCHS 2011/65/UE,
außerdem erfüllt dieses Produkt die Anforderungen der folgenden harmoniserten Normen | complies with the requirements of the following harmonized standards | spetila wymaganala następujących norm zharmonzowanych | ce produit est conforme aux normes harmonisées suivantes | inoltre il prodotto soddisfa | requisiti previsti dalle seguenti norme armonizate | además, este producto comule con los requisitos de las siguientes normas armonizadas | kronité toho sulpule texto produkt nogarlavky nas dullicia harmonizowanych paron:
EN 60745-1:2009+A11:2010,
EN 60745-2-1:2010,
EN 60745-2-17:2010
• EN 60745-2-25:2013,
EN 55014-1:2008+A2:2011, EN 55014-2:1997+A2:2008
EN 55014-2.1937-702.2008, EN 61000-2-2-2014
EN 61000-3-2 2014, EN 61000-3-3 2013
Ort, Dature / Nase, Date / 16/09/2023,
Date / Lise, Date / Luogo, Date / Lagur,
Fisher / Mido, Datum
Umszschfr / Signature / People / Signature /
Erma / Phys. / Bio's
Plotr R. Gajos
For the disposal of the device please consider and act according to the national and local rules and regulations.
expondo Polska sp. z o.o. sp. k.