AC-DN1 - Battery charger SONY - Free user manual and instructions
Find the device manual for free AC-DN1 SONY in PDF.

| Product Type | Battery Charger / AC Adapter |
| Brand | Sony |
| Model | AC-DN1 |
| Dimensions (L × H × D) | 112 × 169 × 38 mm |
| Weight | 660 g |
| Input Power (AC) | 100-240 V, 50/60 Hz, 0.9 A max |
| Rated Power (DC) | 38 W |
| Output Voltage (DC) | 16.8 V |
| Output Current (DC) | 2.26 A |
| Output Connectors | 3-pin (battery charge), 4-pin, 5-pin |
| AC Input Connector | Swivel up to 90° |
| Main Functions | DC power up to 38 W, lithium-ion battery charging (BP-L60A/L90A) up to 85% in 4 h (BP-L60A) or 6 h (BP-L90A), backup power via battery |
| Operating Temperature | 0 °C to 40 °C |
| Compatible Batteries | Lithium-ion BP-L60A/L90A (via optional BKW-L601/2 adapter) |
| Supplied Accessories | DC cord, angled AC power cord, connector cover, operating instructions, maintenance manual |
| Safety | Mandatory grounding; do not expose to rain or moisture; disconnect in case of fault |
| Standards | CE, EN60950, EN55103-1, EN55103-2 |
Frequently Asked Questions - AC-DN1 SONY
User questions about AC-DN1 SONY
0 question about this device. Answer the ones you know or ask your own.
Ask a new question about this device
Download the instructions for your Battery charger in PDF format for free! Find your manual AC-DN1 - SONY and take your electronic device back in hand. On this page are published all the documents necessary for the use of your device. AC-DN1 by SONY.
USER MANUAL AC-DN1 SONY
Japanese/English/French/German
1st Edition (Revised 1)
Serial No. 10001 and Higher (SY)
安全のために
natural_image
Technical line drawing of a mechanical clamp or bracket component (no text or symbols)natural_image
Mechanical diagram showing a clamp or bracket assembly with an arrow indicating force direction (no text or symbols present)natural_image
Technical line drawing of a mechanical assembly showing internal components connected to a final component (no text or symbols present)ベータカムSPカムコーダーへの取り付け
充電のしかた
To avoid electrical shock, do not open the cabinet. Refer servicing to qualified personnel only.
WARNING
THIS APPARATUS MUST BE EARTHED.
WARNING
This unit has no power switch.
When installing the unit, incorporate a readily accessible disconnect device in the fixed wiring, or connect the power cord to socket-outlet which must be provided near the unit and easily accessible.
If a fault should occur during operation of the unit, operate the disconnect device to turn the power supply off, or disconnect the power cords.
For customers in the U.S.A.
You are cautioned that any changes or modifications not expressly approved in this manual could void your authority to operate this equipment.
For customers in Europe
This product with the CE marking complies with both the EMC Directive (89/336/EEC) and the Low Voltage Directive (73/23/EEC) issued by the Commission of the European Community.
Compliance with these directives implies conformity to the following European standards:
• EN60950: Product Safety
• EN55103-1: Electromagnetic Interference (Emission)
• EN55103-2: Electromagnetic Susceptibility (Immunity)
This product is intended for use in the following Electromagnetic Environment(s): E1 (residential), E2 (commercial and light industrial), E3 (urban outdoors), and E4 (controlled EMC environment, ex. TV studio).
Table of Contents
Overview....3 (E)
Locations and Functions of Parts and Controls ....4 (E)
Connections 6 (E)
Connectable Devices 6 (E)
Connecting the AC Power Cord 7 (E)
Attaching to Digital Betacam Camcorders ...... 8 (E)
Attaching to Betacam SP Camcorders.... 9 (E)
Charging Batteries....10 (E)
Specifications.... 12 (E)
Overview
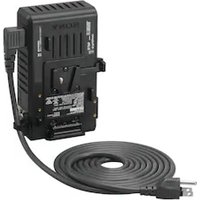
The AC-DN1 functions as an AC adaptor and battery charger when attached to portable devices, such as digital Betacam camcorders.
The AC-DN1 has following features:
Maximum power supply of 38W DC
The AC-DN1 supplies a maximum of 38W to devices that use the BP-L60A/L90A Lithium-Ion Battery Pack, and a maximum of 16.8V, 2.26A to devices that use the NP-1B/1A or NP-90A/90 Nickel-Cadmium Battery Pack and with a maximum voltage rating of 17V.
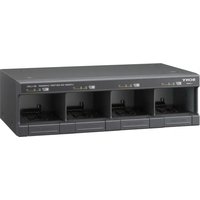
Battery charging of about 85% capacity
The AC-DN1 can be used to charge a BP-L60A/L90A Lithium-Ion Battery Pack, attached using an optional BKW-L601/2 Battery Adaptor, to about 85% capacity.
Note
Operating a camcorder or other device while charging the battery with the AC-DN1 may cause excessive power consumption and overheating in the AC-DN1. Therefore, you should never charge a battery while using it to operate a device.
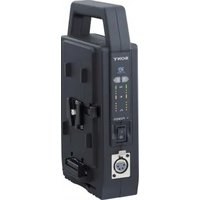
Battery backup
Should the AC power cord be accidentally unplugged from the AC power source, a charged BP-L60A/L90A Lithium-Ion Battery Pack attached to the AC-DN1 provides an alternate back-up power to the connected device.
90° rotatable AC IN connector
The AC IN connector is designed to be rotated up to 90^ to allow convenient orientation of the AC power cord.
Note
For information on changing the angle of the AC IN connector, please consult Sony service personnel.
Locations and Functions of Parts and Controls
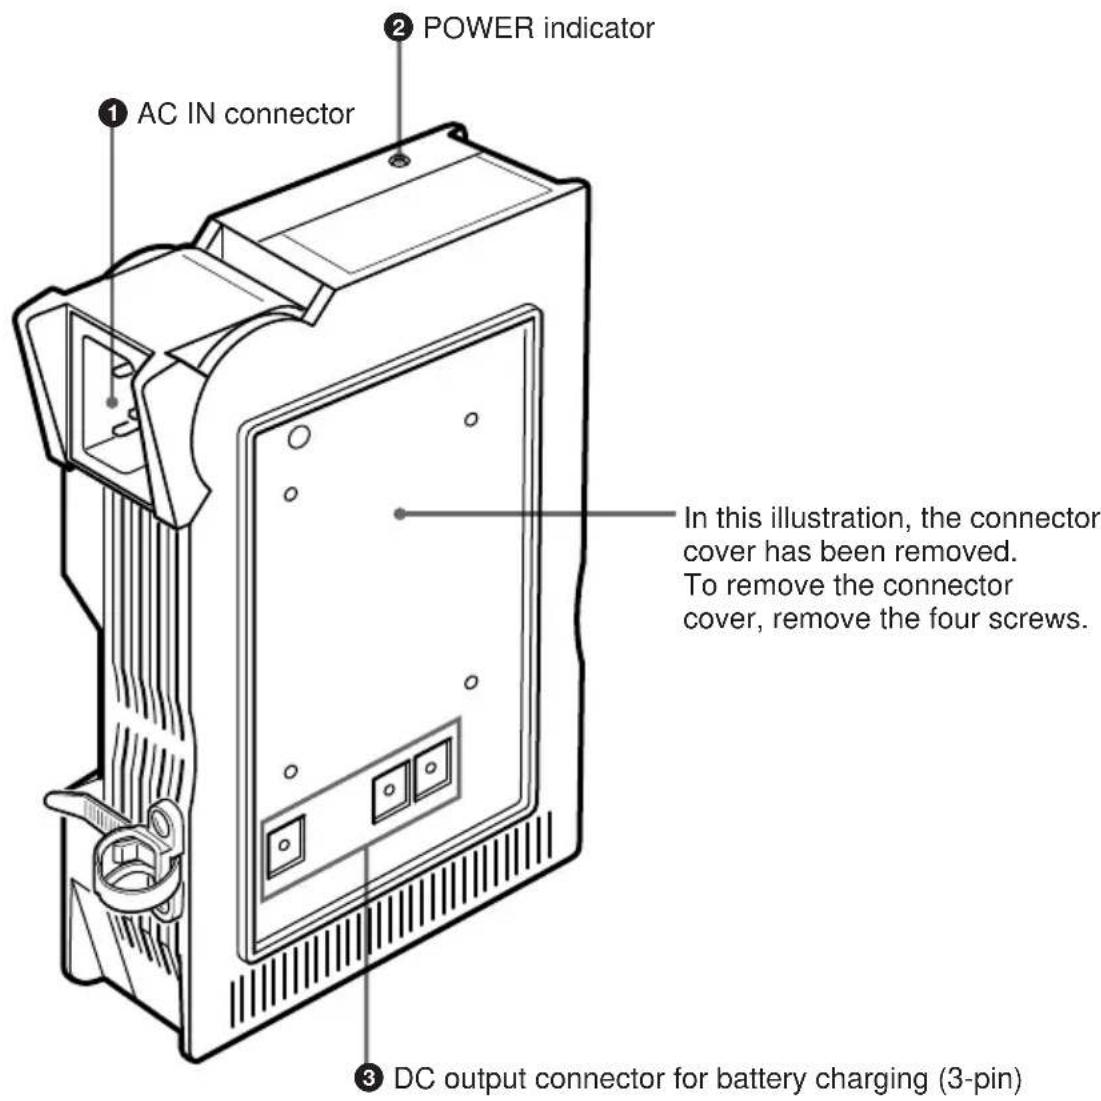
① AC IN connector
Connects to an AC power source through an optional AC power cord. The AC IN connector can be rotated up to 90° to obtain the most convenient orientation of the AC power cord.
Note
For details on rotating the AC IN connector, consult Sony service personnel.
② POWER indicator
The indicator lights up when the power is turned on. This indicator does not light up, however, when the BP-L60A/L90A Lithium Ion Battery Pack is used as the back-up power supply.
③ DC output connector for battery charging (3-pin)
Supplies power for charging a BP-L60A/L90A Lithium-Ion Battery Pack attached through an optional BKW-L601/2 Battery Adaptor.
The lower left pin is a sensor which blocks the charging current when a battery other than a Lithium-Ion Battery has been mistakenly attached.
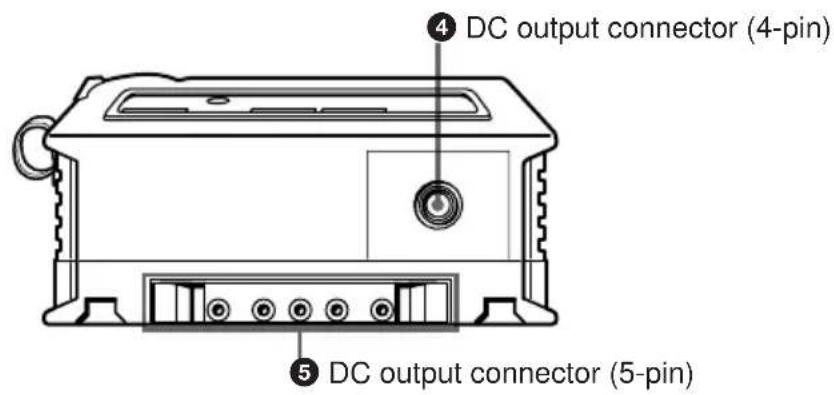
④ DC output connector (4-pin)
Supplies DC power through the supplied DC power cord to portable devices except camcorders. As to the polarity of the connector pins, the outside is plus and the inside is minus.
⑤ DC output connector (5-pin)
Supplies DC power to digital Betacam camcorders such as the DVW-700/700P/DNW-7/7P, portable editors and field editors, connected directly to the AC-DN1.
When the AC-DN1 is attached to a Betacam SP camcorder, such as the BVW-300/300P/BVW-400/400P, through the optional BWW-L601 or BWW-L601/2 Battery Adaptor, DC power is supplied to the camcorder.
Connectable Devices

flowchart
graph TD
    A["Digital Betacam camcorders"] -->|DNW-90/P, DNW-7/P, DVW-700/P| B["AC-DN1 (This unit)"]
    C["Betacam SP camcorders"] -->|BVW-300/P, BVW-400/P| B
    D["Other portable devices"] -->|DNE-50, BVW-50/P, DVW-250/P| E["DC-convert cable (supplied)"]
    B <--> F["BKW-L601 or BKW-L601/2 Battery Adaptor (not supplied)"]
    B <--> G["BKW-L601/2 Battery Adaptor (not supplied)"]
    H["BP-L60A/L90A Lithium Ion Battery Pack"] --> I["AC-DN1"]
    I --> J["BCB-W-L601/2 Battery Adaptor (not supplied)"]
    J --> K["BCB-W-L601/2 Battery Adaptor (not supplied)"]
    L["Other portable devices"] --> M["DC-convert cable (supplied)"]
Notes
- You must use an optional BKW-L601/2 Battery Adaptor to connect a BP-L60A/L90A Lithium-Ion Battery Pack to the AC-DN1. The BKW-L601 Battery Adaptor cannot be used to attach the battery pack.
•To attach the AC-DN1 to a Betacam SP camcorder, purchase the additional BKW-L601/2 Battery Adaptor.
Connecting the AC Power Cord
When connecting the supplied AC power cord (angle type) or an optional AC power cord (straight type) to the AC-DN1, secure the cord with the cord strap as shown below.
When operating a camcorder, using an optional straight type AC power cord is recommended.

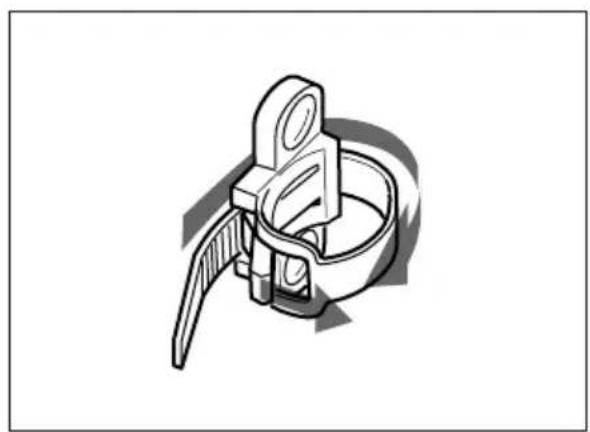
Using the Cord Strap
1 Pull back the clasp to release the strap, or pull the strap out.
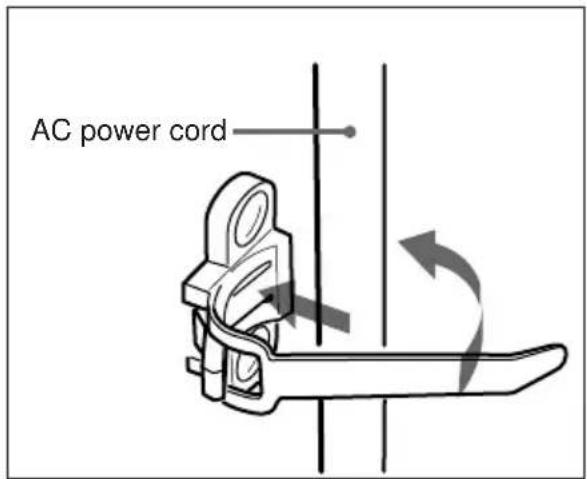
natural_image
Mechanical component diagram showing a clamp and lever assembly (no text or symbols)2 Connect the AC power cord and wrap the strap around it.
3 Insert the strap through the buckle and push it in the direction of the arrow until the cord is firmly secured.
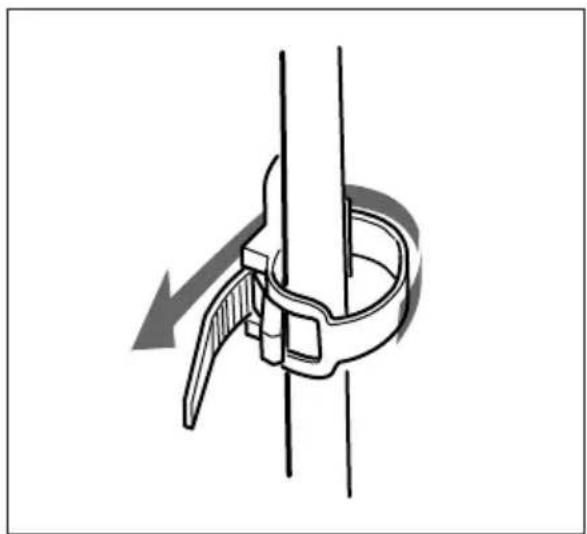
natural_image
Mechanical diagram showing a clamp or bracket assembly with an arrow indicating motion (no text or symbols present)Attaching to Digital Betacam Camcorders
By attaching the AC-DN1 to the devices as shown in the illustration below, the battery connectors on the AC-DN1 and the respective device (DVW-7/7P, etc.) are joined together.
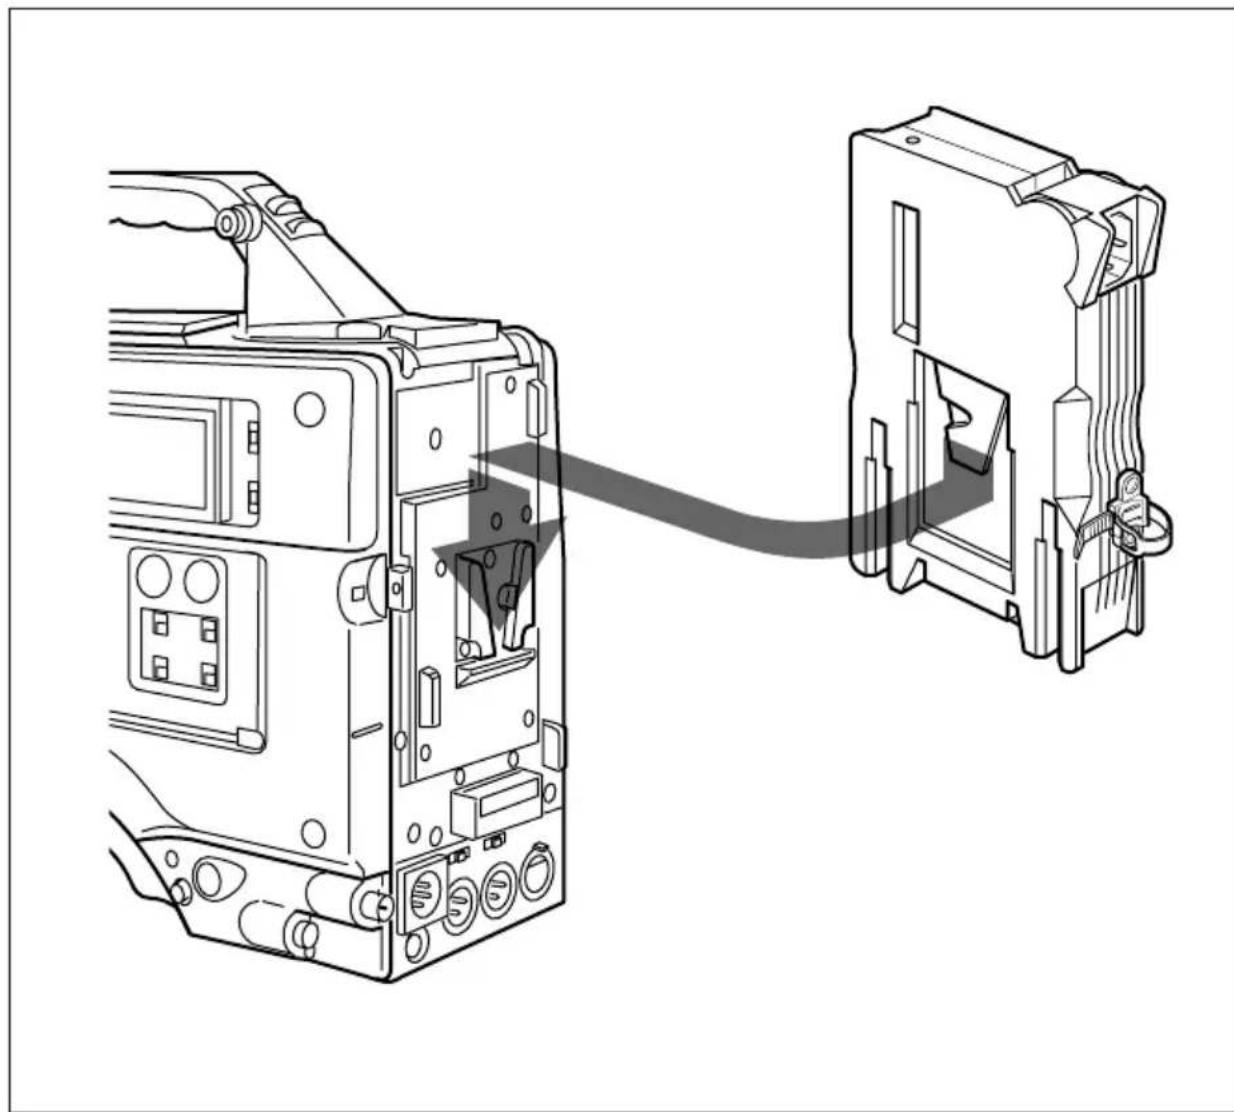
natural_image
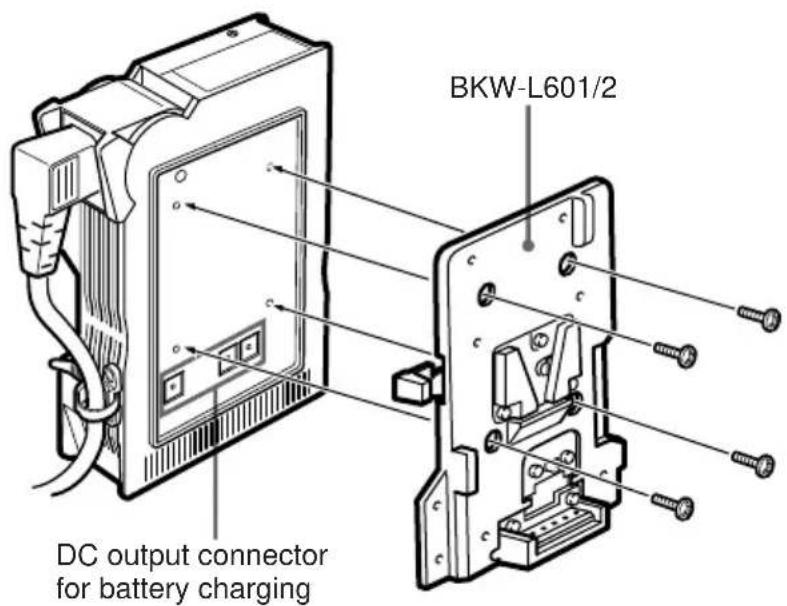
Technical line drawing of a mechanical assembly showing internal components connected to a terminal block (no text or symbols present)Attaching to Betacam SP Camcorders
Attach the optional BKW-L601 or BKW-L601/2 Battery Adaptor to the Betacam SP camcorder as shown in the illustration below, then attach the AC-DN1 as you would to a digital Betacam camcorder (described on the preceding page). For details on detaching the battery case from a Betacam SP camcorder, refer to the operation manual for the BKW-L601 or BKW-L601/2.

natural_image
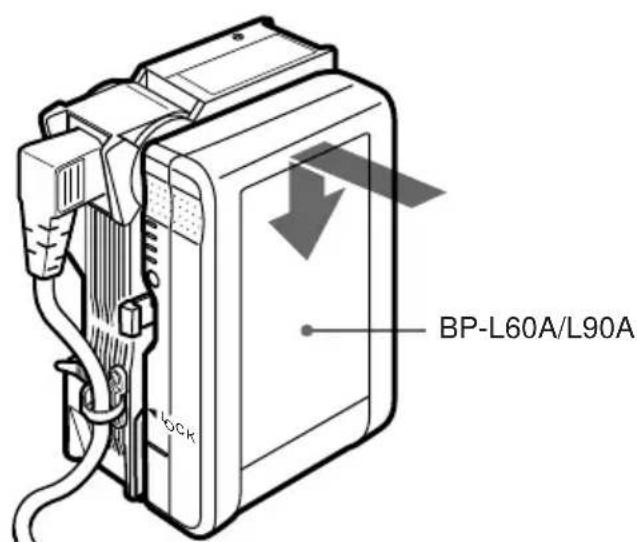
Technical line drawing of an electrical enclosure with internal components and screw fasteners (no text or labels)Charging Batteries
Using an optional BKW-L601/2 Battery Adaptor, attach the BP-L60A/L90A Lithium-Ion Battery Pack as shown below.
To attach the BP-L60A/L90A Lithium-Ion Battery Pack
1 Remove the connector cover from the AC-DN1 if it is attached.
2 Attach the optional BKW-L601/2 Battery Adaptor to the AC-DN1.
3 Attach the BP-L60A/L90A Lithium-Ion Battery Pack to the BKW-L601/2.
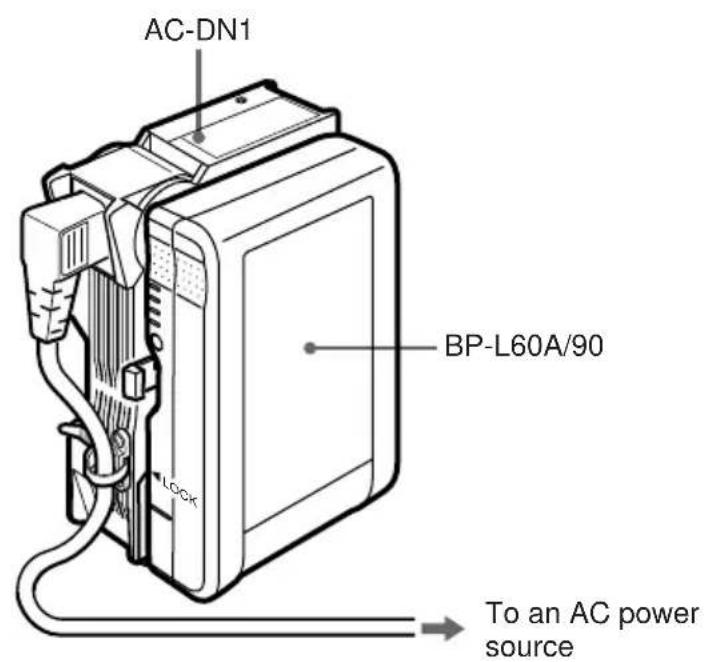
Procedure
Plug in the AC power cord connected to the AC-DN1 into an AC power outlet. At a room temperature of 25 ^ ( 77 ^ ), the AC-DN1 will provide an 85% charge to a BP-L60A in about four hours, and to a BP-L90A in about six hours.
Notes
- When the AC-DN1 has charged the BP-L60A/L90A to about 85% capacity, all four indicators on the BP-L60A/L90A will light up.
•The actual charge level will not be shown on the indicators while the AC-DN1 is still attached to the battery. To check the charge level, you must first disconnect the battery from the AC-DN1.
- Never charge a battery with the AC-DN1 while the battery is being used to operate a video camera or other device. Doing so may cause excessive power consumption and overheating in the AC-DN1, or a malfunction in the device.
General
Voltage source
100-240V AC, 50/60 Hz
Current drain
0.9 A or less
Peak inrush current
(1) Power ON, current probe method: 20 A (100 V)/60 A (240 V)
(2) Hot switching inrush current, measured in accordance with European standard EN55103-1: 50 A (230 V)
Operating temperature
0^ to 40^
(32°F to 104°F)
Mass 660 g (1 lb 7 oz)
Rated power output (DC)
38 W
Voltage output (DC)
16.8 V
Current output (DC)
2.26 A (on regulation)
DC output connector
5-pin connector 16.8 V
4-pin connector 16.8 V
Battery charging connector (DC)
3-pin connector 16.5 V,
2.2 A
Supplied accessories
DC power cord (1)
Operation Manual (1)
Maintenance Manual (1)
AC power cord (angle type) (1)
Connector cover (1)
Optional accessory
AC power cord (straight type)
BKW-L601/2 Battery Adaptor
Design and specifications are subject to change without notice.
AVERTISSEMENT
natural_image
Mechanical clamp device with lever and handle (no text or symbols)natural_image
Mechanical diagram showing a lever mechanism with an arrow indicating motion (no text or symbols present)natural_image
Technical line drawing of a mechanical assembly showing internal components connected to a terminal block (no text or symbols present)Fixation aux camescopes SP Betacam
Recharge des piles
natural_image
Mechanical clamp device with handle and lever mechanism (no text or symbols)natural_image
Mechanical diagram showing a clamp or bracket assembly with an arrow indicating motion (no text or symbols present)Anbringen an digitale Betacam-Camcorder
natural_image
Technical line drawing of a mechanical assembly showing internal components connected to a terminal block (no text or symbols present)Anbringen an Betacam SP-Camcorder
natural_image
Technical line drawing of an electrical enclosure with internal components and screw fasteners (no text or labels)Aufladen von Akkus
The material contained in this manual consists of information that is the property of Sony Corporation and is intended solely for use by the purchasers of the equipment described in this manual.
Sony Corporation expressly prohibits the duplication of any portion of this manual or the use thereof for any purpose other than the operation or maintenance of the equipment described in this manual without the express written permission of Sony Corporation.