
BC-QZ1 - Battery charger SONY - Free user manual and instructions
Find the device manual for free BC-QZ1 SONY in PDF.

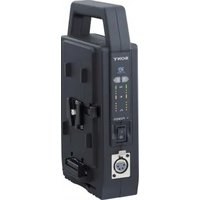
| Product Type | Battery Charger |
| Brand | Sony |
| Model | BC-QZ1 |
| Input Voltage | 100 V - 240 V AC |
| Input Frequency | 50 Hz / 60 Hz |
| Input Current | 0.38 A |
| Output Voltage | DC 8.4 V |
| Output Current | 1.6 A |
| Compatible Battery | Sony InfoLITHIUM Z series (e.g., NP-FZ100) |
| Charging Time (full charge) | Approx. 150 minutes |
| Operating Temperature | 0 °C to 40 °C (32 °F to 104 °F) |
| Storage Temperature | -20 °C to +60 °C (-4 °F to +140 °F) |
| Dimensions (W x H x D) | 70 mm x 33 mm x 95 mm (2 7/8 in. x 1 5/16 in. x 3 3/4 in.) |
| Weight | Approx. 125 g (4.4 oz) |
| Included Items | Charger unit, power cord, printed documentation |
| Charging Indicator | CHARGE lamp (orange) and status indicator lamp |
| Safety Features | Automatic pause/restart based on temperature; overcurrent protection |
| Worldwide Voltage Support | Yes (100 V - 240 V) |
Frequently Asked Questions - BC-QZ1 SONY
User questions about BC-QZ1 SONY
0 question about this device. Answer the ones you know or ask your own.
Ask a new question about this device
Download the instructions for your Battery charger in PDF format for free! Find your manual BC-QZ1 - SONY and take your electronic device back in hand. On this page are published all the documents necessary for the use of your device. BC-QZ1 by SONY.
USER MANUAL BC-QZ1 SONY
©2016 Sony Corporation Printed in China http://www.sony.net/

BC-QZ1
A
B
日本語
Thank you for purchasing the Sony Battery charger.
Before operating this Battery charger, please read this manual thoroughly and retain it for future reference.
Features
The BC-QZ1 Battery Charger (here in after referred to as "this unit") is designed exclusively for charging the Sony "InfoLITHIUM" Z series battery pack.
| • The "InfoLITHIUM" Z series battery pack has the 1 INTELIMUS logo on it. |
| • "InfoLITHIUM" is a trademark of Sony Corporation. |
- InfoLITHIUM" is a trademark of Sony corporation. - This unit cannot be used to charge battery packs except for the "InfoLITHIUM" Z series battery pack.
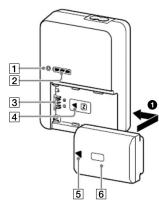
A B Identifying the parts
1 CHARGE lamp
2 Charging status indicator lamp
3 Battery terminal
4 Charger ▲ mark
⑤ Battery ▲ mark
6 Battery pack
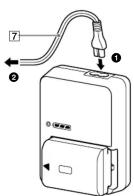
⑦ Power cord (mains lead)
To Charge the Battery Pack
The battery pack is charged by attaching it to this unit.
1 Attach the battery pack. (See illustration A-1.) To attach the battery pack, make sure that the charger ▲ mark and
the battery ▲ mark point to the same direction.
2 Connect the power cord (mains lead) to this unit and then to a wall outlet (wall socket). (See illustration
B-1/2.
The CHARGE lamp (orange) lights up and charging begins. The CHARGE lamp goes out when the battery pack is at least 90 % charged. The charging status indicator lamp goes out when continues for about 30 more minutes. (Full charge) Notes • Do not lift this unit by the battery pack. • Be careful not to hit the battery pack against this unit. • Be careful not to catch your fingers when attaching and removing
To remove the battery pack
Remove the battery pack by sliding it in the opposite direction to when you attached it.
You can check the approximate charging status with the charging status indicator lamp.
○, ...Off,
| CHARGE lamp | Charging status indicator lamp | |
| Immediately after attaching the battery pack - 30 % | ● | □□□ |
| 30 % - 60 % | ● | □□■ |
| 60 % - 90 % | ● | □■■ |
| 90 % - Full charge | ◎ | ■■■ |
| Full charge completed | ◎ | □□□ |
The charge level shown by the charging status indicator lamp and the percentages in the above table are rough guides.
The actual status may differ depending on the ambient temperature or the condition of the battery pack.
Charging time
The following table shows the charging time for a battery pack that is completely discharged.
Battery pack NE
| Battery pack N° 12,000 | |
| Full charge time 150 | |
- Approximate number of minutes to charge an empty battery pack
- For more about the battery life, see the instruction manual of your device.
• The charging time may differ depending on the condition of the battery pack or the ambient temperature.
- The times shown are for charging an empty battery pack which has been run down with a device, using this unit at an ambient temperature.
been run down with a device, using this unit at an ambient temperature of 25 °C (77 °F).
Charging temperature
The temperature range for charging is 0 °C to 40 °C (32 °F to 104 °F). For maximum battery efficiency, the recommended temperature
For maximum battery efficiency, the recommended range when charging is 10 °C to 30 °C (50 °F to 86 °F)
Notes
- If the CHARGE lamp does not light up, check if the battery pack is firmly attached to this unit.
- When a fully charged battery pack is installed, the CHARGE lamp lights attached to this unit.
- A battery pack that has not been used for a long time may take longer than usual to charge.
| This unit supports worldwide voltages 100 V to 240 V.Do not use an electronic voltage transformer, as this may cause a malfunction. |
The shape of wall outlets (wall sockets) differs depending on the country and region. Check before departure.
, 3 ,
Troubleshooting
When the CHARGE lamp blinks, check through the following chart
The CHARGE lamp blinks in two ways.
Blinks slowly: Turns on and off repeatedly every 1.5 seconds Blinks quickly: Turns on and off repeatedly every 0.15 seconds
The action to be taken depends on the way the CHARGE lamp blinks.
When the CHARGE lamp keeps blinking slowly
Charging is pausing. This unit is in the standby state. If the room temperature is out of the appropriate temperature range
In the room temperature is out of the appropriate temperature range charging stops automatically.
When the room temperature returns to the appropriate range, the CHARGE lamp lights up and charging restarts.
We recommend charging the battery pack at 10 °C to 30 °C (50 °F to 86 °F)
When the CHARGE lamp keeps blinking quickly
When charging the battery pack for the first time in one of the
| following situations, the CHARGE lamp may blink quickly. |
| If this happens, remove the battery pack from this unit, reattach it and |
charge it again
① When the battery pack is left for a long time ② When the battery pack is left installed in the camera for a long
② When the battery, push is off installed in the camera for a long time
③ Immediately after purchase
If the CHARGE lamp keeps blinking quickly, check through the following chart.
| Chart. |
| Remove the battery pack that is being charged and then firmly |
attach the same battery pack again.
| The CHARGE lamp blinks again:Install another battery pack. | The CHARGE lamp lights up and does not blink again:If the CHARGE lamp goes out because the charging time has passed, there is no problem. |
| The CHARGE lamp blinks again:The problem is with this unit. | The CHARGE lamp lights up and does not blink again:If the CHARGE lamp goes out because the charging time has passed, the problem is with the battery pack first installed. |
The battery should be charged.
The battery pack cannot be charged. • The power cord (mains lead) is not connected to the wall outlet (wall
Propofore core (mainly 102) is not connected to the wall outlet (wall socket). - Connect the power card (mains load) to the wall outlet (wall serial
→ Connect the power cord (mains lead) to the wall outlet (wall socket) properly.
- The battery pack is not firmly attached.
→ Attach the battery pack to this unit correctly.
Specifications
Input rating 100 V - 240 V AC 50 Hz/60 Hz
0.38 A
Output rating DC 8.4 V 1.6 A Operating temperature: 0.3C to 40.3C (22.3F to 104.5F)
Operating temperature 0 °C to 40 °C (32 °F to 104 °F) Storage temperature -20 °C to +60 °C (-4 °F to +140 °F)
Storage temperature 25 °C to 100 °C (1-1 to 110-1) Dimensions (Approx.) 70 mm x 33 mm x 95 mm (w/h/d)
(2 7/8 in. x 1 5/16 in. x 3 3/4 in.)
Mass
Included Items
Approx. 125 g (4.4 oz) Battery Charger (BC-071) (1)
Battery charger (BCEQET) (1) Power cord (mains lead) (1)
Set of printed documentation
Design and specifications are subject to change without notice.
Français
The Ground Truth image displays a single, solid horizontal line, which is a stylistic or background element (like a rule line on paper). According to Rule 2, such lines must be ignored by the OCR result. The provided OCR content is "____", which consists of underscores. Underscores are not equivalent to a solid line and are not permitted under the “Stylistic/Background Lines (Ignore)” rule. Outputting underscores for a stylistic line is incorrect because it misinterprets the line as a placeholder fill-in-the-blank area. Since the OCR output incorrectly rendered a stylistic line as underscores (which should be ignored), this violates the rule. Therefore, the OCR result is inconsistent with the Ground Truth.
⑥ Batterie rechargeable
Folds Articles inclus
Dimensiones (Aprox.) 70 mm × 33 mm × 95 mm (an/al/prf)
Peso Aprox. 125 g
The Ground Truth image displays a single, solid horizontal line, which is a stylistic or background element (like a rule line on paper). According to Rule 2, such lines must be ignored by the OCR result. The provided OCR content is "____", which consists of underscores. Underscores are not equivalent to a solid line and are not permitted under the “Stylistic/Background Lines (Ignore)” rule. Outputting underscores for a solid line constitutes an error, as it misrepresents the visual element and violates the instruction to ignore stylistic lines. Therefore, the OCR result is inconsistent with the Ground Truth.
■ The following described information is presented in the above:
m = 311
ال Mazda


Brand : SONY
Model : BC-QZ1
Category : Battery charger