
TV-24S50AEZ - TV PANASONIC - Free user manual and instructions
Find the device manual for free TV-24S50AEZ PANASONIC in PDF.

| Product type | 24-inch LED TV |
| Brand | Panasonic |
| Model | TV-24S50AEZ |
| Screen size | 24 inches (61 cm) |
| Dimensions (with stand) | 134 x 553 x 372 mm (D x W x H) |
| Dimensions (without stand) | 63 x 553 x 334 mm |
| Weight | 3.75 kg |
| Power supply | 220-240 V AC, 50 Hz |
| Power consumption | 45 W (operation), < 2 W (standby) |
| Tuner type | DVB-T2/C/S2 |
| Smart TV | Yes, built-in Amazon Fire TV |
| HDR compatibility | HDR10, HLG |
| Audio power | 2 x 2.5 W |
| Connectivity | HDMI, USB 2.0, Ethernet, Wi-Fi (802.11 a/b/g/n/ac), Bluetooth, Headphone jack, Digital audio output (SPDIF), AV input, CI+ |
| Main features | Parental control, Program guide, Media player, Miracast, Alexa voice control |
| Wall mount | VESA 75 x 75 mm, M4 screws (depth 7-10 mm) |
| Included accessories | Remote control, AAA batteries (x2), removable stand, mounting screws, power cord, quick start guide |
| Maintenance | Soft dry cloth or slightly damp (water or diluted neutral detergent) |
| Safety | Automatic shutdown not specified; precautions against electric shock and choking hazards |
Frequently Asked Questions - TV-24S50AEZ PANASONIC
User questions about TV-24S50AEZ PANASONIC
0 question about this device. Answer the ones you know or ask your own.
Ask a new question about this device
Download the instructions for your TV in PDF format for free! Find your manual TV-24S50AEZ - PANASONIC and take your electronic device back in hand. On this page are published all the documents necessary for the use of your device. TV-24S50AEZ by PANASONIC.
USER MANUAL TV-24S50AEZ PANASONIC
Safety Information ......2
Maintenance....4
Assembling / Removing the pedestal....4
When using the wall-hanging bracket....5
Introduction......5
Accessories Included....5
Features ....5
Antenna Connection....6
Other Connections....7
Turning On/Off the TV 8
TV Control & Operation 8
Remote Control 10
Initial Setup Wizard....11
Main Screen 12
Live TV 13
Customising TV Settings 13
Settings....14
Channel List....26
Channel Guide....26
Connecting to the Internet 27
Specification 28
Notice 29
Licences 29
Declaration of Conformity (DoC) 30
Safety Information

CAUTION
RISK OF ELECTRIC SHOCK
DO NOT OPEN

CAUTION: TO REDUCE THE RISK OF ELECTRIC SHOCK DO

NOT REMOVE COVER (OR BACK). NO USER-SERVICEABLE PARTS INSIDE. REFER SERVICING TO QUALIFIED SERVICE PERSONNEL
In extreme weather (storms, lightning) and long inactivity periods (going on holiday) disconnect the TV set from the mains.
The mains plug is used to disconnect TV set from the mains and therefore it must remain readily operable. If the TV set is not disconnected electrically from the mains, the device will still draw power for all situations even if the TV is in standby mode or switched off.
Note: Follow the on screen instructions for operating the related features.
IMPORTANT - Please read these instructions fully before installing or operating

WARNING: This device is intended to be used by persons (including children) who are capable / experienced of operating such a device unsupervised, unless they have been given supervision or instruction concerning the use of the device by a person responsible for their safety.
- Use this TV set at an altitude of less than 5000 metres above the sea level, in dry locations and in regions with moderate or tropical climates.
- The TV set is intended for household and similar indoor use but may also be used in public places.
- For ventilation purposes, leave at least 5cm of free space around the TV.
- The ventilation should not be impeded by covering or blocking the ventilation openings with items, such as newspapers, table-cloths, curtains, etc.
- The power cord/plug should be easily accessible. Do not place the TV, furniture, etc. on the power cord. A damaged power cord/plug can cause fire or give you an electric shock. Handle the power cord by the plug, do not unplug the TV by pulling the power cord. Never touch the power cord/plug with wet hands as this could cause a short circuit or electric shock. Never make a knot in the power cord or tie it with other cords. When damaged it must be replaced, this should only be done by qualified personnel.
-
Do not expose the TV to dripping or splashing of liquids and do not place objects filled with liquids, such as vases, cups, etc. on or over the TV (e.g. on shelves above the unit).
-
Do not expose the TV to direct sunlight or do not place open flames such as lit candles on the top of or near the TV.
- Do not place any heat sources such as electric heaters, radiators, etc. near the TV set.
- Do not place the TV on the floor or inclined surfaces.
- To avoid danger of suffocation, keep plastic bags out of the reach of babies, children and domestic animals.
- Carefully attach the stand to the TV. If the stand is provided with screws, tighten the screws firmly to prevent the TV from tilting. Do not over-tighten the screws and mount the stand rubbers properly.
- Do not dispose of the batteries in fire or with hazardous or flammable materials.
WARNING
- Batteries must not be exposed to excessive heat such as sunshine, fire or the like.
- Excessive sound pressure from earphones or headphones can cause hearing loss.
ABOVE ALL - NEVER let anyone, especially children, push or hit the screen, push anything into holes, slots or any other openings in the TV.
 | Caution | Serious injury or death risk |
 | Risk of electric shock | Dangerous voltage risk |
 | Maintenance | Important maintenance component |
Markings on the Product
The following symbols are used on the product as a marker for restrictions and precautions and safety instructions. Each explanation shall be considered where the product bears related marking only. Note such information for security reasons.

Class II Equipment: This appliance is designed in such a way that it does not require a safety connection to electrical earth.

Hazardous Live Terminal: The marked terminal(s) is/are hazardous live under normal operating conditions.

Caution, See Operating Instructions: The marked area(s) contain(s) user replaceable coin or button cell batteries.

Class 1 Laser Product: This product contains Class 1 laser source that is safe under reasonably foreseeable conditions of operation.
WARNING
- Do not ingest the battery, Chemical Burn Hazard.
- This product or the accessories supplied with the product may contain a coin/button cell battery. If the coin/button cell battery is swallowed, it can cause severe internal burns in just 2 hours and can lead to death.
- Keep new and used batteries away from children.
- If the battery compartment does not close securely, stop using the product and keep it away from children.
- If you think batteries might have been swallowed or placed inside any part of the body, seek immediate medical attention.
A television may fall, causing serious personal injury or death. Many injuries, particularly to children, can be avoided by taking simple precautions such as:
- ALWAYS use cabinets or stands or mounting methods recommended by the manufacturer of the television set.
- ALWAYS use furniture that can safely support the television set.
- ALWAYS ensure the television set is not overhanging the edge of the supporting furniture.
- ALWAYS educate children about the dangers of climbing on furniture to reach the television set or its controls.
- ALWAYS route cords and cables connected to your television so they cannot be tripped over, pulled or grabbed.
- NEVER place a television set in an unstable location.
- NEVER place the television set on tall furniture (for example, cupboards or bookcases) without anchoring both the furniture and the television set to a suitable support.
- NEVER place the television set on cloth or other materials that may be located between the television set and supporting furniture.
- NEVER place items that might tempt children to climb, such as toys and remote controls, on the top of the television or furniture on which the television is placed.
- The equipment is only suitable for mounting at heights ≤ 2 m.
If the existing television set is going to be retained and relocated, the same considerations as above should be applied.
Apparatus connected to the protective earthing of the building installation through the MAINS connection or through other apparatus with a connection to protective earthing – and to a television distribution system using
coaxial cable, may in some circumstances create a fire hazard. Connection to a television distribution system has therefore to be provided through a device providing electrical isolation below a certain frequency range (galvanic isolator).
WALL MOUNTING WARNINGS
- Read the instructions before mounting your TV on the wall.
- The wall mount kit is optional. You can obtain from your local dealer, if not supplied with your TV.
- Do not install the TV on a ceiling or on an inclined wall.
- Use the specified wall mounting screws and other accessories.
-
Tighten the wall mounting screws firmly to prevent the TV from falling. Do not over-tighten the screws.
-
Using other wall-hanging brackets, or installing a wall-hanging bracket by yourself have the risk of personal injury and product damage. In order to maintain the unit's performance and safety, be absolutely sure to ask your dealer or a licensed contractor to secure the wall-hanging brackets. Any damage caused by installing without a qualified installer will void your warranty.
- Carefully read the instructions accompanying optional accessories, and be absolutely sure to take steps to prevent the TV from falling off.
- Handle the TV carefully during installation since subjecting it to impact or other forces may cause product damage.
- Take care when fixing wall brackets to the wall. Always ensure that there are no electrical cables or pipes in the wall before hanging bracket.
- To prevent fall and injury, remove the TV from its fixed wall position when it is no longer in use.
DAMAGES
- Excepting cases where responsibility is recognised by local regulations, Panasonic accepts no responsibility for malfunctions caused by misuse or use of the product, and other problems or damages caused by use of this product.
- Panasonic accepts no responsibility for loss, etc., of data caused by disasters.
- External devices separately prepared by the customer are not covered by the warranty. Care for the data stored in such devices is the responsibility of the customer. Panasonic accepts no responsibility for abuse of this data.
Figures and illustrations in these operating instructions are provided for reference only and may differ from the actual product appearance. Product design and specifications may be changed without notice.
Because the Fire TV operating system is periodically updated, the images, navigation instructions, titles and location of menu options shown in this manual may be different from what you see on the screen.
Maintenance
First, remove the mains plug from the mains socket.
Display panel, Cabinet, Pedestal
Regular care:
Gently wipe the surface of the display panel, cabinet, or pedestal by using a soft cloth to remove dirt or fingerprints.
For stubborn dirt:
- First clean the dust from the surface.
- Dampen a soft cloth with clean water or diluted neutral detergent (1 part detergent to 100 parts water).
- Wring out the cloth firmly. (Please note, do not let liquid enter the TV inside as it may lead to product failure.)
- Carefully wipe moisten and wipe away the stubborn dirt.
- Finally, wipe away all the moisture.
Caution
Do not use a hard cloth or rub the surface too hard, otherwise this may cause scratches on the surface.
• Take care not to subject the surfaces to insect repellent, solvent, thinner or other volatile substances. This may degrade surface quality or cause peeling of the paint.
- The surface of the display panel is specially treated and may be easily damaged. Take care not to tap or scratch the surface with your fingernail or other hard objects.
- Do not allow the cabinet and pedestal to make contact with a rubber or PVC substance for a long time. This may degrade surface quality.
Mains plug
Wipe the mains plug with a dry cloth at regular intervals.
Moisture and dust may cause fire or electrical shock.
Assembling / Removing the pedestal
Preparations
Take out the pedestal(s) and the TV from the packing case and put the TV onto a work table with the screen panel down on the clean and soft cloth (blanket, etc.)
- Use a flat and firm table bigger than the TV.
- Do not hold the screen panel part.
• Make sure not to scratch or break the TV.
CAUTION: Please refrain from inserting pictured screws to the TV body when not using the TV stand e.g. wall hanging. Inserting screws without pedestal may cause a damage of the TV.
Assembling the pedestal
- The stand of the TV consists of two pieces. Install these pieces together.
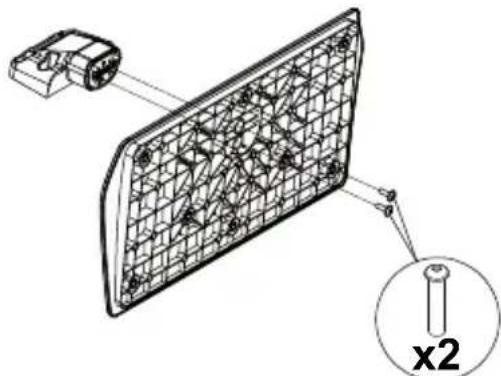
natural_image
Technical diagram of a mechanical component with grid pattern and labeled part 'x2' (no text or symbols beyond label)- Place the stand(s) on the stand mounting pattern(s) on the rear side of the TV.

natural_image
Diagram of a monitor with an upward arrow pointing to a small device (no text or symbols present)- Insert the screws (M4 x 12 mm) provided and tighten them gently until the stand is properly fitted.
natural_image
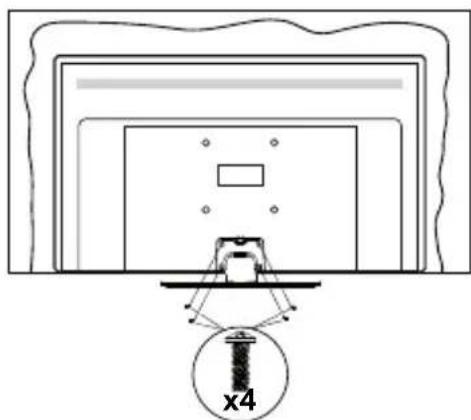
Simple line drawing of a room with a monitor and a screw, no text or symbols presentRemoving the pedestal from the TV
Be sure to remove the pedestal in the following way when using the wall-hanging bracket or repacking the TV.
- Put the TV onto a work table with the screen panel down on the clean and soft cloth. Leave the stand(s) protruding over the edge of the surface.
- Unscrew the screws that fixing the stand(s).
- Remove the stand(s).
When using the wall-hanging bracket
Please contact your local Panasonic dealer to purchase the recommended wall-hanging bracket. Holes for wall-hanging bracket installation;
Rear of the TV

flowchart
graph TD
    A["•"] -->|a| B["•"]
    B -->|b| C["•"]
| a (mm) 75 | |
| b (mm) 75 |
View from the side
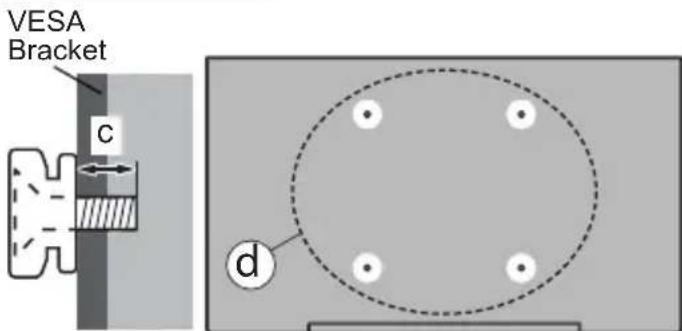
Note: The screws for fixing the TV onto the wall-hanging bracket are not supplied with the TV.
Introduction
Thank you for choosing our product. You'll soon be enjoying your new TV. Please read these instructions carefully. They contain important information which will help you get the best from your TV and ensure safe and correct installation and operation.
Accessories Included
- Remote Control
- Batteries: 2 x AAA
- Quick Start Guide
- Power Cord
- Detachable stand
- Stand mounting screws (M4 x 12 mm)
Features
High Dynamic Range (HDR) / Hybrid Log-Gamma (HLG)
Using this feature the TV can reproduce greater dynamic range of luminosity by capturing and then combining several different exposures. HDR/HLG promises better picture quality thanks to brighter, more realistic highlights, more realistic colour and other improvements. It delivers the look that filmmakers intended to achieve, showing the hidden areas of dark shadows and sunlight with full clarity, colour and detail. HDR/HLG content is supported via native and market applications, HDMI and USB inputs and over DVB-S broadcasts. When the input source is set to the related HDMI input, highlight the related HDMI option in the Home > Settings > Display & Audio > Picture Settings menu and press Select to display setting options. Set the HDMI Input Mode option in the Advanced Settings menu as Mode 1 (1.4), Mode 2 (2.0), or Auto in order to watch HDR/HLG content, if the HDR/HLG content is received through an HDMI input. The source device should also be at least HDMI 2.0a compatible in this case.
Antenna Connection
Connect the aerial or cable TV plug to the aerial input (ANT) socket or satellite plug to the satellite input (LNB) socket located on the rear side of the TV.
Rear side of the TV
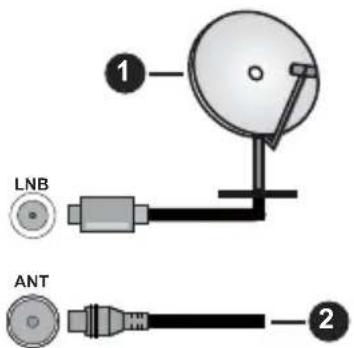
-
Satellite
-
Aerial or cable

If you want to connect a device to the TV, make sure that both the TV and the device are turned off before making any connection. After the connection is done, you can turn on the units and use them.
Other Connections

If you want to connect a device to the TV, make sure that both the TV and the device are turned off before making any connection. After the connection is done, you can turn on the units and use them.
| Connector Type Cables Device | |||
| [620D] | HDMI Connection(side&back) | 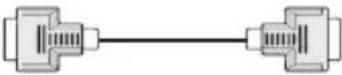 |  |
 | SPDIF(Coaxial Out)Connection(side) |  |  |
 | Side AV(Audio/Video)Connection(side) |  Side Audio/Video Audio/Video Connection Cable Cable Side Audio/Video Audio/Video Connection Cable Cable |  |
 | Headphone Connection(side) | [KCBV] | |
| [DCYS] | USB Connection(side) |  |  |
 | CI Connection(side) |  |  |
 | Ethernet Connection(back) |  LAN / Ethernet Cable LAN / Ethernet Cable | [2D6K] |
Turning On/Off the TV
Connect power
IMPORTANT: The TV set is designed to operate on 220-240V AC, 50 Hz socket.
After unpacking, allow the TV set to reach the ambient room temperature before you connect the set to the mains.
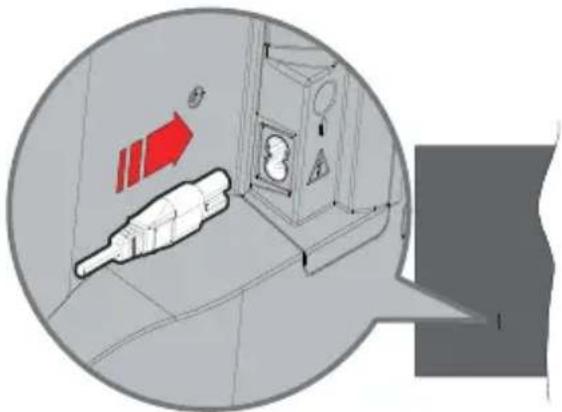
natural_image
Diagram showing a device with red directional arrows and a warning symbol, enclosed in a circular frame (no text or labels)Plug one end (the two-hole plug) of the supplied detachable power cord into the power cord inlet on the rear side of the TV as shown above. Then plug the other end of the power cord into the mains socket outlet. The TV will switch to standby mode.
Note: The position of the power cord inlet may differ depending on the model.
To switch on the TV from standby
If the TV is in standby mode the standby LED lights up. To switch on the TV from standby mode either:
- Press the Standby button on the remote control.
- Press the control button on the TV.
The TV will then switch on.
To switch the TV into standby
- Press the Standby button on the remote control.
- Press the control button on the TV, the function options menu will be displayed. The focus will be on the Inputs option. Press the button consecutively until the Power Off option is highlighted. Press and hold the button for about 2 seconds, the TV will switch into standby mode.
To switch off the TV
To power down the TV completely, unplug the power cord from the mains socket.
TV Control & Operation
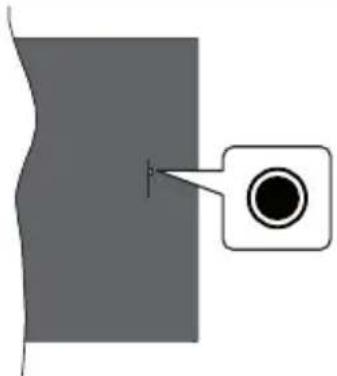
natural_image
Simple diagram showing a gray rectangular area with a black circular inset containing a dot, no text or symbols present.Your TV has a single control button. This button allows you to control the Inputs / Volume Up-Down / Channel Up-Down / Power On-Off / Exit functions of the TV.
Note: The position of the control button may differ depending on the model.
Operating with the Control Button
- Press the control button to display the Power Menu.
- Then press the button consecutively to move the focus to the desired option if needed.
- Press and hold the button for about 2 seconds to use the function, enter the sub menu or select the option.
To turn the TV off: Press the control button to display the Power Menu, the focus will be on the Inputs option. Press the button consecutively until the Power Off option is highlighted. Press and hold the button for about 2 seconds to turn the TV off (standby mode).
To turn on the TV: Press the control button, the TV will turn on.
To change volume: Press the control button to display the function options menu and then press the button consecutively to move the focus to Volume Up or Volume Down option. Press and hold the button to increase or decrease the volume.
To change channel (in Live TV mode): Press the control button to display the Power Menu and then press the button consecutively to move the focus to Channel Up or Channel Down option. Press and hold the button to switch to the next or previous channel in the channel list.
To change input: Press the control button to display the Power Menu, the focus will be on the Inputs option. Press and hold the button for about 2 seconds to display the inputs list. Scroll through the available input options by pressing the button. Press and hold the button for about 2 seconds to switch to the highlighted input option.
Note: Live TV settings menu OSD in Live TV mode cannot be displayed via the control button.
Operation with the Remote Control
Press and hold the Home button on your remote control to display available quick settings menu options when in Live TV mode. Press the Home button to display or return to the Home screen of your Fire TV. Use the directional buttons to move the focus, proceed, adjust some settings and press Select to make selections in order to make changes, set your preferences, enter a sub-menu, launch an application etc. Press Return/Back to return to the previous menu screen.
Input Selection
Once you have connected external systems to your TV, you can switch to different input sources. Press the Input button to open the Inputs menu (availability depends on the model of the remote). You can also press and hold the Home button on your remote control to display available quick settings menu options and then highlight the Inputs option and press the Select button to display the list of available input options. Use the directional buttons to highlight the option of your choice and then press the Select button to switch to the selected input. Or select the desired input from the Inputs row in the inputs tab on the Home screen and press Select.
Changing Channels and Volume
You can adjust the volume by using the Volume +/- buttons and change the channel in Live TV mode by using the Programme +/- buttons on the remote.
Remote Control
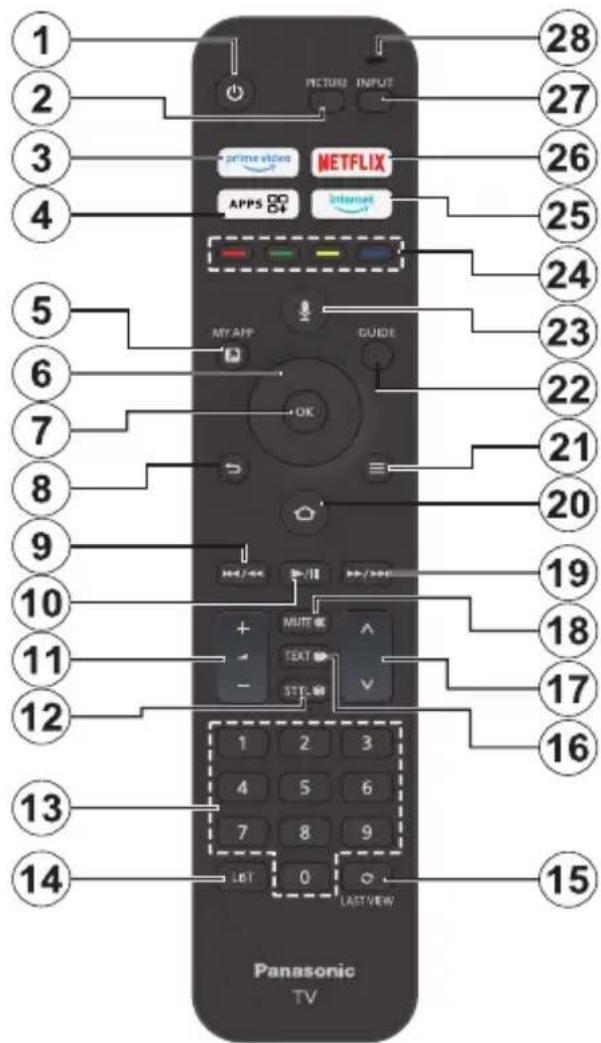
Inserting the Batteries into the Remote
Remove the back cover to reveal the battery compartment on the back side of the remote control first. Insert two 1.5V - size AAA batteries. Make sure the (+) and (-) signs match (observe correct polarity). Do not mix old and new batteries. Replace only with same or equivalent type. Place the cover back on.
To pair remote with the TV
When TV is turned on for the first time, a pairing process for your remote will be performed during the initial setup. Follow the on screen instructions to pair it. If you experience difficulties pairing your remote with your TV you can turn off other wireless devices and try again. Refer to the Remotes & Bluetooth Devices section for detailed information on pairing new devices with your TV.
- Standby: Standby / On
- Picture: Opens the picture mode
- Prime Video: Opens Prime Video screen
- Apps: Displays your apps & channels
- My App (*)
- Directional button: Helps navigate menus, content, etc. and displays the subpages in TXT mode when pressed Up or Down
- Select: Confirms selections, enters sub-menus
- Back/Return: Returns to previous menu screen, goes one step back, closes open windows, returns to main screen or Home tab
- Rewind: Moves frames backwards in media such as movies, scrolls back a day in the channel guide
- Play/Pause
Play: Starts to play selected media
Pause: Pauses the media being played - Volume +/-: Increases/decreases the volume level
- Sttl: Displays audio and subtitle options, where you can change the language preference and turn subtitles on or off (where available)
- Numeric buttons: Switches the channel in Live TV mode, enters a number in the text box on the screen
- List: Opens the channel list
- Last View: Quickly cycles between previous and current channels and switches to Live TV mode
- Text: Opens and closes teletext or interactive services (where available in Live TV mode)
- Programme +/-: Increases/Decreases channel number in Live TV mode
- Mute: Completely turns off the volume of the TV
- Fast forward: Moves frames forward in media such as movies, scrolls forward a day in the channel guide
- Home: Opens the Home screen. Press and hold to display quick settings menu
- Options: Displays setting options (where available)
- Guide: Displays the channel guide
- Voice button: Activates the microphone on the remote
- Coloured Buttons: Follow the on-screen instructions for coloured button functions
- Internet: Opens the Amazon Silk browser
- Netflix: Launches the Netflix application
- Input: Shows available broadcast and content sources
- Alexa LED: Illuminates when the Voice button is pressed and during pairing process Microphone opening: Speak into the microphone when using Alexa or voice search
(\*) MY APP:
You can assign a shortcut to the My App button at any time by pressing and holding this button to quickly access apps, Alexa voice commands, and more. Follow the on-screen instructions.
Initial Setup Wizard
Note: Follow the on-screen instructions to complete the initial setup process. Use the directional buttons and the Select button on the remote to select, set, confirm and proceed.
1. Choose Your Location
Select your location from the list and press Select to continue.
2. Choose Your Language
The language selection options will be listed on the screen. Select the desired language from the list and press Select to continue.
3. Select TV Mode
In the following step of the initial setup, you can set the TV's operation mode. Store Use option will configure your TV's settings for store environment. This option is intended only for store use. It is recommended to select Continue for home use.
4. Pair Your Remote with your TV
If your remote does pair with your TV automatically or if you have paired your remote with your TV once previously, this step will be skipped. If this is not the case, a search for your remote will be performed. Follow the on-screen instructions to pair your remote control (depends on the model of the remote control).
5. Connect to your network
Even if you did connect your TV to internet via an Ethernet cable before the initial setup begins the network connection will not be available automatically, you first have to enable it in this step. A confirmation dialogue will be displayed on the screen. You will be informed that the power consumption may increase and be asked for your consent to continue. Highlight Enable and press Select to proceed.
If you didn't connect your TV to internet via an Ethernet cable, your TV will search and list available wireless networks at this point after you enable network connection. Select your network and press Select to connect to it.
You can review or change the network settings later using the options in the Settings > Network menu. Refer to the Network and Connecting to the Internet sections if you need further information. Press Fast Forward button on your remote to skip.
After the internet connection is established, the TV will check for the software updates and download the latest software next, if any available. Please notice that this might take some time.
6. Sign In with Your Amazon Account
You can sign in to your Amazon account on the next screen. You need to be signed in to an Amazon account in order to use Amazon services. This step will be skipped if no internet connection has been established in the previous step. If you don't already have an Amazon account you can set up an account by choosing New to Amazon? Create a free account option. You can press the Fast Forward button to skip this step. A dialogue will be displayed for confirmation. Highlight Do this later and press Select to continue. If you skip this step some of the following steps may differ or be skipped as well.
Once the account has been registered, you will be asked whether you want to use the account you signed in. You can choose to change the account, read the terms and conditions, which will be accepted if you continue, at this point. Highlight the symbol with three dots next to the texts at the bottom side of the screen and press Select to read and learn more about the related subject. Highlight Continue and press Select button to proceed without changing the account.
If you have connected your TV to internet via a WLAN network a dialogue will be displayed at this point, asking if you want to save your WLAN password to Amazon. Highlight Yes and press Select to confirm and proceed. Select No to proceed without confirmation.
7. Restore Fire TV
If you have previously used a Fire TV device, then you can choose to use the settings from that device for this TV. If you are new to Fire TV then highlight Skip and press Select.
To restore a previous Fire TV device highlight Restore and press Select. A list of your Fire TV devices will be displayed. Highlight the device of your choice then press Select. Your TV will now restore all the setting so that they match your other Fire TV device.
8. Prime Video
Depending on the selected location a brief information on the prime video services may be displayed next. You can start your 30 day free trial at this point. Highlight Not now and press Select to skip.
9. Select Apps
In the next step you can select the apps you want to download. Highlight Get Started and press Select to proceed. The apps are free to download but some of them may require payment for full access. Highlight No Thanks and press Select to skip.
10. Parental Controls
You can enable Parental Controls at this point or you can do it later.
Note that, if you choose No Parental Controls, purchasing and video playback without PIN will be allowed.
If you choose the Enable Parental Controls option, you will be asked to enter a PIN next. This is the Prime Video PIN and it is related to your Amazon account. Use the buttons on your remote as shown on the screen to enter the PIN. You will have to enter it to
access some menus, services, content, etc. protected by this PIN. If you have forgotten your PIN follow the link shown on the screen to reset your PIN.
You will be informed about the feature on the next screen. Press Select to continue.
You can review or change the parental control settings later using the Parental Controls option in the Settings > Preferences menu.
11. What's New on Fire TV
You can get the latest news about TV shows, films, product news, special offers and more. Emails will be sent to the email address associated with your Amazon account. You can cancel your subscription at any time. To subscribe, select Subscribe or highlight Skip and press the Select button to skip.
12. Welcome to Fire TV
Brief information on the use of your Fire TV will be provided on the next screen. After reading press Select to continue.
13. Scan for TV channels
You will be asked whether you want to scan for channels in the next step. Highlight Yes and press Select to start the scan process. Highlight No and press Select to scan later.
Before the scan starts, you will be asked to check if your aerial is set up and your antenna cable is plugged properly into the antenna socket on your TV. Press Select to proceed.
14. Channel Type
The next step is the selection of the channel type. Select your scanning preference to install channels for Live TV function. Cable, Terrestrial and Satellite options will be available.
If the Cable or Terrestrial option is selected, the TV will search for digital terrestrial or digital cable broadcasts. Select the searching method on the next screen and press Select to start search.
If the Satellite option is selected, you can choose an operator on the next step, if any available. You can also choose to perform manual or complete channel scan or import a channel list from a connected USB storage device. Highlight the operator option you prefer and press Select to proceed. If an operator different than the default one is selected, a confirmation dialogue is displayed. Highlight Yes and press Select to continue with the selected operator. The Satellite Connection screen will be displayed next. Depending on your previous selections some options may be preset automatically. Change if necessary and proceed.
If you have a suitable channel list that was previously exported to a USB storage device, you can also use the Customised Channel List option at this point. Connect the USB storage device to your TV, highlight this option and press Select to proceed.
If you select the Complete Channel Scan or Manual Channel Scan option, you will have to select the satellite in the next step. Then the Satellite Connection screen will be displayed. Set the LNB Type, LNB Power, DiSEqC Version, Single Cable, ToneBurst, and Scan Mode options manually corresponding to your environment on the next screen. When you set the DiSEqC Version option, the Port option will become available. You will need to set the diseqc port using this option after setting the diseqc version. If you select Manual Channel Scan, you will need to configure the Frequency, Polarisation, and Symbol Rate options additionally before the scan starts.
When complete press the Play/Pause button. The TV will start to search available broadcasts.
While the search continues you can press the Select button to cancel. A dialogue will be displayed for confirmation. Highlight Yes and press Select to cancel.
When the initial setup is completed the results will be displayed. You can choose to make changes on the channel list or rescan at this point. Highlight Done and press Select to finish the setup.
Profile selection screen will be displayed next. You can select a profile, add a new one or edit profile settings. Highlight the profile you want to continue with and press Select.
Home screen will be displayed. In order to switch to Live TV mode and watch TV channels press the Live button on the remote (availability depends on the model of the remote). You can also select a channel from the On Now row in the Home tab or select the Aerial or Satellite input option from the Inputs menu or Inputs row in the Inputs tab on the Home screen and press Select to start watching. Press the Input button to open the Inputs menu (availability depends on the model of the remote).
Main Screen
To enjoy the benefits of your Amazon Fire TV, your TV must be connected to the Internet. Connect the TV to a home network with a high-speed Internet connection. You can connect your TV wirelessly or wired to your modem/router. Refer to the Network and Connecting to the Internet sections for further information on how to connect your TV to the internet.
The main screen is the centre of your TV. Press the Home button on your remote to display the main screen. From the main screen you can start any application, switch to a TV channel, watch a movie or switch to a connected device, manage the settings. Depending on your TV setup and your country
selection in the initial setup the main screen may contain different items.
The main screen is organised into several tabs. Profiles, Inputs, My Stuff, Find, Home, Live, recently used apps, Your Apps and Channels and Settings (gear wheel symbol) tabs will be available. You can scroll through them using the directional buttons. Available tabs may differ depending on the network connection status of your TV and whether you signed in to your Amazon account. Move the focus to the desired tab option to display the content. Available options of the highlighted tab will be positioned in rows generally. To navigate through the options use the directional buttons on the remote. Select a row then move the focus to the desired item in the row. Press Select button to make a selection or to enter a sub-menu.
The main screen will be opened with the Home tab. You can use the Find tab to search and find the content that you'll looking for. It has a dedicated search function where you can either press the Alexa Voice Button (if your remote has a built-in microphone) and ask Alexa to find what you're looking for or you can type a word to start a search. Library will show any content that you have added to your Watchlist.
Live TV
Live TV refers to channels that have been tuned in via an aerial, cable and satellite connection. There are several ways to watch Live TV channels. You can press the Live button on the remote (availability depends on the model of the remote) to switch to Live TV mode and watch TV channels. You can also select a channel from the On Now row in the Home tab or Live tab, or select the Aerial or Satellite input option from the Inputs menu or the Inputs row in the Inputs tab on the Home screen and press Select to start watching. Press the Input button to open the Inputs menu (availability depends on the model of the remote).
If the channel installation is not completed the On Now row will not be available.
Customising TV Settings
Adjusting the Picture Settings
Allows you to set your preferred picture settings. You can access the picture settings menu via the Settings menu on the main screen or by pressing and holding the Home button for about 2 seconds while viewing any input.
Accessing Picture Settings via Settings Menu
Press the Home button, scroll to Settings tab. Scroll to Display & Audio option and press the Select button. Highlight the Picture Settings option and press the Select button. Scroll down to select the input that you want to adjust the picture setting of and press Select button. The TV will now change to the selected input. The Picture Settings menu will appear on the right hand side of the screen.
Accessing Picture Settings while watching the TV
While watching the input that you would like to adjust press and hold the Home button for 2 seconds. The quick settings menu will appear on the right hand side of the screen. Scroll down and highlight Picture then press Select. The picture setting options will appear on the right hand side of the screen.
Picture Menu Content
The following options show all the available picture setting adjustment on your TV.
Picture settings are input-specific and all of these settings will not apply to all Inputs. Some options may not be available depending on the input source.
Picture Mode: Set the picture mode to suit your preference or requirements. Picture mode can be set to one of these options: Standard, Movie, Dynamic, Sport, Game, PC and Customised. You can also manually adjust each mode. Available options may differ depending on the currently set input source.
Backlight: Increases or decreases the brightness of the backlight from 0 - 100.
Dynamic Backlight: Set the Dynamic backlight to On, Off or Eco.
Colour Saturation: Adjusts the difference between light and dark levels in the picture. The range is from 0-100.
Screen Settings: The picture format can be set to Automatic, 16:9 and 4:3.
Advanced Settings
Contrast: Adjusts the difference between light and dark levels in the picture. The range is from 0-100.
Brightness: Increases or decreases the picture brightness from 0-100.
Dynamic Contrast: Set the Dynamic Contrast to On or Off.
Local Contrast: Divides each frame to small regions and applies independent contrast curves for every distinct region. Local Contrast Control has 4 different setting Off, Low, Medium, High. Highlight your desired setting then press Select.
Gamma: Gamma can be changed between -4 and 4.
Tint: Increases or decreases the picture tint from -50 (greens) to 50 (reds).
Colour Temperature: Sets the desired colour temperature value. Cool, Standard and Warm options are available.
Sharpness: Adjusts the level of crispness in the edges between light and dark areas of the picture. Range is from 0-100.
MPEG NR: MPEG Noise Reduction has 4 different setting Off, Low, Medium, High. Highlight your desired setting then press Select.
Noise Reduction: Noise Reduction has 4 different setting Off, Low, Medium and High. Highlight your desired setting then press Select.
Natural Cinema: Set the Natural Cinema to On or Off.
Picture Reset: Resets all setting to factory default settings.
Adjusting the Sound Settings
Allows you to adjust the sound settings on your TV. You can access the sound settings menu via the Settings menu on the main screen or by pressing and holding the Home button for 2 seconds while viewing any input.
Accessing Audio Settings via Settings Menu
Press the Home button, scroll to Settings tab. Scroll to Display & Audio option and press the Select button. Scroll down to Audio Settings option and press the Select button. The sound setting options will appear on the right hand side of the screen.
Accessing Sound Settings while watching the TV
While watching the input that you would like to adjust press and hold the Home button for 2 seconds. The quick settings menu will appear on the right hand side of the screen. Scroll down and highlight Sound then press Select. The sound setting options will appear on the right hand side of the screen.
Sound Menu Content
The following options show all the available sound setting adjustment on your TV.
Dolby Mode: Dolby Audio has preset sound settings. The available options are Standard, Music, Speech, Sport, Stadium, User and Off. They are designed to give you the best sound quality for the content that you are viewing. Highlight your desired setting then press Select.
DTS Mode: This setting can only be accessed if Dolby Mode has been switched off. DTS Mode has 6 different setting Standart, Music, Film, Clear Voice, Enhanced Bass and Flat. The default setting is Standart. Highlight your desired setting then press Select.
Advanced Settings: Here you will be able to switch Dialogue Clarity, TruVolume and DTS Virtual:X on or off. Highlight the desired option and press Select to switch on or off. You can also configure your Balance and Equaliser settings.
Dialogue Clarity: Enhances signal clarity for clear dialogue that is audible above background sound effects.
TruVolume: Provides a consistent and comfortable volume level across content.
DTS Virtual:X: Reproduces elevated sounds and a cinematic surround sound image without surround speakers.
Dialogue Enhancer: This setting will only be available if the Dolby Mode option is not set to Off. Off, Low, Mid and High options will be available.
Volume Leveller: This setting will only be available if the Dolby Mode option is not set to Off. Allows you to balance the sound levels. Off, Low, Mid, and High options will be available.
Balance: Adjusts the sound level from the left and right speakers and can be adjusted from -25 to 25. The default setting is 0.
Equaliser: This setting can only be accessed once Dolby Mode has been switched off. Equaliser has 5 different settings: 100Hz, 500Hz, 1.5kHz, 5kHz, 10kHz. Each setting can be adjusted from -10 to 10, the default setting is 0 for all.
TV Speakers: Press Select to switch the TV speaker on or off.
Reset: Resets all settings to factory defaults.
Settings
If you need to change or adjust anything on your TV you'll be able to find the required setting in the Settings menu. You can access the Settings menu from the main screen of the TV. Press the Home button and scroll across to Settings. The settings menu is split into separate menus to make it easy for you to find what you're looking for.
Inputs
Use the Inputs menu to change between inputs and also select the Media Player from here if you have a USB Drive connected to one of the USB sockets.
Accessing the Inputs Menu
You can access the Inputs menu through the Settings menu on the main screen. Press the Home button to display the home screen, then scroll across to Settings. Press the down directional button to highlight Inputs and press Select.
You can also access input options from the Inputs tab on the Home screen or you can simply press the Input button to open the Inputs menu (availability depends on the model of the remote).
Selecting an Input
Press the left/right directional buttons to highlight your desired input then press Select. Your TV will now switch to that input.
Changing an Inputs Name
The input name can be changed for HDMI inputs. Highlight the input that you want to rename and press the Options button. Highlight Change Device Name and press Select. You'll now see a list of devices, highlight the one that you have connected and press Select. Then select Next.
If you want to set the inputs back to their original names, highlight the input, press Option and select Reset Input.
Media Player
If you have a USB storage device plugged into one of the USB sockets or you have files in Gallery you can access them and display them in the Media Player. The Media player allows you to display images, or play videos and audio files.
In the Inputs menu highlight Media Player and press Select. If this is the first time you have used the Media Player, you may be asked whether you want to allow gallery to access photos, media and files on your device. Gallery is the name used for your TV so highlight Allow and press Select.
With Media Player open you'll see 4 tabs at the top of the screen, highlight Your Files to see all the files, Videos to see all videos, Images to see all images and Audio to see all audio files.
Under these tabs view options will be available. View All option and the folders which include media files will be listed. When you scroll across an option, only the media files in the highlighted folder will be displayed on the screen. Highlight the View All option to see all files.
Press Options button, highlight Sort and press Select to see available options to sort the files displayed on the screen.
If you have multiple images on your USB Drive you can create a slide show using your images. Highlight the Images tab at the top of the screen then press the Options button. From the Options menu highlight Multi-select Images and press Select. Now select the images that you would like to add into the slide show by highlighting each image and pressing Select. Once you have selected all the images press the Play/Pause button to start the slide show.
Once you have a slide show running you can change the setting of the slide show. Press Options button to see available options. You can set the Album, Slide Style, Slide Speed and Shuffle options according to your preferences. Adjust the settings then press the Play/Pause button to view your slide show.
Supported file Video formats: MPEG, MKV, MP4, MOV, 3GP and AVI.
Supported file Picture formats: JPEG, JPG, BMP and PNG.
Supported file Music formats: MP3 and WAV.
Notifications
The notifications menu shows you all the notifications about your TV. The notification symbol (a small bubble) will appear on the upper right corner of the gear wheel symbol on the Home screen to indicate that you have new notifications.
Reading Notifications
Highlight Notifications in the Settings menu and press Select. A small number in the small bubble on the upper right corner of the Notifications option indicates how many notification you have. All the available notifications will be displayed. Scroll across and highlight the notification that you want to read, then press Select. The notification message will be displayed on the screen.
Clearing Notifications
You can clear individual notifications or clear all of them. To clear an individual notification highlight the notification then press the Options button. In the Options menu highlight Dismiss and press Select. The notification will be deleted. To clear all the notifications press the Options button, highlight Dismiss All and press Select. All of the notifications will be deleted.
Managing Notifications
For the Appstore related notifications Manage option may be available. Highlight the notification and press the Options button. Highlight Manage and press Select. You will be directed to the Notifications setting option in the Settings>Applications>Appstore menu. Press Select to turn off the notifications related to Appstore.
Notification Settings
In order to configure the notification settings clear all notifications first. Press the Options button while "No new notifications" message is displayed on the screen, then highlight Settings and press Select to see available options. 2 options will be available. Use the Do Not Interrupt option to hide or show all application notification pop-ups. Use the App Notifications option to block or unblock notifications from individual apps.
Profiles
You can use the profiles menu to switch between the profiles associated with your account. You can also edit them and add a new profile if you wish. For
more detailed configurations, you can use the Profile Settings option here to access the account and profile settings menu.
Account & Profile
The option to manage your Amazon Account settings may appear different depending on the registration status of the account. If you have registered with your Amazon Account the option will read Account & Profile Settings. Otherwise, it will read Amazon Account Sign In/Up. Here you can register/deregister your account or synchronise your purchased Amazon content.
Amazon Account
If you wish to remove your Amazon account from the TV you will need to deregister it. This will not delete your Amazon account it will just remove it from this TV. After deregistering your account this will remove content from your TV and many features will not work, until a new account is registered.
Highlight Amazon Account and press Select.
Then highlight Deregister and press Select to deregister your account. This will take a few seconds.
Important: Deregistering an account will NOT remove all personal data. To remove all personal data you will need to factory reset your TV. To do this go to Settings > Device & Software > Reset to Factory Defaults.
Once the account has been deregistered the Amazon Account Sign In/Up screen will be displayed so you can sign in using another account.
Sync Amazon Content
If you have purchased content such as movies, these can be viewed on other devices by synchronising Amazon content.
Highlight Sync Amazon Content and press Select. The word 'Synchronising' will appear. Your purchased content will now be viewable on other devices.
Prime Video
Information on where you can manage your subscriptions and transactions will be displayed.
Child Settings
Here you can manage child profile settings including adding content, setting time limits and managing your Child PIN.
Parental Controls
Your TV has some default protections which when enabled will require a PIN code to be entered for purchases, app launches and it will also restrict viewing of content rated Teen and above. Parental controls are set to OFF as default.
Highlight Parental Controls and press Select to switch parental controls on.
Note: You will be asked to enter a PIN to turn the parental controls on or off. This is the Prime Video PIN and it is related to your Amazon account. If you have forgotten your PIN follow the link shown on the screen to reset your PIN.
Profiles
Here you can manage the profiles associated with your account. Highlight Profiles and press Select.
Profile Sharing
Profile sharing allows Amazon Household adults to select each others profiles on Prime Video and Fire TV. Here you will find the site where you can change these settings.
Network
The Network menu has all the settings for connecting your TV to the internet. All the available networks will be shown here and this is where you can configure your network.
If you have connected your TV via an Ethernet cable or the Enable Network option is not set to Off, wireless networks will not be listed and wireless network related options will not be available.
Checking Network Status
Highlight Network in the Settings menu and press Select.
The Network menu will display the strongest 3 wireless networks your TV can find, your network is the one with the word ‘Connected’ written under it.
Highlight your network, if you're connected it will show Connected under the Network name. On the right of the screen it will show the Security of your connection. With your network highlighted press the Play/Pause button to check your network. You will see connection status of your network. Press the Back button to exit this screen. If you want to forget the network press the Options button while your network is highlighted.
Seeing All Networks
If you want to search for more networks, highlight See All Networks and press Select. You will now see a list of all the networks that your TV can find. If you scroll down to the bottom of the list you also have the option to rescan for networks.
Joining a Network Using WPS Button or PIN
If you can't remember your WLAN password using the WPS option temporarily disables your routers' password and allows you to connect to it without it.
Highlight your preferred WPS connection option and press Select, then follow the on-screen instructions.
Advanced Network Settings
If you are confident in using network setting you can manually setup a network by highlighting Join Other Network and pressing Select. You will have to manually type in all your desired network settings using the on-screen keyboard.
If you have connected your TV via an Ethernet cable you can also configure your network setting. This is also a more advanced setting for users that are confident in setting up networks.
Saving your WLAN Password to your Amazon Account
Your WLAN password can be saved to your Amazon Account, this can be helpful if you would like to connect other devices to the same network. The default setting is Off.
Highlight Save Wi-Fi Passwords to Amazon and press Select. Your WLAN password will now be saved in your account. It can be deleted at any time by turning this option off.
Turning on your TV via LAN and WLAN
Enable devices and apps that you select to turn on your TV via LAN and WLAN. Turning this option on may increase your TV's power consumption.
If you enable network connection this option will also be enabled automatically. Highlight Turn on with LAN and Wi-Fi and press Select to disable.
Changing Connection Status
If you did not enable the network connection during the initial settings process, you can use this option to enable it. Or you can disable it if you enabled priorly.
Highlight Enable Network and press Select to enable or disable the network connection. Refer to Connecting to the Internet section if you need more information.
Basic Wi-Fi Troubleshooting Tips
Here you can view tips like these and restart your Fire TV. Highlight Basic Wi-Fi Troubleshooting Tips and press Select.
Display & Audio
This menu houses all the settings and adjustments for your picture and sound as well as other settings such as, how your TV powers on, screen mirroring, screen saver setting and HDMI CEC device control.
Highlight Display & Audio in the Settings menu and press Select.
Picture Settings
Picture settings can be adjusted on each input, so each input can be set to have its own picture settings. For information on adjusting each setting refer to the Customising TV Settings section of this manual.
For adjusting picture setting while viewing your TV, press and hold the Home button and select Picture in the menu on the right hand side of the screen.
Audio Settings
Sound settings can be adjusted here, for information on adjusting each setting refer to the Customising TV Settings section of this manual.
For adjusting sound settings while viewing your TV, press and hold the Home button and select Sound in the menu on the right hand side of the screen.
Apple AirPlay & HomeKit
Stream from your Apple devices and control content with Apple AirPlay & HomeKit. You will be redirected to Apple AirPlay & HomeKit settings for setup and configuration.
Power Controls
The Power Control menu has 2 options: Power On and Voice Commands When TV Screen is Off.
Power On: The Power On setting allows you to choose which state you want your TV to switch on in, either the last input that you were watching or the Home screen.
Highlight Power On and press Select. Highlight Home or Last Input and press Select. A tick will appear next to your choice.
Voice Commands When TV Screen is Off: When enabled, you can give voice commands through a linked Alexa or Apple HomeKit-enabled device when your TV screen is off. Your TV screen will turn on to complete voice commands. Highlight this option and press Select. Select Yes and press Select.
Audio Output
The Audio Output menu has 6 options: TV Speakers, Audio output jack, Digital Audio Format, DTS DRC and Bluetooth Audio Sync.
Highlight Audio Output and press Select.
TV Speakers: In the TV Speakers menu you can switch your TV's built-in speakers on or off. You may wish to switch them off if you have connected a soundbar.
Highlight TV Speakers and press Select to switch the TV Speakers on or off.
Audio output jack: For 3.5 mm audio jack in back of TV. Select fixed for line output or variable for headphone.
Digital Audio Format: Depending on the type of audio device you have connected you may need to adjust the audio format that your TV outputs. The audio format can be changed here.
Highlight Digital Audio Format and press Select.
Highlight your desired audio format PCM, Dolby Audio, Pass-through and Auto then press Select. The default setting is Auto.
DTS DRC: The DTS DRC menu enables DTS DRC to be switched on or off.
Highlight DTS DRC and press Select to switch the DTS DRC on or off.
Bluetooth Audio Sync: If you have a Bluetooth speaker or headphones connected to your TV you might need to sync the audio to your device. Selecting this option will do this for you.
With your Bluetooth device connected to your TV highlight Bluetooth Audio Sync and press Select.
Enable Display Mirroring
Enable mobile devices to temporarily mirror their display to your TV, by making it discoverable. This referred to as Display Mirroring or Miracast on your device.
Highlight Enable Display Mirroring and press Select. Display Mirroring screen will be displayed. Your TV is ready now for display mirroring.
Navigation Sounds
While navigating menus and selecting items your TV will make a sound, this can be switched on and off here
Highlight Navigation Sounds and press Select to switch them on or off.
Screen Saver
When your TV is inactive for a few minutes the screen saver will activate. Pictures from the Amazon Collection will play. The screen saver menu gives you many options to change so that you can customise your screen saver. If your TV is not connected to the internet
Screen Saver option will not be available.
Highlight Screen Saver and press Select.
The Screensaver Settings menu will appear.
Current Screen Saver - Here you can change the screen saver album so it shows your pictures.
Slide Style - Change the way the pictures transition. Choose from Pan & Zoom or Dissolve.
Slide Speed - Adjust the time taken to change pictures. Choose from Slow, Medium or Fast.
Start Time - Set the time taken before the Screen Saver starts. Choose from 5, 10, 15 minutes or Never.
Date and Clock - Switch the date and clock information on or off.
Display Info - Switch the picture information on or off.
Alexa Hints - Switch the Alexa hints on or off.
Shuffle - Switch this option on if you want to display pictures in a random order.
HDMI-CEC Device Control
Allows your TV to control connected CEC-capable HDMI devices using your TV remote.
Playback, navigation and power on/off can all be accomplished via a single TV remote. Press Select to switch on or off.
If you have a CEC enabled device connected to your TV via a HDMI cable, this setting allows your TV remote control to also control selected functions of your connected device. For example the Standby button on your TV remote will also switch on your CEC enabled device.
The HDMI-CEC Device Control menu has 4 options: One-Touch Play, ARC, Power Control and Remote Control Pass-Through.
Highlight HDMI-CEC Device Control and press Select.
One-Touch Play: Use your TV as the primary source for playback. Highlight One-Touch Play and press Select. Allow, Always Ask and Deny options will be available. Highlight your desired option then press Select.
ARC: Use your HDMI cable connection to send audio from your TV to your soundbar or AV receiver. Highlight ARC and press Select to switch the on or off.
Power Control: Use your TV to turn on/off connected devices. Press Select to switch on or off.
Remote Control Pass-Through: Use your TV remote to control devices from other inputs. Press Select to switch on or off.
Preferred Live TV Language
Select your preferred primary or secondary audio and subtitle language for Live TV channels.
Subtitles
Enable or disable subtitles. If subtitles are enabled you can further choose your preferred subtitle languages.
Spoken Subtitles
Enable automatic playback of spoken subtitles in addition to main audio if available for current program.
Audio Description
Low volume, Medium volume, High volume and Off options will be available. Select Off to disable audio description or any other option to enable it. Certain programmes offer the possibility of choosing the volume of the audio description voice over. For such programmes your choice of volume will be automatically applied.
Hybrid TV (HbbTV)
Enable or disable red button interactive applications (HbbTV) on TV or radio channels.
"Do not track" request
Send "Do not track" requests while using red button applications (HbbTV). When enabled, this option enhances your privacy protection; however certain applications may offer limited content or functionality when this option is enabled.
Low signal strength alert
Enable or disable low signal strength alert.
Applications
The applications menu lets you manage all your apps. Highlight Applications and press Select.
Amazon Photos
Here you can change the Amazon photo app settings, you can allow others to cast photos from their Amazon Photos account to your TV, and you can also disable your account so it can't be viewed on your TV.
Highlight Amazon Photos and press Select.
Allow Guest Connections is switched on as default, if you don't want to allow other users to cast photos from their Amazon Photo accounts you can switch this feature off. Highlight Allow Guest Connections and press Select to switch the feature on and off.
If you want to stop seeing your photos from your Amazon Photos account you can disable the feature here. Access is enabled as default. Highlight Access Amazon Photos and press Select. Highlight Disable Amazon Photos and press Select. Your photos will now not be viewable on your TV. Don't worry your photos will not be deleted they will remain in your account.
Silk Browser
Configure the settings of the Amazon web browser.
Appstore
This menu allows you to control your app setting such as auto updates, in-app purchases and how to open external market links.
Highlight Appstore and press Select.
The Appstore menu will be displayed where you can select the following:
Automatic Updates: When automatic updates are enabled Appstore will automatically update your apps to the latest versions. If the permissions of the app are altered they will not be automatically updated, so you will review any changes before agreeing and updating. Press Select to switch on or off.
External Market Links: Gives you the choice of how you want external links to open. Press Select to see the available options: Open with the Amazon Appstore, Don't Open and Ask Before Opening. Highlight the option you prefer and press Select. A tick will appear next to your choice.
In-App Purchases: Some apps have in-app purchases that can be made, this setting lets you choose if you want to allow them or not.
Press Select to switch on or off.
Manage My Subscriptions: You can manage your subscriptions online.
Follow the link shown on the screen.
Notifications: Set to ON to display notifications relating to Appstore. Press Select to switch on or off.
Manage Installed Applications
Here you can manage all the apps on your TV. It will also show you the amount of available memory left on your TV. Highlight Manage Installed Applications and press Select.
The default setting is for it to show all apps, however if you highlight Show and press Select you get the options to show All Applications, Internal Only or USB Only.
A list of apps will be displayed, highlight the app that you'd like to manage and press Select.
Pre-installed apps have 3 options, apps that you have downloaded and installed have more options. If you uninstall an app it will still be available for you to download and re-install again in the future.
Pre-installed apps
You will have 6 options Force stop, Clear data, Clear cache, Clear Defaults, Open supported links, and Supported Links.
Installed apps
You will have some extra options: Permissions, Launch application and Uninstall.
Equipment Control
Soundbars and receivers can be connected to your TV and here they can be setup so that your Fire TV remote can control the connected device no matter how you connected it to your TV. This process might take some time.
Adding a Soundbar or Receiver
Highlight Add Equipment and press Select.
Highlight either Soundbar or Receiver depending on the product that you have connected then press Select.
Note: Make sure your soundbar or receiver is connected to your TV and switched on.
The following example shows how to setup a soundbar. Now you need to select the brand of your soundbar. Highlight the brand then press Select.
Make sure your soundbar is switched on and the volume is up then press Select.
Press Standby on your TV remote control, wait 10 seconds then press the Standby button again.
You'll now be asked 'Did your soundbar turn off and then back on when you pressed Standby'. If it did highlight Yes and press Select, if it didn't highlight No and press Select. You may need to repeat this process multiple times.
When your soundbar eventually turns off and on, you will be asked to press the volume up and down buttons. Press the Volume + and - buttons.
If your volume level adjusted as expected highlight Yes and press Select. If not select No and continue until the volume level changes.
Your Fire TV remote has now been setup, it will now switch your soundbar on and off and adjust the volume level.
Now when you switch your TV on your soundbar will also switch on. The TV speakers will be automatically switched off.
Soundbar/Receiver Settings
Once you have setup your soundbar or receiver you will now see either Soundbar or Receiver in the Equipment Control menu. This will show you all the settings for your device.
Highlight Soundbar or Receiver and press Select. You will now see a list of settings.
Highlight the setting that you wish to adjust and press Select.
Volume Increments: Set the amount the volume increases or decreases when you ask Alexa to change the volume. The default increment is set to 4.
Press Fast Forward or Rewind to increase or decrease the increments. Press Option to restore back to default settings.
Infrared Options: Changes the infrared options. IR Profile, Timing, Repetition and IR Controller options will be available.
Power Controls: Adjusts the power on/off settings for your soundbar or receiver. Power On Delay and Power Control options may be available.
Fire TV Input: Change the input, to which your soundbar or receiver will switch to for watching Fire TV.
Change Soundbar/Change Receiver: If you would like to change the soundbar or receiver that's connected to your TV highlight Change Soundbar/Change Receiver and press Select. To remove the device highlight Change Soundbar/Change Receiver and press the Option button.
Restore Soundbar Defaults/Restore Receiver Defaults: Restores all the settings that you may have changed back to factory defaults. This option will be available if you change the default settings.
Advanced Settings
Adjust the power timing if your soundbar or receiver does not switch on/off.
Press Fast Forward or Rewind to increase or decrease the increments.
Press Option to restore back to default settings.
Live TV
This menu allows you to tune in your TV, manage the channels, set up a CI card and set parental controls.
Highlight Live TV and press Select.
Channel Scan
You should have already tuned in your TV during the initial setup process. But if you skipped the channel scan step or if you need to retune your TV follow these instructions.
Highlight Channel Scan and press Select.
You will be prompted to check that your antenna is set up and that the cable is plugged properly into the antenna input socket on your TV. Press Select to proceed.
Select your scanning preference to install channels. Terrestrial, Cable and Satellite options will be available.
If the Terrestrial option is selected, the TV will search for digital terrestrial broadcasts. Select the search method on the next screen and press Select to start the search. If you continue with the manual scan, you will need to configure the Frequency and UHF Band options before starting the scan.
If the Cable option is selected, the TV will search for digital cable broadcasts. On the next screen, select the cable provider, if any available, or the search method, then press Select to start the search. You may need to configure the Network ID and Frequency options before starting the scan.
If the Satellite option is selected, you can choose an operator on the next step, if any available. You can also choose to perform complete or manual scan. Highlight the option you prefer and press Select button to proceed. If you continue with manual or complete scan option, you will have to select the satellite in the next step. Then the Satellite Connection screen will be displayed next. You can set the LNB Type, LNB Power, DiSEqC Version, Port, Single Cable, ToneBurst, and Scan Mode parameters of the selected satellite corresponding to your environment on this screen. Depending on your previous selections, some options may not be available or may be set automatically. Change if necessary and proceed.
When you are finished, press the Play/Pause button. The TV will start to search available broadcasts.
You will be asked at some point whether you want to clear existing channels, if you have installed channels previously using the same search option. Highlight Yes, Clear Channels and press Select. All the previously tuned in channels will be deleted. Highlight No, Keep Channels and press Select to proceed without clearing existing channels.
While the search continues you can press the Select button to cancel. When the search is completed the results will be displayed. You can choose to make changes on the channel list or rescan at this point. Highlight Done and press Select to finish the setup.
Automatic Service Update
You can allow your TV to automatically scan for network operator changes when TV enters standby mode. Press Select to turn this feature on and off.
Favourite Channels
You can view and manage your favourite channels here.
Highlight Favourite Channels and press Select.
If you do not have any favourite channels go to Manage Channels menu to add channels by pressing the Select button. Then select the channel source to view the channel list. Highlight a channel and press Select to add this channel to your favourites. You can make multiple selections.
If you have priorly added channels to your favourites you can press Select to select the channels you want to remove from your favourites.
Manage Channels
Manage your favourite channels and select the channels you want to display.
Highlight Manage Channels and press Select. Then select the channel source. Terrestrial Channels, Cable Channels, and Satellite Channels options will be available. Available options may differ depending on the currently installed channels.
You will now see the channel list with several tabs: All, Favourites, Free, Encrypted, Audio, HD, SD, and Hidden. Available tab options may differ depending on the installed channels.
All will show all the channels, Favourites will show all the channels you marked as favourite channels and Hidden will show all the hidden channels. Other tabs will work according to the same logic.
In the All tab you can choose to add a channel to the favourites list by pressing Select or you can hide a channel by pressing Play/Pause. To change the channel number press Rewind and to move a channel from the channel list press Fast Forward. Press the
Options button to view the Sort Options menu. You can sort the channels using the options of this menu. You can also import or export the customised channel list using the relevant options in the Sort Options>Advanced Options menu.
CI Card
Access your CI Card settings and information.
Parental Controls
Restrict over-the-air films, TV shows, purchasing and certain types of content.
Highlight Parental Controls and press Select.
The default setting is Off so press Select to switch on.
Note: You will be asked to enter a PIN to turn the parental controls on or off. This is the Prime Video PIN and it is related to your Amazon account. If you have forgotten your PIN follow the link shown on the screen to reset your PIN.
The first time you enable Parental Controls you'll see some brief information about the settings. Press Select to continue.
You'll now see all the settings that can be adjusted. Highlight your desired setting and press Select.
Parental Controls: Press Select to switch parental controls on or off.
PIN-Protect Purchases: Asks for a PIN before any video, apps or games purchases. Press Select to turn on or off.
Prime Video Ratings: Restricts viewing of videos based on ratings. The default setting for General and Family rating is On, for Teen, Young Adults and Mature ratings is Off. Highlight the desired rating option and press Select to change the setting.
Note: These settings apply to Prime Video (including Amazon Channels). Content from other service providers may have their own restriction settings.
Broadcast Ratings: Use ratings to restrict the viewing of Live TV programmes from over-the-air broadcast TV accessed directly from the Fire TV user interface, such as Guide or On Now row. Visit third-party apps to manage settings for content accessed within those apps.
• DVB 4 (Child) - DVB 18 (Adult)
- All settings are switched on by default
PIN-Protect App Launches: Asks for a PIN before launching apps and games. This setting will not apply to the content accessed directly from the Fire TV user interface, such as the Guide or On Now row. Press Select to turn on or off.
PIN-Protect Amazon Photos App: Asks for a PIN before launching Amazon Photos. This setting will be ignored if you have already set PIN-Protect App Launches to ON. Press Select to turn on or off.
Change PIN: Change the Prime Video PIN. First enter your current PIN, then enter your new PIN.
If you have forgotten your PIN follow the link shown on the screen to reset your PIN.
Sync Sources
Sync your Live TV sources to refresh the data on this device.
Remotes & Bluetooth Devices
You can add extra voice remote to your TV, or you may also need to replace one if your old one broke. Other bluetooth devices like speakers, games controllers, mice and keyboards can also be connected via bluetooth.
Voice Remotes with Alexa
Check the status of your current voice remote with Alexa or add a new one.
Highlight Voice Remotes with Alexa and press Select.
Remote Status
To see the status of your current voice remote highlight the remote option and look at the right hand side of the screen. You will see the type of remote control, the battery status, the version number and its serial number.
To unpair the remote press the Options button while the remote option is highlighted then press Select to confirm. The Options button will have no function if only one remote is paired.
Add New Remote
Highlight Add New Remote and press Select.
You'll see the word 'Searching' appear, press and hold the Home button on the new remote control for 10 seconds. When the remote has been discovered it will appear in the list.
Game Controllers
Bluetooth gaming controllers can be connected to your TV which can be used to enjoy all the gaming apps on your TV.
Highlight Game Controllers and press Select.
Highlight Add New Game Controller and press Select to search for new controllers.
You'll see the word 'Searching for Controllers' appear on the right hand side of the screen. Make sure your controller is discoverable and ready to pair. Follow the on-screen instructions. When the controller has been discovered it will appear in the list. Select your controller from the list.
Other Bluetooth Device
You can connect other bluetooth devices such as a mouse or a keyboard, which can be handy when using the internet browser.
Highlight Other Bluetooth Devices and press Select.
Make sure your bluetooth device is in pairing mode and then highlight Add Bluetooth Devices and press Select.
Your device will appear in the list, this could take a minute or so. Then highlight the device and press Select to connect the device.
Alexa
This menu has more information about the Alexa app and examples of things to try.
Highlight Alexa and press Select.
Alexa App
To find out more information about the Alexa application and where to download it select Alexa app. You will need this app if you want to let your Amazon Echo speakers control your TV. The app is the place where you'll be able to connect all your Amazon devices together.
Highlight Alexa app then press Select, you will now see information about the application and where to download it.
Things to Try
For lots of examples of what you can use Alexa for, look in this section. You will find many ideas.
Highlight Things to Try then press Select, you will see a list of things to try.
Highlight something in the list and then press Select to see more information.
Preferences
The preferences menu is where you'll find adjustment to lots of the settings on your TV. Things like parental controls, privacy and data setting and restricting access to certain content and purchases.
Highlight Preferences and press Select.
Parental Controls
Your TV has some default protections which when enabled will require a PIN code to be entered for purchases, app launches and it will also restrict viewing of content rated Teen and above. Parental controls are set to OFF as default.
Highlight Parental Controls and press Select to switch parental controls on.
Note: You will be asked to enter a PIN to turn the parental controls on or off. This is the Prime Video PIN and it is related
to your Amazon account. If you have forgotten your PIN follow the link shown on the screen to reset your PIN.
Refer to Parental Controls section under the Live TV Menu title for more information.
Privacy Settings
You can manage all of your TV's privacy settings here. Highlight Privacy Settings and press Select.
You will now see a list of all the settings that can be adjusted, highlight the setting that you would like to adjust and press Select. The possible settings are as follows.
Cookie consent: Allows use of cookies, device identifiers and similar tools to enhance your advertising experience on this Fire TV device. Visit amazon.co.de/deviceprivacy to make more detailed choices.
Device Usage Data: Allows use of personal data collected by operating system of this TV for marketing and product improvement purposes. The default setting is ON (Allow). Highlight and press Select. You will be informed about this feature. Use directional buttons to read the entire text. To turn this feature off highlight Turn Off and press Select.
Collect App and Broadcast Usage Data: Allows Amazon to collect information relating to your use of broadcast TV content, as well as the frequency and duration of your use of third-party apps. The default setting is ON (Allow). Highlight and press Select. You will be informed about this feature. To turn this feature off highlight Turn Off and press Select.
Interest-based Ads: If you opt out of interest-based ads on your TV, apps will be instructed not to use the advertising ID to build profiles for advertising purposes or target you with interest-based ads on your TV. The advertising ID is a resettable identifier that can be used to build profiles or show you interest-based ads. The default setting is ON (Allow). To turn this feature off press Select.
Your Advertising ID: Shows your Advertising ID on the right hand side of the screen. Press Options button to reset your ID. A confirmation dialogue will be displayed. Highlight OK and press Select to reset. This option will be available if the Interest-based Ads option is set to ON.
Data Usage Monitoring
You can manage all your data usage here.
Highlight Data Usage Monitoring and press Select to switch on and adjust any settings. Data monitoring is set to OFF as default.
Data Usage Monitoring: Switching on allows you to monitor your data consumption. The default setting is OFF.
Set Video Quality: This allows you to choose the video quality on Amazon Video. The default setting is
Best. Available options are Good (least amount of data used), Better and Best (most amount of data used).
Set Data Alert: Set a data limit and receive on-screen alerts when consumption reaches 90% and 100% of the limit. This is just an alert and will not block data consumption.
Monthly Top Data Usage: Displays a list of your apps and shows individual data usage for the monthly billing cycle specified in the Set Data Alert option.
Notification Settings
You can manage all your notifications here, turn off all notification pop-ups or block/unblock notifications from specific apps.
Highlight Notification Settings and press Select.
To switch on/off notification pop-ups highlight Do Not Interrupt and press Select.
To block or unblock notifications from individual apps, highlight App Notifications and press Select. You'll see a list of your apps, it will show if notifications are on or off. To adjust this highlight an app and press Select to switch between ON and OFF.
Featured Content
The Home screen has featured content at the top, when you select this content it will play a preview of the content. In this menu you can choose if the content plays or not and also switch the audio of this content on and off.
Highlight Featured Content and press Select.
Highlight either Allow Video Autoplay or Allow Audio Autoplay and press Select to switch the feature on or off. The default setting is ON for both.
Allow video autoplay
ON - The video will automatically play.
OFF - A still image will appear and no audio will be heard.
Allow audio autoplay
ON - Audio will be heard when the video plays.
OFF - No audio will be heard when the video plays.
Auto Turn Off
Your TV will automatically switch off after 4 hours of no activity. This feature is to help save energy if your TV was accidentally left on. If you have been watching your TV for 4 hours without pressing any buttons, a warning will appear telling you its about to turn off. If you wish to continue watching at this stage highlight OK and press Select.
To switch off this feature, highlight Auto Turn Off and press Select. Then highlight Turn Off and press Select. Your TV will now not switch off after 4 hours of inactivity.
HbbTV
Enables Hybrid Broadcast Broadband TV on your TV. Highlight HbbTV and press Select to switch on or off.
Sync Recent Content
You can include Prime Video titles watched on other devices in the Recent row on this device.
Highlight Sync Recent Content and press Select to switch this feature on or off.
Location
Its handy that your TV knows where it is in the world so when you ask Alexa a question like 'Alexa, what's the weather outside?' it can tell you the weather in your location. Download and install the Alexa app on your mobile device, then select Device > Echo & Alexa. Select your Fire TV from the list, then enter your device's location.
Time Zone
In this menu you can set your clock to display as a 24 hour clock and you can also change your time zone.
Highlight Time Zone and press Select.
To switch 24 hour time format on/off highlight 24-Hour Time and press Select.
To change your time zone, highlight Time Zone and press Select.
Sync Date and Time
Your TV will automatically synchronise date and time with an internet time server. If you switch this feature off your TV will sync with broadcast time. This may result in network connection and playback issues. You must restart your Fire TV if you choose to switch this feature on again.
Highlight Sync Date And Time and press Select to switch it on or off.
Language
You can change the system language.
Highlight Language and press Select.
Choose your desired language from the list of languages and press Select.
Metric Units
This option will be set to ON by default. Temperatures and distances will be displayed in metric units.
Highlight Metric Units and press Select to switch on or off.
Sleep Timer
The sleep timer function lets you set a countdown to when your TV will switch off, so that you can fall asleep while watching TV knowing it will automatically switch off. You can set a countdown from 5 - 240 minutes.
Highlight Sleep Timer and press Select.
Highlight the amount of time you want until your TV switches off and then press Select.
A countdown will start in the bottom corner of the screen. You can also switch off the countdown by highlighting Off and pressing Select.
Note: The TV will switch off once the sleep time has elapsed, no warning will be shown.
Device & Software
This menu will give you information about your TV, show you legal and compliance documents. You can also restart or reset your TV back to factory defaults.
Highlight Device & Software and press Select.
About
If you need to find out any information about your TV it should be displayed here. You'll also see storage and network information and you will also be able to check for any available software updates.
Highlight About and press Select.
Your TV: Displays information related to your TV.
Storage: Shows the available storage space on your TV and on any external device that's connected.
Network: Displays all the information related to network setting.
Check for Updates: Displays your current software version and when it was last updated. Press Select to check for any new updates. If an update is available this option will appear as Install Update. In this case, you can press Select to install the update.
USB Drive
This menu will show you the available space on your drive. You will also be able to eject the drive or manage installed applications. This menu will only appear if you have a USB drive connected.
Highlight USB Storage Status. The space available will be shown on the right hand side of the screen.
Eject USB Drive
Highlight USB Drive and press Select.
Then highlight Eject USB Drive and press Select. Now remove your drive from the USB socket. The menu will return back to the Device & Software root menu.
Formatting a USB Drive
Important: Formatting the USB drive will erase all information on the USB drive. Once formatted this USB drive can only be used by this TV.
Select this option if you intend your TV to use apps stored on this drive.
Highlight Format to Internal Storage then press Select.
When formatting is complete select OK.
Manage Installed Applications
Select this option to manage installed applications from both Amazon and other sources.
Legal & Compliance
To read all the legal and compliance notices regarding your TV select this menu.
Highlight Legal & Compliance then press Select.
Note: Your TV will need to be connected to the internet to access Legal & Compliance information.
Sleep
Your TV can be put to sleep.
Highlight Sleep then press Select. Your TV will go to sleep. You can wake it up again by pressing the Standby or Select button.
Restart
If for some reason your TV is slow or locking up you may want to restart it. This will re-boot your TV.
Highlight Restart then press Select. Confirm you want to restart by selecting Restart and then press Select. Your TV will now restart, this will take a few seconds.
Reset to Factory Defaults
If you want to totally reset your TV select Reset to Factory Defaults. This will remove all personal data and downloaded content from your TV. You should do this if you sell your TV or give it to someone.
Highlight Reset to Factory Defaults then press Select. Confirm you want to reset by selecting Reset and then press Select. Your TV will now reset itself back to the state it left the factory. This process will take a few minutes.
Accessibility
This menu has accessibility options where you can switch on Subtitle, Alexa Subtitles, VoiceView, Text Banner, Screen Magnifier, High-Contrast Text, Audio Description, Spoken Subtitles for Broadcast Channels and Feedback & Support.
Highlight Accessibility and press Select.
Subtitle
Displays subtitles on all video content when available. Press Select to switch subtitles on and see more options.
Alexa Subtitles
Displays subtitles for Alexa responses when available. Press Select to switch subtitles on and see more options.
VoiceView
Provides spoken feedback as you navigate items on the screen. Manage voice guidance settings including turning VoiceView on and off, reading speed and volume.
Text Banner
Displays text related to the focused item in a box with customisable font size, colours and more. Toggle the text banner on and off.
Screen Magnifier
Enables the use of button combinations to magnify the screen. Only for use when viewing the Home screen or menus.
Highlight Screen Magnifier and press Select.
The button combinations will be displayed. Highlight OK and press Select to continue. Highlight TURN OFF MAGNIFIER and press Select to turn it off.
You can also press and hold the Back and Fast Forward buttons to activate/deactivate screen magnifier.
Once the magnifier is activated you will see a yellow box at the top of the screen. Press Options button and a directional button at the same time to pan around the screen.
High-Contrast Text
Changes text to black or white and adds a border.
Audio Description
This setting controls the volume of the descriptive track related to the normal track for over-the-air channels and Prime Video content.
Highlight Audio Description and press Select.
Highlight the option you want and press Select to set. You can set Over-the-Air Channels option to Off, Low, Medium or High and the Prime Video option to ON or OFF.
Spoken Subtitles for Broadcast Channels
Speaks subtitles of supported broadcast content. Press Select to turn it on or off.
Feedback & Support
Your suggestions are important and help us improve the accessibility of Fire TV. Please e-mail us at device-accessibility@amazon.com, and mention you are using a Fire TV.
If you need help now, please contact Amazon customer service.
Help
If you are struggling to understand how your TV work and you need a little help then you should take a look at this menu. It will show you helpful videos and quick
tips about your TV. It will also give you contact details for getting support about any issue you have.
Highlight Help then press Select.
Help Topics
Your TV has helpful videos that you can watch to help you understand how to use your TV.
Note: New helpful video will be added every time your TV updates, so the amount of content here will change from time to time.
Get More Help
If you feel you need more help with your TV, select the related section where you will find details of how to get in touch with a support team.
Highlight Have Us Call You and press Select.
Suggestions
Highlight Send Feedback to display information on where you can send us feedback about your Fire TV experience.
Channel List
The TV stores and shows all channels in the channel list. When a TV channel is turned on in Live TV mode programme information will be displayed. You can also press the Live button (availability depends on the model of the remote) to display programme information. Press the Down directional button to see the channel list. You can press the Left and Right directional buttons to scroll through the list.
Use the directional buttons and the Select button to navigate the channel list, change channel and view additional information on programmes.
Press the Down directional button twice when the channel list first appears to see the options menu. You can set the subtitle and audio preferences and access the channel guide using the related options of this menu.
Refer to Channel Guide section for information on managing channels.
Channel Guide
By means of channel guide function of your TV you can browse the event schedule of the currently installed channels on your channel list. It depends on the related broadcast whether this feature is supported or not.
In order to access the channel guide press the Guide button on the remote. You can also press the Down directional button and then the Left directional button when watching Live TV channels to open the channel guide.
Use the directional buttons to navigate through the channel guide. You can use the Up/Down directional
buttons to switch to previous/next channel on the list and Right/Left directional buttons to select a desired event of the currently highlighted channel. If available, the full name, start and end times and a brief description of the highlighted event will be displayed on the screen. Press Select to view full details of the event.
Filter Channels
You can filter the channels listed in the channel guide. Press the Guide button or press the Up directional button consecutively to see the filtering options on the top of the channel guide. You have the choice here to filter via one of these options. Just highlight the option you want. You will only see the channels that match the selected filter option. You can use the All option to cancel filtering in the channel guide.
Guide Options
Press the Options button to display available options in the channel guide. You can filter channels, add channels to your favourite channel list or open the channel management menu using these options. Highlight the one you want to use and press Select.
Add to Favourite Channels
Channels can be added to your favourite channel list so you can quickly and easily view your favourite channels without scrolling through the whole list of channels. You will see a heart symbol next to the channel which is added to your favourite channel list.
If a channel is already added to the favourites previously, the Remove from Favourite Channels option will be available in the options menu instead of the Add to Favourite Channels option. You can use this option to remove the channel from favourite channel list.
Manage Channels
You can see all your channels, create favourite channels or hide channels that you don't want to appear in the channel guide. The channels will be listed in 3 tabs; All, Favourites and Hidden.
In the All tab highlight a channel in the list and press the Select button to add it to favourites. Favourite channels will be listed in the Favourites tab. If the channel is already in the favourites list, it will be removed from the list when the Select button pressed.
In the All tab highlight a channel in the list and press Play/Pause button to hide it. Hidden channels will be listed in the Hidden tab. If the channel is already hidden, it will be visible again in the channel guide when the Select button pressed.
Connecting to the Internet
You can access the Internet via your TV, by connecting it to a broadband system. It is necessary to configure the network settings in order to enjoy a variety of streaming content and internet applications. These settings can be configured from Settings>Network menu.
Wired Connection
Connect your TV to your modem/router via an Ethernet cable. There is a LAN port on the rear side of your TV. Your TV will automatically connect to the network. If it doesn't, you will need to enable the network connection manually using the Enable Network option in the Network menu. Highlight this option and press Select to enable.
You can check the status of the connection using the Ethernet Configuration option in the Network menu. Highlight this option and press Play/Pause button on the remote to see the network status.
To configure your wired connection settings manually highlight Ethernet Configuration and press the Select button. Follow the on-screen dialogues to proceed and enter the required values respectively.
If the Ethernet cable is not connected, depending on the current connection status, Configure Ethernet Connection or Configure Network option will be available instead of Ethernet Configuration option.
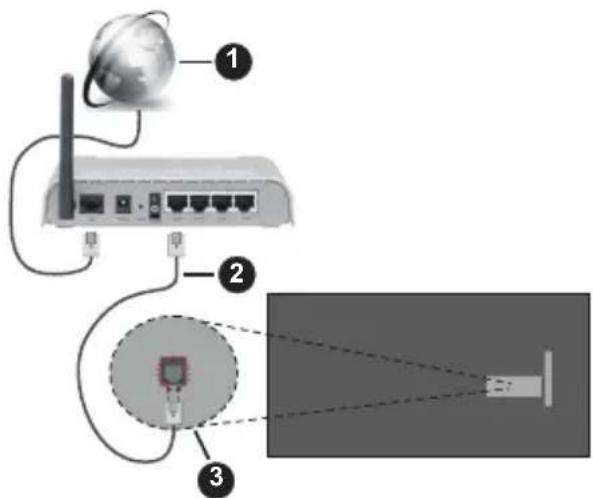
-
Broadband ISP connection
-
LAN (Ethernet) cable
-
LAN input on the rear side of the TV
You might be able to connect your TV to a network wall socket depending on your network's configuration. In that case, you can connect your TV directly to the network using an Ethernet cable.
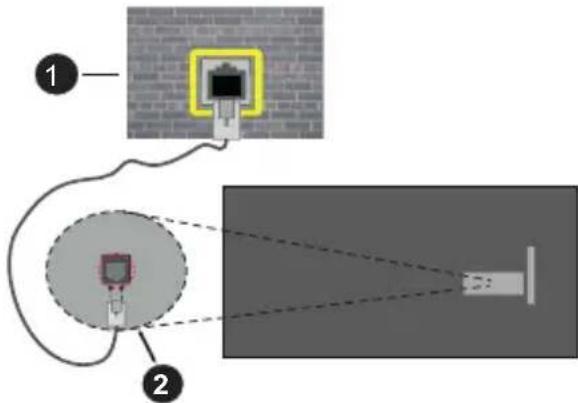
-
Network wall socket
-
LAN input on the rear side of the TV
Wireless Connection
A wireless LAN modem/router is required to connect the TV to the Internet via wireless LAN.
Highlight Enable Network option in the Network menu and press Select to enable wireless connection. Then disconnect the Ethernet cable, if connected priorly. Some of the available networks will be listed. Highlight See All Networks and press Select to see the complete list.
If you prefer to connect your TV to your network via WLAN you have 3 ways to do this.
- Highlight one of the listed available wireless networks and press Select. Then enter the password if the network is password protected.
- Use the WPS button on your router. Highlight Join Network Using WPS (Button) option and press Select. Press the WPS button on your router. Your TV will connect to your router, without the use of a password.
Note: During the initial setup process Connect using WPS Push Button option will be available instead of Join Network Using WPS (Button) option.
- Enter WPS PIN on your router. Highlight Join Network Using WPS (PIN) option and press Select. A code will be created and displayed on the screen. Enter this code on your router. Your TV will connect to your router, without the use of a password.
Note: During the initial setup process Connect using WPS PIN option will be available instead of Join Network Using WPS (PIN) option.
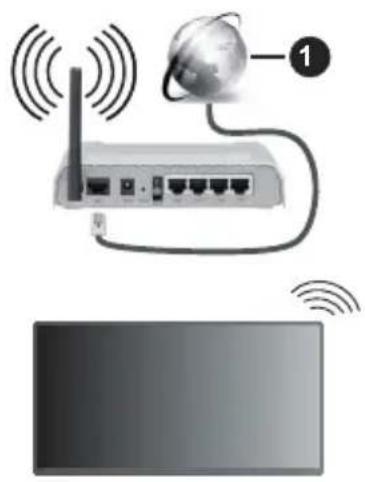
natural_image
Diagram showing a router connected to a globe and a monitor, with wireless signal waves above (no text or symbols)1. Broadband ISP connection
A network with hidden SSID can not be detected by other devices. If you want to connect to a network with hidden SSID, highlight the Join Other Network option under the Network menu and press Select. Add the network by entering its name, security type and password manually. If you want to configure additional settings of the network manually, highlight Advanced when prompted and press Select. Follow the on-screen instructions to proceed and enter the required values respectively.
If you want to save the wireless network passwords to Amazon you can use the Save Wi-Fi Passwords to Amazon option. To delete saved passwords turn this option off.
A Wireless-N router (IEEE 802.11a/b/g/n/ac) with 2.4 and 5 GHz bands is designed to increase bandwidth. These are optimised for smoother and faster HD video streaming, file transfers and wireless gaming.
Use a LAN connection for quicker data transfer between other devices like computers.
The transmission speed differs depending on the distance and number of obstructions between the transmission products, the configuration of these products, the radio wave conditions, the line traffic and the products that you use. The transmission may also be cut off or may get disconnected depending on the radio wave conditions, DECT phones or any other WLAN 11b appliances. The standard values of the transmission speed are the theoretical maximum values for the wireless standards. They are not the actual speeds of data transmission.
The location where the transmission is most effective differs depending on the usage environment.
The Wireless feature of the TV supports 802.11 a,b,g,n & ac type modems. It is highly recommended that you should use the IEEE 802.11ac communication protocol in order to avoid any possible problems while watching videos.
You must change your modem's SSID when there are any other modems around with the same SSID. You can encounter connection problems otherwise. Use a wired connection if you experience problems with a wireless connection.
A stable connection speed is required to play back streaming content. Use an Ethernet connection if the wireless LAN speed is unstable.
Specification
| Digital Reception | Fully integrated digital terrestrial-cable-satellite TV(DVB-T-C-S)(DVB-T2, DVB-S2 compliant) |
| Channel Indicator On | Screen Display |
| RF Aerial Input 75 Ohm | (unbalanced) |
| Operating Voltage 220 | -240V AC, 50Hz. |
| Audio | DTS HDDTS VIRTUAL:X |
| Headphone 3.5 mm mini stereo jack | |
| Networked Standby Power Consumption (W) | < 2 |
| Audio Output Power (WRMS.) (10% THD) | 2 x 2,5 W |
| Power Consumption (W) | 45 W |
| Weight (Kg) | 3,75 Kg |
| TV Dimensions DxLxH (with foot) (mm) | 134 x 553 x 372 |
| TV Dimensions DxLxH (without foot) (mm) | 63 x 553 x 334 |
| Display | 16/9 24" |
| Operation temperature and operation humidity | 0°C up to 40°C, 85% humidity max |
For more product information, please visit EPREL: https://eprel.ec.europa.eu.
EPREL registration number is available on https://eprel.panasonic.eu/product.
Wireless LAN Transmitter Specifications
| Frequency Ranges | Max Output Power |
| 2400 - 2483,5 MHz (CH1 - CH13) < 100 | mW |
| 5150 - 5250 MHz (CH36 - CH48) < 200 | mW |
| 5250 - 5350 MHz (CH52 - CH64) < 200 | mW |
| 5470 - 5725 MHz (CH100 - CH140) < 200 | mW |
Country Restrictions
The Wireless LAN equipment is intended for home and office use in all EU countries, the UK and Northern Ireland (and other countries following the relevant EU and/or UK directive). The 5.15 - 5.35 GHz band is restricted to indoor operations only in the EU countries, in the UK and Northern Ireland (and other countries following the relevant EU and/or UK directive). Public use is subject to general authorisation by the respective service provider.
| Country Restriction | |
| Russian Federation Indoor use only | |
The requirements for any country may change at any time. It's recommended that user checks with local authorities for the current status of their national regulations for both 2.4 GHz and 5 GHz wireless LAN's.
Standard
IEEE 802.11.a/b/g/n
Host Interface
USB 2.0
Security
WEP 64/128, WPA, WPA2, TKIP, AES, WAPI
Notice
DVB / Data broadcasting / IPTV functions
- This TV is designed to meet the standards (as of March, 2021) of DVB-T / T2 (MPEG2, MPEG4-AVC(H.264) and HEVC(H.265)) digital terrestrial services, DVB-C (MPEG2, MPEG4-AVC(H.264) and HEVC(H.265)) digital cable services and DVB-S (MPEG2, MPEG4-AVC(H.264) and HEVC(H.265)) digital satellite services.
Consult your local dealer for availability of DVB-T / T2 or DVB-S services in your area.
Consult your cable service provider for availability of DVB-C services with this TV.
- This TV may not work correctly with the signal which does not meet the standards of DVB-T / T2, DVB-C or DVB-S.
- Not all the features are available depending on the country, area, broadcaster, service provider, satellite and network environment.
- Not all CI modules work properly with this TV. Consult your service provider about the available CI module.
- This TV may not work correctly with CI module that is not approved by the service provider.
- Additional fees may be charged depending on the service provider.
- The compatibility with future services is not guaranteed.
- Internet apps are provided by their respective service providers, and may be changed, interrupted, or discontinued at any time.
Panasonic assumes no responsibility and makes no warranty for the availability or the continuity of the services.
- Panasonic does not guarantee operation and performance of peripheral devices made by other manufacturers; and we disclaim any liability or damage arising from operation and/or performance from usage of such other maker's peripheral devices.
Licences
The terms HDMI, HDMI High-Definition Multimedia Interface, HDMI trade dress and the HDMI Logos are trademarks or registered trademarks of HDMI Licensing Administrator, Inc.

Manufactured under licence from Dolby Laboratories. Dolby, Dolby Audio, and the double-D symbol are trademarks of Dolby Laboratories Licensing Corporation.
For DTS patents, see http://patents.dts.com. Manufactured under licence from DTS Licensing Limited. DTS, DTS-HD, Virtual:X, and the DTS-HD logo are registered trademarks or trademarks of DTS, Inc. in the United States and other countries. © 2022 DTS, Inc. ALL RIGHTS RESERVED.
dts HD.
The Bluetooth ^® word mark and logos are registered trademarks owned by the Bluetooth SIG, Inc. and any use of such marks by Vestel Elektronik Sanayi ve Ticaret A.S. is under licence. Other trademarks and trade names are those of their respective owners.
This product contains technology subject to certain intellectual property rights of Microsoft. Use or distribution of this technology outside of this product
is prohibited without the appropriate licence(s) from Microsoft.
Content owners use Microsoft PlayReady™ content access technology to protect their intellectual property, including copyrighted content. This device uses PlayReady technology to access PlayReady-protected content and/or WMDRM-protected content. If the device fails to properly enforce restrictions on content usage, content owners may require Microsoft to revoke the device's ability to consume PlayReady-protected content. Revocation should not affect unprotected content or content protected by other content access technologies. Content owners may require you to upgrade PlayReady to access their content. If you decline an upgrade, you will not be able to access content that requires the upgrade.
The "CI Plus" Logo is a trademark of CI Plus LLP.
This product is protected by certain intellectual property rights of Microsoft Corporation. Use or distribution of such technology outside of this product is prohibited without a licence from Microsoft or an authorised Microsoft subsidiary.
Amazon, Alexa, Fire, Prime Video and all related logos are trademarks of Amazon.com, Inc. or its affiliates.

Advance™
Covered by patents at patentlist,accessadvance.com
Disposal of Old Equipment and Batteries


Only for European Union and countries with recycling systems
These symbols on the products, packaging, and/or accompanying documents mean that used electrical and electronic products and batteries must not be mixed with general household waste.
For proper treatment, recovery and recycling of old products and batteries, please take them to applicable collection points in accordance with your national legislation.
By disposing of them correctly, you will help to save valuable resources and prevent any potential negative effects on human health and the environment.
For more information about collection and recycling, please contact your local municipality.
Penalties may be applicable for incorrect disposal of this waste, in accordance with national legislation.
Note for the battery symbol (bottom symbol):
This symbol might be used in combination with a chemical symbol. In this case it complies with the requirement set by the Directive for the chemical involved.

Declaration of Conformity (DoC)
Hereby, Panasonic Marketing Europe GmbH, declares that this TV is in compliance with the essential requirements and other relevant provisions of the Directive 2014/53/EU.
If you want to get a copy of the original DoC of this TV, please visit the following website:
http://www.ptc.panasonic.eu/compliance-documents
Authorized Representative:
Panasonic Testing Centre
Panasonic Marketing Europe GmbH
Winsbergring 15, 22525 Hamburg, Germany
Web Site: http://www.panasonic.com
Inhaltsverzeichnis
natural_image
Diagram of a solar panel with a small component and a magnified inset showing a pin labeled 'x2' (no text or symbols on the panel itself)natural_image
Simple line drawing of a monitor with an upward arrow pointing to the bottom portion of the screen (no text or symbols)natural_image
Diagram of a device mounted on a platform with a magnified inset showing a screw and x4 label (no text or symbols beyond the label)natural_image
Simple diagram showing a circle with four dots and a dashed outline, labeled 'd' pointing to the circle (no text or symbols beyond label)| (d) | Schraubenlänge (c) | min. 7 mm |
| max. 10 mm | ||
| Durchmesser M4 | ||
natural_image
Diagram showing a mechanical component with red directional arrows and a warning symbol, enclosed in a circular frame (no readable text or labels)natural_image
Simple diagram showing a gray rectangular area with a black circular inset containing a dot, no text or symbols present.natural_image
Diagram showing a router connected to a globe and wireless signal waves, with a screen below (no text or symbols)WEP 64/128, WPA, WPA2, TKIP, AES, WAPI.
Hinweis
Panasonic Testing Centre
Panasonic Marketing Europe GmbH
Winsbergring 15, 22525 Hamburg, Germany
Website: http://www.panasonic.com
Table des matières
natural_image
Technical diagram of a mechanical component with grid pattern and labeled part 'x2' (no text or symbols beyond label)natural_image
Diagram of a device with an upward arrow pointing to a component, no text or symbols presentnatural_image
Diagram of a device mounted on a platform with a magnified inset showing a screw and 'x4' label (no text or symbols on the diagram itself)natural_image
Simple diagram showing a circle with four dots and a dashed outline, labeled 'd' pointing to the circle (no text or symbols beyond label)natural_image
Diagram showing a device inside a vehicle cabin with directional arrows and a warning symbol (no readable text or labels)natural_image
Pure diagram of a mechanical component with a circular feature and a rectangular inset (no text or symbols)natural_image
Diagram showing a router connected to a globe and wireless signal waves, with a monitor below (no text or symbols)WEP 64/128, WPA, WPA2, TKIP, AES, WAPI
Remarque
Panasonic Testing Centre
Panasonic Marketing Europe GmbH
Winsbergring 15, 22525 Hamburg, Germany
Site Internet : http://www.panasonic.com
Tabla de contenido
natural_image
Diagram of a solar panel with a small component and a magnified inset showing a cylindrical component labeled 'x2' (no text or symbols on the panel itself)natural_image
Simple line drawing of a monitor with an upward arrow pointing to the bottom panel (no text or symbols)natural_image
Diagram of a device mounted on a platform with a magnified inset showing a screw and 'x4' label (no text or symbols on the diagram itself)natural_image
Simple diagram showing a circle with four dots and a dashed outline, labeled 'd' pointing to its center (no text or symbols within the circle)natural_image
Diagram showing a device inside a vehicle with directional arrows and warning symbols (no readable text or labels)natural_image
Simple diagram showing a gray rectangular area with a black circular region and a white rectangle, no text or symbols present.natural_image
Diagram showing a router connected to a globe via wireless signal waves, with a monitor below (no text or symbols)WEP 64/128, WPA, WPA2, TKIP, AES, WAPI
Aviso
Covered by patents at patentlist.accessadvance.com
Panasonic Testing Centre
Panasonic Marketing Europe GmbH
Winsbergring 15, 22525 Hamburg, Germany
Sitio Web: http://www.panasonic.com
Indice
natural_image
Technical diagram of a vehicle mounted on a grid-patterned panel with a magnified inset showing a screw (no text or symbols)natural_image
Diagram of a device with an upward arrow pointing to a component, no text or symbols presentnatural_image
Diagram of a device mounted on a platform with a magnified inset showing a screw and x4 label (no text or symbols beyond the label)natural_image
Diagram showing a device inside a vehicle with directional arrows and a warning sign, no readable text or symbols present.natural_image
Pure diagram of a mechanical or electrical component with no visible text, numbers, or symbolsnatural_image
Diagram showing a router connected to a globe and wireless signal waves, with a separate screen below (no text or symbols)WEP 64/128, WPA, WPA2, TKIP, AES, WAPI
Avviso
Panasonic Testing Centre
Panasonic Marketing Europe GmbH
Winsbergring 15, 22525 Hamburg, Germany
Sito web: http://www.panasonic.com
Indholdsfortegnelse
natural_image
Technical diagram of a mechanical component with grid pattern and labeled section 'x2' (no text or symbols beyond label)den
natural_image
Simple line drawing of a monitor with an upward arrow pointing to the bottom panel (no text or symbols)natural_image
Diagram of a device mounted on a platform with a magnified inset showing a screw and part number x4 (no text or symbols present)flowchart
graph TD
    A["●"] -->|a| B["●"]
    B -->|b| C["●"]
| a (mm) | 75 |
| b (mm) | 75 |
Set fra siden
VESA-beslag
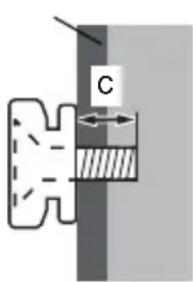
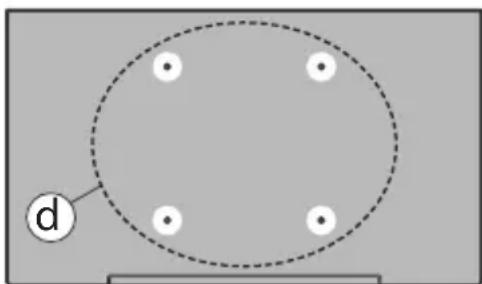
natural_image
Simple diagram showing a circle with four white dots and a dashed outline, labeled 'd' pointing to the circle (no text or symbols beyond label)natural_image
Diagram showing a device inside a vehicle or utility room with directional arrows and a warning sign (no readable text or symbols)For at slukke for TV'et.
For at slukke TV'et helt, tag strømledningen ud af stikkontakten.
natural_image
Simple diagram showing a gray rectangular area with a black circular shape inside, connected by a line to a small circle (no text or symbols)natural_image
Diagram showing a router connected to a globe via wireless signal waves, with a separate screen below (no text or symbols)WEP 64/128, WPA, WPA2, TKIP, AES, WAPI
Angående
Covered by patents at patentlist,accessadvance.com
Panasonic Testing Centre
Panasonic Marketing Europe GmbH
Winsbergring 15, 22525 Hamburg, Germany
Website: http://www.panasonic.com
Sisältö
natural_image
Diagram of a vehicle-mounted panel with grid pattern and a magnified inset showing a screw (no text or symbols)natural_image
Simple line drawing of a monitor with an upward arrow pointing to a small object below (no text or symbols)natural_image
Diagram of a device mounted on a platform with a magnified inset showing a screw and part number x4 (no text or symbols)Jalustan irrottaminen televisiosta
flowchart
graph TD
    A["●"] -->|a| B["●"]
    B -->|b| C["●"]
| a (mm) | 75- |
| b (mm) | 75- |
Näkymä sivusta
VESA- kannatin
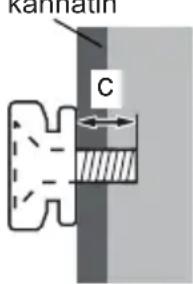
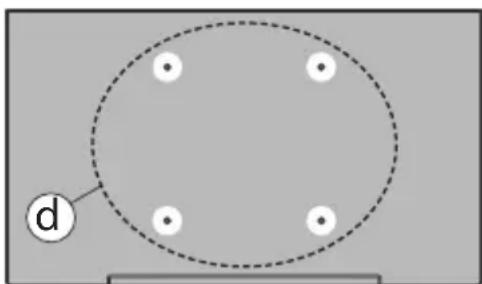
natural_image
Simple diagram showing a circle with four white dots and a dashed circular outline, labeled 'd' pointing to the circle (no text or symbols beyond label)| (d) | Ruuvin syvyys (c) | min. 7 mm |
| max. 10 mm | ||
| Halkaisija M4 | ||
natural_image
Diagram showing a mechanical component inside a vehicle or industrial space, with no visible text or symbols.natural_image
Simple diagram showing a gray rectangular area with a black circular shape inside, connected by a line to a small circle (no text or symbols)natural_image
Diagram showing a router connected to a globe and wireless signal waves, with a separate screen below (no text or symbols)WEP 64/128, WPA, WPA2, TKIP, AES, WAPI
Huomautus
Panasonic Testing Centre
Panasonic Marketing Europe GmbH
Winsbergring 15, 22525 Hamburg, Germany
natural_image
Technical diagram of a mechanical component with grid pattern and labeled part 'x2' (no text or symbols beyond label)natural_image
Diagram of a computer monitor with an upward arrow pointing to the bottom portion of the screen (no text or symbols present)natural_image
Diagram of a mechanical assembly with a central component and a cross-sectional view labeled 'x4' (no text or symbols beyond the label)flowchart
graph TD
    A["●"] -->|a| B["●"]
    B -->|b| C["●"]
| a (mm) | 75 |
| b (mm) | 75 |
Sedd från sidan
VESA-FÄSTE
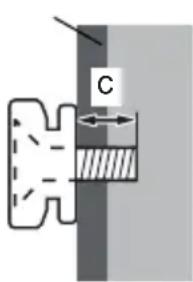
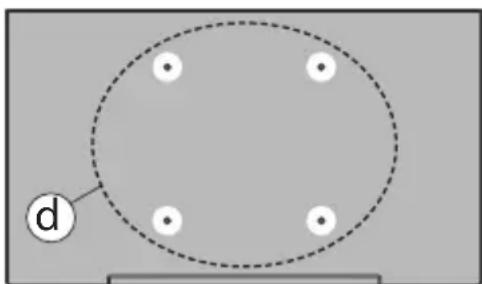
natural_image
Simple diagram showing a circle with four white dots and a dashed circular outline, labeled 'd' pointing to the circle (no text or symbols beyond label)natural_image
Diagram showing a device inside a vehicle or utility room with directional arrows and a warning sign (no readable text or symbols)natural_image
Pure diagram of a mechanical or electrical component with no visible text, numbers, or symbolsnatural_image
Diagram showing a router connected to a globe and wireless signal waves, with a separate monitor below (no text or symbols)1. Bredband ISP-anslutning
WEP 64/128, WPA, WPA2, TKIP, AES, WAPI
Obs:
Panasonic Testing Centre
Panasonic Marketing Europe GmbH
Winsbergring 15, 22525 Hamburg, Germany
Webbsida: http://www.panasonic.com
Innhold
natural_image
Technical diagram of a grid-patterned panel with a small component and a magnified inset labeled 'x2' (no text or symbols on the panel itself)natural_image
Simple line drawing of a monitor with an upward arrow pointing to a small object on a stand (no text or symbols)natural_image
Diagram of a device mounted on a platform with a magnified inset showing a screw and x4 label (no text or symbols beyond the label)flowchart
graph TD
    A["●"] -->|a| B["●"]
    B -->|b| C["●"]
| a (mm) | 75 |
| b (mm) | 75 |
Sett fra siden
VESA
Brakett
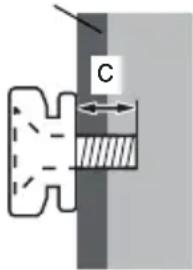
natural_image
Simple diagram showing a circle with four white dots and a dashed outline, labeled 'd' pointing to the circle (no text or symbols beyond label)natural_image
Diagram showing a device with red directional arrows and a warning symbol, enclosed in a circular frame (no readable text or labels)natural_image
Simple diagram showing a gray rectangular area with a black circular inset containing a dot, no text or symbols present.natural_image
Diagram showing a router connected to a globe via wireless signal waves, with a separate monitor below (no text or symbols)WEP 64/128, WPA, WPA2, TKIP, AES, WAPI
Merknad
Panasonic Testing Centre
Panasonic Marketing Europe GmbH
Winsbergring 15, 22525 Hamburg, Germany
Nettsted: http://www.panasonic.com
Panasonic®
HANDLEIDING / INSTRUÇÕES DE UTILIZAÇÃO / UŽIVATELSKÁ PŘÍRUČKA / INSTRUKCJE UŽYTKOWANIA / HASZNÁLATI UTASÍTÁS / INSTRUCTIUNI DE OPERARE / ОДНГІЕЗ ХРНЄНЗ / ИНСТРУКЦИИ ЗА ЕКСПЛОАТАЦИЯ / POUŽÍVATELŠKÁ PŘÍRUČKA
TV-24S50AEZ
Led-tv / Televisor LED / LED televizor / Telewizor LED / LED TV / Τηλεόραση LED / LED телевизор / LED televízor
Inhoudsopgave
natural_image
Diagram of a solar panel with a connector and a magnified inset showing a screw (no text or symbols)natural_image
Diagram of a device with an upward arrow pointing to a component, no text or symbols presentnatural_image
Simple line drawing of a monitor setup with a small circular component labeled 'x4' (no text or symbols on the diagram itself)natural_image
Diagram showing a circle with four white dots and a dashed outline, labeled 'd' pointing to the center (no text or symbols within the circle)natural_image
Diagram showing a device inside a vehicle with red directional arrows and warning symbols (no readable text or labels)natural_image
Pure diagram of a mechanical or electrical component with no visible text, numbers, or symbolsDepending on the selected location a brief information on the prime video services may be displayed next. U kunt uw gratis proefperiode van 30 dagen starten. Highlight Not now and press Select to skip.
9. Selecter Apps
natural_image
Diagram showing a router connected to a globe and wireless signal waves, with a monitor below (no text or symbols)1. Breedband ISP-verbinding
WEP 64/128, WPA, WPA2, TKIP, AES, WAPI
Bericht
Panasonic Testing Centre
Panasonic Marketing Europe GmbH
Winsbergring 15, 22525 Hamburg, Germany
Web Site: http://www.panasonic.com
ÍNDICE
natural_image
Technical diagram of a solar panel assembly with a motor and a pin labeled 'x2' (no text or symbols on the components)natural_image
Diagram of a device with an upward arrow indicating motion or force, no text or symbols presentnatural_image
Diagram of a mechanical assembly with a central component and a circular inset labeled 'x4' (no text or symbols on the diagram itself)natural_image
Simple diagram showing a circle with four dots and a dashed outline, labeled 'd' pointing to the circle (no text or symbols beyond label)| (d) | Comprimento do para-fuso (c) | min. 7 mm |
| máx. 10 mm | ||
| Diâmetro M4 | ||
natural_image
Pure diagram of a mechanical or electrical component with no visible text, numbers, or symbols- Tomada de parede de rede
- Entrada LAN no lado de trás da TV
Ligação sem fios
natural_image
Diagram showing a router connected to a globe via wireless signal waves, with a separate screen below (no text or symbols)WEP 64/128, WPA, WPA2, TKIP, AES, WAPI
Observação
Covered by patents at patentlist,accessadvance.com
natural_image
Diagram of a solar panel array with a small component labeled 'x2' pointing to it (no text or symbols on the diagram itself)natural_image
Diagram of a device with an upward arrow pointing to a component, no text or symbols presentnatural_image
Diagram of a device mounted on a platform with a magnified inset showing a screw and x4 label (no text or symbols beyond the label)flowchart
graph TD
    A["●"] -->|a| B["●"]
    B -->|b| C["●"]
| a (mm) | 75 |
| b (mm) | 75 |
Pohled ze strany
VESA
držák
natural_image
Simple diagram showing a circle with four white dots and a dashed outline, labeled 'd' pointing to the circle (no text or symbols beyond label)natural_image
Diagram showing a device with red directional arrows and warning symbols, enclosed in a circular frame (no readable text or labels)natural_image
Simple diagram showing a gray rectangular area with a black circular inset containing a dot, no text or symbols present.natural_image
Diagram showing a router connected to a globe via wireless signal waves, with a separate monitor below (no text or symbols)WEP 64/128, WPA, WPA2, TKIP, AES, WAPI
Poznámka
Panasonic Testing Centre
Panasonic Marketing Europe GmbH
Winsbergring 15, 22525 Hamburg, Germany
natural_image
Diagram of a solar panel with a small component and a labeled screw (x2), no text or symbols present.natural_image
Simple line drawing of a device with an upward arrow pointing to it, no text or symbols present.natural_image
Diagram of a mechanical assembly with a central component and a cross symbol, no readable text or labels present.natural_image
Simple diagram showing a circle with four white dots and a dashed outline, labeled 'd' pointing to the circle (no text or symbols beyond label)natural_image
Diagram showing a hand holding a device inside an aircraft cabin, with red arrows and warning symbols indicating motion (no text or labels present)natural_image
Simple diagram showing a gray rectangular area with a black circular inset containing a dot, no text or symbols present.natural_image
Diagram showing a router connected to a globe and a monitor, with wireless signal waves above (no text or symbols)1. Łacze szerokopasmowe ISP
WEP 64/128, WPA, WPA2, TKIP, AES, WAPI
Uwaga
Covered by patents at patentlist,accessadvance.com
Panasonic Testing Centre
Panasonic Marketing Europe GmbH
Winsbergring 15, 22525 Hamburg, Germany
Strona internetowa: http://www.panasonic.com
Tartalomjegyzék
natural_image
Technical diagram of a mechanical component with grid pattern and labeled part 'x2' (no text or symbols beyond label)natural_image
Simple line drawing of a monitor with an upward arrow pointing to the bottom panel (no text or symbols)natural_image
Diagram of a device mounted on a platform with a magnified inset showing a crosshair labeled 'x4' (no text or symbols beyond the label)natural_image
Diagram showing a device inside a vehicle or utility room with directional arrows and a warning sign (no readable text or symbols)natural_image
Simple diagram showing a gray rectangular area with a black circular inset containing a dot, no text or symbols present.natural_image
Diagram showing a router connected to a globe via wireless signal waves, with a monitor below (no text or symbols)WEP 64/128, WPA, WPA2, TKIP, AES, WAPI
Megjegyzés
Panasonic Testing Centre
Panasonic Marketing Europe GmbH
Winsbergring 15, 22525 Hamburg, Germany
Web Site: http://www.panasonic.com
Cuprins
natural_image
Technical diagram of a solar panel with a small component and a magnified inset labeled 'x2' (no text or symbols on the panel itself)natural_image
Simple line drawing of a monitor with an upward arrow pointing to the bottom panel (no text or symbols)natural_image
Diagram of a device mounted on a platform with a magnified inset showing a screw and x4 label (no text or symbols beyond the label)natural_image
Simple diagram showing a circle with four dots and a dashed outline, labeled 'd' pointing to the circle (no text or symbols beyond label)natural_image
Diagram showing a white connector with red directional arrows and a warning symbol inside a vehicle (no text or labels)natural_image
Simple diagram showing a gray rectangular area with a black circular inset containing a dot, no text or symbols present.Formate video compatibile: MPEG, MKV, MP4, MOV, 3GP and AVI.
Formate Imagine compatibile: JPEG, JPG, BMP and PNG.
Conectivitate wireless
natural_image
Diagram showing a router connected to a globe and wireless signal waves, with a monitor below (no text or symbols)WEP 64/128, WPA, WPA2, TKIP, AES, WAPi.
Observatie
DVB / Transmitere a datelor / IPTV
Covered by patents at patentlist,accessadvance.com
Panasonic Testing Centre
Panasonic Marketing Europe GmbH
Winsbergring 15, 22525 Hamburg, Germany
natural_image
Diagram of a 3D grid-patterned panel with a small cylindrical component labeled 'x2' (no text or symbols on the panel itself)natural_image
Diagram of a device with an upward arrow pointing to a component, no text or symbols presentnatural_image
Diagram of a device mounted on a platform with a magnified inset showing a screw and 'x4' label (no text or symbols on the diagram itself)natural_image
Simple diagram showing a circle with four white dots and a dashed circular outline, labeled 'd' pointing to the circle (no text or symbols beyond label)natural_image
Diagram showing a device inside a vehicle with directional arrows and warning symbols (no readable text or labels)natural_image
Simple diagram showing a pipe passing through a rectangular channel with a circular component inside (no text or symbols)natural_image
Diagram showing a router connected to a globe with signal waves, next to a flat-screen monitor (no text or symbols)WEP 64/128, WPA, WPA2, TKIP, AES, WAPI
Επισήμανση
Panasonic Testing Centre
Panasonic Marketing Europe GmbH
Winsbergring 15, 22525 Hamburg, Germany
natural_image
Diagram of a solar panel with a small vehicle and a labeled component 'x2' (no text or symbols on the diagram itself)natural_image
Diagram of a monitor with an upward arrow pointing to a small device (no text or symbols present)natural_image
Simple line drawing of a ceiling-mounted device with a circular component labeled 'x4' (no text or symbols on the device itself)natural_image
Simple diagram showing a circle with four dots and a dashed outline, labeled 'd' pointing to the circle (no text or symbols beyond label)natural_image
Diagram showing a vehicle inside a vehicle cabin with directional arrows and a warning sign (no readable text or symbols)natural_image
Simple diagram showing a gray rectangular area with a black circular region and a white rectangle containing a black circle (no text or symbols)natural_image
Diagram showing a router connected to a globe and a monitor, with wireless signal waves above (no text or symbols)WEP 64/128, WPA, WPA2, TKIP, AES, WAPI
Забележка:
Panasonic Testing Centre
Panasonic Marketing Europe GmbH
Winsbergring 15, 22525 Hamburg, Germany
natural_image
Technical diagram of a mechanical component with grid pattern and labeled part 'x2' (no text or symbols beyond label)- Stojan(y) umiestnite na schému montáže stojana(ov) na zadnej strane TV.
natural_image
Simple line drawing of a monitor with an upward arrow pointing to the bottom portion of the screen (no text or symbols)natural_image
Diagram of a camera setup with a mounted sensor and a magnified view labeled 'x4' (no text or symbols beyond the label)natural_image
Diagram showing a circle with four white dots and a dashed outline, labeled 'd' pointing to the center (no text or symbols within the circle)natural_image
Diagram showing a device inside a room with directional arrows and a warning symbol (no readable text or labels)natural_image
Simple diagram showing a gray rectangular area with a black circular inset containing a dot, no text or symbols present.natural_image
Diagram showing a router connected to a globe and wireless signal waves, with a monitor below (no text or symbols)1. Širokopásmové pripojenie k ISP
WEP 64/128, WPA, WPA2, TKIP, AES, WAPI
Upozornenie:
Covered by patents at patentlist.accessadvance.com
Panasonic Testing Centre
Panasonic Marketing Europe GmbH
Winsbergring 15, 22525 Hamburg, Germany