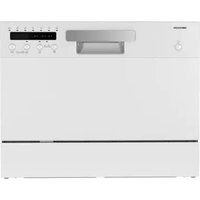
MD 37763 - Dishwasher MEDION - Free user manual and instructions
Find the device manual for free MD 37763 MEDION in PDF.

| Product type | Compact dishwasher |
| Brand | MEDION |
| Model | MD 37763 |
| Capacity | 2 standard place settings (Ø 24 cm) |
| Height | 435 mm |
| Width | 420 mm |
| Depth (door closed) | 435 mm |
| Depth (door open) | 750 mm |
| Net weight | 13.5 kg |
| Electrical supply | 220-240 V~, 50 Hz |
| Power consumption | 730-860 W |
| Water inlet pressure | 0.04 - 1.0 MPa (0.4 - 10 bars) |
| Max hot water connection | 60 °C |
| Wash programs | ECO, 1 hour, Rapid, Short (hot/cold rinse), Baby bottles, Glasses |
| Water consumption (ECO program) | 5 L |
| ECO program duration | 165 min |
| Regeneration salt tank | Yes, capacity 130 g |
| Water filling | Manual (5 L tank) or direct connection |
| Filter system | Fine filter and main filter |
| Additional functions | Additional rinse, additional drying, delayed start (1-24 h) |
| Frost protection | Yes, manual drainage recommended |
| Protection class | I |
| Available spare parts | Electronics: 7 years, mechanical and plastic: 10 years |
| Use | Domestic, indoor only |
Frequently Asked Questions - MD 37763 MEDION
User questions about MD 37763 MEDION
0 question about this device. Answer the ones you know or ask your own.
Ask a new question about this device
Download the instructions for your Dishwasher in PDF format for free! Find your manual MD 37763 - MEDION and take your electronic device back in hand. On this page are published all the documents necessary for the use of your device. MD 37763 by MEDION.
USER MANUAL MD 37763 MEDION
MEDION Service Center
ENAME,S.A
- Information about this user manual 104
1.1. Explanation of symbols 104 - Proper use 104
- Safety instructions 105
- Package contents 106
5.Appliance parts. 106 - Possible displays 107
- Installation 107
7.1. Set-up and levelling 107
7.2. Water connection 108
7.3. Filling with water manually 108
7.4. Connecting the water outlet 109
7.5. Connecting to power supply 110
- Preparations for use 110
8.1. Closing the door 110
8.2.Adding salt to the appliance 110
8.3. Setting salt consumption 110
8.4. About dishwasher detergents 111
8.5.Adding detergent 111
8.6. Loading the dishes and cutlery 112
8.7. General information and tips on energy saving 112
- Using the dishwasher 114
9.1. Switching on the appliance 114
9.2. Extra rinse/extra dry 115
9.3. Changing the program 115
9.4. Opening during operation 115
9.5.Use start delay 115
9.6. Selecting a wash program 115
9.7. End of the wash program 117
- Cleaning and maintenance 117
10.1. Pump water out of the water tank 117
10.2.Filterystem 117
10.3. Cleaning the appliance 118
- Antifreeze protection 118
- Longer periods without use 118
- Moving the appliance 118
- Troubleshooting 119
- Error messages 121
- Disposal 121
- Technical specifications 121
17.1. Product data sheet 122
- EU declaration of conformity 122
- Spare parts 122
- Service information 122
- Legal Notice 122
1. Information about this user manual

Thank you for choosing our product. We hope you enjoy using this appliance.
Please read the safety instructions and the user manual carefully before using the appliance for the first time. Note the warnings on the appliance and in the user manual.
Always keep the user manual close to hand. If you sell the appliance or give it away, please ensure that you also pass on this user manual. It is an essential component of the product.
1.1. Explanation of symbols
If a block of text is marked with one of the warning symbols listed below, the hazard described in that text must be avoided to prevent the potential consequences described there from occurring.

DANGER!
Warning: risk of fatal injury!

WARNING!
Warning: risk of possible fatal injury and/ or serious irreversible injuries!

CAUTION!
Warning: risk of minor and/or moderate injuries!

NOTICE!
Follow these instructions to prevent damage to the appliance!

More detailed information about using the appliance!

Follow the instructions in the user manual!
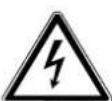
Warning: risk of electric shock!
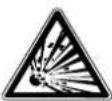
Warning: risk of explosive materials!

Symbol for alternating current (AC)

Indoor use
Appliances with this symbol are intended exclusively for use indoors.
2. Proper use
This appliance may only be used for washing dishes and cutlery.
- Only use dishwasher-safe dishes. Look for markings such as "Dishwasher safe" or "Suitable for dishwashers" when purchasing dishes.
This appliance is designed for use in private households and similar household applications, such as
- in kitchens, for staff in retail outlets, offices and other commercial areas
on agricultural estates - by customers in hotels, motels and other accommodation facilities
- in bed and breakfasts
The appliance is not intended for commercial or industrial use.
Please note that we shall not be liable in cases of improper use:
Do not modify the appliance without our consent and do not use any auxiliary equipment that we have not approved or supplied.
Only use replacement parts or accessories that we have supplied or approved.
Comply with all the information in this user manual, especially the safety instructions. Any other use is considered improper and can cause personal injury or property damage.
3. Safety instructions
IMPORTANT SAFETY INSTRUCTIONS - READ CAREFULLY AND KEEP FOR FUTURE REFERENCE!

WARNING!
Risk of injury!
Risk of injury due to improper use.
- Keep the appliance and its accessories out of the reach of children.
This appliance can be used by children of 8 years and older, and by people with reduced physical, sensory or mental capacity, or with a lack of experience and/or knowledge, but only with proper supervision, or if they have been told how to use the appliance safely, and have understood the risks involved if they use it improperly.
Children must not be allowed to play with the appliance. - Cleaning and user maintenance may not be carried out by children unless they are supervised.
Supervise children in the vicinity of the dishwasher at all times. There is a risk of children becoming trapped in the dishwasher.
The appliance works with high water temperatures. Children may only use the appliance when supervised by adults owing to the high temperatures and resultant water vapour.

WARNING!
Risk of electric shock!
There is a risk of electric shock due to live parts.
Only connect the appliance to a properly installed and freely accessible socket. The local mains voltage must correspond to the technical specifications for the appliance. The socket must have a fuse rated at min. 10 ampere.
The appliance is switched on or off using the switch. It only ceases to be live when you pull the plug out of the socket.
The socket must be easily accessible so that you can unplug the appliance from
the mains quickly if necessary.
Always hold the plug to pull it out, and never pull the mains cable.
Completely unwind the mains cable.
Do not kink or crush the mains cable.
Do not allow the mains cable to come into ES contact with hot objects or surfaces (e.g. Icooker hob).
Do not use an extension cable.
- Do not use if the appliance or the mains cable is visibly damaged or if the appliance has been dropped.
- Contact our Service Centre without delay if the appliance has been damaged during transport.
- Do not, under any circumstances, make any unauthorised modifications to the appliance or try to open and/or repair a component yourself.
If there is damage to the mains connection cable on this appliance, it must be replaced by the manufacturer, its customer service department or another suitably qualified person. This is necessary to avoid hazards.
- Never open the housing or slide objects into the ventilation slots.
The appliance must not be submerged in water or other liquids, nor exposed to running water or used in damp environments, as this may result in an electric shock.
Unplug the appliance from the socket:
- before cleaning or maintaining the appliance
- before fitting or removing accessories
-during thunderstorms
- if the appliance is damp or wet
- when the appliance is unattended
- when you are no longer using the appliance
- Never touch the appliance or mains cable with wet or damp hands.
Only operate the appliance in a protected, dry room.
4. Package contents

DANGER!
Risk of choking and suffocation!
There is a risk of choking and suffocation due to swallowing or inhaling small parts or plastic wrap.
- Keep all packaging materials used (bag, pieces of poly styrene etc.) out of the reach of children.
- Do not let children play with the packaging material.
Remove the product from the packaging and remove all packaging material.
- Please check the package contents to ensure that all items are included and in perfect condition. If anything is missing or damaged, contact us within 14 days of purchase.
The following items are supplied with your product:
- Mini dishwasher
- Dish rack
Cutlery basket
Water supply hose with hose connection - Drain hose
- Measuring container
- Baby bottle holder
Short manual

A test operation with water was carried out after production of the appliance. It is normal if there is still some water in the appliance.
5. Appliance parts

Fig. 1 - Front
- Recessed grip
- Control panel
- Upper spray arm (in inner compartment)
- Lower spray arm
- Filter
- Dish rack
- Measuring container
- Baby bottle holder
- Basket
- Dishwasher detergent compartment
- Salt container
- Water tank opening with cover
- Base
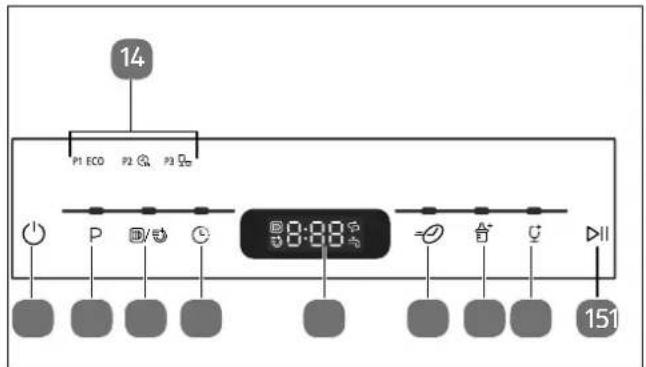
Fig. 2 - Control panel
- Cleaning program operating light active (P1, P2 or P3)
- Button, starts or interrupts the wash program
- button, glass cleaning program
- button, baby bottle cleaning program
- button, short program
- Display field
- button, timer Delayed switch-on
- button, additional function: extra rinse extra dry
- P button, program selection (P1, P2 or P3)
- button, switch the appliance on/off
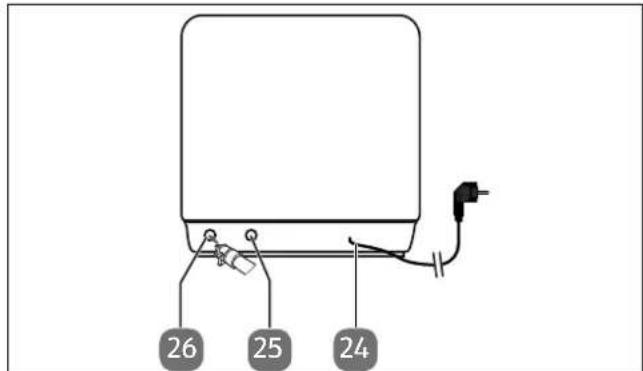
Fig. 3 - Back of the appliance
- Mains cable with mains plug
- Connection for water supply
- Connection for water outlet
6. Possible displays

Extra rinse active
Extra dry active
Warning light: too little special salt
Warning light: too little water
Operating time display
7. Installation

WARNING!
Risk of electric shock and material damage!
There is a risk of electric shock as well as material damage if the appliance is connected improperly.
The electricity and water supply should only be connected by a qualified expert.

NOTICE!
Possible material damage!
There is a risk of material or water damage if the appliance is installed or used incorrectly.
-
Do not install the appliance in rooms prone to frost, as considerable damage can result if the pipes burst.
The appliance must be installed on a level, stable surface, which can bear the weight of the appliance plus that of the dishes contained in it.
The appliance is designed as a free-standing appliance. It must not be built into kitchen units.
Use the appliance indoors only.
Do not expose the appliance to extreme conditions. Avoid: -
high humidity or wet conditions
extremely high or low temperatures
direct sunlight -
naked flames.
-
Do not place the appliance near heat sources.
Chemical additives in furniture coatings may corrode the material of the appliance feet and cause residue on the furniture surface.
If necessary, place the appliance on an underlay that is insensitive to heat and moisture.
7.1. Set-up and levelling
Install the appliance on a stable, flat surface close to a drain and water connection:
on a table/work surface
- in a ventilated cupboard.
Observe the dimensions of the appliance when setting it up:
Height 435 mm
Width 420 mm
Depth (door closed) 435 mm
Depth (door open) 750 mm

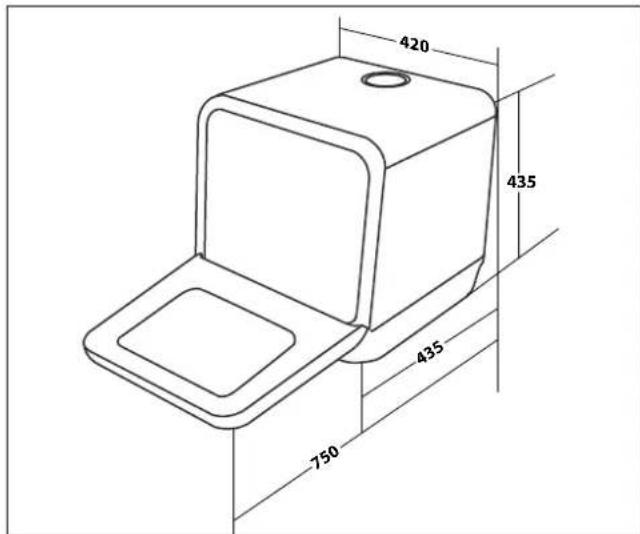
Fig. 4 - Appliance dimensions
Only connect the mains plug (24) to a properly installed and freely accessible socket if the water supply and outlet have been connected correctly (see next section).
7.2. Water connection
0 NOTICE!
Damage to the appliance!
If the appliance is connected improperly, there is a risk of damage to the appliance.
The hose must be free of kinks and connected carefully.
If the water pipes are new or have not been used for a long time, run the water to ensure that the water is clear and free of impurities. If this precaution is not taken, there is a risk of the water inlet becoming blocked and the appliance being damaged.
If the appliance is to replace an old appliance, never use old hose sets for the connection. Connect the appliance with the new hose sets provided.
Connect the appliance to a drinking water pipe up to max. 60^
Only use the accessories supplied or accessories which As an alternative to using the water supply via a water tap, are described as suitable in this user manual. you can also fill up the appliance with water manually (see Fig. 6).
As an alternative to using the water supply via a water tap, you can also fill up the appliance with water manually (see Fig. 6).
i
When connecting to the drinking water, ensure that the appliance is connected to a safety device to stop the drinking water becoming contaminated by backflow (in accordance with DIN EN 1717). We recommend hiring a qualified specialist to perform the installation work, including the water and electrical connections, and any repair work.
i
If the hose supplied does not fit your tap, you can buy adapters from your plumbing supply store.
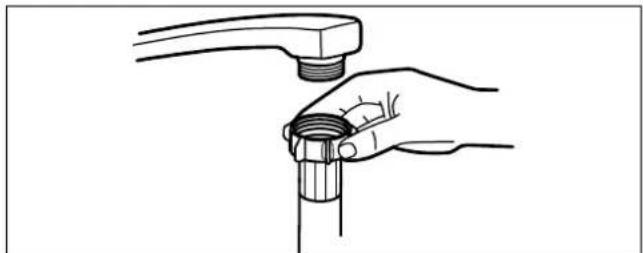
Fig. 5 - Connecting the water hose
Connect the water supply ho(25) to a cold water tap with a 3 / 4'' thread (see Fig. 5).
i
You can connect the supply hose to a hot water tap if the water temperature does not exceed 60^ . This reduces wash time by about 15 minutes.
Screw the hose connection hand tight.
The water hose is designed for a water pressure of approx. 10 bar. We recommend turning off the water supply after use, especially if your house connection does not have a pressure reducer.
7.3. Filling with water manually
i
Before adding water, press the button to switch on the dishwasher.
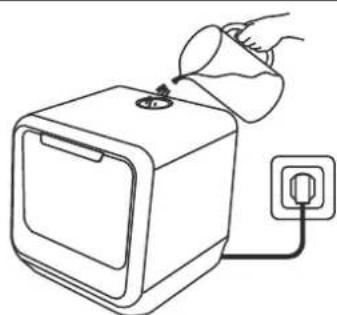
Fig. 6 - Filling with water
It is always necessary to fill up the appliance as soon as the warning light lights up. Acoustic signals will sound.
Fill the measuring container (7) with clean tap water.
Remove the water tank cover (12).
- Fill the water tank with water (min./max. 5 litres). Take care to pour the water into the water tank opening slowly and carefully to avoid splashing.
Put on the water tank cover.
7.4. Connecting the water outlet
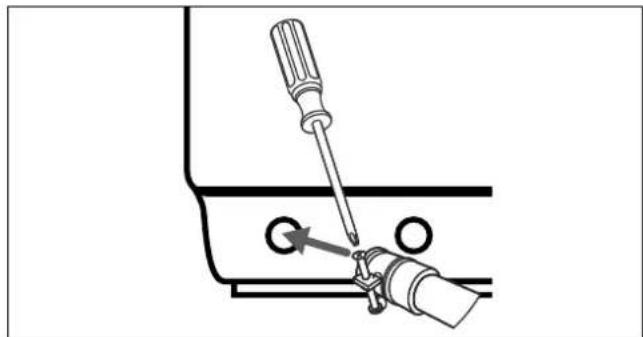
Fig. 7 - Water outlet connection
Insert the drain hose with the connection for the water outlet (26) to the back of the appliance and secure it using a clamp (see Fig. 7).
You can connect the outlet hose in different ways:
connect the hose to a special connection on the drain pipe
- feed the hose into an outlet pipe,
- or run into a sink/container.
7.4.1. Connecting the hose with the siphon on the sink

Fig. 8 - Siphon connection
Connect the outlet hose with the drain pipe siphon (for washing machines) underneath the sink (see
Fig. 8). Ensure that the waste water hose is inclined sufficiently. The appliance is to be positioned at least 4 cm higher than the drain.

If connecting to a siphon, depending on the siphon design an adapter may be required for the connection to the outlet hose. This is available from specialist retailers.
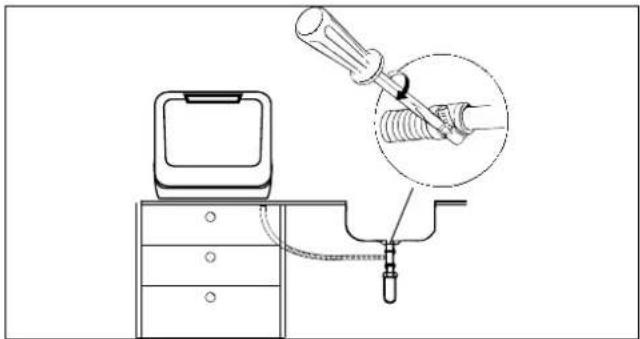
Fig. 9 - Securing hose connection
- Secure the hose end so that the hose cannot slip (see Fig. 9).
7.4.2. Feeding the hose into an drain pipe
NOTICE!
Possible material damage!
Material damage is possible in the event of water leakage.
Make sure that the outlet hose is always introduced into an outlet at a height of 60~cm as otherwise the pump performance would be impaired.
Under no circumstances should the hose end be submerged.
Ensure that the inlet and outlet hoses are not kinked or crushed.
- You can also feed the outlet hose into a drain pipe. Mount the hose in the outlet pipe in such a way that it cannot come loose and that water can flow downwards freely.
The outlet hose can be extended by max. 100cm Use an extension with an internal diameter that is at least the diameter of the original hose or a suitable connecting piece.
The hose extension should run along the floor - only the section of hose near the draining point should run upwards.
7.4.3. Running the hose into a sink/container
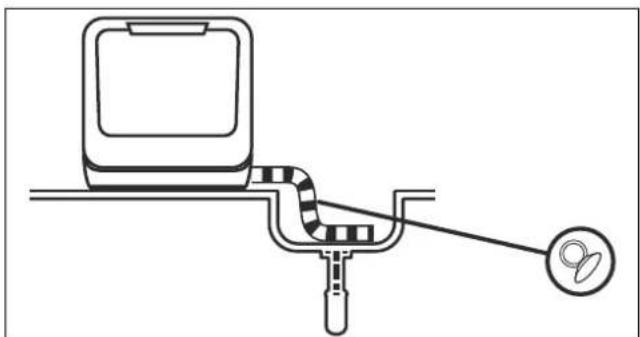
Fig. 10 - Discharging into a sink
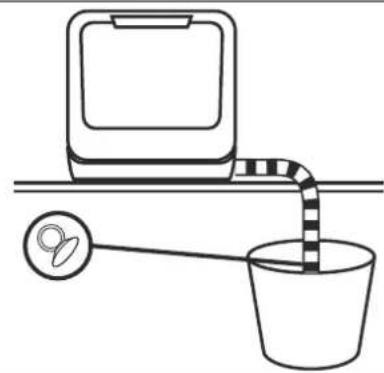
Fig. 11 - Discharging into a container
-
Hang the end of the waste water hose in a sink (see Fig. 10) or a sufficiently large container (see Fig. 11).
-
Ensure that the waste water hose is inclined sufficiently. The appliance is to be positioned at least 4cm higher than the sink/container.
Use, e.g. a retaining bracket or hose guide with suction cup (not included in package contents) to hang the drain hose to ensure that the drain hose is firmly attached.
7.5. Connecting to power supply
Once you have connected the washing machine to the water supply and drainage, connect the mains plug (24) to a socket.
The socket must be easily accessible so that you can unplug the appliance from the mains quickly if necessary.
8. Preparations for use
Hold the recessed grip (1) and open the door by pulling it towards you. Open the door completely (see Fig. 12).
If the door is opened during operation the wash cycle will automatically be interrupted.
8.1. Closing the door
Push the dish rack (6) fully into the appliance.
Press on the door until you hear it lock into place.
8.2. Adding salt to the appliance
Dishwasher salt (regeneration salt) is used to harden water from a water hardness of 1-2 "medium".
It is advisable to add dishwasher salt.
NOTICE!
Possible material damage!
Using an incorrect salt additive may damage the appliance.
Always use dishwasher salt/regeneration salt that is suitable for the dishwasher.
Normal household salt is not suitable and can damage the appliance.
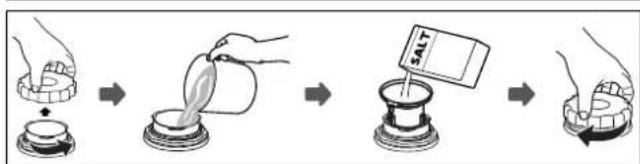
Fig. 13 - Filling with salt
Remove the dish rack (6) and twist the lid off the salt container (11).
Fill the salt container with approx.1 l water before the first use (see Fig. 13).
Use a suitable aid such as a normal household funnel to pour 130g of dishwasher salt into the opening on the salt container (11). It is normal if water escapes from the salt container.
Once the container has been filled, twist the lid clockwise to tighten (see Fig. 13).
To prevent damage to the appliance, a quick program without dishes or dishwasher detergent should be started immediately after filling with salt (see section "9.6. Selecting a wash program" on page 115).
i
The salt container (11) must be filled up when the salt warning light switches on. Once the salt consumption has been set according to "8.3. Setting salt consumption" on page 110 and the salt container (11) has been filled, the salt warning light will go out.
8.3. Setting salt consumption
For good dishwashing results, the dishwasher needs low-lime water. Adding regeneration salt helps to achieve the required water hardness with the aid of the softening system. To maintain the function of the softening system, regeneration is performed regularly, resulting in higher water and energy consumption during the process (see table below).
Set the required salt consumption, depending on the local water hardness.
The table below shows what setting is necessary for your local water hardness.
| Water hardness | Salt consumption Press P | Display | Regeneration at every X program sequence* | |
| dH (degree of German hardness) | mmol/l (milli-mole per litre) | |||
| 0-5 0-0 | 0.941 x H1 - | |||
| 6-11 1.0 | 2.02 x H2 10 | |||
| 12-17 2.1 | 3.03 x | (factory setting) | H3 | 5 |
| 18-22 3.1 | -4.04 x H4 3 | |||
| 23-34 4.1 | -6.05 x H5 2 | |||
| 35-55 6.1 | -9.8 | 6 x H6 1 | ||
| * When regeneration is carried out during a program, an additional 2 l of water is required, the energy consumption increases by 0.01 kWh and the program is extended by 4 minutes. | ||||
Close the appliance door.
Press the button (23) to switch on the appliance and make settings.
Within the next 60 seconds, press and hold the P button (22) for approx. 5 seconds.
Then press the P button several times in accordance with the table above to set the salt consumption.
Press the P button (22) several times until the required water hardness level (H1, H2, H3, H4, H5 or H6) is set. The setting is saved after 5 seconds if no further buttons are pressed.
8.4. About dishwasher detergents
8.4.1. Types of detergent
Dishwasher detergent ensures that dirt is loosened and removed from dishes and cutlery. Always use detergents suitable for dishwashers. There are three types of dishwasher detergent:
- Detergents with phosphate and chlorine
- Detergents with phosphate and without chlorine
- Detergents without phosphate and without chlorine.
Dishwasher detergent in powdered form does not normally contain phosphate. As phosphate softens water, this function is not performed without phosphate.
If phosphate-free detergent is used, add extra dishwasher salt (see section "8.2. Adding salt to the appliance" on page 110).
If using phosphate-free detergent, increase the dose of detergent to avoid water spots on the dishes and glasses.
Detergents with chlorine will bleach the dishes slightly. Stains and crusts are removed less easily without chlorine.
In this case, select a wash program with a higher temperature.
8.4.2. Detergent concentrates
Concentrates come in two types, depending on their chemical composition:
- Conventional, alkaline detergents with caustic components
- Detergents with low alkali content and natural enzymes.
A "normal" wash program in conjunction with a detergent concentrate reduces water pollution and is better for the dishes. These wash programs are designed to loosen the dirt optimally and can achieve the same effect with cleaner concentrate as an "intensive" program.
8.4.3. Detergent tabs
The various components of cleaner tabs (e.g. 3-in-1 tabs, rinse aid, salt) dissolve gradually in sequence. The combination of several components does away with the need for a separate rinse aid and/or salt).
Larger cleaner tabs may not dissolve fully in certain circumstances. Make sure that the tabs are suitable for the selected wash program and follow the manufacturer's instructions.
8.5. Adding detergent

DANGER!
Risk of chemical burns!
Detergents are chemicals containing caustic and abrasive ingredients. There is a risk of injury. Dishwasher detergents are highly alkaline, therefore dangerous if swallowed and may cause burns.
Avoid contact with the eyes and skin.
Always keep detergents out of reach of children.
- Keep children away from the appliance door when open, there could be detergent in the appliance.
- Do not fill the detergent compartment with detergent until just before running the wash cycle.

NOTICE!
Possible material damage!
Incorrect cleaning agents may damage the appliance.
Only use dishwasher-safe detergent and rinse aid. Do not use soap, laundry detergent or hand wash.
Dishwasher detergent must be added before each wash cycle. Only add as much detergent as indicated in the table in section "9.6. Selecting a wash program" on page 115.
The appliance normally needs less detergent than a conventional dishwasher. One tablespoon of detergent is usually enough to wash a complete load of dishes. Depending on the degree of dirt, more can also be required.
Always add the detergent immediately before the wash cycle so that dishwasher powder does not become moist and dissolves properly later.
Open the appliance door.
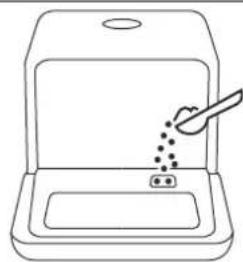
Fig. 14 - Adding detergent
Fill the dispenser (10) labelled with the symbol with dishwasher powder or a detergent tab.

For the best cleaning results, the use of detergent tabs with rinse aid is recommended.
8.6. Loading the dishes and cutlery

WARNING!
Risk of injury!
There is a risk of injury due to sharp objects.
Knives and other utensils with sharp tips must be placed in the rack or basket with the tip in a horizontal position.

NOTICE!
Possible material damage!
Incorrect loading can damage the dishes.
Only use dishwasher-safe dishes. Look for markings such as "Dishwasher safe" or "Suitable for dishwashers" when purchasing dishes.
Ensure that plastic dishes do not come into contact with the heating element when the appliance is in use.
The appliance is designed for up to 2 place settings dia. 24cm .Do not overload the appliance.
8.7. General information and tips on energy saving
Only use dishwasher-safe dishes and cutlery. Look for markings such as "Dishwasher safe" or "Suitable for dishwashers" when purchasing dishes.
Use mild detergent that is also suitable for sensitive dishes.
- Remove larger food residues from the crockery and soak dried food residues (such as dried egg or spinach). However, it is not necessary to rinse the dishes under running water before the wash cycle. Pre-rinsing dishes increases water and energy consumption and is not recommended.
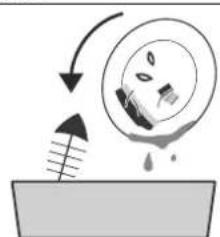
Fig. 15 - Removing food residue
To prevent damage to glass or cutlery, do not remove these from the dishwasher directly after the wash program has finished. Allow the dishes to cool down slightly first.
- Arrange hollow objects such as cups, glasses, pans etc. with the opening downwards, so that water cannot collect inside.
Dishes must not be put inside each other or cover another dish.
Place large dishes on the dish rack (6).
To save energy and water it is best to run a cycle when your dishwasher is full.
To achieve good washing results, avoid overfilling the dishwasher.
- Washing dishes in a dishwasher usually uses less energy and water than washing them by hand, provided the dishwasher is used according to the user manual.
Select a program that is suitable for the type of dishes and the degree of soiling.
Reduce the amount of detergent if the dish racks are only half full.
8.7.1. Unsuitable or partially suitable dishes
Unsuitable dishes
- Dishes with elements made from wood, horn, mother-of-pearl
- Plastic items not resistant to heat
Bonded dishes - Pewter
Crystal glass
Non-stainless steel items
Partially suitable dishes
- Some types of glass can become dull after many wash cycles
Silver and aluminium parts can lose colour - Glazed designs can become pale after many wash cycles
8.7.2. Dish loading example
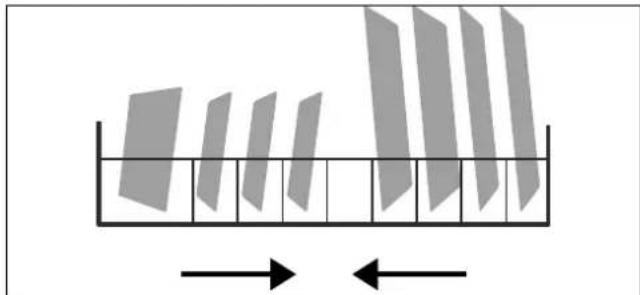
Fig. 16 - Loading dish rack
Load the dish rack (6) as shown in the example in
Fig. 16. The arrow shows the slide-in direction.
Dishes should be placed in the positions provided to obtain the best washing result.
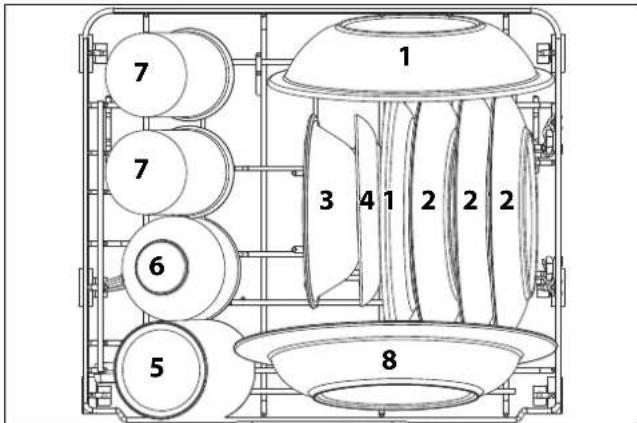
Fig. 17 - Optimum loading of dish rack
- Dessert plates
- Dessert bowls
- Saucers
- Tumblers
- Cups
- Glass
- Soup plates
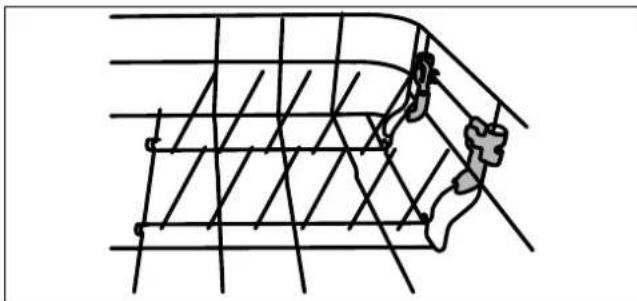
Fig. 18 - Holder folded up
If the plate holders are not required, they can be folded down to create space for pots (see Fig. 19).
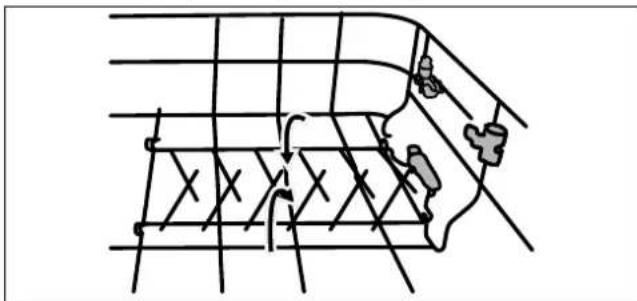
Fig. 19 - Plate holder folded down
Unclip the plate holders from the blue fixtures and fold down the plate holder.
8.7.3. Cutlery loading example
Clip the cutlery tray on the left edge of the dish rack.
Place long/sharp knives and cutlery horizontally in the cutlery tray.
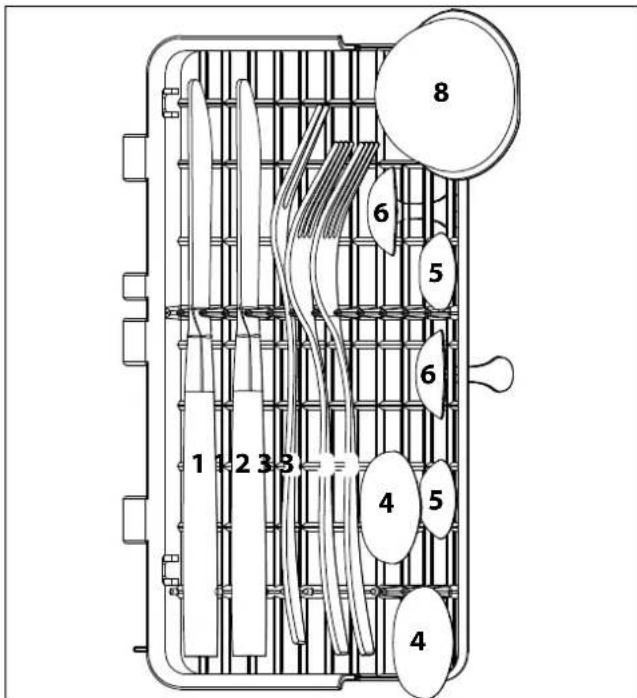
Fig. 20 - Optimum loading of cutlery basket
- Serving forks
- Forks
- Soup spoons
- Teaspoons
- Dessert spoons
- Serving spoons
- Gravy ladle
8.7.4. Baby bottle holder
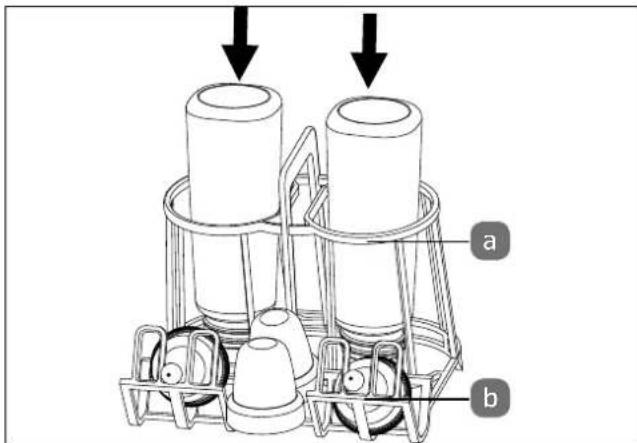
Fig. 21 - Using the baby bottle holder
To clean baby bottles, place the baby bottle holder (8) in the dish rack and place the bottles with the opening facing downwards in the basket opening (a) (seeFig. 21).
Place the lids and dummies of the baby bottle on the lid holder (b).
9. Using the dishwasher

CAUTION!
Risk of injury!
There is a risk of injury due to improper use of the appliance.
- Close the appliance door again after a wash cycle has finished, as an open door could pose a trip hazard.
- Do not place any heavy objects on the door if it is open. The appliance could tip forwards.

CAUTION!
Risk of burning!
There is a risk of scalding if hot surfaces are touched. Hot water/hot steam can escape and cause burns if the door is opened while a program is running.
- Allow the appliance to cool down before emptying. Do not touch the heating element in the dishwasher during or immediately after use.
Only operate the dishwasher once the door has been closed firmly. - Do not open the dishwasher door fully straight away – instead wait for about 3 seconds until the spray arm stops rotating and then open the door.
Fig. 22 - Using the dishwasher drain
Press the program selection button P (22) several times to select the desired program P1, P2 or P3 or press the button (16) for the glass cleaning program, the button (7) for the baby bottle cleaning program or the button (48) for the short program (see "9.6. Selecting a wash program" on page 115). With the short program, you can choose between hot (press 1x = 0 ) and cold rinsing (press 2x = 0 ).
You have the option of adding an extra rinse and/or an extra dry cycle to the programs. Press the button (21) (see also "9.2. Extra rinse/extra dry").
The control light for the selected program lights up.
Press the button (15) to start the program.
While a program is running, the display panel shows the current status:
- Segment display shows "---" - the appliance is in standby mode
Segment display shows "H:MM" - the program is interrupted
- Segment display shows "H:MM" and flashes - the program is running
- Segment display shows "END" - program completed

If you press the button while the program is running, the program is interrupted. The appliance sounds an acoustic signal every minute.
Press the button again to continue the program. The program continues after approx. 10 seconds.
9.1. Switching on the appliance
To start the appliance, proceed as follows:
- Add the detergent, rinse aid and, if necessary, salt depending on the desired program.
- Insert the dish rack and cutlery basket (6) (see section "8.6. Loading the dishes and cutlery" on page 112) and push the dish rack into the dishwasher.
Plug the mains plug (24) into the socket. Turn on the water supply fully or fill the water tank manually.
Press the button (23) to switch on the appliance.
Program P1 flashes and is displayed alternately with the program duration.
9.2. Extra rinse/extra dry
Press the button after you have set the desired program to run an additional rinse and/or dry cycle. The following activations are possible:
| P1 Press once Extra | rinse | |
| Press twice | Extra dry | |
| Press three times | Extra rinse/dry | |
| P2 Press once Extra | rinse | |
| P3 Press once Extra | rinse | |
| Baby bottles Press | since Extra rinse | |
| Press twice | Extra dry | |
| Press three times | Extra rinse/dry | |
| Glasses Press once | Extra rinse | |
| Press twice | Extra dry | |
| Press three times | Extra rinse/dry | |

The program duration increases when the extra rinse/extra dry functions are activated.
9.3. Changing the program
You can only change the program if the appliance has been operating for a short time. If the appliance has already been running for a longer time, the detergent and water must be replenished and the required program must be restarted.
Press the button (15) to interrupt the program.
Press the P button (22) for approx. 3 seconds until the program changes.
- Select another program: To do this, press the program selection button P, the button (16) for the glass cleaning program, the button (17) for the baby bottle cleaning program or the button (18) for the short program.
Press the button again to start the program.
9.4. Opening during operation
The door can be opened while a program is running, allowing more dishes to be loaded or others to be removed. This is only efficient if the program has only been running for a short time, as otherwise the newly loaded dishes might no longer be fully cleaned.
While the program is running, press the button (15). Wait about 3 seconds until the spray arm stops rotating and then open the door.
Load the additional dishes and/or remove items.
- Close the door again fully. Press the button again to continue the program. The appliance continues after approx. 10 seconds.
9.5. Use start delay
You can start the wash program at a later time. Select between 1 and 24 hours for the start delay.
Switch on the appliance by pressing the button (23).
Select a wash program as described above.
Use the button (20) to select the desired delay, after which the appliance is to start the wash program. The display field indicates the selected delay.
Press the button (15) to confirm the setting.
The appliance starts automatically after the set delay time.
9.6. Selecting a wash program
The following table shows the various wash programs and their applications.
- Set an energy saving or quick program if possible, e.g. the "ECO" or "Quick" program.
| Program Suitable for Sequence | Detergent (Left/right dis- penser) | Runtime in minutes** | Energy/water consumption [kWh/l] | Water con- sumption | ||
| P1 - ECO* Items with normal dirt such as plates, glasses, bowls and lightly soiled pans | Wash (50°C) Rinse Rinse (55°C) Dry | 10 g 165 | 0.314 5 | |||
| P2 - One hour Dis th dishes with light dirt that does not need to be dried thoroughly | Wash (50°C) Rinse Rinse (65°C) Dry | 10 g 60 | 0.40 5 | |||
| P3 - Quick Og Dishes with light dirt Wash (50°C) Rinse Rinse (60°C) | 10 g 29 | 0.35 5 | ||||
| Short program Rinse with hot water =0 | Rinse off light grease stains. Suitable for dishes that do not need to be dried. | - | 12 | 0.15 | 5 | |
| Short program Rinse with cold water =0 | Rinse parts with light dirt that you want to clean later in the day | Rinse | - | 6 0.015 | ||
| Baby bottles i Clean baby bottles without loading additional dishes to ensure hygienic cleaning. | Wash (69°C) Rinse Rinse (70°C) Drying | 10 g 115 | 0.5 | 5 | ||
| Glass C+ | lightly soiled items such as glasses, porcelain | Wash (50°C) Rinse Rinse (65°C) Drying | 10 g 85 | 4 | 5 |
- The ECO program is suitable for cleaning normally soiled dishes. For this application, it is the most efficient program in terms of its energy and water consumption, and therefore complies with the EU Ecodesign Directive. Consumption figures and program duration are only approximate values, except for the ECO program.
** Runtime calculated at a water temperature of 15^ from the water inlet

About halfway through the ECO program, four acoustic signals sound and the operating light (21) flashes quickly for approx. 5 minutes to remind you to add rinse aid to the washing compartment if necessary. This allows you to achieve the best possible washing and drying results for the specified energy class in the ECO program.
- Open the door, pour 3 ml of rinse aid into the washing compartment and close the door.
When using detergent tabs that already contain the rinse aid, it is not necessary to add it.
After closing the door, the program continues.
9.7. End of the wash program

WARNING!
Risk of scalding!
Hot water/hot steam can escape and cause burns if the door is opened while a program is running.
- Do not fully open the door immediately - wait instead until the appliance has cooled down.

CAUTION!
Risk of tripping!
The opened door constitutes a trip hazard.
- Close the appliance door again after a wash cycle has finished.
Once the program has ended, acoustic signals sound and End appears on the display field (19).
Switch off the appliance using the button (23).
The appliance switches off automatically a short time after the end of the wash cycle.
- Open the door slightly so that the steam can escape.
Wait a short time before removing the cutlery/dishes so that the dishes dry more quickly and the heat can escape. - Remove the dishes and cutlery. It is normal for the appliance to be damp inside.
10. Cleaning and maintenance

DANGER!
Risk of electric shock from live parts.
Always pull out the mains plug each time before cleaning or maintenance.
10.1. Pump water out of the water tank
In standby mode, press and hold the button (17) and the button (16) simultaneously for 3 seconds to empty the water tank manually (e.g. before a long period of non-use).
10.2. Filter system
The filter system (5) in the base of the appliance interior retains coarse impurities from the rinsing cycle, including foreign objects such as toothpicks or shards. The collected coarse impurities can lead to clogging of the filters. Check the condition of the filters regularly, carefully remove foreign objects and clean the parts of the filter system with water if necessary. Carry out the following steps to clean the filter.
The filter is made up of two parts:

Fig. 23 - Filter
A Fine filter for small particles:
This filter retains food residue on the bottom of the appliance and prevents it from becoming deposited on the dishes during the wash cycle.
B Main filter:
Food residue and dirt particles retained on the main filter are released by the lower spray arm and rinsed into the fine filter.

NOTICE!
Possibility of damage to the appliance!
Operation without the filter will damage the appliance.
- Never start the appliance without the installed filter system.
An incorrectly inserted filter can damage the appliance or dishes.
10.2.1. Cleaning the fi Her
To ensure that the appliance continues to wash effectively, the filter must be cleaned at regular intervals.
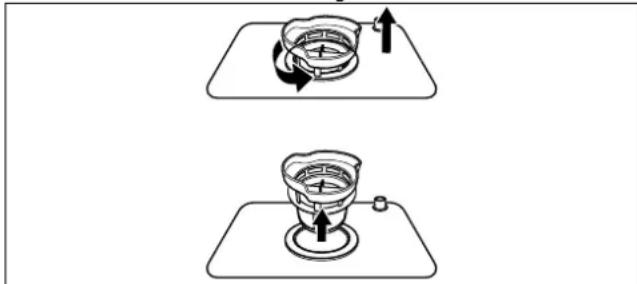
Fig. 24 - Removing the filter
To remove the filter, twist off the fine filter and remove it (see Fig. 24).
Remove the main filter.
- Rinse the filter under running water and clean it thoroughly with a brush. After each wash cycle, check whether larger objects are blocking the filter and remove them immediately.
Proceed in the reverse order to refit the filter system.
10.3. Cleaning the appliance

NOTICE!
Possibility of damage to the appliance!
Damage to the appliance is possible if incorrect detergent is used.
- Do not use harsh detergents or scouring agents or sharp objects to clean the appliance. Scraping materials such as steel wool or sponges with a scrubbing side are not suitable either.
Clean the outside of the appliance with mild detergent using a damp cloth.

NOTICE!
Possibility of damage to the appliance!
Risk of damage to the appliance due to moisture in the appliance.
Clean the appliance door with a slightly damp cloth.
Make sure that no moisture penetrates into the electronics of the door lock so as not to damage the appliance.
To protect the control panel, make sure that no moisture comes into contact with the electronics.
Do not use spray cleaner.

NOTICE!
Possible material damage!
Material damage is possible in the event of water leakage.
Turn off the water supply before cleaning or empty the water tank (see "10.1. Pump water out of the water tank" on page 117).

Fig. 25 - Removing the spray arm
Remove the spray arm (4) inside the appliance (see
Fig. 25) to clean it. Lift this slightly and remove it. Clean the spray arm under running water and check that the openings are not blocked. Reinstall it again afterwards.
In case of grease deposits, run the intensive program without a load to clean the interior.
To remove stains or soiling from the interior surfaces, use water and a cloth dampened with a little vinegar or detergent suitable for a dishwasher.
11. Antifreeze protection
When operating in cold environments, e.g. during the winter months, follow these instructions after each wash cycle to prevent freezing:
Pull the mains plug (24) out of the mains socket.
Turn off the water supply, if necessary, and disconnect the water hose from the water inlet valve.
- Allow the water to drain out of the hose and valve (e.g. into a bucket).
Reconnect the hose to the water inlet valve.
- Remove the filter system on the base of the appliance and collect the remaining water from the appliance base using a rag or sponge.

Contact customer services or a similarly qualified person if the appliance does not function due to freezing.
12. Longer periods without use

WARNING
Risk of explosion!
Under certain conditions, hydrogen gas may be produced in a hot water system that has not been used for two weeks or more. HYDROGEN GAS IS HIGHLY EXPLOSIVE!
If you have not used the dishwasher for an extended period of time, open all hot water taps and allow the water to flow for several minutes before using the dishwasher. This releases pent up hydrogen gas from the system.
As hydrogen gas can ignite, avoid naked flames during this time and do not smoke.
Perform a wash cycle without load.
Pull the mains plug out of the socket.
Turn off the water supply before cleaning or empty the water tank (see "10.1. Pump water out of the water tank" on page 117).
- Leave the appliance door open slightly to prevent potential odours from forming and preserve the seal.
13. Moving the appliance
Always transport the appliance vertically, wherever possible. If necessary, it is also possible to transport the appliance on its back.
14.Troubleshooting
| Technical faults | ||
| Fault Possible cause Solution | ||
| The appliance does not start. | Fuse defective or circuit breaker tripped | Change the fuse or switch on the circuit breaker againMake sure that the electric circuit is protected with at least 10 ampere. |
| Switch the appliance on. | ||
| Appliance door is not fully closed | Close the door correctly. | |
| Water was not pumped out of the dishwasher. | Drain hose is kinked | Route the hose so that it is not kinked. |
| Filter blocked Clean the | filter regularly. | |
| Siphon is blocked | Check the siphon. Make sure the outlet hose is properly installed. | |
| General faults | ||
| Fault Possible cause Solution | ||
| Foam in the appliance | Incorrect detergent | Only use detergent that is suitable for household dish-washers. If foam has formed, open the appliance and wait ap-prox. 20-30 minutes until the foam has receded. Fill the water tank with 1.5 l water and allow the water to drain manually. If necessary, repeat the process several times until the foam has been rinsed away. |
| Blotchy appliance acces-sories | Detergent with colour ad-ditives was used. | Only use detergent without colour additives. |
| White deposits inside the appliance | Mains water hard/high in calcium carbonate | Clean the appliance with a little cleaner for dishwash-ers using a damp sponge. Wear rubber gloves during cleaning. Always use only cleaners for household dishwashers. |
| Rust marks on the cutlery The cutlery in question is not stainless. | Use only dishwasher-safe cutlery. | |
| No program was started after adding salt. | Always start the Quick program without dishes after adding salt. | |
| Noise | ||
| Fault Possible cause Solution | ||
| Knocking/rattling noise in the appliance | The spray arm knocks against the dishes and/or against an item in the dish rack or one of the dishes is loose in the rack. | Stop the program and rearrange the dishes. |
| Unsatisfactory wash result | ||
| Fault Possible cause Solution | ||
| The dishes are not clean. The dishes were not arranged correctly. | Arrange the dishes correctly (see section “8.6. Loading the dishes and cutlery” on page 112). | |
| The selected program was not suitable. | Select a more intensive program (see section “9.6. Se-lecting a wash program” on page 115). | |
| Not enough detergent was used. | Use more or another detergent. | |
| Individual dishes are blocking the path of the spray arm. | Rearrange the dishes so that the spray arm can move freely. | |
| The filter is not inserted or is fitted incorrectly. | Clean and/or insert the filter correctly. Also clean the spray arm (see section “10.3. Cleaning the appliance” on page 118). | |
| Glasses are spotty. Combination of soft water and too much detergent. | Use less detergent if you have soft water and use the shortest wash program to wash glasses correctly. | |
| Black or grey spots on the dishes. | Aluminium cutlery/ac-cessories have come into contact with the plates. | Use a mild detergent to remove the spots. |
| The detergent compa-ment still contains deter-gent after the wash cycle. | The lid of the deter-gent compartment was blocked by dishes. | Rearrange the dishes. |
| Unsatisfactory drying results | ||
| Fault Possible cause Solution | ||
| The dishes are not dried. The dishes were not ar-ranged correctly. | Arrange the dishes correctly (see section "8.6. Loading the dishes and cutlery" on page 112). | |
| The dishes were removed too soon. | Do not remove the dishes immediately after the pro-gram is finished.Open the door slightly so that the steam can escape.Remove the dishes while they are still slightly warm. | |
| The dishes are not dried. Incorrect program select-ed. | The temperature is lower in programs with a short runtime. Select a program with a longer runtime and higher temperature. | |
15. Errormessages
If there is a fault, the dishwasher displays an error code. The following table shows possible error codes and their causes.
| Error message | Problem Solution | |
| E1 If the | predefined amount of water is not reached after 4 minutes during the water inlet process or if no water inlet is detected after 60 seconds and 30 pulses, error E1 is output. | Check the water supplyCheck inlet valveCheck drain valveFlow rate measurement, drain valve or pump failure, contact the service department. |
| E3 | Wash temperature is not reached | Heating element/thermistor error, contact the service department. |
| E4 | The appliance overflows/leaks. | Make sure that the door is closed correctly and that the water inlet and outlet are connected correctly.Turn off the water supply.If water is on the appliance base due to overfilling, remove the water before restarting the dishwasher. |
| Ed | Error display on control panel | Contact our Service Centre. |
| S | Salt container is empty | Replenish the salt container |
If there is an error code that cannot be rectified, contact Service.
16.Disposal


PACKAGING
Your appliance has been packaged to protect it from damage in transit. The packaging is made of materials that can be recycled in an environmentally friendly manner.

Observe the following labels on the packaging materials regarding waste separation with the abbreviations (a) and numbers (b):
1-7:plastics/20-22:paper and cardboard/80-98: composite materials

(France only)
The "Triman" symbol tells the consumer that the product can be recycled, is covered by an extended system of manufacturer's responsibility and must be sorted by material type in France.
APPLIANCE
All old appliances marked with the symbol shown must not be disposed of in normal household waste.
In accordance with Directive 2012/19/EU, the appliance must be properly disposed of at the end of its service life.
This involves separating the materials in the appliance for the purpose of recycling as well as minimising the environmental impact and negative effects on human health.
Take old appliances to an electrical scrap collection point or a recycling centre.
Contact your local waste disposal company or your local authority for more information on this subject.
17. Technical specifications
Distributor: MEDION AG
Am Zehnhof 77
45307 Essen
Germany
Model MD 37763
Power supply 220-240 V\~, 50 Hz
Power consumption 730-860 W
Capacity up to 2 place settings (dia. 24 cm)
Inlet water pressure 0.04-1.0 MPa (0.4-10 bar)
Hot water supply max. 60^
Protection class
Net weight 13.5 kg

17.1. Product data sheet

Scan the QR Code shown to download the product data sheet or contact the service department at www.medion.com/contact to obtain a printed copy of the product data sheet. You will also find the QR code on the energy label.
18. EU declaration of conformity
CE MEDION AG hereby declares that the product conforms to the following European requirements:
EMC Directive 2014/30/EU
Low Voltage Directive 2014/35/EU
- Ecodesign Directive 2009/125/EC
RoHS Directive 2011/65/EU
Regulation (EU) 2019/2022
Regulation (EU) 2019/2017
19. Spareparts
If you would like to reorder spare parts, please visit our MEDIONServiceshop at https://www.medion.com/medi-onserviceshop.
You will be able to find out all the details about your specific product while you're there.
The minimum period for the supply of electronic components for your dishwasher is 7 years. For the supply of spare parts such as seals, spray arms, drain filters, internal shelves and plastic peripherals such as baskets and lids, the minimum period for your dishwasher is 10 years.
20. Service information
Please contact our Customer Service team if your device ever stops working the way you want or expect it to. There are several ways for you to contact us:
- In our Service-Community, you can meet other users, as well as our staff, and you can exchange your experiences and pass on your knowledge there. You will find our Service-Community at community.medion.com.
- Alternatively, use our contact form at www.medion.com/contact.
- You can also contact our Service team via our hotline or by post.
| Opening times Hotline number UK | |
| Mon – Fri: 08.00 – 20.00Sat – Sun: 10.00 – 16.00 | 1 0333 3213106 |
| Service address | |
| MEDION Electronics Ltd. 120 Faraday Park, Faraday Road, Dorcan Swindon SN3 5JF, Wiltshire United Kingdom | |

You can download this and many other sets of operating instructions from our service portal at www.medionservice.com.
We have stopped providing printed copies of our warranty terms and conditions as part of our commitment to sustainability, but you can access the warranty terms and conditions on our service portal.
You can also scan the QR code on the side of the screen, to download the operating instructions onto your mobile device from the service portal.
21./legalNotice
Copyright 2024
Date: 23. May 2024
All rights reserved.
These operating instructions are protected by copyright. Mechanical, electronic and any other forms of reproduction are prohibited without the written permission of the manufacturer.
Copyright is owned by the company:
MEDION AG
Am Zehnhof 77
45307 Essen
Germany
Please note that you cannot use the address above for returns. Please always contact our Customer Service team first.