
CFX2 28 - Refrigerator DOMETIC - Free user manual and instructions
Find the device manual for free CFX2 28 DOMETIC in PDF.
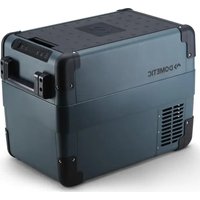


| Product type | Compression refrigerator (electric cooler) |
| Brand | DOMETIC |
| Model | CFX2 28 |
| Dimensions (L x W x H) | 726 x 590 x 596 mm |
| Weight | 13.5 kg |
| Capacity | 28 L |
| Power supply | 12/24 V DC (direct current) and 100-240 V AC (alternating current) |
| Power consumption (12 V) | 8.6 A |
| Power consumption (24 V) | 3.8 A |
| Temperature range | -18°C to +10°C |
| Refrigerant | R-600a (isobutane) |
| Refrigerant quantity | 13 g |
| Main functions | Bluetooth, NFC, Mobile Cooling app, 3-level battery protection, LCD screen, temperature control, foldable handles, USB port 5V/2A, removable basket |
| Safety | Overvoltage protection, reverse polarity protection, battery protection, fuse |
| Maintenance and cleaning | Clean with a damp cloth, manual defrosting |
| Spare parts and repairability | Replaceable fuse, control board replaceable by a professional |
| Warranty | Legal warranty, see manual for details |
| General information | Use in camping, vehicle, boat; not suitable for freezing |
Frequently Asked Questions - CFX2 28 DOMETIC
User questions about CFX2 28 DOMETIC
0 question about this device. Answer the ones you know or ask your own.
Ask a new question about this device
Download the instructions for your Refrigerator in PDF format for free! Find your manual CFX2 28 - DOMETIC and take your electronic device back in hand. On this page are published all the documents necessary for the use of your device. CFX2 28 by DOMETIC.
USER MANUAL CFX2 28 DOMETIC
Dometic CFX2 28, CFX2 37, CFX2 45, CFX2 57
Compressor cooler Operating manual....3 Kompressor-Kühlbox Bedienungsanleitung...... B3 Réfrigérateur à compression Manuel d'utilisation....DD Never: e compreso Instrucciones de uso....6i (4) elem: com compressor Manual de instruções.... 86 Frigorifero portatile con compressore Istruzioni per l'uso...... dCj Compressor koelbox Gebruiksaanwijzing...... dB8 R/ Kompressor- køleboks Betjeningsvejledning...... dDh Kylbox med kompressor Bruksanvisning...... d6h Kompressor kjøleboks Bruksanvisning......d8h Kompressor. 2lm5l!! ti..o !"yttöohje...... BCh -0'67.! spr89!r.07! Instrukcja obsługi...... BBh Chll' il ci box s:. ompresorom ' ( od na obsluhu......Bi d
Kompresorový chladicí box ' ( od k obsluze......Bj B Kompresszoros hűtőláda használati utasítás......BhB Kompresorski hladilnik '! n4! . Upute za rukovanje....3d3 Kompresör soğutucu kullanma kılavuzu.... 33D Kompresorski hladilnik '! iln! torb! ' a odilo za uporabo.... 3i D p! r! t' e rFcire cE compresor Instruc-iuni de operare....3j D HI J KEMNI EOF GRFSTROF UPOM /01234567 89:40;ло919567....3hi Kompressorig! 4! hEtEsse! ' e ! asutusjuhend.... Dd6 Ψυγείο με συμπιεστή Οδηγίες χειρισμού...... D36 Kompresorinis W! 1' 2tEv! s ' audojimo ado as.... Di 8 DzesXW! n! s . ! ste ! r . ompresorE Lietošanas rokasgrāmata.... Dj h / R\ni CC.....\nالإستعمال
Copyright. Dometic Group. The visual appearance of the contents of this manual is protected by copyright and design law. The underlying technical design and the products contained herein may be protected by design, patent, or pending patent. The trademarks mentioned in this manual belong to Dometic Sweden AB. All rights are reserved.
English
1 Important notes....3 2 Explanation of symbols....3 3 Explanation of symbols on the device.....D 4 Safety instructions....D 5 Scope of delivery....6 6 Accessories....j 7 Intended use....j 8 Technical description....8 9 Operation.... dC 10 Meaning and maintenance....dh 11 Troubleshooting....dh 12 Warranty....BC 13 Disposal......Bd 14 Technical data...... Bd
Important notes
Please read these instructions carefully and follow all instructions, guidelines, and warnings included in this product manual in order to ensure that you install, use, and maintain the product properly at all times. These instructions MUST stay with this product.
By using the product, you hereby confirm that you have read all instructions, guidelines, and warnings carefully and that you understand and agree to abide by the terms and conditions as set forth herein. You agree to use this product only for the intended purpose and application and in accordance with the instructions, guidelines, and warnings as set forth in this product manual as well as in accordance with all applicable laws and regulations. Failure to read and follow the instructions and warnings set forth herein may result in an injury to yourself and others, damage to your product, or damage to other property in the vicinity. This product manual, including the instructions, guidelines, and warnings and related documentation, may be subject to changes and updates. For up-to-date product information, please visit documents.dometic.com.
A signal word will identify safety messages and property damage messages and also will indicate the degree or level of hazard seriousness.

DANGER
Indicates a hazardous situation that, if not avoided, will result in death or serious injury.

WARNING
Indicates a hazardous situation that, if not avoided, could result in death or serious injury.

CAUTION
Indicates a hazardous situation that, if not avoided, could result in minor or moderate injury.

NOTICE
Indicates a situation that, if not avoided, can result in property damage.

NOTE: Supplementary information for operating the product.
3 Explanation of symbols on the device

Warning: Risk of fire. Flammable materials.
4 Safety instructions

DANGER: Electrocution hazard.
On boats: the device is powered by the mains; ensure that the power supply has a residual current circuit breaker (RCCB) or a ground fault circuit interrupter (GFCI). Installation, especially in potentially damp areas, must be in accordance with all applicable installation regulations. Do not touch exposed cables with your bare hands. This applies especially when operating the de-ice from the mains.

WARNING: Electric shock hazard!
Do not operate the cooling de-ice if it is visibly damaged. If this cooling de-ice's power cable is damaged, it must be replaced to prevent safety hazards. This cooling de-ice may only be repaired by qualified personnel. Improper repairs can lead to considerable hazards. Plug the de-ice into sockets that ensure proper connection, especially when the de-ice needs to be earthed.

WARNING: Fire hazard!
When positioning the de-ice, ensure the supply cord is not trapped or damaged. Do not locate multiple portable socket-outlets or portable power supplies at the rear of the de-ice. The refrigerant in the refrigerant circuit is highly flammable, and in the event of a leakage, combustible gases could build up if the appliance is in a small room. In the event of any damage to the refrigerant circuit?
Keep naked flames and potential ignition sources away from the refrigerator. Ventilate the room well. Switch off the refrigerator.
For cooling de-ices with R600a refrigerant:
The refrigeration circuit contains a small quantity of an environmentally friendly but flammable refrigerant. It does not damage the ozone layer and does not increase the greenhouse effect. Any leaking refrigerant may ignite. Do not use or store the cooling de-ice in confined spaces with none or minimal air flow.
Keep the ventilation openings on the de-ice housing or in installations free of obstructions. Do not use any mechanical objects or other media to speed up the defrosting process, unless they have been recommended by the manufacturer for this purpose. Do not open or damage the refrigerant circuit. Do not use electrical devices inside the cooling de-ice unless they are recommended by the manufacturer for that purpose.

WARNING: Health hazard!
This de-ice can be used by children aged from 8 years and above and persons with reduced physical, sensory or mental capabilities or lack of experience and knowledge if they have been given supervision or instruction concerning use of the de-ice in a safe way and understand the hazards involved. Children aged from 3 to 8 years are allowed to load and unload refrigerating de-ices. Children must be supervised to ensure that they do not play with the de-ice. Cleaning and user maintenance shall not be made by children without supervision.

WARNING: Explosion hazard!
Do not store any explosive substances such as spray cans with a flammable propellant in the cooling de-ice.

CAUTION: Electric shock hazard!
Before starting the cooling device, ensure that the power supply cable and the plug are dry. Disconnect the cooling device from the power supply before each cleaning and maintenance and after every use.

To avoid contamination of food, respect the following instructions:
Check that the cooling capacity of the device is suitable for storing the goods you wish to cool. Food may only be stored in its original packaging or in suitable containers. Opening the cooling device for long periods can cause a significant increase in temperature in the compartments of the device. Clean regularly surfaces that can come in contact with food and accessible drainage systems.
If the device is left empty for long periods:
Switch off the device. Defrost the device. Clean and dry the device. Leave the lid open to prevent mould developing within the device.

Check that the voltage specification on the type plate corresponds to that of the energy supply. Only connect the cooling device as follows:
With the DC connection cable to a DC power supply in the vehicle
Or with the AC connection cable to an AC power supply
Never pull the plug out of the socket by the cable.
If the cooling device is connected to a DC outlet: Disconnect the cooling device and other power consuming devices from the battery before connecting a quick charging device. If the cooling device is connected to a DC outlet, disconnect the cooling device or switch it off when you turn off the engine. Otherwise you may discharge the battery. The cooling device is not suitable for transporting caustic materials or materials containing solvents. The insulation of the cooling device contains flammable cyclopentane and requires special disposal procedures. Deliver the cooling device at the end of its life-cycle to an appropriate recycling center. Do not place the cooling device near naked flames or other heat sources such as direct sunlight, gas ovens, etc. Do not fill the inner container with ice or fluids. Never immerse the cooling device in water. Protect the cooling device and cables against heat and moisture. The cooling device shall not be exposed to rain. To enable the refrigerant to circulate properly, the cooler may not be tilted by more than 30°. Use a spirit level to ensure the cooler is level. Risk of overheating! Ensure at all times that there is sufficient ventilation on all four sides of the cooling device. Keep the ventilation area free of any objects that could restrict the air flow to the cooling components. Do not place the cooling device in closed compartments or areas with none or minimal air flow.
5 Scope of delivery
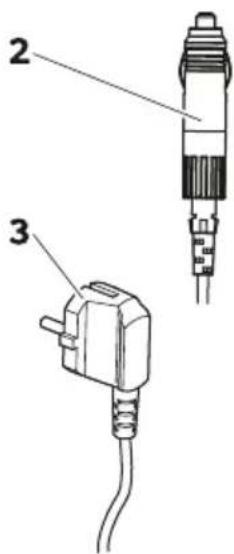
Item Quantity Description
| d d Mooler |
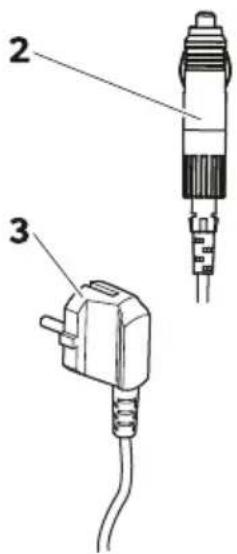
| B d Monnection cable for EM connection |
| 3 d Monnection cable for J M connection |
| e d l hort operating manual |
6 / Accessories
Available as accessory "not included in scope of delivery"
| Design! tion Re, no. Mo' el | ||
| f uick release GiLing kit MRg-f R! h6CCCCCCd66 MRgB B8 only | ||
| f uick release GiLing kit MRg-f R! 3i Di | h6CCCBhi hh | MRgB 3j and MRgB Di only |
| Mobile cooling app e suits all models | ||
7 Intended Use
The cooler is suitable for cooling goods. The cooler is also suitable for use in vehicles. The cooler is designed to be operated from a 12 V power supply socket of a vehicle or from a 230 V power supply.
The cooler is also suitable for camping use.
The cooler is intended to be used in household and similar applications such as
- Staff kitchen areas in shops, offices, and other working environments - Farm houses - Clients in hotels, motels, and other residential type environments - Bed and breakfast type environments - Catering and similar non-retail applications
The cooler is not suitable for
- Quick freezing of food - Storage of corrosive, caustic, or solvent-containing substances - Use as a built-in appliance
This cooler is only suitable for the intended purpose and application in accordance with these instructions.
This product is only suitable for the intended purpose and application in accordance with these instructions.
This manual provides information that is necessary for proper installation and/or operation of the product. Poor installation and/or improper operation or maintenance will result in unsatisfactory performance and a possible failure.
The manufacturer accepts no liability for any injury or damage to the product resulting from
- Incorrect installation, assembly, or connection including excess voltage - Incorrect maintenance or use of spare parts other than original spare parts provided by the manufacturer - Alterations to the product without express permission from the manufacturer - Use for purposes other than those described in this manual
The manufacturer reserves the right to change product appearance and product specifications.
8) Technical description
The cooler can cool products. A low maintenance refrigerant circuit with compressor provides the cooling. The generous insulation and powerful compressor ensure efficient and fast cooling.
The cooler is portable.
The cooler can withstand a short-term inclination of 30° for example on boats.
Scope of functions
U Power supply with priority circuit for connecting to the 12/24 V power supply U 3-level battery monitor to protect the vehicle battery U Display with temperature gauge in °C and °F U Temperature setting with buttons in steps of 1 °C/1 °F U Integrated Bluetooth and Wi-Fi function for controlling the cooler via the mobile cooling app U Foldable carrying handles U USB port for a power supply U Removable wire basket
3 Operating and display elements
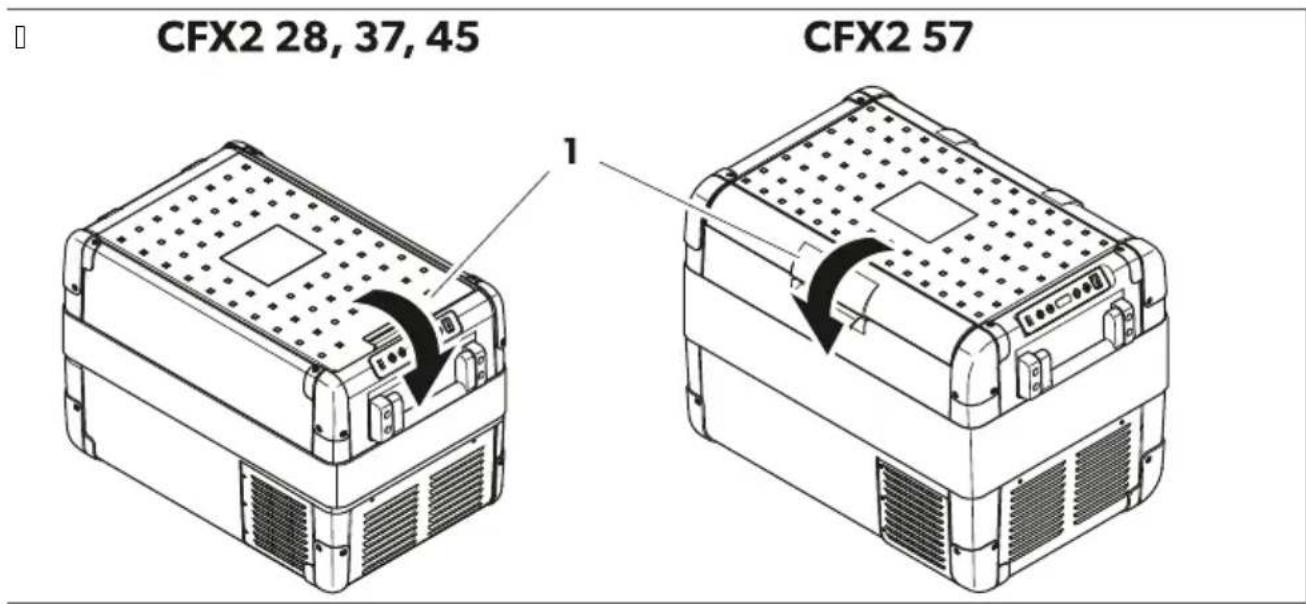
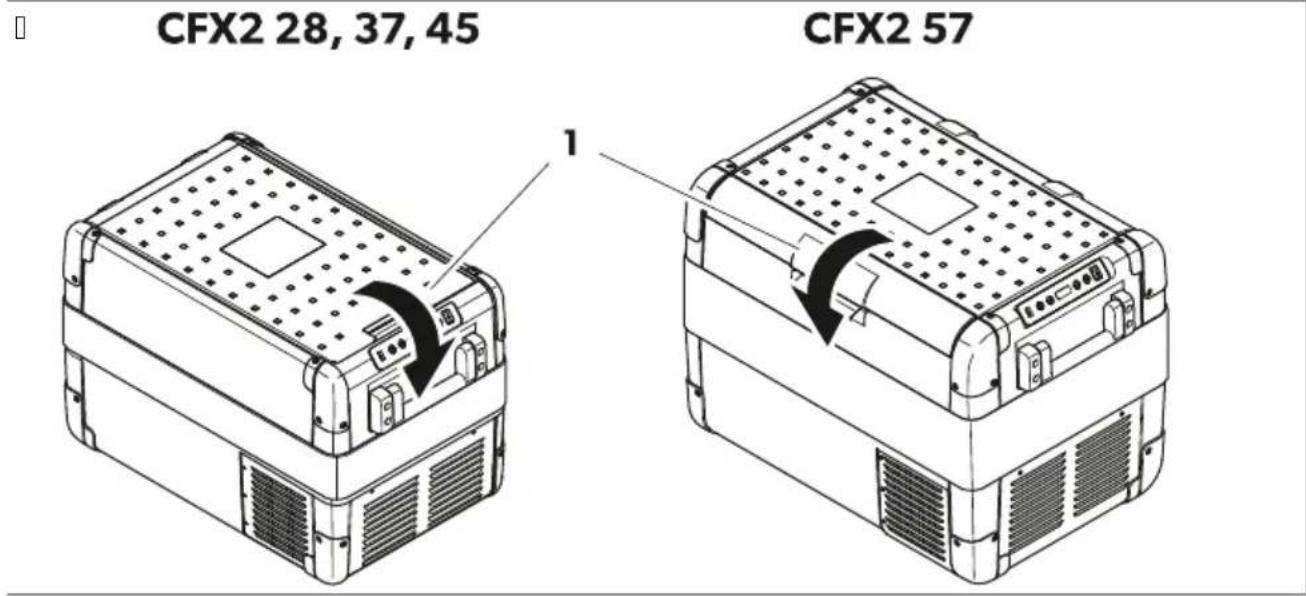
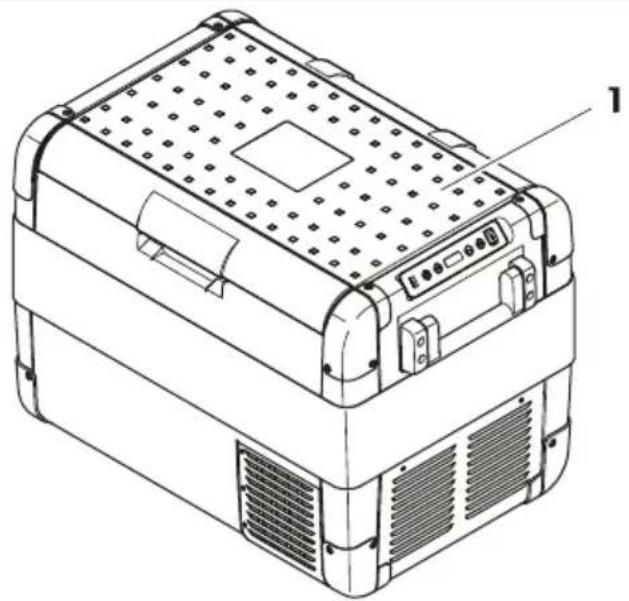
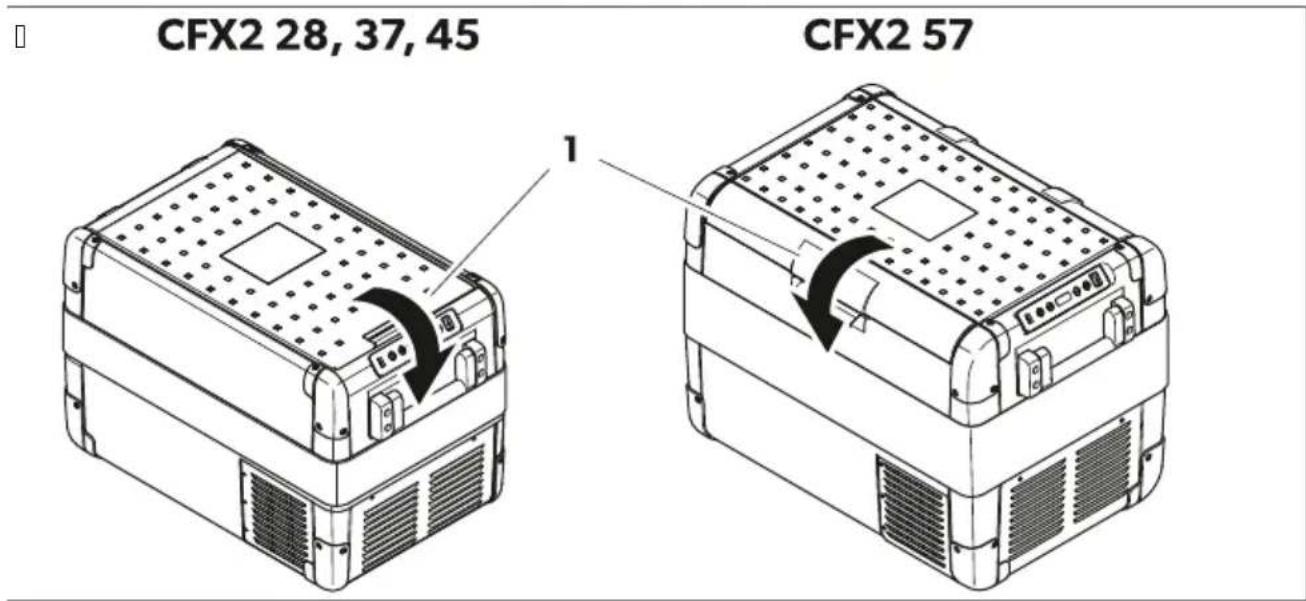
Latch (Fig. 1 on page 3) for lid
Control panel
□
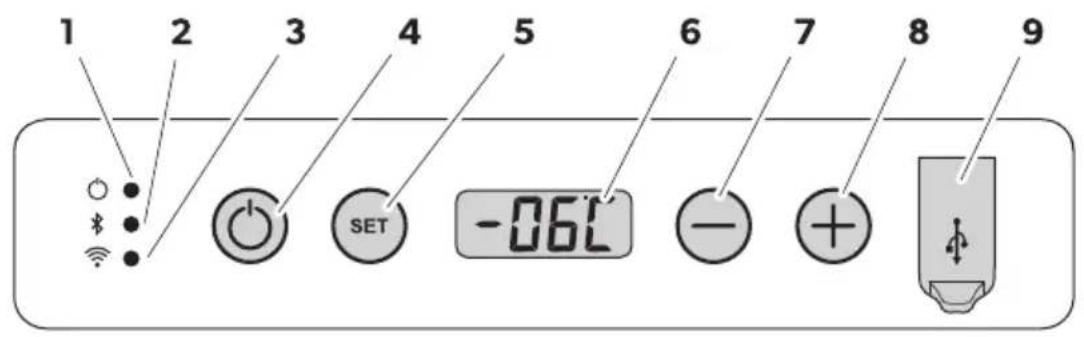
| Item Description Expl! n! tion | ||
| I tatus indication | ||
| Fhe LKE lights up whiteV Fhe compressor starts running.d Oower | ||
| Fhe LKE lights up orangeV Fhe compressor stops running. | ||
| B | Bluetooth | Fhe LKE is switched offV Fhe Bluetooth of the cooler is switched off. |
| Fhe LKE @lashes slow whiteV Fhe Bluetooth of the cooler is switched on. Fhe cooler is not paired with a de ice. | ||
| Fhe LKE @lashes cast whiteV Fhe cooler pairs with a de ice ia Bluetooth. | ||
| Fhe LKE lights up whiteV Fhe cooler is paired with a de ice ia Bluetooth. | ||
| 3 | NLJ' | Fhe LKE is switched offV Fhe NLJ' of the cooler is switched off. |
| Fhe LKE @lashes whiteV Fhe NLJ' of the cooler is switched on. Fhe cooler is not connected to a de ice. | ||
| Fhe LKE lights up whiteV Fhe cooler is paired with a de ice ia NLJ'. | ||
| DO' kORR I witches the cooler on or off. | ||
| i | SET | I elects the input modeVU Temperature settingU Melsius or Rahrenheit displayUl et battery monitorUl et brightness of displayUl et the display modeUl et BluetoothUl et NLJ' |
| 6 E isplay | ||
| j - | I ets the temperatureH the temperature unitH the battery monitorH the brightness of the displayH the modeH the BluetoothH and the NLJ'. | |
| 8 + | ||
| h Ul B port | ||
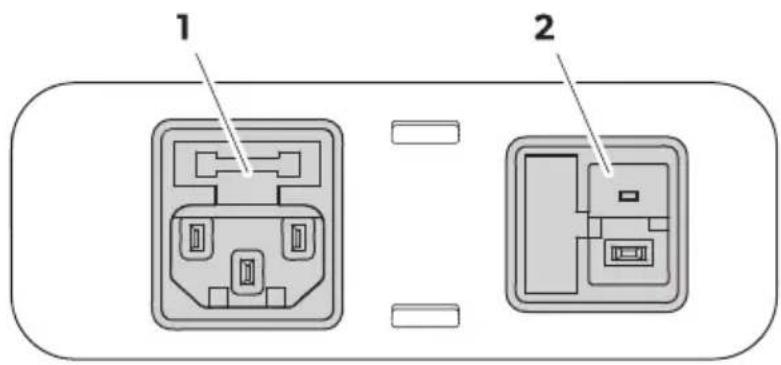
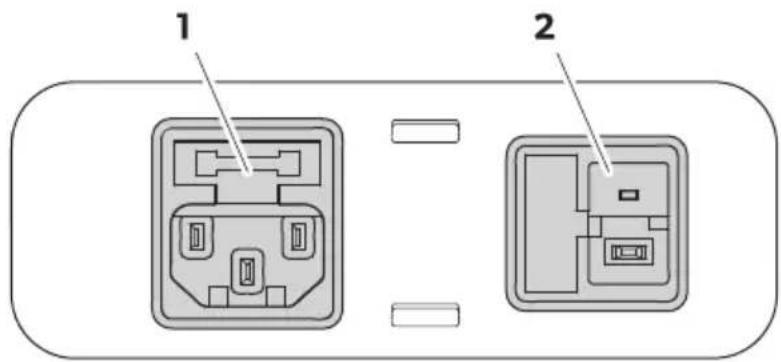
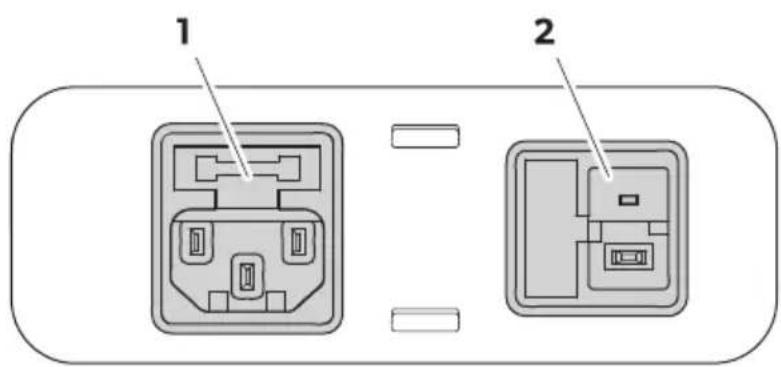
Connection sockets
□
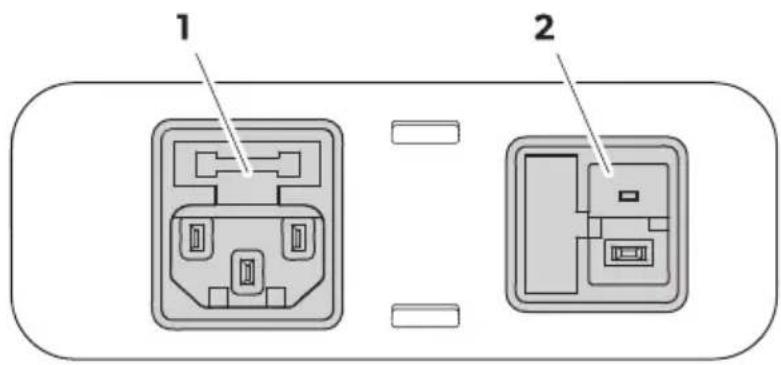
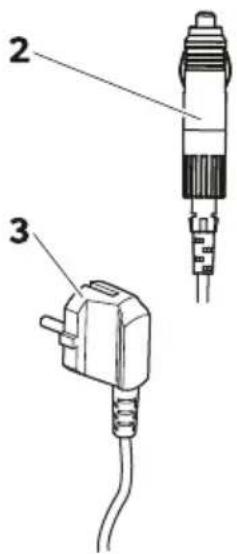
Item Description
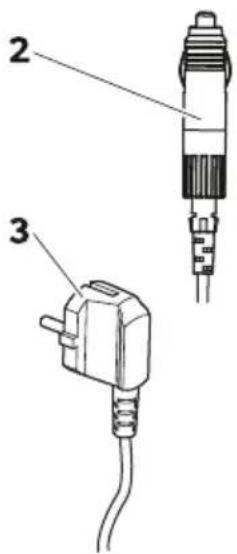
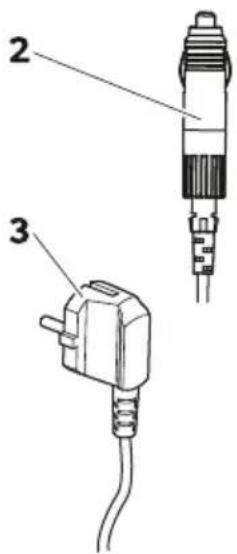
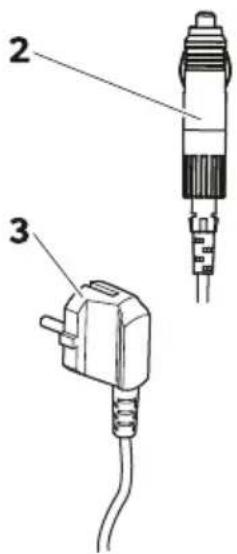
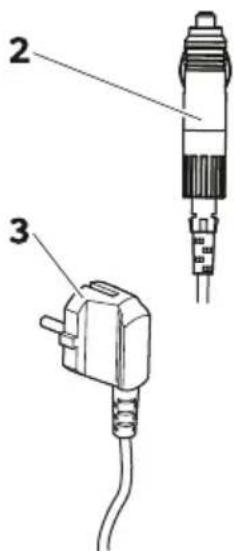
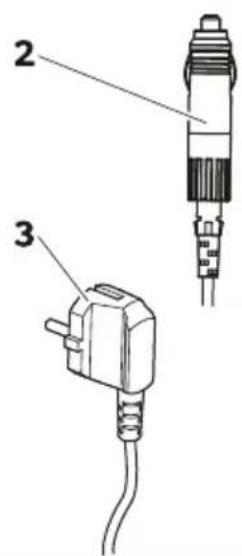
1 Connection socket 12/24 V voltage supply
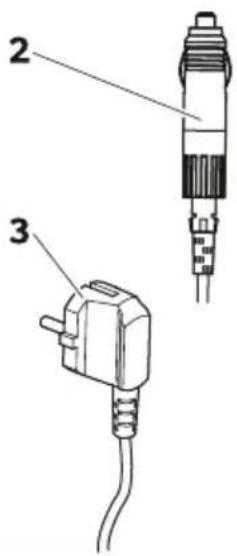
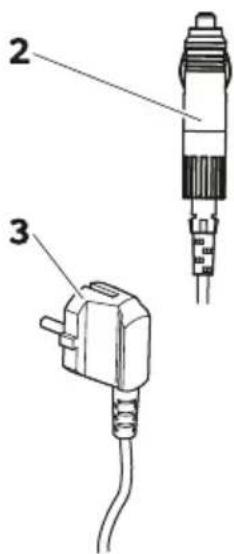
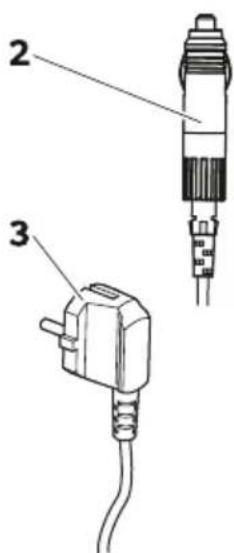
2 Connection socket 100-240 V voltage supply

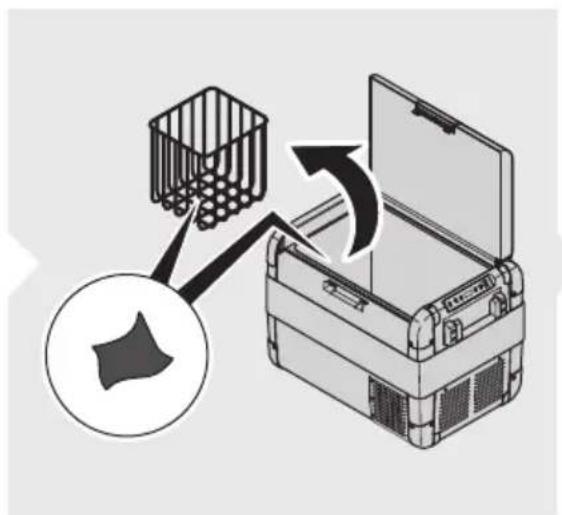
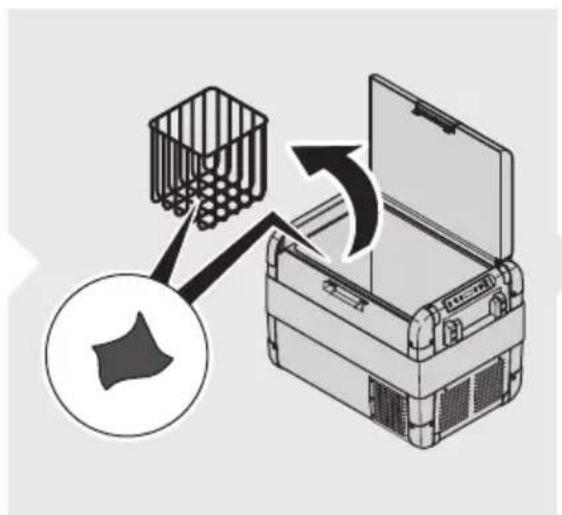
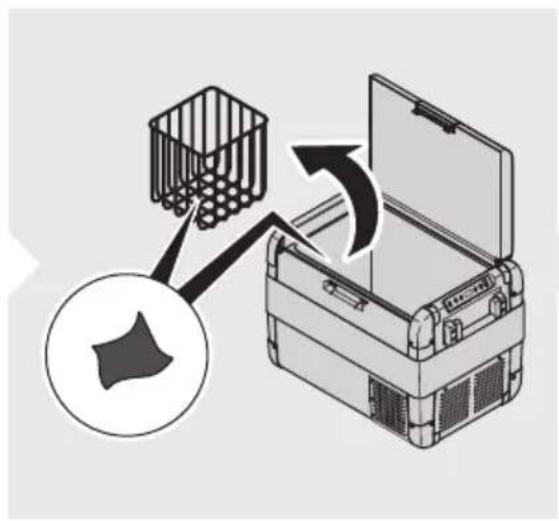
Before starting the cooler for the first time, clean the inside and outside of the cooler with a damp cloth for hygienic reasons. See "Cleaning and maintenance" on page 14.
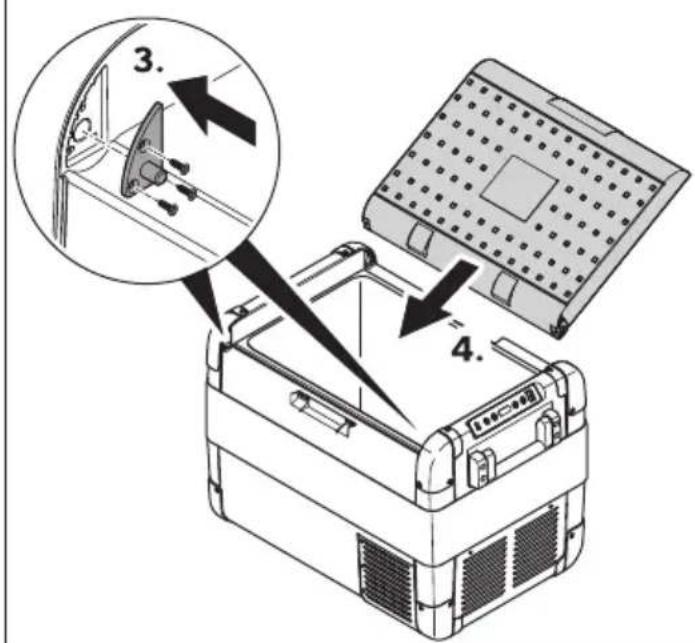
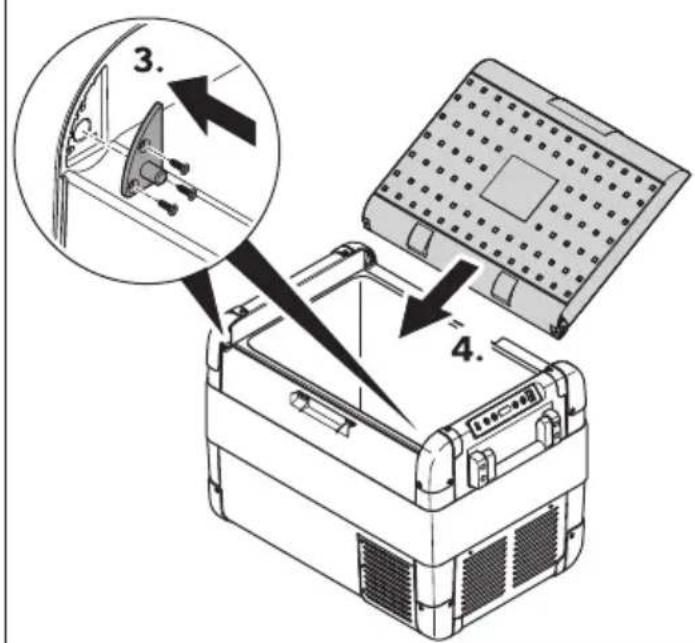
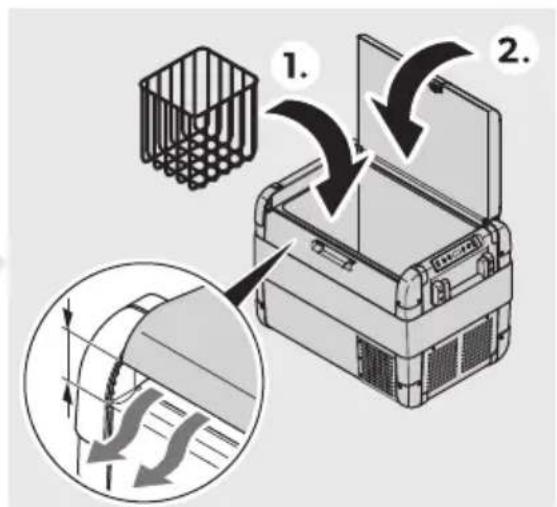
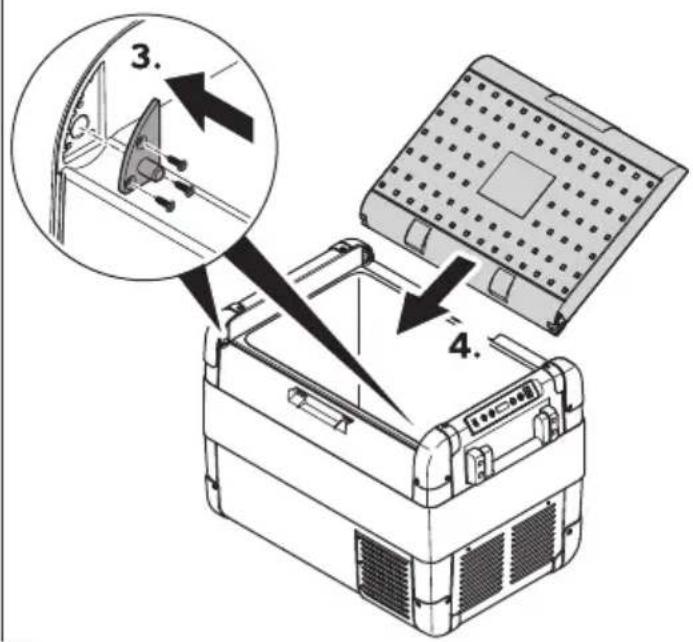
Reversing the lid opening direction (CFX 2 57 only)
The lid hinges can be moved to the opposite side.
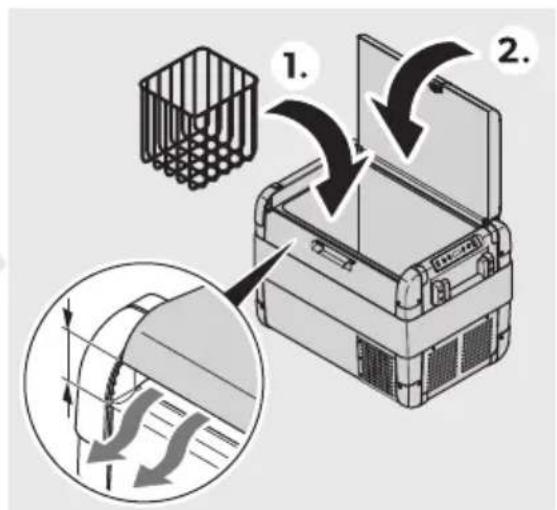
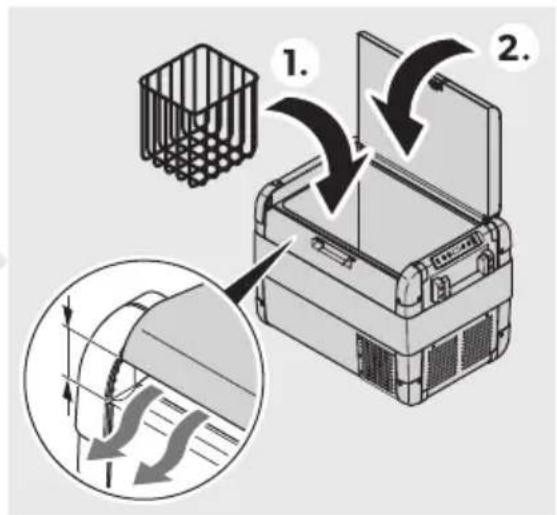
a. Open and remove the lid (Fig. 9 on page 14).
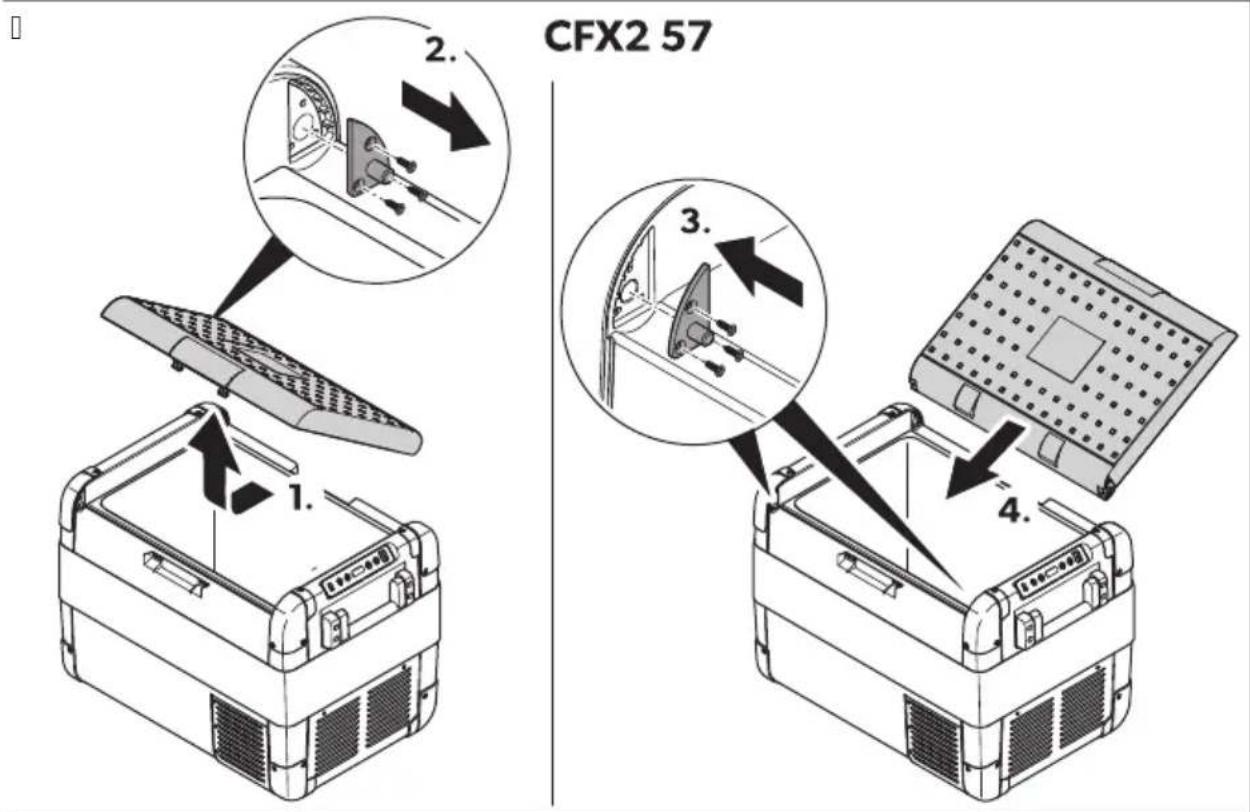
b. Remove the 3 screws for each hinge (Fig. 9 on page 14) and take them off. c. Replace the hinges in the new positions. d. Insert the lid into the new hinge positions (Fig. 10 on page 14).
Saving energy
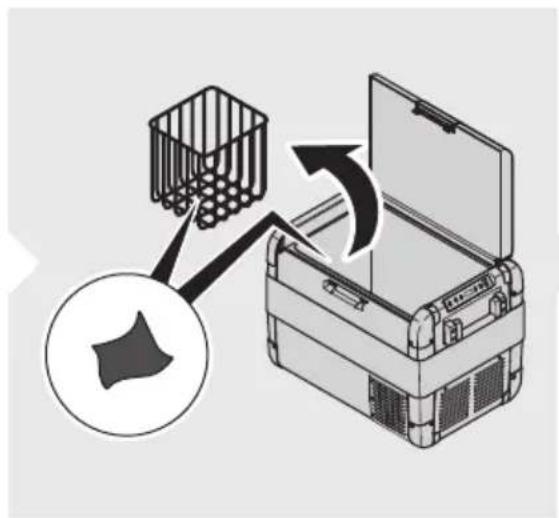
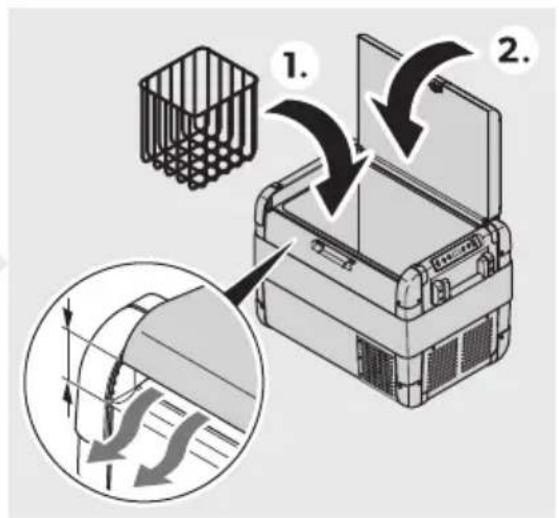
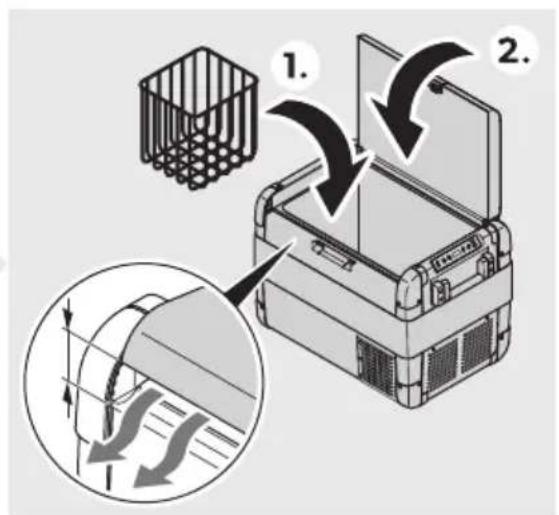
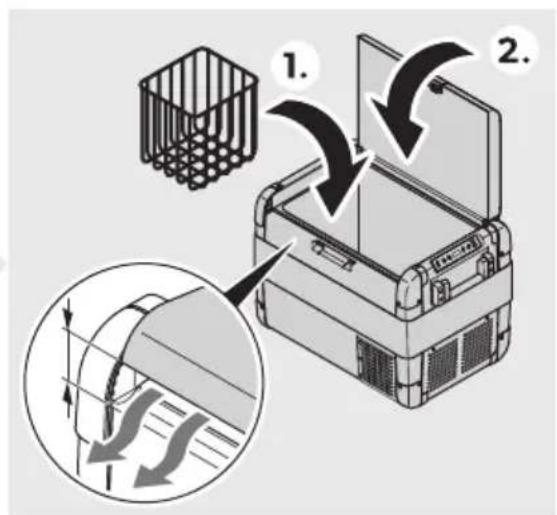
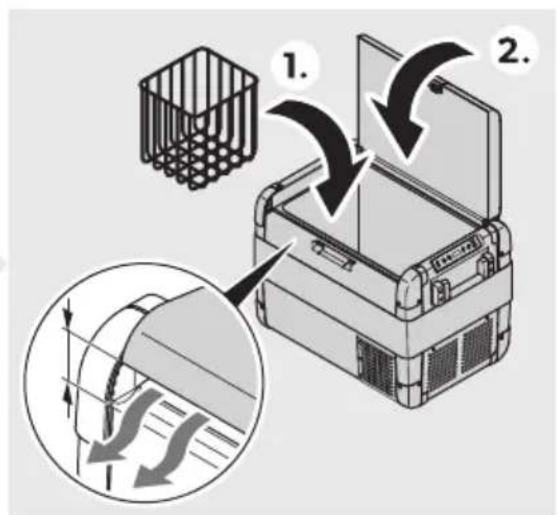
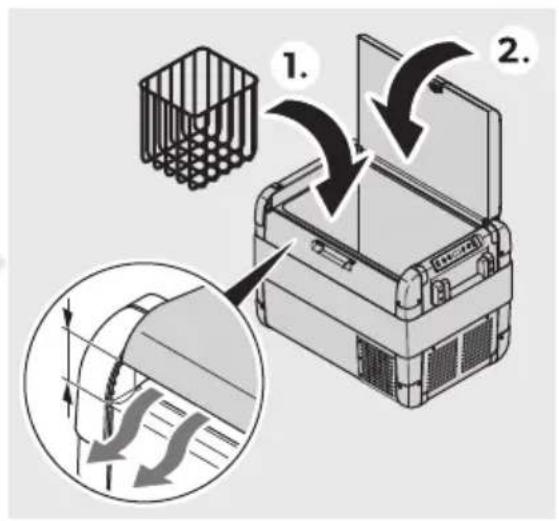
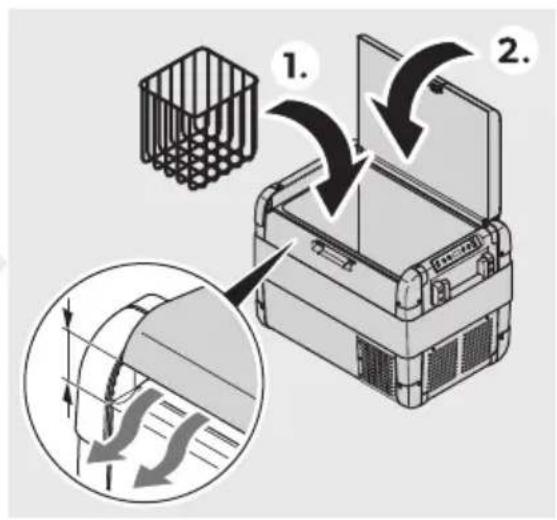
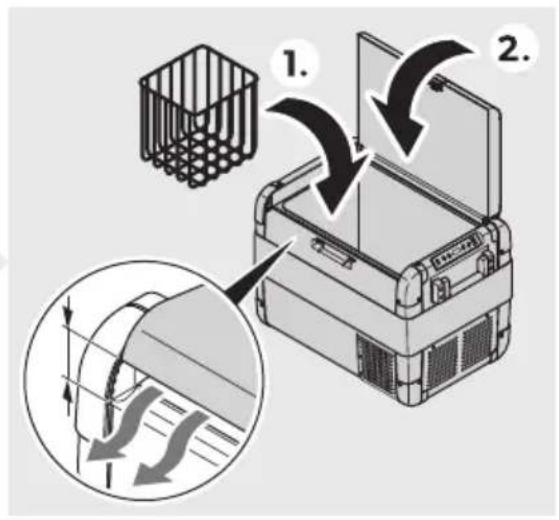
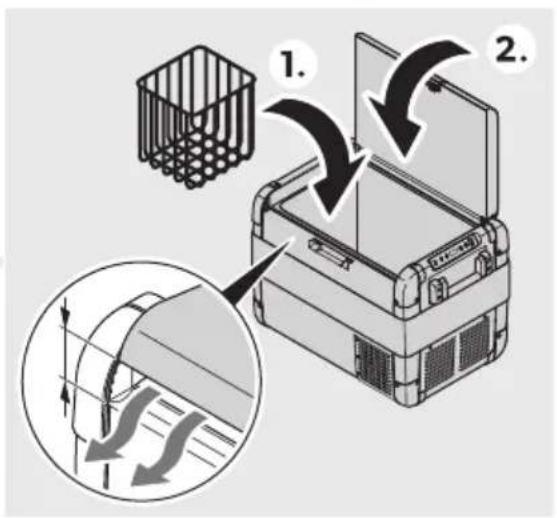
Choose a well-ventilated location which is protected from direct sunlight. Allow warm food to cool down first before placing it in the cooling device to keep cool. Do not open the cooling device more often than necessary. Do not leave the cooling device open for longer than necessary. If the cooling device has a basket, for optimal energy consumption position the basket according to its position on delivery. On a regular basis, ensure that the lid seal still fits properly.
Connecting the cooler
Connecting to a battery

CAUTION! Damage hazard
For protection of the device, the DC cable supplied includes a fuse inside the plug. Do not remove the fused DC plug. Only use the DC cable supplied. Disconnect the cooler and other consumer units from the battery before connecting the battery to a quick charging device. Overvoltage can damage the electronics of devices connected to the battery.

NOTE: The cooler is equipped with an electronic system to prevent polarity reversal. The electronic system protects the cooler against short-circuiting when connected to a battery.
The cooler can be operated with 12 V or 24 V.
Connect the cooler to a battery using the EM connection cable as shown.
![graph TD A["Electric Vehicle Battery"] --> B["Switch"] B --> C["Battery with DC power supply"] C --> D["DC-AC/PLA 120kV DC"] D --> E["Switch 1."] E --> F["DC-AC/PLA 2."] F --> G["Switch 2."] G --> H["DC-AC/PLA 3."] H --> I["Switch 3."] I --> J["DC-AC/PLA 4."] J --> K["Switch 4."] K --> L["DC-AC/PLA…](/content/2026/04/709060/images/e3e9bf9af5251ee61754917dd8cd1d3929d42e5e40ee0ff8fa80fb1fc608e15d.jpg)
Connecting to AC power supply

DANGER! Electrocution hazard!
Never handle plugs and switches with wet hands or if you are standing on a wet surface. If the cooler is operated on board a boat from an AC power supply, a residual current circuit breaker must be installed between the AC power supply and the cooler. Seek advice from a trained technician.

NOTE
The cooler is equipped with an integrated multi-voltage power supply with priority circuit for connecting to an AC voltage source. The priority circuit automatically switches the cooler to AC operation if the cooler is connected to an AC power supply, even if the EM connection cable is still attached.
Connect the cooler to an AC power supply using the AC connection cable as shown.
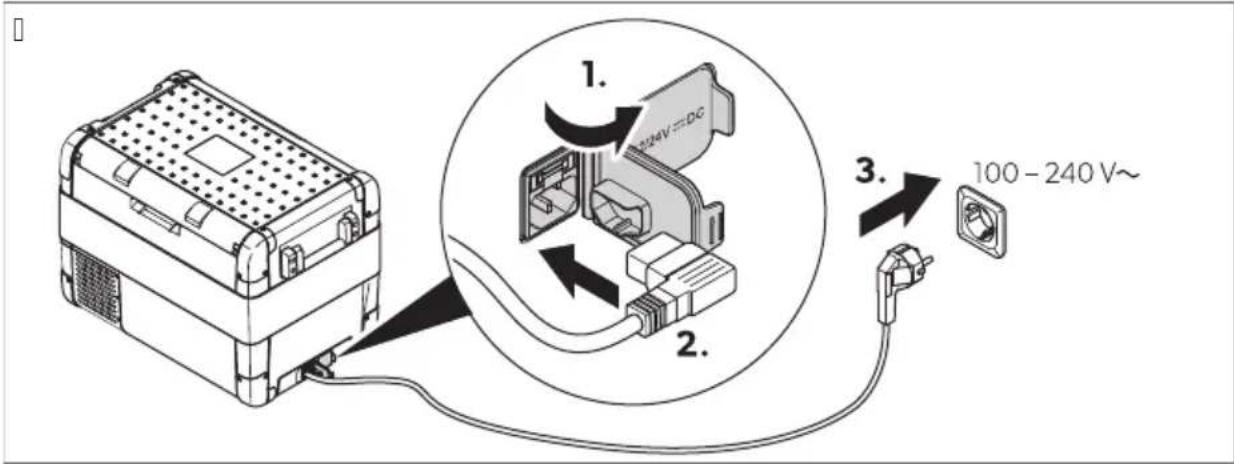
Using the cooler

NOTICE! Damage hazard!
Place the cooler with the base facing downwards.
a. Place the cooler on a firm foundation. b. Connect the cooler (see chapter "Connecting the cooler" on page 10).

WARNING! Health hazard!
Ensure that only the items that are to be cooled at the selected temperature are placed in the cooler.
- Press the MODE button for about 3 seconds.
The power LED lights up. The display switches on and displays the current temperature.

The display shows the current temperature.
The temperature displayed is the temperature of the large interior compartment (see Fig. 10 on page Yx).
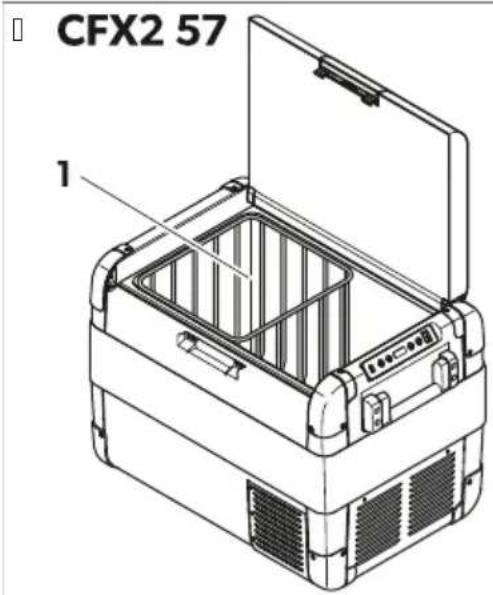
The cooler starts cooling the interior.
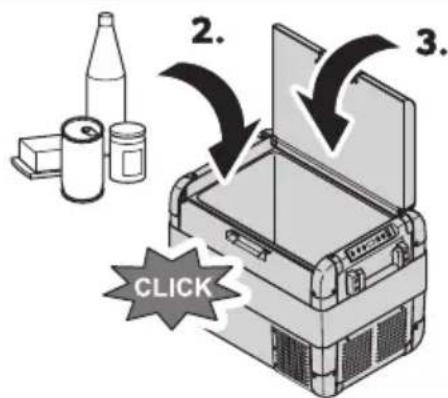
Switch on the cooler.
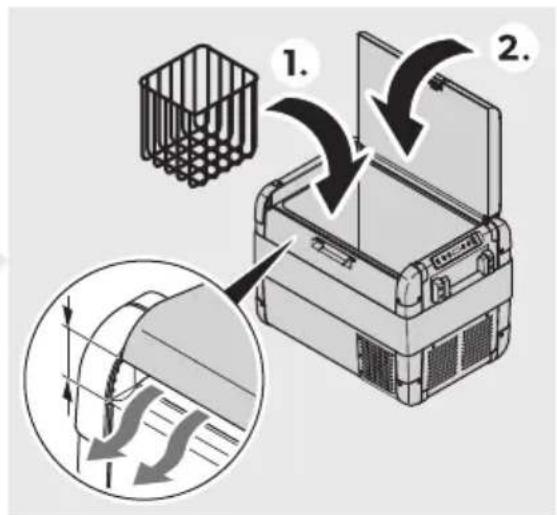
Close the lid.
Press the latch down until it audibly clicks into place.
To avoid food waste, note the following:
Keep temperature fluctuation as low as possible. Only open the cooling device as often and for as long as necessary. Store the goods in such a way that the air can still circulate well.
Adjust the temperature to the quantity and type of the foodstuff.
Foodstuff can easily absorb or release odor or taste. Always store foodstuff covered or in closed containers/bottles.
Setting the temperature
Press the SET button once.
Use the + and - buttons to select the cooling temperature.
The selected temperature and icon appear in the display for a few seconds. The display flashes several times. Afterwards the current temperature is displayed again.
Selecting the temperature unit
d. Press the SET button 3 times.
B. Press the + or - button to select the temperature unit.
The selected temperature unit and icon are displayed on the display for a few seconds. The display flashes several times before displaying the current temperature.
Using the battery monitor

CAUTION! Risk of damage!
When the battery monitor switches off, the battery is no longer fully charged. Avoid repeated starting or the operation of power consumers without longer charging phases. Ensure that the battery is recharged.
The cooler is equipped with a multi-level battery monitor that protects the vehicle battery against excessive discharging when the cooler is connected to the on-board DC supply.
If the cooler is operated with the vehicle ignition switched off, the cooler switches off automatically as soon as the supply voltage falls below a certain value. The cooler switches on again as soon as the battery is recharged to the restart voltage.
In the "HIGH" mode, the battery monitor responds faster than at the "LOW" and "MED" modes.
| G! tter2 monitor mo' e - 3 W MED HI H | |||
| Testart oltage at dB V | dd.D V | dB.B V | dB.6 V |
| I witch-off oltage at dB V | dC.d V | dd.B V | dd.8 V |
| Testart oltage at BD V | B3 V | Bi .3 V | B6.D V |
| I witch-off oltage at BD V | Bd.i V | BD.d V | BD.6 V |
Select the battery monitor mode as follows:
d. Switch on the cooler.
B. Press the SET button 3 times.
- Use the + or - buttons to select the battery monitor mode.
The display changes as follows: Lo, LON, XHPnd, MKKEXPH, ( ) IG)
The selected mode appears in the display for a few seconds. The display flashes several times before returning to the current temperature.

Note: When the cooler is supplied by the starting battery, select the battery monitor mode (IG) n. If the cooler is connected to a house battery, select the battery monitor mode (LON) n.
Setting the display brightness
The display brightness can be dimmed for low ambient light conditions.
d. Switch on the cooler.
B. Press the SET button D times.
- Use the + or - buttons to set the brightness of the display.
The display changes as follows: d Lo, low-d nd, medium H, high
The display shows the set mode for a few seconds. The display flashes a few times before returning to the current brightness.

Note: If a fault occurs, the brightness automatically switches to H (default). Once the fault has been rectified, the set brightness is restored.
Using the USB port
The USB port allows small devices such as cell phones and MP3 players to be charged.
Connect the device to be charged to the USB port of the cooler using a USB cable (not included).

Note: Ensure that the connected device is compatible with the operation of the USB port.
Setting the sleep mode
d. Press the SET button i times.
B. Use the + or - buttons to set the sleep mode.
√ The display changes as follows: 5 ORR NH O' 5 Show X 5 Lo
S OF 'ORRW' The sleep mode is deactivated. The display is constantly switched on.
S On O' X' The sleep mode is activated. If the cooler is not used for several minutes, the display only shows a dot.
S Lo |Low| The sleep sub-mode is activated. If the cooler is not used for several minutes, the display switches to the lowest display brightness.

N3) E If the display is in the sleep mode or sleep sub-mode, press a button on the cooler to briefly exit the corresponding mode.
Using the mobile cooling app
The cooler can be monitored and controlled via Bluetooth or Wi-Fi using an app that can be installed on a compatible device.
d. Download and install the mobile cooling app.

Get the app from Zr.dometic.comkbei DT.
B. Press the SET button as follows
U 6 times to open the Bluetooth settings.
Uj times to open the Wi-Fi settings.
- Use the + or - buttons to set the Bluetooth or NLJ.

If the cooler is paired with a compatible device via Bluetooth, the pairing mode must be set.
The display changes as follows when setting the Bluetooth pairing.

If [bLOF] is displayed, the display does not change when the - button is pressed. If [bLPA] is displayed, the display does not change when the + button is pressed.
The Bluetooth LED flashes white and the display shows while the pairing to Bluetooth is being established.
The display changes as follows when setting the NLJ function.
Follow the instructions in the mobile cooling app. The Bluetooth or NLJ LED lights up when the cooler is connected.
Switching the cooler off
Empty the cooler.
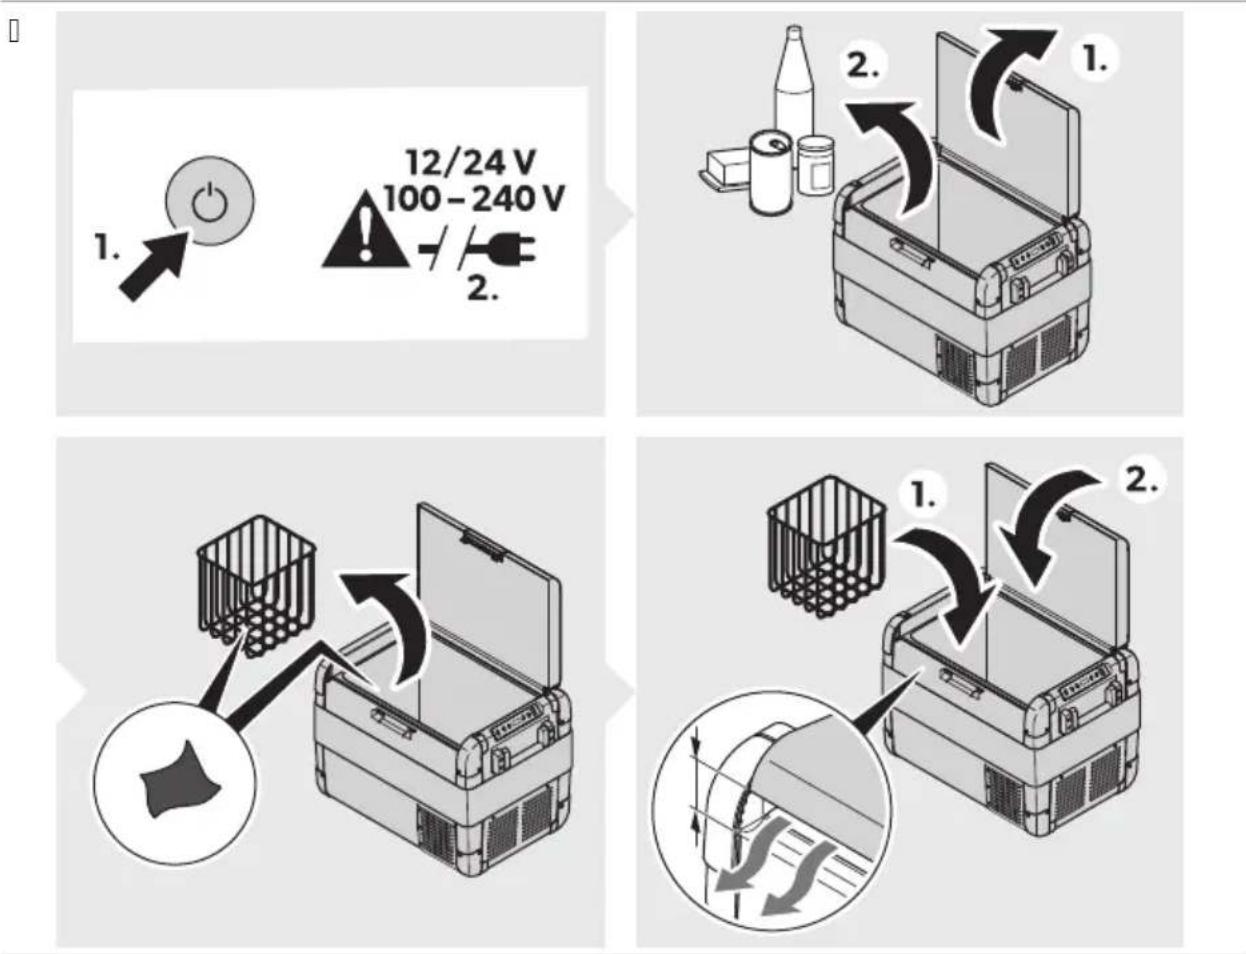
Press the power button. Pull out the connection cable. If the cooler is not used for a longer period of time, leave the lid open so that no odors can build up.
Defrosting the cooler
Humidity can form frost in the interior of the cooler or on the evaporator. This reduces the cooling capacity.

Danger! Risk of damage!
Never use hard or pointed tools to remove ice or to loosen objects which have frozen in place.
To defrost the cooler, proceed as follows:
Empty the contents of the cooler. If necessary, place the contents in another cooler to keep them cool.
- Switch off the cooler. Leave the lid open. Wipe off the defrosted water.
Replacing the AC fuse

DANGER! Electrocution hazard!
Disconnect the power supply and the connection cable before replacing the fuse.
a. Disconnect the power supply to the cooler. b. Pull off the connection cable. c. Pry out the fuse insert (Fig. 10 on page 4, item B) with a screwdriver. d. Replace the defective glass fuse with a new one that has the same type and rating.
Press the fuse insert back into the housing.
- Reconnect the power supply to the device.
Replacing the DC plug fuse

NOTE: There is an additional fuse inside the device (automotive standard blade fuse, DC). This fuse can only be replaced by an authorized repair center.
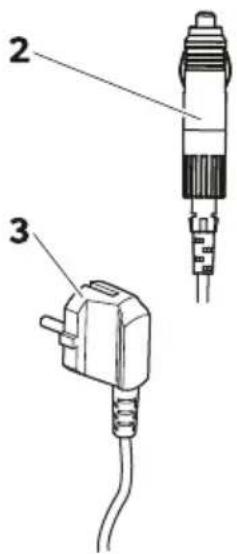
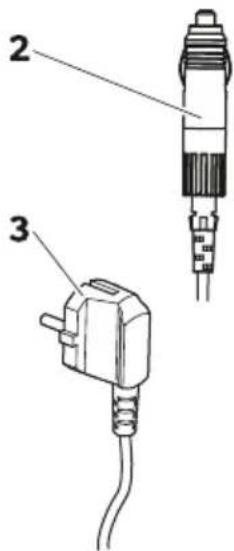
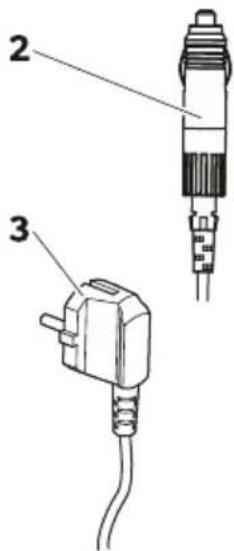
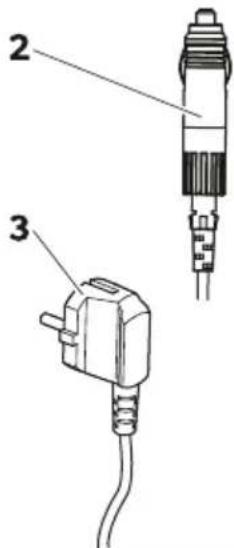
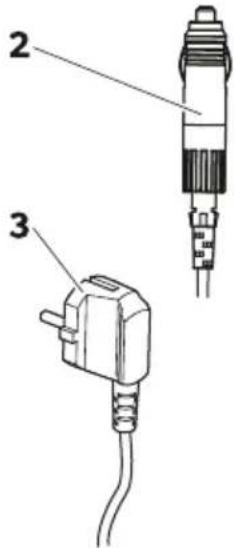
a. Unscrew the contact pin housing (Fig. 10 on page 4, item B) from the plug (Fig. 10 on page 4, item A).

b. Replace the defective fuse (Fig. 10 on page 4, item C) with a new fuse of the same type and rating (fast-acting, DC).
c. Re-assemble the plug in reverse order.
Replacing the light (LED)

The light OMB may only be replaced by the manufacturer, a service agent, or a similarly qualified person in order to avoid hazard.
Cleaning and maintenance

CAUTION: Electrocution hazard
Ensure that the cooling device is disconnected from the power supply before any cleaning or maintenance work.

CAUTION: Damage hazard
Never clean the cooling device under running water or in dishwater. Do not use abrasive cleaning agents or hard objects during cleaning.
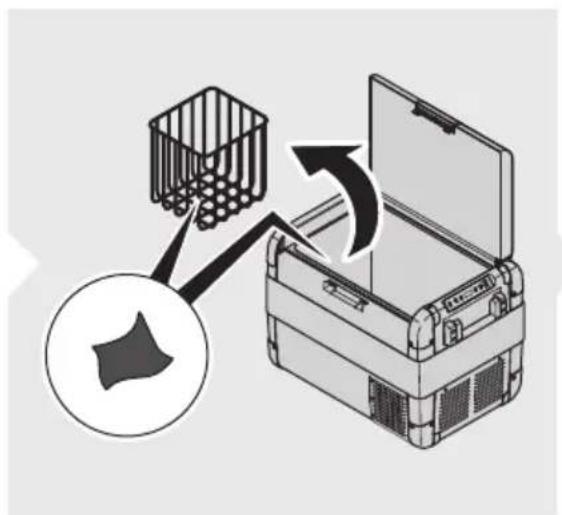
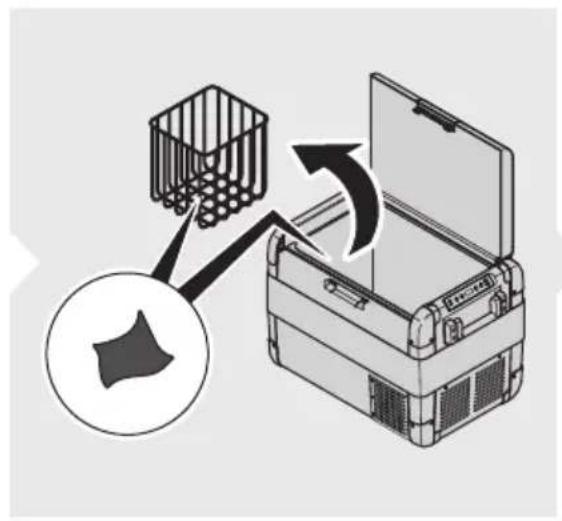
Occasionally clean the device interior and exterior with a damp cloth. Ensure that the air inlet and outlets on the cooling device are free of any dust and dirt so that heat can be released and the cooling device is not damaged.
Troubleshooting
| ( problem (ossible c! Ese SEggeste' reme' 2 | ||
| Fhe cooler does not operate. Fhe power LKE does not light up. | ' o oltagc is detected at the EM sock-et. | > J cti ate the ignition of the ehi-cle. |
| ' o oltagc is detected at the J M sock-et. | > Use another plug socket. | |
| Fhe J M Cuse is defecti e. | > Teplace the J M CuseH see Teplac ing the J M Cuse on pageld8. | |
| Fhe integrated mains adapter is defe- ti e. | > Montact an authorized ser ice agent. | |
| Fhe power LKE lights up orange the error code E 01 is displayed and the cooler is not cooling e en though the plug is plugged in. | Fhe battery monitor is set too high. | d. I et the battery monitor to a lower mode *see Using the battery mon itor on pageldi X.B. Fest the starting battery.3. To necessarily charge the starting battery.Rollow the manufacturer's instructions. |
| Fhe battery monitor is set too low. | d. I et the battery monitor to a high-er mode *see Using the battery monitor on pageldi X.B. Fest the starting battery. | |
| ( problem (ossible cl Ese SEggeste’ reme’ 2 | ||
| 3. To necessarily charge the starting battery.Rollow the manufacturer’s instructions. | ||
| N hen operating the cooler from the EM outlet? Fhe ignition is on and the cooler does not operate. Fhe power LKE does not light up. | Fhe EM plug is not connected correctly. | > Teconnect the EM plug. |
| Fhe EM socket is dirty. This leads to poor electrical contact. | > Mean the EM outlet.Rollow the manufacturer’s instructions. | |
| Fhe EM plug use has blown. | > Teplace the EM plug use see chapter Teplacing the EM plug use on pageld8. | |
| Fhe EM use inside the cooler has blown. | > Montact an authorized ser ice agent. | |
| Fhe chicle EM outlet use has blown. | > Teplace the chicle EM outlet use.Rollow the manufacturer’s instructions. | |
| Fhe display displays an error code and the cooler does not cool see Krror codes on pageBCX. | Fhe cooler has switched off due to an internal fault. | > Montact an authorized ser ice agent. |
Error codes

If one of the error codes E 02 to E 07 occurs, contact an authorized service agent.
| Error co' e Description |
| E 01 Low oltageko er oltage |
| E 02 Ran o ercurrent |
| E 03 Mompressor start Cailed |
| E 04 Mompressor speed low |
| E 05 Montroller o erheated |
| E 06 ' FM open circuit |
| E 07 ' FM short circuit |
Warranty
The statutory warranty period applies. If the product is defective, please contact the manufacturer's branch in your country (see dometic.com/dealer) or your retailer.
For repair and warranty processing, please include the following documents when you send in the device:
A copy of the receipt with purchasing date
Reason for the claim or description of the fault
Note that self-repair or nonprofessional repair can have safety consequences and might void the warranty.
Y3 Disposal

WARNING: Risk of child entrapment
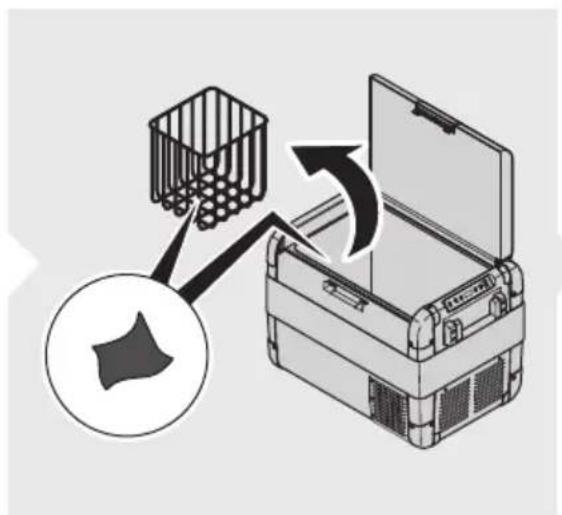
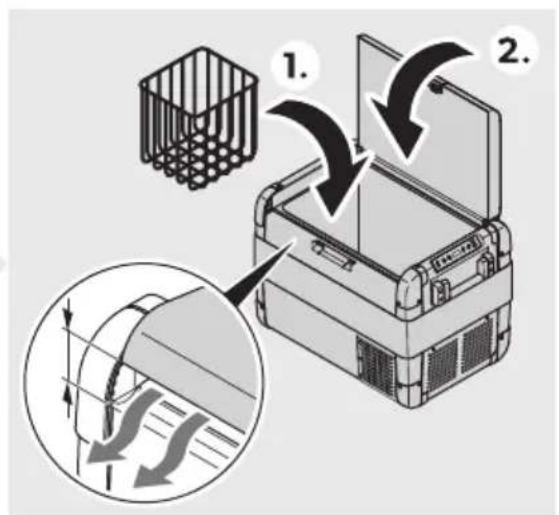
Before disposing of your old cooling device, dismantle the lid. Leave the baskets in place so that children may not easily climb inside.

Place the packaging material in the appropriate recycling waste bins wherever possible. Consult a local recycling center or specialist dealer for details about how to dispose of the product in accordance with the applicable disposal regulations.
Recycling products with batteries, rechargeable batteries, and light sources: Remove any batteries, rechargeable batteries, and light sources before recycling the product. Return defective or used batteries to your retailer or dispose of them at collection points. Do not dispose of any batteries, rechargeable batteries, and light sources with general household waste. If you wish to finally dispose of the product, ask your local recycling center or specialist dealer for details about how to do this in accordance with the applicable disposal regulations. The product can be disposed of free of charge.
Y4 Technical data

N3) If the ambient temperature is above 38°C, the minimum temperature cannot be attained.
This product contains fluorinated greenhouse gases.
The cooling unit is hermetically sealed.
| CFX2 28 CFX2 37 CFX2 45 CFX2 57 | ||||
| Tated input | i Clo 6C) z | |||
| dCClo BDC V~ | ||||
| Tated current | dB VV 8.6 J | dB VV 8.j J | dB VV 8.8 J | dB VV h J |
| BD VV 3.8 J | BD VV 3.8i J | BD VV 3.h J | BD VV D J | |
| dCC VV d.6 J | dCC VV d.63 J | dCC VV d.6i J | dCC VV d.j J | |
| BDC VV C.j j J | BDC VV C.j 8 J | BDC VV C.j h J | BDC VV C.8 J | |
| Mooling capacity | e BB bMlo BC bM | |||
| J mbient temperature | d6 bMlo D3 bM | |||
| Mlimate class' or F | ||||
| UI B | i VBJ | |||
| Teérigerant T6CCa | ||||
| Teérigerant Zuantity | d3 g d3 g dD g dj g | |||
EN::CFX2 28, CFX2 37, CFX2 45, CFX2 57
| CFX2 28 CFX2 37 CFX2 45 CFX2 57 | ||||
| E imensions N q) qEH including handlesx | 3Di mmlqDBj mmlq 3j i mm | DCd mmlqDB8 mmlq D3C mm | DCd mmlqDh3 mmlq D3C mm | Di 8 mmlqi C3 mmlq D8i mm |
| Volume | B8 L 3j L Di L i j L | |||
| N eight | d3.i kg | di .8 kg | d6.8 kg | d8.i kg |
| RreZuency band"N LJ' x | B.D G) z | |||
| MaL. output powerNLJ' dh.BB dBmBluetooth j .h3 dBm | ||||
Hereby, Dometic Yruhai Technology Mo.- Ltd declares that the radio equipment type MRgB B8- MRgB 3j - MRgB Di H MRgB i j is in compliance with Directive BCdDki 3kKU. The full text of the KU declaration of conformity is available at the following internet address: documents.dometic.com
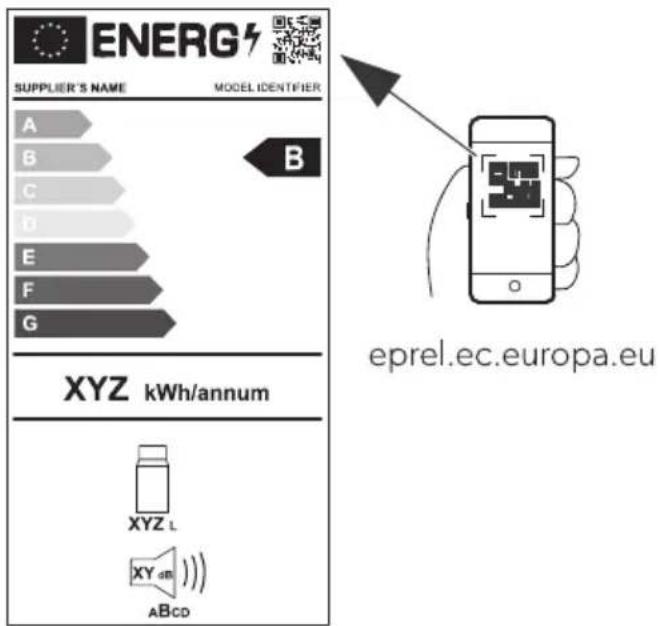
Further product information can be accessed via QR code on the energy label or via eprel.ec.europa.eu.
DeEtsch
Item Quantity Description
| d d Glacière |
| B d M| ble de raccordement au courant continu |
| 3 d M| ble de raccordement au courant alternatió |
| e d Mode d'emploi abrzgz |
6 / accessories
8 Technical Description
Item Quantity Description
Connection to alternating current

p(E-I R3Z Risk of electrocution
Item Quantity Description
Connection to alternating current power supply

| Nr. /! nt! | Geschrij4ving |
| d d ! oelboL |
| B d ] ansluitkabel oor gelijkstroomaansluiting |
| 3 d ] ansluitkabel oor wisselstroomaansluiting |
| e d ! orte handleiding |
6 / accessories
/D1/RSE-2 SEn' he's,! re
F3 RSI ) I 2 SEn' he's,! re
/rti. el /nt! l Ges. rivelse
d d ! øleboks
) ilslEtning til et ve. selstrOmnet

B. Press the button on the control panel.
Part for disassembly
d d ! ylboL
B d J connection cable for DC connection
Connect to AC

eprel.ec.europa.eu
Nors.
Element for disassembly
) il. oblings. ont! . ter
□
Element disassembly
d Connection contact for AC power supply
B Connection contact for DC power supply
![graph TD A["Electric Vehicle Battery"] --> B["Switch"] B --> C["Battery with DC power supply"] C --> D["DC-EAC/DC Power Supply"] D --> E["Switch to Battery"] E --> F["DC-EAC/DC Power Supply"] F --> G["DC-EAC/DC Power Supply"] G --> H["DC-EAC/DC Power Supply"] H --> I["DC-EAC/DC Power Supply"] I -->…](/content/2026/04/709060/images/67ba3263757f038067686c34d0b8547a8d7e122764906688b68ffbe7b43f6ccc.jpg)
Connection to a DC power supply network

For fire or electric shock hazard
Important safety instructions
Connection to an AC power supply network

1 // R/2 S5h. Cis. En v!! r!
r ( padka Nobr. I no stranelBi j H Y eka V
3 vlB' ! cí p! nel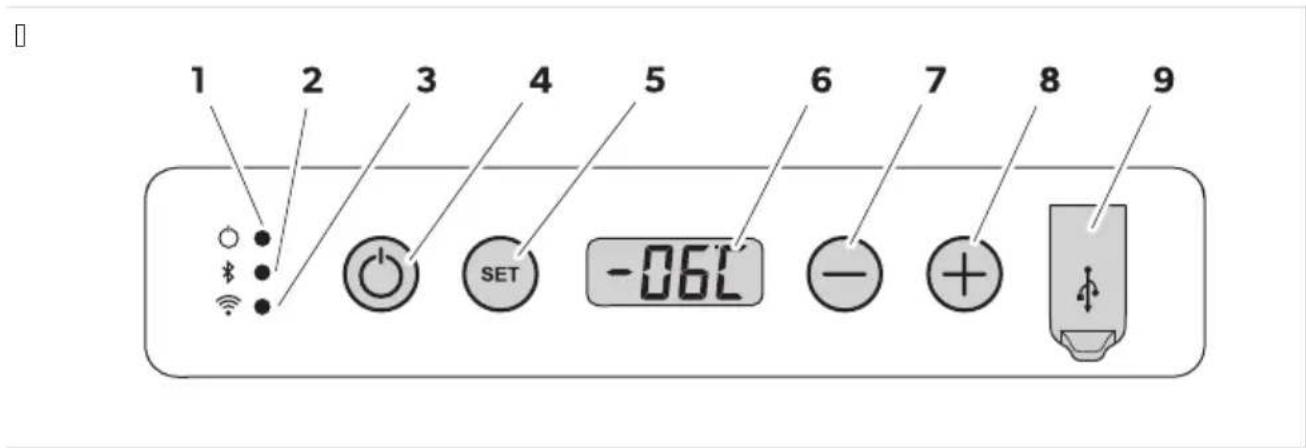
| ( o-lož- . ! 3 pis 1 2svetlenie | ||
| d Výkon | Indik( cia sta u | |
| LKE indik( tor sa rozs ieti na bielov! ompresor sa spustí. | ||
| LKE indik( tor sa rozs ieti na oranžo ov! ompresor sa zasta í. | ||
| B | LKE indik( tor je ypnutýv Runkcia Bluetooth chladiaceho boLu je ypnut(. | |
| Bluetooth | LKE indik( tor pomaly blik( na bielov! Runkcia Bluetooth chladiaceho boLu je zapnut(. Mhladiaci bol nie je sp(ro any so zariadením. | |
| LKE indik( tor rýchlo blik( na bielov! Mhladiaci bol sa sp(ruje so zariadením pomocou Šunkcie Bluetooth. | ||
| LKE indik( tor sa rozs ieti na bielov! Mhladiaci bol je sp(ro any so zariadením pomocou Šunkcie Bluetooth. | ||
| 3 | NLJ' | LKE indik( tor je ypnutýv Runkcia NLJ' chladiaceho boLu je ypnut(. |
SK::CFX2 28, CFX2 37, CFX2 45, CFX2 57
Connection to the power supply network

DANGER (ELECTRIC SHOCK) 1 37 Danger of electric shock
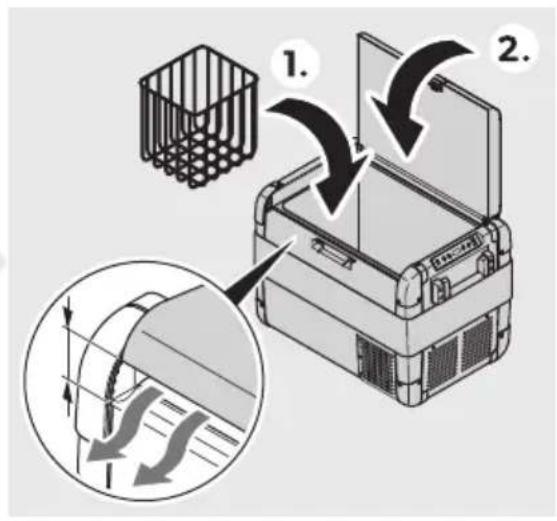
B. Press the button xO' kORRm. 3. Pull out the connection cable. D. If the cooling unit has not been used for a long time, leave it open so that no odor accumulates.
Freezing the cooling box
CFX2 57

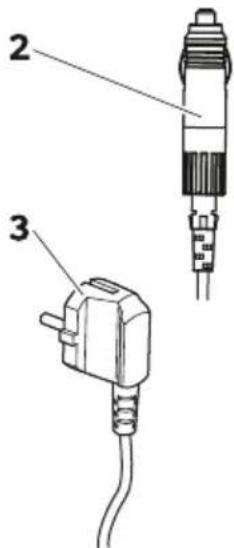
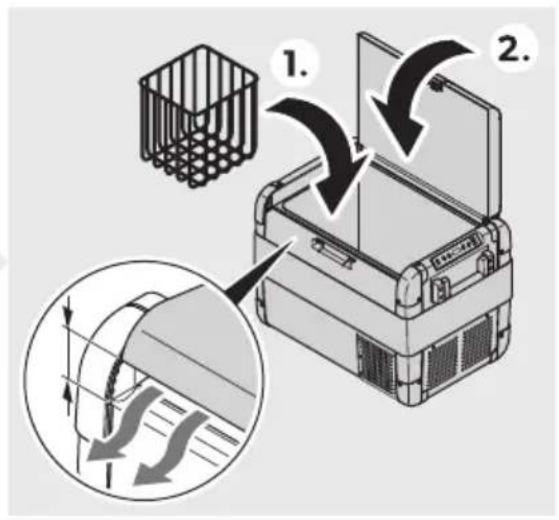
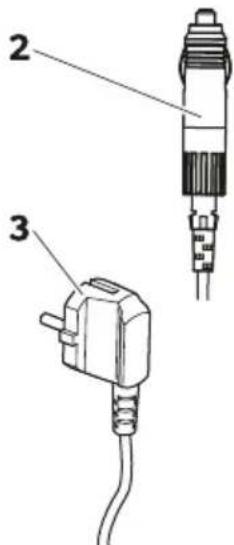

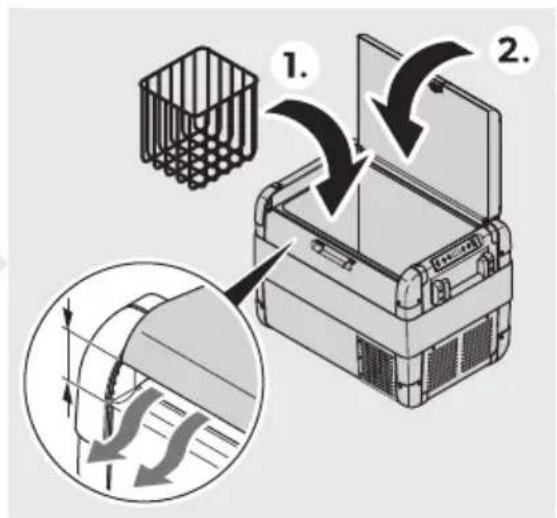
Never touch plugs and switches with wet hands or if you are standing on a wet surface. If the refrigerator is powered from the AC mains, you must install an automatic circuit breaker between the AC mains and the refrigerator. Consult a qualified electrician.

CFX2 57
Quantity: 3 pcs
Cooler bag
DC connection cable
AC connection cable
Quantity: 3 pcs
Connection cable
Connection cable for AC supply


DANGER: Keep the device away from rain and moisture.
Before cleaning or maintenance, disconnect the device from the power supply. Use a dry cloth to wipe the surface. Do not use water, solvents, or abrasive cleaners. Ensure the device is completely dry before reconnecting to the power supply.

WARNING: Keep the device away from heat sources.
Do not place the device near open flames or hot surfaces. Do not cover the ventilation openings. Ensure proper air circulation around the device. Do not use the device in dusty or humid environments. Keep the device away from direct sunlight.

WARNING: Keep the device away from magnetic fields.
Do not place the device on unstable surfaces or near vibrating equipment. Do not drop or subject the device to strong impacts. Keep the device away from strong magnetic fields and electromagnetic interference. In case of malfunction, disconnect the device from the power supply and contact qualified service personnel. Do not attempt to repair the device yourself.
The cooling system contains refrigerant gas. Do not puncture or damage the cooling circuit. If the cooling system is damaged, avoid contact with the refrigerant and ventilate the area. Do not use sharp objects to clean the device. Do not block the ventilation openings. Ensure proper air circulation around the device. Do not place the device in direct sunlight or near heat sources.

To 86 32: do mozh: d9 0: 68; ol8v9 ol1d: 59 /9d 81god6sh/9 v8z2901 61o1l659 0ior29/6ch: /6 f686ch: 0-46H 0: /8o2/6 bl6 3m01v: /6 0; o0ob/o016 bl6 l659 b: 8 o; 61 61; o8/9/67N 94o 1: 09 b6l6 ; 2: dv9-261: l/o 6/012341629/6 89 b: 8o; 90/o1o 68; ol8v9/: /9I32: d9 61298b6291 ; o1: /569l/61: o; 90-/o016. U D: 59 o1 3|do 8|god6/6 mog91 d9 ; o019v71 6 68v9zhd91 ; 2: dm: 16 v 32: d9 89 ohl9zhd9/: . U D: 59 1276v9 d9 09 ; od /9blyud: /6: H 89 d9 : 06g32/och: /: 06 6g2971 0 32: d9. U Poch601v9/: 61; odd2ъzh49 /: 1127bv9 d9 0: 68vъ2shv9 o1|d: 59 b: 8 /9blyud: /6: .

WARNING: OXYGEN NOZZLE AND VALVE
H: 0ъх29/7в9й1: в|хл9д6л/67 32: д : 40; ло86в/6 03б019/566 491о 0; 2: йов: 0ъ0 89; 9л6м в; 2ъ04в9щ г98.

CAUTION: OXYGEN NOZZLE AND VALVE
U P2: d6 d9 ; 30/: 1: hл9d6l/67 32: d 0: 3v: 2: 1: H ch: 89h29/v9shch671 49b: l 6 4o/1941ы1 09 03h6. U P9849ch: 1: ohl9zhd9shch67 32: d 01 : l: 412o89x29/v9/: 10 ; 2: d6 v074o ; och601v9/: 6 ; odд2ъzh49 6 0l: d v0749 3; 012: 69.

CAUTION: OXYGEN NOZZLE AND VALVE
U 39 d9 686: g/: 1: 89mъ207v9/: /9 h29/61: l/61: ; 2od3416N 0; 98v9й1: 0l: d/61: 6/01234566W U P20v: 2: 1: d9l6 49; 9561: 1ь1 /9 ohl9zhd9/: /9 32: d9 : ; odhod7shch 89 0ьh29/: /6: /9 h29/919-4071o 60491: d9 ohl9zhd91:. U X29/61: l/61: ; 2od3416 1276v9 d9 0: 0ъh29/7v91 vlo26g6/9l/61: o; 94ov46 6l6 vl; odhod7shch6 43166. ∪ Dъ2zh9/: 10 /9|hл9d6l/67 32: d o|vo2: / 89 dъlgo v2: m: mozh: d9 ; ov6sh6 8/9ch61: l/о 1: m; : 29-132919 v|o|d: l: /6719 /9|32: d9. U P: dov/o ; och601v9й1; ; ovь2h/о0161: N 4061o mog91 d9 vl7891 v14o/1941 0lx29/61: l/6 ; 2od3416 6|do01ъ; /61: ch9016 o110601: m919 89 681ochv9/: . U A4o ; 20d341ы1 0: 0019v7 ; 298: / 89 ; 20dълж61: l: / ; : 26od' U. 84lyuch: 1: ; 2od3419. U P98M298: 1: ; 20d3419. U Poch601: 1: 61; od03sh: 1: ; 2od3419. U O019B: 1: 49; 949 o1BO2: /H 89 d9 /: 10: ob2983B9 m3hъл.

CAUTION: OXYGEN NOZZLE AND VALVE
The cooling unit: 2: 1: d9l6 d9//61: 89 /9; 2: zh: /6: 10 /9116; ov919 196: l49 o1gov9271 /91/9; 2: zh: /6: 10 /91m-2: zh919. U Sv8v9/: 10 019v9 ; 010l: d/67 /9ch6/U U S ; 00107//01040v67 49b: l.4m ; 00107//01040v01o 89x29/v9/: /919v1omob6l U S ; 20m: /l6v01040v67 49b: l 4m : l: 4126ch: 04919 m2: zh9 U H64or9 /: lo149ch9y1: 40/19419H 4910 d2; 91: 496: l9. U A4o oxl9zhd9shch671 32: d: 0v289/ 4m; o0107//o1040vo 89x29/v9/: V O149ch: 1: ohl9zhd9shch67 32: d 6|d23g61: 4o/03m91o26N; 2: d6 d9 v4lyuch61: 3012oy01vo1o 89 b28o 892: zhd9/: . U A4o ohl9zhd9shch671 32: d : 0v289/ 4m ; o0107//o1040vo 89x29/v9/: V O149ch: 1: ohl9zhd9shch67 32: d 6l6 go 684lyuch: 1: H; 2: d6 d9; 9l61: dv6g91: l7. . /9ch: mozh: d9 2982: d61: 943m3l91o29. U Ohl9zhd9shch671 32: d /: 1: ; odkhod7shch 89 ; 2: /907/: /912987zhd9shch6 m91: 269l6 bl6 /91m91: 269l6 od2zh9shch6 2981vo261: l6. U. 80l956719 /91ohl9zhd9shch67 32: d 0d2zh9 89; 9l6m 564lo; : /19/ 61127bv9 d9 0: 68hv2l7 ; o10; : 56-9l/9 ; 205: d329. Sl: d 4297 /91zh6vo19 /91ohl9zhd9shch67 32: d go ; 2: d9y1: /91; odkhod7shcho ; 2: d; 267-16: 89 2: 564l629/: . U H: ; o019v7y1: ohl9zhd9shch67 32: d v bl68001 do o14261 org/ 6l6 d23g6 681och/656 /9 1o; l6/9 «og/6-shch9N /9g2: v91: l6N g980v6 ; : ch46N d62: 41/9 0l/ch: v9 0v: l6/9 6 shch: %. U H: ;l/: 1: v12: sh/67 0d 0ll: d 6l6 1: ch/o016. U H64or9 /: |; o19; 7y1: ohl9zhd9shch67 32: d vv vod9. U P98: 1: ohl9zhd9shch67 32: d 61496: l61: 011/9g27v9/: 61vl9g9. U Ohl9zhd9shch671 32: d /: 1127bv9 d9 0: 68l9g9 /9|dzhd. U 39 d9 mozh: hl9d6l/671 9g: /1 d9 56243l629 ; 29v6l/oH ohl9zhd9shch67 32: d /: 1276v9 d9 0: /94l9/7 0 ; ov: ch: o1 3S b. . 8; ol8v9y1: /6v: l62N 89 d9 0: 3v: 261: N ch: ohl9zhd9shch67 32: d : ho268o/19l: /. U PTNk I V:KL MrL yavPOMZ Uv: 2:1: 0:H ch: ; o v074o v2: m: 6m9 do0191ch/9 v: /16l9567 o1 ch: 16261: 0129/6 /9 ohl9zhd9shch67 32: d. P98: 1: ; loshch19 89 v: /16l9567 ch6019 o1v07494v6 ob: 416H 4o61o mog91 d9 og29/6ch91 ; oyu49 /9Іv8d3h 4m ohl9zhd9shch61: 4om; o/ : /16. N: 298; ol9g9y1: ohl9zhd9shcho oo-2zh: /6: vі89Іvo2: /6 ; om: shch: /67 6l6 /9Іm: 019 0l6; 0V9shch 6l6 m6/6m9l: / v8d3sh: / ; oyu4.
5 O6QB PV OP SI NVP BK PVP
[ ]
ДМVPИR HI RTUMNVВІ OKTNPOTM
| d d K; M; 2: 0o2/9 xI9Д6Л/9 ч9/19 |
| B d K96: л 89 0ВЬ28В9/: 4ЪМ ; 001o7/: / 1o4 |
| 3 d K96: л 89 0ВЬ28В9/: 4ЪМ ; 2ОМ: /л6В 1o4 |
| e d K2914о 2ъ4ОВОД01ВО 89 296019 |
6 ПЛ TOPSRMЖОI NVT
Н9л6ч/6 4910 ; 26/9дл: ж/о016 N/: 09 в4люч: /6 в обхв919 /9 до019в4919х
| Обі 'ОРUMOTM ИОВ. No MI SMR | ||
| Ком; л: 41 89 8942: ; в9/: 0 бъ28о оовобожд9в9/: MRg-f R! h6СССССд66 С9мо 89 MRgB B8 | ||
| Ком; л: 41 89 8942: ; в9/: 0 бъ28о оовобожд9в9/: MRg-f R! 3i Di | h6СССВhi hh | С9мо 89 MRgB 3j6 MRgB Di |
| Моббл/о ; 26лож: /6: 89 охл9жд9/: | e | ; 90в9 /9 в06ч46мод: л6 |
7 И' КI Р' ВРОМ КI KL MSOP' OPUMOTM
Хл9д6л/919 ч9/19 : ; одход7щ9 89 охл9жд9/: /9 x29/61: л/6 ; 2од3416. Хл9д6л/919 ч9/19 мож: д9 0: 68; ол8в9 б в ; 2: во8/6 02: д01в9. Хл9д6л/919 ч9/19 мож: д9 0: 89x29/в9 01 г/: 8д01о 89 ; о01о7/: / 104 /9 ; 2: во8/01о 02: д01во 6л6 01 ; 2ом: /л6в01о4ов01о 89x29/в9/: .
Хл9д6л/919 ч9/19 : ; одход7щ9 89 68; ол8в9/: /9 4ъм; 6/г.
Хл9д6л/919 ч9/19 : ; 2: д/98/9ч: /9 89 68; ол8в9/: в дом946/01в01о 6 в ; одоб/6 ; 26лож: /67-491о /9; 26м: 2
BG::CFX2 28, CFX2 37, CFX2 45, CFX2 57
The refrigerator is designed for household use and similar applications such as: staff kitchens in shops, offices and other working environments; farmhouses; by clients in hotels, motels and other residential type environments; bed and breakfast type environments; catering and similar non-retail applications. The refrigerator is not intended for use by persons (including children) with reduced physical, sensory or mental capabilities, or lack of experience and knowledge, unless they have been given supervision or instruction concerning use of the appliance by a person responsible for their safety. Children should be supervised to ensure that they do not play with the appliance. If the supply cord is damaged, it must be replaced by the manufacturer, its service agent or similarly qualified persons in order to avoid a hazard. Do not store explosive substances such as aerosol cans with a flammable propellant in this appliance. The refrigerant and insulation blowing gas are flammable. When disposing of the appliance, do so only at an authorized waste disposal center. Do not expose to flame. Warning: Keep ventilation openings, in the appliance enclosure or in the built-in structure, clear of obstruction. Warning: Do not use mechanical devices or other means to accelerate the defrosting process, other than those recommended by the manufacturer. Warning: Do not damage the refrigerant circuit. Warning: Do not use electrical appliances inside the food storage compartments of the appliance, unless they are of the type recommended by the manufacturer.
8 TMQOTUMNkI I KTNPOTM
The refrigerator can be cooled. Cooling is carried out automatically using a compressor cooling system with a fan. The operation of the compressor and fan is controlled by a thermostat and a cooling sensor.
The refrigerator is automatic.
The refrigerator can be connected to a 220-240 V AC power supply.
ОбQвPV OP фуОкцTTVM
To remove the door, first remove the hinge cover. Then remove the screws and lift the door off the lower hinge. To reinstall, place the door on the lower hinge and secure with the screws. The door can be reversed. The Bluetooth function is available on models with a display. To use the Bluetooth function, press the button on the control panel. The door handle is on the right side.
PP6I VOT T TOSTKPVI LOT MRMJ MOVT
Model «Fig.10 for the refrigerator DCdH YX 89 49; 949»
TP6RI 'P yKL PBRMOTM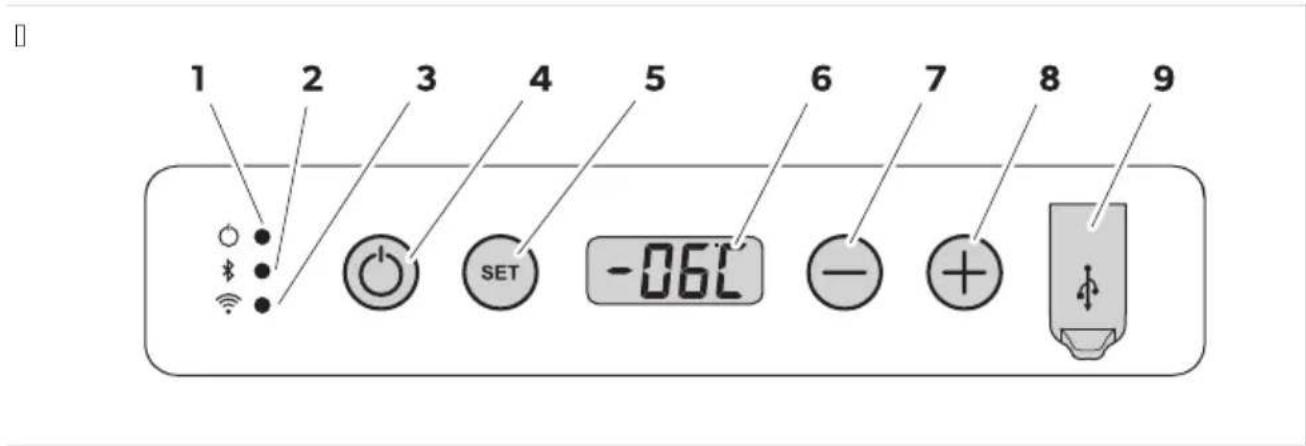
| ДМ-ОКТПОТМ ОБЯНОМОТМ | |
| d Мош/о01 | ./д649567 89 0ь0107/6: 10 |
| Св: 1одбодъ1 0в: 16 в 67л0ч Ком; 2: 0о2ъ1 89; очв9 д9 296016. | |
| Св: 1одбодъ1 0в: 1в9 в 029/ж:-Ком; 2: 0о2ъ1 0; 629 д9 296016.во0′ | |
| BBluetooth | Св: 1одбодъ1 : 684люч: /v Bluetooth ф3/456719 /9 хл9д6л/919 ч9/19 : 684люч: /9. |
| Св: 1одбодъ1 м6г9 б9в/о в 67- Bluetooth ф3/456719 /9 хл9д6л/919 ч9/19 : в4люч: /9. Хл9д6л/919 ло0′ ч9/19 /: : 0дво: /9 0 3012ой01во. | |
| Св: 1одбодъ1 м6г9 бъ28о в 67- Хл9д6л/919 ч9/19 0: 0дво7в9 0 3012ой01во ч2: 8 Bluetooth.ло0′ | |
| Св: 1одбодъ1 0в: 16 в 67л0ч Хл9д6л/919 ч9/19 : 0дво: /9 0 3012ой01во ч2: 8 Bluetooth. | |
| 3 NLJ' | Св: 1одбодъ1 : 684люч: /v NLJ' /9 хл9д6л/919 ч9/19 : 684люч: /9. |
BG::CFX2 28, CFX2 37, CFX2 45, CFX2 57
| ДМ-ОКТПОТМ ОбЯНОМОТМ | |
| Св: 1одбодъ1 м6г9 в 67ло' N LJ ' /9 хл9д6л/919 ч9/19 : в4люч: /9. Хл9д6л/919 ч9/19 /: :0въ289/9 0 3012ой01во.Св: 1одбодъ1 0в: 16 в 67ло' Хл9д6л/919 ч9/19 : 0дво: /9 0 3012ой01во ч2: 8 NLJ ' . | |
| D ВКЛ.к. 3КЛ. В4лючв9 6л6 684лючв9 хл9д6л/919 ч9/19. | |
| iSET | . 86629 2: ж6м9 /9 във: жд9/:УН9012ой49 /9 1: м; : 29132919U По498в9/: /9 Ц: л86й 6л6 Ф92: /х9й1U 39д9в9/: /9 89щ61919 /9 943м3л91о29U 39д9в9/: /9 724о0119 /9 д60; л: 7U 39д9в9/: /9 2: ж6м9 /9 д60; л: 7U 39д9в9/: /9 BluetoothU 39д9в9/: /9 NLJ ' |
| 6 Д60; л: й | |
| j - | Н9012ойв9 1: м; : 29132919+: д6/65919 89 1: м; : 291329H 89щ61919 /9 943м3л91о29H 724о0119 /9 д60;-л: 7H 2: ж6м9+ Bluetooth 6 NLJ ' . |
| 8 + | |
| h UI B ; o21 | |
HI OVPKVOT ROM' SP
[]
| ДМУРИЙ ОКТПОТМ |
| d Ko/1941/о г/: 8до 89 ; 20м: /л6в01040во 89х29/в9/: |
| В Ko/1941/о г/: 8до 89 ; 00107//01040во 89х29/в9/: |
9 PP6I VP
ПЛМST КЪЛВРVP уКИ VLM6P

INSTRUCTION P2: d6 d9 019216291: 32: d9 89; v2v6; v1go; och601: 1: o1v12: 6 o1v/ hly9d6l/919 ch9/19 0
vl9zh/9 4ъ2; 9 01 h6g6: //6 0ъob29zh: /67 «vbzh1: Poch601v9/: 61; odd2ъzh49 /9 0129/659 Ddd#.
B. H9160/: 1: 631o/9 SET 3; b16.
- . 8; ol8v9й1: 6310/9 + 6l6 - + 89 d9 686: 2: 1: zh: l9/67 2: zh6m /9 89sh61919 89 943m3l91029.
D60; l: 71 0: ; 2om: /7 ; o 0l: d/67 /9ch6/ PLo LON PNd MKEPH, IG)
. 8629/671 2: zhb6m 0: ; o7v7v9 /9 d60; l: 7 89 /74ol4o 0: 43/d6. D60; l: 71 ; 2: m6gv9 /74ol4o ; ъ16H ; 2: d6 d9 0: vъ2-/: 4ъm 1: 43sh919 1: m; : 291329.

INSTRUCTION Kog91o hly9d6l/919 ch9/19 : 89h29/v9/9 o1 01921: 2/67 943m3l91o2H 68b: 2: 1: 2: zhb6m /9 89sh619 89 943m3l91o29 ×) IG) m ₩V. SOKOKH. A4o hly9d6l/919 ch9/19 : 0vъ289/9 4ъm dom9sh: / 943m3l9-1o2N 68b: 2: 1: 2: zhb6m9 /9 89sh619 89 943m3l91o29 xLONm ₩N. SKOKH.
HPNVLI йКР ОР ЯЛ КІ NVVP ОР STNKRMЯ
Ya2400119 /9 d60; l: 7 mozh: d9 bъd: /9m9l: /9 89 30lov67 /9 /6049 o4ol/9 0v: 1l6/9.
d. V4lyuch: 1: hly9d6l/919 ch9/19.
B. H9160/: 1: 631o/9 SET D; b16.
- . 8; ol8v9й1: 6310/9 + 6l6 -+89 d9 89d9d: 1: 72400119 /9 d60; l: 7.
D60; l: 71 0: ; 2om: /7 ; o 0l: d/67 /9ch6/d Lo 1/604okhn pd 102: d/okhn n, «v60o4okh
N9 d60; l: 7 0; ; o498v9 89d9d: /671 2: zh6m 89 /74ol4o 0: 43/d6. D60; l: 71; 2: m6gv9 /74ol4o; ъ16H; 2: d6 d9 0: vъ2/: 4ъm 1: 43sh919 724o01.

INSTRUCTION A4o vъ8/64/: /: 68; 29v/о01N 724o0119 9v1om916ch/о 0: v2ъsh9 dod N, ☐; o ; od298-6629/: ⚙. Sl: d 010129/7v9/: /9 ; ov2: d919 89d9d: /919 724o01 0: 9416v629 o1/ovо.
General maintenance and repair instructions
(see. Figures) 5histEs
d d cooling device
B. Press the button xl KKI kVu Lwj 1 m. 3. Connect the connection cable "lja. D. ! If the cooling device is not used for a long time, keep the cover open to prevent odors.
J! hEtEsse!' me sEl! t! mine
Yc ( Eh! st! mine 4! hool' ! mine

CFX2 57
Components
Kie. is /pr! W2m! s
d d «aldytu as
B d' uolatinés sro és jungties jungiamasis kabelis
3 d ! intamosios sro és jungties jungiamasis kabelis
e d Frumpas naudojimo ado as
6 ( rie' ! i


CFX2 57
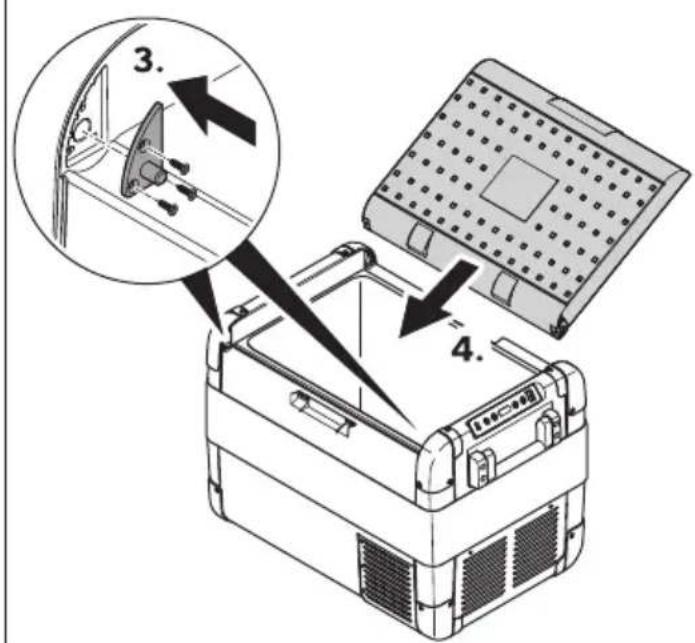
3.

4.

eprel.ec.europa.eu

dometic.com
YOUR LOCAL DEALER
dometic.com/dealer
YOUR LOCAL SUPPORT
dometic.com/contact
dometic.com/sales-offices
- DOMETIC CFX2 28, CFX2 37, CFX2 45, CFX
- ENGLISH
- IMPORTANT NOTES
- NOTICE
- EXPLANATION OF SYMBOLS ON THE DEVICE
- SAFETY INSTRUCTIONS
- DANGER: ELECTROCUTION HAZARD
- WARNING: ELECTRIC SHOCK HAZARD
- WARNING: FIRE HAZARD
- WARNING: HEALTH HAZARD
- WARNING: EXPLOSION HAZARD
- CAUTION: ELECTRIC SHOCK HAZARD
- SCOPE OF DELIVERY
- ACCESSORIES
- INTENDED USE
- TECHNICAL DESCRIPTION
- SCOPE OF FUNCTIONS
- OPERATING AND DISPLAY ELEMENTS
- CONTROL PANEL
- SAVING ENERGY
- CONNECTING THE COOLER
- CONNECTING TO A BATTERY
- CAUTION! DAMAGE HAZARD
- USING THE COOLER
- NOTICE! DAMAGE HAZARD
- WARNING! HEALTH HAZARD
- THE DISPLAY SHOWS THE CURRENT TEMPERATURE
- DEFROSTING THE COOLER
- DANGER! RISK OF DAMAGE
- REPLACING THE AC FUSE
- REPLACING THE DC PLUG FUSE
- RE-ASSEMBLE THE PLUG IN REVERSE ORDER
- REPLACING THE LIGHT (LED)
- CLEANING AND MAINTENANCE
- CAUTION: ELECTROCUTION HAZARD
- CAUTION: DAMAGE HAZARD
- TROUBLESHOOTING
- ERROR CODES
- WARRANTY
- Y3 DISPOSAL
- Y4 TECHNICAL DATA
- DEETSCH
- P(E-I R3Z RISK OF ELECTROCUTION
- D1/RSE-2 SEN' HE'S,! RE
- F3 RSI ) I 2 SEN' HE'S,! RE
- NORS
- R/2 S5H. CIS. EN V!! R
- DANGER (ELECTRIC SHOCK) 1 37 DANGER OF ELECTRIC SHOCK
- FREEZING THE COOLING BOX
- QUANTITY: 3 PCS
- DANGER: KEEP THE DEVICE AWAY FROM RAIN AND MOISTURE
- WARNING: KEEP THE DEVICE AWAY FROM HEAT SOURCES
- WARNING: KEEP THE DEVICE AWAY FROM MAGNETIC FIELDS
- WARNING: OXYGEN NOZZLE AND VALVE
- CAUTION: OXYGEN NOZZLE AND VALVE
- O6QB PV OP SI NVP BK PVP
- ПЛ TOPSRMЖОI NVT
- И' КI Р' ВРОМ КI KL MSOP' OPUMOTM
- BG::CFX2 28, CFX2 37, CFX2 45, CFX
- TMQOTUMNKI I KTNPOTM
- ОБQВPV OP ФУОКЦTTVM
- PP6I VOT T TOSTKPVI LOT MRMJ MOVT
- PP6I VP
- HPNVLI ЙКР ОР ЯЛ КІ NVVP ОР STNKRMЯ
- GENERAL MAINTENANCE AND REPAIR INSTRUCTIONS
- (SEE. FIGURES) 5HISTES
- J! HETESSE!' ME SEL! T! MINE
- YC ( EH! ST! MINE 4! HOOL' ! MINE
- ( RIE' ! I
Brand : DOMETIC
Model : CFX2 28
Category : Refrigerator