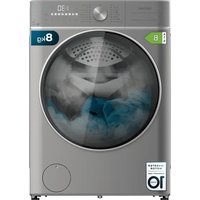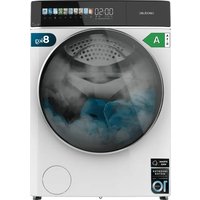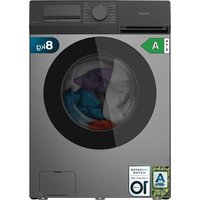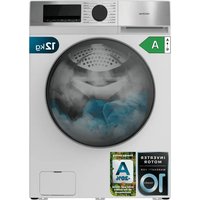
Bolero Wash&Dry 10680 Inverter B - Washing machine CECOTEC - Free user manual and instructions
Find the device manual for free Bolero Wash&Dry 10680 Inverter B CECOTEC in PDF.


User questions about Bolero Wash&Dry 10680 Inverter B CECOTEC
0 question about this device. Answer the ones you know or ask your own.
Ask a new question about this device
Download the instructions for your Washing machine in PDF format for free! Find your manual Bolero Wash&Dry 10680 Inverter B - CECOTEC and take your electronic device back in hand. On this page are published all the documents necessary for the use of your device. Bolero Wash&Dry 10680 Inverter B by CECOTEC.
USER MANUAL Bolero Wash&Dry 10680 Inverter B CECOTEC
natural_image
Exterior view of a white disposable washing machine with digital display and control panel (no visible text or symbols)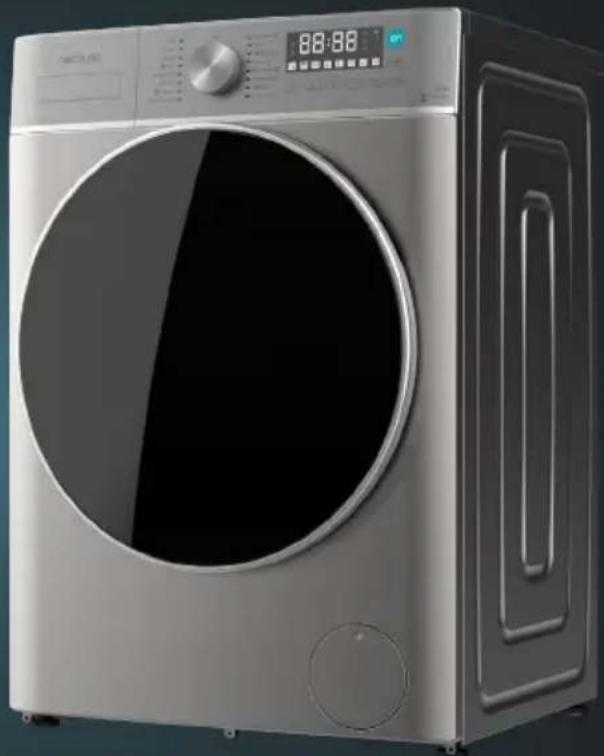
natural_image
Modern stainless steel washing machine with digital display and front panel (no visible text or symbols)Safety instructions 12
-
Parts and components 123
-
Before use 123
-
Product installation 124
-
Operation 128
-
Cleaning and maintenance 147
-
Troubleshooting 150
-
Technical specifications 158
-
Technical sheets 159
-
Disposal of old electrical and electronic appliances 163
-
Technical support and warranty 163
-
Copyright 163
SOMMAIRE
- Read these instructions thoroughly before using the device. Keep this instruction manual for future reference or new users.
- Ensure that the mains voltage matches the voltage specified on the device rating label and that the plug is earthed.
- If the power cord is damaged, it must be replaced by the official Cecotec Technical Support Service or by a similarly qualified person to prevent hazards.
- This appliance is for indoor use only.
- Make sure the device is installed in places where the temperature is above 0 °C.
- The device is not designed for built-in installation.
- Use the hose set supplied with the appliance. Do not reuse old hoses.
- Check hose connections regularly to ensure that no water leaks out.
- Do not use the appliance if parts are missing or defective or if the power cord or plug is damaged.
- Do not use the appliance until you are sure that it is installed in accordance with the instructions provided in this manual and all water, drain, electrical and grounding connections comply with all applicable local regulations and/or other requirements.
-
Before carrying out any maintenance or cleaning in the device, unplug the appliance from the mains.
-
As a safety measure, we advise you to unplug the appliance and cut the water supply after every use.
Maximum water-inlet pressure: 1 MPa. Minimum water-inlet pressure: 0.03 MPa. - Never unplug the appliance with wet hands.
- To ensure your safety, power plug must be inserted into an earthed three-pole socket. Check carefully and make sure that your socket is properly and reliably earthed.
- It must be possible to disconnect the appliance from the power supply by unplugging it if the plug is accessible, or by means of an all-pole switch upstream of the plug, in accordance with national electrical safety regulations.
- The maximum current of the device is 10 A, make sure that the power supply system (voltage, current and cable) is applicable to the load of the device.
- Make sure that the socket outlet can support the Maximum Power rating of the appliance as indicated on the rating plate.
- Water and electrical devices must be connected by a qualified technician in accordance with the manufacturer's instructions and local safety regulations.
- The glass door may reach high temperatures during operation. Keep children and pets away from the glass door. Never open the door during the drying stage.
- Do not operate the device in very wet rooms or in rooms with explosive or caustic gas.
- Adequate ventilation must be provided to avoid the back flow of gases into the room from appliances burning other fuels, including open fires.
- Do not dry unwashed items in the appliance.
- Do not wash items that have been soiled with substances such as cooking oil, acetone, alcohol, petrol, kerosene, spot removers, turpentine, waxes, and wax removers. These should be washed in hot with an extra amount of detergent before being dried in the appliance.
- Items such as foam rubber (latex foam), shower caps, waterproof textiles, rubber backed articles and clothes, or pillows fitted with foam rubber pads should not be dried in the machine.
- Do not wash articles that have been cleaned in, washed in, soaked in, or stained with flammable or explosive substances, like wax, oil, paint, petrol, degreasers, dry-cleaning solvents, kerosene, etc., which may result in fire or explosion.
- Fabric softeners or similar products should be used as specified by manufacturer.
- Do not wash or dry articles that have been cleaned in, washed in, soaked in, or dabbed with combustible or explosive substances (such as wax, oil, paint, petrol, degreasers, dry-cleaning solvents, kerosene, etc.). This may result in fire or explosion.
- When washing fabrics that contain vegetable or cooking oil or have been contaminated by hair care products, they should first be washed in hot water with extra detergent. This will reduce, but not eliminate, the hazard.
- The exhaust air must not be discharged into a flue which is for exhausting fumes from appliances burning gas or other fuels.
- The air openings must not be obstructed by a carpet.
- Appliances with a single inlet valve can only be connected to a cold-water supply. Appliances with a double inlet valve must be correctly connected to a hot water and cold-water supply (depending on the washing machine model).
- The plug must be accessible after installation.
- The appliance must not be installed behind a lockable door, a sliding door, or a door with a hinge on the opposite side to that of the device.
- The appliance shall not be installed in a humid place.
- Do not place other items or appliances (such as microwaves) or objects under pressure on the device.
- The product is only for home use and is only designed for the textiles suitable for machine washing and drying.
- The product cannot be used for commercial or industrial purposes. Do not use the appliance outdoors, even if the area is protected, as it may be exposed to moisture, rain or thunderstorms.
- Do not insert more laundry load than the allowed load (maximum allowed load indicated in the product data tables).
- The device is not designed to be operated by external switching devices such as timers or remote-control systems.
- Do not use an extension cord or multiple sockets.
- Do not wash garments containing glass fibre, such as certain curtains or blinds, as particles may remain in the
washing machine and adhere to other types of garments, causing skin irritation.
- Do not stand or sit on the appliance.
- Do not lean against appliance door.
- Flammable and explosive or toxic solvents are forbidden. Do not use detergents containing petrol, alcohol, etc. Use only detergents suitable for machine washing, especially for the drum.
- Garments containing oil may catch fire spontaneously, especially when exposed to heat sources such as a washer-dryer. The garments are heated, causing an oxidation reaction in the oil. Oxidation generates heat. If heat cannot escape, garments may become hot enough to catch fire. Piling, stacking or storing garments containing oil retains heat and therefore creates a fire hazard.
- Garments containing vegetable cooking oil or hair care products should first be washed in hot water with extra detergent, this will reduce the hazard, but will not completely eliminate it.
- Make sure that no objects such as lighters, matches, etc. are introduced.
- Close the door properly, if it is difficult to close, check that clothing does not prevent proper closing.
- Never stop the device before the end of the drying cycle unless all items are quickly removed and spread out so that the heat is dissipated.
- In the final part of the tumble dryer cycle, the cooling part, no heat is provided to ensure that the garments are not damaged due to high temperature.
- Make sure that there is no water in the drum before opening the door.
- Once the washing cycle has finished, we recommend removing the laundry as soon as possible to prevent creases.
- This appliance can be used by children aged 8 and above and persons with reduced physical, sensory, or mental capabilities or lack of experience and knowledge, as long as they have been given supervision or instruction concerning the use of the appliance in a safe way and understand the hazards involved. Do not allow children to play with the device. The cleaning and maintenance of the appliance should not be carried out by children without supervision.
- Children of less than 3 years should be supervised to ensure that they do not play with appliance.
- Children should be supervised to make sure that they do not play with the device.
- Cleaning and maintenance should not be carried out by children without supervision.
- Be sure to use the child lock functions and to switch off the appliance when not in use.
- Keep the cleaning products out of the reach of children.
Cautions during the handling of the machine
- If you wish to change the location of the washing machine, make sure you install the transport bolts again in the device, as they will ensure the interior of the product is not damaged during transport.
- Water accumulated inside the appliance must be drained out.
- Handle the machine carefully. Never hold each protruded part on the machine while lifting. Do not use the door of the device as a handle during transport.
- The device is heavy. Transport it with care.
- Secure the drain and water-supply hose correctly.
- Do not insert hands into the running water extracting tub.
- Do not close the door with excessive force. If it is found difficult to close the door, please check if the clothes are put in or distributed well.
- It is forbidden to wash carpets.
- Never refill the water by hand during washing.
Installation
- The appliance must be handled and installed by 2 or more people to avoid risk of injury. Wear protective gloves when unpacking and installing the product to avoid cutting hazards.
- Keep children away during installation process.
- During installation, make sure that the power cable is not damaged to avoid possible risk of fire or electric shock.
- Before using the device, it is imperative to remove the transport screws.
- Keep the room dry and ventilated.
-
Never place the appliance over the opening of an uncovered drain.
-
Do not expose the device to temperatures below 5^ C or above 35^ C.
- Do not install in bathrooms or very damp rooms.
- Check that it is correctly levelled on the floor by means of the feet.
- WARNING! Cecotec accepts no liability for incidents caused by improper use outside the rules set out in this instruction manual.
INSTRUCTIONS DE SÉCURITÉ
- Water supply hose
- Door
- Drain hose
- Main body
- Power cord
- Detergent/fabric softener dispenser tank
- Control panel
- Drum
- Drain filter
- Adjustable feet
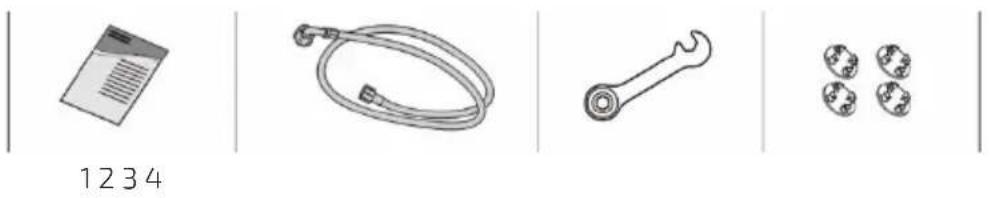
Accessories
Fig. 2.
- Instruction manual
- Cold water supply hose
- Adjustable pliers or wrench
- Transport hole plug
2. BEFORE USE
- Unpack the appliance and keep the original packaging and materials in a safe place. It will help prevent any damage if the appliance needs to be transported in the future. In case the original packaging is disposed of, make sure all packaging materials are recycled accordingly.
- To remove the lower part of the packaging, do not tilt the appliance on its front side. Carefully tilt to the side. Never place the appliance directly on the floor on its back or front part.
- Make sure all parts and accessories are present and in good conditions. If there is any piece missing or not in good condition, immediately contact the Technical Support
ENGLISH
Service of Cecotec.
- Keep all packaging materials away from children.
- Before using the washing machine, the product shall be calibrated.
- Before washing the clothes for the first time, the product shall be operated in one round of the whole procedures without the clothes inside.
- Make sure that all pockets are empty. Sharp and rigid items such as coins, brooches, nails, screws or stones may cause serious damage to this machine.
3. PRODUCT INSTALLATION
- Place the device on a flat, stable and dry surface. Make sure the product does not stand on the power cord.
- Never install it on a soft carpet or wooden floor, or on any kind of mezzanine.
- The washer dryer may move a little during operation due to overload factors.
- Avoid direct sunlight and ensure sufficient ventilation.
- Keep the room environment dry and avoid humidity.
- Remove the cardboard box and Styrofoam packing.
- Free the power cable and the drain hose from the rear.
- Remove any accessories that may be inside the drum, such as the water supply hose, instruction manual, etc.
- The washer dryer should be operated within a temperature range of 5-40°C. If used under 0°C, the inlet valve and draining system may be damaged.
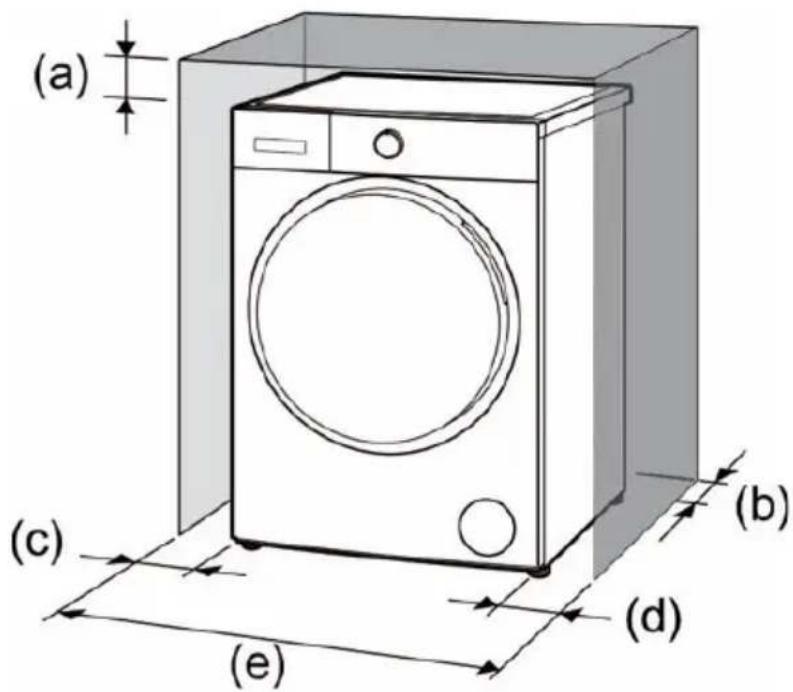
- Install the appliance ensuring sufficient space around it (Fig. 4):
a: minimum 3 cm.
b: minimum 5 cm.
c: minimum 5 cm on the left side.
d: minimum 5 cm on the right side.
e: minimum 70 cm.
WARNING: Do not allow metal parts of the appliance to come into contact with metal sinks or other appliances.
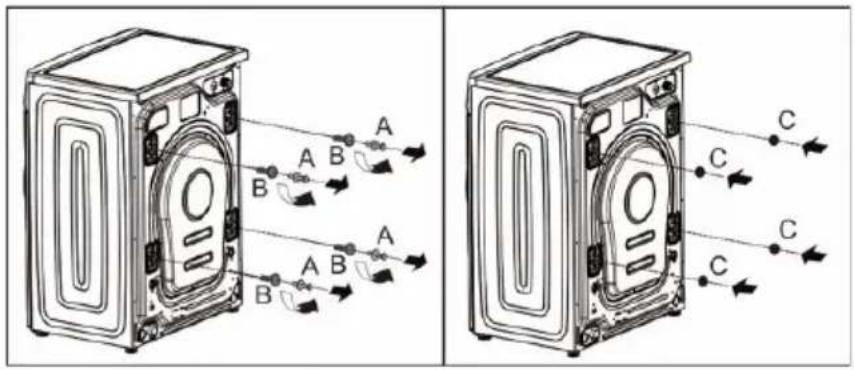
Removing the transport screws (Fig. 3)
- The transport screws must be removed from the backside of the device before installing it.
- IMPORTANT: it is imperative to remove the transport screws before the first use, otherwise they may damage the drum during the operation of the device.
- The transport screws will be necessary again when moving the product, so make sure they are kept in a safe place.
- In order to remove the screws:
- Loosen 4 screws with a spanner and then remove them (A).
- Remove the 4 tube spacers (depending on model) (B).
- NOTE: during removal of the transport screws, occasionally the pipe spacers may fall into the machine, if this happens, they can be accessed by tilting the machine forward and picking them up from the floor or inside the base of the machine.
- Cover the transport screw holes with the 4 supplied plugs (C).
- Keep the transport screws properly for future use. You will need them again if the washer dryer needs to be moved to another location.
-
If it is necessary to transport it to another location:
-
Reinstall the transport screws.
-
Secure the power cable to the rear of the appliance.
Levelling the washer dryer
The appliance reaches high spin speeds to remove water at the end of the wash cycle.
Therefore, it is important that it is level and that all 4 legs press against the floor with the same pressure.
This will help to ensure quieter operation and less vibration.
Carry out the following steps:
- Install the appliance on a solid, level surface. Preferably in a corner of the room.
- If the floor is uneven, adjust the legs as necessary to level the device. Do not place any objects under the legs in an attempt to level it.
- Do not extend the legs more than necessary. The more extended, the more vibrations the device will suffer. Start with the legs all the way in and adjust each one as
ENGLISH
necessary.
- You can use a spirit level (not included) to check that the appliance is level.
- Press down on each corner of the top of the equipment to ensure that it does not "wobble".
- All legs must press equally against the floor.
- When the device is level and does not wobble, lock the legs by tightening the lock nuts against the bottom of the equipment. Be sure to do this without changing the height of the leg (hold the leg while tightening the lock nut). Fig. 5
Connection of the supplied hoses
Water supply hose connection
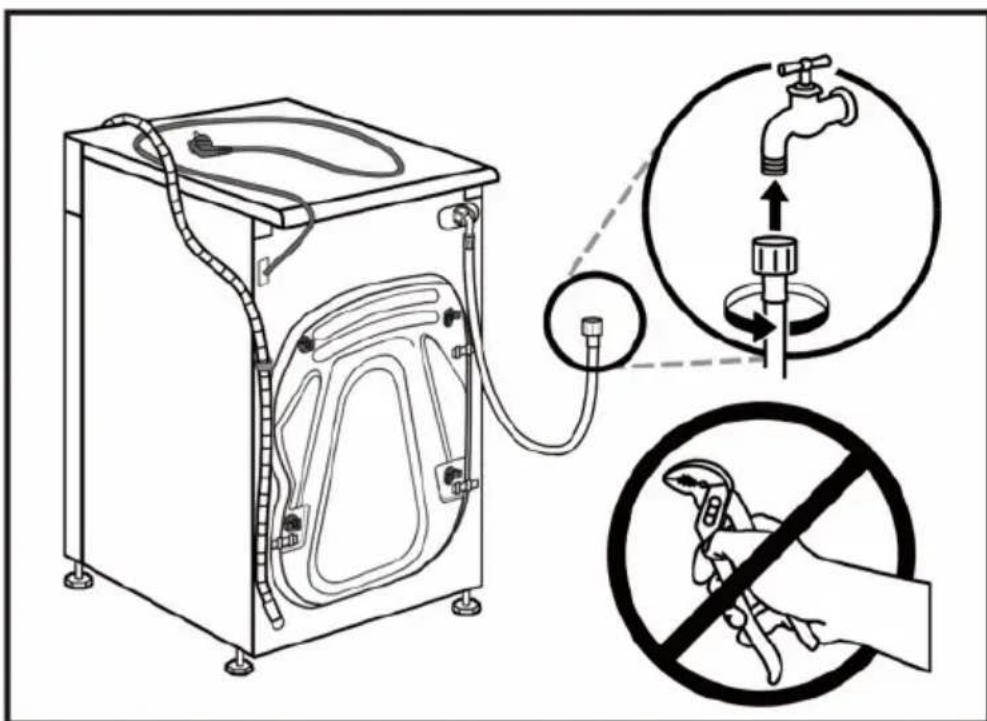
- Connect one end of the water supply hose to a cold water tap and tighten by hand (Fig. 6). Before making the connection, allow the water to run freely until it runs completely clear.
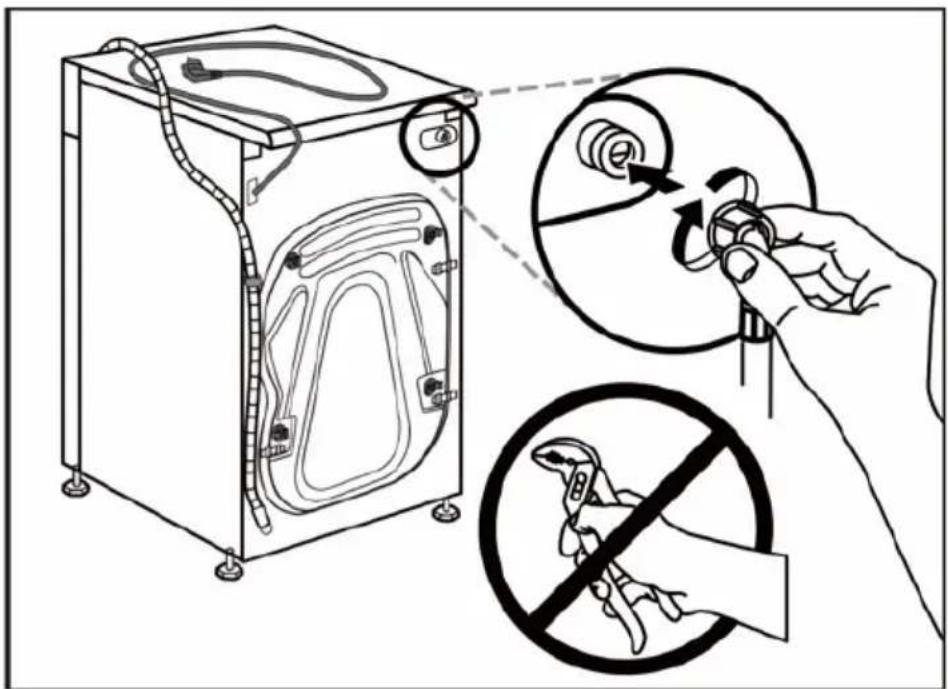
- Connect the other end of the water supply hose to the water inlet valve at the rear by turning clockwise (Fig. 7).
- Open the tap slowly and make sure there are no water leaks.
Warning
- Do not kink, crush, modify or sever the water supply hose.
- Squeeze the end of the hose firmly by hand.
- The water supply pressure must be within a range between 0.03 and 1 MPa. If the pressure exceeds this value, a pressure reducing valve (not included) must be installed.
- If the hose is not long enough, please contact a specialised retailer, an authorised technician or the Cecotec Service Centre.
- Never use a second-hand or used hose. Always use the hose supplied with the equipment.
Drain hose connection
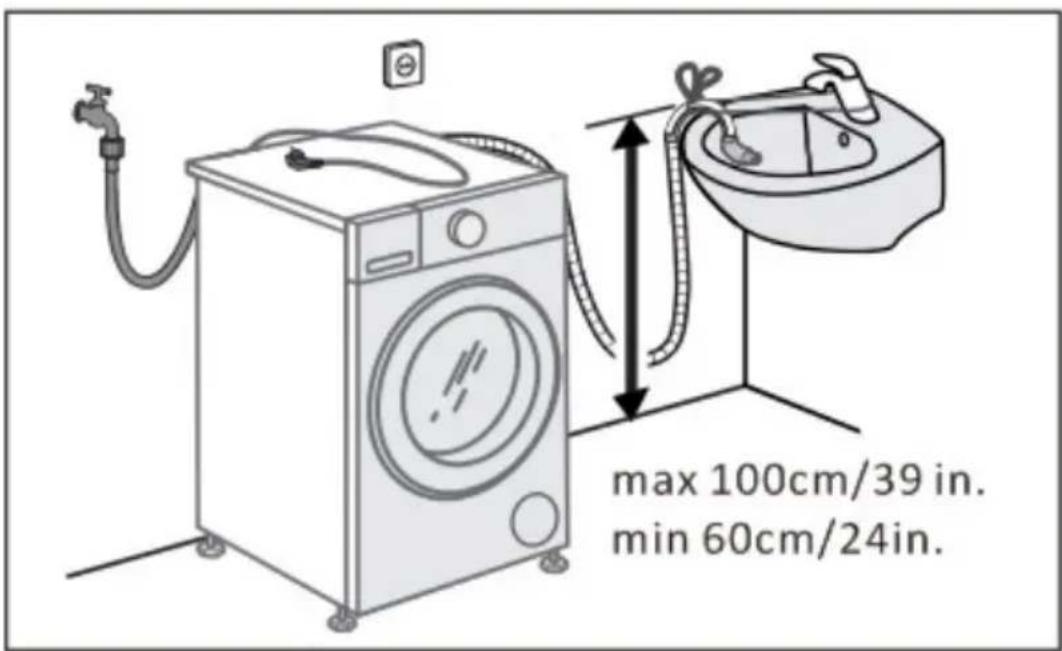
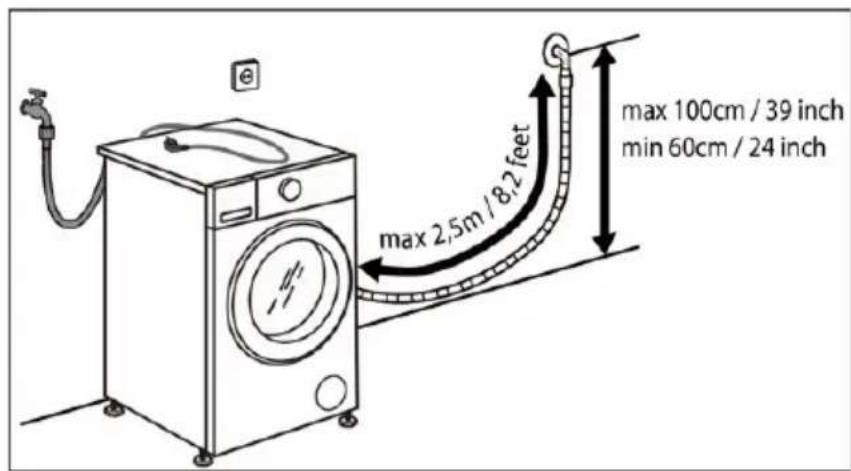
Drainage point height (Fig. 8)
Height difference between the floor and the drain:
- Minimum 60 cm (24 inches)
- Maximum 100 cm (39 inches)
Drainage connection types:
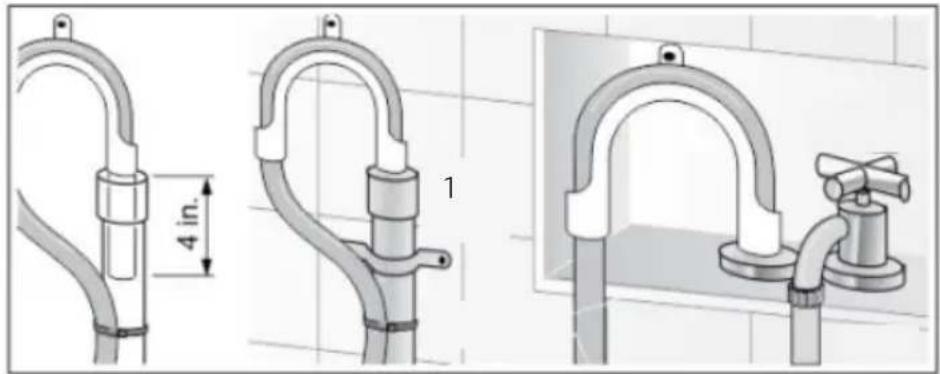
1) To the vertical drainage pipe
Connect the drain hose to the elbow (not included) of the drain pipe. Place the elbow on the hose 4 inches (100 mm) from the end of the hose. Insert this section of hose into the pipe. If the hose is pushed down too far, it can cause the washer dryer to self-siphon, i.e. to continuously empty as it fills with water. Secure the elbow and hose with a hose clamp (not included) to prevent the hose from slipping out of the tube during use.
Fig. 9
- Drainage pipe
- Cold water
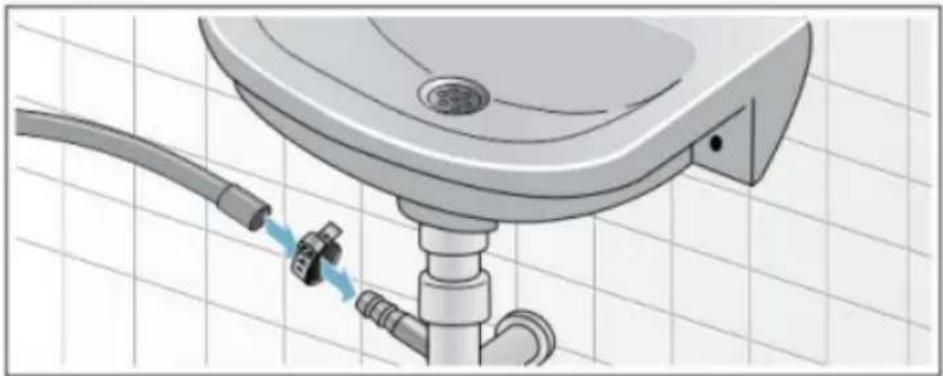
2) To the sink trap
Secure the drain hose to the sink trap using a 0.9-1.6 inch (20-44 mm) hose clamp. Not included. Available in hardware or specialised shops. Fig. 10
3) To a sink/washbasin
WARNING: DANGER OF BURNS
When washing at high temperatures, there is a risk of burns when touching hot soapy water, e.g. when draining hot water with foam into the sink/washbasin. Do not touch hot soapy water.
Note:
Damage to the appliance / damage to textiles.
If the end of the drain hose touches the water drained by the washer dryer, water can be sucked back into the washer and damage the appliance or the laundry inside the drum.
To ensure that this does not happen, make sure that:
- No plug in the sink/washbasin drain.
- The end of the drain hose does not touch the drained water.
- Water flows freely through the sink/washbasin drain and there are no blockages.
- The hose is securely connected.
ENGLISH
Note:
- Do not twist, pull or bend the drain hose.
- Fix the hose with a hose clamp to the drainpipe, sink/washbasin, etc., so that the hose will not be forced out by the force of the water.
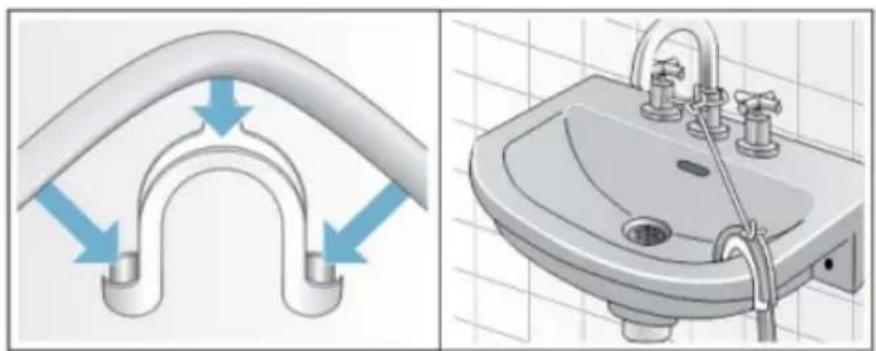
- For added safety, you can also use a drain hose holder (not included) and install the hose over a sink/washbasin or tank, as shown in Figure 11.
- The use of hose extensions is not recommended; if absolutely necessary, the extension should have the same diameter as the original hose and should not exceed 250 cm in length (Fig. 12).
- If drain hose is too long, do not force it into washing machine as it will cause abnormal noises.
- After installation, wait a few hours before operating the appliance to allow it to acclimatise to the ambient conditions in the room.
- Only connect the device when the installation has been completed.
4. OPERATION
Note
- Before washing the clothes for the first time, the product shall be operated in one round of the whole procedures without the clothes inside.
Control panel
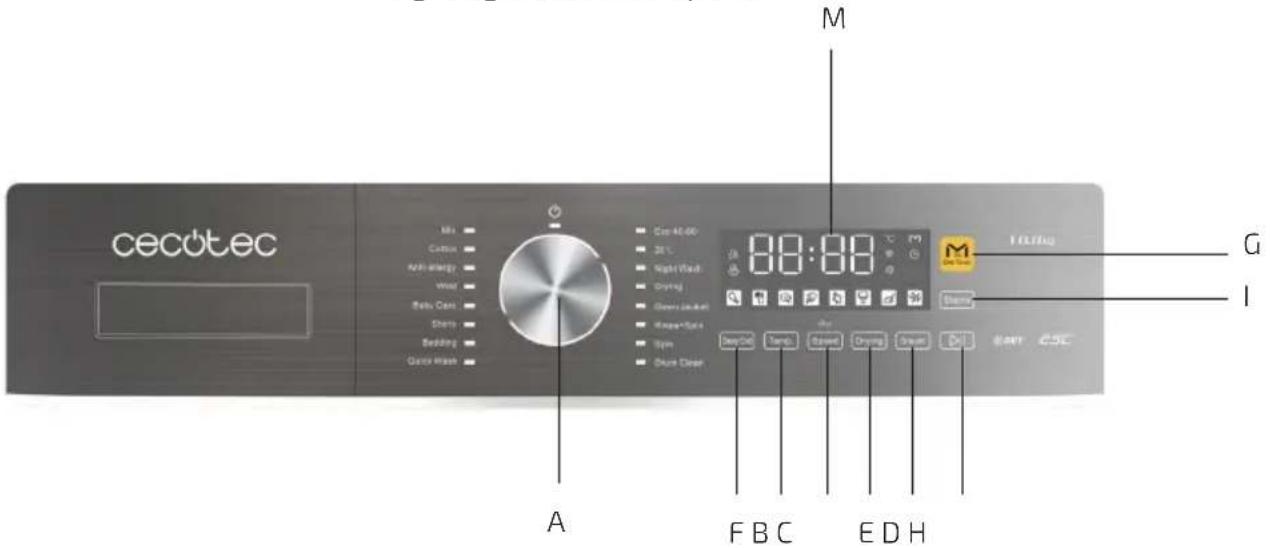
A: Wash cycle button/selector
Used to programme the desired wash cycle.
OFF position: turn the wash cycle selector, when the indicator light below the symbol
is on, the machine will stop running and turn off. If the machine is switched off during a wash cycle, the wash cycle will be cancelled.
B: TEMP
Press the button to change the water temperature of the selected cycle, the temperature value will appear on the display.
C: SPEED
Press the button to change the spin speed of the selected cycle, the speed value will
appear on the display.
CHILD LOCK FUNCTION
When a wash cycle is running, if you want to activate the child lock, press and hold the SPEED button for about 3 seconds.
Sound cancellation (buzzer)
Press and hold the SPEED button and the ONE TOUCH button at the same time for at least 3 seconds.
Perform the same operation to restore the sound.
D: STEAM
Press the button to add a steam wash process after the last water draining step of the selected wash programme.
Some wash cycles cannot select the steam wash function. It can only be selected if there is a steam icon in front of the programme name on the control panel or in the wash cycle table.
E: DRYING
Press the button to set the drying type according to your needs and the drying type or drying time will appear on the digital display.
Some programmes do not have a drying function.
F: DELAYED END
Press the button to set the end time of the washing programme.
G: ONE TOUCH M
Press the button to set the "M-Smart" wash cycle.
H: START/PAUSE
Press and hold the button to start or pause a wash cycle.
Adding laundry during the execution of a washing programme
Once the wash cycle has started, press and hold the "START/PAUSE" button again. If the "DOOR LOCK" indicator light is off, the door can be opened, and laundry can be taken in
ENGLISH
or out of the drum.
To resume the wash cycle from the point where it was interrupted, close the door and press the button again.
WARNING: if the water level or water temperature in the drum is too high, the door lock indicator light will come on and the door could not be opened.
I: STAINS
Press the button to select the type of soiling of the laundry, the washer dryer will automatically adjust the most optimal way to remove the soiling.
Up to 8 types of soiling can be selected.
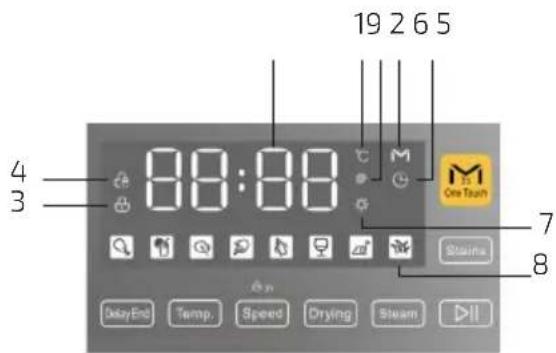
M: Display (Fig. 14)
1. Temperature indicator °C
When a wash cycle is selected, the default temperature value of this programme will appear on the display, with the temperature indicator light illuminated.
You can change the temperature value by pressing the "TEMP" button. If "--" is shown on the display, it means that the washer dryer uses cold water only (the internal heating element for heating water would not be available in this programme).
2. Rotational speed indicator rpm
When a wash cycle is selected, the default spin speed of this programme will appear on the display, with the spin speed indicator light illuminated.
You can change the spin speed value by pressing the "SPEED" button. If "--" is shown on the display, it means that the washer dryer does not spin after the final draining process in this programme.
3. Door lock indicator
The lit symbol indicates that the door is locked. To avoid any damage, wait until the icon turns off before opening the door.
To open the door while a wash cycle is in progress, press the "START/PAUSE" button, if the "Door Lock" icon is off, the door can be opened.
NOTE: for safety reasons it is not always possible to open the door once the wash cycle has started.
4. Child-lock indicator
The lit icon means that the function is activated, the buttons on the control panel will be locked (except the OFF position of the selector).
5. Delayed end indicator
The lit icon means that the function is activated. The countdown to the end of the selected wash cycle will appear on the digital display.
6. One touch indicator M
The lit icon means that the "M-Smart" washing programme has been selected.
There are 3 ways to set this wash programme.
7. Drying function indicator
When the icon lights up, it means that the “drying function” has been set or the drying cycle is running.
8. Type of stains indicator
The “stain type” icon lit means that a stain type has been selected, the device will automatically set the most optimal cycle to remove the stains.
Types of stains (Fig. 15))
- Remaining wash cycle time
- Delayed end time
ENGLISH
- Temperature
- Spin speed
- Drying Time
- Error code
Before each washing
- Check the label on each garment.
- Empty the pockets of the clothes to be washed. Make sure that there are no metal objects such as coins or paper clips, papers, etc. in the pockets.
- Tie a knot with straps or cords, close zips and fasten buttons on covers, cushions, etc.
- Remove the sliders from the curtains.
- Place small or particularly delicate garments such as stockings, lace, socks or handkerchiefs inside a net ball.
- Turn garments like trousers, knitted items, T-shirts and sweatshirts upside down.
- Ensure that wire cup bras are machine washable and place them inside a net ball that can be securely closed with a zip or buttons. If the wire slips out of the cup, it can fall through the holes in the drum and cause major damage.
Before each drying
- Use the tumble dryer only for laundry that has been previously washed, rinsed and spun-dried.
- Remove as much water as possible from the clothes. Do not reduce the spin speed.
- To ensure uniform drying, sort the laundry according to the type of fabric and the degree of drying required.
- Garments that require ironing do not have to be ironed immediately after drying, but it is advisable to fold them and store them for a while to allow the remaining moisture to evaporate.
- When washing laundry for tumble drying, use the correct amount of detergent and fabric softener, as specified by the manufacturer. Some detergents may deposit on the moisture sensors and negatively affect the operation of the equipment and the drying results.
-
The following garments should not be tumble dried:
-
Clothing marked with the following symbol on its label.
- Woollen articles. Risk of shrinkage!
- Delicate fabrics such as silk or synthetic net curtains. Risk of creasing!
- Articles containing foam rubber or similar materials.
- Articles that have been treated with flammable solvents such as stain removers, gasoline, paint thinners. Danger of fire!
- Articles containing hairspray or similar substances. Hazardous vapours!
- Dripping wet clothes. Waste of energy!

Classification of clothing according to colour and soiling degree
Sort the laundry according to colour, soiling degree and recommended washing temperature range.
- Garments may discolour.
- Never wash new multicoloured garments together with other garments.
- Wash white garments separately from coloured garments. Otherwise, white items may tend to turn grey.
Degree of soiling
Light soiling
No visible dirt or stains but may have absorbed some odour.
Light summer clothing such as T-shirts or blouses worn only once.
Also, to "freshen" bed linen or towels.
Normal soiling
Visible soiling and/or some light staining.
Light summer clothing such as T-shirts or blouses that have been worn several times.
Kitchen towels, towels or bed linen used for a week or more.
Stain-free curtains.
ENGLISH
Heavy soiling
Visible dirt and stains.
Kitchen towels, cloth napkins, baby bibs, children's clothing, sports shirts.
Work clothes.
Classification of clothing according to the specifications of its care label
The symbols on the garment labels will help you to choose the right washing programme, temperature, washing cycles and ironing methods.
Don't forget to look at these tips!
ENGLISH
ENGLISH
Washing cycle table
| Wash cycles | Temperature °C (MAX) | Maximum load (Kg) | |
| Washing | Drying | ||
| Mix 60 10 6 | |||
| Cotton 60 10 6 | |||
| Anti-allergy 85 3 - | |||
| Wool 40 1 - | |||
| Baby Care | 85 | 5 | 5 |
| Shirts | 60 | 3 | - |
| Bedding | 60 6 - | ||
| Quick Wash | 40 | 1 | 1 |
| ECO 40-60 | 40 | 10 | 6 |
| 20°C | 20 2 - | ||
| Night Wash | 60 | 2 | - |
| Drying | - | - | 6 |
| Down jacket | 40 2 2 | ||
| Rinse&Spin | - | 10 - | |
| Specifications | Type of detergent | |||
| Detergent | Softener | |||
| Universal Specific | ||||
| For washing mixed loads of cotton and synthetic fabrics with light to normal soiling, white and coloured garments together. | L/P - | ○ | ||
| For daily wear of cotton, linen and cotton blends | L/P - | ○ | ||
| For garments in need of dust mite and allergen removal | L/P --- | ○ | ||
| For machine washable woollen and wool- blend garments | - | L | ○ | |
| For baby clothes | L/P | - | ○ | |
| For shirts and blouses | L/P | L | ○ | |
| For large bedding such as blankets and bedspreads. Also for curtains. | L/P - | ○ | ||
| For lightly soiled or lightly soiled garments | L/P | - | ○ | |
| Energy efficiency programme | L/P | - | ○ | |
| For small quantities of easily discoloured garments | L/P - | ○ | ||
| A cycle used at night, with a lower noise level | L/P | - | ○ | |
| For drying wet cotton fabrics | - | - | - | |
| For machine-washable down jackets | - L/P | ○ | ||
| Combines a rinse and spin for loads that require an additional rinse cycle. Also for loads that only require rinsing. | - | - | ○ | |
ENGLISH
| Spin Only | -10 - | ||
| Drum Clean | 85 -- | ||
| M-Smart 40 5 - |
L= gel/liquid detergent
P= powder detergent
○ = optional
If you use liquid detergent, it is not recommended to activate the delayed finish.
We recommend the use of powder detergent for clothes from 20 to 80^ and specific detergent for wool from 20 to 40^ .
Follow the detergent / softener manufacturer's recommended dosage.
| This cycle uses a spin cycle to shorten drying times for heavy fabrics or special care items washed by hand | -.- | |||
| Cleans the drum by removing dirt and preventing bacteria build-up. Make sure the drum is empty. | -.- | |||
| Special cycle that can be started by simply pressing the ONE TOUCH button. | L/P. | ○ |
ENGLISH
WASH CYCLES
M-Smart washing cycle
The M-SMART wash cycle can intelligently detect the weight of the laundry and combine different wash times and temperatures for a smart wash.

It is shown on the display in the detection stage after the cycle starts, and the M-SMART wash cycle can be activated by the following 3 methods:
- When the device is OFF, press and hold the ONE-TOUCH button for at least 3 seconds, the device will run the M-SMART cycle directly with the M-Smart indicator light illuminated.
- When the device is ON, press and hold the ONE-TOUCH button for at least 3 seconds, the device will run the M-SMART cycle directly with the M-Smart indicator light illuminated.
- When the appliance is on, press the ONE-TOUCH button lightly, the M-Smart indicator light will turn on, then press the "START/PAUSE" button, the appliance will run the M-Smart wash cycle.
Drying programme
How to set the drying programme?
- To set the "Washing'Drying" programme (Washing + Drying).
Only some of the washing programmes can add the drying function.
First, load the laundry into the drum, close the door, turn the wash cycle selector to select the desired wash programme (except the drying programme) and press the Drying button to select the two drying modes as follows:
- Auto Drying: press the Drying button continuously to adjust the drying time shown on the display, and when "R" is displayed, the "Auto Drying" mode is activated, the drying time can be adjusted automatically according to the amount and humidity of the laundry.
-
Timed drying: press the Drying button to set the drying time. Press the drying button, the digital display will show the drying time (30-60-90-120-150-180-210-240 minutes). Select a suitable drying time and activate the "Timed drying" mode. Then, press the button. "START/PAUSE", the machine will start to run the "Wash + Dry" Programme, with the drying programme automatically activated at the end of the washing programme.
-
To set the "Drying only" programme WITHOUT PREWASHING
This dry-only programme is suitable for drying cotton laundry. Do not dry clothes prone to deformation or shrinkage. When the programme is set, before drying, it is recommended to run a single spin cycle to dry the laundry.
- First, load the laundry into the drum, close the door, turn the programme selector to select the Drying programme and then press the "Drying" button continuously, to select the "Auto Drying" or "Time Drying" mode, as described above.
- Then press the START/PAUSE" button to start the "Drying only" programme.
- To set the "Down jacket drying" programme
AutoThe "Washing+Drying" programme should be used to dry the jackets. Select "Down jacket" programme + "Automatic Drying" mode.
Do not choose "Drying only" mode to dry the down jacket. For best drying effect, it is recommended to dry only one down jacket at a time.
Precautions for the drying programme
- If there is too much moisture in the laundry, the machine will automatically extend the drying time and it is normal that "0" is displayed for a long time.
- When running the drying programme, the tap must be open, as water is required for cooling and dehumidifying.
- The longest drying time is set according to the different models.
- To avoid wrinkles in the laundry caused by over-drying, the drying time can be set a little shorter at first and then increased according to the results obtained.
- Before running the "Drying only" programme, it is recommended to run a spin cycle first.
- If necessary, untie any knots in the laundry that may have formed after spinning and then place them in the drum to dry.
- For larger or thicker laundry, drying may be uneven in some areas of the garments. Select the drying time according to the result obtained after the end of the drying cycle.
- Woollen fabrics are not suitable for drying.
- Do not dry clothes that may warp or shrink.
- Some programmes do not have a drying function.
ENGLISH
Steam function
Press the “STEAM” button to add a steam wash process after the last water drain stage of the selected (or ongoing) wash cycle and before the last spin. In the steam washing process, the machine generates a large amount of high temperature steam which penetrates deep into the fabrics, improving their softness and elasticity and, at the same time, eliminating unpleasant odours and refreshing the laundry. After the steam washing process, the machine enters the final stage of rinsing and spinning.
Special washing cycles
Baby Care
Cycle designed for the typical soiling of children's garments, effectively removing residual detergent residues.
Down jacket
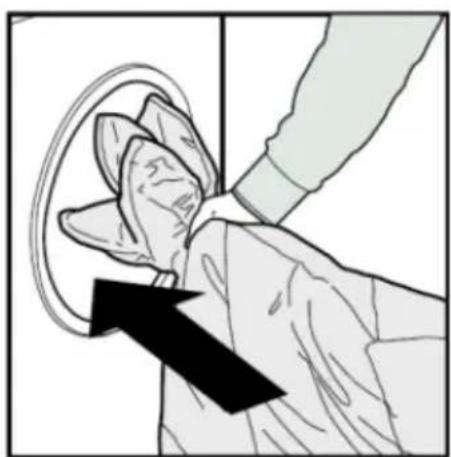
Cycle for washing down jackets (weighing no more than 2.0 kg), cushions or garments padded with goose down. We recommend that the jacket is placed in the drum with the edges folded inwards (Fig. 16) and that no more than 3/4 of the total drum volume is used. For best results, we recommend using a liquid detergent.
Wool
Cycle designed for woollen garments.
IMPORTANT: after use, confirm that the garments have not been damaged or shrunk.
DELAYED END
Press the "Delayed End" button to set the programme end time, which is incremented in one-hour intervals, up to a maximum of 24 hours. After selecting the desired wash programme, but before pressing the "START/PAUSE" button, press the "Delayed End" button until the desired time is displayed, e.g. 8h, with the "Delayed End" indicator light on.
NOTE: The cycle time is included in the set deferred end time.
Example of a cycle time of 1 hour and 30 minutes and a delayed end time of 8 hours.
8 h is shown on the display and a countdown (approx. 6 hours and 30 minutes) until the wash cycle starts, then the cycle duration 1: 30 is shown and starts. The total time is approximately 8 hours.
The way to cancel the deferred termination function is as follows:
- Turn the wash cycle selector to reset the wash cycle. The "Delayed Completion" indicator light will go out.
NOTE:
- The "delayed end" function cannot be set in some wash cycles.
- The actual end time of the wash cycle may be different from the set delayed end time, depending on multiple factors such as water supply pressure, drainage, type of laundry, water temperature, as well as other conditions.
Child Lock
- The setting of the child lock function can prevent malfunctions or unwanted incidents.
- During operation, press and hold the "SPEED" button for approximately 3 seconds to set or cancel the child lock function.
- After setting the child lock function, its indicator light comes on, the door cannot be opened and the control panel is locked, the buttons remain inactive, as well as the wash cycle selector (the indicator light below the power symbol is on). The machine can only be switched off by turning the wash cycle selector to its OFF position, the indicator light below the power symbol will go out and the device will stop operating. If the machine is switched off, the child lock function will be cancelled.
- When the machine is switched on again, it will directly run the selected programme before it was switched off.
Stain removal
This option allows you to select the type of stains on the laundry for better efficiency during washing.
The appliance adjusts the average wash temperature, drum movement and soaking time to the specific type of stain. Hot or cold water, gentle or intensive washing and long or short soaking ensure that the washing sequences are specially adapted to each type of stain. Selecting this option ensures that the stains are treated in the best possible way.
NOTICE: Pressing and holding the "STAINS" button automatically runs through the set type of stains.
The duration of the wash cycle varies according to the type of soiling selected.
Before the first wash
All washer dryers are tested before leaving the factory under strict quality control. This process involves running several wash cycles. As a result, a small amount of water may
ENGLISH
remain in the drum and drainage system. Run a "Drum Clean" cycle without laundry to clean the system before your first load of laundry.
First add 1 or 2 tablespoons of detergent to compartment I of the detergent dispenser. Then run the "Drum Clean" cycle.
Wait for the cycle to finish.
How to use the washer dryer
1. Load the laundry
Open the door and insert the laundry into the drum. Load the items one at a time without squeezing them or overfilling the drum, place them evenly. Please note the load sizes indicated in the "Washing cycle table". Overloading of the machine will result in non-optimal washing and wrinkled laundry.
2. Close the door
Make sure that there are no dirty clothes between the door glass and the rubber seal. Close the door, make sure you hear the "click" as it closes.
3. Open the tap
Make sure that the appliance is connected to the water mains. Open the tap.
4. Set the desired programme
Select the required programme with the washing programme selector. The duration of the wash cycle is shown on the display. The machine automatically displays the default temperature and possible spin speed settings for the selected programme. Adjust the temperature and/or spin speed settings, if necessary, with the corresponding buttons.
Change the temperature, if necessary
Press the TEMP (Temperature) button to progressively decrease the temperature setting until cold wash is reached (“--” will be displayed on the digital display). Pressing the button again sets the highest possible setting.
Change the spin speed, if necessary
Press the "SPEED" button to progressively decrease the spin speed until the spin cycle is switched off ("--" will be shown on the digital display). Pressing the button again sets the highest possible setting.
Select options, if necessary
ENGLISH
Press the buttons to select the desired option; the indicator light of the corresponding option will turn on.
Press the button(s) again to cancel the option, the indicator light of the corresponding option will go out.
If the selected option is incompatible with the configured programme, the incompatibility will be signalled by a beep of the buzzer and the indicator light of the corresponding option will flash.
If the selected option is incompatible with a previously configured option, only the most recent selection shall remain active.
5. Add detergent
Remove the detergent dispenser and add detergent and fabric softener (if applicable) into the corresponding compartments as described in figure 17.
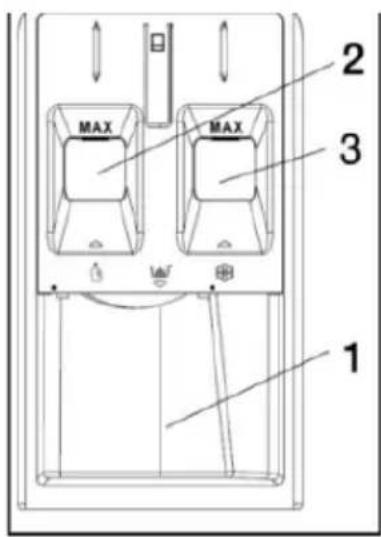
- Compartment 1: detergent powder
- Compartment 2: liquid detergent (must not exceed the level marked MAX).
- Compartment 3: additives such as softener (must not exceed the level marked MAX).
Observe the dosage recommendations of the detergent/softener manufacturer.
The correct dosage of detergent/softener is important because:
- Optimises the cleaning result.
- Avoid excess detergent residues in your laundry, which can cause skin irritations.
- Saves money by avoiding waste of leftover detergent.
- Protects the washer dryer, preventing calcification of the components.
- It respects the environment by avoiding unnecessary environmental burdens.
Do not use detergents for hand washing as they create too much foam!
Use powder detergent for cotton whites, for pre-washing and for washing at a temperature over 60 °C!
When using agglomerated, ropy detergent or additives, before they are poured into the detergent box, it is suggested to use some water for dilution to prevent the inlet of detergent box from being blocked and overflowing while filling water.
6. Delayed end
If desired, use this function to end a programme at the programmed time.
ENGLISH
7. Start-up programme
- Press the "START/PAUSE" button ▷II. The corresponding indicator light will illuminate, the door will lock and the DOOR LOCK 🚗 Indicator light will illuminate.
- To avoid water spillage, do not open the detergent dispenser during a running programme.
- The remaining duration of the programme may vary. Factors such as imbalance in the wash load or foam formation may affect the programme duration.
- Change the configuration of a running programme, if necessary.
You can change the settings while a programme is running. The changes shall be implemented as long as the respective programme phase has not been completed yet.
To change the configuration of a running programme:
- Press the "START/PAUSE" button to pause the running programme.
- Change your settings.
- Press the START/PAUSE" button again to continue the programme.
If you have changed the programme, do not add detergent for the new programme.
To prevent a running program from being accidentally changed (e.g., by children), use the Child Lock function.
Pausing a running programme and opening the door
Press the "START/PAUSE" button to pause the running programme.
If the water level and/or temperature in the drum is/are not high, the "DOOR LOCK" indicator light will go out. You can open the door, for example, to add more laundry or to remove laundry that was loaded by mistake. Press the START/PAUSE" button again to continue the programme.
- Change the configuration of a running programme, if necessary.
-
Cancellation of a running programme
-
Turn the wash cycle selector to turn off the machine while the light under the "⏻" symbol is on.
- If the water level and/or temperature is low enough, the door will unlock and can be opened.
- The door will remain locked if there is a higher water level in the drum. To unlock the door, first turn the wash cycle selector to select the "SPIN" programme, then turn off the "SPIN"
ENGLISH
option by pressing the "SPEED" button to set the spin speed to "-" (should be displayed on the digital display).
- Press the START/PAUSE button to run the SPIN programme. Water will drain from the drum during the wash cycle. The door unlocks at the end of the programme.
-
Switching off the device after the end of a wash programme
-
At the end of the cycle, the message "END" is shown on the digital display.
- The door can only be opened when the DOOR LOCK indicator light goes out.
- Check that the DOOR LOCK indicator light is off, then open the door and remove the laundry.
- Turn the wash cycle selector to switch off the machine to the "OFF" position.
- Leave the door ajar to allow the inside of the drum to dry out and prevent odours and mould growth.
5. CLEANING AND MAINTENANCE
Warning
Before cleaning or maintaining, unplug the appliance and close the tap.
- Proper maintenance on the washing machine can extend its working life. The surface can be cleaned with diluted non-abrasive neutral detergents when necessary. If there is any water overflow, use a cloth to wipe it off immediately.
- Do not use abrasive cleaners or scouring pads to clean the device.
- Do not use pressurised water to clean the equipment.
Cleaning the drum
- The rusts left inside the drum by the metal articles shall be removed immediately with chlorine-free detergents.
- Do not use steel wool.
Note
Do not put laundry in the washing machine during the drum cleaning.
Cleaning the door seals and glass
- Wipe the glass and seal after each wash to remove lint and stains. If lint builds up it
ENGLISH
can cause leaks.
- Remove any coins, buttons and other objects from the seal after each wash.
Equipment decalcification
- As long as you use the correct amounts of detergent with the wash loads, descaling is not necessary. If it is necessary to descale the drum of the appliance, follow the instructions of the manufacturer of the descaling product.
- Small amounts of descaling agent can be used to remove white stains on the washing machine drum caused by limescale or mineral deposits or small amounts of rust caused by metal objects left in the drum.
NOTE: Descaling agents contain acids which can attack parts of the appliance and discolour the laundry.
Checking the water supply hose
Check the water supply hose at least once a year. If there are cracks, it should be replaced immediately, during the wash cycle, the water pressure is very strong, and a cracked water supply hose could easily open.
Cleaning the detergent dispenser tank
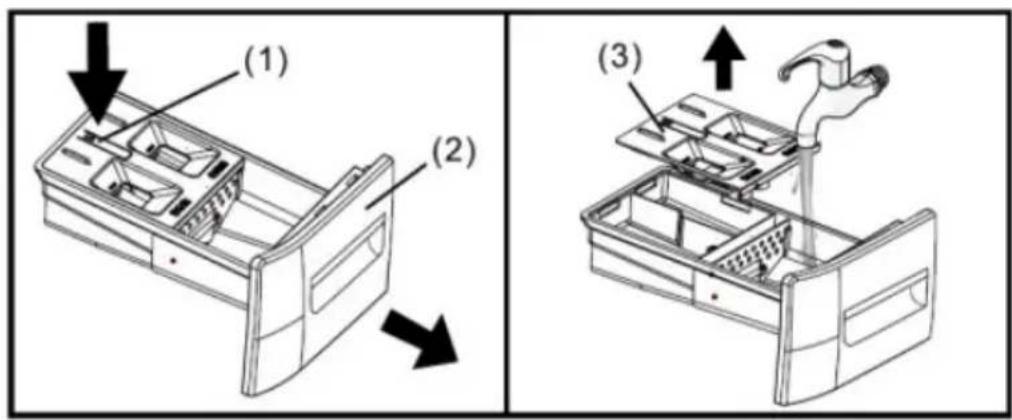
If there is a build-up of residual detergent or additives, or if the softener compartment is not rinsed well enough, the dispenser must be cleaned to avoid water overflows due to blockages. Fig. 18
- Open the detergent dispenser. Press down the tab (1) and pull the dispenser (2) completely out of the washer-dryer housing.
- Remove the liquid detergent cap (3) by holding it and pulling it upwards from the detergent dispenser.
- Clean the lid and the dispenser itself under running water. Lightly wipe off any remaining detergent residue.
- Replace the cap and reinsert the dispenser back into place.
Tip: do not operate the appliance without the detergent dispenser in place. If the appliance is not in use, always keep the dispenser closed.
Warning
Do not use alcohol, solvents or chemical products.
You can use a soft brush to remove detergent residues adhering to the dispenser.
Cleaning the mesh filter in the water supply hose and the water inlet valve
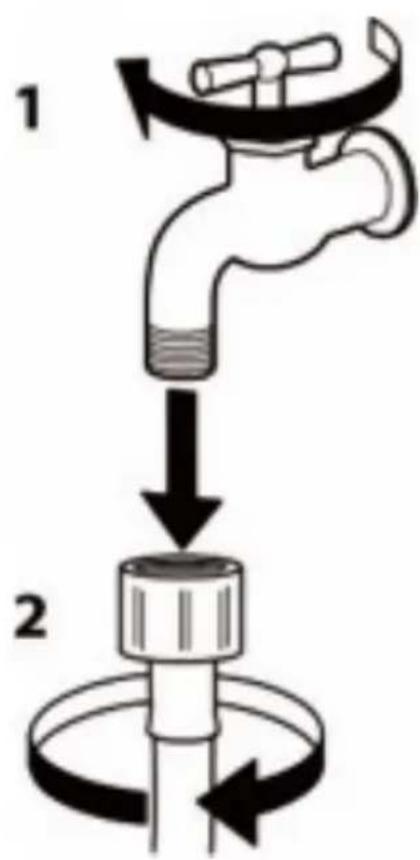
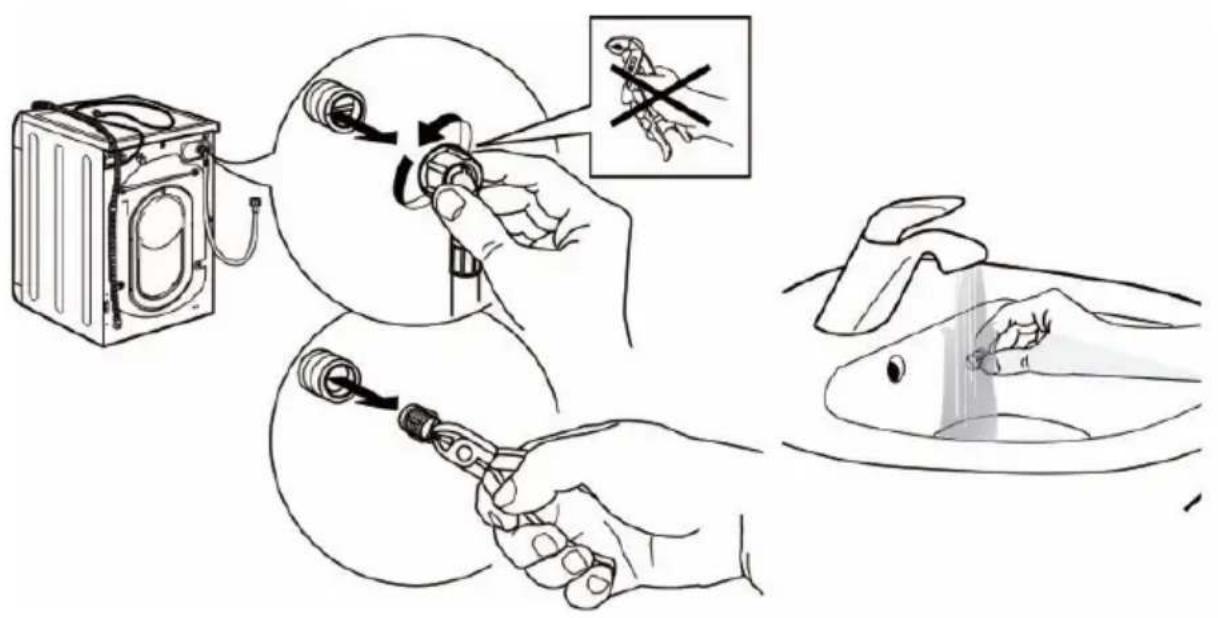
- 1.- Close the tap (stopcock) and unscrew the water supply hose (Fig. 19).
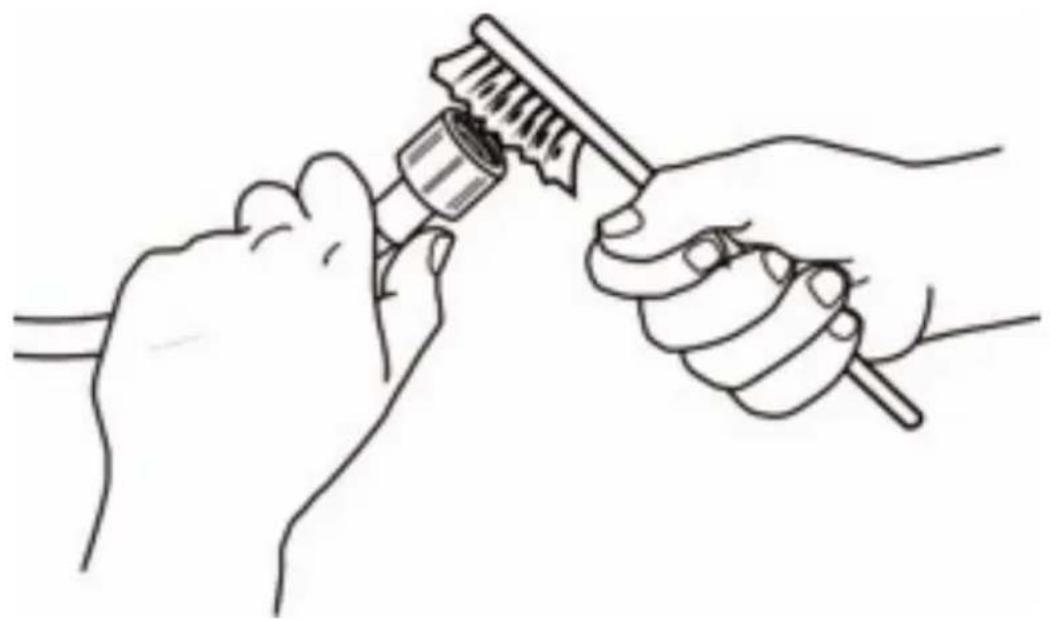
- Carefully clean the mesh filter at the end of the hose with a fine brush (Fig. 20).
- Now unscrew the water supply hose at the back of the appliance by hand. Remove the mesh filter from the water inlet valve at the back of the appliance with needle-nose pliers (be careful not to damage it) and clean it carefully (Fig. 21).
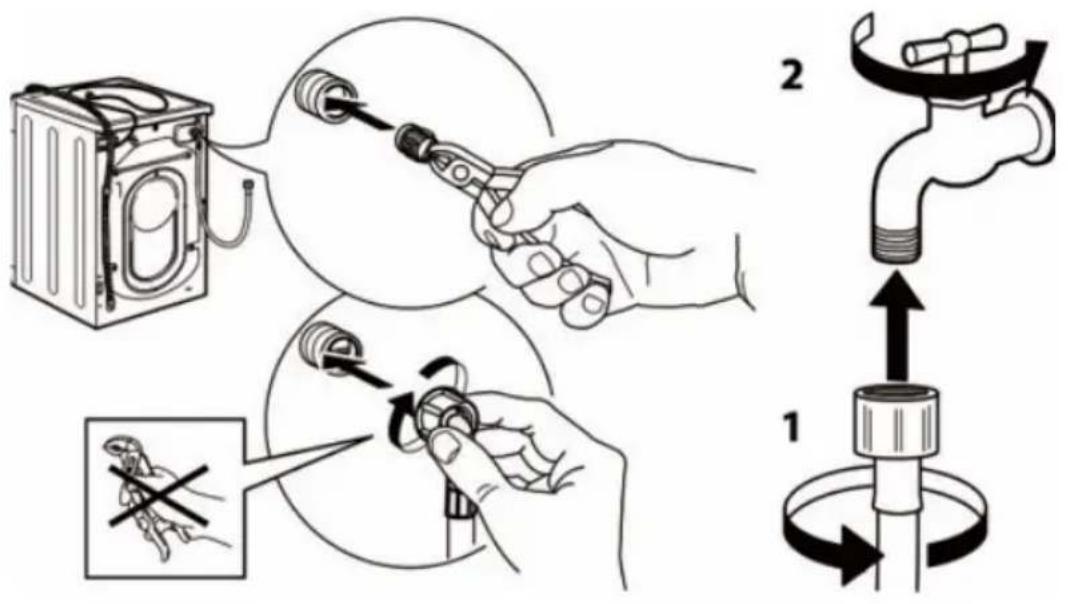
- Reinsert the mesh filter back into the back of the washer dryer. Reconnect the water supply hose to the tap and to the appliance. Do not use a tool to connect the inlet hose. Open the water tap and check that all connections are tight (Fig. 22).
Cleaning the drain pump filter
WARNING: DANGER OF BURNS. Danger of skin injury from hot water!
Take special care when draining water from the appliance and opening the lid.
It is advisable to clean the filter of the drain pump from time to time to ensure that there are no problems.
The pump of the appliance may become blocked with loose debris (remember to check the drum and remove visible debris after each load). Fabrics that shed large amounts of lint can also cause blockages.
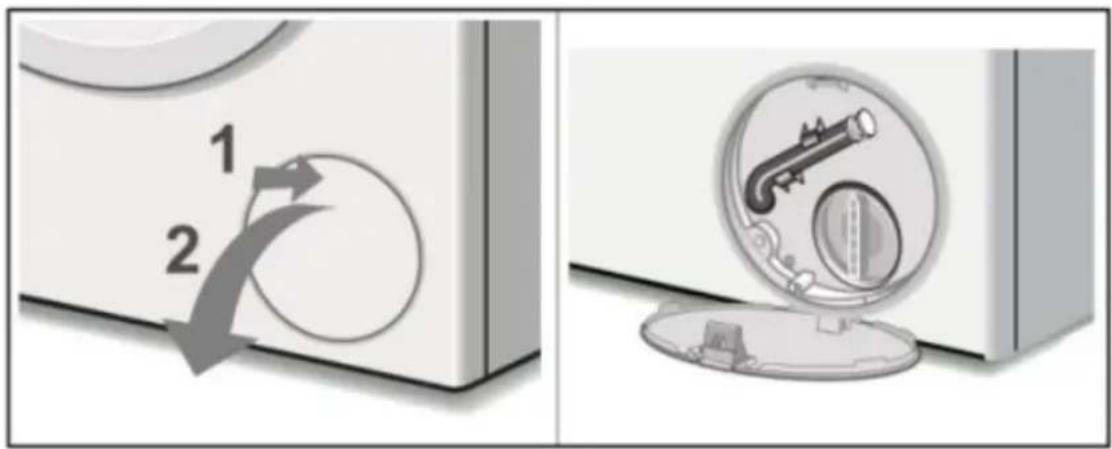
To access the drain pump filter, you must first open the cover on the bottom right-hand side. Press lightly to open the lid (Fig. 23). With the lid open, proceed as follows:
- If the appliance has not been drained, try draining it now. First, turn the wash cycle selector to select the "SPIN" programme, press the "SPEED" button until the display shows "-", then press the "START/PAUSE" button. Wait a moment for the pump to drain the water from the drum. If the pump is totally blocked, the water will not be able to drain, and the cycle will end.
- Turn off the tap so that no more water enters. Turn off the appliance. Disconnect the power cord from the plug.
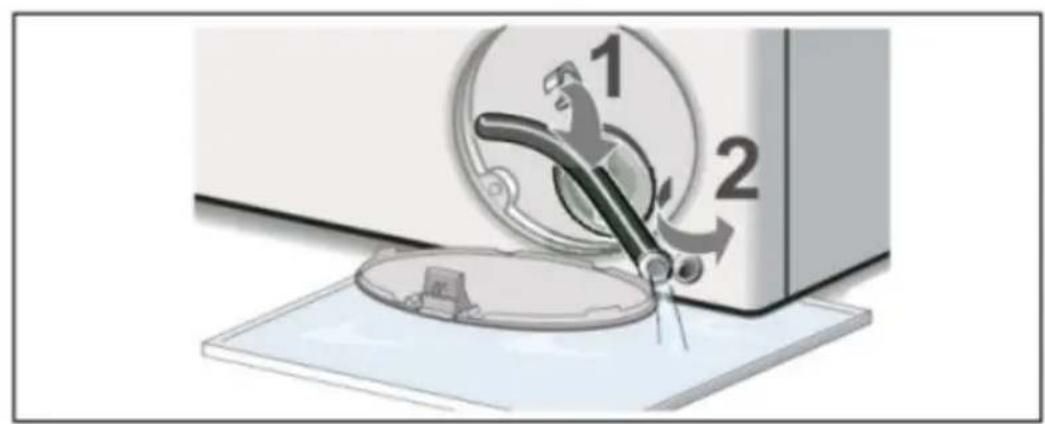
- Use the removable drain hose located on the filter access opening to drain the remaining water into a suitable container (up to 20 litres of water can be drained). Remove the plug from the hose and place it over the side of a suitable container and allow the water to drain out of the drum. When finished, replace the sealing plug on the end of the hose and return the hose to its storage location. Be careful not to spill the drained water on the floor (Fig. 24).
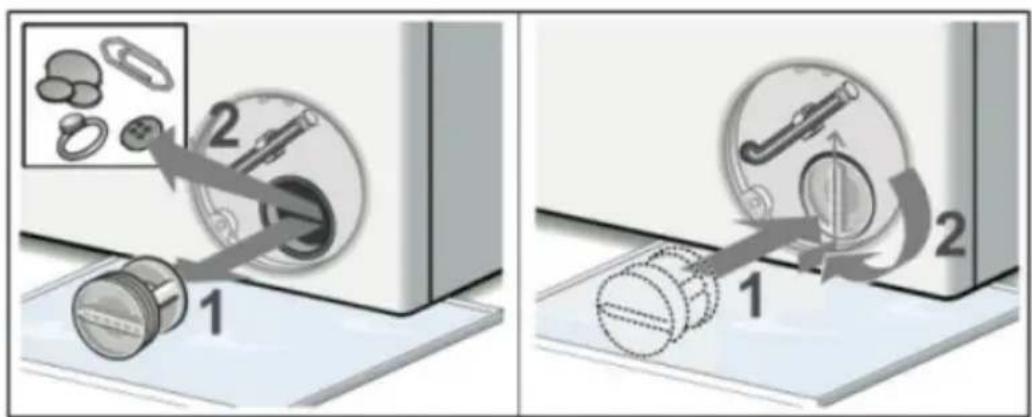
- Turn the filter cover counterclockwise to remove the filter. A small amount of residual water may flow out when the lid is removed. Clean the inside, as well as the filter itself, removing any debris or foreign objects. Remove any lint, dirt or detergent residue from
ENGLISH
the filter thread. You can use water, a cloth or a soft brush. Reinstall it in its original position (Fig. 25).
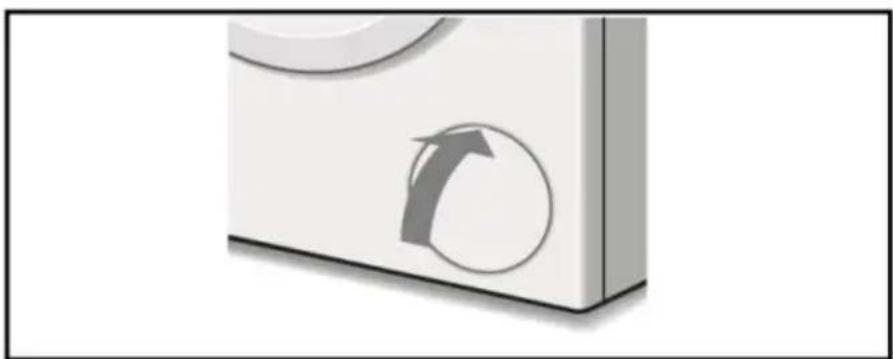
- Close the lid and wipe up any water spillage (Fig. 26).
6. TROUBLESHOOTING
| Problem Possible cause and solution | |
| There are coloured stains and oil stains on the drum. | The appliance requires a service wash. Run a “DRUM CLEAN” wash cycle without detergent and laundry. |
| Bad smells Due to the use of rubber parts, the machine will have a rubber smell at the beginning of use, but the rubber smell will gradually disappear during use.Leave the door ajar after each wash cycle. | |
| The door cannot be opened The safety protection function is in operation and the water temperature and/or water level are too high.If the programme has finished normally, but there is a power failure.Is the "CHILD LOCK" function activated? Deactivate the child lock function.Turn off the delayed end function. | |
| Water spillage from detergent dispenser | The dispenser is blocked with detergent and requires cleaning.The water pressure is too high and needs to be lowered; close the tap on the water supply pipe slightly and try again.The appliance is tilted forward - It must be level when in its final position. |
| Water leaks Water supply hose | is loose, check connections.Water supply hose is tight but still leaks; if so, replace the rubber washers, or the water supply hose does not have the rubber washer.The drain hose is not positioned correctly.In case of water leakage inside the machine, turn off the power supply and contact Cecotec Technical Support. |
| Does not turn on Appliance is not fully plugged in or not plugged in enough to make contact.No power is reaching the socket. Check the fuses and control and protection elements of the electrical installation. | |
| Wash cycle does not start The door is not closed properly.The “START/PAUSE” button has not been pressed.The water tap has not been turned on to allow water to flow into the appliance.A delayed end function has been configured. | |
| No water or detergent enters the drum. Error “E02” appears on the screen | Water supply hose is kinked or bent.The water supply hose is not connected to the water supply.The water pressure is too low.The water tap has not been opened to allow water to flow into the machine.There is no water supply in the dwelling.The mesh filter in the water supply hose and/or the water inlet valve is/are blocked.Tap and/or water supply pipe is/are frozen.The “START/PAUSE” button has not been pressed.There is already enough water in the drum. |
| Water discharge when the programme starts | This is not an issue. Do not open the door to pour water directly into the drum before the programme is run, otherwise the machine may discharge the water that was poured into the drum when the programme was started. |
| The water level is too low when the machine is washing. | This is not an issue. The water consumption in the wash cycle of this appliance is relatively small, the water level in the wash cycle is lower than that of other types of washer dryers. |
ENGLISH
| Overfilling of water during operation of the wash cycle | If the water level drops, the machine will automatically recover the water.When the amount of laundry to be washed is too large, the appliance can automatically fill the water several times during the operation of the wash cycle. |
| Too much foam in the drum or foam overflows from the detergent dispenser. | The detergent is not suitable for machine washing (must show the text "for washing machines" or "hand and machine wash" or similar).Too much detergent was used; less detergent is required in soft water. |
| The high-speed spin must be repeated many times (spinning). | Due to different types and materials of laundry, the load balancing system of the appliance may wobble and scatter the laundry many times to extend the spin time. This is a normal phenomenon, not an incidence of the machine. |
| Machine does not spin No spin speed has been selected. The control panel displays “_” | |
| The machine vibrates a lot during the spin cycle | The legs have not been adjusted, causing the machine to rock.New installation: the transport screws, including the plastic spacer, or the polystyrene packaging, has not been removed when installing the machine.The appliance is trapped between furniture and/or walls.The load is slightly unbalanced, and the device is rotating, but at a slower speed. |
| Spinning result is not optimal W | When you wash less laundry, such as a pair of jeans, a jumper, a bath towel, etc., the machine may not complete the spin process due to balance protection.If the load is slightly unbalanced, the appliance will spin, but at a lower speed, not at the cycle's default spin speed or the spin speed setting for the cycle. |
| Machine does not drain, drains slowly or “E03” appears on the display. | The top of the drain hose is too high. It should be installed at a height of 65-100 cm from the ground.The draining pump filter is blocked.Drain hose is kinked or bent.Drain hose is blocked or frozen. |
| The wash programme time stops counting before entering the high-speed spin process. | This is not an issue. The load balancing system of the appliance tumbles and scatters the laundry in the drum for a long time to achieve balance and complete the high speed spin. In the process of tumbling and scattering, the programme time stops counting before the appliance reaches the high-speed spin process. |
| Washing programme lasts too long | Programme times will vary due to water pressure, incoming water, temperature, etc.If the wash load becomes unbalanced, the time will increase. |
| Excessive noise There will always be some noise from the motor, pump and drum during spinning.The washer dryer touches other objects.Foreign objects, such as hairpins or metal objects, fall into the drum. | |
| The machine is continuously filled with water and continuously emptied. | The top of the drain hose is too low. It should be installed at a height of 65-100 cm from the ground.The end of the drain hose has been pushed too far down into the standpipe; the hose elbow must be installed 100 mm from the end of the drain hose.The end of the drain hose is submerged in the discharged water. |
| The drained water returns to the apparatus | If the end of the drain hose touches the discharged water (water drained from the washing machine), it (the discharged water) may be sucked back into the appliance and damage the appliance or garments. |
| Control panel gets hot This is a slight heating effect of the electronic components on the PCB board installed on the back of the control panel. | |
ENGLISH
| After drying, there are drops of water on the door and drum | During drying, the door may be stained with water droplets, wipe off the water droplets.Do you wear too much or too thick clothing? |
| The drying effect is poor and uneven. | Do clothes that are not easy to dry (such as thick cotton fabrics) and fabrics that are easy to dry (such as synthetic fabrics) dry together?Do you put too many laundries to dry?When only running the "Drying" programme, do you separate the tangled laundry to place it in the drum?Due to different types and quantities of laundry, uneven drying may occur. Is the tap closed during drying?Is the drain pump filter blocked during drying?Is the drain hose bent, kinked or blocked during drying? |
| General issues Your appliance | contains sensors that monitor progress during the wash cycle (e.g. water level, temperature, unbalanced loads, wash time/progress). Normally, if your appliance completes the cycle successfully, it is unlikely that there will be a problem. |
- Do not repair or replace any part of the appliance unless specifically instructed to do so in this instruction manual. It may lead to a dangerous incident that endangers your health and/or damages property.
- In case of fault or malfunction, contact the official Technical Support Service of Cecotec.
- Use original spare parts.
- IMPORTANT: Do not come into contact with the following internal components while the appliance is connected: inlet valve(s), drain pump, motor controller heat sink, PCB.
Errors
| Error Cause Solution | ||
| E02 No water in Check if the tap is open. If the | water supply is cut off. Are the mesh filter in the water supply hose and the water inlet valve blocked? What if the water supply hose of the appliance is frozen? Eliminate the above causes of failure. If the fault code still exists, please contact the Cecotec Technical Support. | |
| E03 Drain failure Clean the pump filter. | Check if the drain hose is bent, kinked or blocked. Eliminate the above causes of failure. If the fault code still exists, please contact the Cecotec Technical Support. | |
ENGLISH
| U4 Door lock fault The door is not closed | properly and the door lock does not function normally. Close the door again, turn the wash cycle selector to the "OFF" position to turn off the power supply, and then turn the selector to select any wash programme and press the START/PAUSE button to restart the programme. Eliminate the causes of this failure. If the fault code still exists, please contact the Cecotec Technical Support.If the fault code appears and you cannot open the door, the door lock may be faulty, please contact Cecotec Technical Support. |
| H Drum temperature is high Press the START/PAUSE | button to suspend operation of the appliance and wait a few minutes. When the temperature in the drum drops to a safe range and the fault code on the display is cleared, press the START/PAUSE button to continue with the rest of the programme. If the fault code still exists, please contact the Cecotec Technical Support. |
| FXXX The concentration of negative ions in the drum is high. | Press the START/PAUSE button to suspend operation of the appliance and wait a few minutes. When the negative ion concentration in the drum drops to a safe range and the fault code on the display disappears, press the START/PAUSE button to continue with the rest of the programme. |
| EXX Other errors Turn the selector switch to | turn off the appliance, unplug the power cord and contact Cecotec Technical Support. |
Note: Be sure to check the cause of the fault and clear the fault before pressing the START/PAUSE button again. If the fault code is cleared, the appliance will continue to operate, and if the fault code still exists, unplug the power cord and call our Technical Support Service for assistance as soon as possible.
Failure to empty the contents of the pockets may cause blockages in the pump or drain hose or may damage the machine.
Do not wash items that do not have a laundry label, nor wash items that are not designed to be machine washed.
ENGLISH
7. TECHNICAL SPECIFICATIONS
You can find more information on this model by scanning the QR code (and the energy label as well).
| Reference: 02768 02769 | |||
| Model Bolero Wash&Dry 10680 Inverter B | Bolero Wash&Dry 10680 Inverter Steel B | ||
| QR code |  |  | |
| Voltage 220-240V ~ | |||
| Rated frequency 50 Hz | |||
| Washing capacity 10,0kg | |||
| Drying capacity 6 kg | |||
| Rated Washing Power | 2000 W | ||
| Rated Drying Power 1600 W | |||
| Standard water pressure: | 0,03 MPa~1 MPa | ||
| Net weight 65 kg | |||
| Measures 600 x 577 x | 347 cm (width x depth x height) | ||
| Protection rating IP X4 | |||
Technical specifications may change without prior notice to improve product quality.
Made in China | Designed in Spain
8. TECHNICAL SHEETS
Input method for the new energy efficiency standard (EN60456:2016 + FprAA:2020)
Eco 40-60, (parameters are not set by default)
| 10kg BLDC 20°C Cotton Woo. | Quick Wash | |||
| Rated capacity / Kg 2 10 11 | ||||
| Programme length (h:min) | 0:39 0:57 0:50 | 0:15 | ||
| Energy consumption (Kw/cycle) | 0.26 1.27 0.22 | 0.11 | ||
| Water consumption (L/cycle) | 60 75 65 | 45 | ||
| Temperature MAX / °C | 20 55 35 | 35 | ||
| Remaining moisture content | 75% 70% | 85% | 75% | |
| Spin speed / (rpm) | 700 | 900 500 700 |
The Eco 40-60 programme can wash cotton laundry with normal soiling declared washable at 40 °C or 60 °C, together in the same cycle, and this programme is used to assess compliance with EU eco-design legislation.
- The most energy-efficient programmes are generally those that operate at lower temperatures and for longer durations.
- Noise and remaining moisture content are influenced by the spin speed: the higher the spin speed in the spin phase, the higher the noise and the lower the remaining moisture content.
- The values given for programmes other than the Eco40-60 programme and the washing and drying cycle are only indicative.
ENGLISH
| SETTING UNIT VALUE | ||
| Rated capacity for the wash cycle, at 0,5 kg(c) intervals kg 10,0 | ||
| Rated capacity for the wash and dry cycle, at 0,5 kg(c) intervals | kg 6,0 | |
| Power consumption for ECO programme 40-60 at rated capacity ( E_w,f,t ) | kWh/cycle | 0,951 |
| Power consumption for ECO programme 40-60 at half capacity ( E_w,1/2 ) | kWh/cycle | 0,582 |
| Power consumption for ECO programme 40-60 at one-quarter of rated capacity ( E_w,1/4 ) | kWh/cycle | 0,355 |
| Weighted energy consumption of ECO 40-60 programme ( E_w ) | kWh/cycle | 0,591 |
| Standard energy consumption of ECO programme 40-60 (SCE _w ) | kWh/cycle | 0,988 |
| Energy efficiency index of the wash cycle (EEI _w ) — 59,8 | ||
| Washing and drying cycle energy consumption at rated capacity ( E_w,D,f,t ) | kWh/cycle | 4,693 |
| Washing and drying cycle energy consumption at half rated capacity ( E_w,D,1/2 ) | kWh/cycle | 2,383 |
| Weighted energy consumption of washing and drying cycle ( E_wD ) | kWh/cycle | 3,767 |
| Standard energy consumption of the washing and drying cycle (SCE _wD ) | kWh/cycle | 4,594 |
| Energy efficiency index of the washing and drying cycle (EEI _wD ) | — 82,0 | |
| Water consumption of ECO programme 40-60 at rated capacity ( W_w,f,t ) | L/cycle 75,0 | |
| Water consumption of ECO 40-60 programme at half of rated capacity ( W_w,1/2 ) | L/cycle 50,0 | |
| Water consumption of ECO 40-60 programme at one quarter of the rated capacity ( W_w,1/4 ) | L/cycle 30,0 | |
| Wash cycle weighted water consumption ( W_w ) L/cycle 49,0 | ||
| Water consumption of the washing and drying cycle at rated capacity ( W_WD,full ) | L/cycle 110 | |
| Washing and drying cycle water consumption at half rated capacity ( W_WD,1/2 ) | L/cycle 58,5 | |
| Weighted water consumption of washing and drying cycle ( W_WD ) | L/cycle 89 | |
| Washing efficiency rating of ECO 40-60 programme at rated capacity ( I_w ) | -1,031 | |
| ECO 40-60 programme wash efficiency rate at half rated capacity capacity ( I_w ) | -1,031 | |
| ECO 40-60 programme wash efficiency rating at one-quarter of the rated capacity ( I_w ) | -1,031 | |
| Washing efficiency index of the wash and dry cycle at rated capacity ( I_w ) | -1,031 | |
| Washing efficiency rate of the wash and dry cycle at half rated capacity ( J_w ) | -1,031 | |
| Rinsing efficiency of ECO 40-60 programme at rated capacity ( I_r ) | g/kg 5,0 | |
| Rinsing efficiency of ECO 40-60 programme at half the rated capacity ( I_r ) | g/kg 5,0 | |
| Rinsing efficiency of ECO 40-60 programme at one quarter of the rated capacity ( I_r ) | g/kg 5,0 | |
| Rinsing efficiency of the wash and dry cycle at rated capacity ( I_r ) | g/kg 5,0 | |
| Rinsing efficiency of the wash and dry cycle at half the rated capacity ( I_r ) | g/kg 5,0 | |
| ECO programme duration 40-60 at rated capacity ( t_w )(h: min) | 3:59 | |
| ECO programme duration 40-60 at half rated capacity ( t_w )(h: min) | 3:00 | |
| ECO programme duration 40-60 at one-quarter of rated capacity ( t_w ) | (h: min) 2:50 | |
| Washing and drying cycle time at rated capacity ( t_WD )(h: min) | 8:00 | |
| Washing and drying cycle time at half rated capacity ( t_WD )(h: min) | 5:30 |
ENGLISH
| Temperature reached for at least 5 min within the load during ECO 40-60 programme at rated capacity (T) | °C 35 | |
| Temperature reached for at least 5 min inside the load during ECO 40-60 programme at half rated capacity (T) | °C 30 | |
| Temperature reached for at least 5 min within the load during ECO 40-60 programme at one quarter of the rated capacity (T) | °C 30 | |
| Temperature reached for at least 5 min inside the load during the wash and dry cycle at rated capacity (T) | °C 30 | |
| Temperature reached for at least 5 min inside the load during the wash and dry cycle at half rated capacity (T) | °C 30 | |
| Spin speed in the spin phase of the ECO programme 40-60 at rated capacity (S) | rpm 1400 | |
| Spin speed in the spin phase of the ECO programme 40-60 at half rated capacity (S) | rpm 1400 | |
| Spin speed in the spin phase of the ECO programme 40-60 at one quarter of the nominal capacity (S) | rpm 1400 | |
| Weighted residual moisture content after washing (D) % 62,5 | ||
| Final residual moisture content after drying % 2,8 | ||
| Airborne acoustic noise emissions during ECO 40-60 programme (spin phase) | dB(A) re 1 Pw | 76 |
| Power consumption in off mode ( P_c ) (if applicable) W 0,50 | ||
| Standby power consumption ( P_sm )(if applicable) W —— | ||
| Is information displayed in standby mode? — No | ||
| Standby power consumption ( P_sm ) in mains standby conditions (if applicable) | W —— | |
| Power consumption in Delayed Start ( P_ds )(if applicable) W 4,00 |
9. DISPOSAL OF OLD ELECTRICAL AND ELECTRONIC APPLIANCES
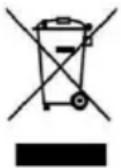
This symbol indicates that, according to the applicable regulations, the product and/or batteries must be disposed of separately from household waste. When this product reaches the end of its shelf life, you should dispose of the cells/batteries/accumulators and take them to a collection point designated by the local authorities.
Consumers must contact their local authorities or retailer for information concerning the correct disposal of old appliances and/or their batteries.
Compliance with the above guidelines will help protecting the environment.
10. TECHNICAL SUPPORT AND WARRANTY
Cecotec shall be liable to the end user or consumer for any lack of conformity that exists at the time of delivery of the product under the terms, conditions, and deadlines established by the applicable regulations.
It is recommended that repairs are carried out by qualified personnel.
If at any moment you detect any problem with your product or have any doubt, do not hesitate to contact the official Cecotec Technical Support Service at +34 963 210 728.
11. COPYRIGHT
The intellectual property rights over the texts in this manual belong to CECOTEC INNOVACIONES, S.L. All rights reserved. The contents of this publication may not, in whole or in part, be reproduced, stored in a retrieval system, transmitted, or distributed by any means (electronic, mechanical, photocopying, recording or similar) without the prior authorization of CECOTEC INNOVACIONES, S.L.
ENGLISH
1. PIÈCES ET COMPOSANTS
Img. 1.
3. INSTALLATION DU PRODUIT
6. Indicator "One touch" M
6. PROBLEEMOPLOSSING
3. INSTALACE PRODUKTU
text_image
Technical diagram of a washing machine with numbered parts for identificationFig./Img./Abb./Afb./Rys.1
natural_image
Four technical illustrations: a document, coiled tubing, a wrench, and four circular components (no text or symbols)Fig./Img./Abb./Afb./Rys.2
text_image
Technical diagram showing front and side views of a washing machine with labeled components A and B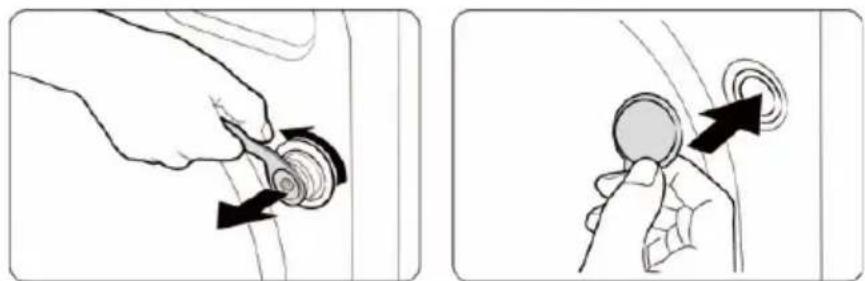
natural_image
Illustration showing two hand positions: one with a circular button and arrow, the other with a circular button and arrow (no text or symbols)Fig./Img./Abb./Afb./Rys.3
natural_image
Three-step diagram showing a washing machine being inserted into a bolt, with blue arrows indicating the process (no text or symbols present)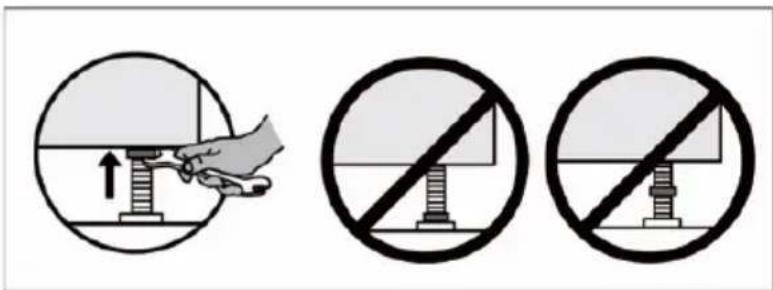
text_image
Safety warning illustration showing hand using a screw to lift a valve, with three prohibition symbolsFig./Img./Abb./Afb./Rys.5
text_image
Diagram illustrating a washing machine with water flow control and no-smoking rules, showing valve placement and safety symbols.Fig./Img./Abb./Afb./Rys.6
text_image
Diagram illustrating a washing machine operation with instructions for disassembly and anti-assembly, showing hand-cranked cleaning steps.Fig./Img./Abb./Afb./Rys.7
text_image
max 100cm/39 in. min 60cm/24in.Fig./Img./Abb./Afb./Rys.8
natural_image
Technical illustration of a faucet with pipe fittings and a 4-inch dimension label (no text or symbols beyond measurement)2
Fig./Img./Abb./Afb./Rys.9
natural_image
Illustration of a kitchen sink with a cable and connector, no text or symbols presentFig./Img./Abb./Afb./Rys.10
natural_image
Illustration of a curved pipe fitting with blue arrows indicating flow direction, alongside a close-up of a sink with faucet and tubing (no text or symbols)Fig./Img./Abb./Afb./Rys.11
text_image
max 2,5m / 8,2 feet max 100cm / 39 inch min 60cm / 24 inchFig./Img./Abb./Afb./Rys.12
text_image
cecòtec M 20℃ Night Wash Drying Green Jacket Knee/Box Skin Shore Diver Digital 88:00 F B C E D H F LIFING G I A Deep Chg Temp Power Oryng Dream SANT CSCFig./Img./Abb./Afb./Rys.13
text_image
19 2 6 5 4 3 88:88 7 One Touch Stairs 8 DelayEnd Temp. Speed Drying SteamFig./Img./Abb./Afb./Rys.14

text_image
StainsFig./Img./Abb./Afb./Rys.15
natural_image
Illustration of a hand performing a medical procedure on a patient's ear with an arrow indicating direction (no text or symbols present)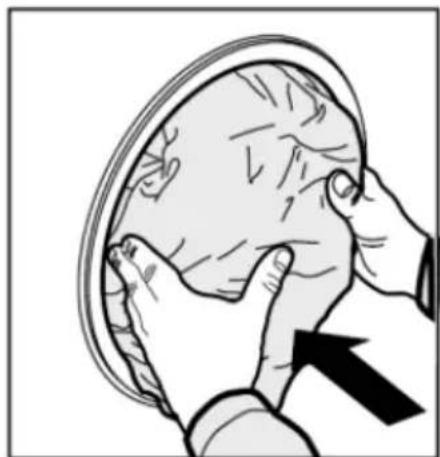
natural_image
Illustration of hands performing a medical procedure on a patient's head (no text or symbols present)Fig./Img./Abb./Afb./Rys.16
text_image
MAX MAX 1 2 3Fig./Img./Abb./Afb./Rys.17
text_image
(1) (2) (3)Fig./Img./Abb./Afb./Rys.18
text_image
1 2Fig./Img./Abb./Afb./Rys.19
natural_image
Line drawing of two hands using a tool to apply or install a component (no text or symbols present)Fig./Img./Abb./Afb./Rys. 20
text_image
Medical procedure illustration showing steps to switch a device into a patient's mouth, with magnified insets and labeled diagrams.Fig./Img./Abb./Afb./Rys.21
text_image
Diagram illustrating the step-by-step installation of a washing machine, showing tool path and valve assembly with numbered instructions.Fig./Img./Abb./Afb./Rys. 22
text_image
1 2 6Fig./Img./Abb./Afb./Rys. 23
natural_image
Illustration of a sewing machine with a hand operating the blade, showing two circular components and a base (no text or symbols)Fig./Img./Abb./Afb./Rys. 24
text_image
Diagram illustrating a mechanical device operation with labeled parts and directional arrows indicating motion or movement.Fig./Img./Abb./Afb./Rys. 25
natural_image
Close-up of a white rectangular object with a circular arrow symbol on its side, no text or labels visible.Fig./Img./Abb./Afb./Rys. 26
www.cecotec.es