Wow 2 - Stroller COSATTO - Free user manual and instructions
Find the device manual for free Wow 2 COSATTO in PDF.

User questions about Wow 2 COSATTO
0 question about this device. Answer the ones you know or ask your own.
Ask a new question about this device
Download the instructions for your Stroller in PDF format for free! Find your manual Wow 2 - COSATTO and take your electronic device back in hand. On this page are published all the documents necessary for the use of your device. Wow 2 by COSATTO.
USER MANUAL Wow 2 COSATTO
baby stuff with personality®
mitty gritty
wow 2
travel system
(EN) Instruction 1 - 40
(FR) Instruction, (DE) Gebrauchsanleitung, (IT) Istruzioni, (PT) Instrução, (RU) Инструкция, (ZH) 说明, (ES) Instrucciones
(EN) Part list diagram
41
(FR) Schéma de nomenclature, (DE) Teilelisteabbildung, (IT) Diagramma della lista delle parti, (PT) Diagrama de lista de peças, (RU) Схема к спецификации деталей, (ZH) 零件清单图, (ES) Diagrama de lista de piezas
(EN) Spare part list diagram
42
(EN) Instruction diagram
43 - 51
(FR) Schéma d'instructions, (DE) Anleitungsdiagramm, (IT) Diagramma di istruzioni,
(PT) Diagrama de instruções, (RU) Схема к инструкции, (ZH) 说明图, (ES) Diagrama de instrucciones
IMPORTANT! READ CAREFULLY BEFORE USE AND KEEP FOR FUTURE REFERENCE Important safety Information.
General:
• This vehicle is intended for children from birth up to a maximum of 25kg or 4 years whichever comes first.
- WARNING: Never leave your child unattended.
- WARNING: Ensure that all the locking devices are engaged before use.
- WARNING: To avoid injury ensure that your child is kept away when unfolding and folding this product.
- WARNING: Do not let your child play with this product.
- WARNING: This product is not suitable for running or skating.
- WARNING: Check that the seat unit, carrycot or child car seat attachment devices are correctly engaged before use.
- WARNING: Always use the bumper bar with the fabric cover fitted.
- Do not use replacement parts or accessories other than those approved by Cosatto.
- A basket is provided for the carriage of 2 kg of goods, evenly distributed.
- Any additional load attached to the handle or on the back of the backrest or on the sides of the vehicle will affect the stability and safety of the vehicle.
- Do not use a platform with this product as it may render the product unsafe.
• Always apply the brake when placing or removing a child from vehicle.
- Never carry a second child on the product.
• This product complies with BS EN 1888-2:2018.
Carrycot:
- This product is suitable only for a child who cannot sit up unaided, roll over and cannot push itself up on its hands and knees. Maximum weight of the child: 9 kg.
- Must only be used in lie flat position.
- WARNING: This product is only suitable for a child who cannot sit up unaided.
- WARNING: Use only on a firm, level and dry surface.
- WARNING: Do not let other children play unattended near the carrycot.
- WARNING: Do not use if any part is broken, torn or missing.
- WARNING: Never use this carrycot on a stand.
- Do not place the carrycot near an open fire or other source of strong heat.
- Mattress included.
- No additional mattress shall be added.
- Carry handle and the base of the carrycot should be inspected regularly for signs of damage and wear.
- Prior to carrying or lifting, make sure that the carrycot carry handle is locked into position.
- The head of the child should never be lower than the body of the child.
• This carrycot complies to BS EN 1466:2014.
Pram mode:
- The pram mode is achieved by attaching the carrycot to the chassis.
- There are a set of "D" rings located at the base of the carrycot for the attachment of a separate safety harness approved to BS EN 13210 should this be required (harness not supplied).

Pushchair mode:
- Pushchair mode is achieved using the seat unit attached to the chassis. In this mode: This product is suitable for children from 6 months up to a maximum user weight of 25kg .
- WARNING: This seat unit is not suitable for children under 6 months.
- WARNING: Always use the restraint system.
- WARNING: Always use the crotch strap in combination with the waist belt.
- Ensure your child wears a correctly fitted and adjusted harness at all times. D-rings are provided on the existing harness for the attachment of a separate safety harness approved to BS EN 13210 should this be required.
Car seat mode:
• This combination is suitable for children from birth up to a maximum user weight of 13kg.
- For use as a travel system, the chassis is only compatible with the child car seat approved by Cosatto and respective child car seat adaptor (All sold separately). In this mode:
This product does not replace a cot or a bed. Should your child need to sleep, then it should be placed in suitable cot, bed or carrycot.
Cosatto changing bag (sold separately):
- A coordinating changing bag can be purchased separately, suitable for the carriage of 2 kg of goods.
- Do not attach the changing bag to the vehicle as it will affect the stability of the vehicle.
Care & Maintenance:
- Your travel system has been designed to meet comprehensive safety standards, and with correct use and maintenance will give many years of trouble free performance.
- Storage - Always store your travel system dry. Storing a damp travel system will encourage mildew to form, so always wipe away any moisture with a soft cloth and allow to dry thoroughly before storing. Never leave in sunlight for prolonged periods - some fabrics may fade.
- Cleaning - Refer to wash care labels on soft goods for cleaning instructions. Plastic and metal parts may be sponged clean with warm water and a mild detergent. Never clean with abrasive, ammonia based, bleach based or spirit type cleaner.
- Wear & Tear - Continual impact can cause damage. The chassis is strong but will weaken should the back wheels be bumped down stairs or kerbs. Tyres will wear with use and wheel units should be replaced if necessary. If your child wears hard shoes these might damage the soft fabric.
- Maintenance - Regularly inspect the locking devices, brakes, wheels, harness assembly, catches, seat adjusters, joints and fixtures to ensure they are secure and in full working order. They should move freely at all times and minimum maintenance should be required. However a regular light application of a spray lubricant e.g. silicone (do not use oil or grease) will extend the life of your travel system and make opening and folding easier. Your travel system should be serviced and reconditioned before using it for a second baby, or after 18 months, whichever is the sooner.
Visual language Key:

| !XX | Refer to warning XX |
| Correct action | |
| Incorrect action | |
| CLICK! | Audible sound |
| Repeat action x times | |
| General action arrow | |
| Lock | |
| Unlock |
| Press and hold | |
| Check | |
| Cont.XX | Continue to step XX |
| Repeat on other side |
Part List:
P1: Chassis
P2: Rear wheel (x2)
P3: Front wheel (x2)
P4: Carrycot mattress
P5: Carrycot liner
P6: Carrycot
P7: Carrycot apron
P8: Seat unit hood
P9: Bumper bar with cover
P10: Bumper bar cap (x2)
P11: Seat unit
P12: Raincover
P13*: Cosatto footmuff (sold separately)
P14*: Cosatto changing bag (sold separately)
Replacement Parts:
The replacement parts shown below are available for your product. For UK & Ireland customers, order through our website: http://www.cosatto.com/service-centre/spares
For customer outside UK & Ireland, contact information for your local distributor can be found on http://www.cosatto.com/stockists
If you require any further assistance, please contact us at cuddle@cosatto.com
S1: Seat unit S10: Basket
S2: Seat unit hood S11: Rear wheel
S3: Chest pads (Set) S12: Carrycot mattress cover
S4: Bumper bar S13: Carrycot mattress
S5: Bumper bar cover S14: Carrycot liner
S6: Bumper bar cap (x2) S15: Carrycot
S7: Harness S16: Carrycot apron
S8: Crotch pad S17: Raincover
S9: Front wheel
Fitting & Operation Information:
Please refer to the following diagrams:
Chassis 1- Opening:
Release the auto lock (1) and lift the handle upwards until the chassis locks into position (2).
Check the chassis has locked in place.
2- Adjusting handle position:
Front wheel 3- Fitting:
4- Removing:
Rear wheel 5- Fitting:
6- Removing:
Brake 7- Applying:
8- Releasing:
Front wheel swivel lock
9- Applying:
10- Releasing:
Basket 11- Front pocket (1). Rear pocket (2). Drinks holder (3).
Chassis 12- Closing:
Note: The chassis cannot be closed with either the carrycot or the child car seat fitted. To close with seat unit fitted, the seat unit must be forward facing and in the most upright recline position.
While pressing the primary release button (1), pull both secondary levers (2) back.
Press down on the handle (3) until the autolock retains the chassis in the folded position (4).
Carrycot 13- Preparation:
Remove mattress and liner from carrycot (1).
Unfold both frame bars until they locked into positions (2).
14- Refit the liner into the carrycot (1) and secure the zip fasteners (2).
Refit the mattress over the liner in the carrycot (3).
There are a set of "D" rings located at the base of the carrycot for the attachment of a separate safety harness approved to BS EN 13210 should this be required (harness not supplied). Push the "D" rings through the slots in the liner (4).
Carrycot hood 15- Opening:
16- Closing:
Carrycot
17- Note: The carrycot can only be fitted rearward facing as shown in illustration.
18- Fitting:
Dots are marked on the chassis mounts and carrycot mounts (1). These should be on the same side and aligned if fitted correctly.
19- Removing:
Open the carrycot hood 15.
Press the release button on top of the hood frame (1).
Lift the carrycot off the chassis (2).
Carrycot apron 20- Fitting:
Removing is a reversal of this procedure.
Raincover 21- Fitting:
Removing is a reversal of this procedure.
22- Using access zip:
23- Accessing handle:
Seat unit
24- Note: The seat unit can be fitted forward or rearward facing.
25- Fitting:
26- Removing:


27- Adjusting seat unit recline angle:
WARNING: Never adjust the seat unit with your child in the seat.
Harness 28- Opening:
29- Closing:
30- Adjusting the strap length:
Slide the strap adjustor to suitable length (1, 2 & 3).
31- Adjusting the shoulder strap position:
32- Satisfactory shoulder strap position:
33- Removing:
Push the shoulder strap retainers through the backrest 31.
Push the crotch strap retainer through the seat (1).
Rotate the "C" clip to expose its opening (2) and slide the waist strap out of the clip (3).
Refitting is a reversal of this procedure.
Bumper bar cap 34- Fitting:
35- Removing:
Bumper bar 36- Fitting:
37- Opening:
38- Removing:
Calf support 39-Adjusting:
Footmuff 40- Fitting:
Open the harness 28 and remove the chest pads & crotch pad (1).
Push the harness straps through the footmuff (2).
Attach the footmuff fabric fasteners to the rear of the backrest (3).
Refit chest pads & crotch pad then close the harness 29.
Seat unit hood 41- Fitting:
Removing is a reversal of this procedure.
42- Opening:
Sun visor 43- Opening:
44- Closing:
Viewing window 45- Opening:
46- Closing:
Seat unit hood 47- Closing:
Raincover 48- Fitting:
Removing is a reversal of this procedure.
49- Using access zip:

IMPORTANT ! LIRE ATTENTIVEMENT AVANT UTILISATION ET CONSERVER POUR CONSULTATION ULTÉRIEURE Informations importantes de sécurité
Généralités:
Freins 7- Application:
8- Libération:
Loquet de rotation
9- Application:
des roues avant
10- Libération:
Repose mollets 39- Réglage:
Chancelière 40- Installation:
Pare-soleil 43- Ouverture:
44- Fermeture:
http://www.cosatto.com/service-centre/spares
http://www.cosatto.com/stockists
http://www.cosatto.com/service-centre/spares
text_image
Illustrated guide showing a car steering mechanism with instructions for using the 'CLICK!' button, including hand positioning and eye detection.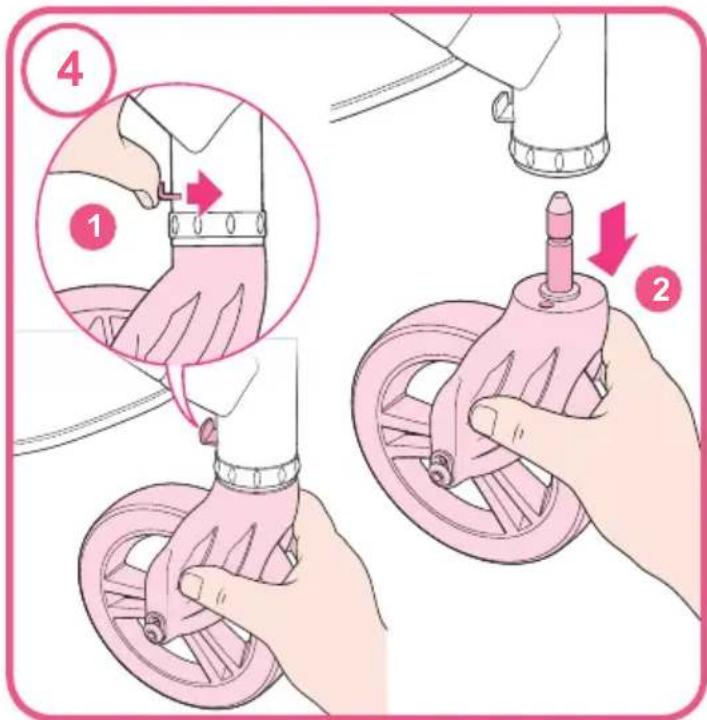
text_image
Illustration showing a hand operating a bicycle steering wheel with labeled steps 1 and 2, including a magnified view of the hand's grip.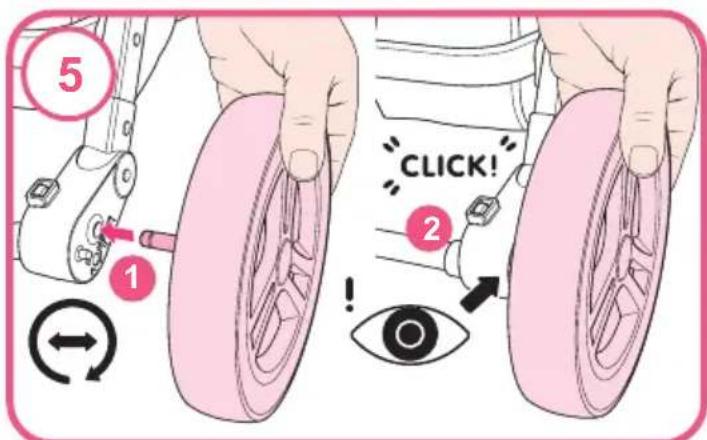
text_image
5 1 CLICK! 2 !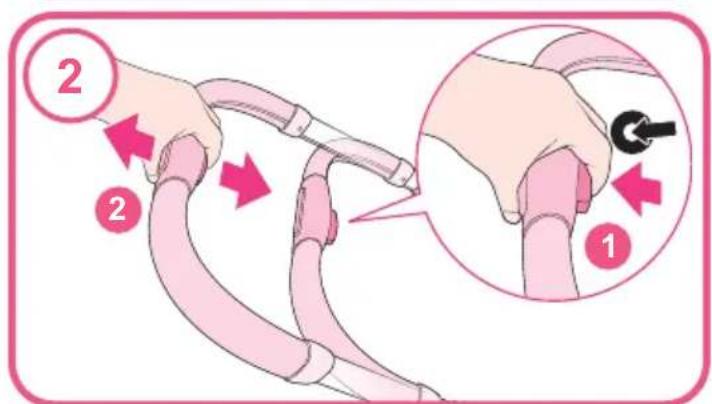
text_image
Illustration showing two-step instructions for cord manipulation, with numbered steps and magnified views of the process.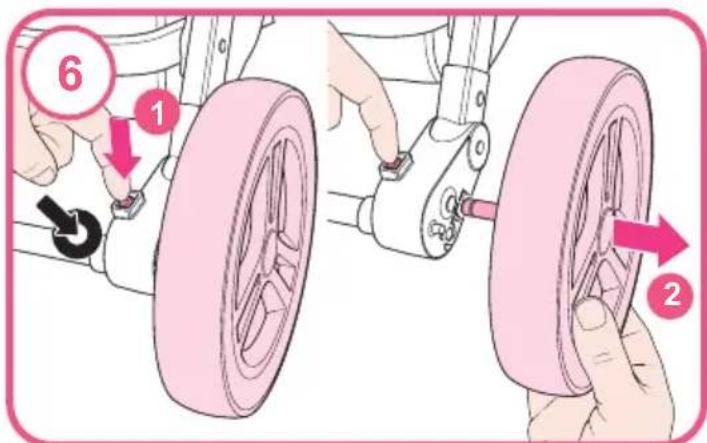
text_image
Illustration showing a car wheel assembly with numbered steps and directional arrows indicating motion or repair.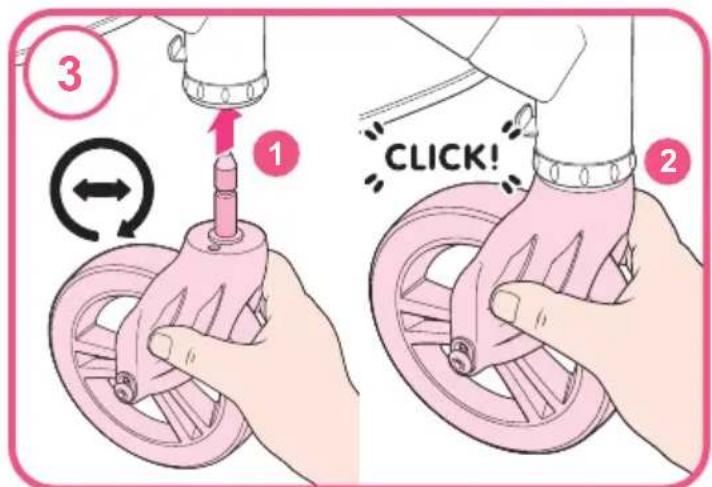
text_image
3 1 CLICK!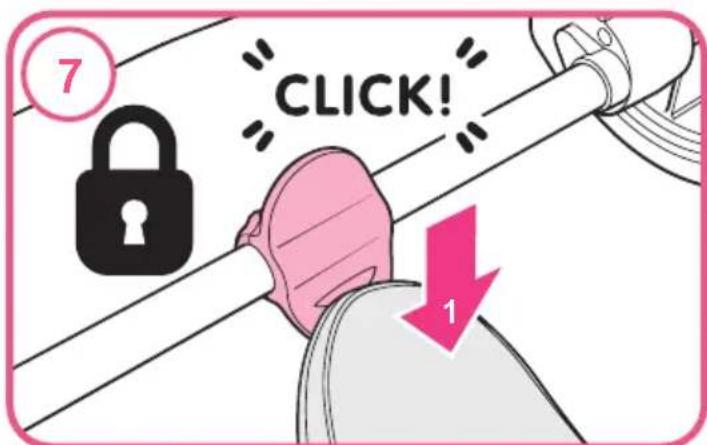
text_image
7 CLICK! 1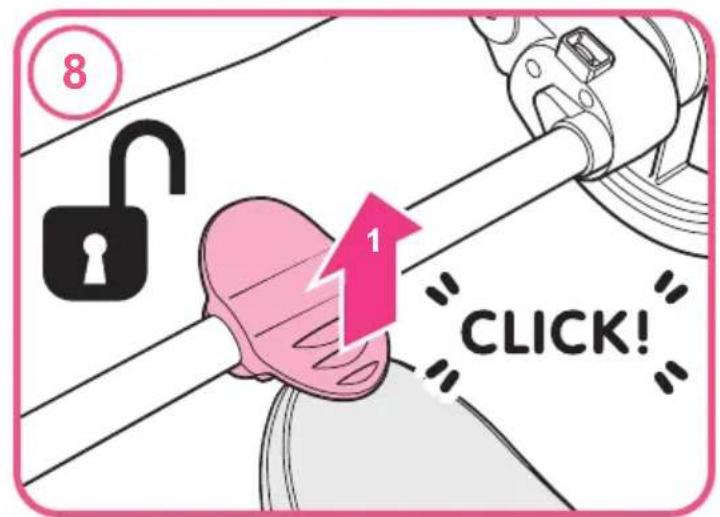
text_image
8 1 CLICK!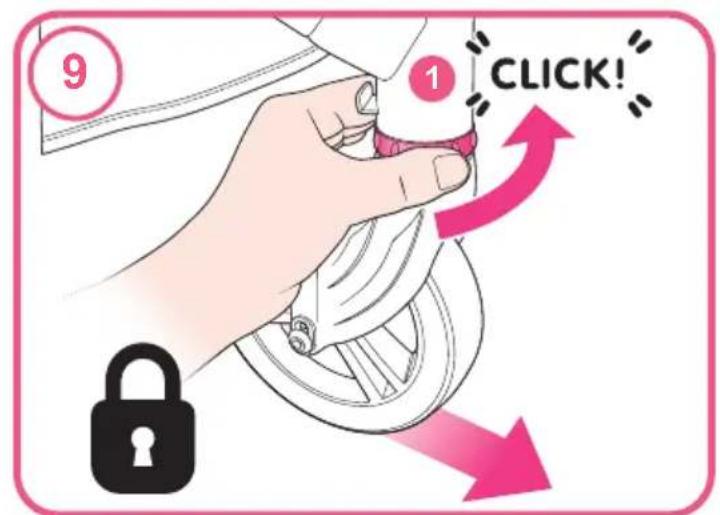
text_image
9 1 CLICK!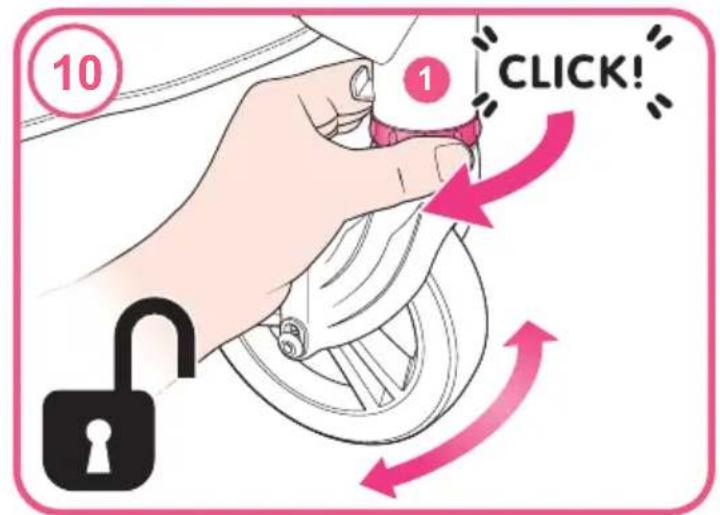
text_image
10 1 CLICK!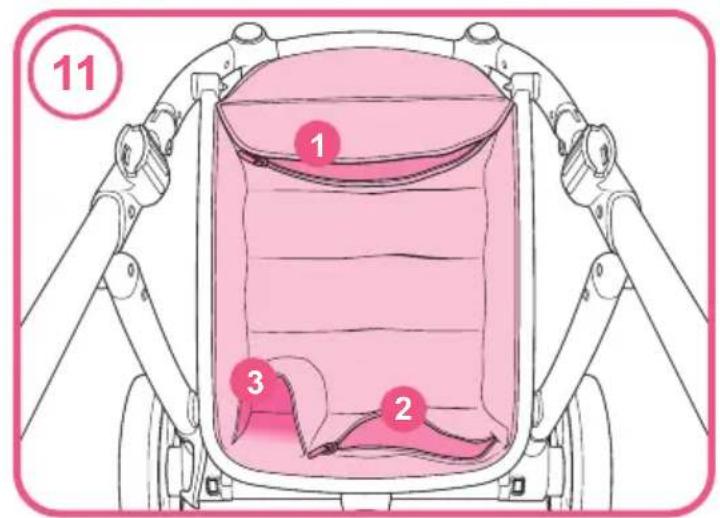
text_image
11 1 2 3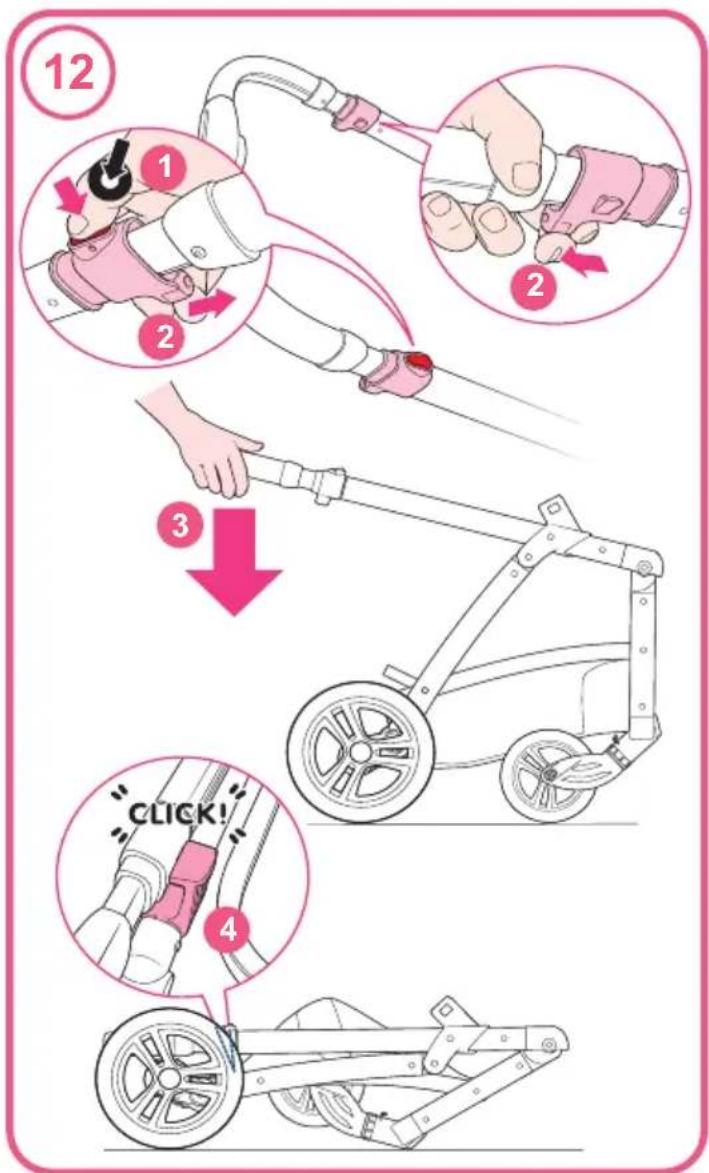
text_image
12 ① ② ③ CLICK! ④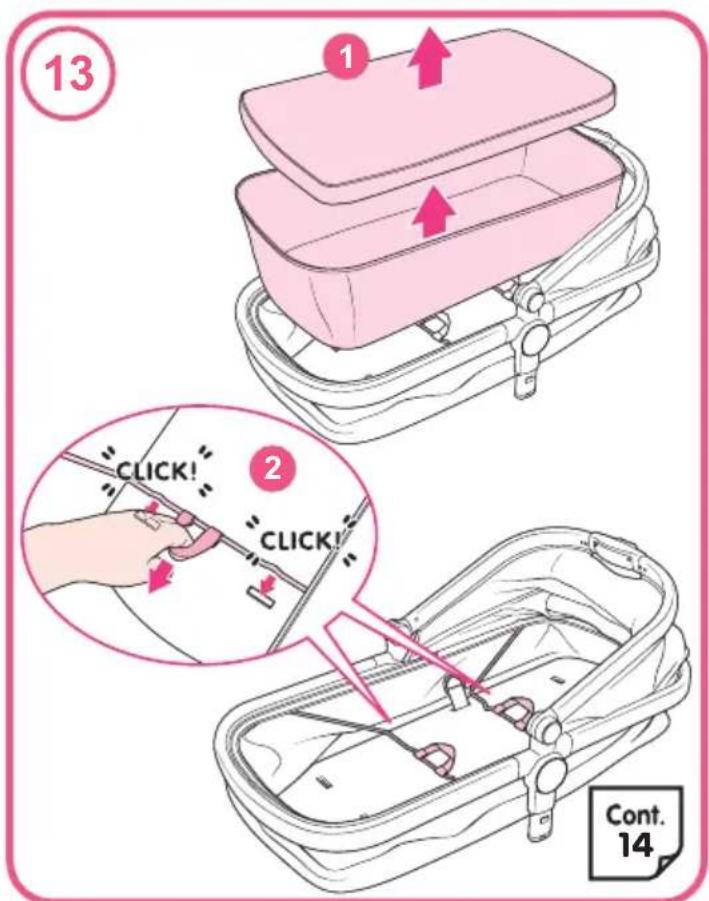
text_image
13 1 2 CLICK! CLICK! Cont. 14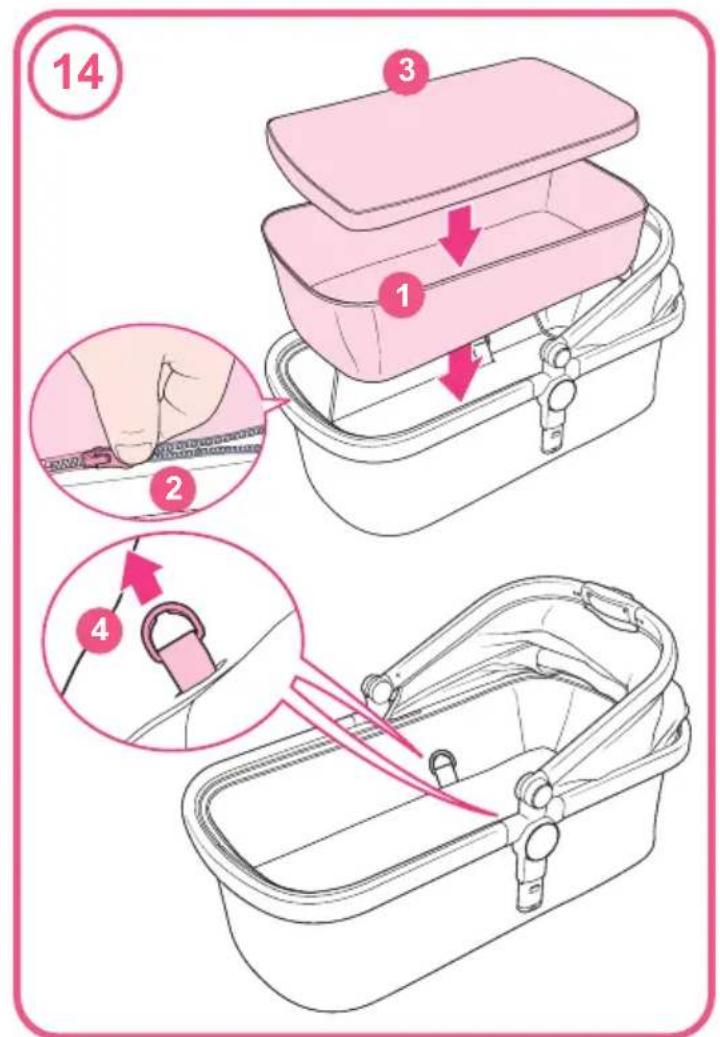
text_image
14 3 1 2 4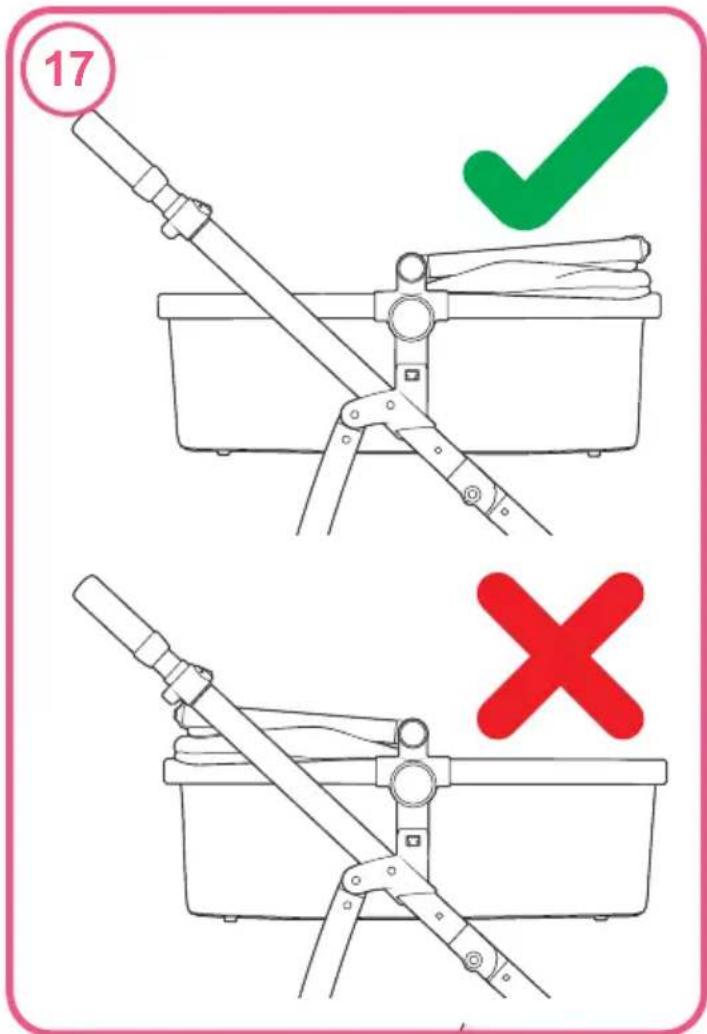
text_image
17 ✓ X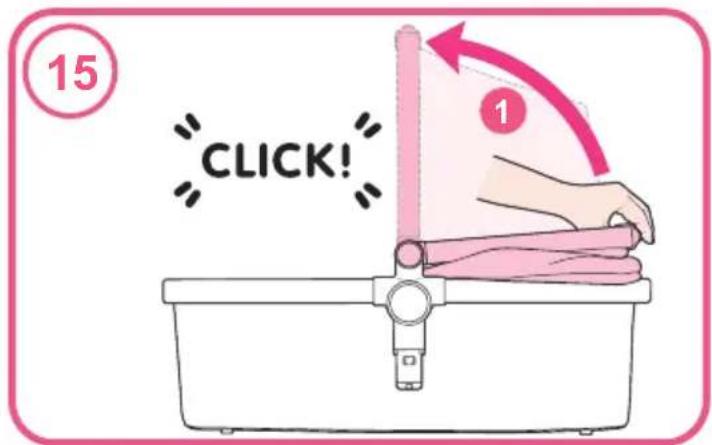
text_image
15 CLICK!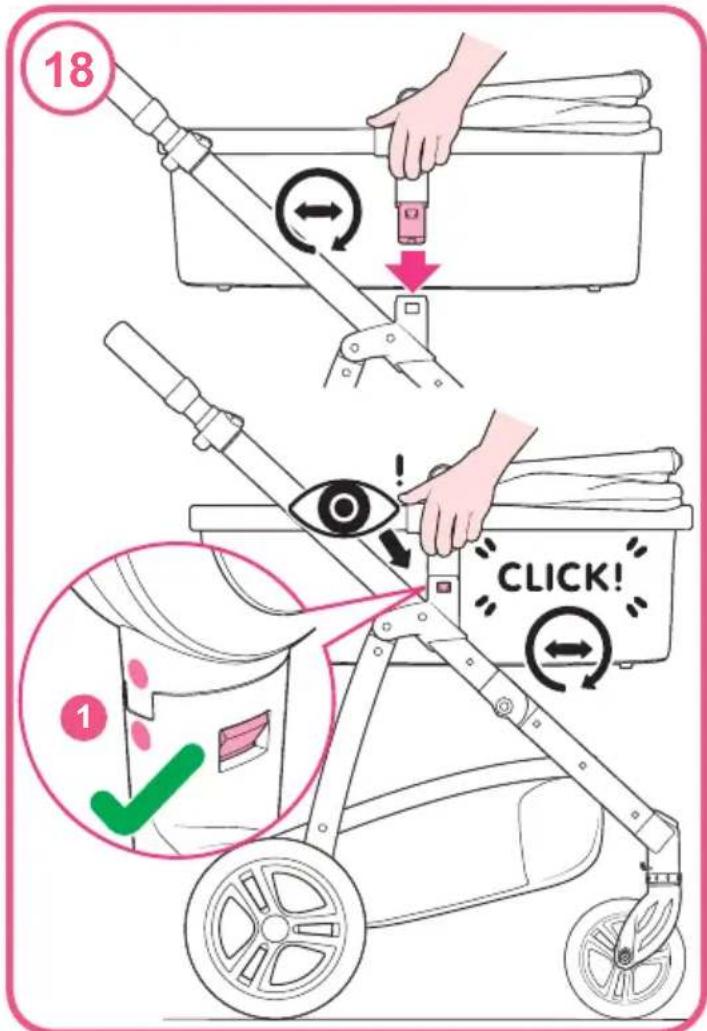
text_image
18 1 CLICK!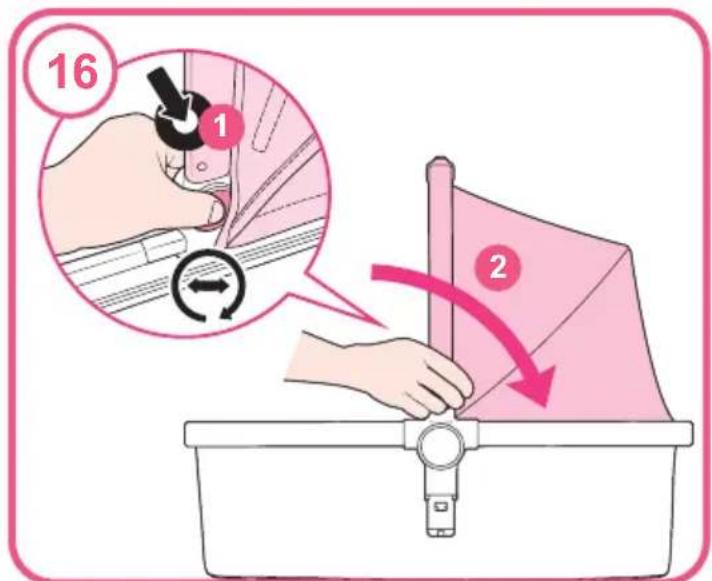
text_image
16 1 2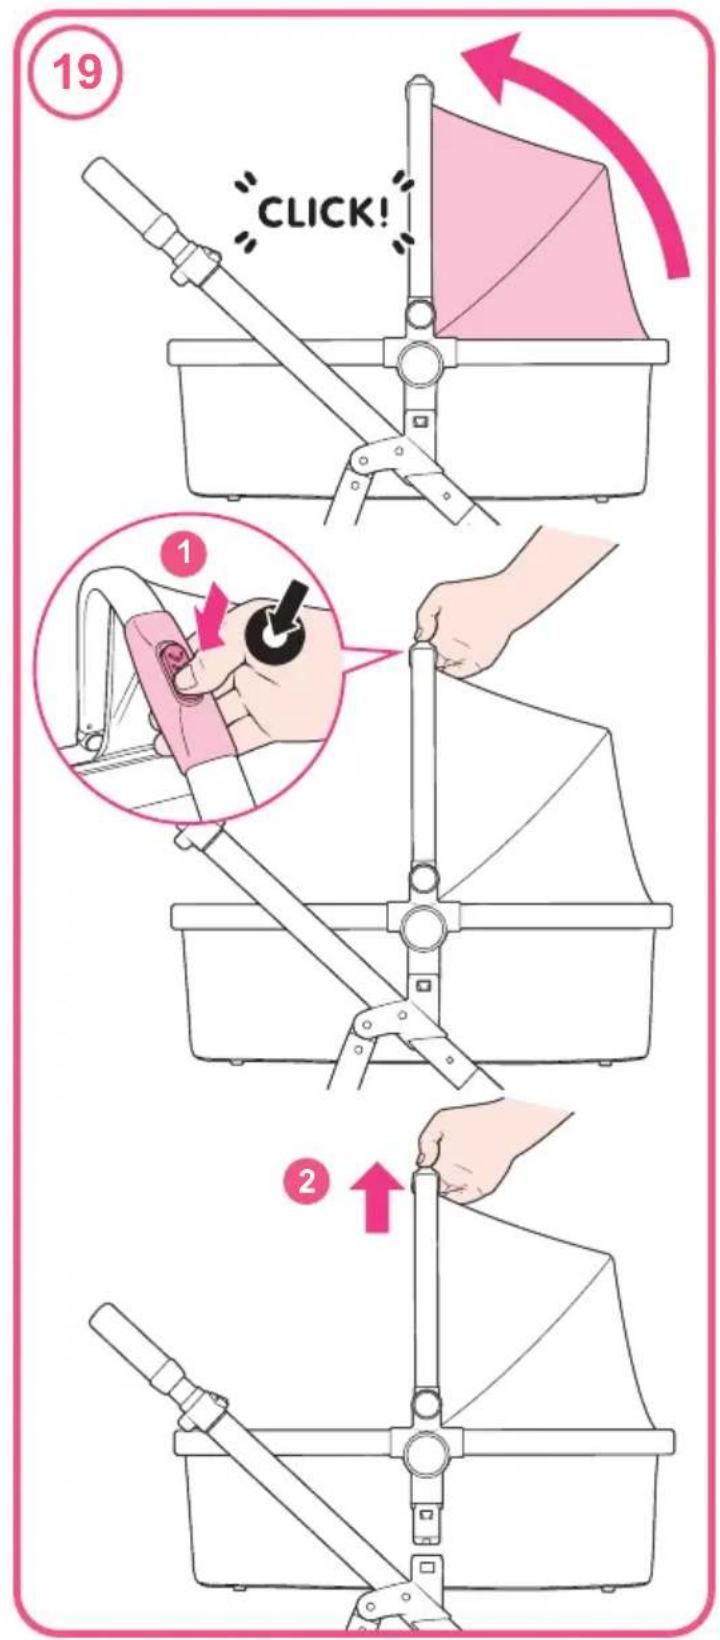
text_image
19 CLICK! ① ②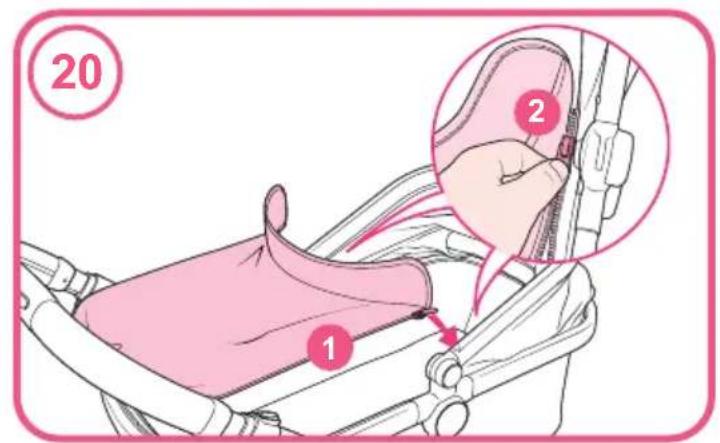
text_image
20 1 2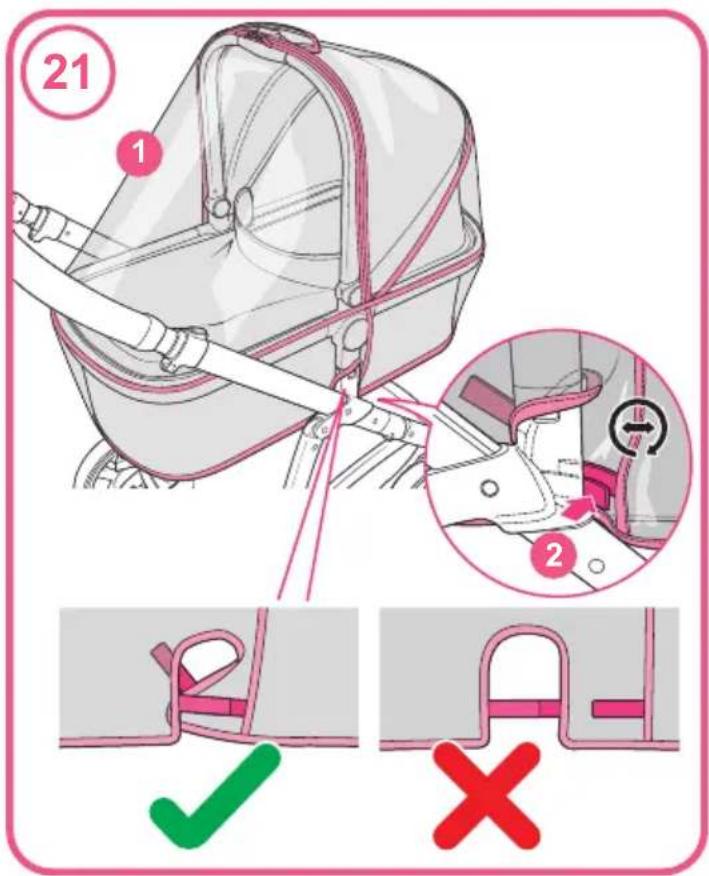
text_image
21 ① ② ✓ ×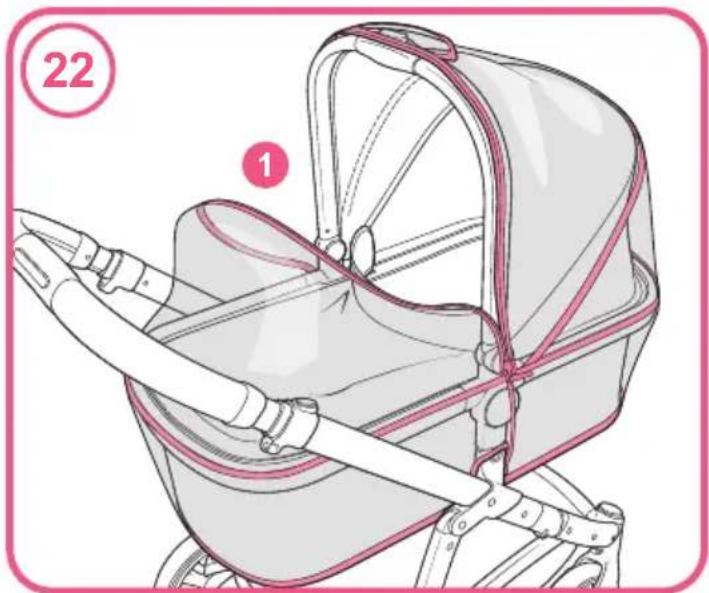
natural_image
Illustration of a baby stroller with pink straps and a numbered label (1) indicating part number 22 (no text or symbols on the diagram itself)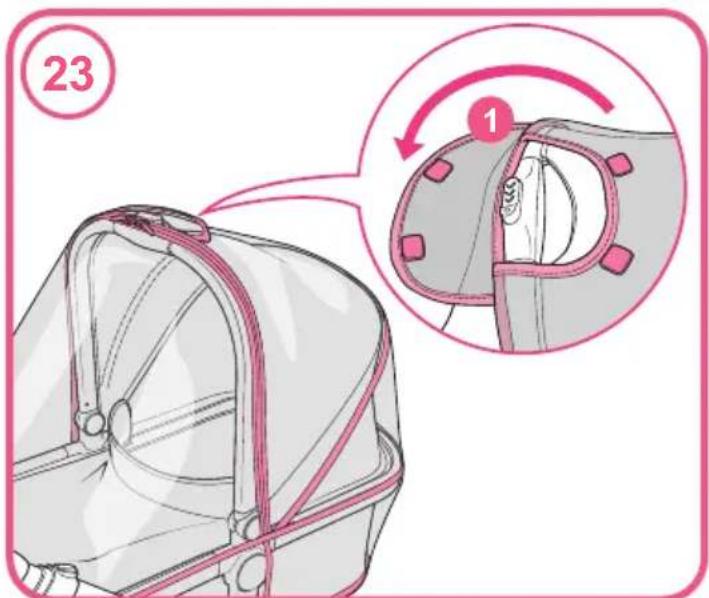
text_image
23 1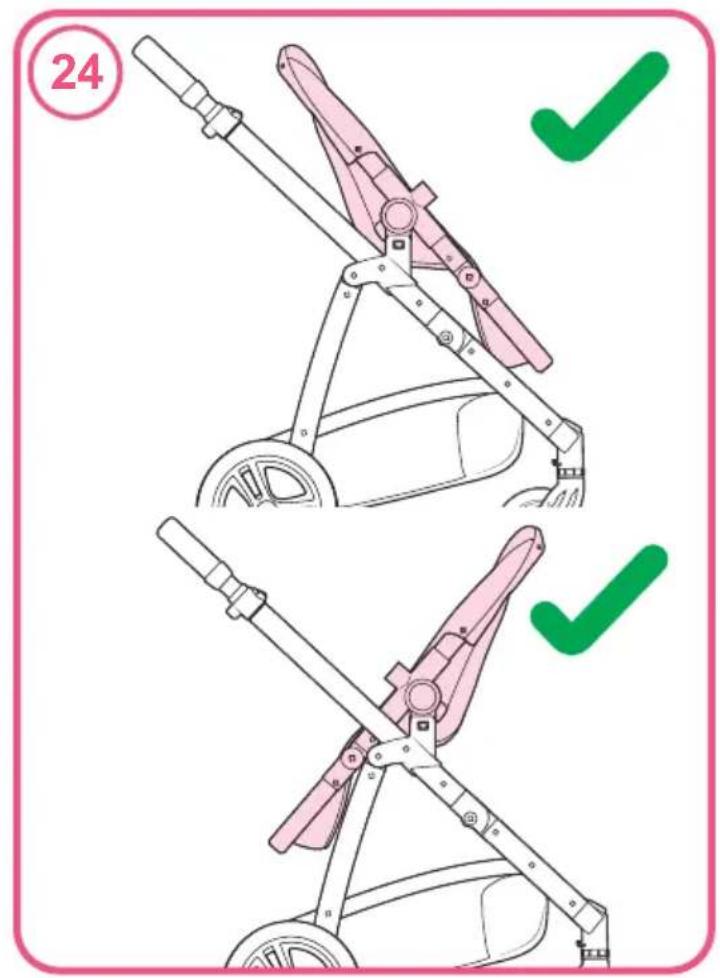
text_image
24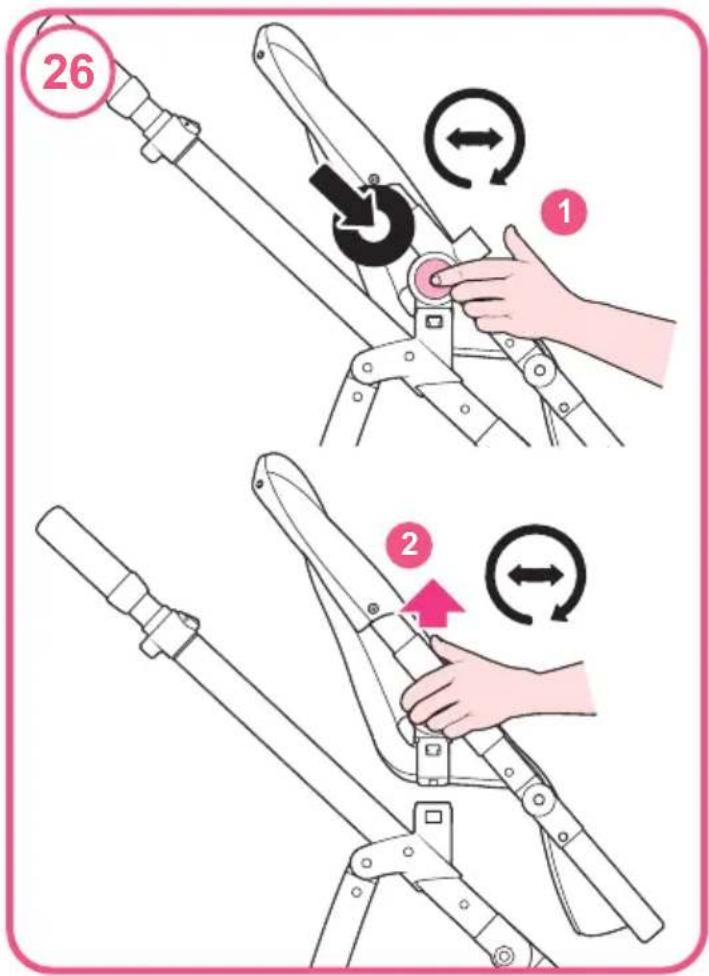
text_image
26 ① ②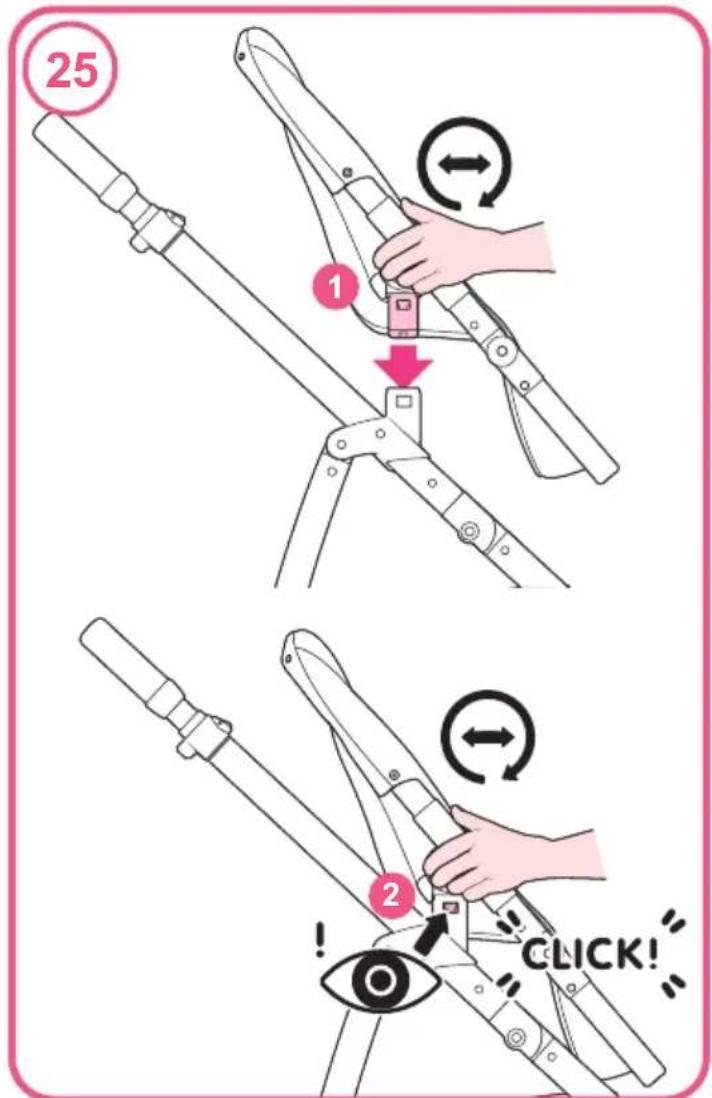
text_image
25 ① ↓ ② ! CLICK!
text_image
27 1 2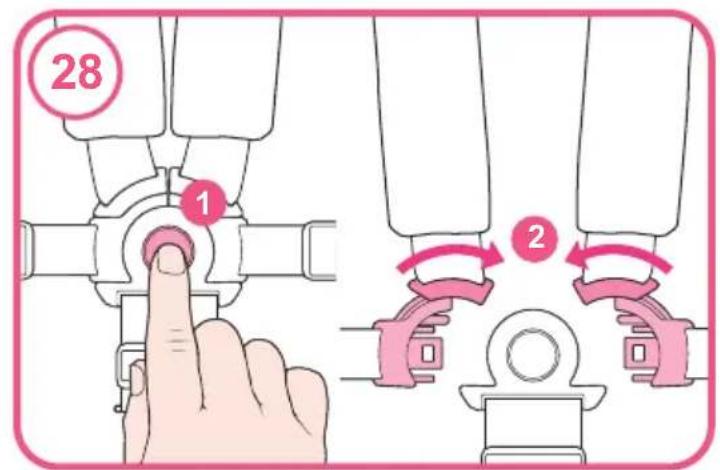
text_image
28 1 2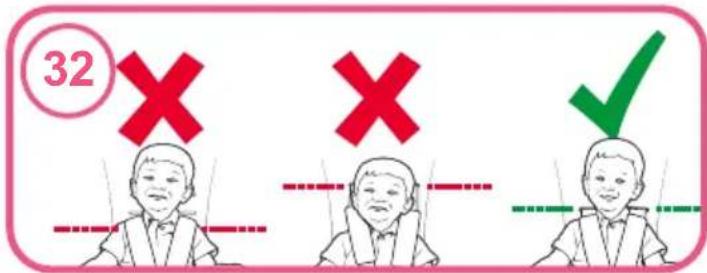
text_image
32 × × ✓
text_image
29 1 1 2 2 CLICK!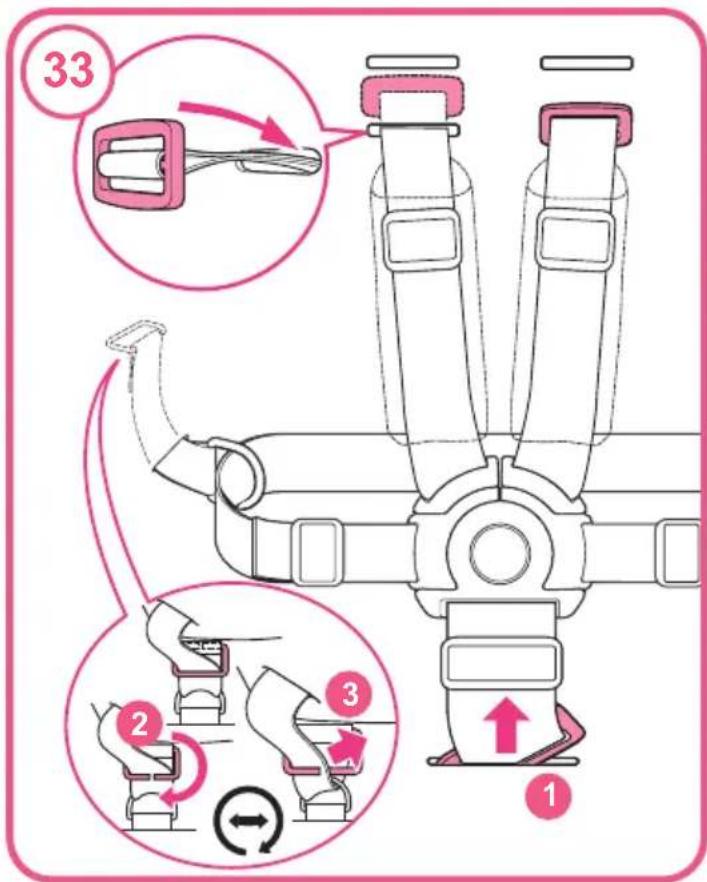
text_image
33 1 2 3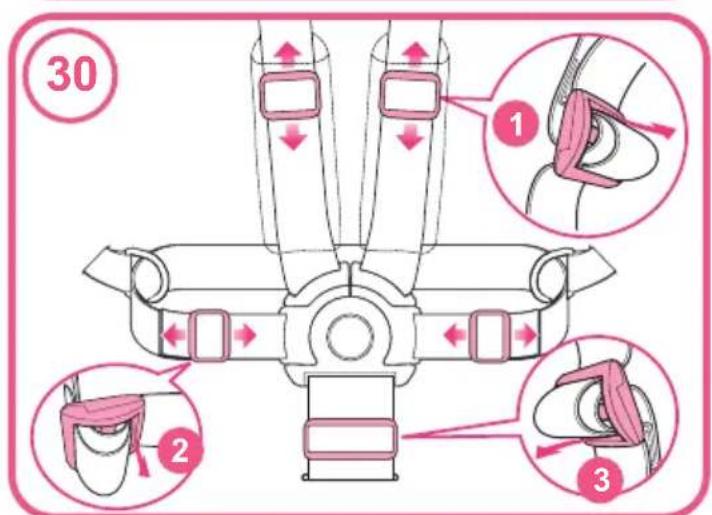
text_image
30 1 2 3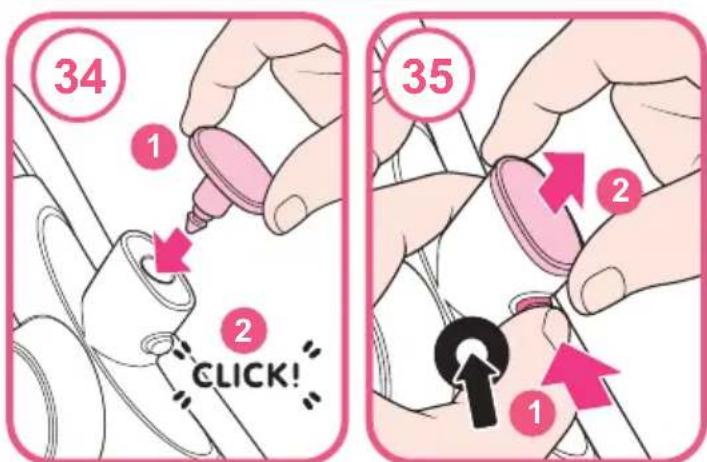
text_image
34 1 2 CLICK! 35 2 1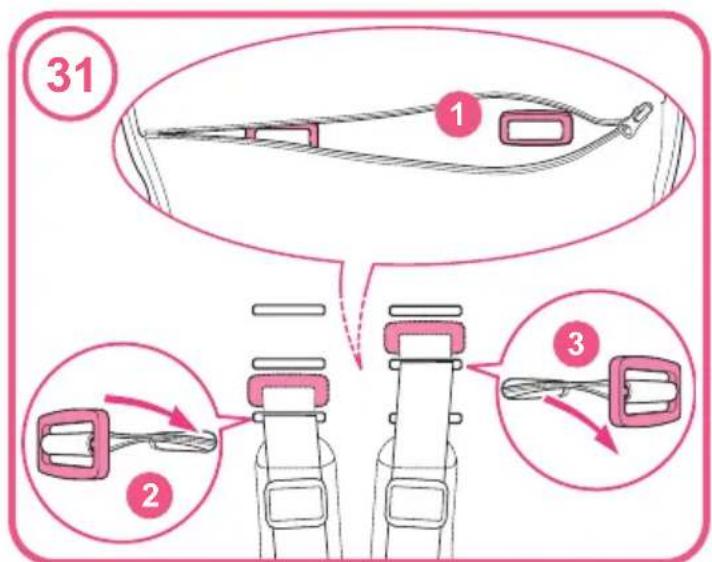
text_image
31 ① ② ③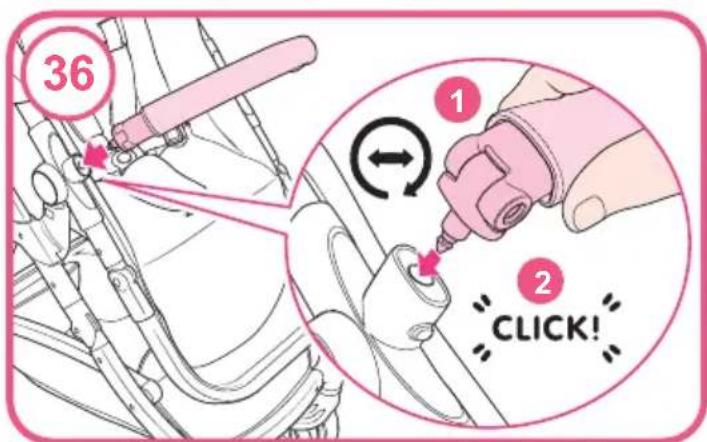
text_image
36 ① ② CLICK!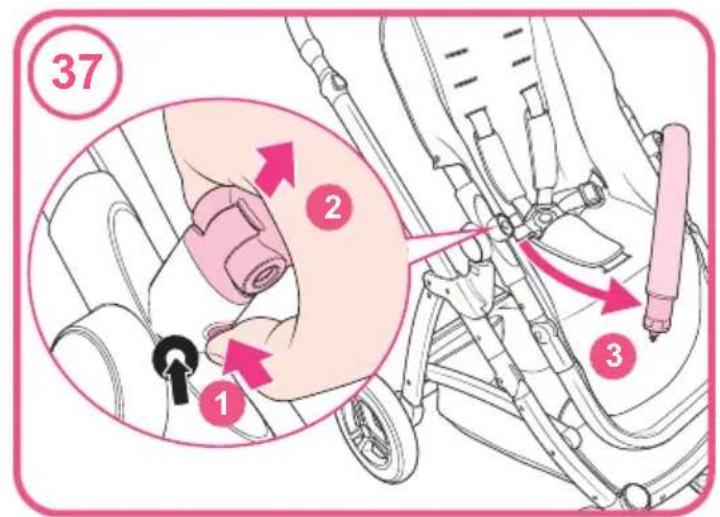
text_image
37 1 2 3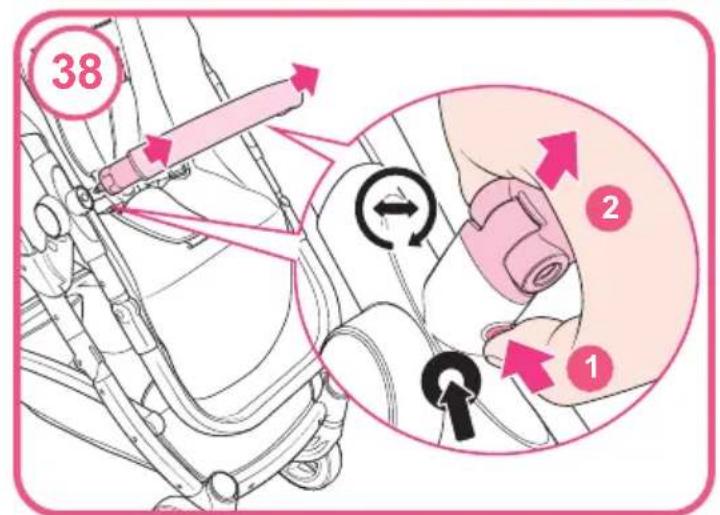
text_image
38 2 1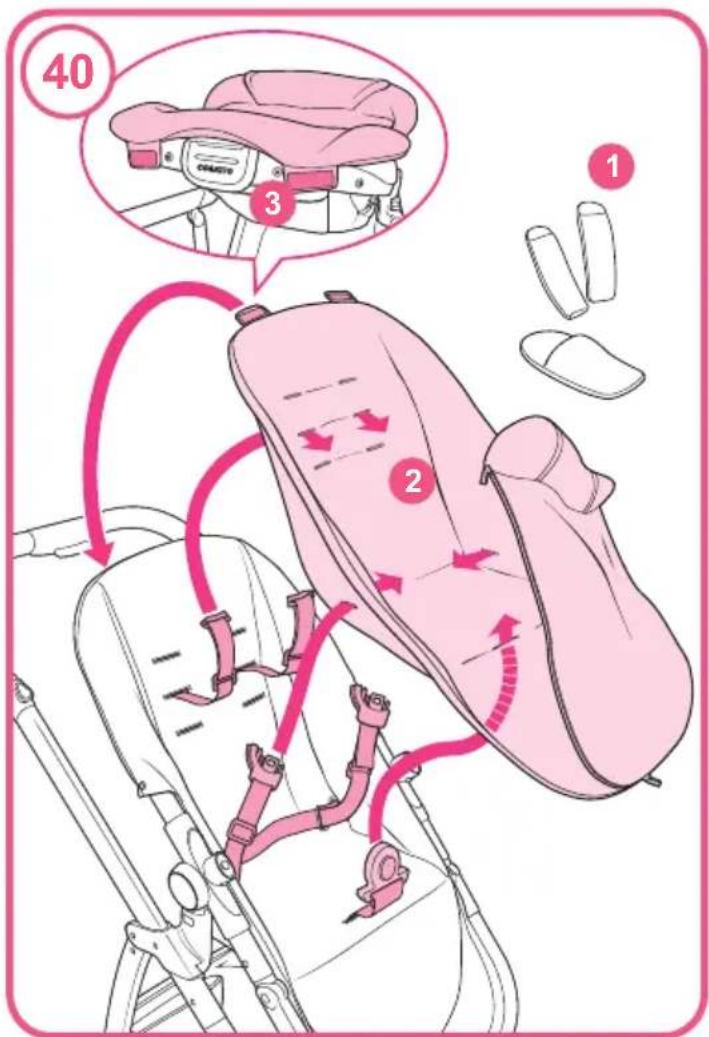
text_image
40 1 2 3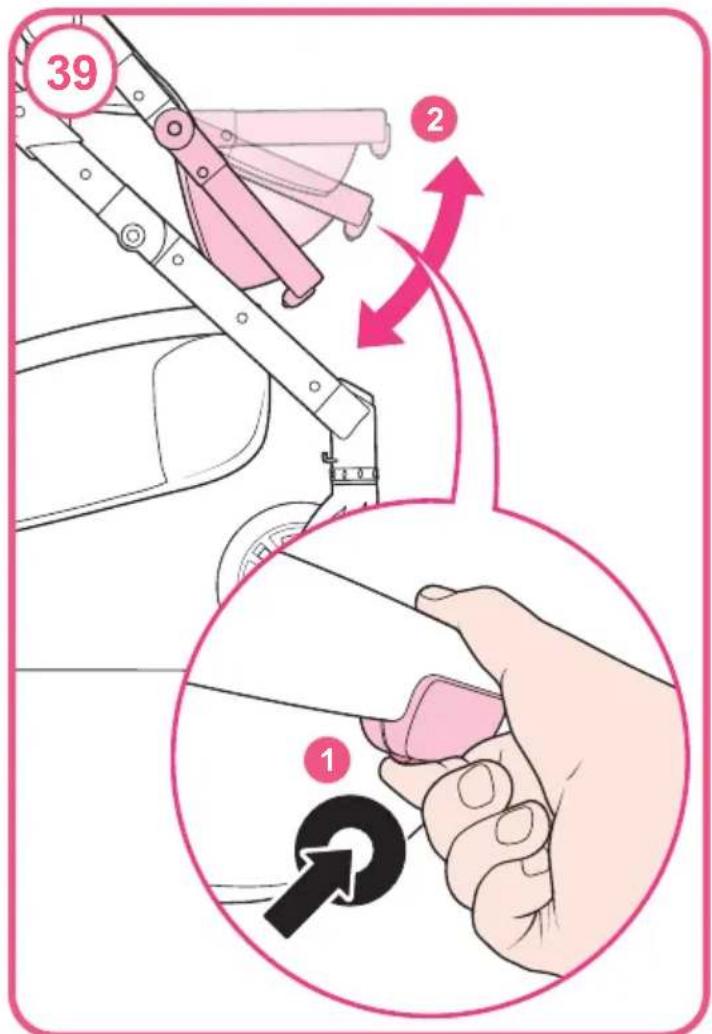
text_image
39 2 1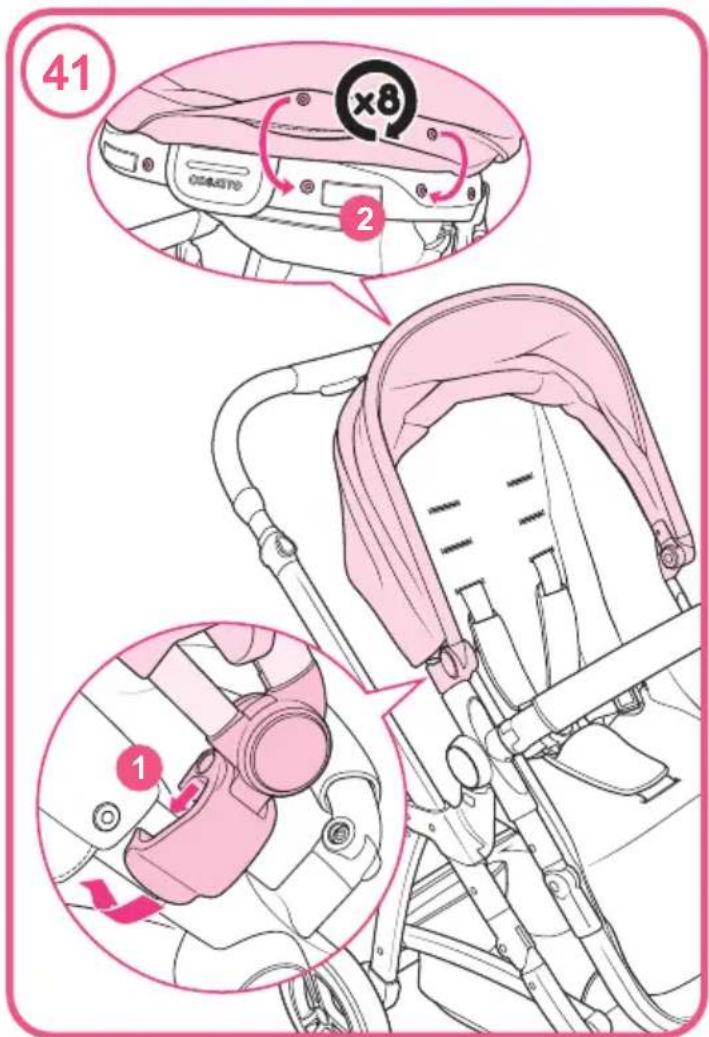
text_image
41 ② ① ⑧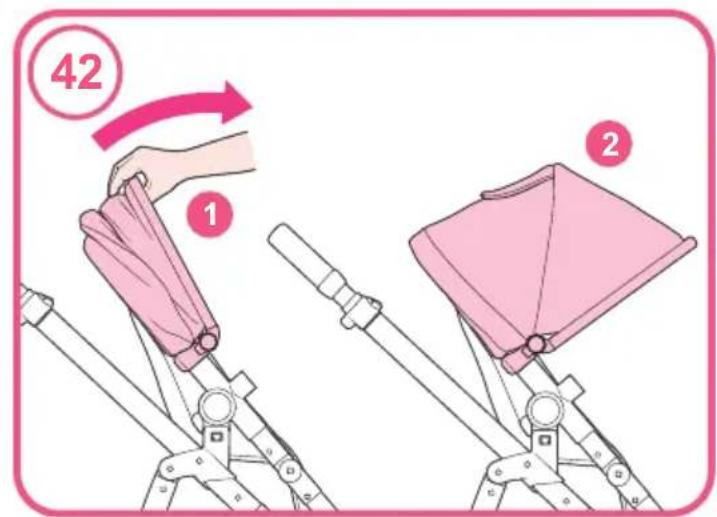
text_image
42 1 2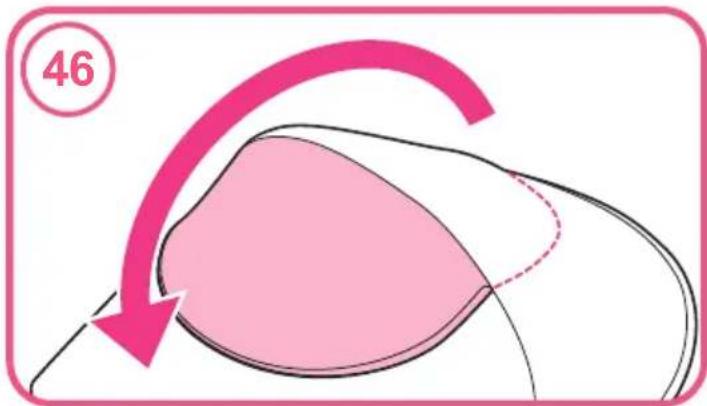
text_image
46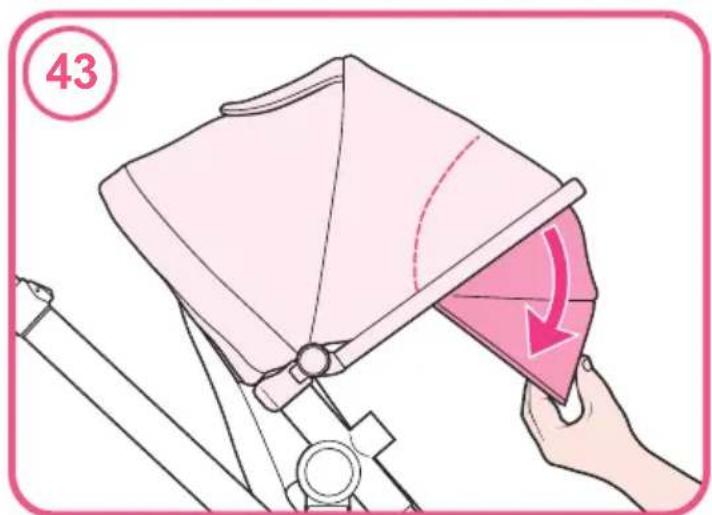
text_image
43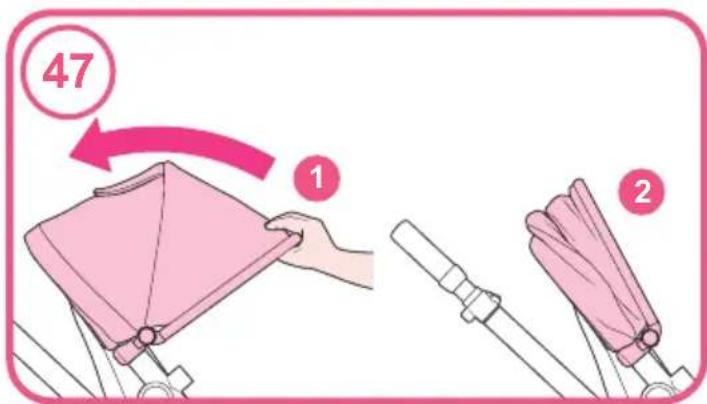
text_image
47 1 2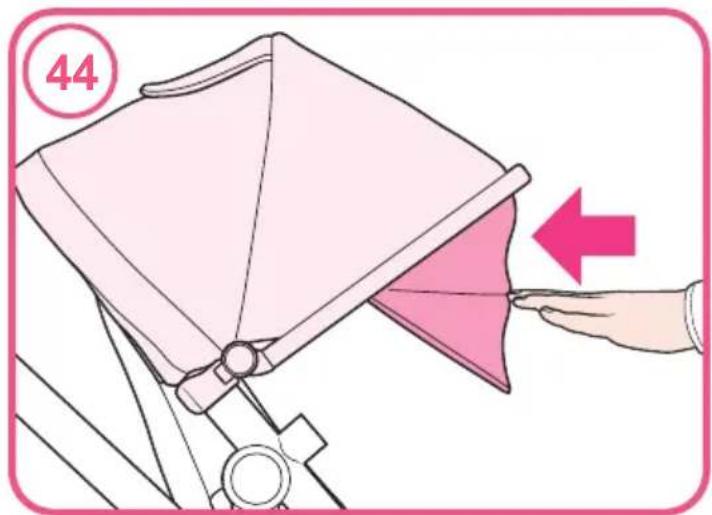
text_image
44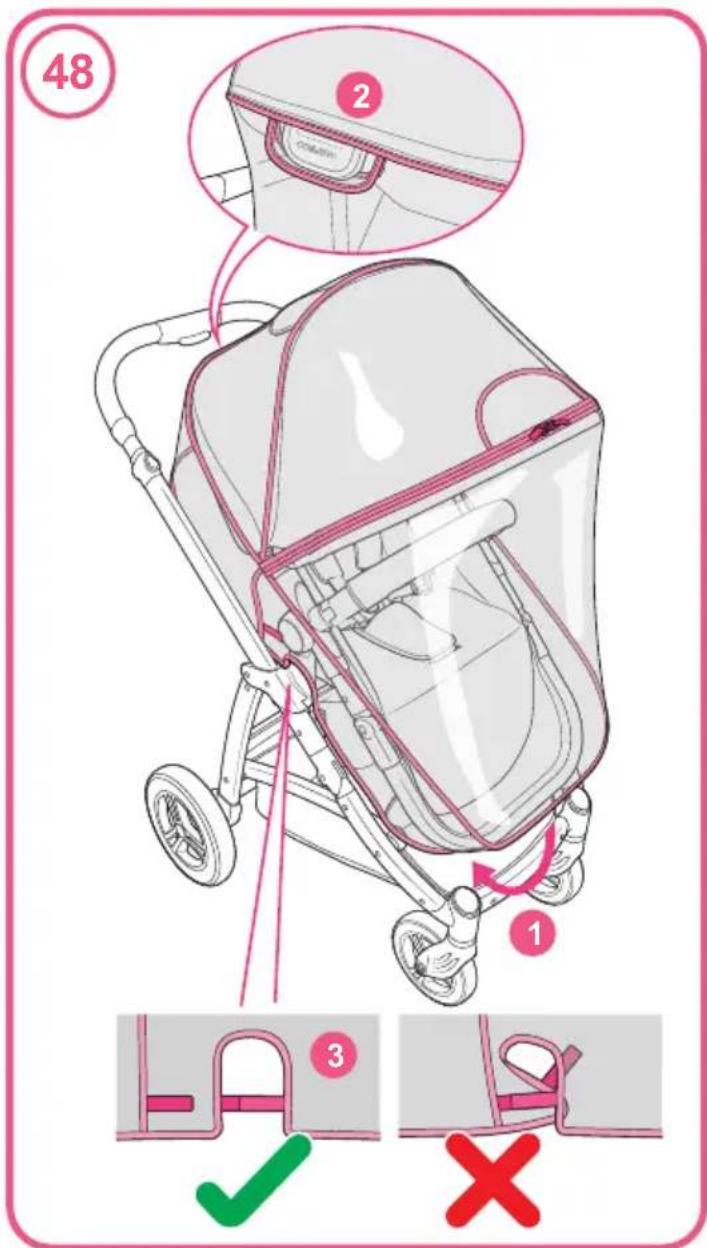
text_image
48 ② ① ③ ✓ ×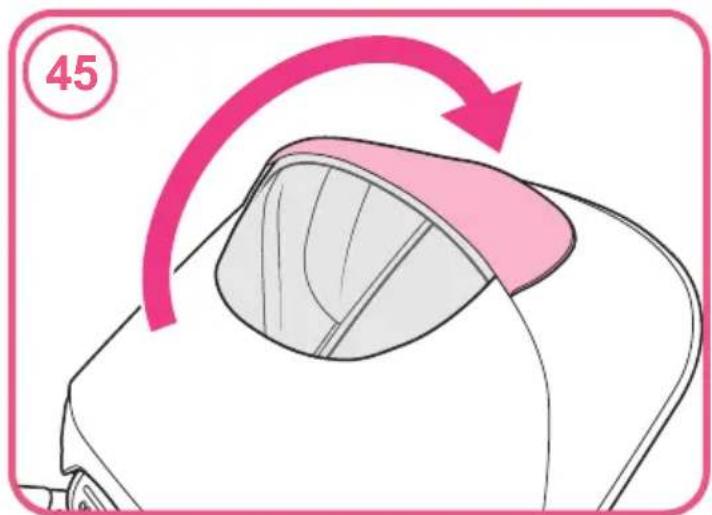
text_image
45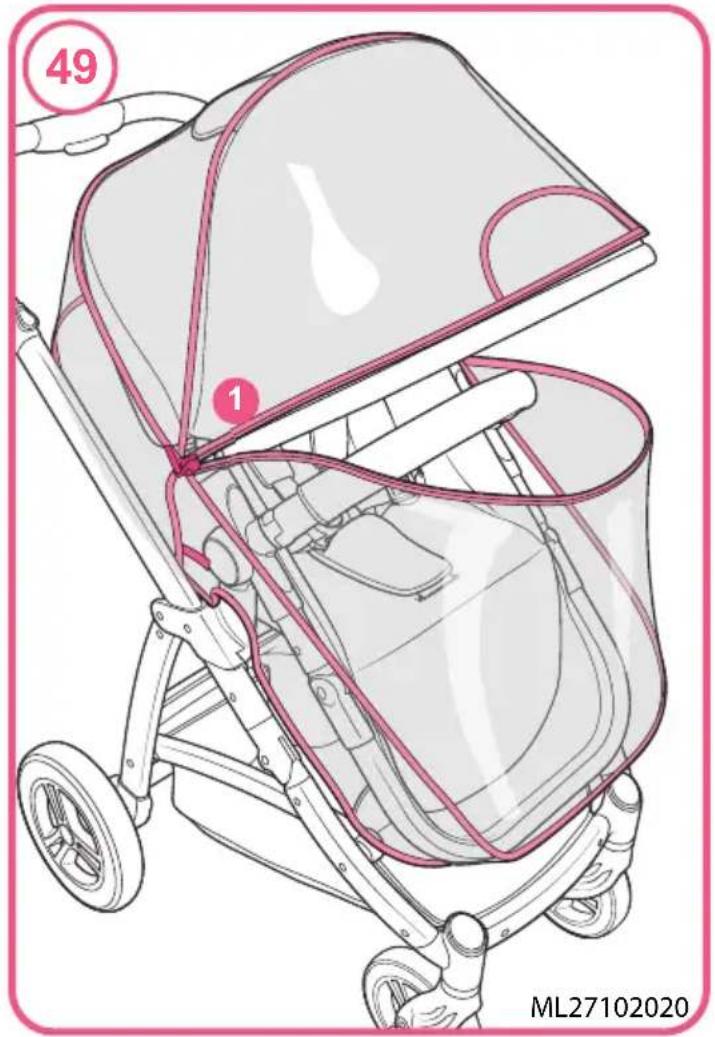
text_image
49 1 ML27102020
natural_image
Blue circular sign with a white baby figure symbol (no text or numbers)max 25 kg
Right by your Side
Landline: Go freephone fabulous on 0800 014 9252*
Mobile: Ring 0333 323 1729
International: +44 120 486 1007
Email: cuddle@cosatto.com
Letter: Cosatto Limited, Bentinck Mill, Bentinck Street, Farnworth, Bolton, Lancs, BL4 7EP, England.
*calls from BT landlines are free but calls from mobiles and other networks may vary.
All the design and trademarks contained herein are the property of Cosatto Limited. No part of this document may be reproduced without the permission of Cosatto Limited.
www.cosatto.com