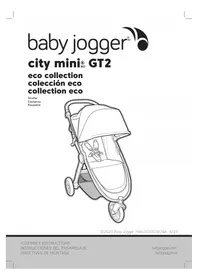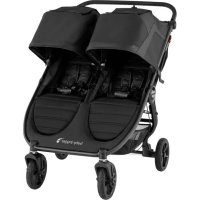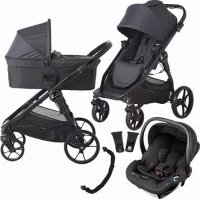
City Prix - Stroller BABY JOGGER - Free user manual and instructions
Find the device manual for free City Prix BABY JOGGER in PDF.


User questions about City Prix BABY JOGGER
0 question about this device. Answer the ones you know or ask your own.
Ask a new question about this device
Download the instructions for your Stroller in PDF format for free! Find your manual City Prix - BABY JOGGER and take your electronic device back in hand. On this page are published all the documents necessary for the use of your device. City Prix by BABY JOGGER.
USER MANUAL City Prix BABY JOGGER
natural_image
Line drawings of two stroller models with wheels and a bicycle, shown from different angles (no text or symbols)©2024 Baby Jogger NWL0001608462B 5/24
Stroller / Bike Trailer Use Positions Posiciones de uso del cochecito / remolque para bicicleta Position d'utilisation de la poussette / remorque pour vélo
Bike Trailer Conversion Kit included on certain models or sold separately as an accessory.
natural_image
Line drawing of a baby stroller with wheels and seat cover (no text or symbols)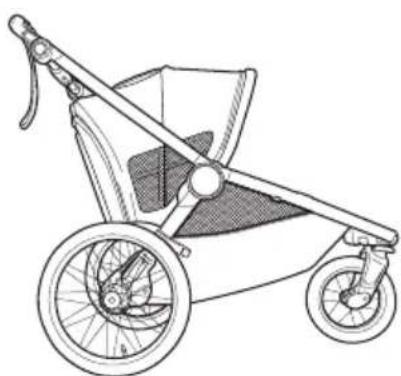
natural_image
Line drawing of a baby stroller with wheels and seat (no text or symbols)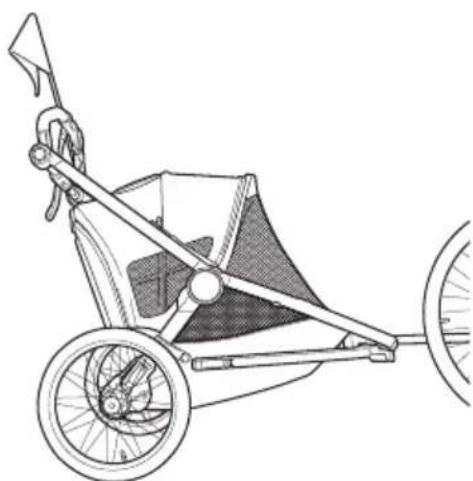
natural_image
Line drawing of a two-wheeled baby wheeled cart with a bucket and wheel (no text or symbols)Stroller Mode
text_image
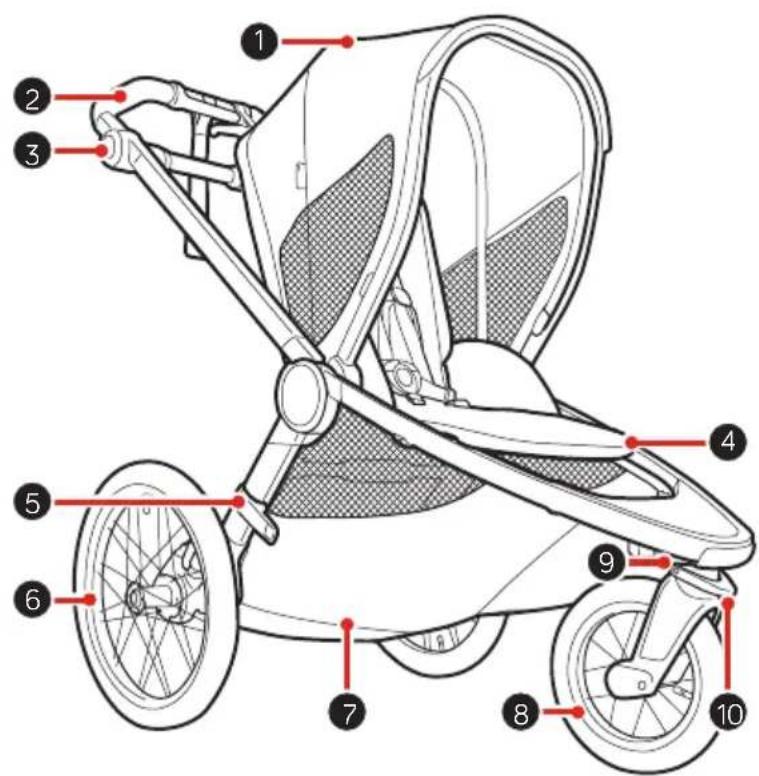
Diagram of a stroller with numbered parts for identification and labeling1 Canopy
2 Handlebar
3 Handle Height Adjustment Buttons
4 Leg Support Incline
5 Auto-Lock
6 Rear Wheel
7 Storage Basket
8 Front Wheel
9 Front Wheel Release Button
10 Swivel/Lock
11 Harness Strap
12 Harness Pads
13 Harness Buckle
14 Crotch Cover
15 Deceleration Brake
16 Frame Fold Actuator
17 Jogging Strap
18 Recline Lever
19 Seat Back Storage Backpack
20SeatSliderActuator
21 Parking Brake
22 Rear Wheel Release Button
23Weathershield
24SunShade
25BugScreen
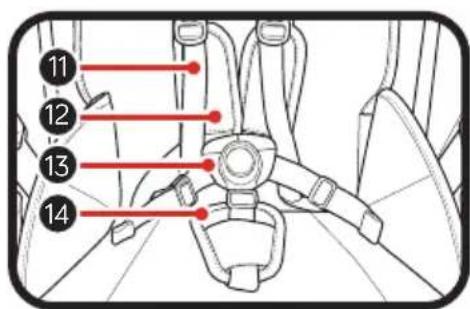
text_image
Diagram of car seatbelt components with numbered labels pointing to different seat positions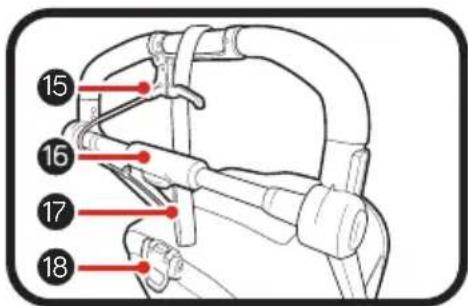
text_image
15 16 17 18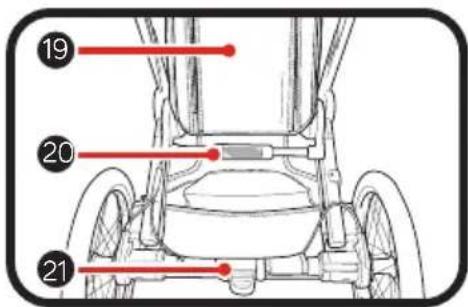
text_image
19 20 21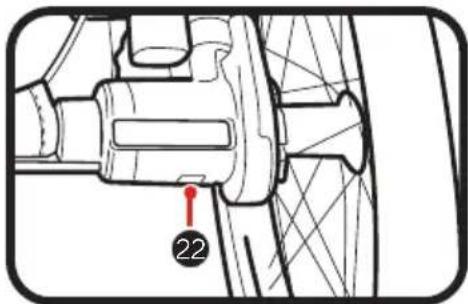
text_image
22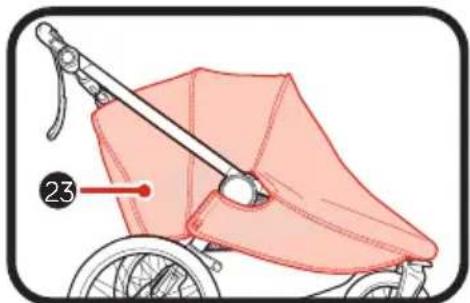
natural_image
Illustration of a stroller with a pink fabric cover and handle, labeled with number 23 (no text or symbols on the diagram itself)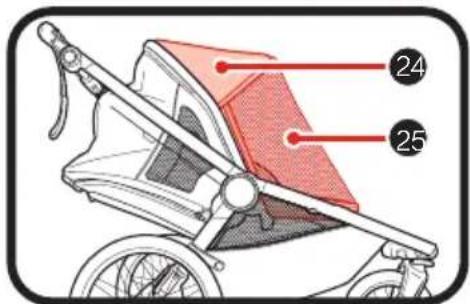
text_image
24 25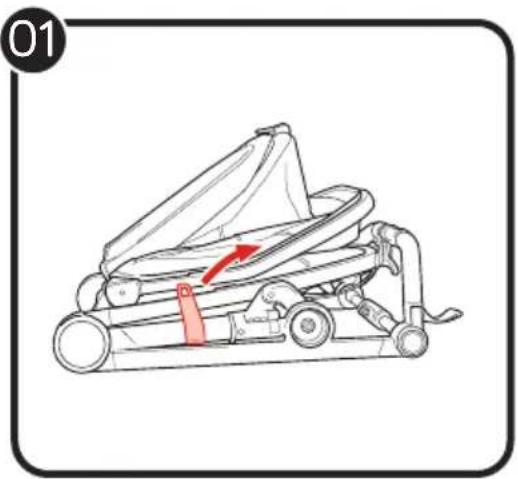
natural_image
Line drawing of a baby stroller with a red arrow indicating motion (no text or symbols)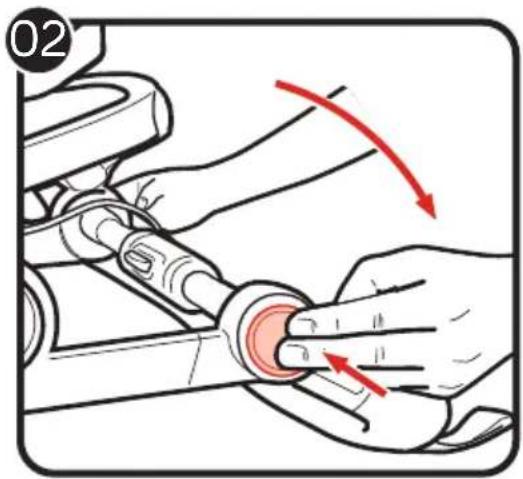
text_image
02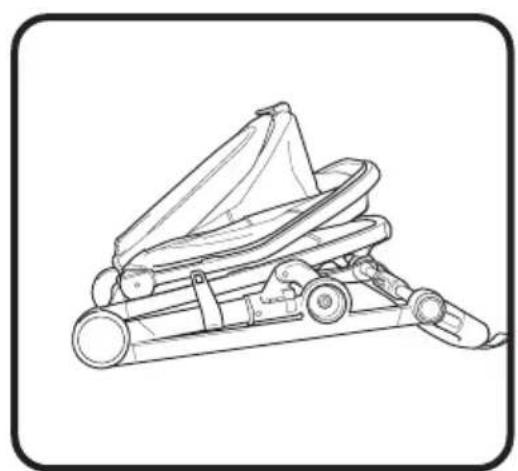
natural_image
Line drawing of a baby stroller with wheels and a triangular top (no text or symbols)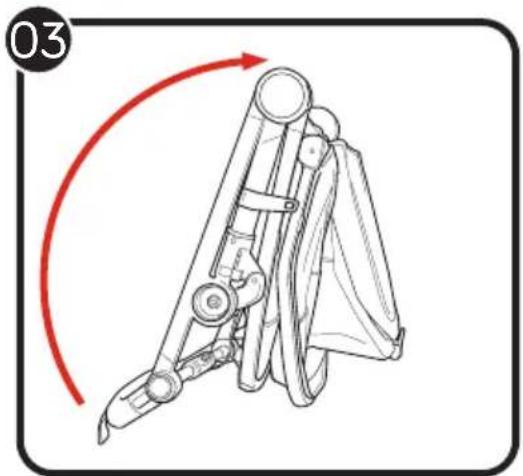
natural_image
Diagram of a mechanical device with a red curved arrow indicating rotation or motion (no text or symbols)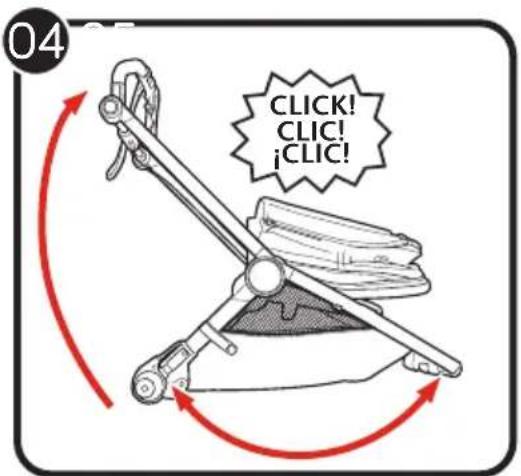
text_image
04 CLICK! CLIC! iCLIC!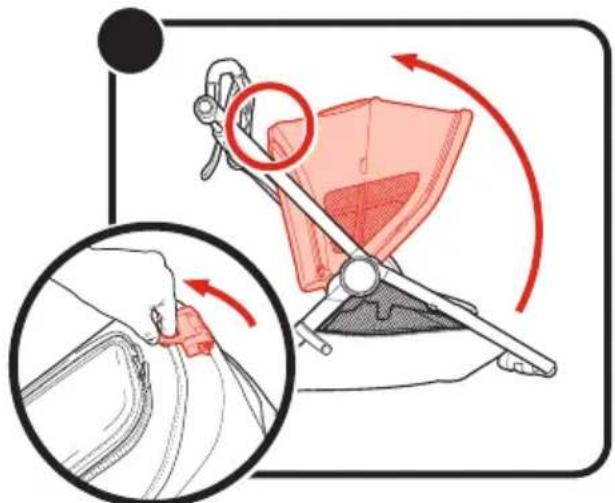
text_image
Diagram illustrating a mechanical device with red meshing and force application, showing step-by-step assembly and close-up of the component.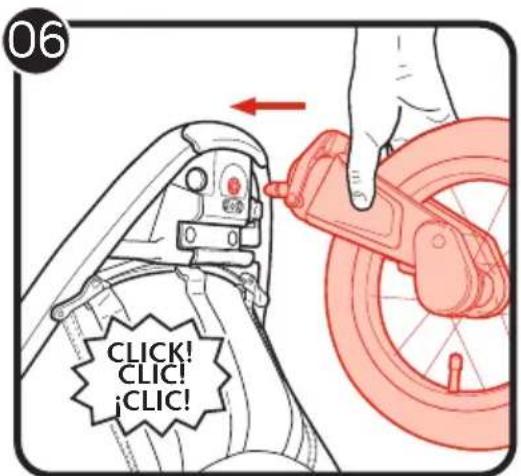
natural_image
Diagram of a mechanical component with a red circular arrow indicating rotational motion (no text or symbols)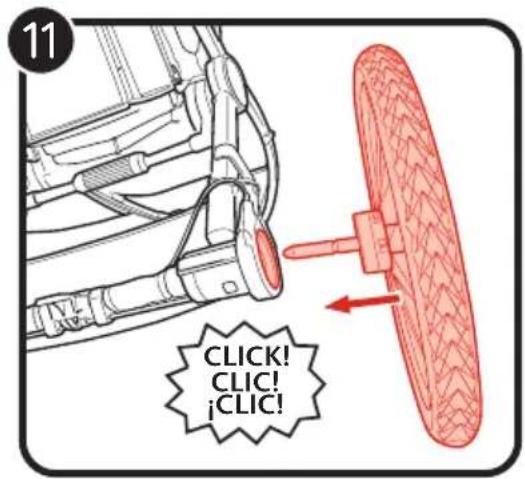
text_image
11 CLICK! CLIC! ¡CLIC!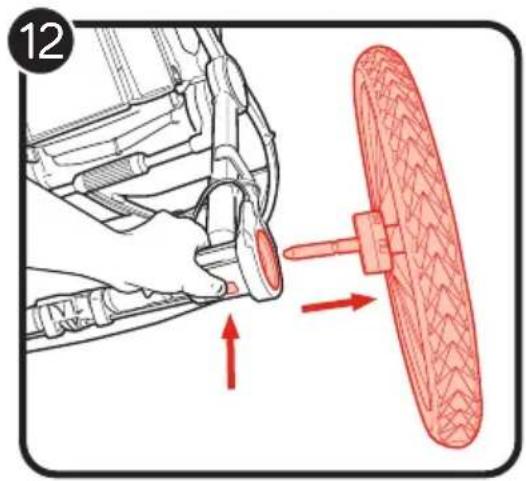
text_image
12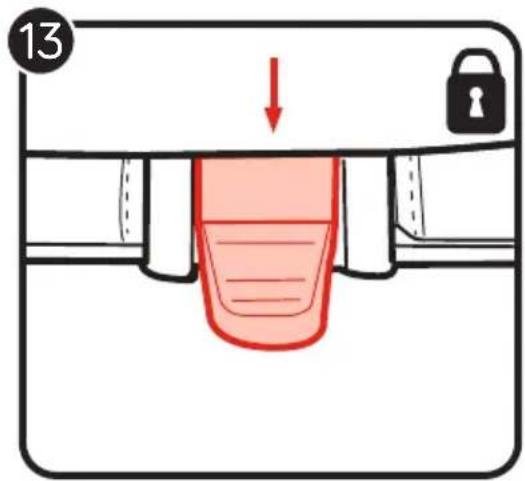
text_image
13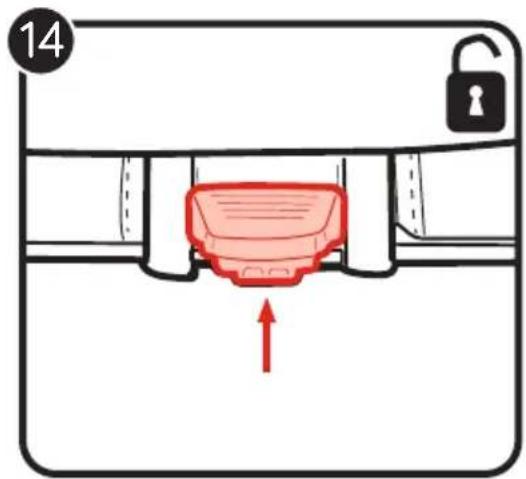
text_image
14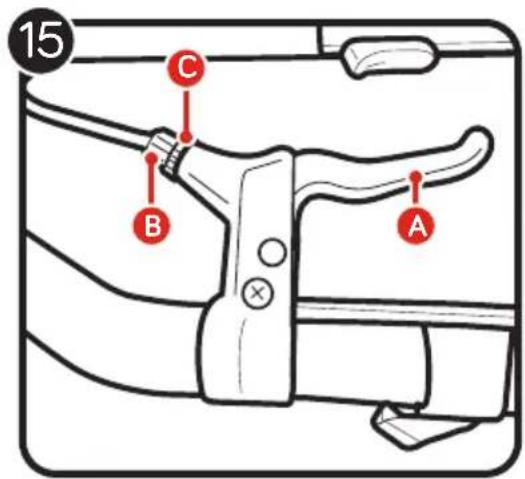
text_image
15 C B A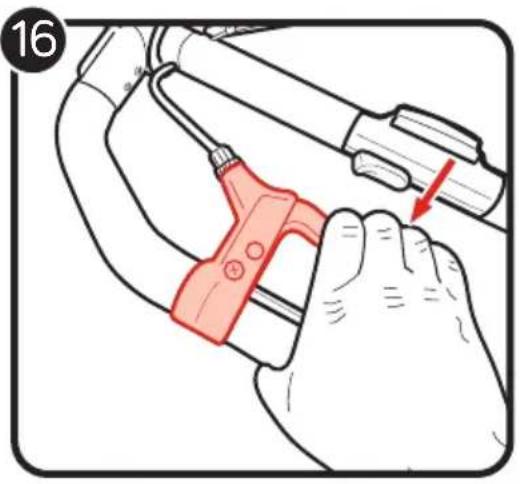
text_image
16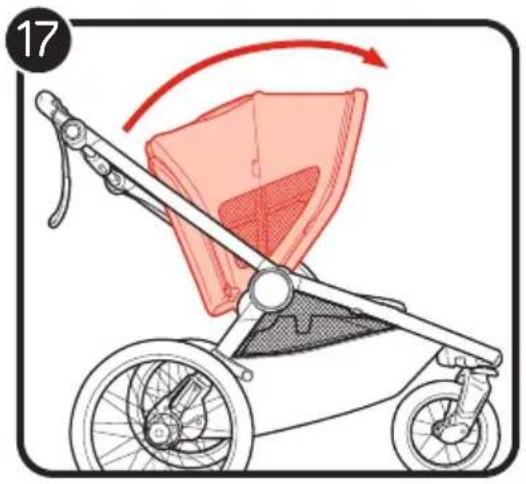
natural_image
Illustration of a stroller with a red fabric cover and directional arrow indicating rotation (no text or symbols)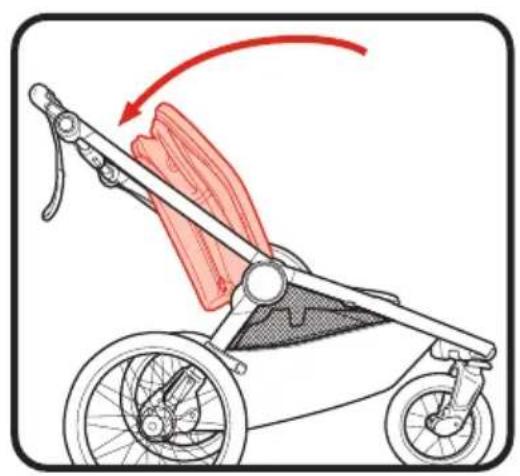
natural_image
Illustration of a stroller with red motion arrows indicating movement (no text or symbols)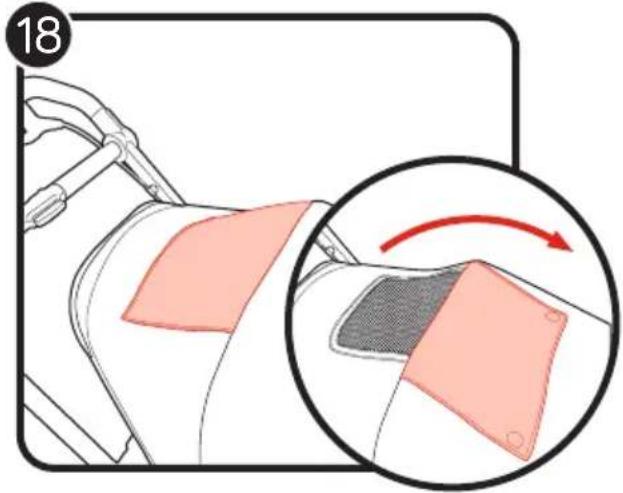
text_image
18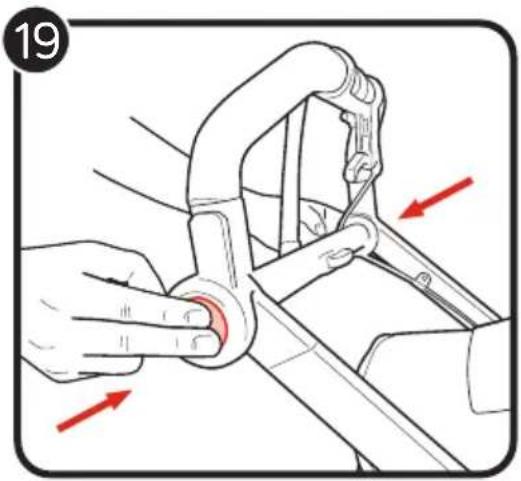
text_image
19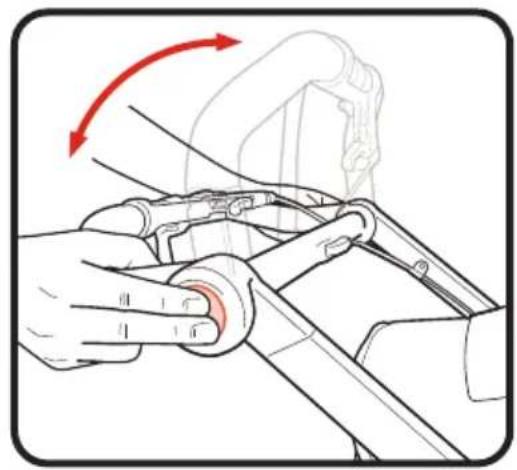
natural_image
Illustration of a hand using a tool to adjust or install a mechanical component, with red arrows indicating motion direction (no text or symbols present)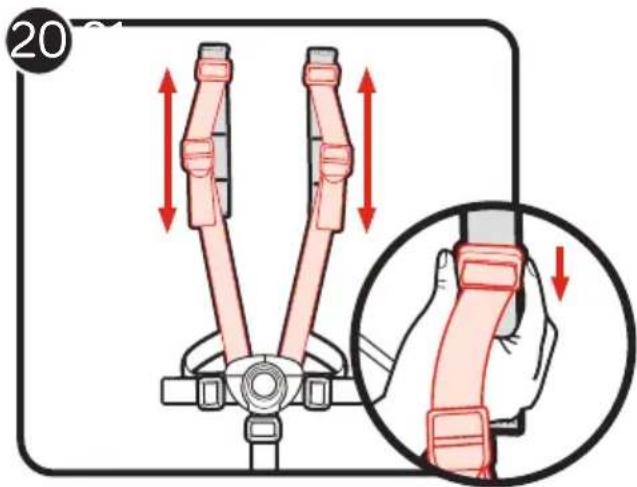
text_image
20 ←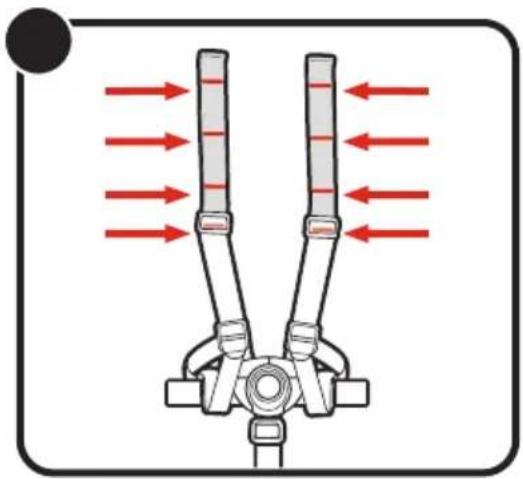
natural_image
Diagram of a mechanical linkage or lifting device with red directional arrows indicating force or motion (no text or symbols)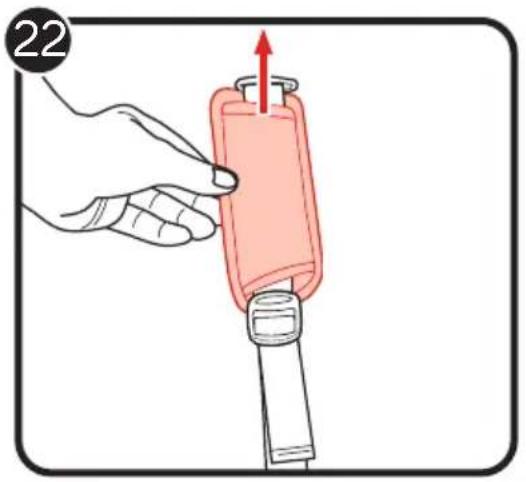
text_image
22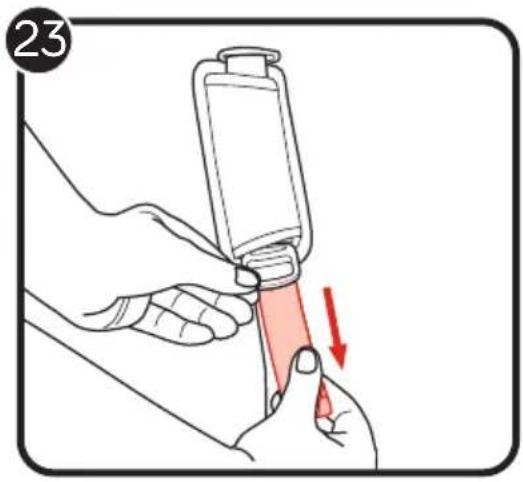
text_image
23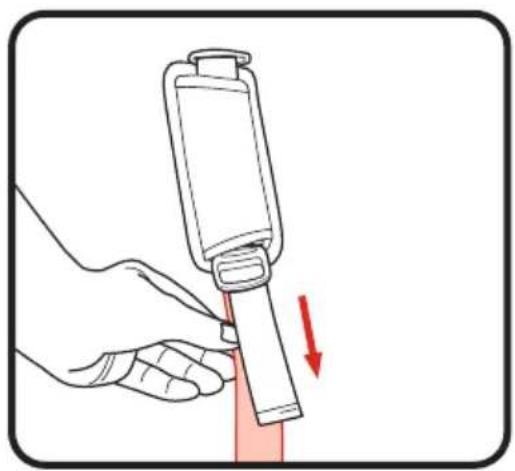
natural_image
Illustration of a hand using a handheld device to adjust a cylindrical component, with a red arrow indicating the process (no text or symbols present)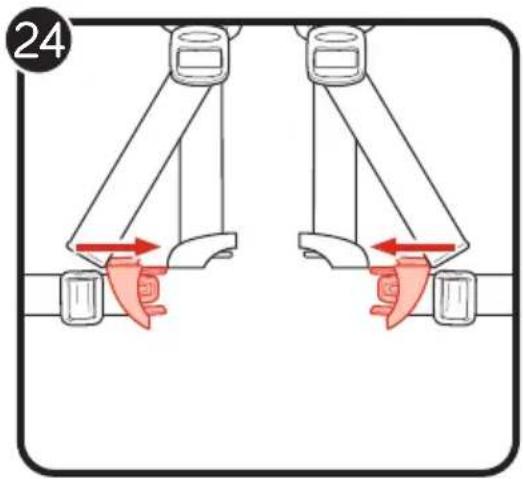
text_image
24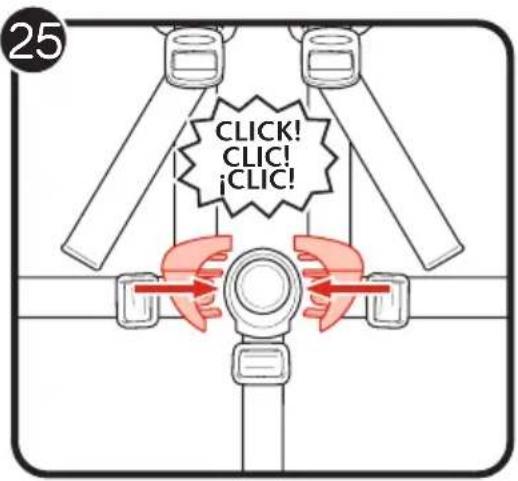
text_image
25 CLICK! CLIC! iCLIC!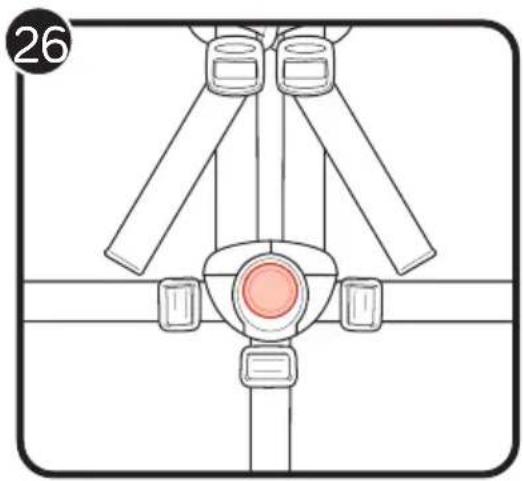
natural_image
Diagram of a mechanical assembly with three vertical rods and a central circular component (no text or symbols)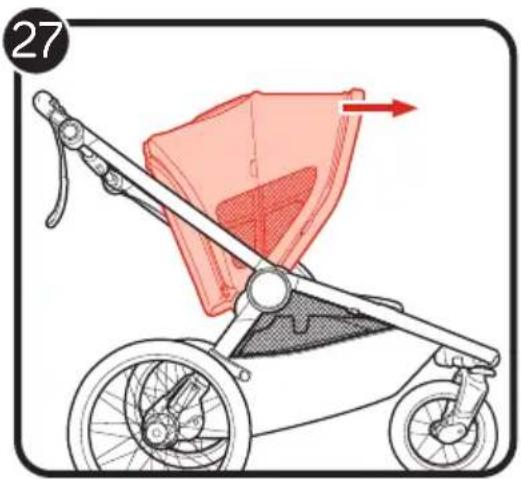
natural_image
Illustration of a baby stroller with a red mesh cover and directional arrow (no text or symbols)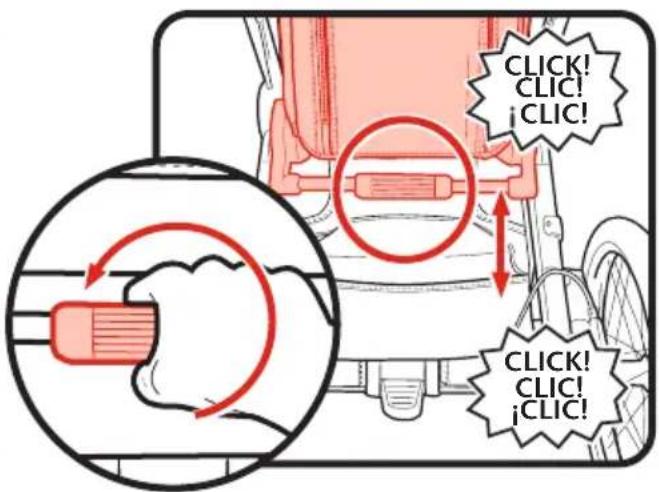
text_image
CLICK! CLIC! iCLIC! CLICK! CLIC! iCLIC!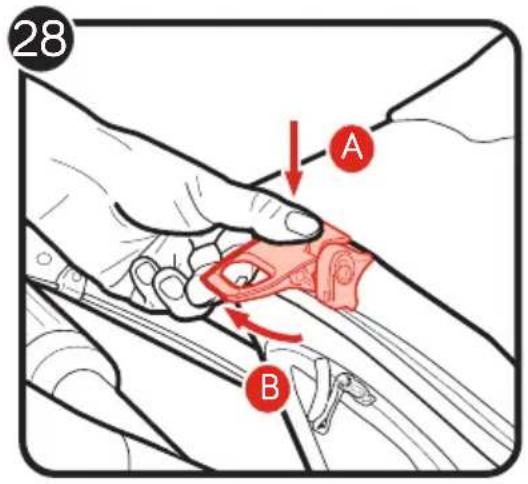
text_image
28 A B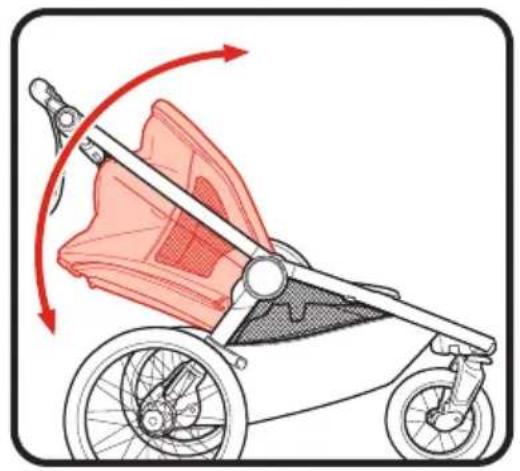
natural_image
Illustration of a stroller with red fabric and motion arrows indicating rotation (no text or symbols)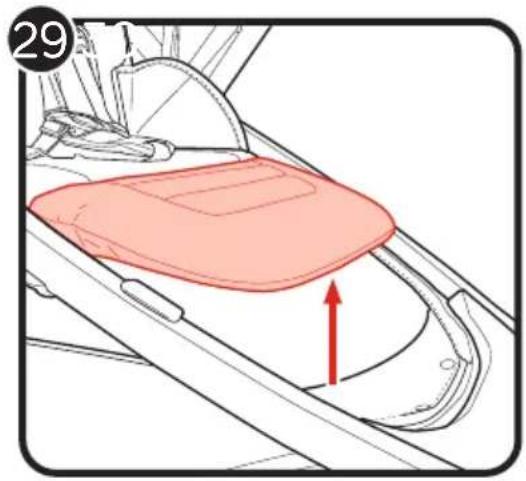
text_image
29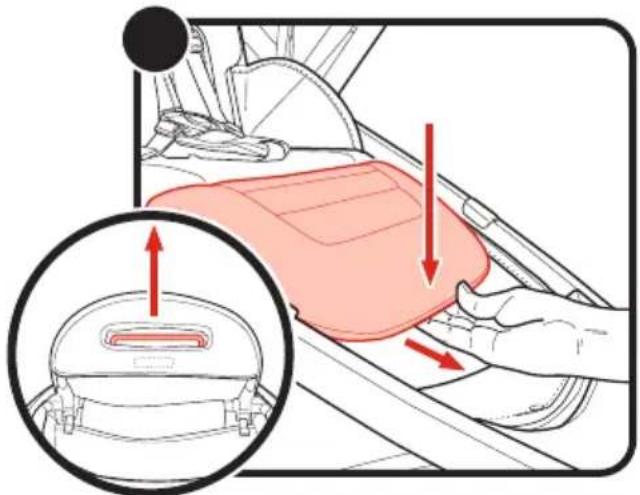
text_image
Diagram illustrating car seatbelt usage with red arrows indicating force or movement, showing a seatbelt component highlighted in an inset.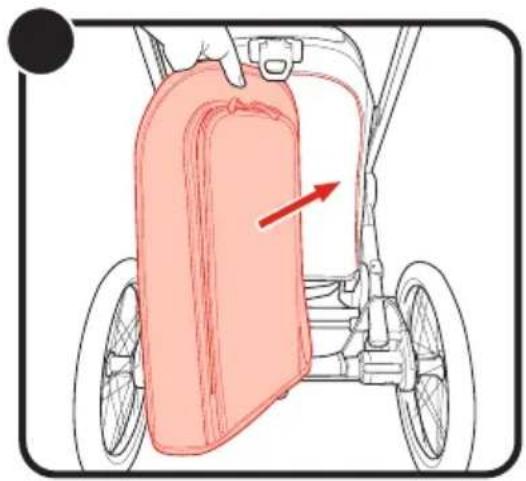
natural_image
Illustration of a fire extinguisher on a vehicle, showing the hood and side wheel (no text or symbols)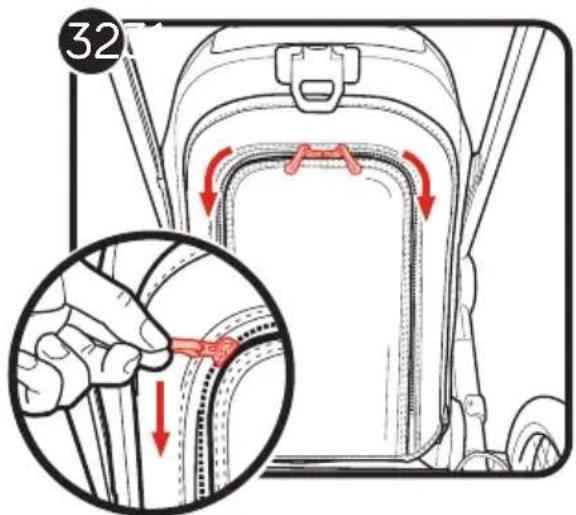
text_image
32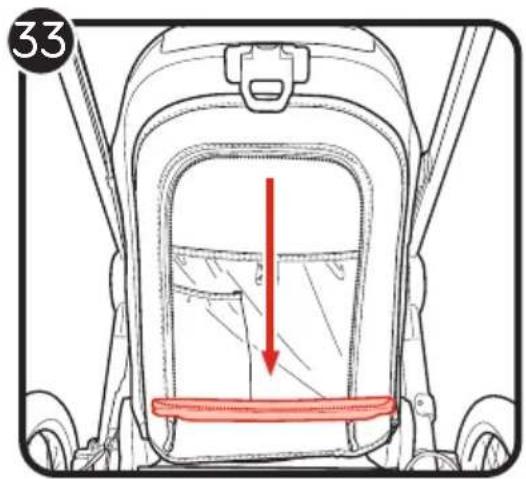
text_image
33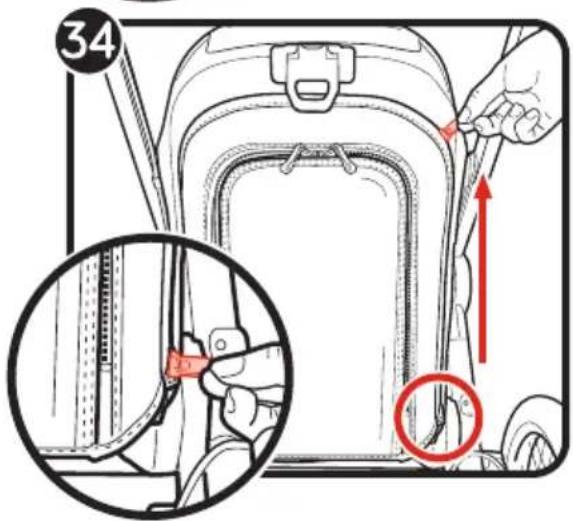
text_image
34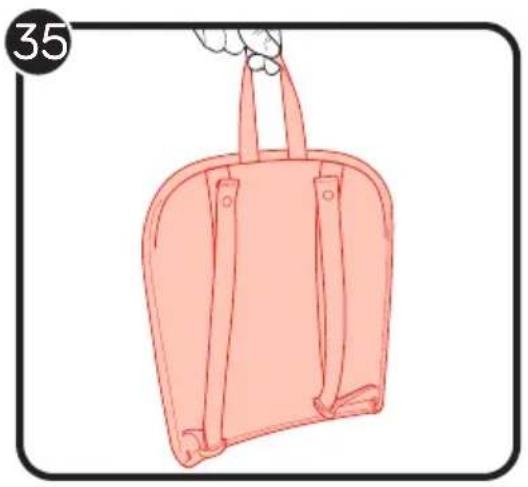
natural_image
Illustration of a pink backpack with straps and handle, no text or symbols present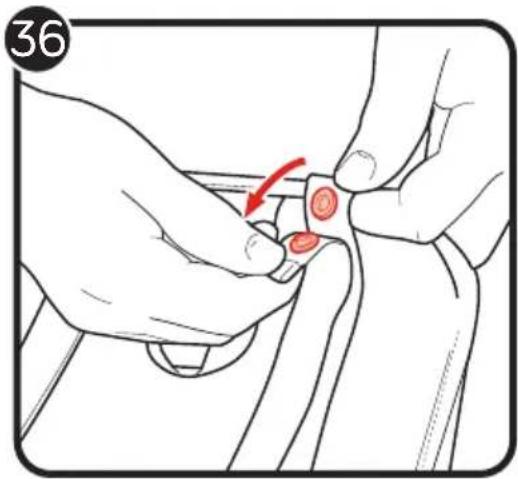
natural_image
Illustration of hands adjusting a small red circular object with a red arrow indicating rotation (no text or symbols)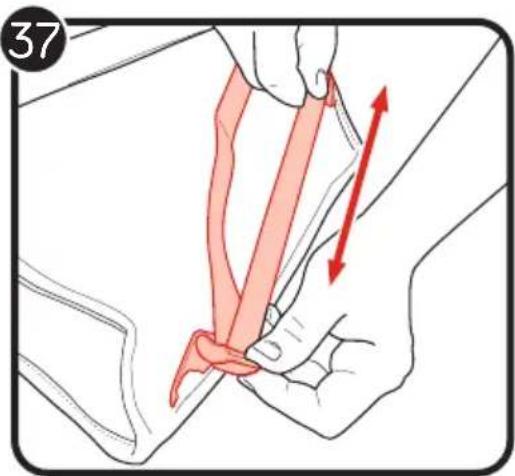
text_image
37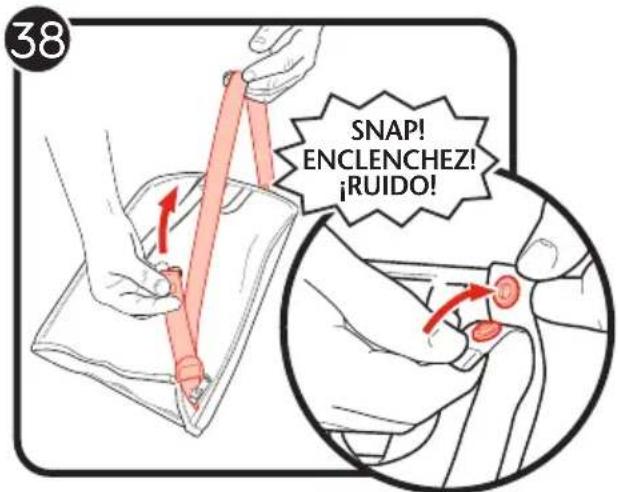
text_image
38 SNAP! ENCLENCHEZ! ¡RUIDO!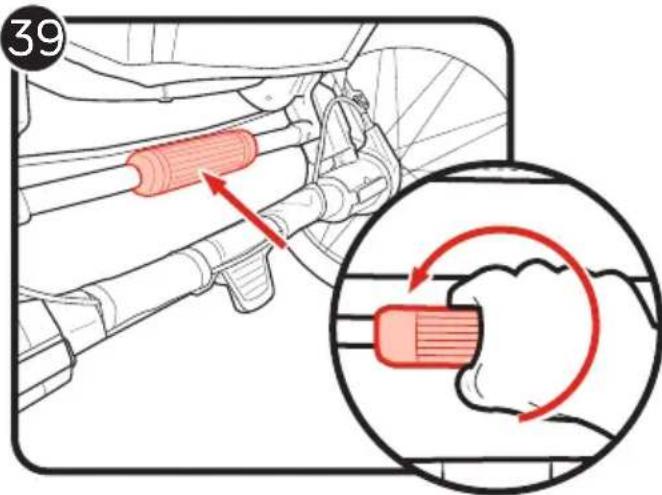
text_image
39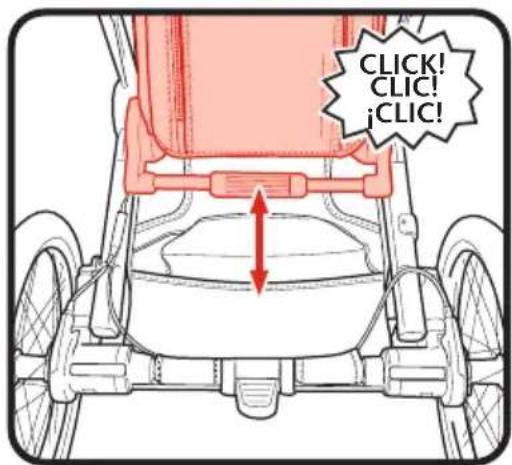
text_image
CLICK! CLIC! jCLIC!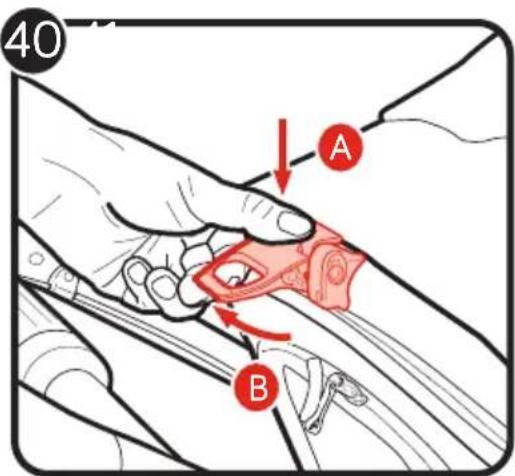
text_image
40 A B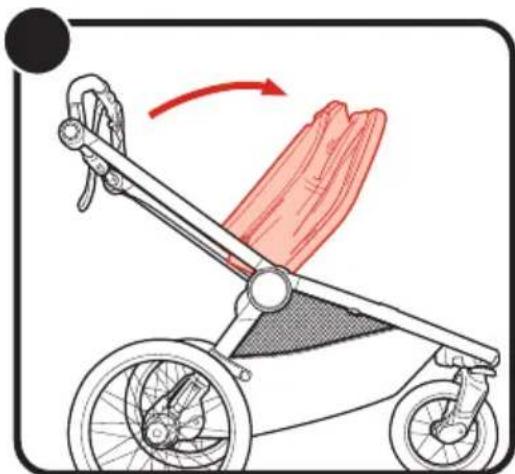
natural_image
Illustration of a stroller with a red fabric being lifted, showing motion direction (no text or symbols)
text_image
42 CLICK! CLIC! ¡CLIC!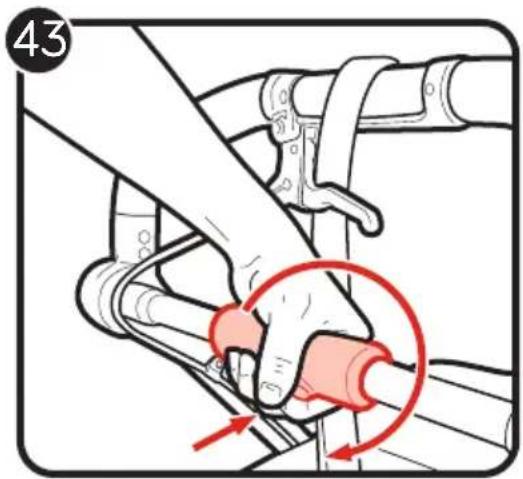
text_image
43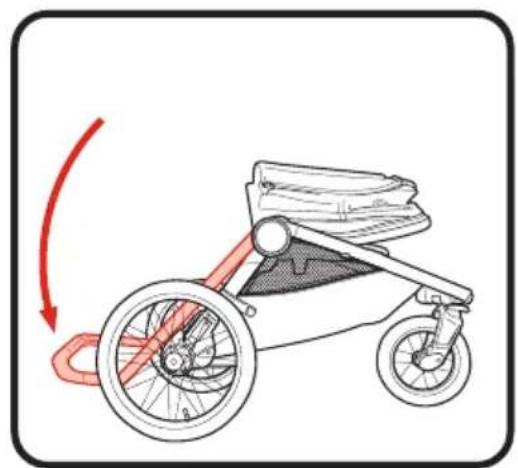
natural_image
Illustration of a two-wheeled stroller with red motion arrows indicating rotation (no text or symbols)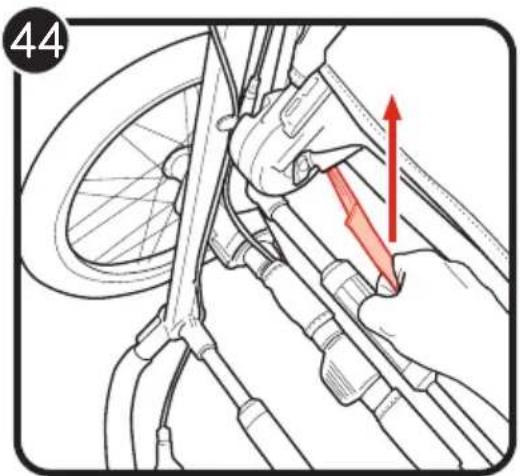
text_image
44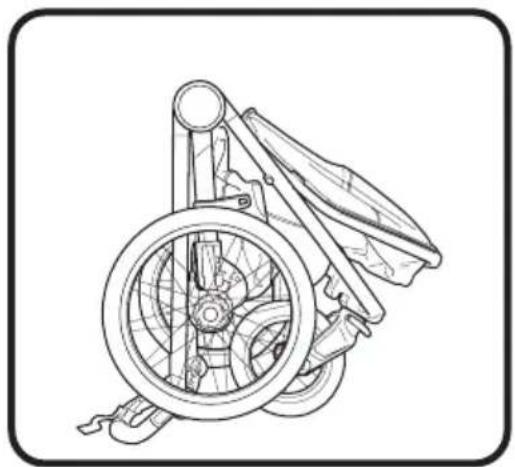
natural_image
Line drawing of a stroller with visible wheel and seat components (no text or symbols)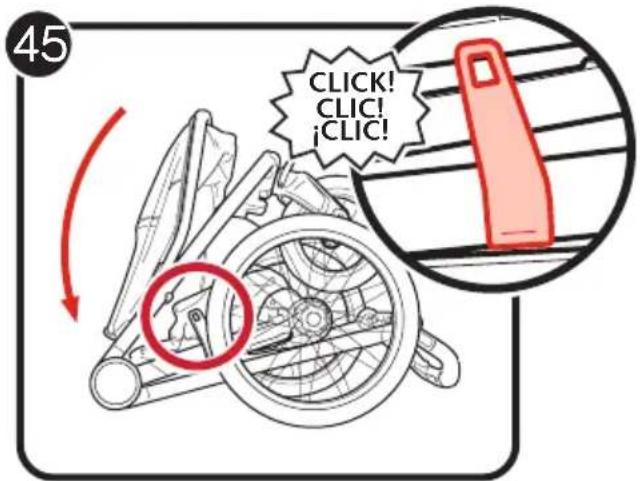
text_image
45 CLICK! CLICK! ¡CLIC!
natural_image
Illustration of a stroller with red fabric and a curved arrow indicating motion (no text or symbols)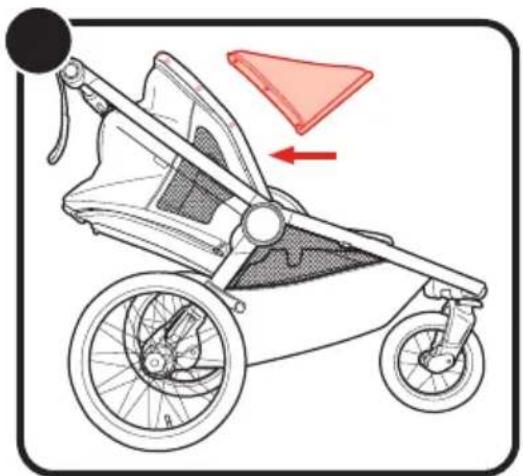
natural_image
Line drawing of a baby stroller with a red triangular object on the side (no text or symbols)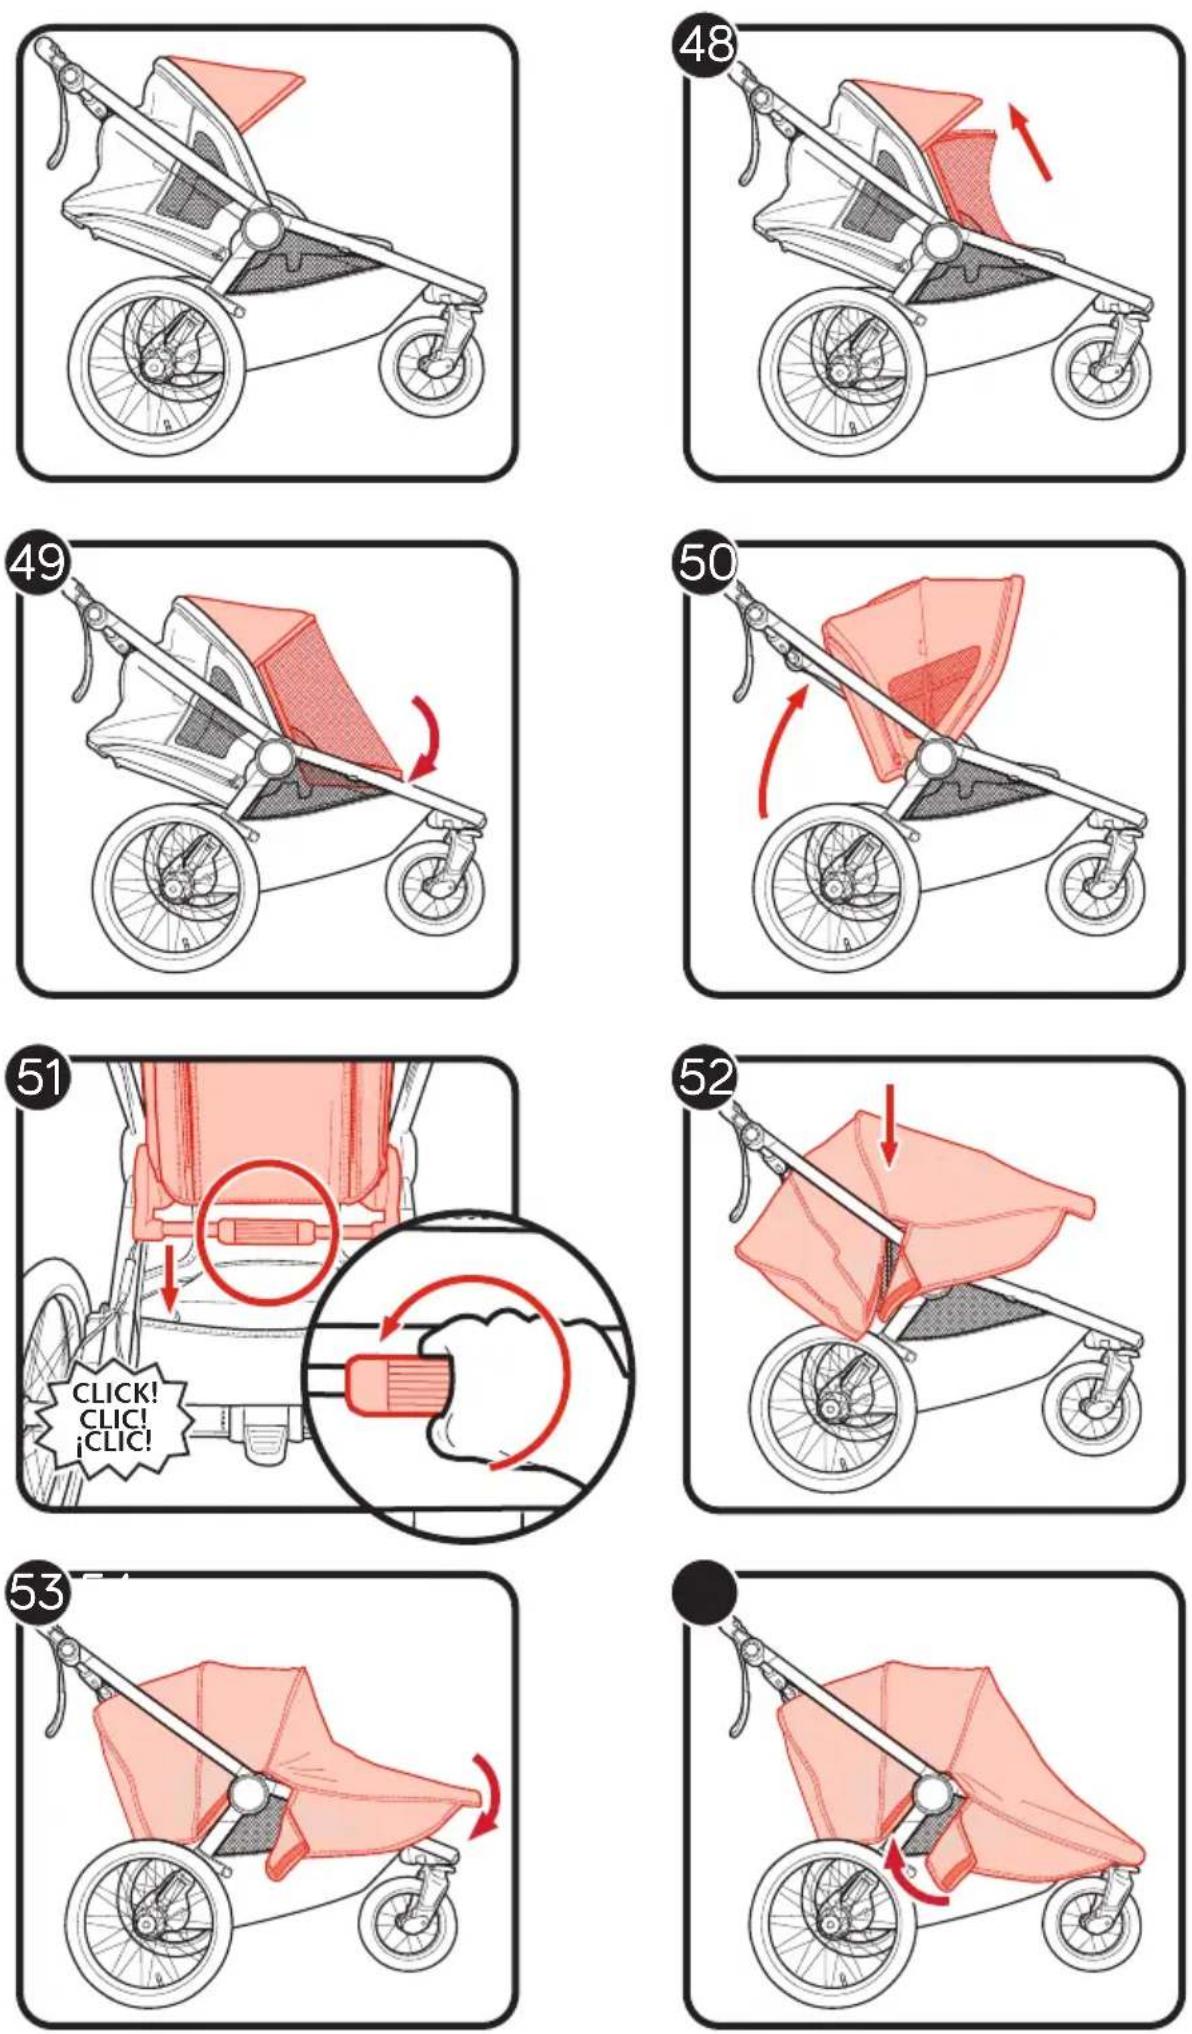
WARNING
IMPORTANT - Keep these instructions for future reference.
Read these instructions carefully before use. Your child's safety may be affected if you do not follow these instructions.
- This stroller is suitable for one child up to 50 lb (22.5 kg) in weight and 40 in (101.6 cm) in height.
- Total weight load recommended for this stroller is 70 lb (31.5 kg): 50 lb (22.5 kg) in the seat, 5 lb (2 kg) in the seat back pocket, and 15 lb (7 kg) in the basket. Excessive weight may cause a hazardous unstable condition to exist.
• Never leave your child unattended. - Avoid serious injury from falling or sliding out. Always properly adjust and fasten harness.
- Do not let your child play with this product.
- Parcels or accessory items, or both, placed on the unit may cause the unit to become unstable.
- Any load attached to the handle affects the stability of the stroller. Do not hang bags from the handle.
- Ensure that all the locking devices are engaged before use.
- Lock the brakes before loading and unloading your child and whenever the stroller is not moving.
- Always keep fingers and children away from moving parts when folding, unfolding, or adjusting the stroller to prevent finger/body part entrapment or pinching.
-
Stroller is not meant to be used for transporting children up or down stairs or escalators. Damage resulting to stroller will not be covered under warranty.
-
This stroller does not replace a cot or a bed. Should your child need to sleep, then it should be placed in a suitable pram body, cot, or bed.
• Accessories which are not approved by Baby Jogger shall not be used. - For newborn babies we recommend always to use the most reclined seat position.
- Check tire pressure before use. Always inflate tires to the inflation level specified on the tire sidewall. Never use this product with low tire pressure as this could result in loss of control. DO NOT over-inflate the tires.
- Only use replacement parts which are supplied or approved by Baby Jogger.
- Discontinue using your stroller should it become damaged or broken.
- Remove child before sliding seat up or down.
- Always check to confirm seat is locked into position after moving up or down.
- This stroller is not suitable for skating or inline skating.
WHEN JOGGING/RUNNING
- FALL HAZARD from tip over: Before running, jogging, or walking fast, LOCK the front wheel in jogging position to keep from swiveling.
- Do not jog/run with children under 6 months of age.
- Place seat in most upright position when jogging/running.
• Always use jogging strap when jogging. - Do not jog/run with bassinet or car seat attached to the stroller.
FRAME
1 Unpack the stroller frame from the box and set the wheels aside.
Unlock the stroller by pulling the storage lock lever.
2 Press the handle height adjustment buttons on both sides and rotate down.
3 Rotate stroller and stand on its handlebar.
4 Open the stroller by pulling the legs apart. Lift the handlebar up.
5 Pull the seat up by the lever to place in the upright position.

RNING: Ensure that all the locking devices are engaged before use.
FRONT WHEEL
6Installation
- Lay stroller on its back so the handlebar is resting on the floor.
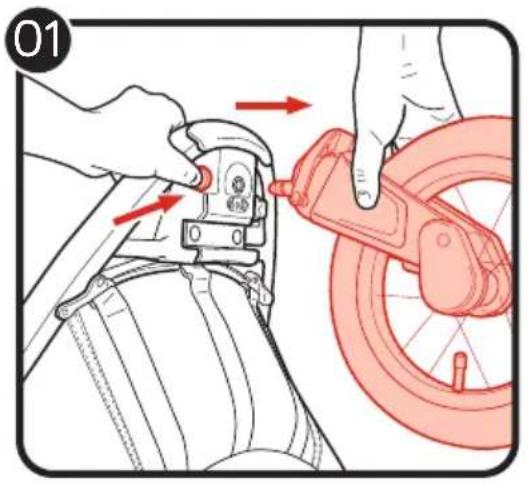
- Attach the front wheel by sliding it into the front wheel mount until it clicks. Gently pull on the front wheel to make sure it is properly attached.
7Removal
- While pressing the front wheel release button, gently slide the front wheel out of the front wheel mount.
SWIVEL FEATURE FOR JOGGING AND RUNNING
8 Push the swivel lock lever up and rotate the wheel so it is pointing forward to lock the front wheel to a fixed position.
9 Press the swivel lock lever down to allow the front wheel to return to an unlocked position.

RNING:
- Front wheel must be locked in jogging position.
- Child must be buckled in the 5-point harness.
- Do not engage or disengage the swivel lock while the stroller is in motion.
ALIGNMENT FEATURE
10 Should the stroller pull to one side while the front wheel is locked in the fixed position, use the alignment knob to align. If the stroller pulls to the right, turn the
knob left to adjust. If it pulls to the left, turn the knob right to adjust the stroller's alignment.
REAR WHEELS
11Installation
- Align the rear wheel axle with the wheel mount on the stroller frame and insert it into the wheel mount until it locks into place. You will hear a click.
- Gently pull on the rear wheel to make sure it is properly attached.
12Removal
- While pressing down on the wheel release button, gently slide the rear wheel out of the wheel mount.
PARKING BRAKE
13 To lock the parking brake: push the brake lever down to engage the parking brake.
14 To release the parking brake: lift the brake lever up.

WARNING: Lock the parking brake before loading and unloading your child and whenever the stroller is not moving.
DECELERATION BRAKE
15 If you do not have good braking action, simply squeeze the brake handle (A) five or six times. If the problem persists, loosen the brake's cylinder ring (B) to adjust the small ring (C) and then move the small ring away from the handle to tighten the cable. (Please do not over tighten!). To lock the rings, tighten the cylinder ring (B) against the handle while holding the small ring (C) in place.
16 To decelerate, pull the brake lever in to engage the brakes.
CANOPY
17 Pull forward to open canopy and push backwards to close canopy.
18 To use the canopy window, fold shade up and secure with magnets.
HANDLE
19 To change the handle to one of 5 use positions, press the handle height adjustment buttons on both sides and rotate up or down to the new position.
ADJUSTING SAFETY HARNESS
20 Slide shoulder harness buckle up and down seat back webbing until desired position.
21 There are 4 positions on seat back webbing.
CHECK that shoulder harness heights are the same. Use stitch lines to help align harness heights.

WARNING: Avoid serious injury from falling or sliding out. Always properly adjust and fasten safety harness.

WARNING: Always use the crotch strap in combination with the shoulder straps and waist belt.
22 Slide the harness pads up to access plastic guide on strap.
23 Hold the plastic guide and pull strap to tighten or loosen.
USING SAFETY HARNESS
24 Insert side strap buckle into harness buckle on both sides.
25 Insert connected harness and side strap buckles into the sides of the crotch buckle.
26 Press button on crotch buckle to release.
SEAT
27 Height Adjustment
- Ensure canopy is fully open by pulling forward.
- Press the button in and twist the seat slider actuator forward to raise or lower seat until you hear a click.
- Ensure the seat is locked in the upper position by trying to lower the seat without actuating the button.

RNING: Seat back does not recline when seat is in lower position, canopy doesn't close.
28 Recline The Seat
- Push the button on the lever down (A) while pulling the lever out (B) to recline.
- Push down to lower the seat and pull up to raise the seat until it clicks into the desired position.

RNING: When making adjustments to the stoller seat, make sure child's head, arms, and legs are clear of moving seat parts and stroller frame.

RNING: Always remove child before sliding seat up or down.
LEG SUPPORT INCLINE
29 Lift the leg support up in order to raise it.
30 To lower the leg support, pull the release bar underneath it and push it down.
SEAT BACK STORAGE
31 Attach seat back storage backpack.
32 Unzip the inner zipper on both sides.
33 Pull down flap to access storage.
TO REMOVE THE SEAT BACK STORAGE
34 Fully unzip the outer zipper.
35 Bag can be carried by its handle or worn as a backpack.
36 To adjust strap length, unsnap snaps at the top of the straps.
37 Hold the plastic guide and pull strap to tighten or loosen.
38 Reverse the steps to re-attach the bag to the frame.

RNING: Always re-attach straps before re-attaching to the seat back.
FOLDING
- Remove your child from the seat.
- Remove all attachments and all items from basket.
39 If the seat is in the lower position, press and twist seat slider actuator and raise seat until you hear a click.
40 Push the button on the lever behind the seat (A) while pulling and rotating the recline lever up to unlock seat (B).
41 Fold the seat forward.
42 Press handle height adjustment buttons on both sides of handlebar and put the handle in the highest position.
43 Press and rotate the frame lock and push the handle down.
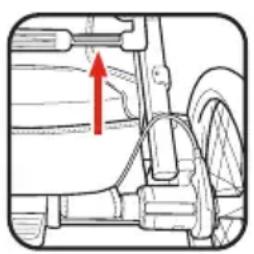
44 Pull the strap underneath the seat and lift up the stroller to fold.
45 Lay the stroller flat on the handle. Make sure the auto-lock lever clicks into place.
ACCESSORIES
SUN SHADE/BUG SCREEN
46 Set the seat in the reclined position.
47 Snap sun shade to the canopy.
48 Zip bug screen to the sun shade.
49 Fit the bottom of the bug screen around the leg support.

RNING: Never use the sun shade/ bug screen when the seat is in the lower position.

RNING: Never use the sun shade/ bug screen when using product as a bike trailer.
WEATHER SHIELD
50 Set the seat in the upright position.
51 Press and twist height adjust handle and lower seat until you hear a click.
52 Place weather shield from above and fit to the stroller.
53 Wrap front of the weather shield to the tip of the stroller.
54 Fasten the fastening strips of the 2 side flaps to the back of the weather shield.
Bike Trailer Mode
(Bike Trailer Conversion Kit included on certain models or sold separately as an accessory)
text_image
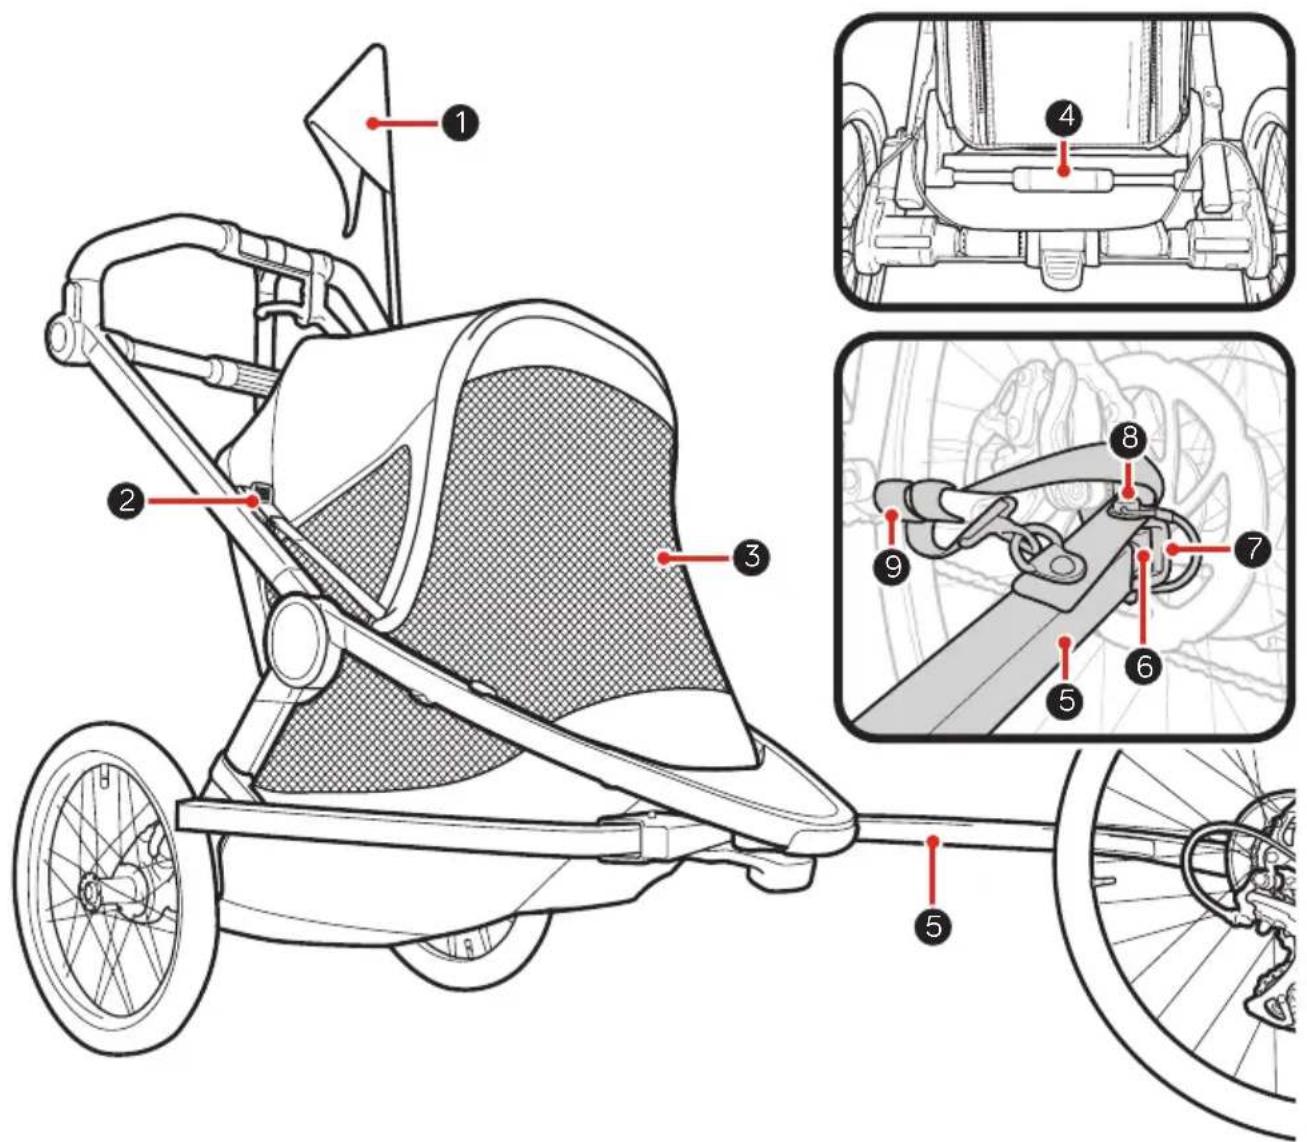
Technical diagram of a stroller with numbered parts and corresponding close-ups of the dashboard and wheel assembly.1Flag
2CanopyClip
3 Trailer Mesh Cover
4 Seat Slider Actuator
5TowBar
6 Tow Bar Coupler
7 Bike Trailer Hitch
8CouplerPin
9SafetyStrap
text_image
01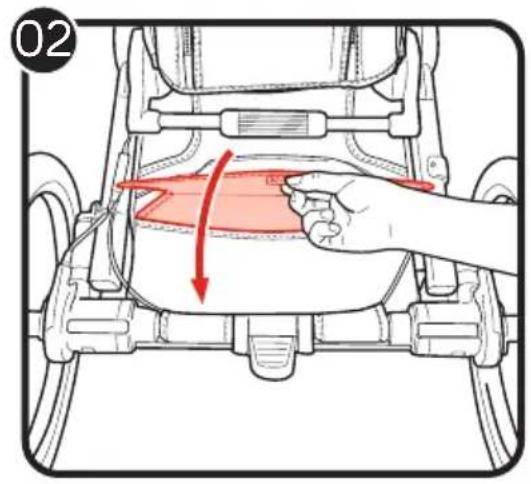
text_image
02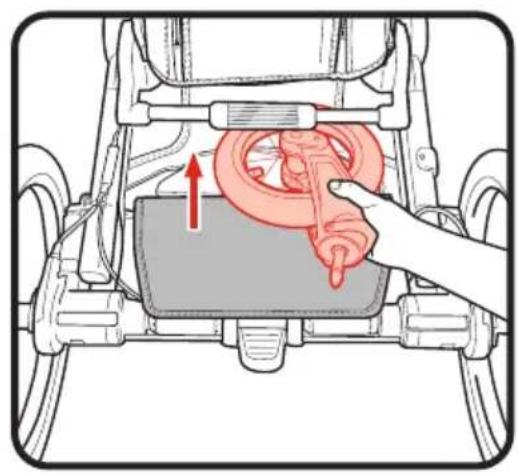
natural_image
Diagram of a car's wheel assembly with a hand adjusting the wheel (no text or symbols present)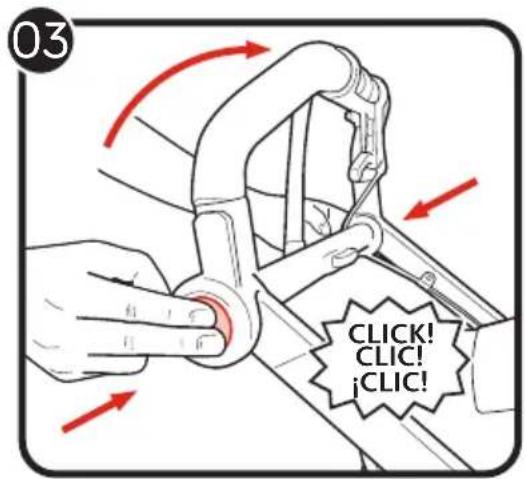
text_image
03 CLICK! CLICK! ¡CLIC!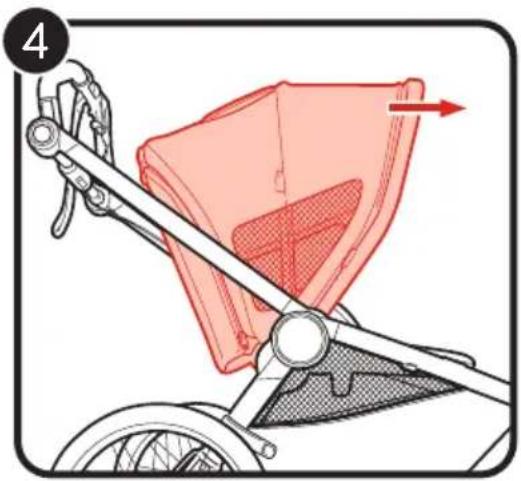
natural_image
Illustration of a stroller with a red mesh cover and directional arrow (no text or symbols)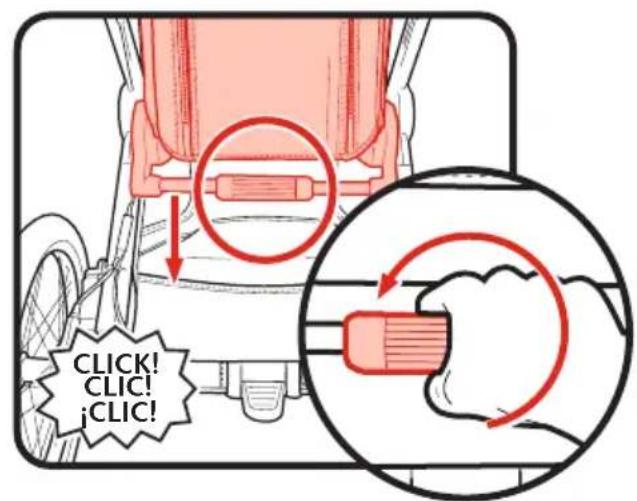
natural_image
Diagram of a bicycle wheel with a red tool and directional arrow indicating motion (no text or symbols)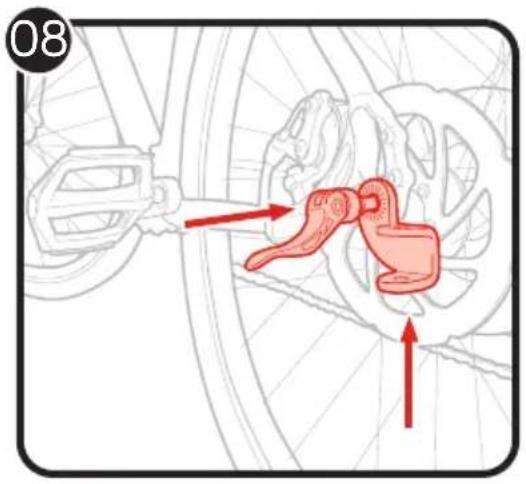
text_image
08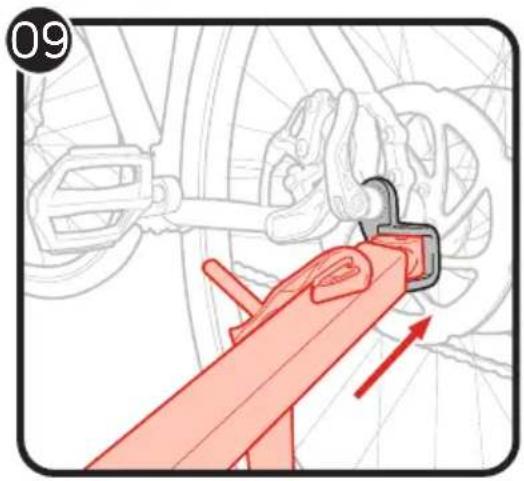
natural_image
Mechanical assembly diagram showing a red clamp securing a bracket with a blue handle, no text or symbols present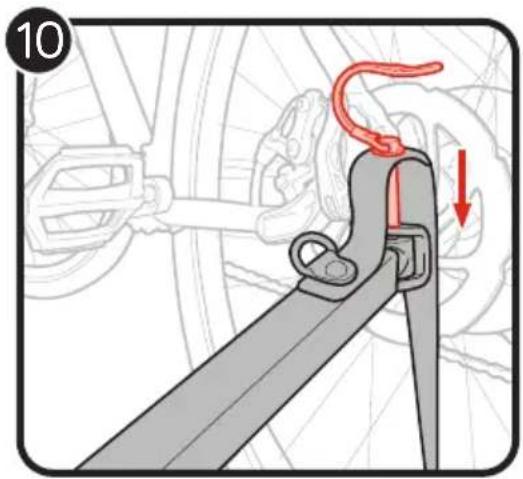
text_image
10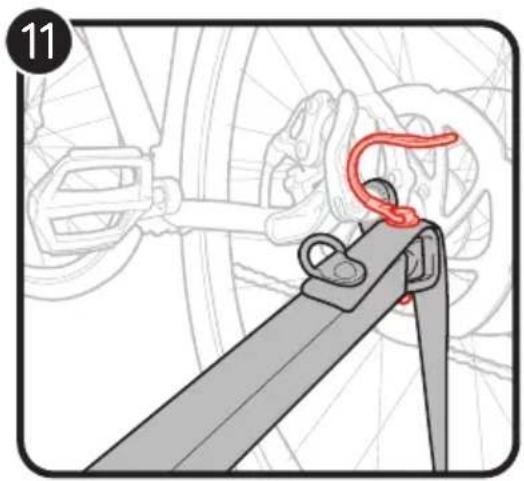
natural_image
Illustration of a mechanical clamp or bracket with a red spring attached, against a background of wire mesh and mechanical components (no text or symbols)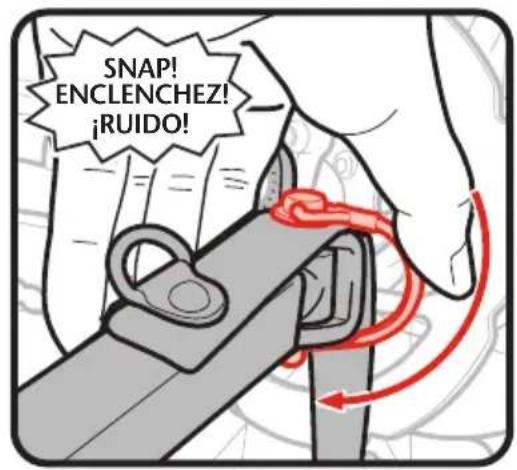
text_image
SNAP! ENCLENchez! ¡RUIDO!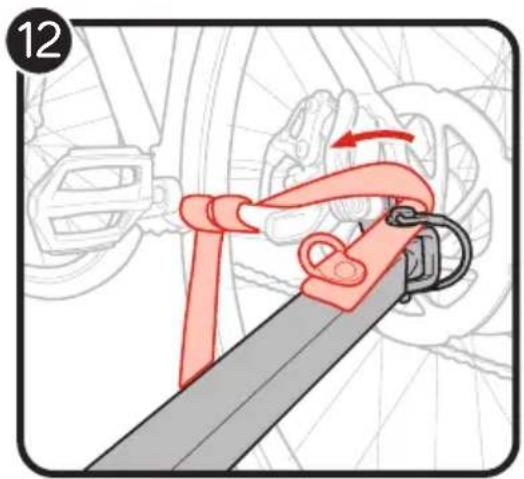
natural_image
Illustration of a car seatbelt buckle being adjusted, showing the grip and seat (no text or symbols)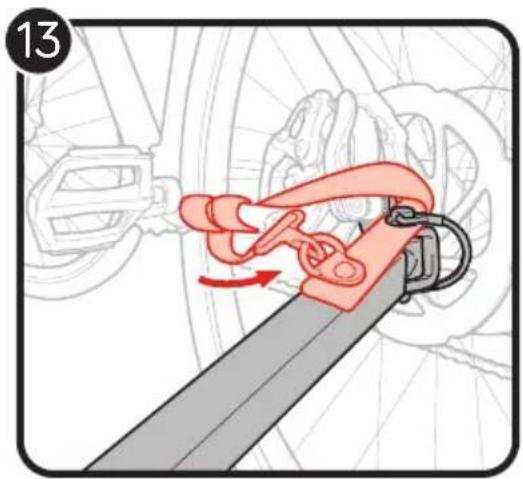
natural_image
Mechanical assembly diagram showing a lever mechanism with red motion arrows (no text or symbols)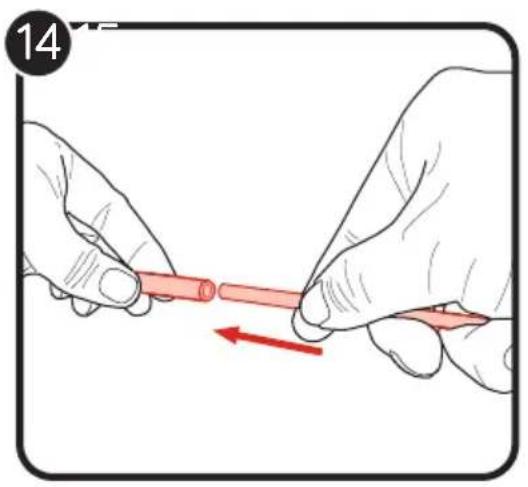
natural_image
Illustration of two hands holding a red pen, with a red arrow indicating direction (no text or symbols)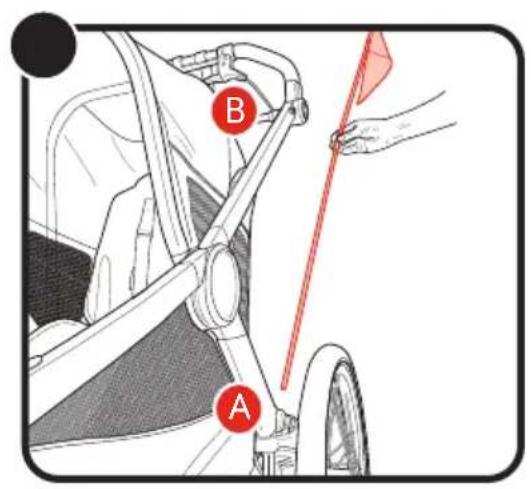
text_image
B A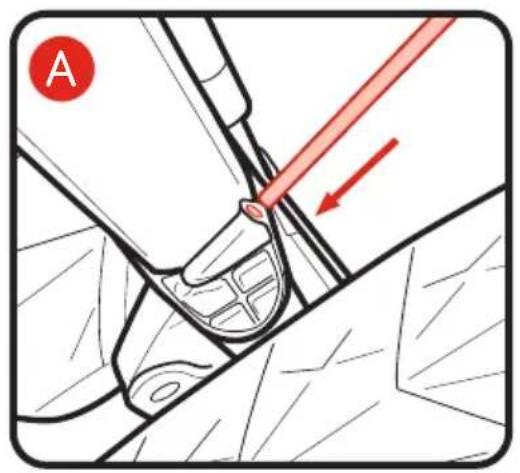
natural_image
Mechanical assembly diagram showing a tool interacting with a component, with no visible text or symbols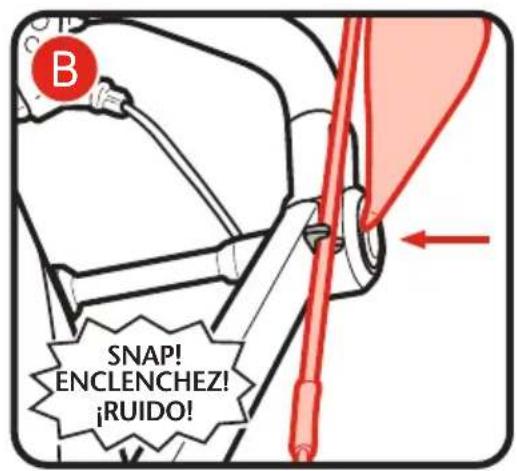
text_image
B SNAP! ENCLENCHEZ! ¡RUIDO!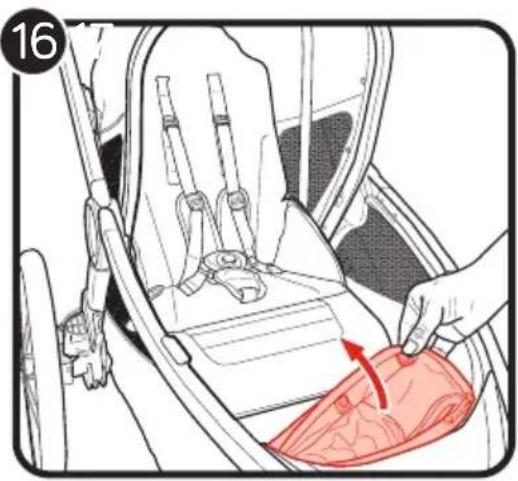
natural_image
Illustration of a hand placing a red plastic bag into a car seatbelt (no text or symbols)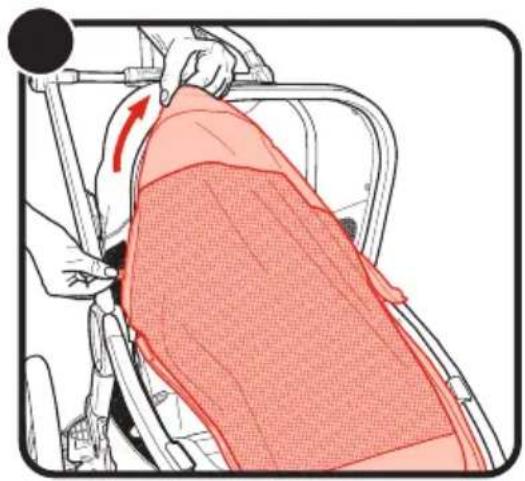
natural_image
Illustration of a person in a wheelchair carrying a red bandage, with a hand adjusting the seat (no text or symbols)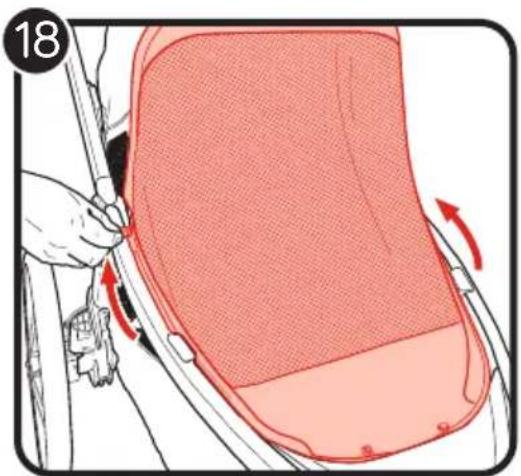
text_image
18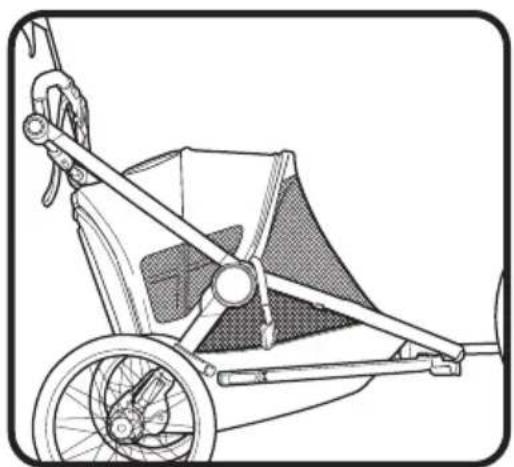
natural_image
Line drawing of a small wheeled cart with wheels and handle, no text or symbols present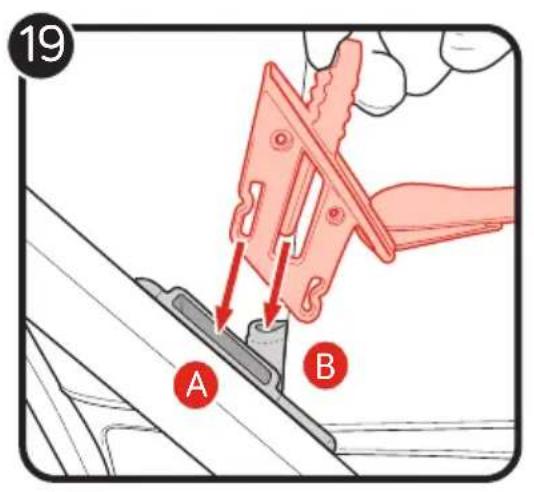
text_image
19 A B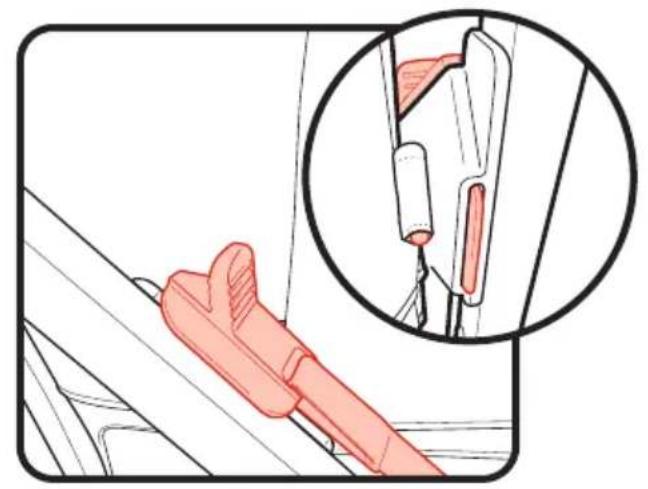
natural_image
Illustration of a medical catheter insertion into a catheter, showing internal structure and magnified view (no text or symbols)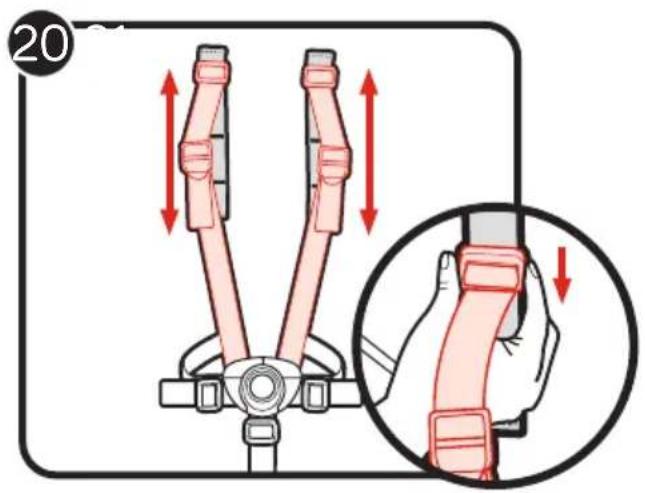
text_image
20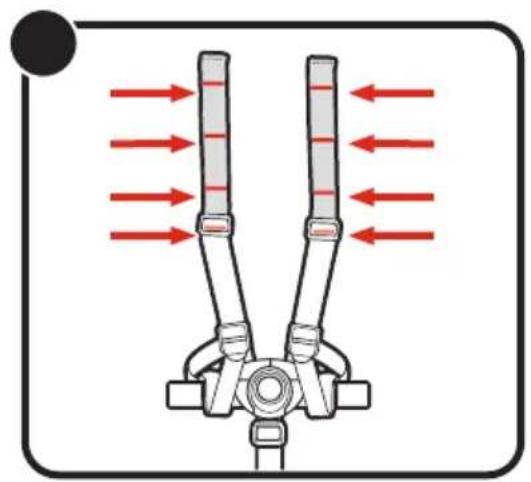
natural_image
Diagram of a mechanical linkage or lifting device with red directional arrows indicating force or motion (no text or symbols)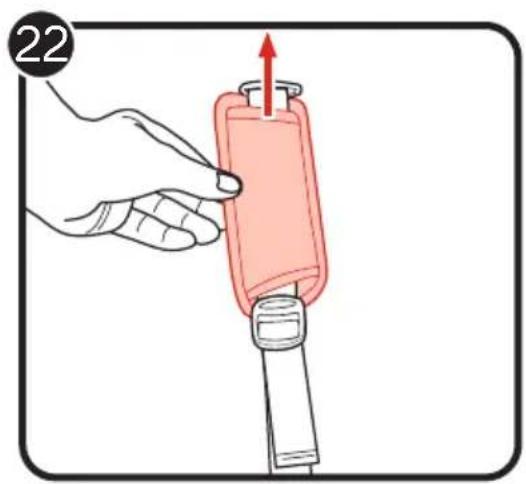
text_image
22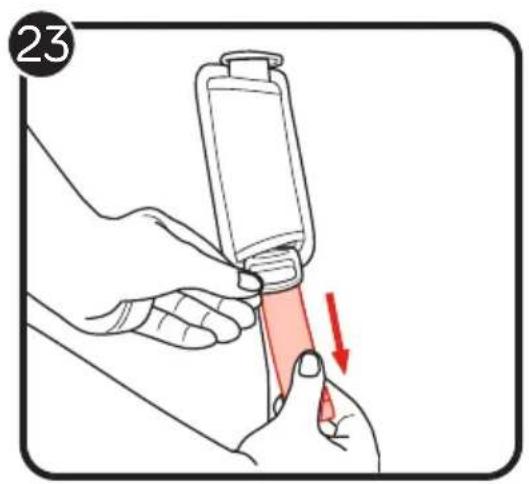
text_image
23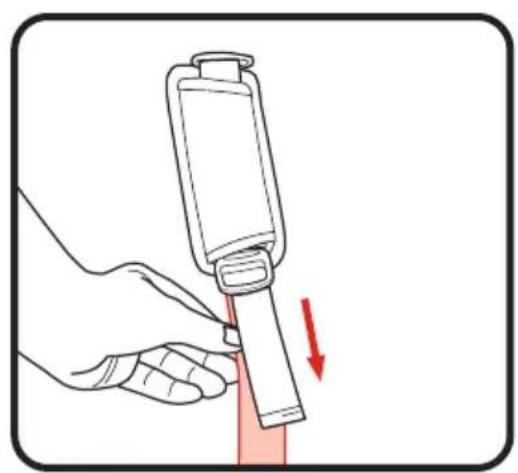
natural_image
Illustration of a hand using a handheld device to adjust a red rod (no text or symbols present)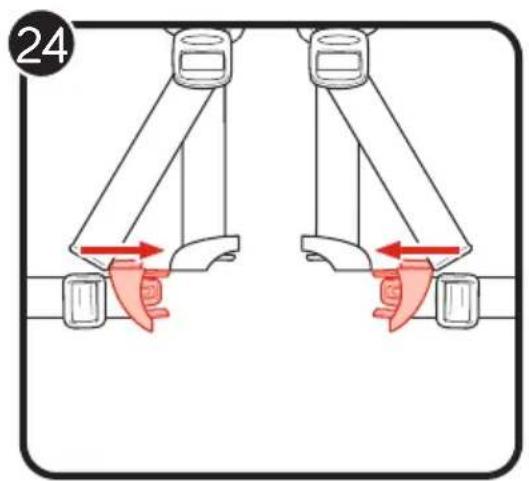
natural_image
Diagram showing two mechanical arms with red directional arrows indicating movement or force (no text or symbols)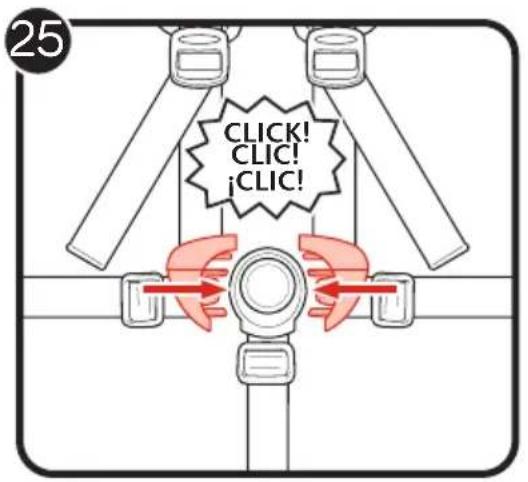
text_image
25 CLICK! CLIC! ¡CLIC!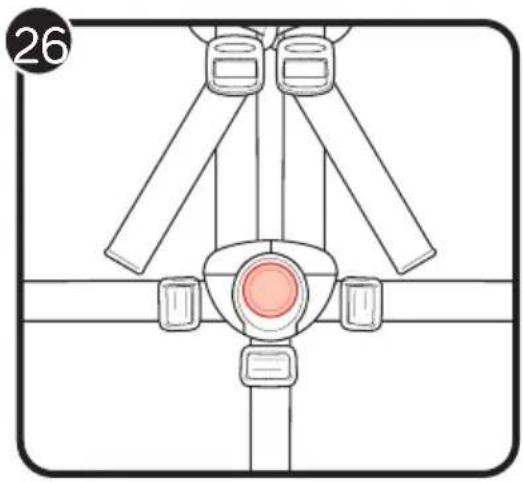
natural_image
Diagram of a mechanical assembly with four vertical supports and a central circular component (no text or symbols)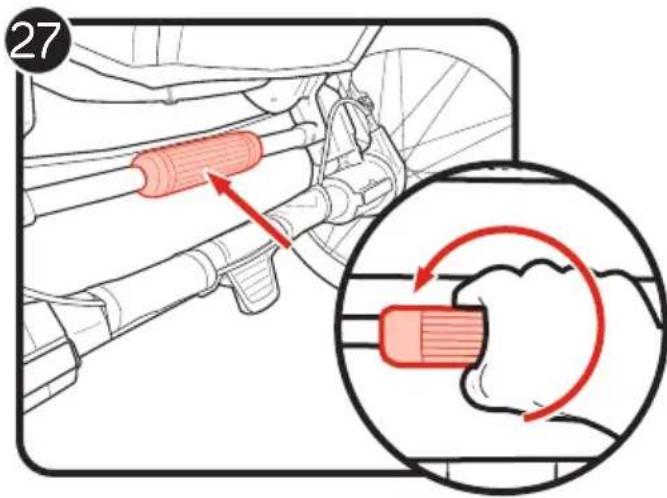
text_image
27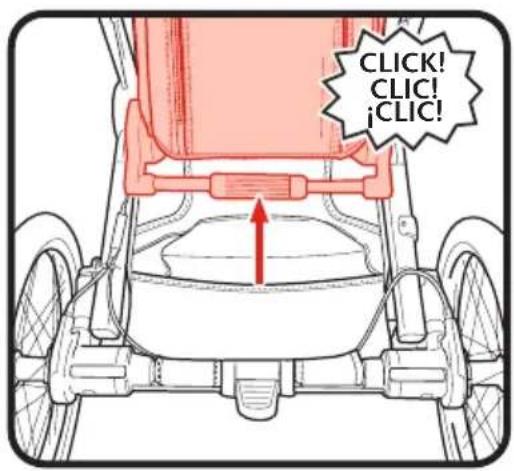
text_image
CLICK! CLIC! iCLIC!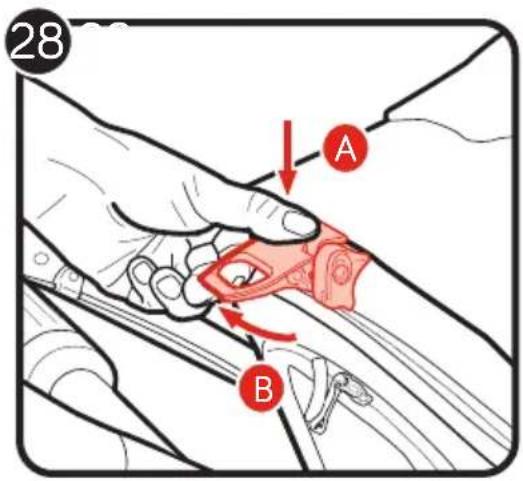
text_image
28 A B
natural_image
Line drawing of a stroller with a red arrow indicating motion, showing body structure and wheel (no text or symbols)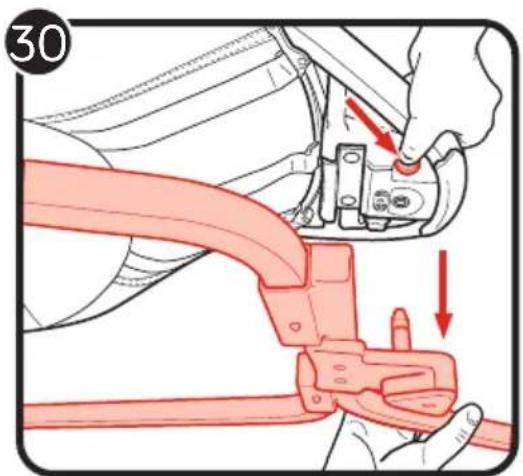
text_image
30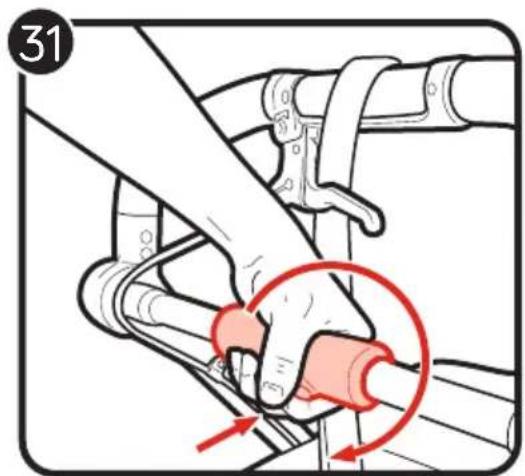
text_image
31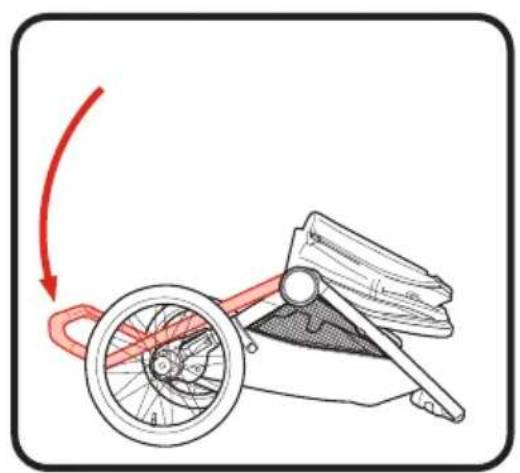
natural_image
Illustration of a bicycle with red wheels and a wooden post, showing a curved arrow indicating motion (no text or symbols)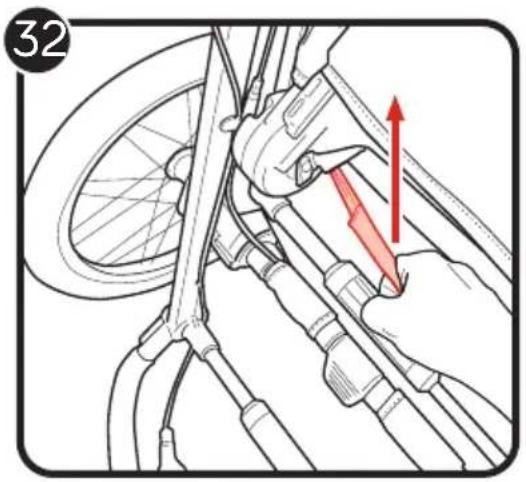
text_image
32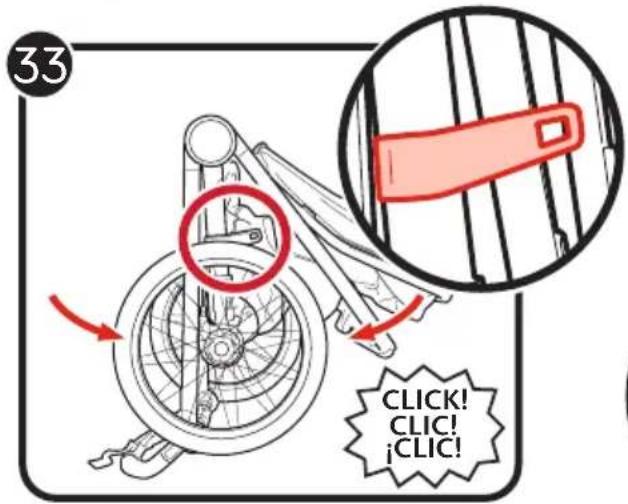
text_image
33 CLICK! CLIC! ¡CLIC!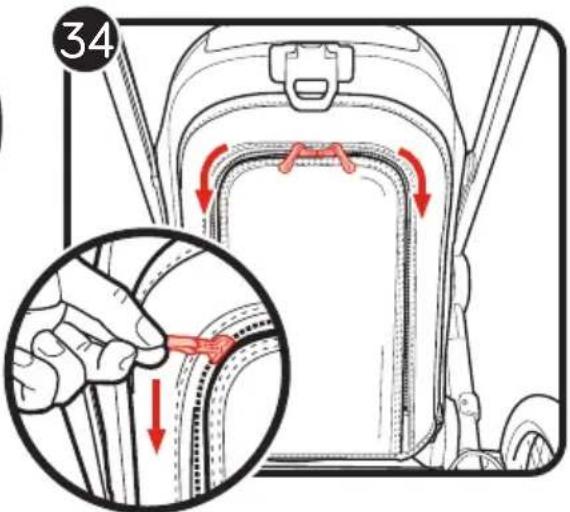
text_image
34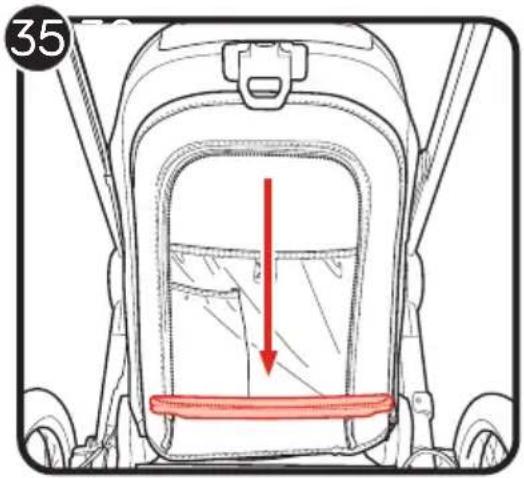
text_image
35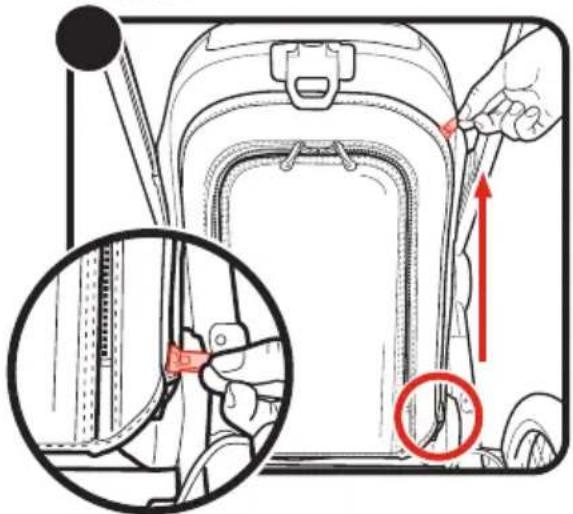
text_image
Diagram showing a hand using a tool to adjust or install a backpack, with an inset magnified view highlighting the component.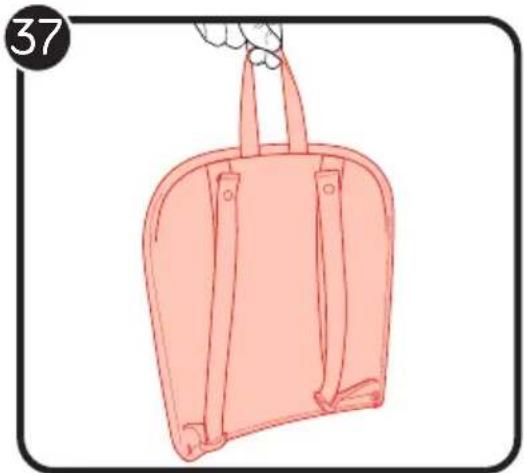
natural_image
Illustration of a pink backpack with straps and handle, no text or symbols present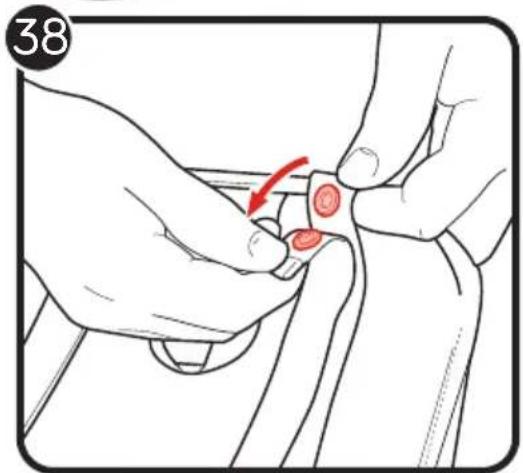
natural_image
Illustration of hands adjusting a small object with a red arrow indicating rotation (no text or symbols)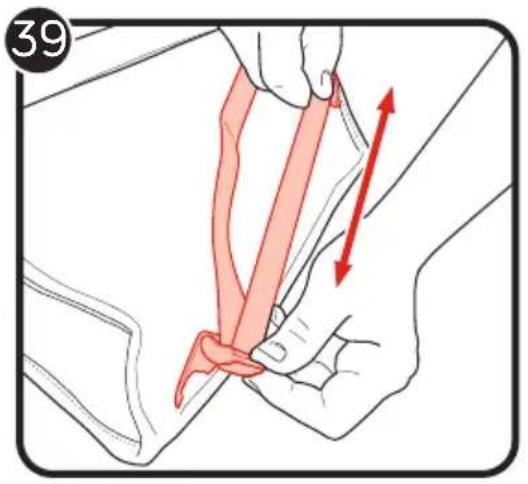
text_image
39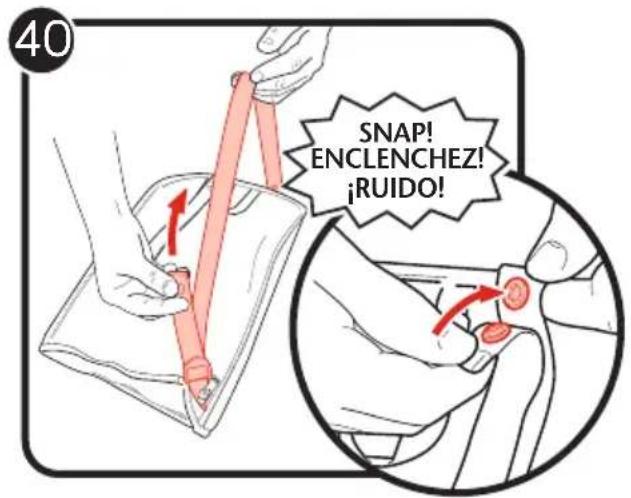
text_image
40 SNAP! ENCLENCHEZ! ¡RUIDO!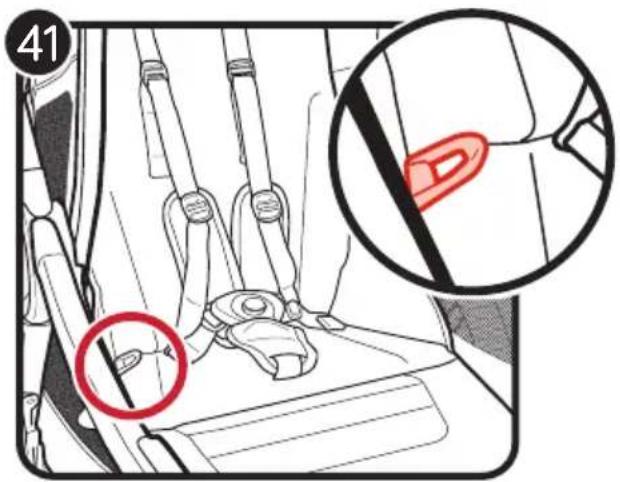
text_image
41WARNING
IMPORTANT - Keep these instructions for future reference.
Read these instructions carefully before use. Your child's safety may be affected if you do not follow these instructions.
Failure to comply with the manufacturer's instructions can lead to serious injury or death of the passenger/rider.
- This bike trailer is suitable for one child up to 50lb (22.5 kg) in weight and 40 in (101.6 cm) in height.
- Child must be at least 12 months old and able to sit upright and support their head while wearing a helmet.
- Nominal load recommended for this trailer is 70 lb (31.5 kg): 50 lb (22.5 kg) in the seat, 5 lb (2 kg) in the seat back pocket, and 15 lb (7 kg) in the basket. Excessive weight may cause a hazardous unstable condition to exist. Do not use with children who exceed the weight limits.
- Max total weight: 150 lb / 68 kg (child + storage + trailer).
- Recommended speed limits: 15 mph (25 km/h) on smooth, straight roads. 6 mph (10 km/h) when turning or on uneven roads.
- Always use seat in the lower position when being used as a trailer. Never pull the product as a trailer with the seat in the upper position.
- Always use the mesh cover when used as a bike trailer.
-
When using your bike trailer, you are towing extra weight. You must allow more time for braking, slowing, stopping and starting (especially when driving downhill) and allow more room for turns, corners, and passageways.
-
Avoid rocks, curbs, hard braking and sudden swerving. Avoid riding over obstacles with one wheel, as this may cause the trailer to tip over.
• Always use good judgement when deciding if weather, road or traffic conditions are safe to use the product. - Be aware of exposure hazards such as wind chill and heat exhaustion, either by less-active trailer passengers in prolonged exposure in colder temperatures, or by extended periods in warmer temperatures without adequate ventilation or hydration.
- Passenger should always wear a properly fitted and approved helmet. In the US, see CPSC Safety standard for bicycle helmets.
- It is recommended that a qualified bicycle mechanic does a safety check of the towing bicycle before attaching the trailer.
- Check tire pressure before use. Always inflate tires to the inflation level specified on the tire sidewall. Never use this product with low tire pressure as this could result in loss of control. DO NOT over-inflate the tires.
- It is recommended to read the user instructions that came with the towing bicycle.
- Bicycle trailers pulled by an Electric Powered Assist Cycle (EPAC) can be restricted by law.
• Never leave your child unattended. - Avoid serious injury from falling or sliding out. Always properly adjust and fasten seat belt.
- Do not let your child play with this product.
-
Parcels or accessory items, or both, placed on the unit may cause the unit to become unstable.
-
Any load attached to the handle affects the stability of the bike trailer. Do not hang bags from the handle.
- Ensure that all the locking devices are engaged before use.
- Lock the brakes before loading and unloading your child and whenever the bike trailer is not moving.
- Always keep fingers and children away from moving parts when folding, unfolding, or adjusting the bike trailer to prevent finger/body part entrapment or pinching.
- Bike trailer is not meant to be used for transporting children up or down stairs or escalators. Damage resulting to trailer will not be covered under warranty.
- This bike trailer does not replace a cot or a bed. Should your child need to sleep, then it should be placed in a suitable pram body, cot, or bed.
- Accessories which are not approved by Baby Jogger shall not be used.
- Only use replacement parts which are supplied or approved by Baby Jogger.
- Discontinue using your bike trailer should it become damaged or broken.
- Do not install a car seat or any other seating device not approved by the manufacturer inside the trailer.
- Make no modifications to the trailer.
- Do not allow any of the child's body, clothing, shoelaces, or toys to come in contact with moving parts.
- Red reflectors shall be visible on the rear of the trailer.
- Before each ride, ensure the attached trailer does not interfere with braking, pedaling, or steering of the bicycle.
- Never ride a bicycle at night without adequate lighting. Obey all local legal requirements for lighting.
FRONT WHEEL
1Removal
- While pressing the front wheel release button, gently slide the front wheel out of the front wheel mount.
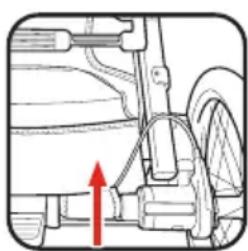
2 Storage - Lift the panel in the storage basket by pulling on the "X" tag. Place the wheel underneath. Replace cover panel.
HANDLE
3 Place the handle in the highest position. Press the handle height adjustment buttons on both sides and rotate up.
SEAT
4HeightAdjustment
- Adjust seat back to most upright position.
- Ensure canopy is fully open by pulling forward.
- Press the button in and twist the seat slider actuator forward to lower the seat until you hear a click.
TOW BAR
5 Attach 2 lateral bars to main tow bar.
6 Attach the tow bar to stroller by sliding the 3 alignment pins into the front wheel mount until it clicks.
7 Remove bike's rear wheel quick release axle.
8 Attach hitch adapter to the bike's rear axle and secure it by re-installing wheel's quick release.
9 Slide tow bar coupler into the hitch.
10 Secure the tow bar coupler to the hitch with the tow bar couple pin.
11 Lock pin to hitch with its clamp.
12 Wrap the tow bar's safety strap around bike's rear wheel support strut.
13 Attach the tow bar's safety belt to the tow bar.
Reverse steps to remove.
FLAG
14 Connect the flag poles.
15 Attach the flag pole to the left rear wheel area (A) and near the handle height adjustment button (B).
TRAILER MESH COVER
16 At the front of the basket, unsnap the 2 snaps to open the pocket.
17 Pull the trailer mesh cover out of the pocket, connect enclosure zipper to canopy and zip it all the way to the other side of the canopy.
18 Zip up both lateral zippers.
CANOPY CLIPS
19 Insert the canopy clip into the slot on the trailer frame until it clicks into place. Make sure that the post of the clip lines up with the fabric slot in the canopy.
ADJUSTING SAFETY HARNESS
20 Slide shoulder harness buckle up and down seat back webbing until desired position.
21 There are 4 positions on seat back webbing.
CHECK that shoulder harness heights are the same. Use stitch lines to help align harness heights.
WARNING: Avoid serious injury from falling or sliding out. Always properly adjust and fasten safety harness.
WARNING: Always use the crotch strap in combination with the shoulder straps and waist belt.
22 Slide the harness pads up to access plastic guide on strap.
23 Hold the plastic guide and pull strap to tighten or loosen.
USING SAFETY HARNESS
24 Insert side strap buckle into harness buckle on both sides.
25 Insert connected harness and side strap buckles into the sides of the crotch buckle.
26 Press button on crotch buckle to release.
To remove child, reverse step 16 to 26.
FOLDING
- Remove your child from the seat.
- Remove all attachments and all items from basket.
27 Press and twist seat slider actuator and raise seat until you hear a click.
28 Push the button on the lever behind the seat (A) while pulling and rotating the recline lever up to unlock seat (B).
29 Fold the seat forward.
30 While pressing the front wheel release button, gently slide the tow bar out of the front wheel mount.
31 Press and rotate the frame lock and push the handle down.
32 Pull handle behind seat to completely fold the stroller.
33 Make sure the auto-lock lever clicks into place.
SEAT BACK STORAGE
34 Unzip the inner zipper on both sides.
35 Pull down flap to access storage.
TO REMOVE THE SEAT BACK STORAGE
36 Unzip the outer zipper from the bottom right.
37 Bag can be carried by its handle or worn on the back by its straps.
38 To adjust strap length, unsnap snaps at the top of the straps.
39 Hold the plastic guide and pull strap to tighten or loosen.
40 Reverse the steps to re-attach the bag to the frame.
WARNING: Always re-attach straps before re-attaching to the seat back.
WHEN USING TRAILER WITH A PET
• Max weight: 20 lb (9 kg).
- Check fabric/harness for any damage.
- Pet should fit completely in the seating area.
WARNING: The bike trailer is only designed for one occupant. Never allow a pet to ride with a child in the trailer.
WARNING: If any damage occurs to the seat harness as a result from pet use, it is no longer safe for a child to use the trailer/stroller.
WARNING: If any damage occurs to the mesh enclosure as a result from pet use, it is no longer safe for a child to use as a trailer.
41 Secure your pet leash to the D ring on the side of the seat.
AXLE GUIDE
The provided bicycle hitch works with most quick release style skewer axles. If you have issues mounting your hitch or have a different style axle, please contact your local bike shop for assistance.
CARE AND MAINTENANCE
To preserve the longevity of your product, it is important to perform simple, regular maintenance. From time to time, make sure that the joints and folding areas are still in good condition. If you hear any squeaking or feel tension, you can take your product to a local bike shop for added lubrication. All repairs should only be carried out by your local bike shop.
DO NOT use alcohol based disinfectants to clean this product.
CLEANING
Fabric

- Wipe clean using a damp cloth.
• DO NOT use solvents, caustic or abrasive cleaning materials.
Plastic/Metal Parts
- Wipe clean using a mild soap and warm water.
- The wheels will need to be dried completely with a soft towel or cloth.
- Clear any debris from the seat sliding track located on the inside of the rear leg.
- DO NOT remove, dismantle or alter any part of the seat folding mechanism or brakes.
STORING
- Sunshine can fade seat fabric and dry out tires, so storing your stroller indoors will prolong its good looks and performance.
- DONOT store outside.
- Ensure that the product is dry before storing for prolonged periods.
• Always store the stroller in a dry environment. - Store the product in a safe place when not in use (i.e. where children cannot play with it).
• DO NOT place heavy objects on top of the product. - DO NOT store the product near a direct heat source such as a radiator or fire.
- Ensure that the joints, connection areas, folding areas, and wheels are still in good condition before each use.
Modo cochecito

text_image
Diagram of a stroller with numbered parts for identification and labeling1 Capota
text_image
Diagram of bicycle seatbelt components with numbered labels pointing to different seat positions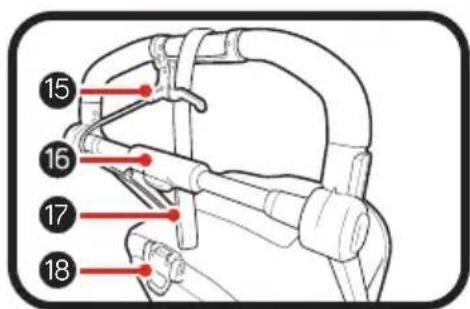
text_image
15 16 17 18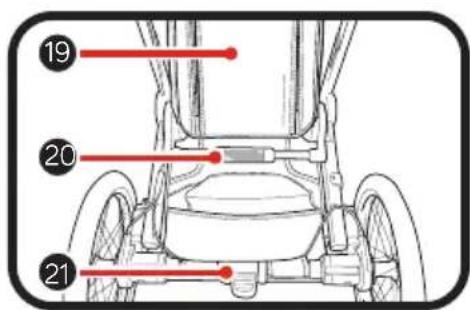
text_image
19 20 21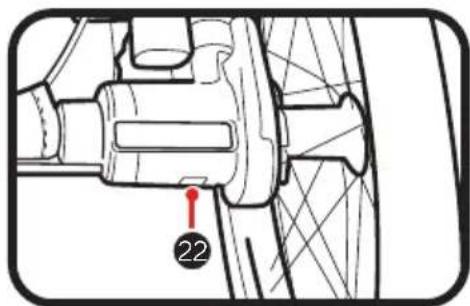
text_image
22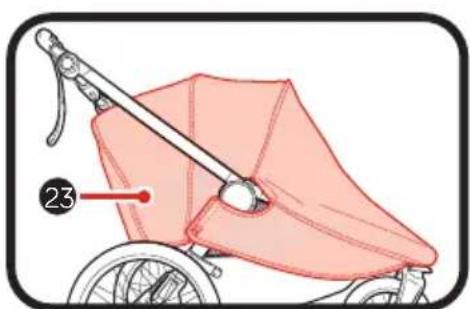
natural_image
Illustration of a baby stroller with a pink bandage and labeled part (23), no text or symbols present.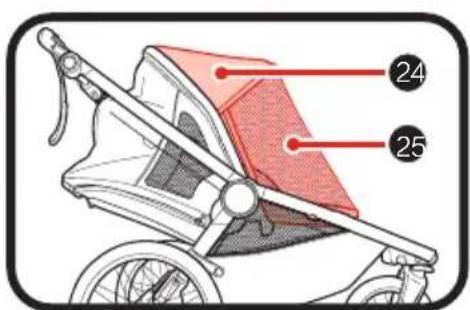
text_image
24 25
ADVERTENCIA
text_image
Technical diagram of a stroller with numbered parts and corresponding close-ups of the dashboard and wheel assembly.1Bandera
text_image
Diagram of a stroller with numbered parts for identification and labelingtext_image
Diagram of car seatbelt components with numbered labels pointing to different seat positions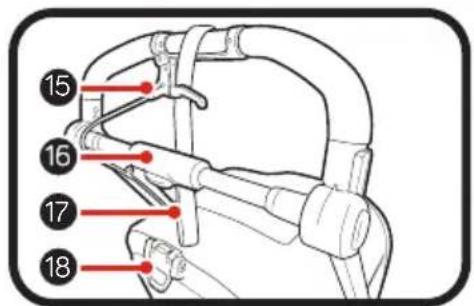
text_image
15 16 17 18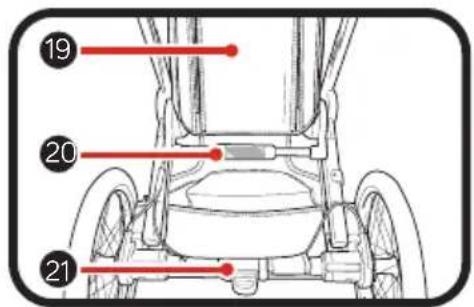
text_image
19 20 21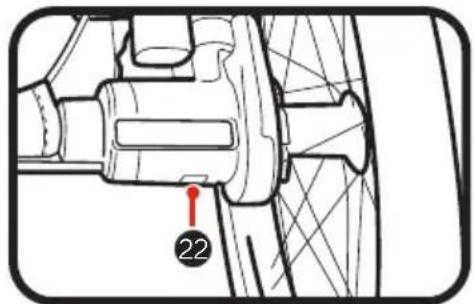
text_image
22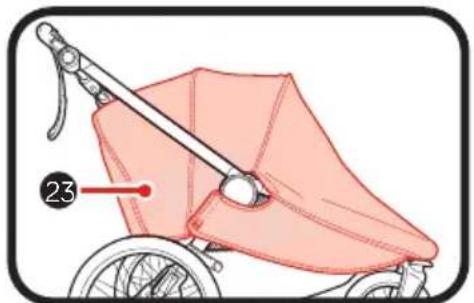
natural_image
Illustration of a stroller with a pink fabric cover and handle, labeled with number 23 (no text or symbols on the diagram itself)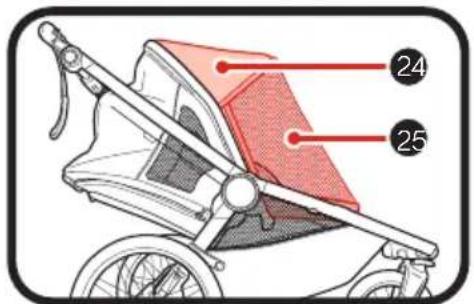
text_image
24 25MISE EN GARDE
text_image
Technical diagram of a stroller with numbered parts and corresponding close-ups of the dashboard and wheel assembly.1Drapeau
United States Consumers Only:
Baby Jogger's Limited Warranty:
Baby Jogger warrants that the product is free from manufacturer defects for one year from the date of purchase. Proof of purchase is required to make a warranty claim and the warranty is only extended to the original purchaser.
THIS WARRANTY DOES NOT COVER:
• Normal wear and tear
- Corrosion or rust
- Incorrect assembly, or the installation of third party parts or accessories not compatible with the original design
- Accidental or intentional damage, abuse or neglect, or use on stairs or escalators.
- Commercial use
- Improper storage/care of the unit
This warranty specifically excludes claims for indirect, incidental, or consequential damages. The implied warranties of merchantability and fitness for a particular purpose is according to the specific warranty period for this model unit at time of purchase. Some states do not allow the exclusion or limitation of incidental or consequential damages, so the above limitations or exclusions may not apply to you. This warranty gives you specific legal rights, and you may also have other rights which vary from state to state. To know what your legal rights are in your state, consult your local or state consumer affairs office or your State's Attorney General.
If your stroller was purchased outside of the United States, please contact the distributor in the country nearest you. Their contact information can be found on our website at http://www.babyjogger.com. Claims for warranty outside of the country in which the product was purchased may incur shipping charges.
natural_image
Mechanical assembly diagram showing a wheel and shaft with a red upward arrow indicating motion (no text or symbols)NOTE: When contacting Baby Jogger distributor regarding your stroller, please have your stroller's serial number ready. It can be found on the crossbar above the basket.
Customer Care Contact Information:
Call: 1-800-241-1848 8:30am - 5:30pm EST, Mon - Fri.
Mail: Baby Jogger, LLC 4110 Premier Drive High Point, NC 27265 www.babyjogger.com / www.babyjogger.ca
Canadian Consumers Only:
Baby Jogger's Limited Warranty:
Baby Jogger warrants that the product is free from manufacturer defects for one year from the date of purchase. Proof of purchase is required to make a warranty claim and the warranty is only extended to the original purchaser.
THIS WARRANTY DOES NOT COVER:
• Normal wear and tear
- Corrosion or rust
- Incorrect assembly, or the installation of third party parts or accessories not compatible with the original design
- Accidental or intentional damage, abuse or neglect, or use on stairs or escalators.
- Commercial use
- Improper storage/care of the unit
This warranty specifically excludes claims for indirect, incidental, or consequential damages. The implied warranties of merchantability and fitness for a particular purpose is according to the specific warranty period for this model unit at time of purchase.
Some Provinces or Territories do not allow the exclusion or limitation of incidental or consequential damages, so the above limitations or exclusions may not apply to you. This warranty gives you specific legal rights and you may also have other rights which vary between different Provinces and Territories. To know what your legal rights are in your specific Province or Territory, consult your local consumer affairs office.
If your stroller was purchased outside of Canada, please contact the distributor in the country nearest you. Their contact information can be found on our website at http://www.babyjogger.ca. Claims for warranty outside of the country in which the product was purchased may incur shipping charges.
NOTE: When contacting Baby Jogger distributor regarding your stroller, please have your stroller's serial number ready. It can be found on the crossbar above the basket.
natural_image
Mechanical assembly diagram showing a red arrow pointing to a component on a vehicle chassis (no text or symbols present)Customer Care Contact Information:
Call: 1-800-241-1848 8:30am - 5:30pm EST, Mon - Fri.
Mail: Baby Jogger, LLC 4110 Premier Drive High Point, NC 27265
www.babyjogger.ca
PLEASE DO NOT CONTACT THE PLACE OF PURCHASE FOR PARTS OR WARRANTY ISSUES
natural_image
Mechanical assembly diagram showing a bracket with a red arrow indicating direction (no text or symbols)Correo: Baby Jogger, LLC
4110 Premier Drive
High Point, NC 27265
www.babyjogger.com / www.babyjogger.ca
natural_image
Mechanical assembly diagram showing a red arrow pointing to a component (no text or symbols present)High Point, NC 27265
www.babyjogger.com / www.babyjogger.ca
VEUILLEZ NE PAS COMMUNIQUER AVEC LE DÉTAILLANT POUR OBTENIR DES PIÈCES OU DU SERVICE EN VERTU DE LA GARANTIE
NOTES/NOTAS:
To register your Baby Jogger product from within the U.S.A. visit us online at www.babyjogger.com or return registration card provided with your product. In Canada, visit www.babyjogger.com to register your product.