city mini GT2 Eco - Stroller BABY JOGGER - Free user manual and instructions
Find the device manual for free city mini GT2 Eco BABY JOGGER in PDF.


| Brand | Baby Jogger |
| Model | city mini GT2 Eco |
| Category | Stroller |
| Maximum child weight | 29.5 kg (65 lb) |
| Maximum child height | 101.6 cm (40 in) |
| Recommended total weight | 35 kg (77 lb) (seat + pocket + storage basket) |
| Stroller weight (approximate) | 10.5 kg |
| Folded dimensions (approximate) | 80 × 60 × 35 cm |
| Recommended age | From birth (reclined position) up to about 4 years |
| Wheel type | Swivel/lockable front wheels, fixed rear wheels |
| Brake | Lever parking brake on rear wheels |
| Harness | 5-point harness with shoulder pads, height adjustable |
| Canopy | Canopy with magnetic window and side vents |
| Handle | 6-position adjustable handle |
| Seat recline | Yes, adjustable via pinch |
| Leg rest | Foldable and retractable |
| Storage basket | Maximum capacity 4.5 kg (10 lb) |
| Seat pocket | Maximum capacity 1 kg (2 lb) |
| Car seat adapter | Compatible with Baby Jogger/Graco seats (adapter included) |
| Fold | Compact fold with auto-lock |
| Frame materials | Aluminum/steel |
| Fabric care | Cold water wash, no bleach, no dryer |
| Warranty | Limited lifetime warranty on frame, 1 year on fabric parts |
| Replacement parts | Baby Jogger original parts only |
Frequently Asked Questions - city mini GT2 Eco BABY JOGGER
User questions about city mini GT2 Eco BABY JOGGER
0 question about this device. Answer the ones you know or ask your own.
Ask a new question about this device
Download the instructions for your Stroller in PDF format for free! Find your manual city mini GT2 Eco - BABY JOGGER and take your electronic device back in hand. On this page are published all the documents necessary for the use of your device. city mini GT2 Eco by BABY JOGGER.
USER MANUAL city mini GT2 Eco BABY JOGGER
©2023 Baby Jogger NWL0001574514A 8/23
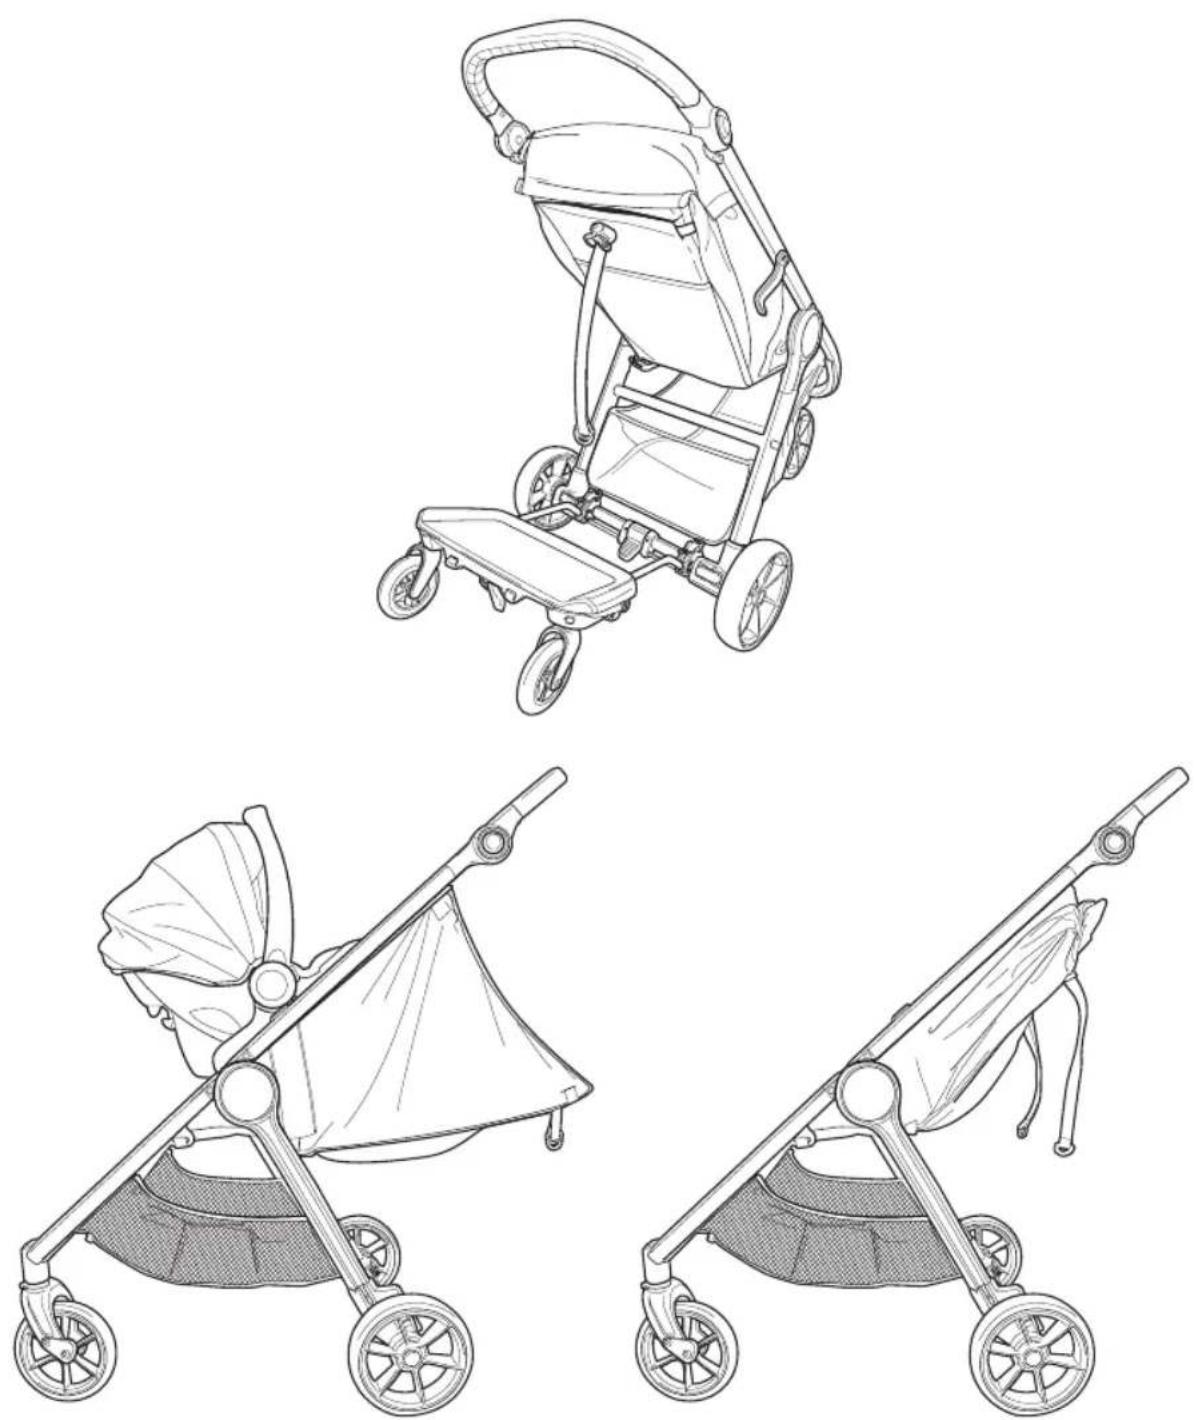
Stroller Use Positions Posiciones de uso del cochecito Position d’utilisation de la poussette
Accessories sold separately Los accesorios se venden por separado Les accessoires sont vendus séparément.
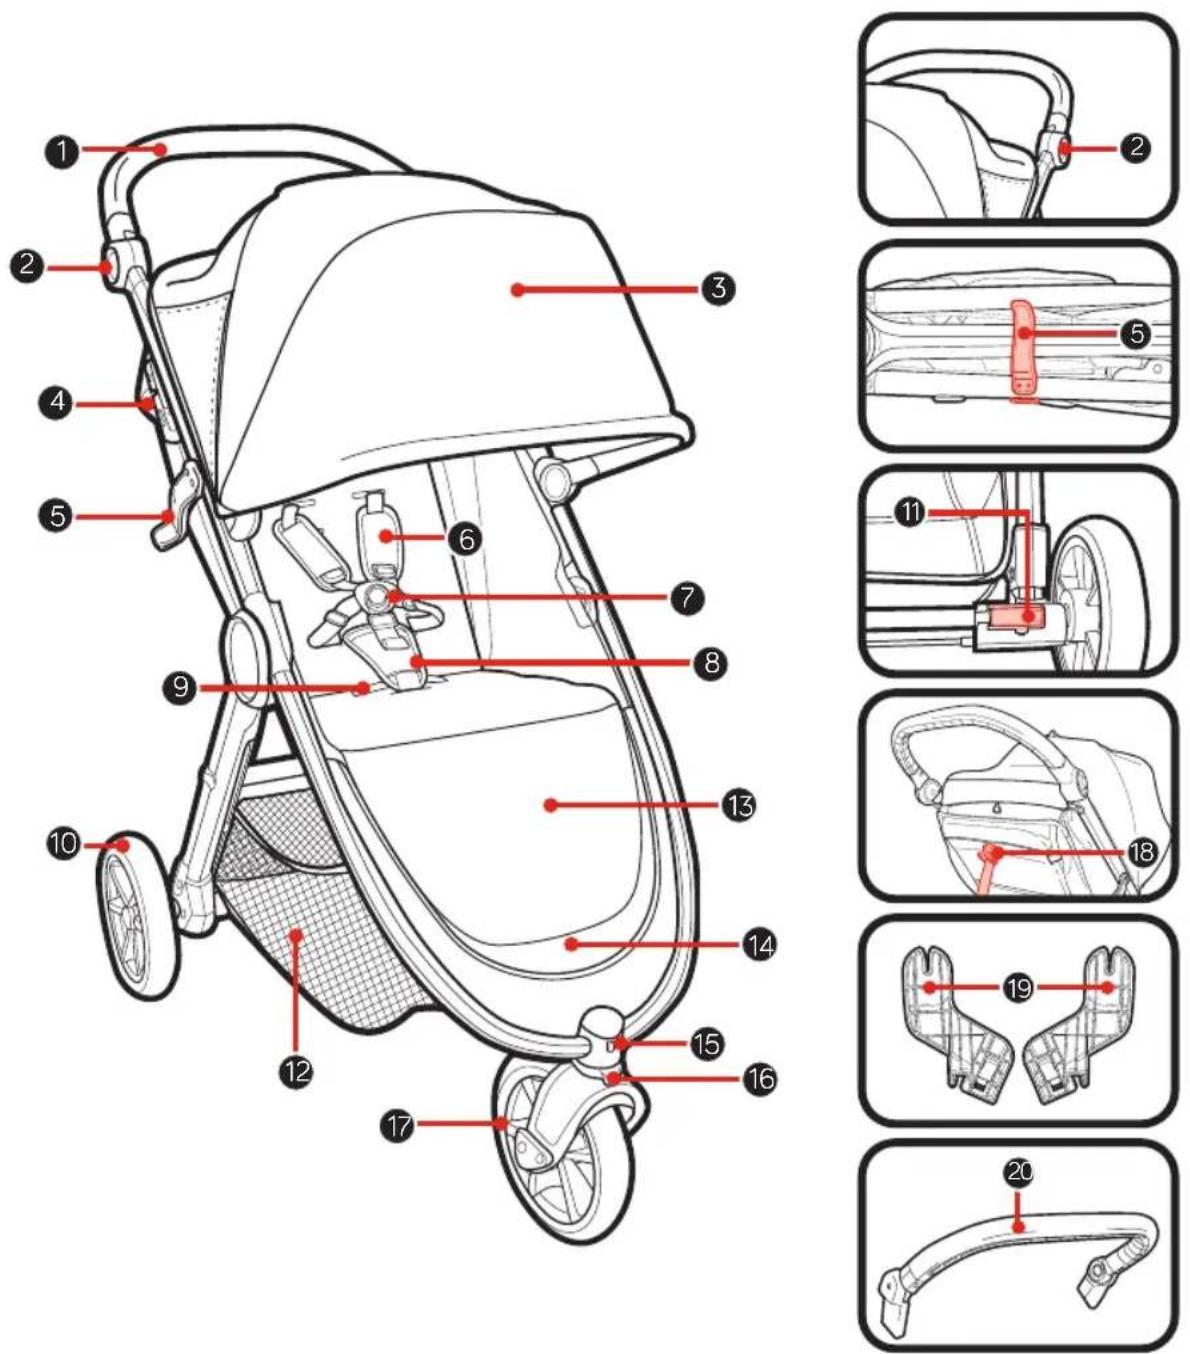
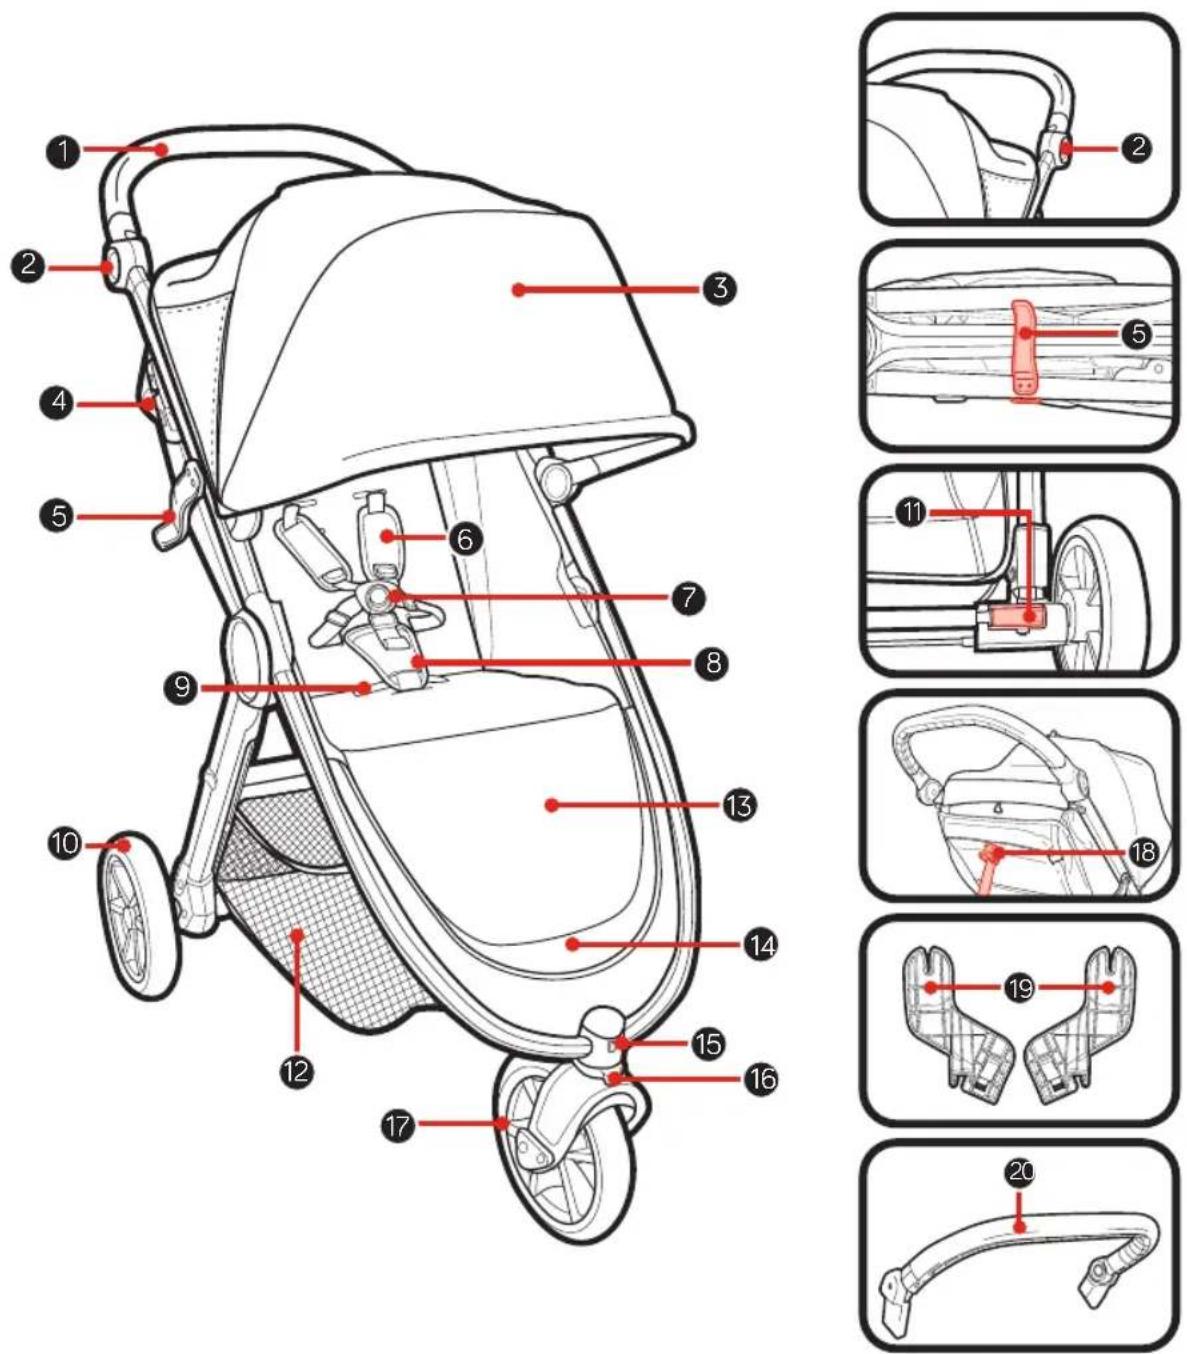
1 Handlebar
2 Handlebar Fold Button
3 Canopy
4 Parking Brake
5 Auto-Lock
6 Harness Pads
7 Harness Buckle
8 Crotch Strap Pad
9 Fold Strap
10 Rear Wheel
11 Rear Wheel Release Button
12 Storage Basket
13 Leg Support
14 Footwell
15 Front Wheel Release Button
16 Swivel/Lock
17 Front Wheel
18 Seat Recline Strap
19 Baby Jogger/Graco Car Seat Adapters
20BellyBar



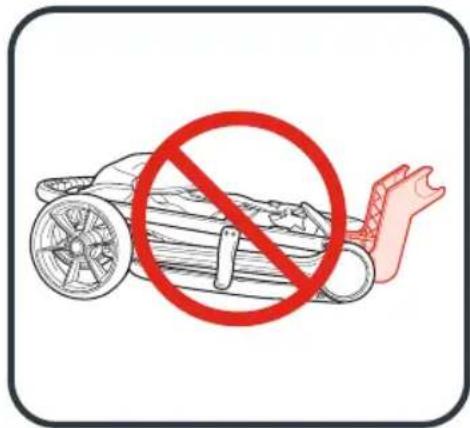
WARNING
IMPORTANT - Keep these instructions for future reference.
Read these instructions carefully before use. Your child's safety may be affected if you do not follow these instructions.
- This stroller is suitable for one child up to 65lb (29.5 kb) in weight and 40 in (101.6 cm) in height.
- Total weight load recommended for this stroller is 77 lb (35 kg); 65 lb (29.5 kg) in the seat, 2 lb (1 kg) in the seat back pocket, and 10 lb (4.5 kg) in the basket. Excessive weight may cause a hazardous unstable condition to exist.
- This stroller is not suitable for running, jogging, skating or inline skating.
• Never leave your child unattended. - Avoid serious injury from falling or sliding out. Always properly adjust and fasten seat belt or infant car seat harness.
- To prevent injury, remove child tray, belly bar or car seat adapter accessory when folding or unfolding the stroller.
- Do not let your child play with this product.
- Parcels or accessory items, or both, placed on the unit may cause the unit to become unstable.
- Any load attached to the handle affects the stability of the stroller. Do not hang bags from the handle.
- Always tightly secure the hook & loop fasteners between the canopy and seat back when the canopy is installed.
- Ensure that all the locking devices are engaged before use.
-
Lock the brakes before loading and unloading your child and whenever the stroller is not moving.
-
Always keep fingers and children away from moving parts when folding, unfolding, or adjusting the stroller to prevent finger/body part entrapment or pinching.
- Stroller is not meant to be used for transporting children up or down stairs or escalators. Damage resulting to stroller will not be covered under warranty.
- This stroller does not replace a cot or a bed. Should your child need to sleep, then it should be placed in a suitable pram body, cot, or bed.
- Accessories which are not approved by Baby Jogger shall not be used.
- Check that the car seat attachment devices are correctly engaged before use.
- Remove car seat adapter before using the stroller with a seated child.
- For new born babies we recommend always to use the most reclined seat position.
- Only use replacement parts which are supplied or approved by Baby Jogger.
- Discontinue using your stroller should it become damaged or broken.
FRAME
1 Unpack the stroller frame from the box and set the wheels aside. Unlock the stroller by pulling the storage lock lever.
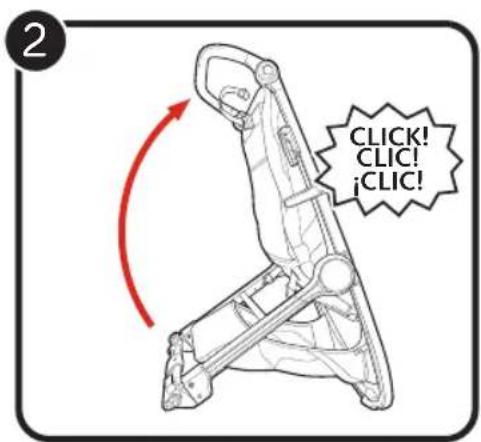
2 Unfold the stroller by pulling the handlebar away from the frame. The stroller will lock into place and you will hear a click.
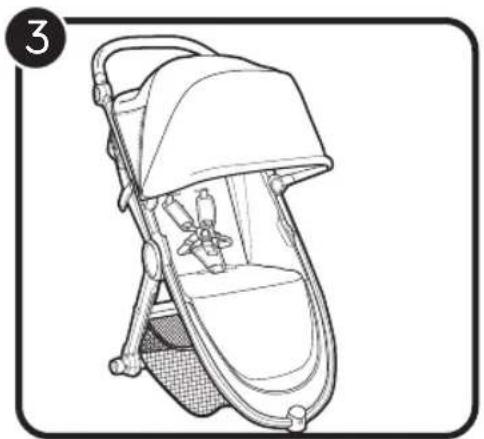
3 Place the stroller in the upright position.
WARNING: Ensure that all the locking devices are engaged before use.
FRONT WHEELS
4Installation
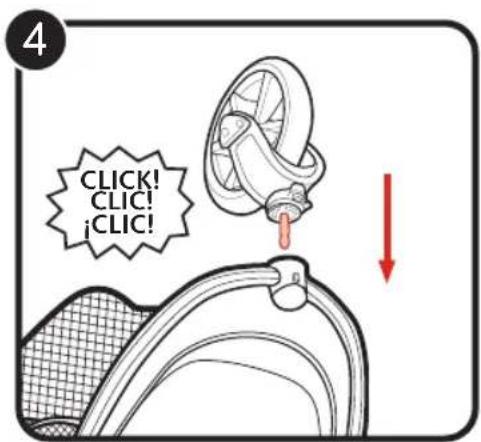
- Lay stroller on its back so the handlebar is resting on the floor.
- Attach the front wheel by sliding it into the front wheel mount until it clicks. Gently pull on the front wheel to make sure it is properly attached.
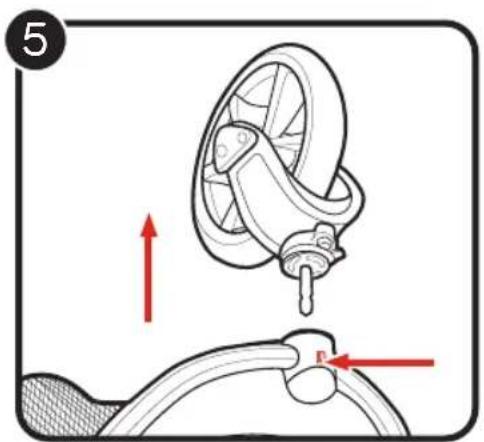
5Removal
- While pressing the front wheel release button, gently slide the front wheel out of the front wheel mount.
SWIVEL FEATURE
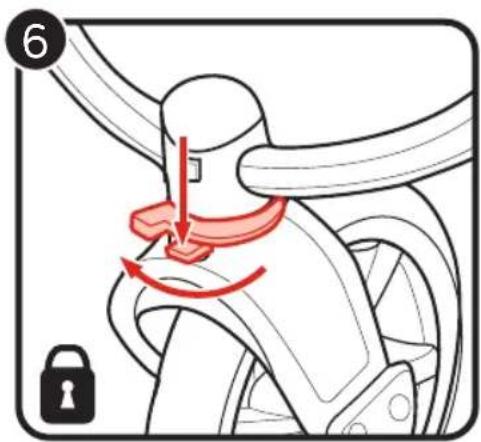
6 Push the swivel button down and rotate to the left to lock the front wheel assembly in a fixed position for long distance strolling.
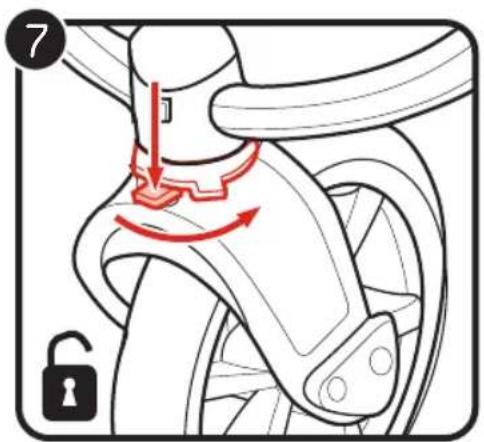
7 Push the swivel button down and rotate to the right to allow the front wheel assembly to swivel.
REAR WHEELS
8Installation
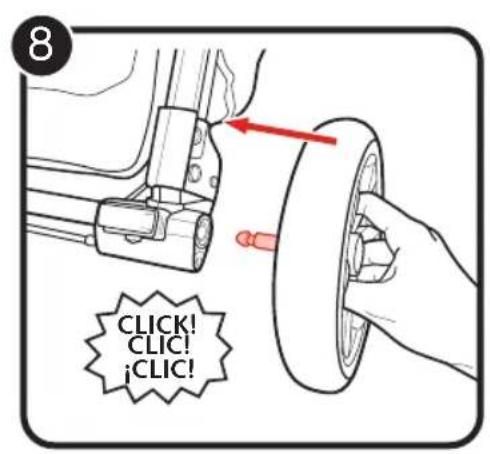
- Align the rear wheel axle with the wheel mount on the stroller frame and insert it into the wheel mount until it locks into place. You will hear a click.
• Gently pull on the rear wheel to make sure it is properly attached.
9Removal
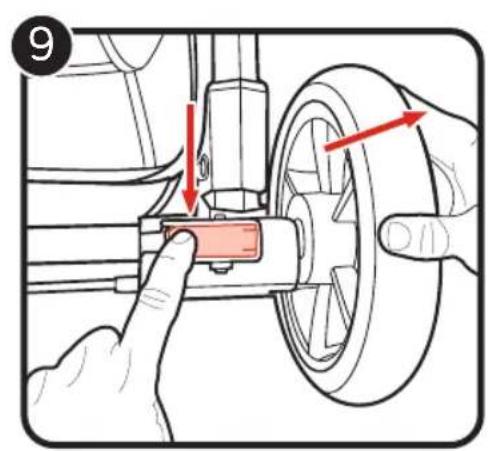
- While pressing down on the wheel release button, gently slide the rear wheel out of the wheel mount.
BRAKE
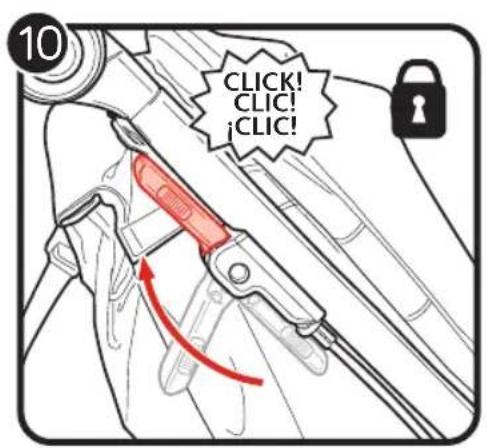
10 To lock the brakes: gently pull the brake lever into upright position until it clicks into place.
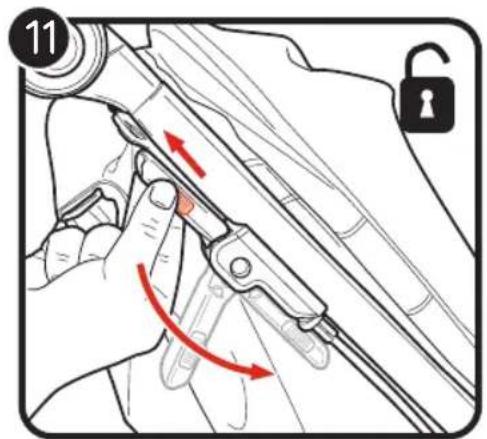
11 To Release the brakes: Pinch the tabs and pull the lever towards you. Push the brake lever down until it is parallel with the frame.

RNING: Lock the brakes before loading and unloading your child and whenever the stroller is not moving.
CANOPY
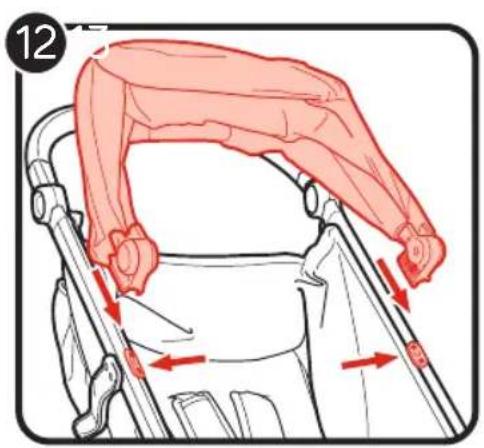
12 Attach the canopy to the frame by sliding the canopy onto the mounting bracket. To remove, slide canopy off of mounts.
NOTE: When using a Baby Jogger, Graco or Britax car seat, the canopy can be attached. For all other car seats, canopy must be removed.
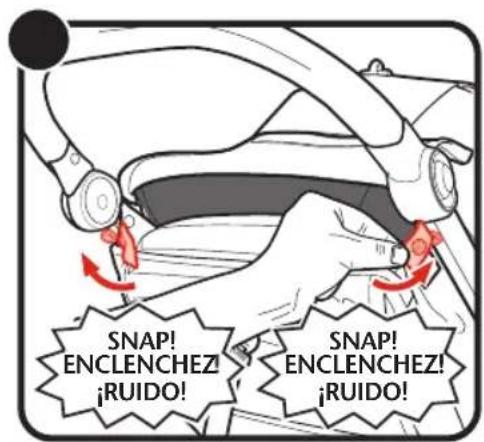
13 Snap the two snaps to the stroller frame.
14 Zip the back of the seat to the canopy top. Attach the 2 fastening strips on the side of the canopy.
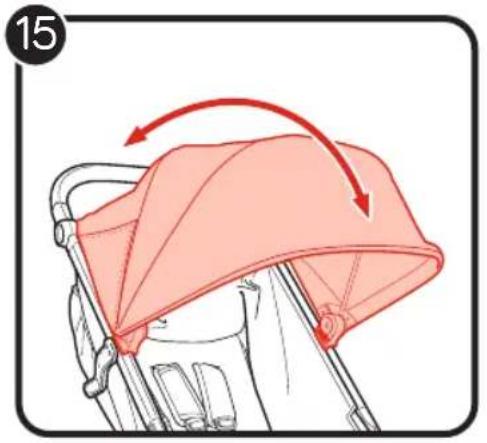
15 Pull forward to open canopy and push backwards to close canopy.
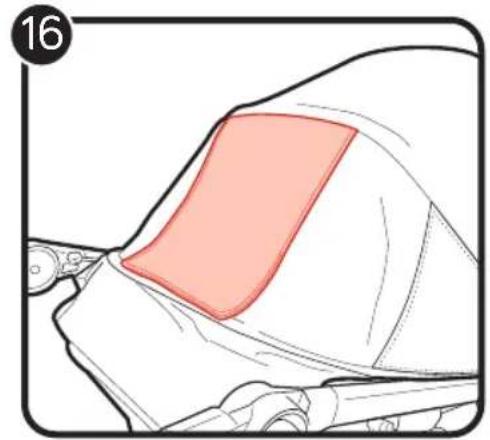
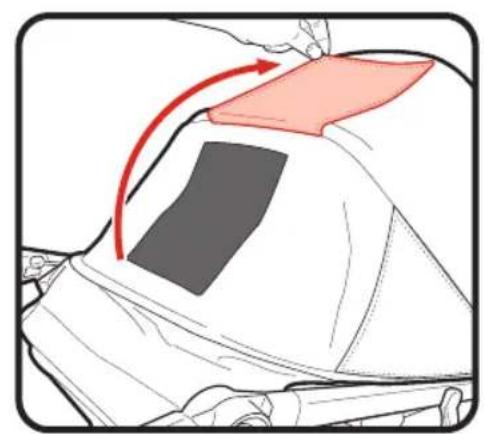
16 To use the canopy window, fold shade up and secure with magnets.
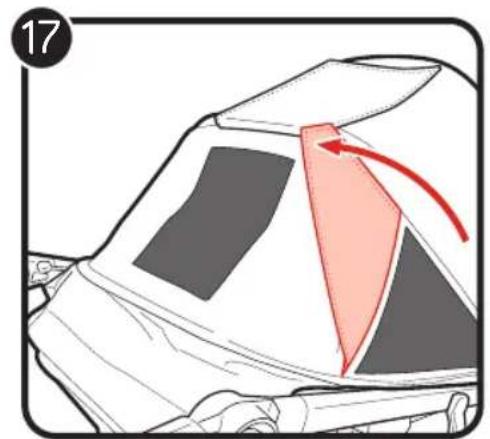
17 To use the side vents, lift the fold vents up and secure with magnets.
HANDLE
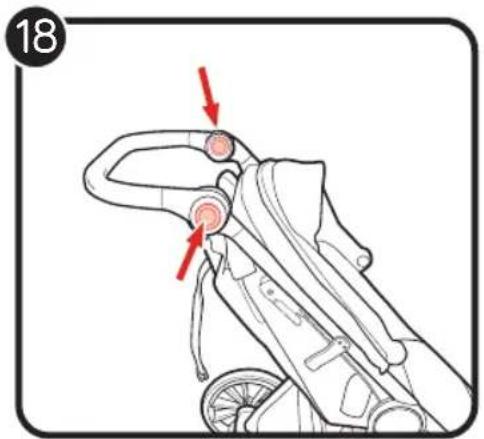
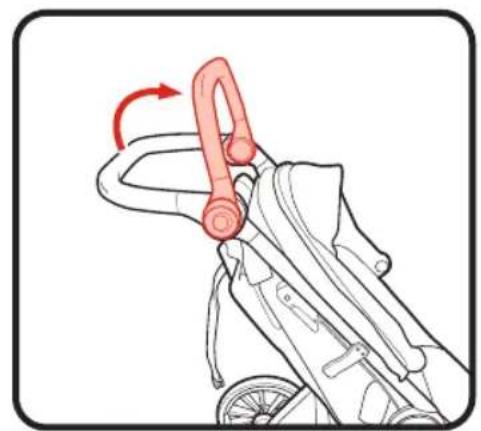
18 To change the handle to one of 6 use positions, press the handle release buttons on both sides and rotate up or down to the new position.
ADJUSTING SAFETY HARNESS
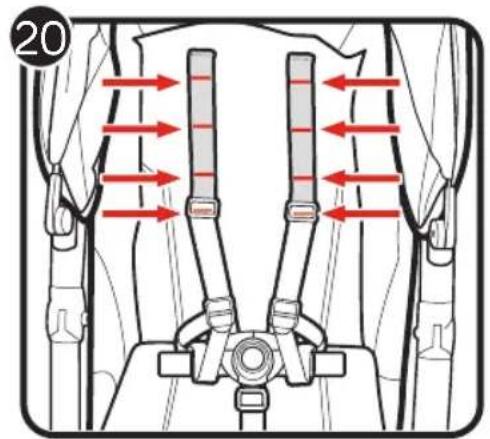
19 Slide shoulder harness buckle up and down seat back webbing until desired position.
20 There are 4 positions on seat back webbing.
CHECK that shoulder harness heights are the same. Use stitch lines to help align harness heights.

WARNING: Avoid serious injury from falling or sliding out. Always properly adjust and fasten safety harness.

WARNING: Always use the crotch strap in combination with the shoulder straps and waist belt.
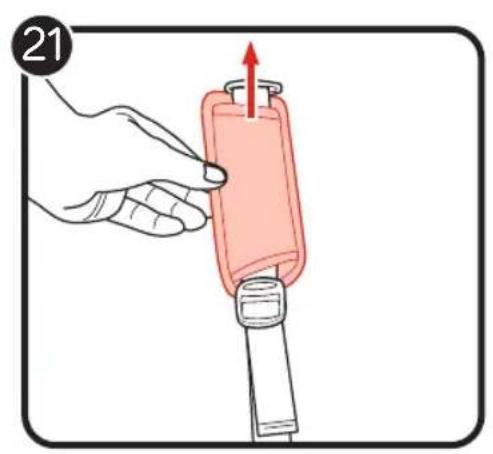
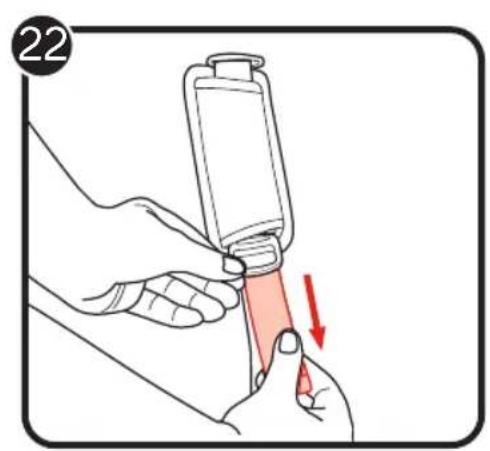
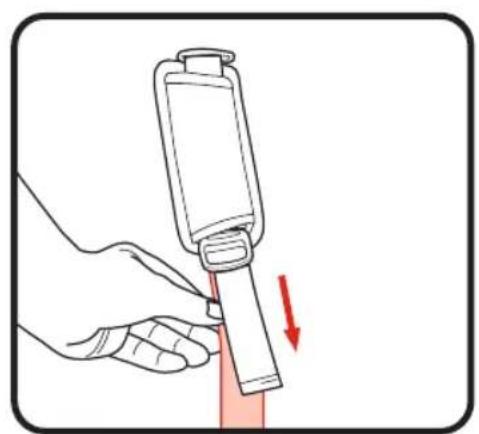
21 Slide the harness pads up to access plastic guide on strap.
22 Hold the plastic guide and pull strap to tighten or loosen.
USING SAFETY HARNESS
23 Insert side strap buckle into harness buckle on both sides.
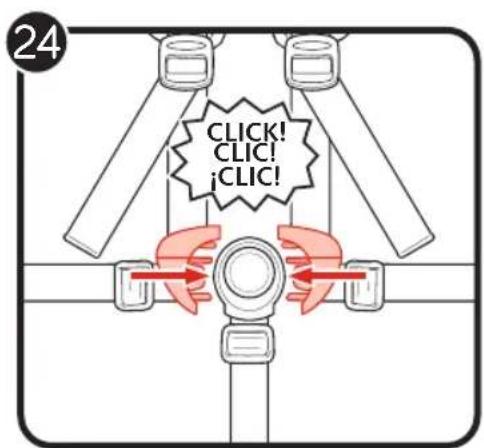
24 Insert connected harness and side strap buckles into the sides of the crotch buckle.
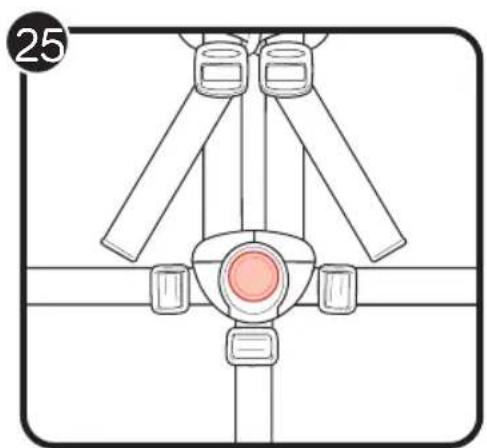
25 Press button on crotch buckle to release.
RECLINE THE SEAT
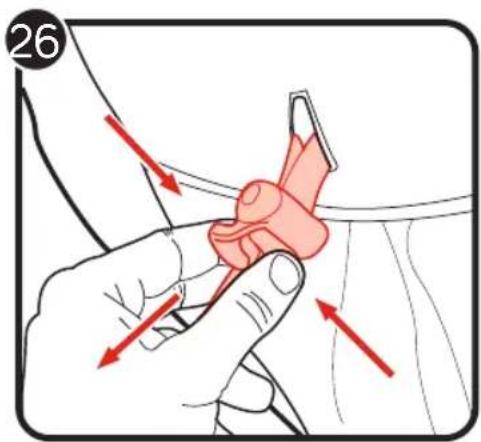
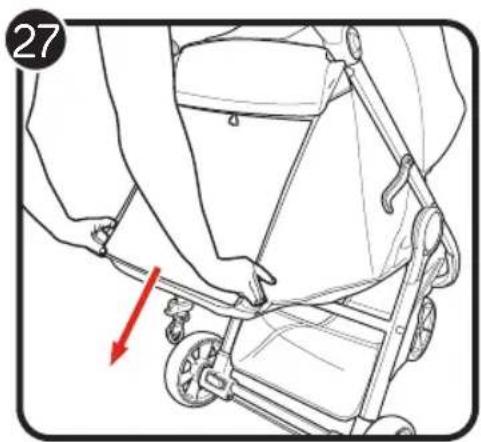
26 Pinch the clamp behind the seat, and slide it down to desired recline.
27 Pull seat down on both sides to match the clamp position. Reverse steps to return to the upright position.

RNING: When making adjustments to the stoller seat, make sure child's head, arms, and legs are clear of moving seat parts and stroller frame.
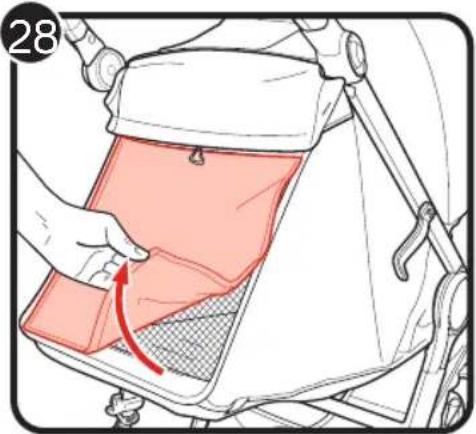
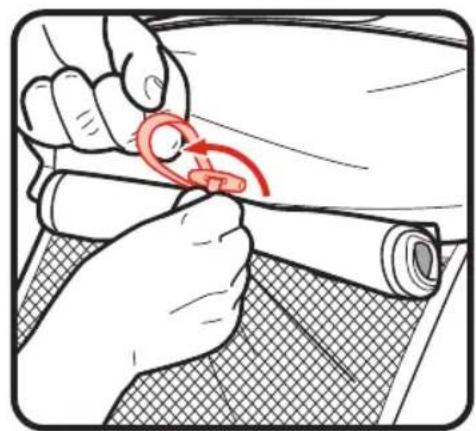
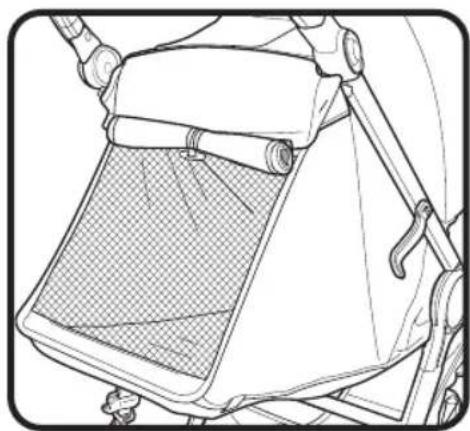
28 For extra ventilation, roll up the seat back flap and secure with elastic and button.
LEG SUPPORT
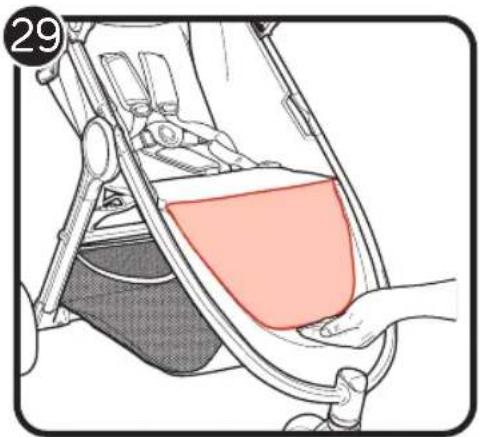
29 To use the leg support, lift the front of the seat pad.
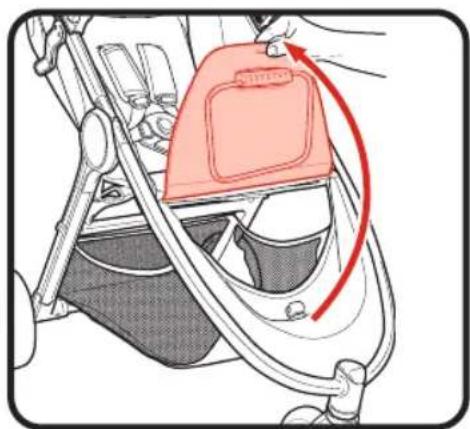
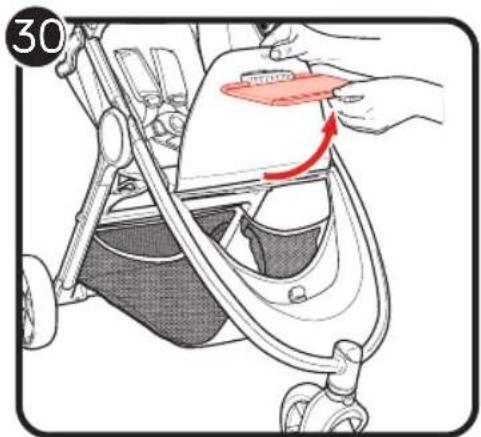
30 Rotate the support arm out and lower the seat pad. Lock the support arm.
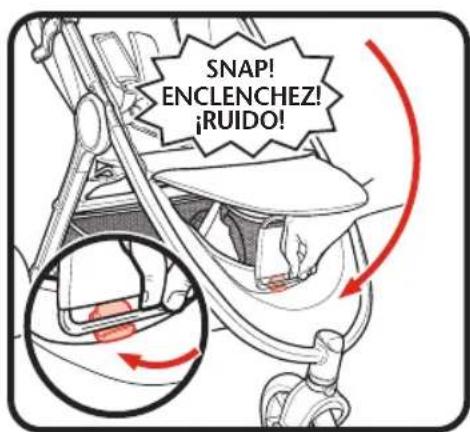
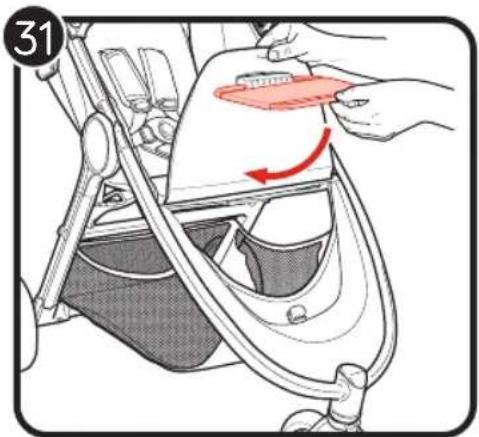
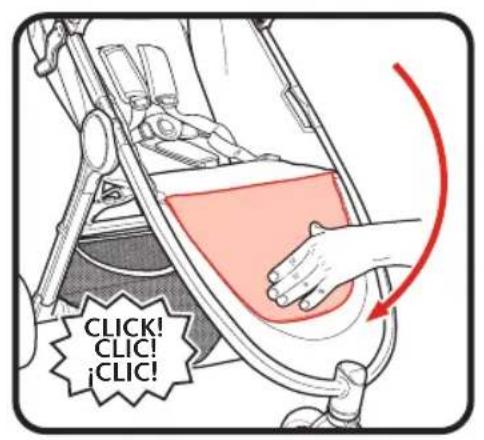
31 To lower leg support, reverse the steps.
FOLDING
- Remove your child from the seat.
• Disengage front wheel swivel locks. - Remove all attachments and all items from basket.

RNING: To prevent injury, remove child tray or belly bar accessory when folding or unfolding the stroller.
32 Press buttons on both sides of frame. Rotate handle up.
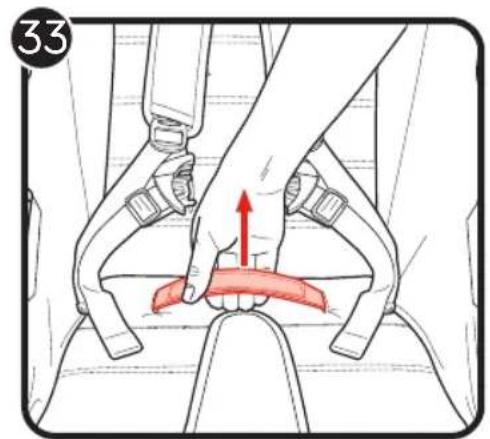
33 Pull up on the "Pull to Fold" folding handle and let the frame collapse.
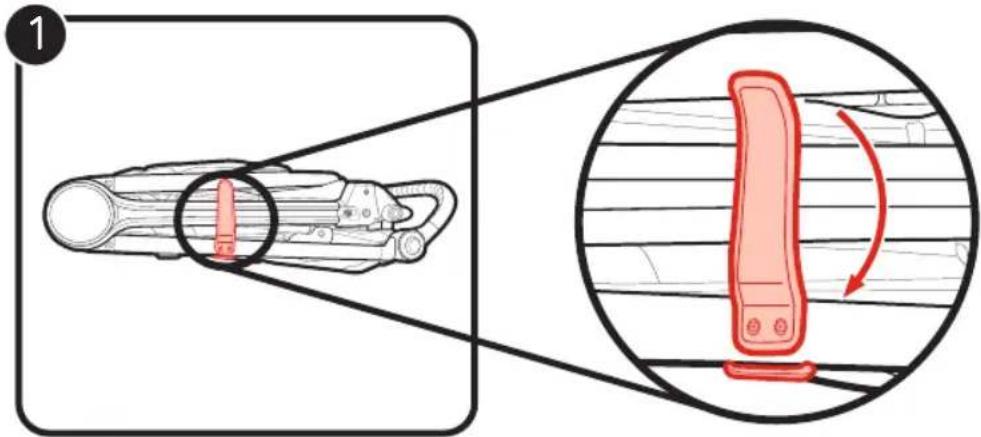
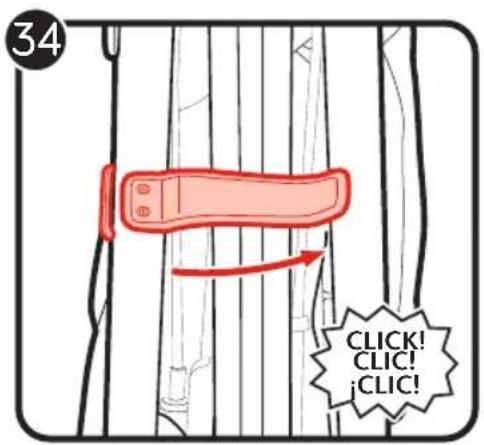
34 Make sure the auto-lock lever clicks into place.
35 Place stroller upright in standing position.
BASKET REMOVAL
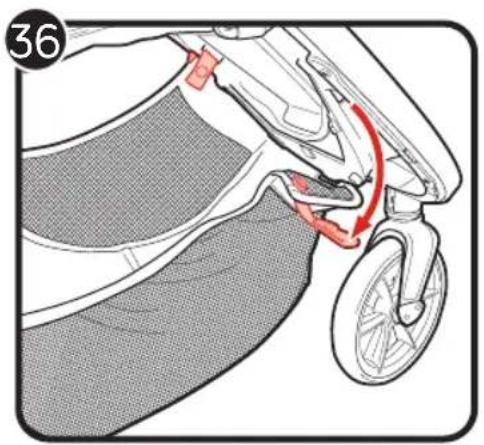
36 From the front of the stroller, unsnap the 2 snaps and pull the straps out of the foot well.
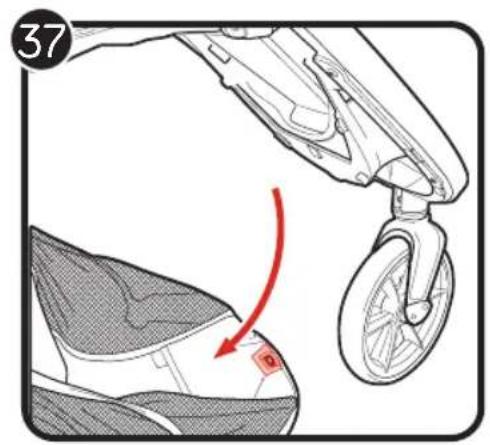
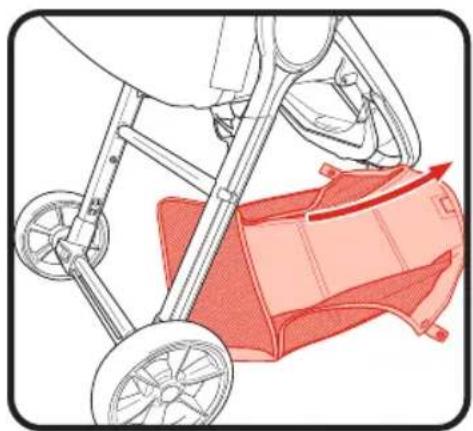
37 Lift basket off the hook.
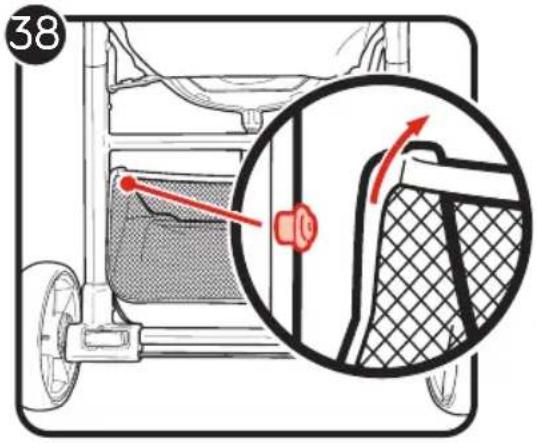
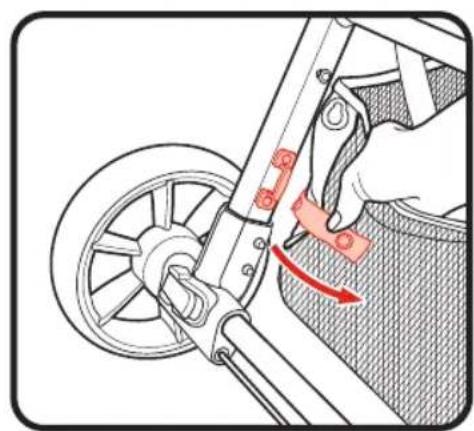
38 From the back, lift the top of the basket off the tab on both sides of the frame.
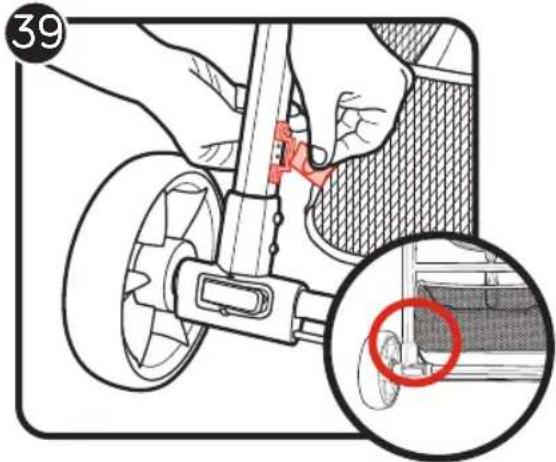
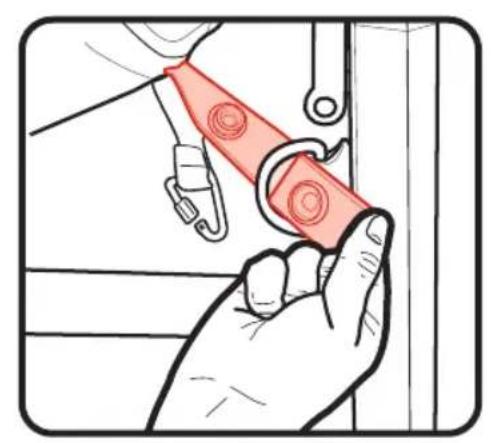
39 Unsnap the strap from the D ring on both sides of the frame.
REMOVING THE SEAT FABRIC
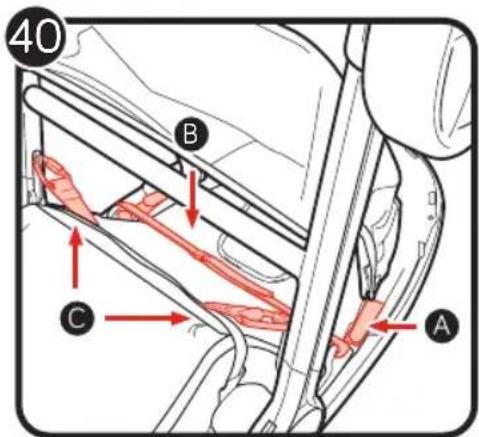
40 Flip the stroller over to expose the seat bottom.
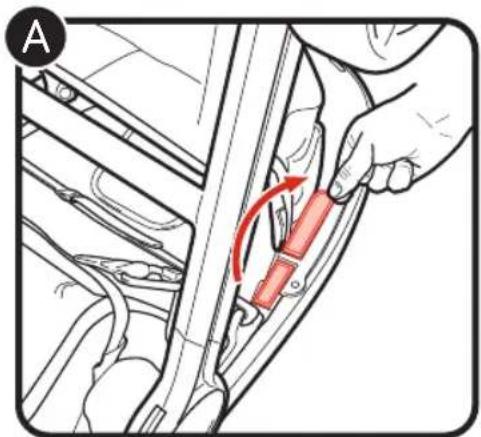
A Unfasten the 2 fastening strips and pull them out of the stroller frame.
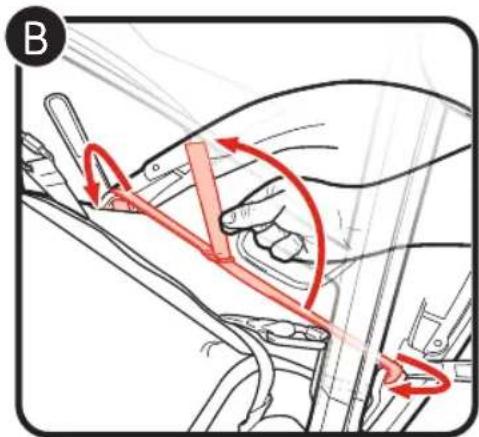
B Unfasten the fastening strip and pull them out of the sides of the stroller frame.
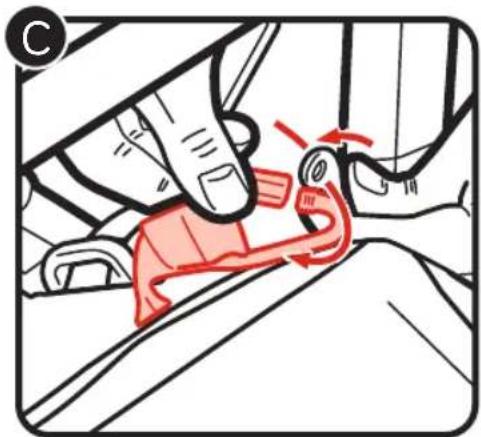
C Unscrew both carabiner hooks and remove them from the stroller frame.
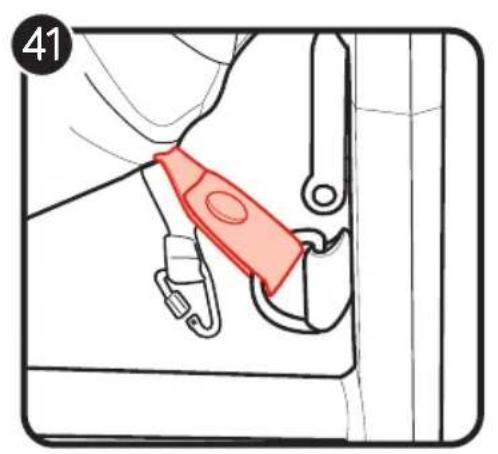
41 From beneath the stroller, unsnap tether strap on the side.
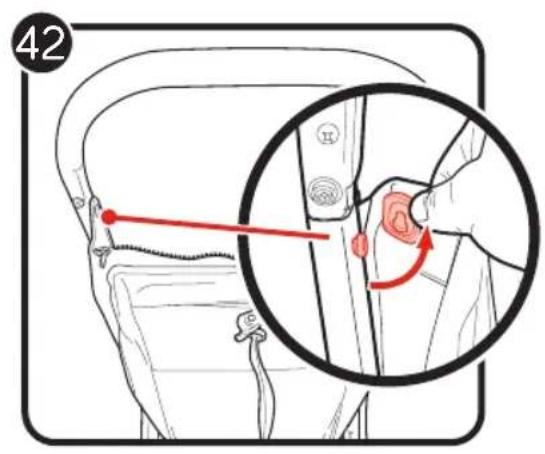
42 Flip the seat back over on its wheels. Unsnap both upper snaps from the stroller frame.
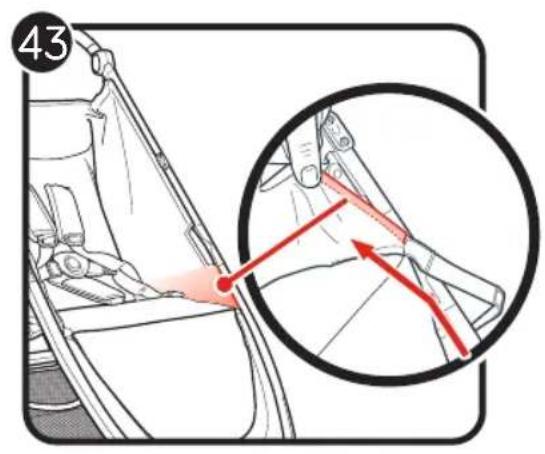
43 Starting from the bottom, slide the seat pad out from the stroller frame on both sides.
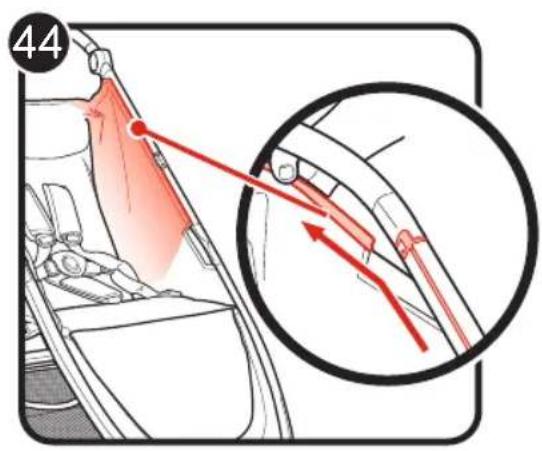
44 From the top, slide the seat pad out of the frame on both sides.
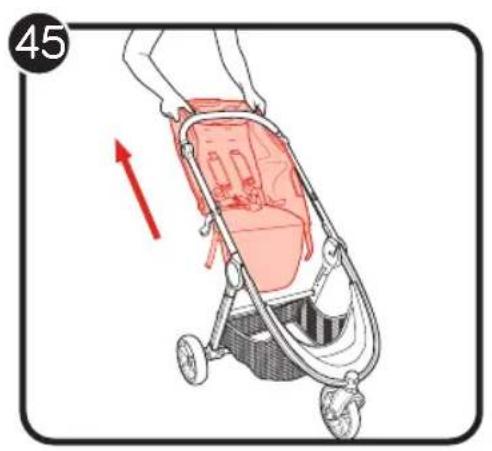
45 Remove seat fabric.
Reverse the steps to reattach the seat pad to the frame.
ACCESSORIES
BELLY BAR
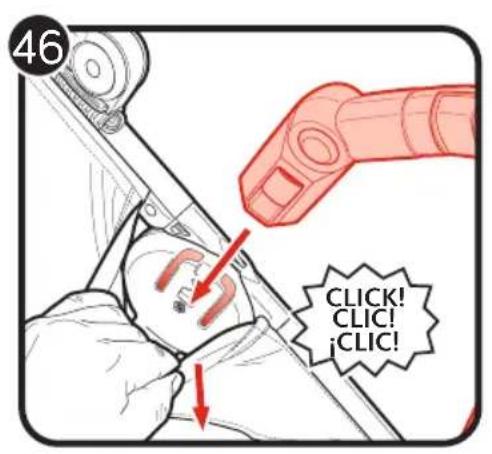
46 To install, pull the fabric on both sides of the stroller frame to expose the belly bar mount and slide belly bar down the mount until it clicks.
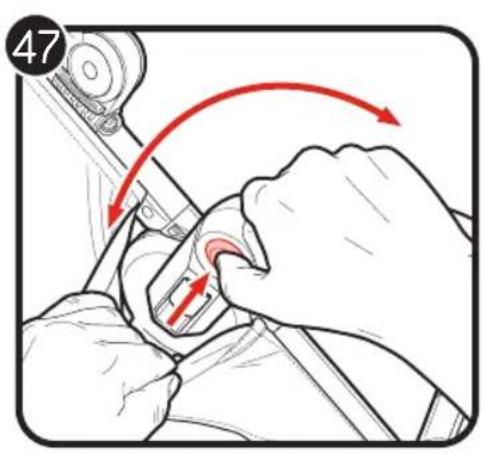
47 To change belly bar angle, press and hold the adjustment buttons on both sides while raising or lowering the belly bar to the desired position.
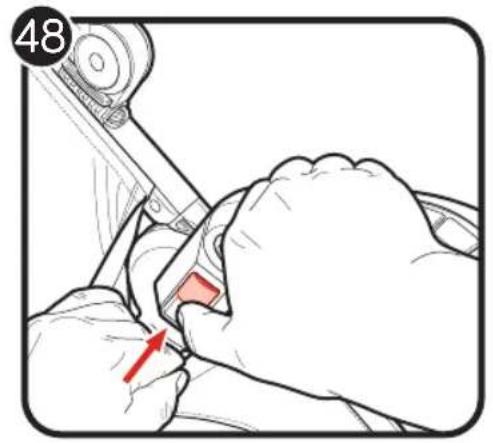
48 To remove belly bar, press and hold the release button.
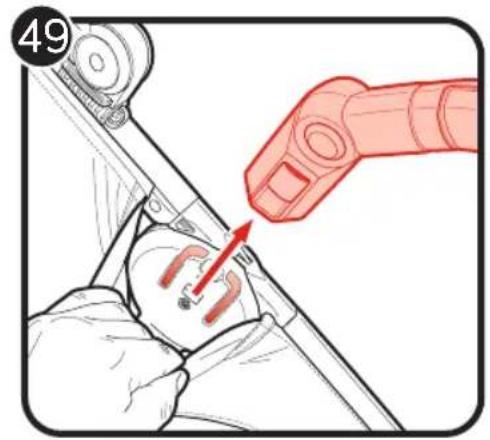
49 While holding the release button, pull the belly bar out of the mount.
BABY JOGGER/GRACO CAR SEAT ADAPTER

WARNING: When attaching car seat adapter, the canopy zipper must be zipped.
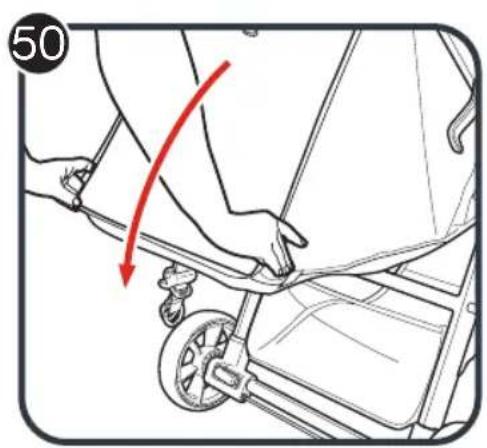
50 Recline the backrest of the stroller.
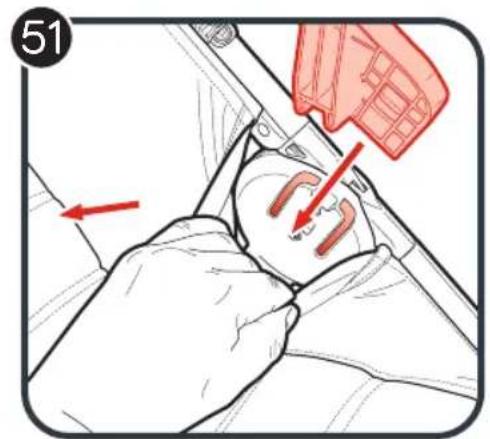
51 Make sure the elastic fabric near the accessory mounting slots is not covering the slots.
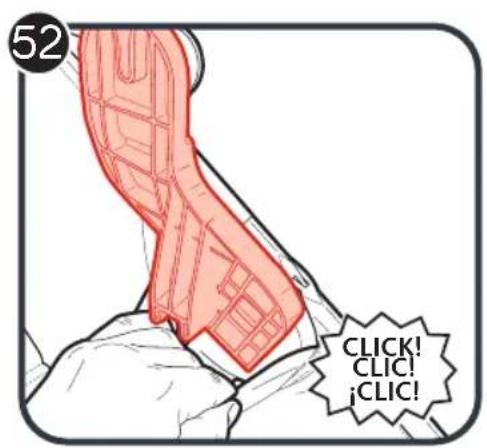
52 Insert Adapter Brackets into the corresponding mounting brackets on your stroller/pushchair. The Adapter Brackets are secure when they click into place.
NOTE: Left and right are determined by standing in front of and facing the stroller and each Adapter Bracket is labeled with an L or an R for your convenience.
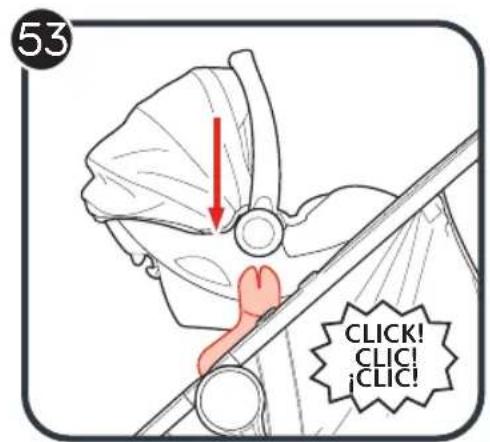
53 Place car seat on the car seat adapter brackets and press down firmly until it clicks into place.
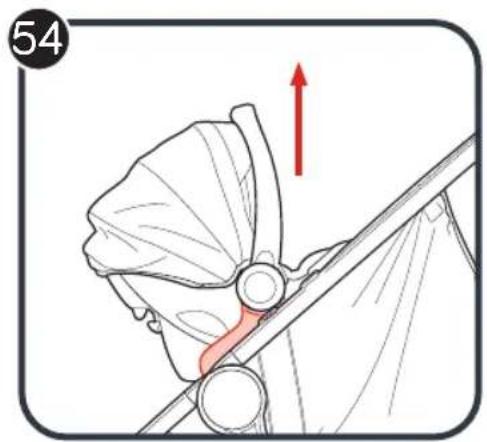
54 Lift up on the car seat to make sure it is attached.

WARNING: Only attach the car seat in a Rear-Facing position.
To remove car seat:
Follow the steps in your car seat's instruction manual to remove car seat from adapters.
To remove adapters:
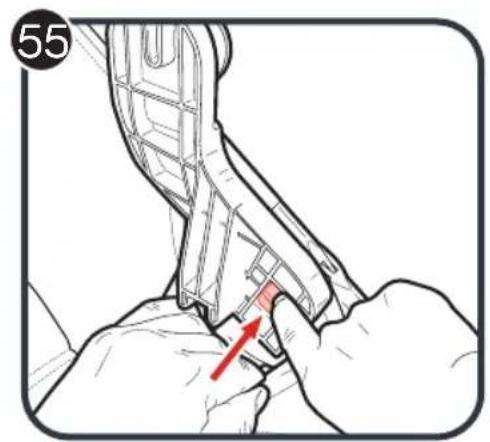
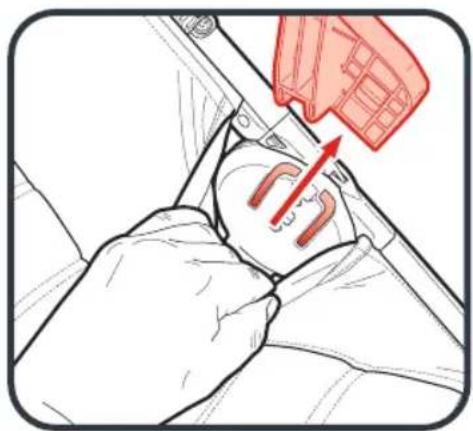
55 Push the release button on each adapter and pull upward to remove.

WARNING: Remove car seat adapter when folding and unfolding the stroller.

Scan for compatibility
CARE AND MAINTENANCE
To preserve the longevity of your stroller, it is important to perform simple, regular maintenance. From time to time, make sure that the joints and folding areas are still in good condition. If you hear any squeaking or feel tension, you can take your stroller to an authorized dealer for added lubrication. All repairs should only be carried out by an authorized dealer.
DO NOT use alcohol based disinfectants to clean this product.
CLEANING
Fabric
• Refer to your care tag on the seat pad for washing instructions

• Wipe clean using a damp cloth.

- Hand wash in cold water with mild soap.

• Machine wash separate in cold water, delicate cycle.

- Do not bleach.

- Do not tumble dry.

- Donotiron.

- Do not dry clean
- Fabric should be attached to frame to dry.
- Be sure to remove the metal frame and PE boads from the seat before washing.
• DO NOT use solvents, caustic or abrasive cleaning materials.
Plastic/Metal Parts
- Wipe clean using a mild soap and warm water.
- The wheels will need to be dried completely with a soft towel or cloth.
- DO NOT remove, dismantle or alter any part of the seat folding mechanism or brakes.
Leatherette Care
- Wipe clean using a mild soap and warm water.
STORING
- Sunshine can fade seat fabric and dry out tires, so storing your stroller indoors will prolong its good looks.
• DONOT store outside.
- Ensure that the stroller is dry before storing for prolonged periods.
• Always store the stroller in a dry environment.
- Store the stroller in a safe place when not in use (i.e. where children cannot play with it).
• DO NOT place heavy objects on top of the stroller.
• DO NOT store the stroller near a direct heat source such as a radiator or fire.
Baby Jogger's Limited Lifetime Warranty:
Baby Jogger warrants that the frame is free of manufacturer defects for the lifetime of the product. Manufacturer's defects include but are not limited to the breaking of welds and frame tube damage. Textile or soft side materials and all other components shall be warranted for one year from the date of purchase (except for tubes and tires). Proof of purchase is required to make a warranty claim and the warranty is only extended to the original purchaser.
THIS WARRANTY DOES NOT COVER:
• Normal wear and tear
- Corrosion or rust
- Incorrect assembly, or the installation of third party parts or accessories not compatible with the original design
- Accidental or intentional damage, abuse or neglect, or use on stairs or escalators.
- Commercial use
- Improper storage/care of the unit
This warranty specifically excludes claims for indirect, incidental, or consequential damages. The implied warranties of merchantibility and fitness for a particular purpose is according to the specific warranty period for this model unit at time of purchase. Some states do not allow the exclusion or limitation of incidental or consequential damages, so the above limitations or exclusions may not apply to you. This warranty gives you specific legal rights, and you may also have other rights which vary from state to state. To know what your legal rights are in your state, consult your local or state consumer affairs office or your State's Attorney General.
If your stroller was purchased outside of the United States, please contact the distributor in the country nearest you. Their contact information can be found on our website at http://www.babyjogger.com. Claims for warranty outside of the country in which the product was purchased may incur shipping charges.
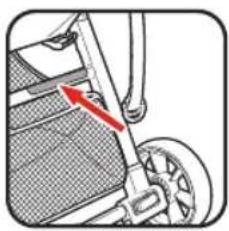
NOTE: When contacting Baby Jogger distributor regarding your stroller, please have your stroller's serial number ready. It can be found on the crossbar above the basket.
Customer Care Contact Information:
Call: 1-800-241-1848 8:30am - 5:30pm EST, Mon - Fri.
Mail: Baby Jogger, LLC 4110 Premier Drive High Point, NC 27265 www.babyjogger.com / www.babyjogger.ca
PLEASE DO NOT CONTACT THE PLACE OF PURCHASE FOR PARTS OR WARRANTY ISSUES
Correo: Baby Jogger, LLC
4110 Premier Drive
High Point, NC 27265
www.babyjogger.com / www.babyjogger.ca
NO CONTACTE EL LUGAR DE COMPRA PARA PIEZAS NI CUESTIONES DE GARANTÍA
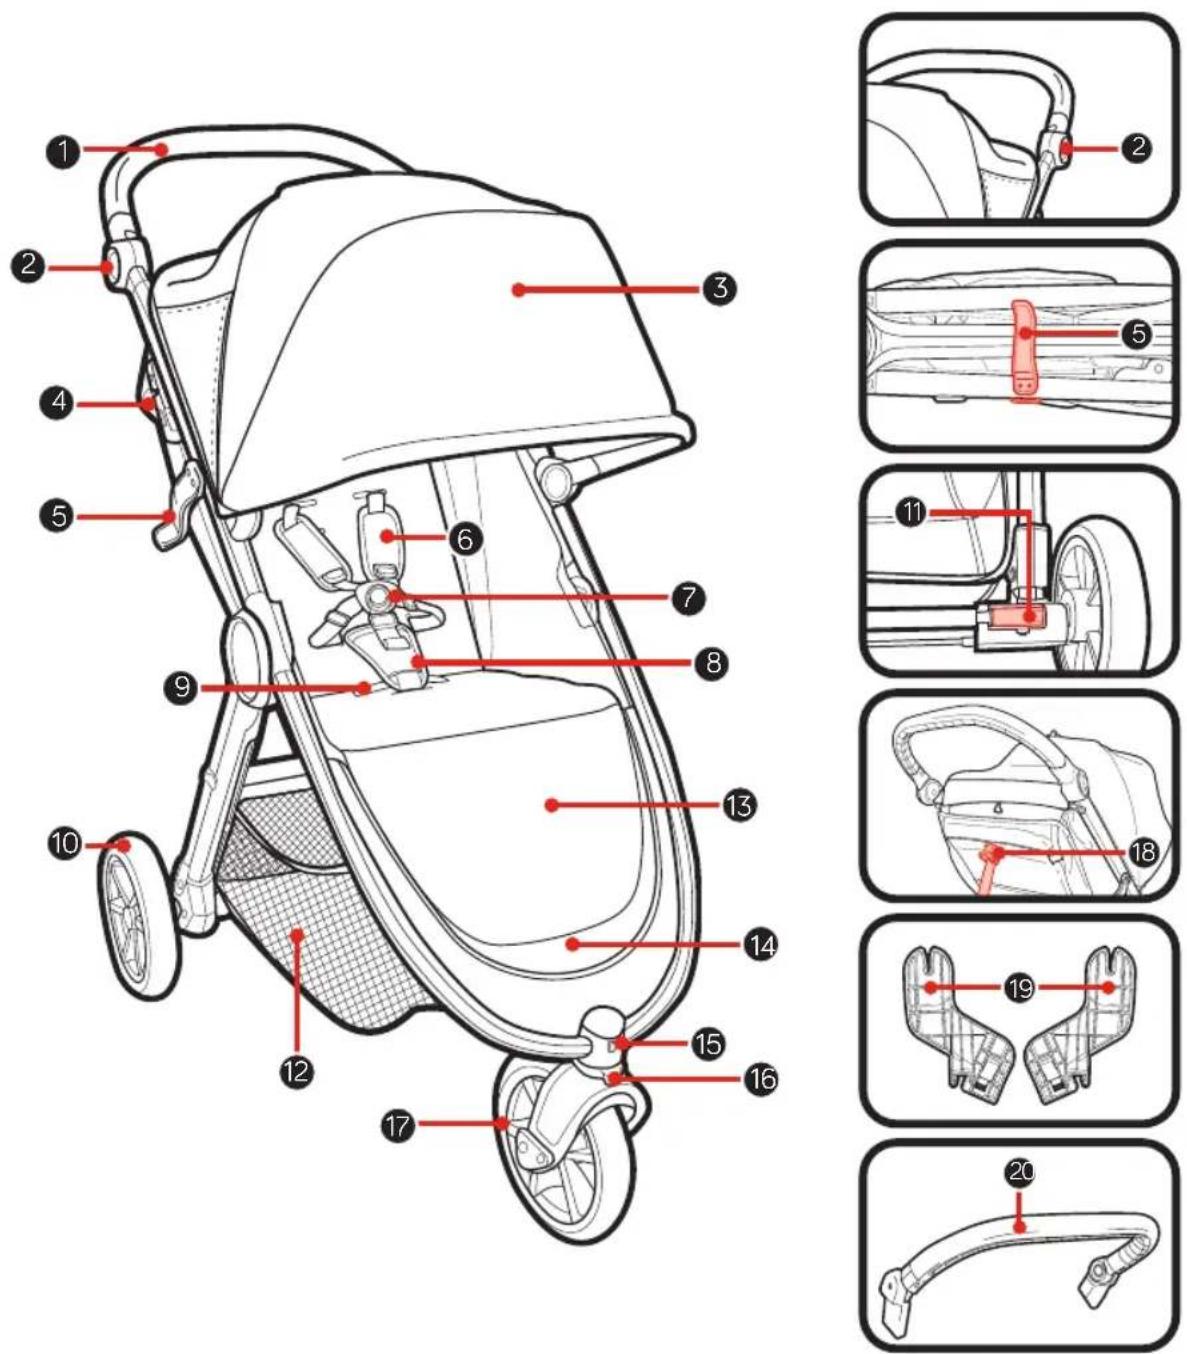
1Poignée
High Point, NC 27265
www.babyjogger.com / www.babyjogger.ca
VEUILLEZ NE PAS COMMUNIQUER AVEC LE DÉTAILLANT POUR OBTENIR DES PIÈCES OU DU SERVICE EN VERTU DE LA GARANTIE


- STROLLER USE POSITIONS POSICIONES DE USO DEL COCHECITO POSITION D’UTILISATION DE LA POUSSETTE
- WARNING
- FRAME
- FRONT WHEELS
- SWIVEL FEATURE
- REAR WHEELS
- BRAKE
- CANOPY
- HANDLE
- ADJUSTING SAFETY HARNESS
- USING SAFETY HARNESS
- RECLINE THE SEAT
- LEG SUPPORT
- FOLDING
- BASKET REMOVAL
- REMOVING THE SEAT FABRIC
- ACCESSORIES
- BELLY BAR
- BABY JOGGER/GRACO CAR SEAT ADAPTER
- TO REMOVE CAR SEAT
- TO REMOVE ADAPTERS
- CARE AND MAINTENANCE
- CLEANING
- FABRIC
- PLASTIC/METAL PARTS
- LEATHERETTE CARE
- STORING
- BABY JOGGER'S LIMITED LIFETIME WARRANTY
- THIS WARRANTY DOES NOT COVER
- CUSTOMER CARE CONTACT INFORMATION
Brand : BABY JOGGER
Model : city mini GT2 Eco
Category : Stroller