Azura - Stroller Lionelo - Free user manual and instructions
Find the device manual for free Azura Lionelo in PDF.

| Product Type | Jogging stroller / all-terrain stroller |
| Brand | Lionelo |
| Model | Azura |
| Recommended age | From 6 months up to 4 years |
| Maximum child weight | 22 kg |
| Configuration | Forward-facing seat (facing the road for running) |
| Safety harness | Adjustable 5-point |
| Wheels | Inflatable front and rear wheels; front wheel lockable in running position |
| Brakes | Hand brake on handlebar + foot parking brake |
| Handlebar | Height-adjustable |
| Canopy | Adjustable canopy with child cover panel |
| Bumper bar | Removable |
| Footrest | Adjustable (integrated into seat) |
| Storage basket | Maximum load capacity: 3 kg |
| Folding | Compact fold with safety lock |
| Sports use | Running and roller skating from 9 months (seat in upright position, facing the road) |
| Textile care | Hand wash at 30°C max (upholstery and basket) |
| Frame care | Clean with a damp cloth and mild detergent |
| Tire pressure | See indication on tires - do not exceed maximum pressure |
| Spare parts | Use only genuine Lionelo parts |
| Warranty | Terms available on Lionelo website |
Frequently Asked Questions - Azura Lionelo
User questions about Azura Lionelo
0 question about this device. Answer the ones you know or ask your own.
Ask a new question about this device
Download the instructions for your Stroller in PDF format for free! Find your manual Azura - Lionelo and take your electronic device back in hand. On this page are published all the documents necessary for the use of your device. Azura by Lionelo.
USER MANUAL Azura Lionelo
natural_image
Line drawing of a two-wheeled stroller with wheels and a backrest (no text or symbols)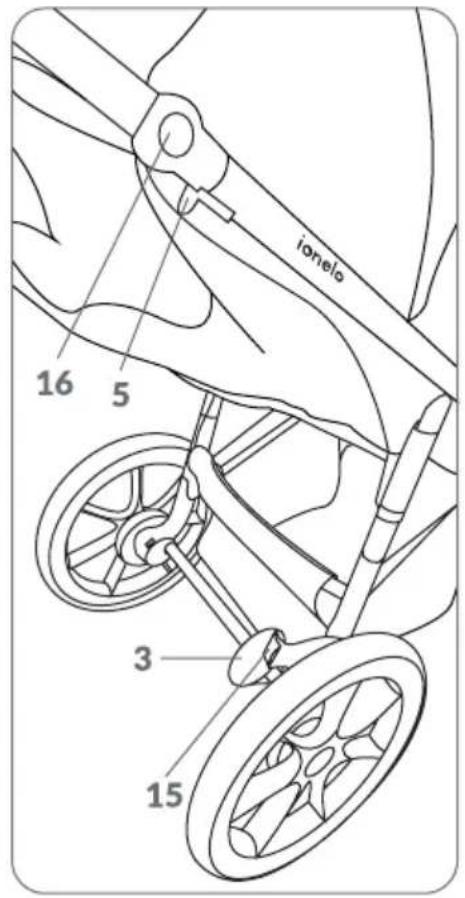
A
natural_image
Technical line drawing of a mechanical component with a cylindrical shaft and flange (no text or symbols)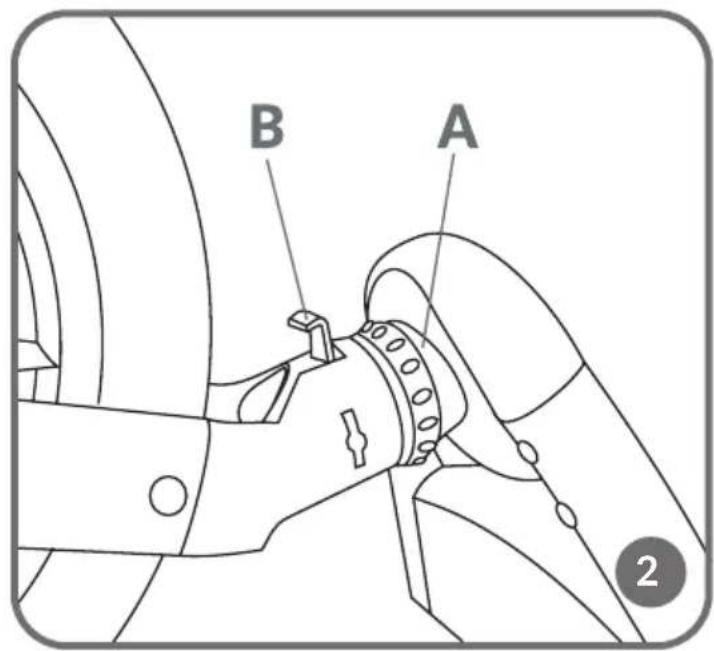
natural_image
Line drawing of a stroller with wheels and a green checkmark indicating action (no text or symbols)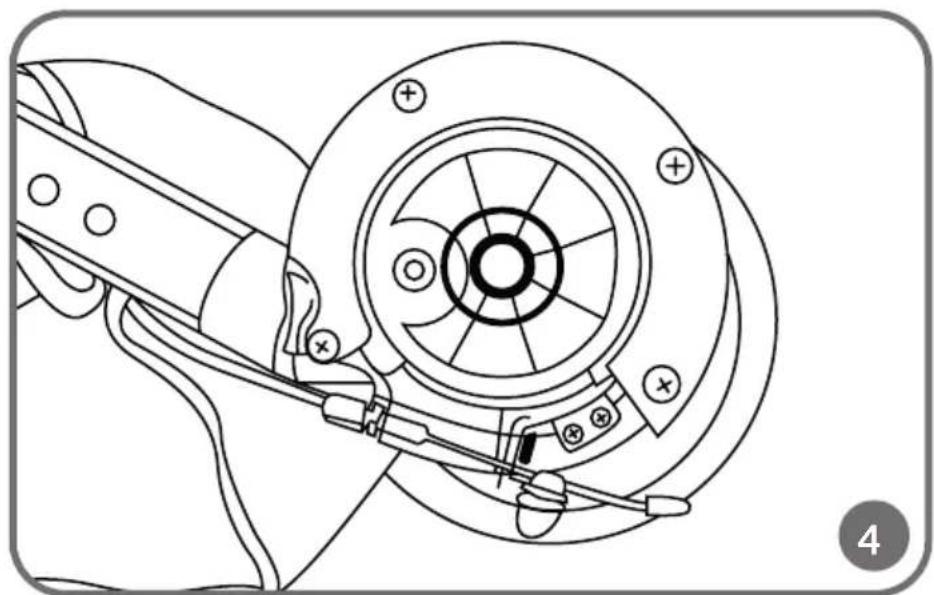
natural_image
Technical line drawing of a mechanical assembly with no visible text or symbols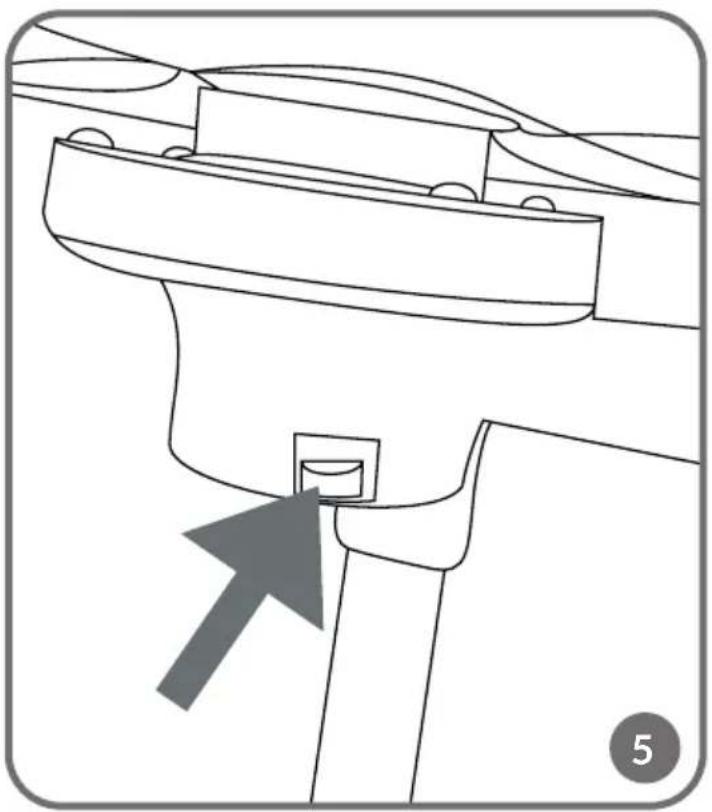
natural_image
Technical line drawing of a mechanical component with an arrow pointing to a small square feature (no text or symbols)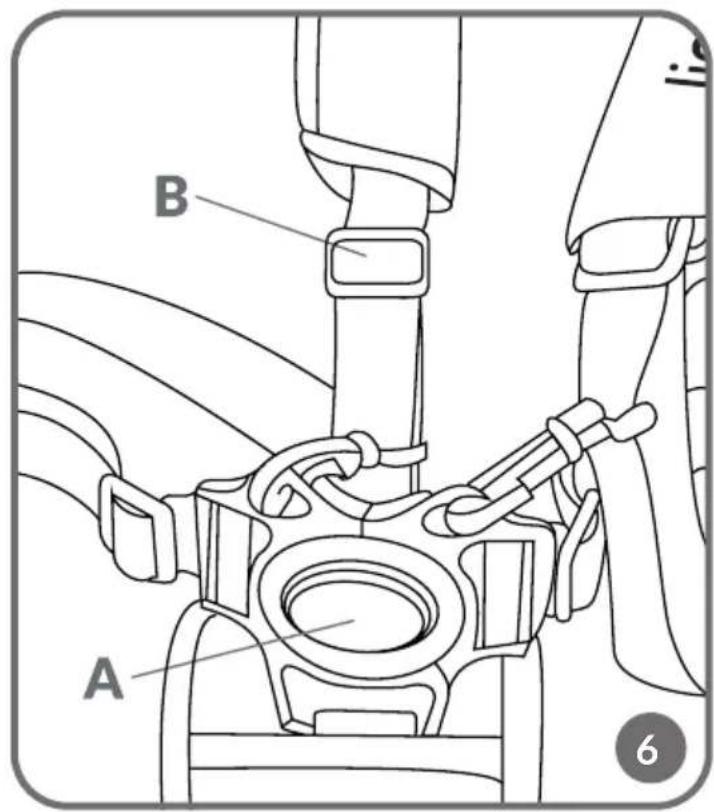
natural_image
Diagram showing a ship's deck with multiple ovals and directional arrows, no text or symbols present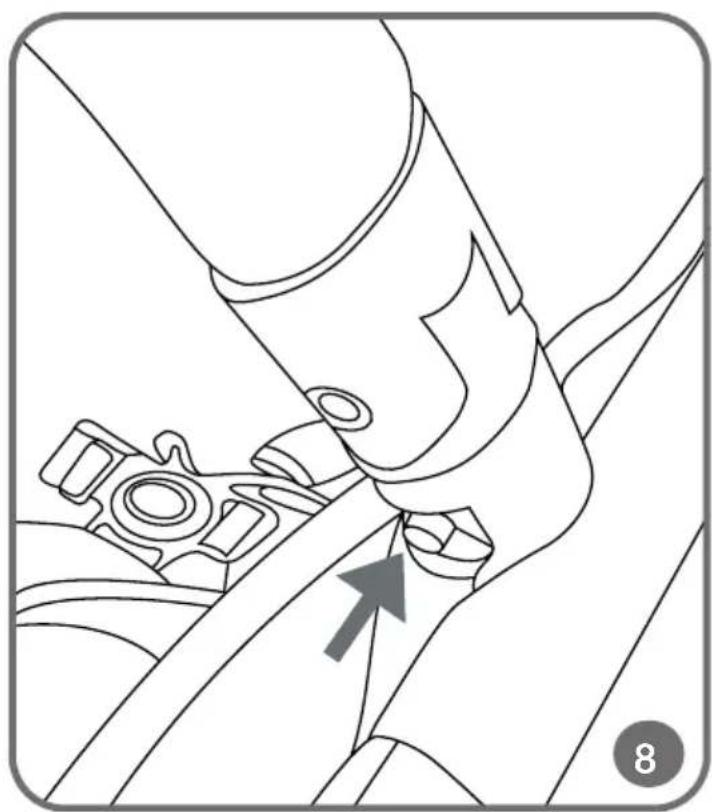
natural_image
Technical line drawing of a mechanical component with an arrow indicating a specific part (no text or symbols present)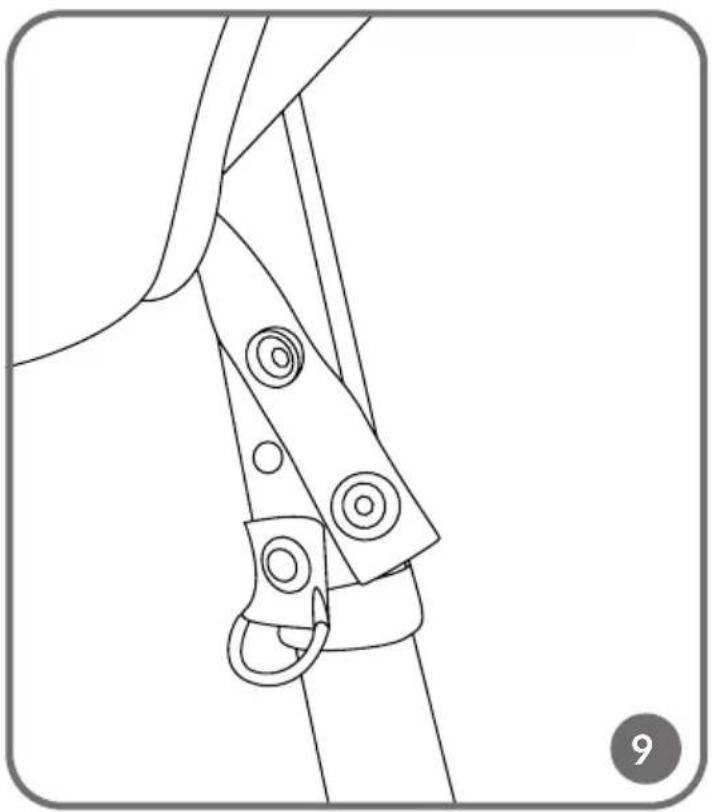
natural_image
Line drawing of a mechanical clamp or bracket assembly (no text or symbols)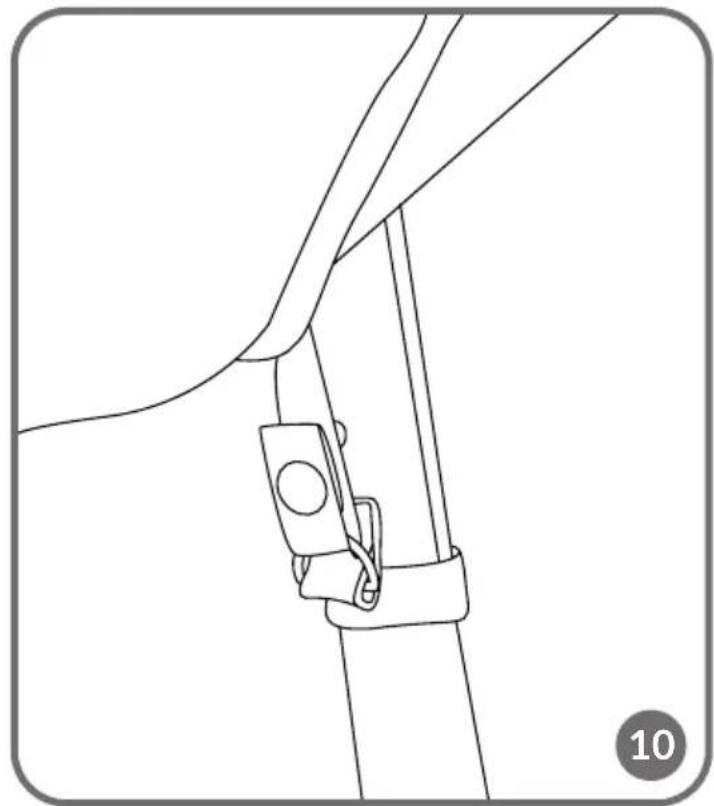
natural_image
Technical line drawing of a mechanical clamp or bracket assembly (no text or symbols)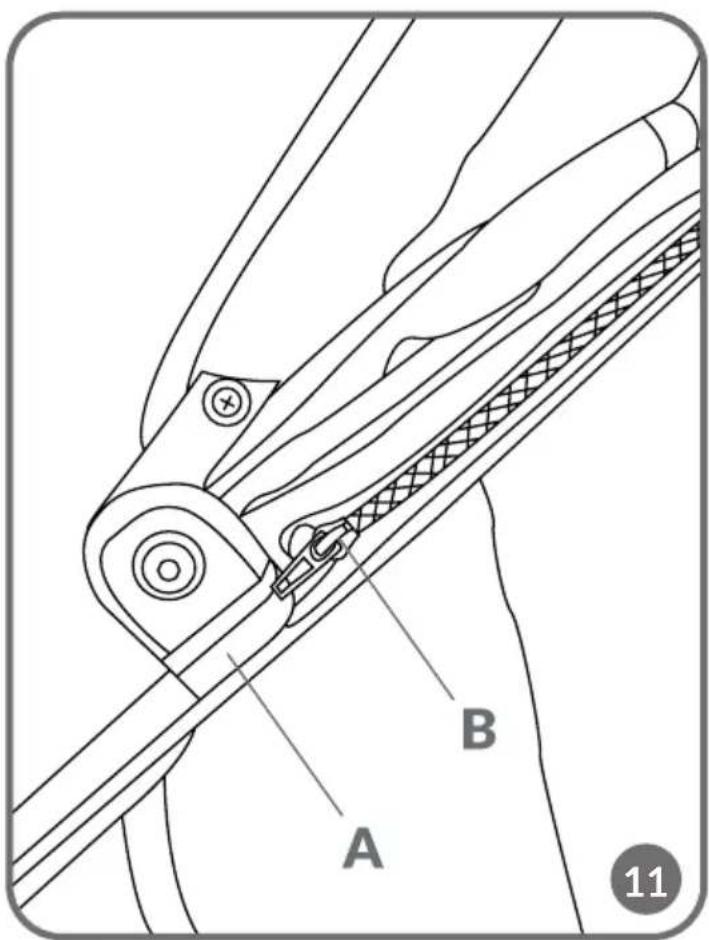

natural_image
Line drawing of a car interior showing seatbelt, lapel, and seat (no text or symbols)
natural_image
Line drawing of a mechanical component with a blue arrow indicating a specific connection point (no text or symbols present)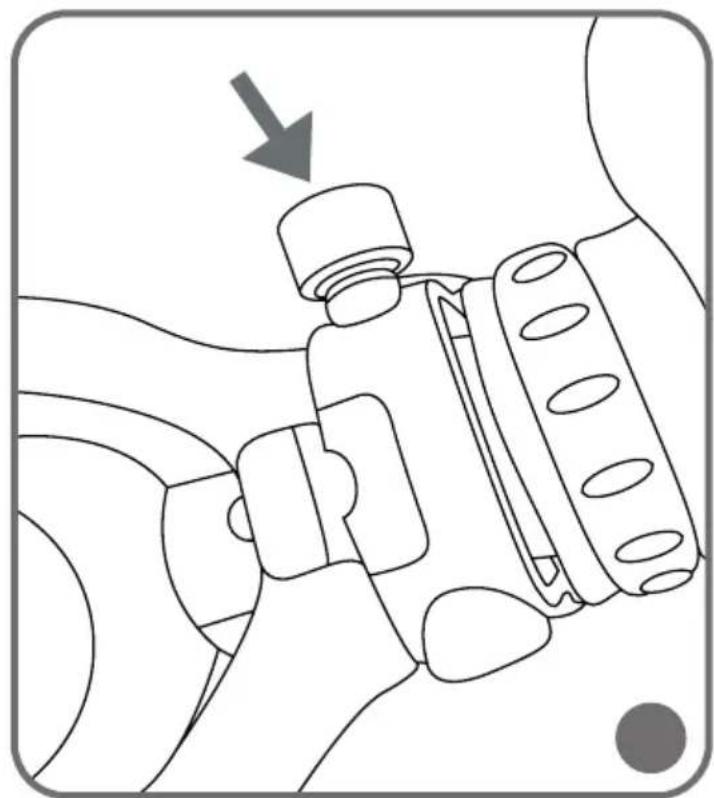
natural_image
Diagram of a mechanical assembly with a directional arrow indicating movement (no text or symbols present)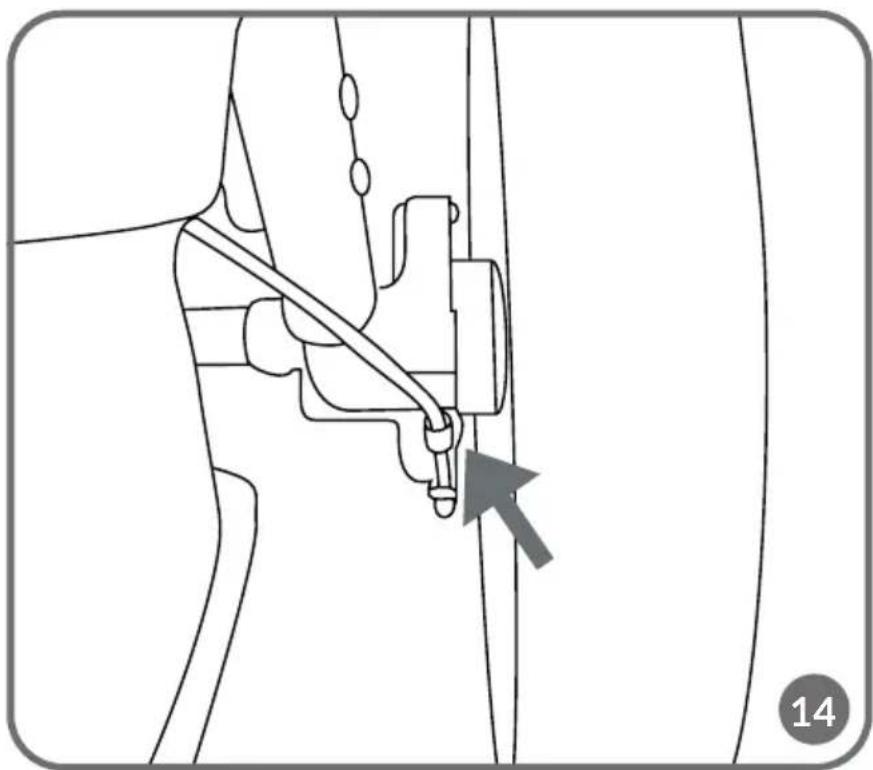
natural_image
Technical line drawing of a mechanical component with a highlighted connection point (no text or symbols)Dear Customer!
If you have any comments or questions about the product you have purchased, please contact us help@lionelo.com
Manufacturer:
BrandLine Group Sp. z o.o.
IMPORTANT! READ CAREFULLY AND KEEP FOR FUTURE REFERENCE WARNINGS
- Never leave the child unattended.
- Ensure that all the locking devices are engaged before use.
- To avoid injury ensure that the child is kept away when unfolding and folding this product.
- Do not let the child play with this product.
- This seat unit is not suitable for children under 6 months.
- Always use the restraint system.
- Check that the pram body or seat unit or car seat attachment devices are correctly engaged before use.
- WARNING! The stroller is equipped with inflatable wheels: Do not exceed the maximum allowable wheel inflation pressure. The value is located on the tire of the wheel.
- The product is suitable for a child weighing up to 22 kg or up to 4 years (whichever comes first).
- If you want to take the baby out of the stroller, or put it in it, make sure the locking mechanism is locked.
- The maximum allowable load of the basket is 3 kg.
- Any load attached to the handle and / or the back of the backrest and / or the sides of the product will affect the stability of the stroller.
- Only one child can use the product at a time.
- Do not use accessories that have not been approved by the manufacturer.
- Use only spare parts supplied or recommended by the manufacturer.
- Do not use the product on stairs.
- WARNING: A child is sharing your sporting activity: take extra care, particularly over kerbs, steps, rough ground and obstacles.
- Make sure the 5-point belts are fastened and the child is in a safe and comfortable position.
- WARNING: Do not use the pushchair for running/jogging or skating until the child is 9 months old.
- Do not use the product for running/jogging or skating when it is configured with a car seat or carrycot.
- When running/jogging or skating, the seat should always be in the most upright position and facing the street.
- It is recommended to protect the child with appropriate protective equipment (such as
a helmet) when the stroller is used for sports activities.
- The child in the stroller should be dressed warmer than the caregiver and protected from rain or UV rays.
- Adults are advised to wear a vest or reflective clothing when running/rolling near traffic.

A belt for the caregiver should be worn on the forearm at all times during sports activities.
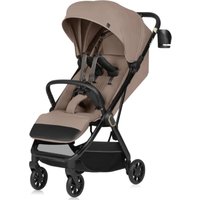
LIST OF PARTS (FIG. A)
- Handle
- Hand brake
- Locking mechanism
- Frame folding button
- Frame folding lever
- Canopy
- Safety bar
-
Rear wheel
-
Front wheel
- Footrest
- Basket
- Seat
- Safety bar installation connector
- 5-point belt
- Unfolding lock
- Handle adjustment button
To unfold the stroller, tilt the lock (15, fig. A), then grab the handle and dynamically pull it upward. The stroller will unfold itself. A click will signal the correct unfolding of the stroller.
HANDLE ADJUSTMENT
Press the handle adjustment buttons (16, fig. A) on both sides of the stroller, then adjust the handle to the desired position.
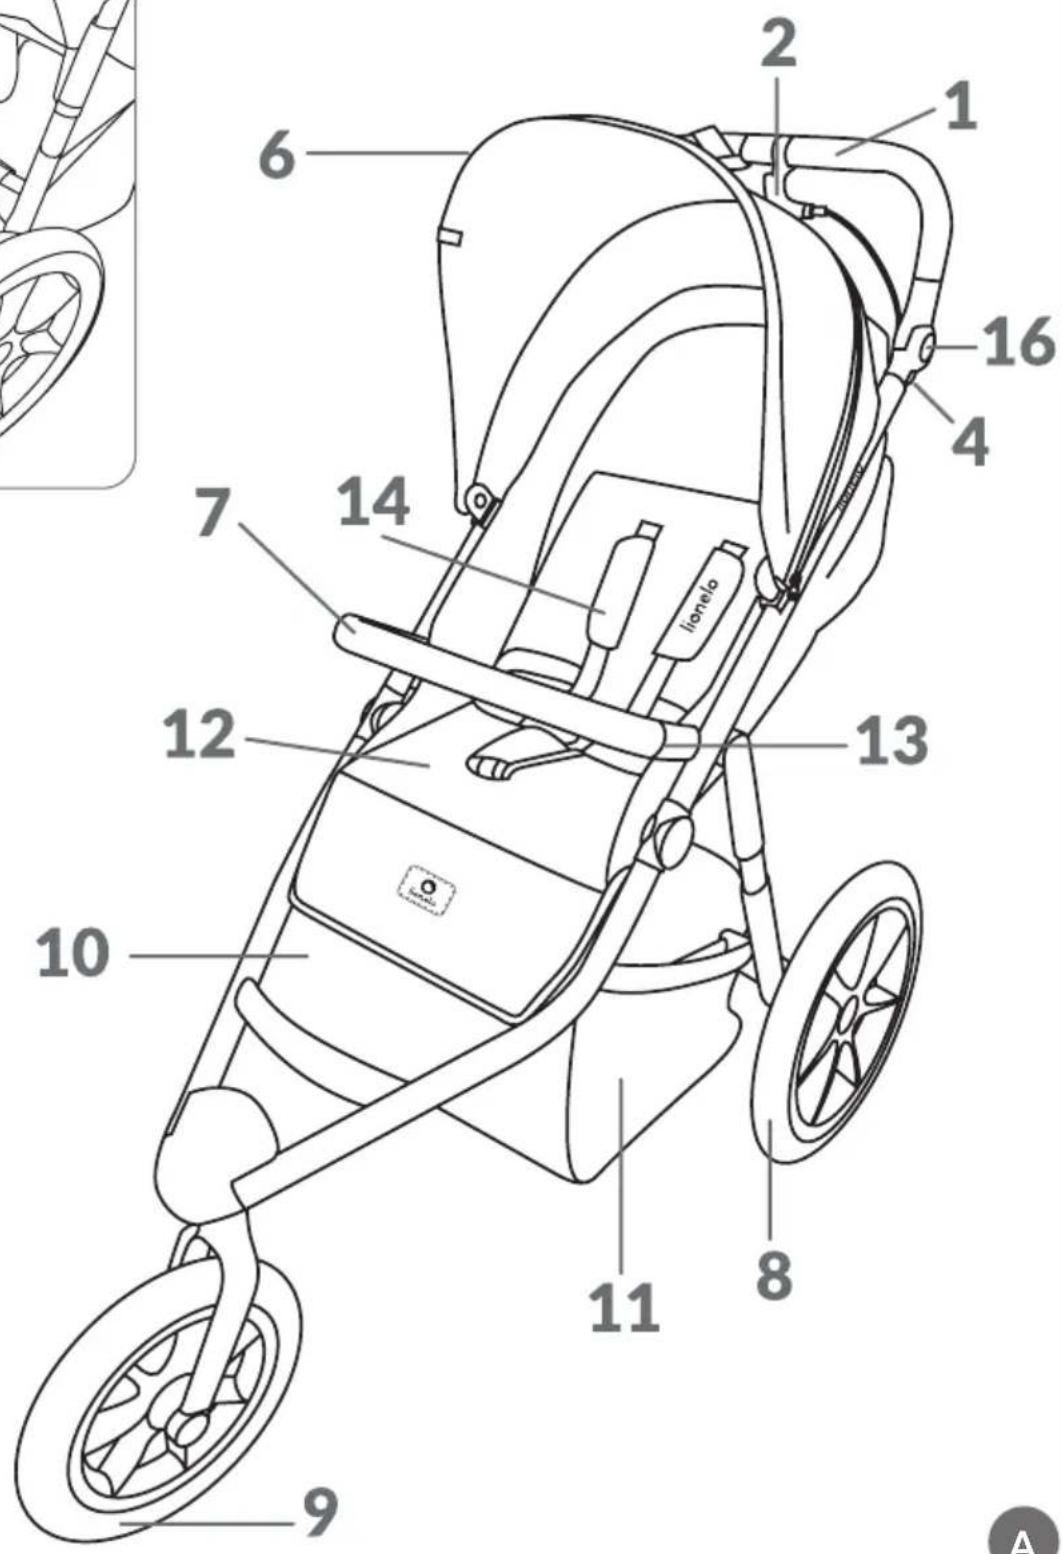
INSTALLATION AND REMOVAL OF THE FRONT WHEEL
- Put the front wheel on the pin at the frame of the stroller (fig. 1).
- To lock the wheel for straight forward movement, turn the lock located above the front wheel (A, fig. 2).
- To unlock, turn the lock in the opposite direction.
- To remove the front wheel, pull the release button (B, fig. 2) and pull it out of the stroller frame.
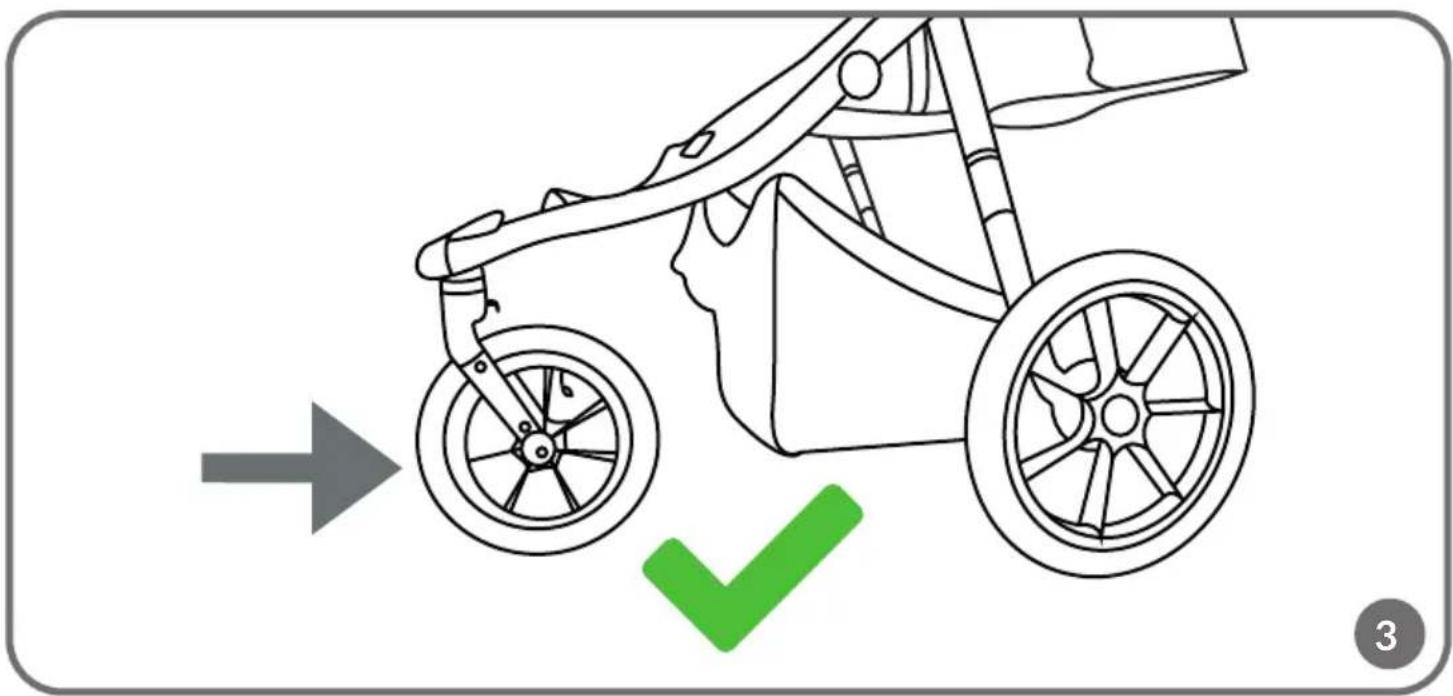
Note! When using the stroller for running or skating, lock the front wheel in an inward-facing position (fig. 3). To adjust the front wheel axis, use the trimmer (fig. 15).
INSTALLATION AND REMOVAL OF REAR WHEELS
- Insert the pin of the rear wheels into the corresponding holes (fig. 4) in the frame of the stroller.
- To remove the rear wheels, press the button (fig. 5) and pull them out of the stroller frame.
SEAT BELTS
- Insert the fastener components into the main buckle (A, fig. 6). A correct connection will signal a click.
- Adjust the length of the harness to the child's body using the buckles located on the straps (B, fig. 6).
- To unbuckle the harness, press the button located in the buckle (A, fig. 6).
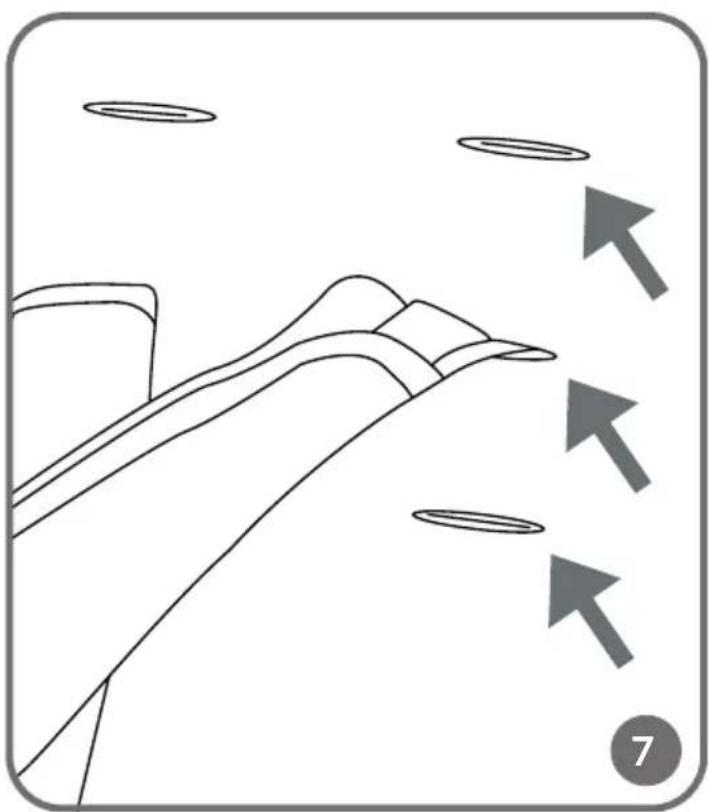
SEAT BELT ADJUSTMENT
To adjust the straps, remove the buckle through the hole located in the seat and put it in the desired place (fig. 7). Make sure that the buckles are in the correct, stable position after repositioning.
INSTALLATION AND REMOVAL OF THE SAFETY BAR
Clip the safety bar installation connectors (13, fig. A) into the appropriate places on the stroller frame.
Insert the safety bar into the connectors on the stroller frame. Correct installation will signal a click.
To remove the safety bar, press the release buttons located at the connectors of the safety bar (fig. 8). Push the buttons independently on both sides of the stroller, then pull out the safety bar.
INSTALLATION OF THE SEAT TO THE FRAME
Note! The seat should be clipped to the frame of the stroller when in use.
To attach the seat to the frame of the stroller, use the straps and buckles located on both sides of the stroller. Put the seat attachment strap through the buckle and fasten the fasteners (fig. 9, 10). Perform the operation on both sides of the stroller.
INSTALLATION AND ADJUSTMENT OF THE CANOPY
- Slide the stroller's canopy over the connectors on both sides of the frame from the top (A, fig. 11). Pay attention to the installation direction.
- Fasten the canopy to the seat with the zipper (B, fig. 11).
- The canopy is equipped with an adjustable panel. To cover the child, push the canopy towards the safety bar. To uncover, push the canopy toward the parent handle.
SEAT ADJUSTMENT
Note! Do not adjust the seat when there is a child in the stroller.
- To change the position of the seat, use the buckle located on the adjustment strap at the back of the backrest (fig. 12).
- Slide the buckle down to the end of the adjustment strap to adjust the seat to the reclining position.
- Slide the buckle upward to adjust the seat to a sitting position.
LOCKING MECHANISM
Push in the locking mechanism (3, fig. A) to lock the wheels and stop the wheelchair. Lift to unlock.
HAND BRAKE
Note! Before using the stroller, check the effectiveness of the hand brake.
- To activate the brake, depress the lever located on the parent handle (2, fig. A).
- If necessary, make adjustments at the brake lever and/or brake drum at the wheel by operating the nuts (fig. 13, 14).
Note! Unlock the front wheel before folding the stroller.
-
To fold the stroller, press the button (4, fig. A) and move both folding levers (5, fig. A) at the same time, then fold the stroller.
-
Press down on the stroller to make sure it is folded correctly. Make sure the lock (15, fig. A) is correctly inserted.
- To unfold the stroller again, follow the steps described in the Unfolding the stroller subsection.
CLEANING AND MAINTENANCE
- The cover and basket can be hand-washed at 30^ .
- Clean the frame of the stroller with a damp cloth and mild cleaning agents.
- Regularly check the condition of the stroller and wheels. Do not use accessories that are not included. Use only original spare parts.
- Do not expose the stroller to direct sunlight for too long.
- Do not expose the stroller to salt water, as this can cause rust.
The photos are for reference only, the actual look of the products may differ from the ones shown in the pictures.
PL
Drogi Kliencie!
BrandLine Group Sp. z o.o.
BrandLine Group Sp. z o.o.
BrandLine Group Sp. z o.o.
BrandLine Group Sp. z o.o.
BrandLine Group Sp. z o.o.
BrandLine Group Sp. z o.o.
BrandLine Group Sp. z o.o.
A. Kręglewskiego 1, 61-248 Poznań (Poznanė), Lenkija
SVARBU! ATIDŽIAI PERSKAITYKITE IR SAUGOKITE, KAD VĚLIAU GALĚTUMĚTE PASISKAITYTI JSPĚJIMAI
MONTÁŽ A DEMONTÁŽ ZADNÍCH KOL
MONTÁŽ A DEMONTÁŽ MADLA
MONTÁŽ SEDADLA NA RÁM
BrandLine Group Sp. z o.o.
BrandLine Group Sp. z o.o.
BrandLine Group Sp. z o.o.
BrandLine Group Sp. z o.o.
BrandLine Group Sp. z o.o.
A. Kręglewskiego 1, 61-248 Poznań, Puola
TÄRKEÄÄ! LUE HUOLELLISESTI JA SÄILYTÄ VASTAISUUDEN VARALLE VAROITUKSET
Detailed warranty conditions are available on the website: