
Luna - Stroller Lionelo - Free user manual and instructions
Find the device manual for free Luna Lionelo in PDF.


| Product Type | Co-sleeping crib for stroller |
| Brand | Lionelo |
| Model | Luna |
| Dimensions (L × W × H) | Approximately 90 × 55 × 75 cm (estimated) |
| Weight | Approximately 8 kg (estimated) |
| Materials | Metal frame, plastic bassinet, fabric cover |
| Number of adjustable heights | 7 positions |
| Co-sleeping function | Yes, with side lowering and attachment to adult bed |
| Wheels | 4 wheels with brakes |
| Washable cover | Yes, hand wash at 30 °C |
| Safety standards | EN 1130:2019+AC:2020 and EN 16890:2017+A1:2021 |
| Recommended age | From birth until the child can sit up or pull themselves up alone |
| Maximum child weight | Up to 9 kg (estimated) |
| Cleaning | Washable cover at 30 °C; metal/plastic parts with damp cloth |
| Storage | Dry place, away from heat and moisture |
| Included accessories | Mattress, mounting straps, accessory basket |
| Repairability | Spare parts available from the manufacturer (contact: help@lionelo.com) |
Frequently Asked Questions - Luna Lionelo
User questions about Luna Lionelo
0 question about this device. Answer the ones you know or ask your own.
Ask a new question about this device
Download the instructions for your Stroller in PDF format for free! Find your manual Luna - Lionelo and take your electronic device back in hand. On this page are published all the documents necessary for the use of your device. Luna by Lionelo.
USER MANUAL Luna Lionelo
natural_image
Line drawing of a portable water heater with adjustable legs and wheels (no text or symbols)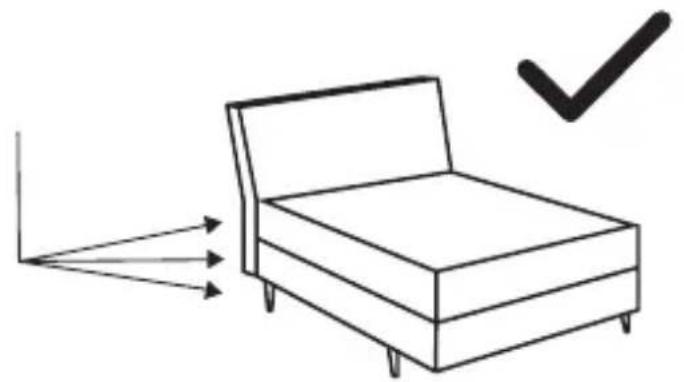
natural_image
Simple line drawing of a bed with arrows pointing to its sides and a checkmark (no text or symbols)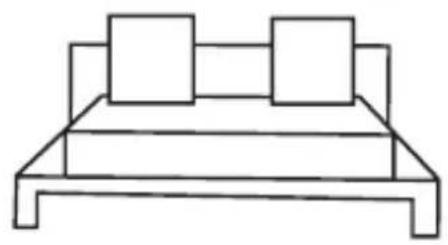
natural_image
Simple line drawing of a bed with two square blocks on top (no text or symbols)
A
natural_image
Diagram of a bicycle seatbelt mechanism showing rotational and linear motion (no text or symbols)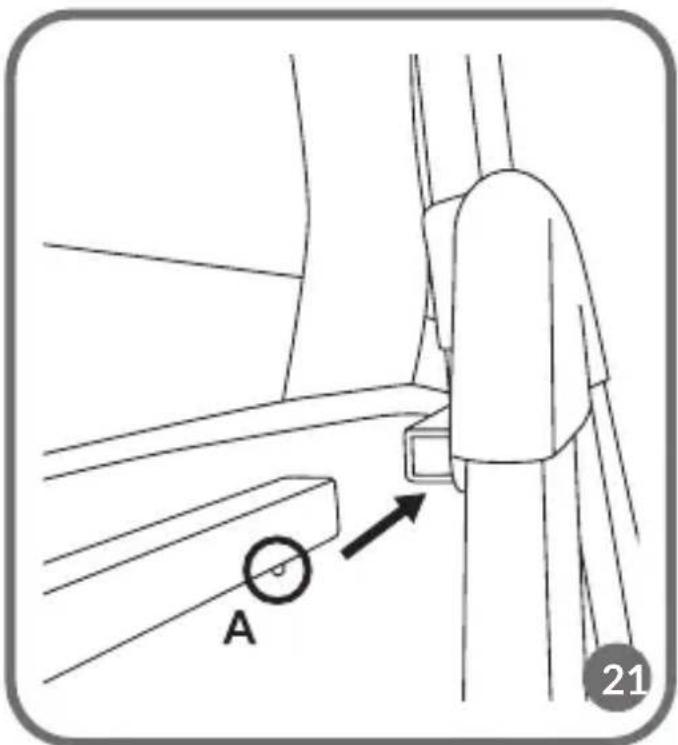
natural_image
Line drawing of a hand gripping a mechanical component with a circular annotation highlighting a key point (no text or symbols present)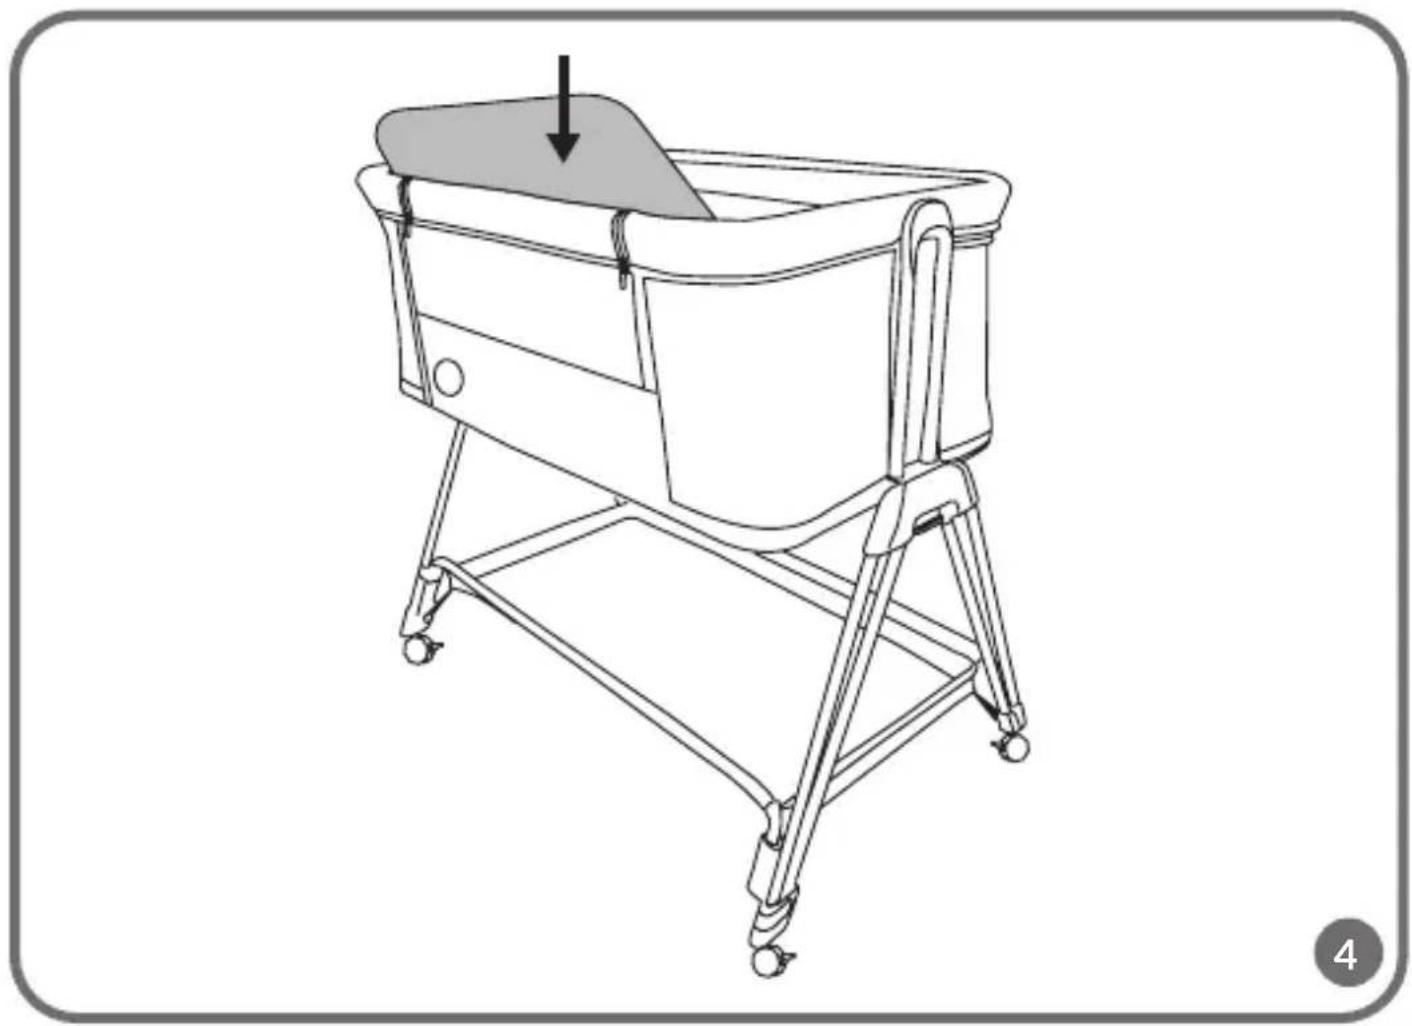
natural_image
Line drawing of a portable water heater with a handle and wheels, no text or symbols present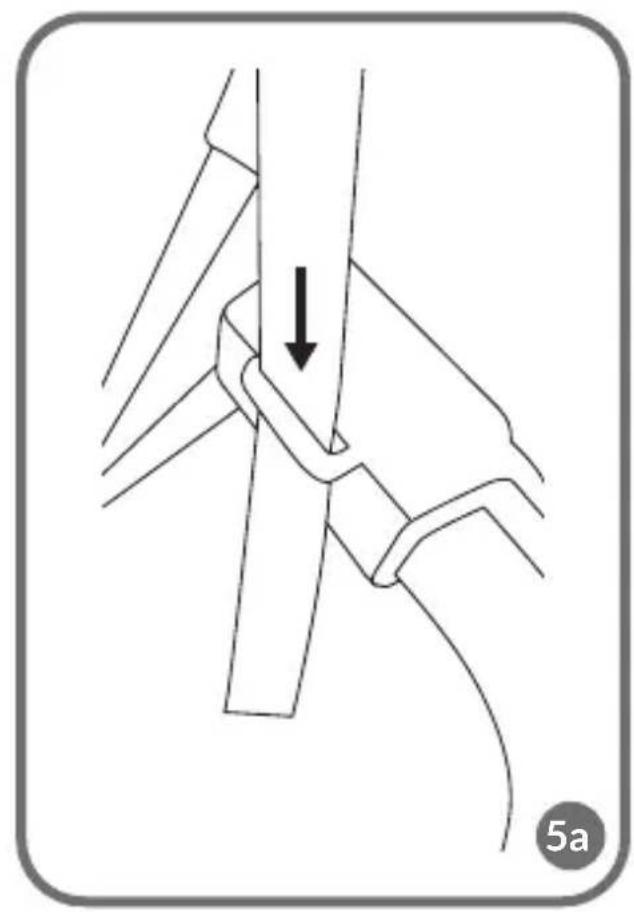
natural_image
Diagram of a mechanical joint or bracket with an arrow indicating direction, no text or symbols present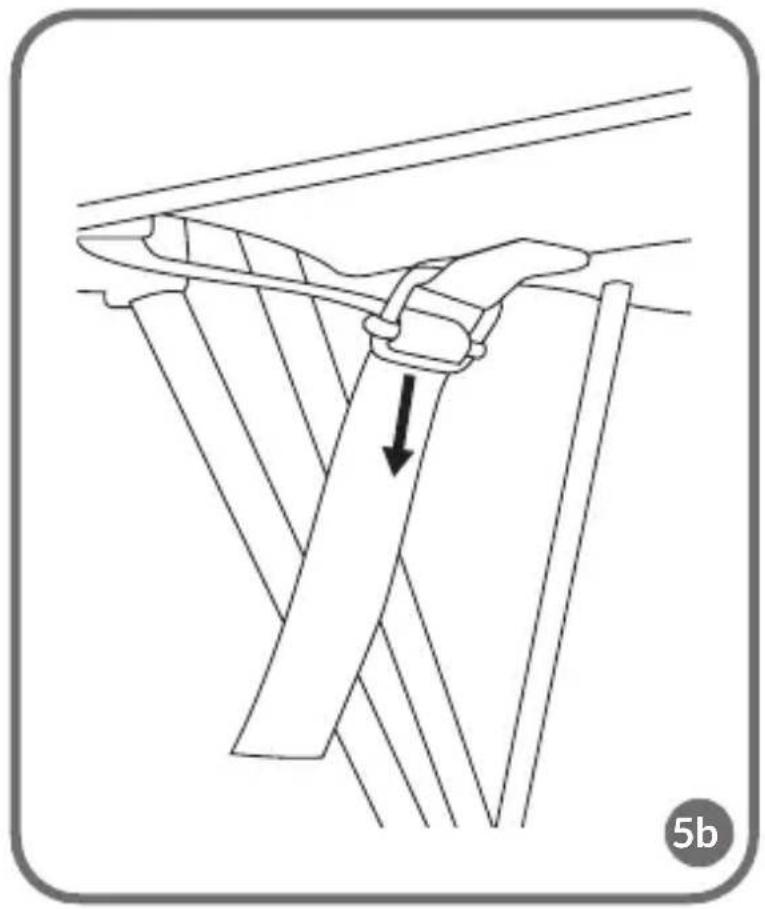
natural_image
Diagram of a mechanical assembly with a downward arrow indicating a process or movement (no text or symbols present)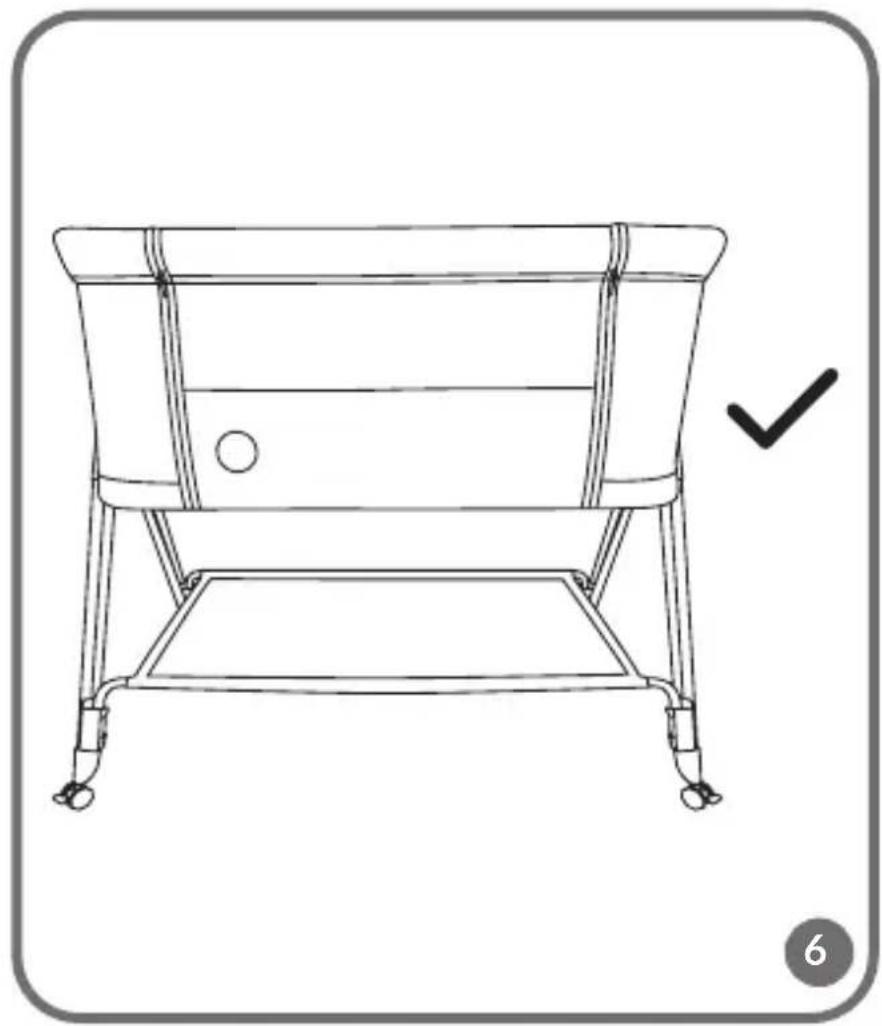
natural_image
Line drawing of a simple outdoor table with legs and feet, no text or symbols present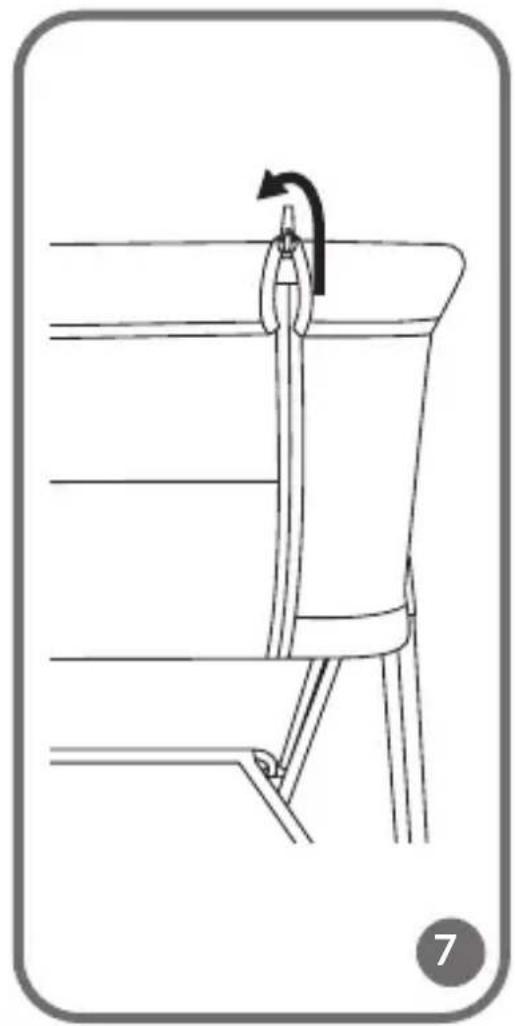
natural_image
Line drawing of a mechanical assembly with a curved arrow indicating motion (no text or symbols)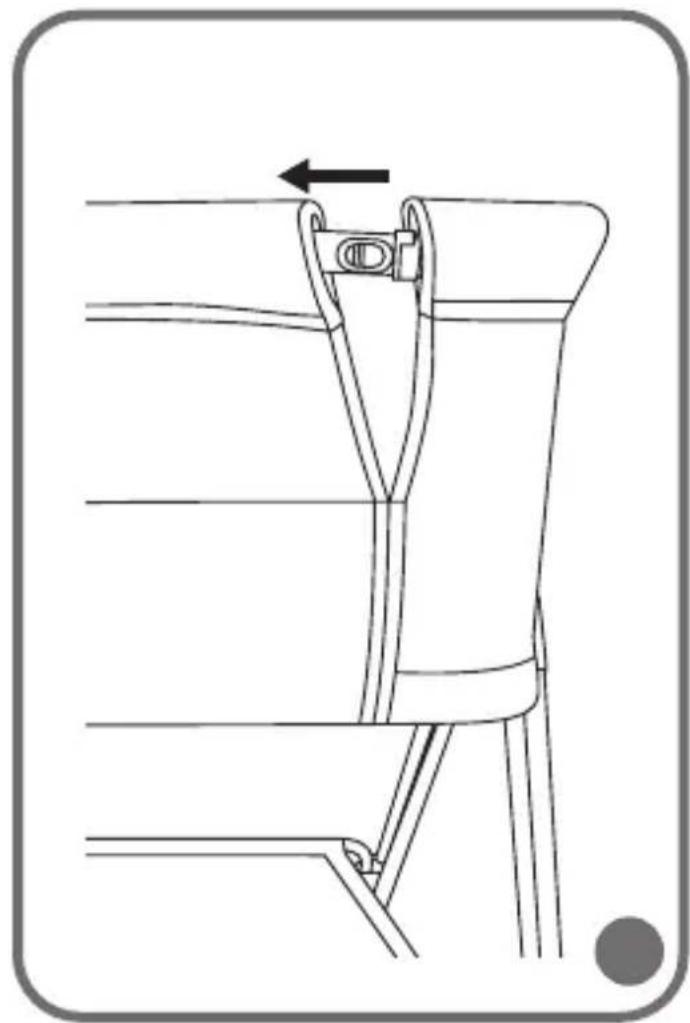
natural_image
Line drawing of a chair seat with a vertical arm and seatbelt, showing structural details (no text or symbols)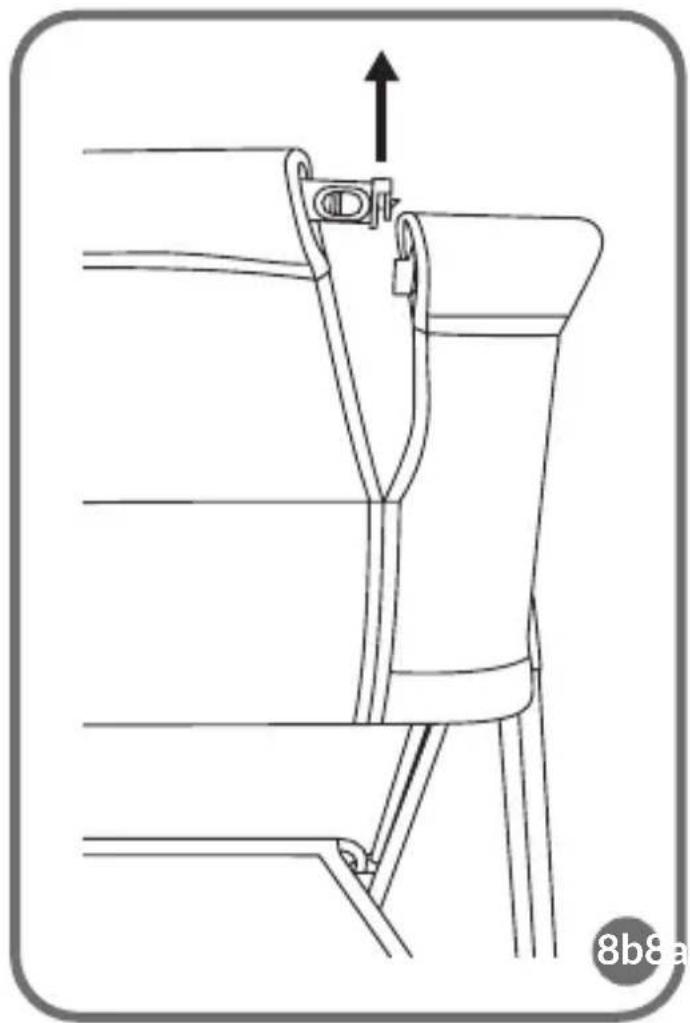
natural_image
Technical line drawing of a mechanical assembly with an upward arrow indicating force or direction (no text or symbols)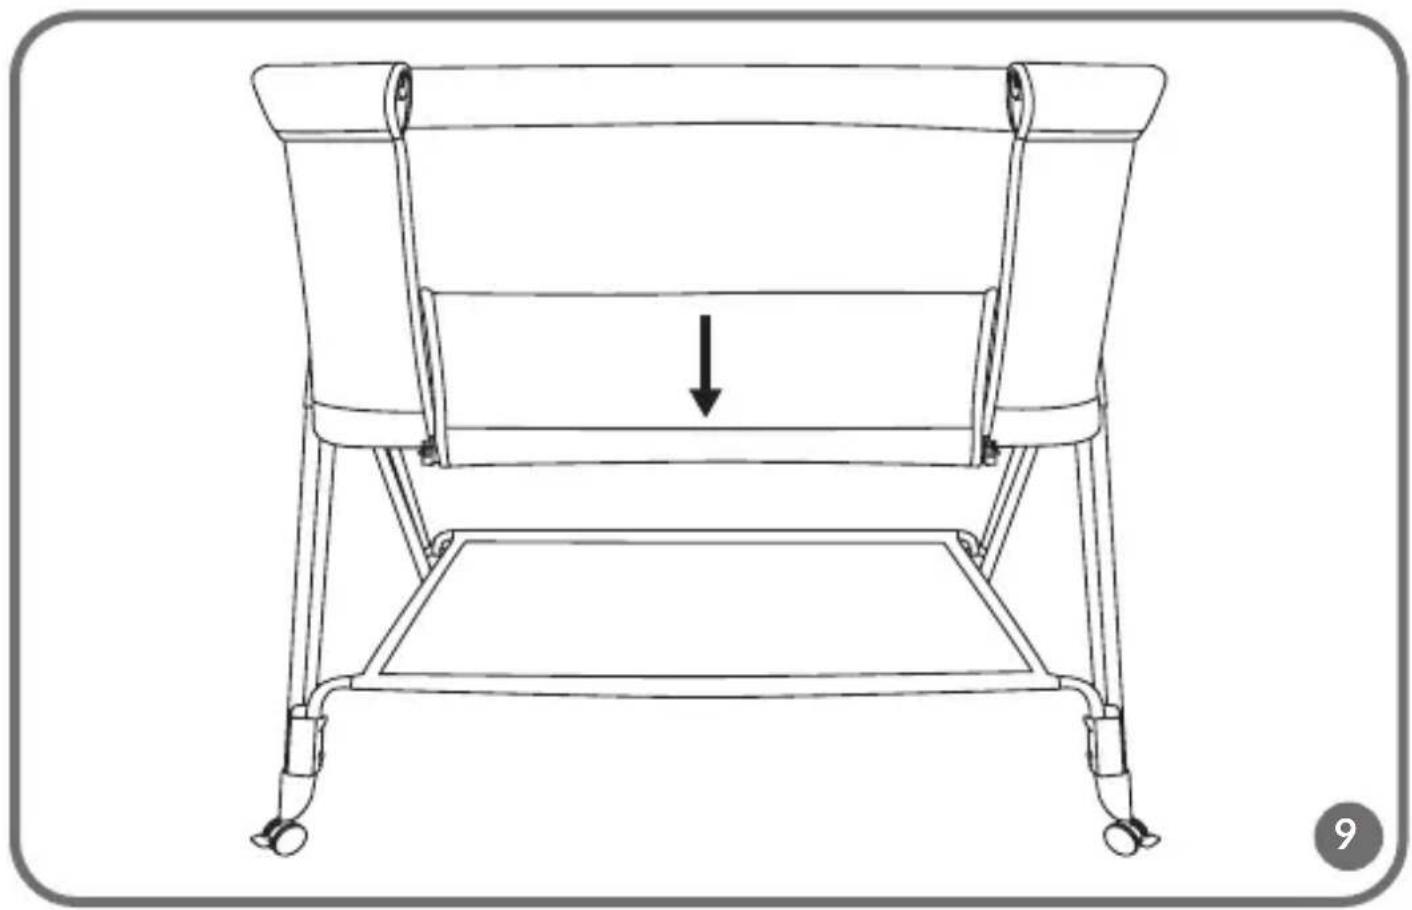
natural_image
Line drawing of a simple chair with legs and seat, showing a downward arrow indicating compression or lifting (no text or symbols)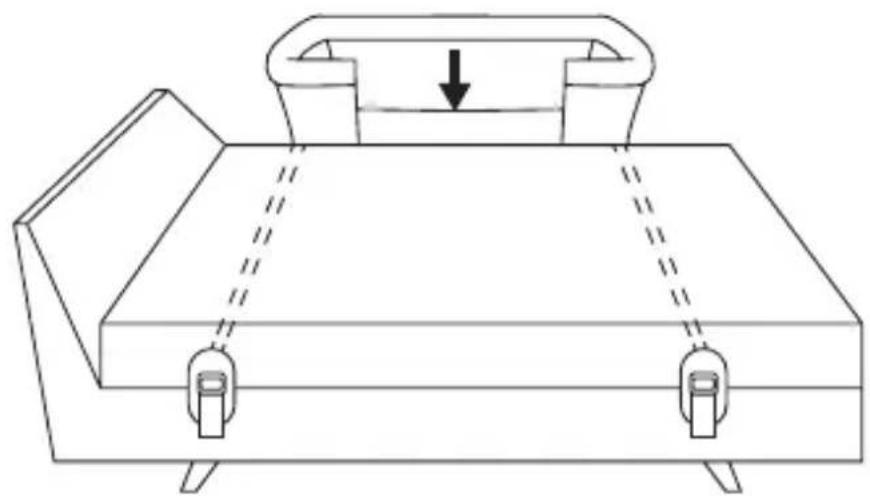
natural_image
Technical line drawing of a mechanical device with a downward arrow indicating force or movement (no text or symbols present)10a
natural_image
Line drawing of a simple outdoor table with two circular fixtures and legs (no text or symbols)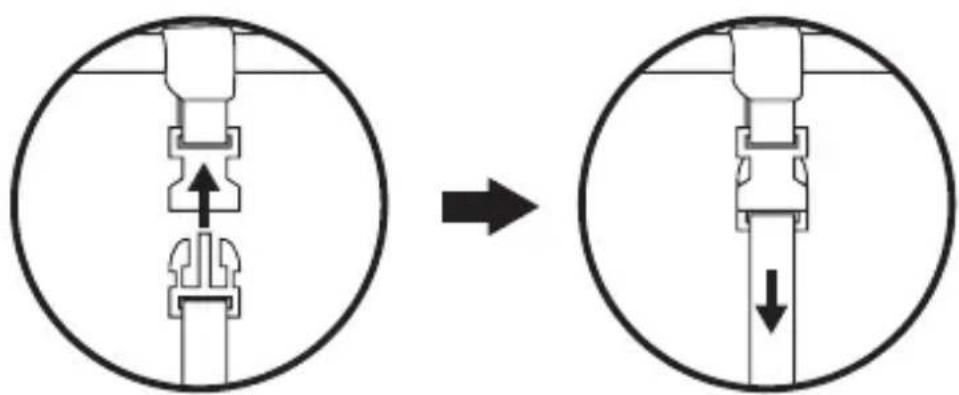
10b
natural_image
Technical line drawing of a mechanical component with no visible text or symbols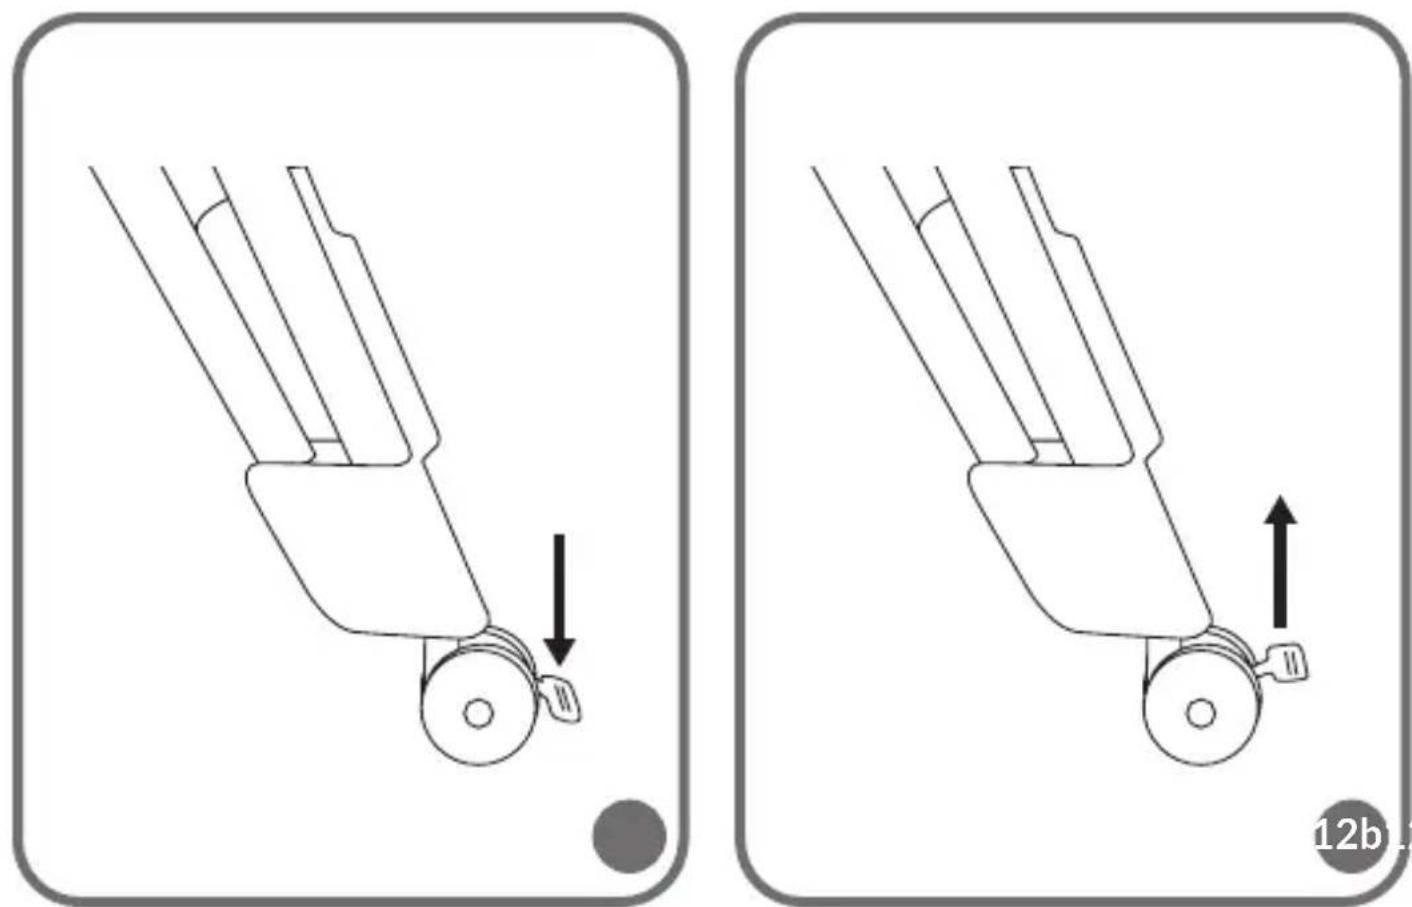
natural_image
Two identical line drawings of a mechanical device with a downward arrow and an upward arrow, no text or symbols present.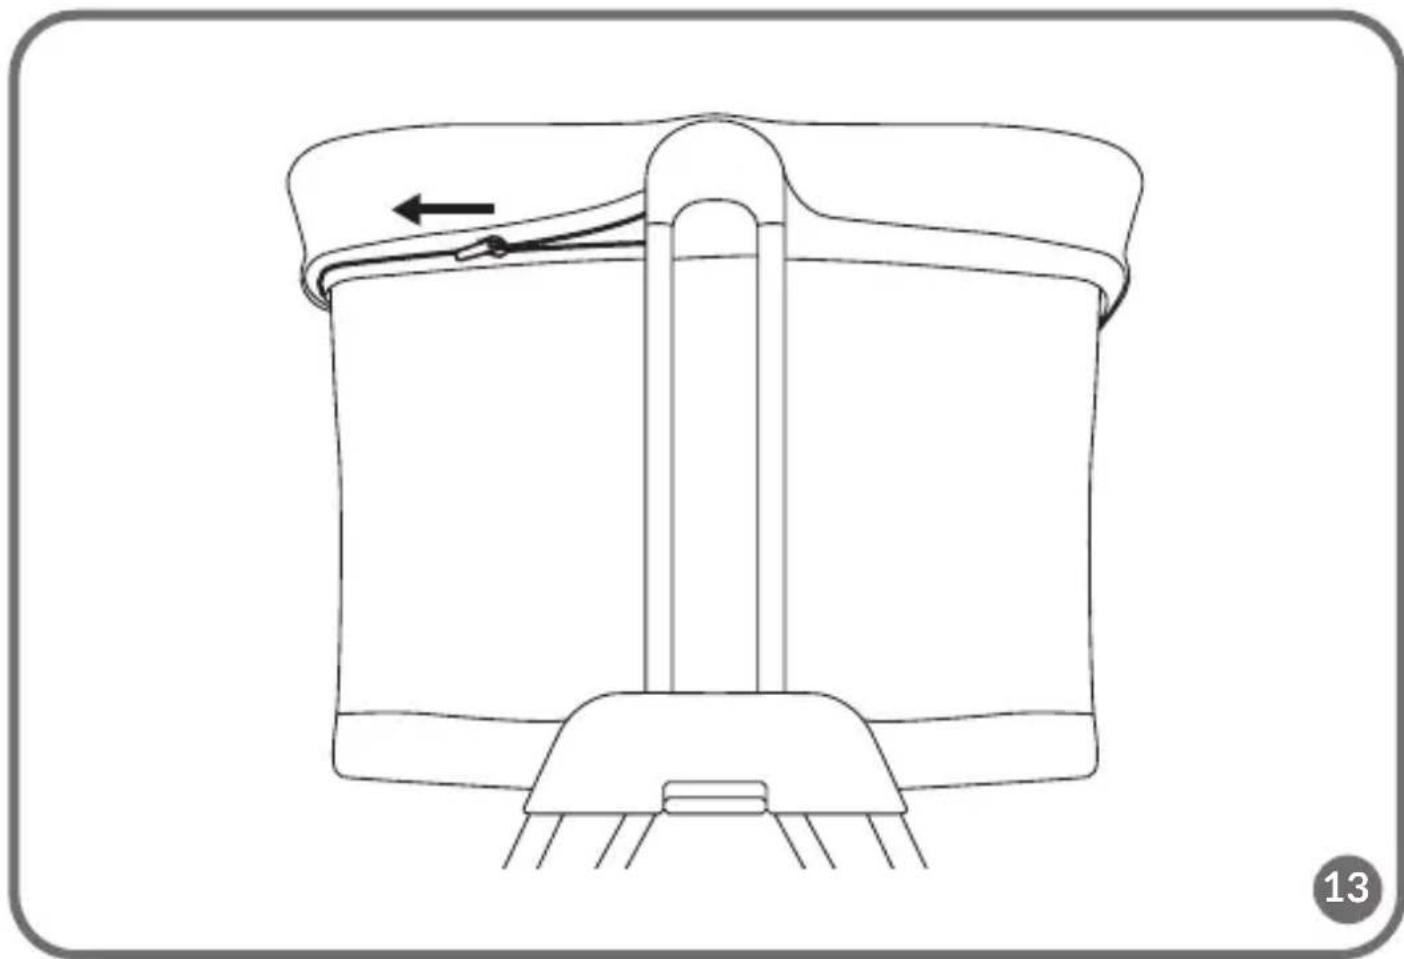
natural_image
Line drawing of a mechanical component with a central shaft and base, showing no text or symbols.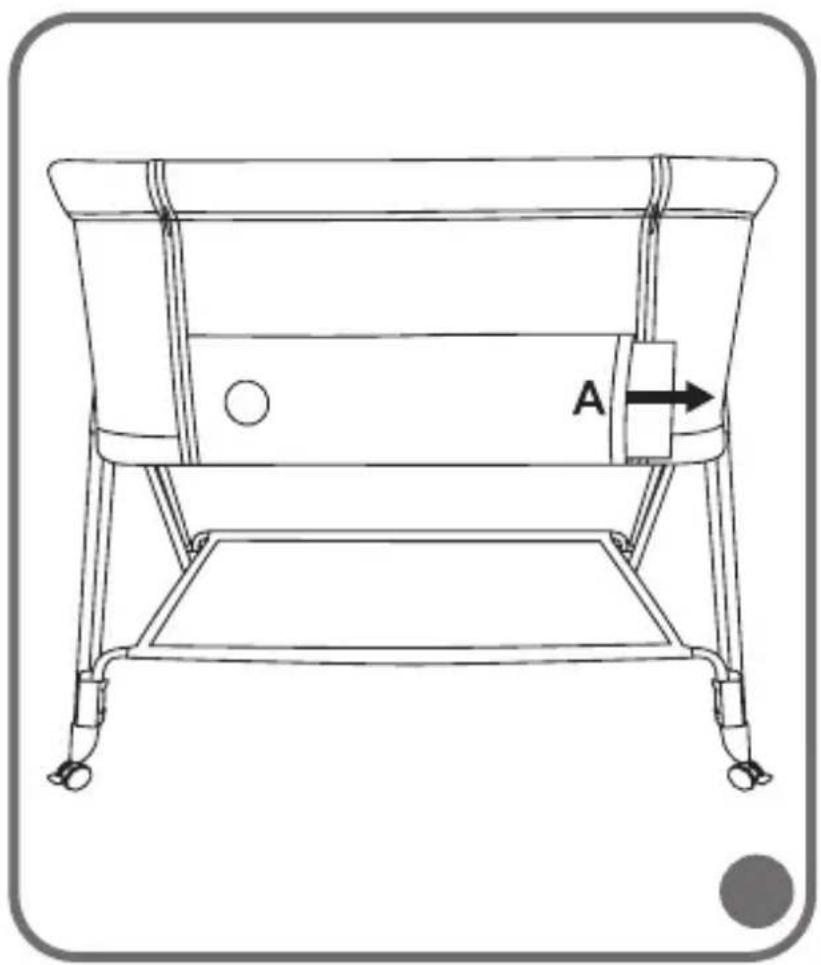
natural_image
Line drawing of a simple outdoor bathtub with legs and feet, labeled A (no text or symbols beyond label)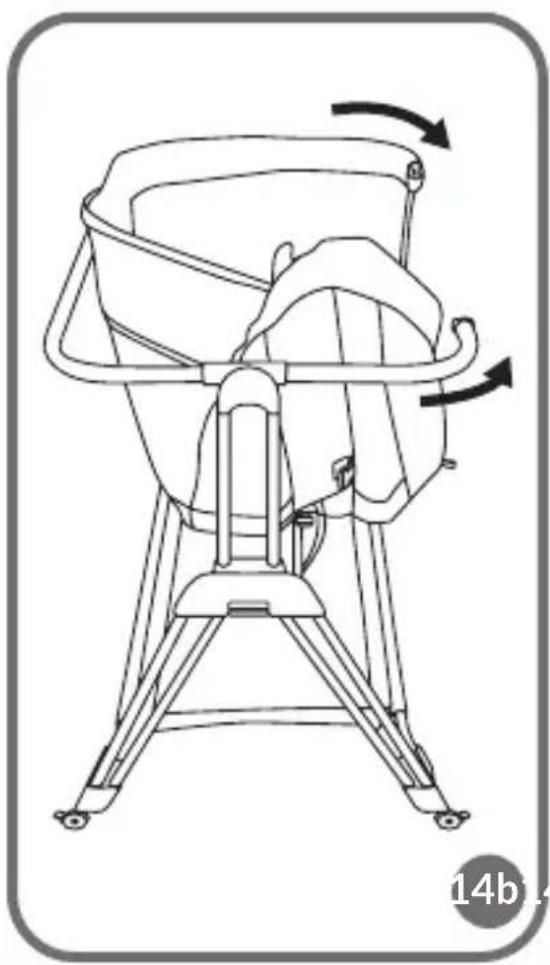
natural_image
Line drawing of a baby boom lift with directional arrows indicating motion (no text or symbols)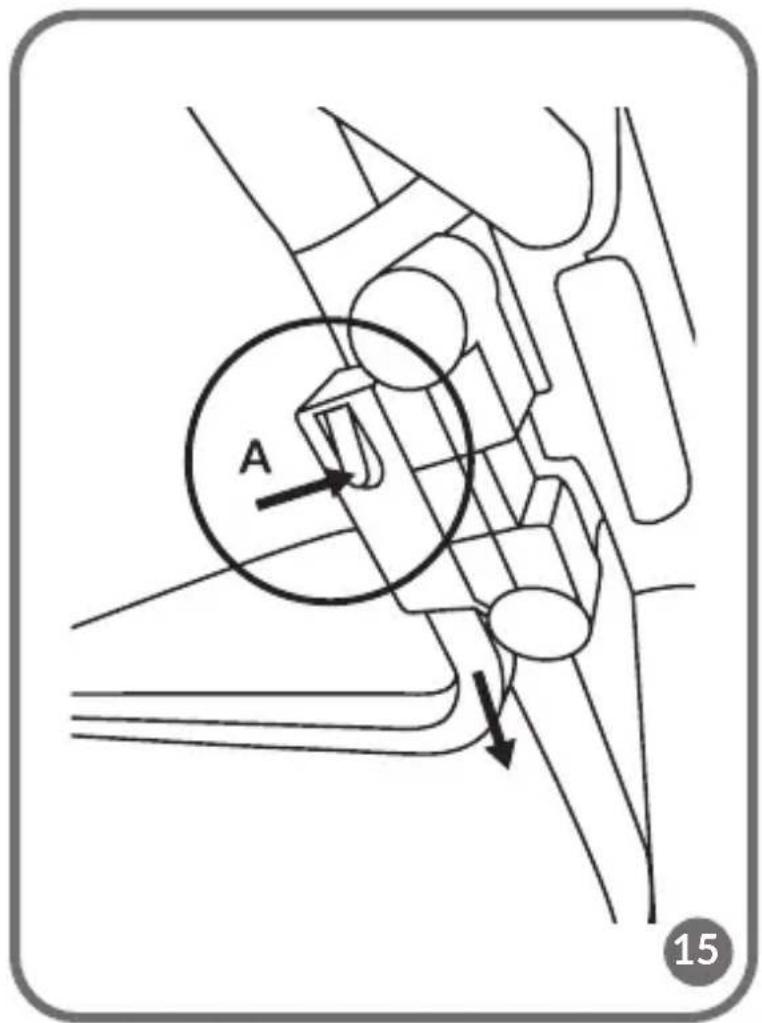
natural_image
Diagram showing a mechanical assembly with two views of a vehicle, one being lifted and the other assembled, both without any text or symbols.Dear Customer!
In case of any questions or comments on the purchased product, please contact
us: help@lionelo.com
Before you use the product, please read this manual carefully.
Producer:
BrandLine Group Sp. z o. o.
CAREFULLY AND KEEP FOR
FUTURE REFERENCE
WARNING
- Do not use this product without reading the instructions for use first.
- Stop using the product as soon as the child can sit or kneel or pull itself up.
- Placing additional items in the product may cause suffocation.
- Do not place the product close to another product, which could present a danger of suffocation or strangulation, e.g. strings, blind/curtain cords, etc.
- Do not use more than one mattress in the product.
- The product should be placed on a horizontal floor.
- Young children should not be allowed to play unsupervised in the vicinity of the crib.
-
The crib should be locked in the fixed position when the child is left unattended.
-
All assembly fittings must always be properly tightened. Make sure no screws are loose because a child could trap parts of the body or clothing (e.g. strings, necklaces, ribbons for babies' dummies, etc.), which would pose a risk of strangulation.
- The maximum mattress thickness is marked with a line inside the carrycot. Do not use a mattress thicker than permitted.
- Be aware of the threat posed by a burning cigarette, open flame or other sources of high temperature, such as electric heaters, gas water heaters, etc., in the near vicinity of the crib.
- The maximum inclination allowed is a two-level difference. The baby must be placed in the crib with its head at the higher end.
- DO NOT use the crib if any parts are missing, damaged, or broken. Contact Lionelo for replacement parts and instructional literature if needed. DO NOT substitute parts.
WARNINGS FOR MATTRESS:
- Do not use the mattress if any parts are broken, torn or missing. Use only the spare parts approved by the manufacturer.
- Do not use more than one mattress in the crib.
- Be aware of the threat posed by a burning cigarette, open flame or other sources of high temperature, such as electric heaters, gas water heaters, etc., in the near vicinity of the crib.
- DO NOT use the bedside sleeper if any parts are missing, damaged, or broken. Contact Lionelo for replacement parts and instructional literature if needed. DO NOT substitute parts.
- The distance from the floor of the adult's bed for which the bedside sleeper is intended is between 54.6 cm and 67.3 cm.
- The bedside sleeper is intended only for standard adults' beds. Do not use the product with waterbeds or rounded beds.
-
Do not use other mounting systems than described in the manual.
-
Never use the bedside sleeper if it is inclined.
- To avoid suffocation risk, always attach the bedside sleeper to the parents' bed with the use of mounting systems described in the manual.
- There must not be any free space between the lower part of the bedside sleeper and adult bed's mattress.
- Before every use, check the bed mounting system tension. To do so, try to pull the bedside sleeper away from the parents' bed.
- If there is free space between the bedside sleeper and adults' bed, DO NOT USE the product.
- The gap between the bedside sleeper and adults' bed must not be filled with pillows, blankets and other items.
- DANGER! Always completely raise the drop side when not attached to the adult's bed.
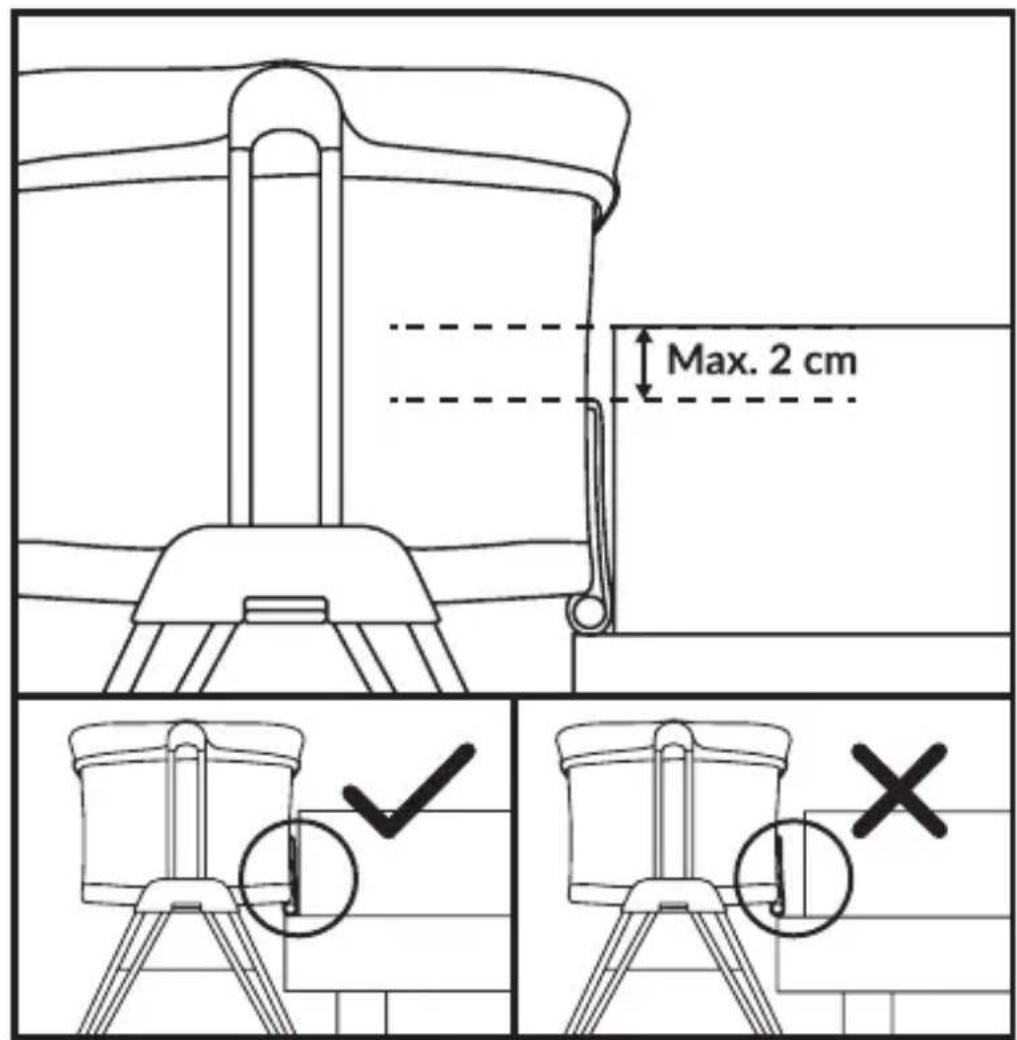
- WARNING: To avoid hazards from the child's neck being caught on the top rail on the side that is next to the adult bed, the top rail must not be higher than the adult bed mattress.
- WARNING: To avoid the risk of your child being strangled the attachment system to the adult's bed shall always be kept away from and out of the crib.
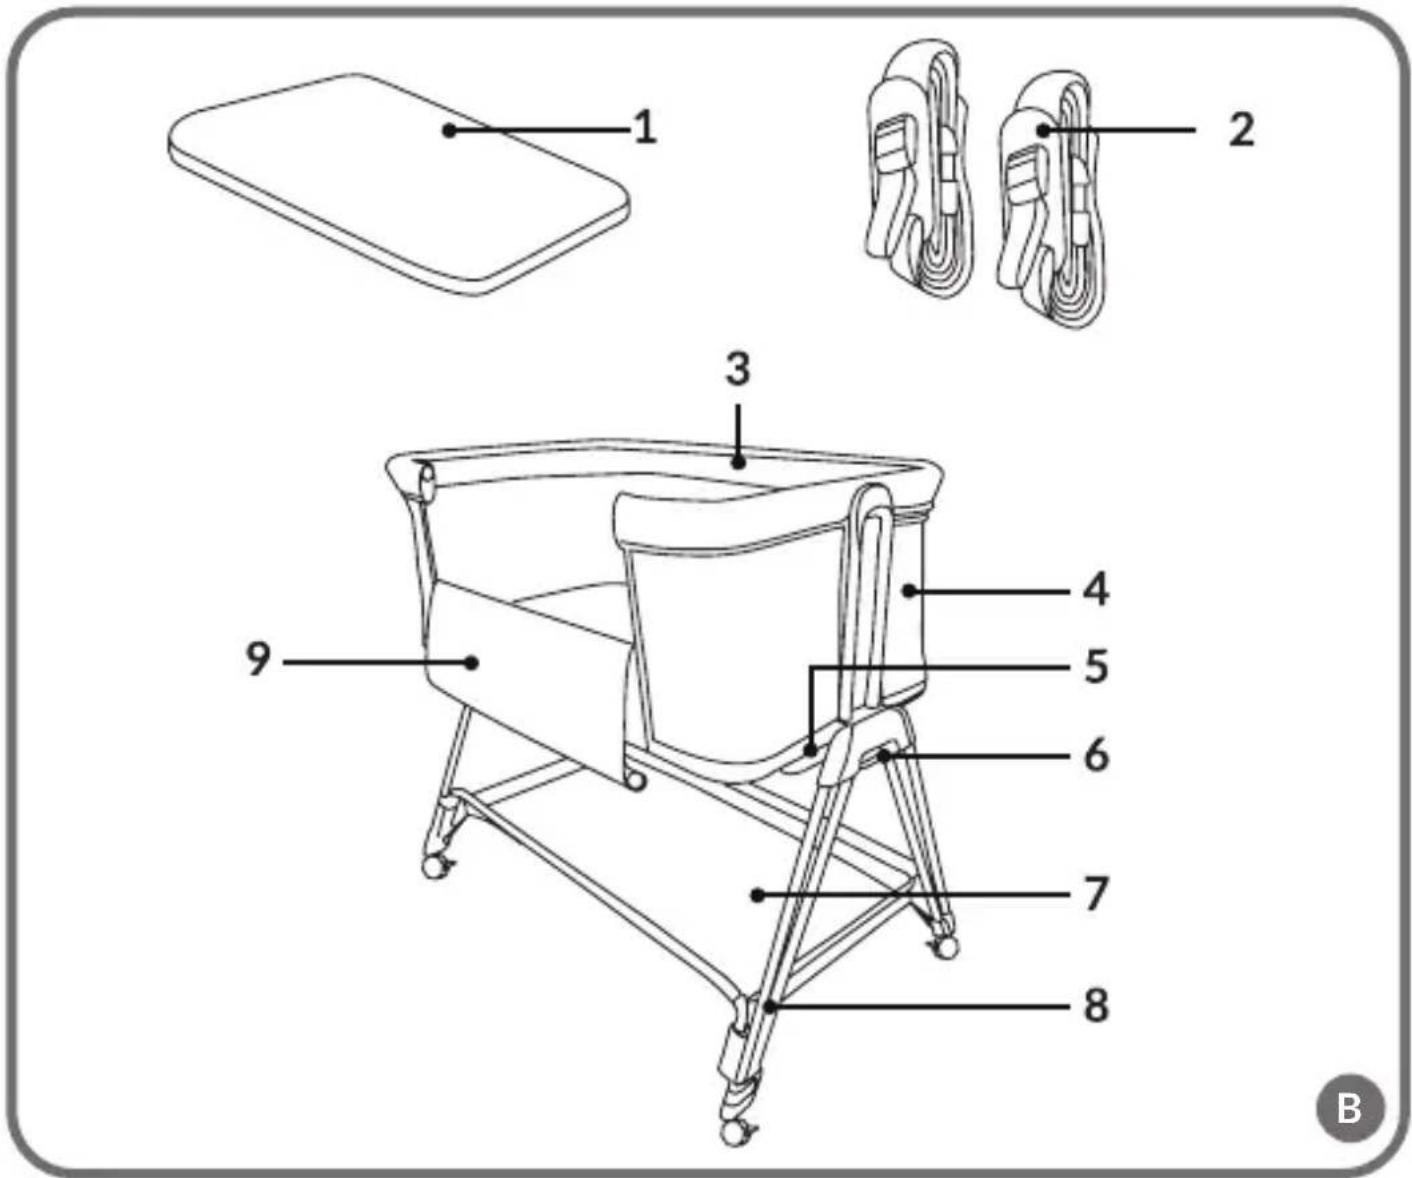
Product components (Fig. B)
- Mattress
- Mounting straps
- Top handrail
- Carrycot
-
Connecting element
-
Height adjustment lever
- Accessory basket
- Frame leg
- Folding side
Assembly instructions
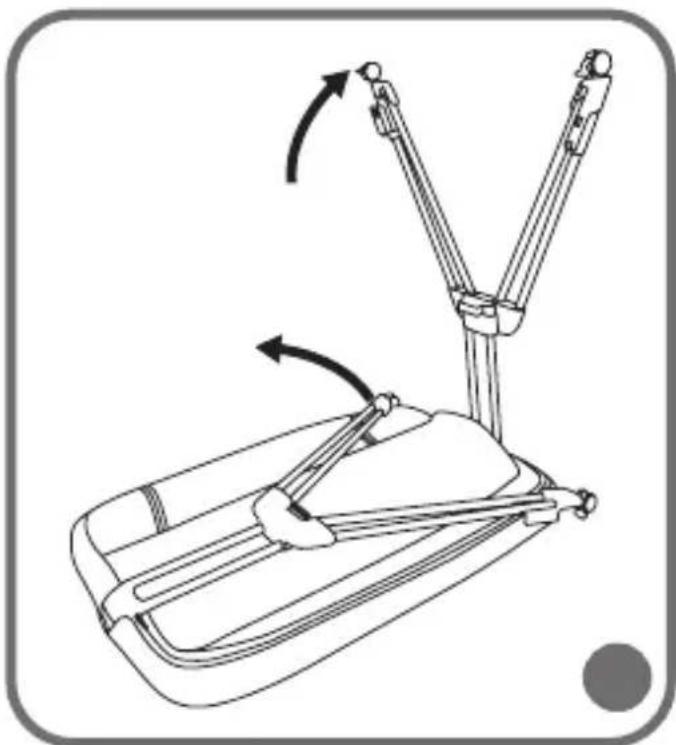
- Unfold the frame legs (fig. 1).
-
Insert the connecting element into the respective receptacle under the carrycot to secure the element with a distinct click (fig. 2). Mind the metal tabs (A, fig. 2), which should engage the respective holes by pressing them in.
-
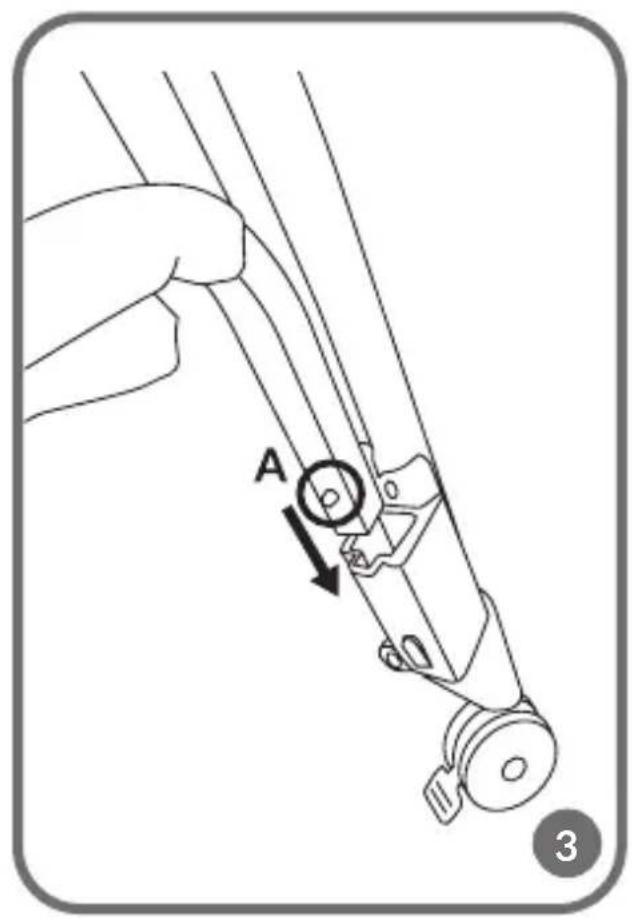
Install the accessory basket (fig. 3). The assembly is secured when the distinct click is heard. Mind the metal tabs (A, fig. 3), which should engage the respective holes by pressing them in.
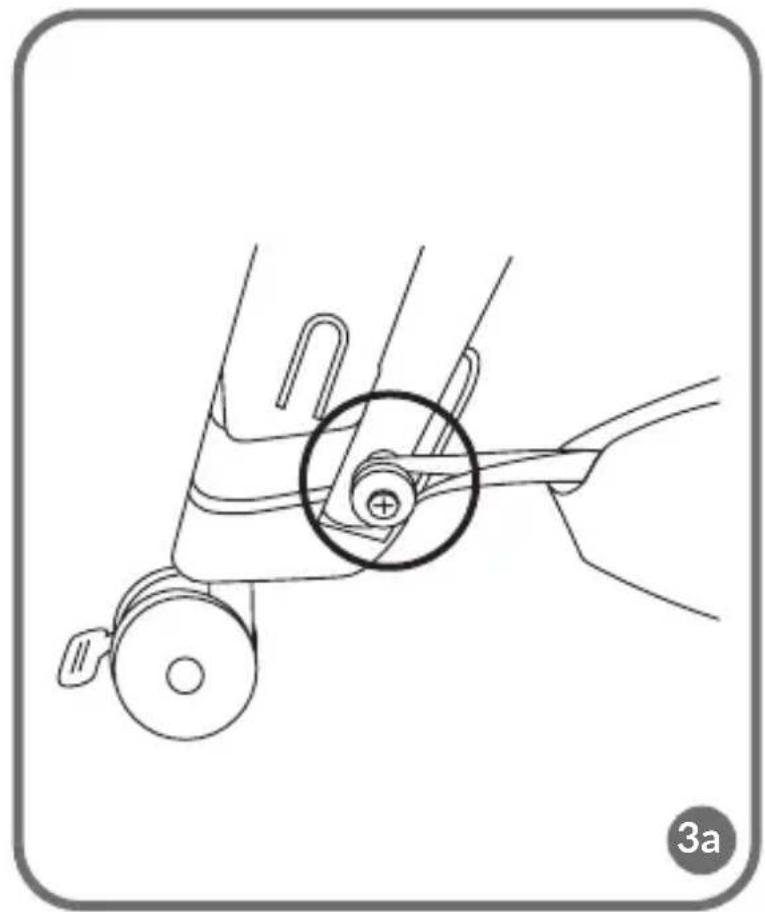
- Put the rubber loops of the accessory basket over the metal tabs (fig. 3a).
- Place the mattress in the crib (fig. 4).
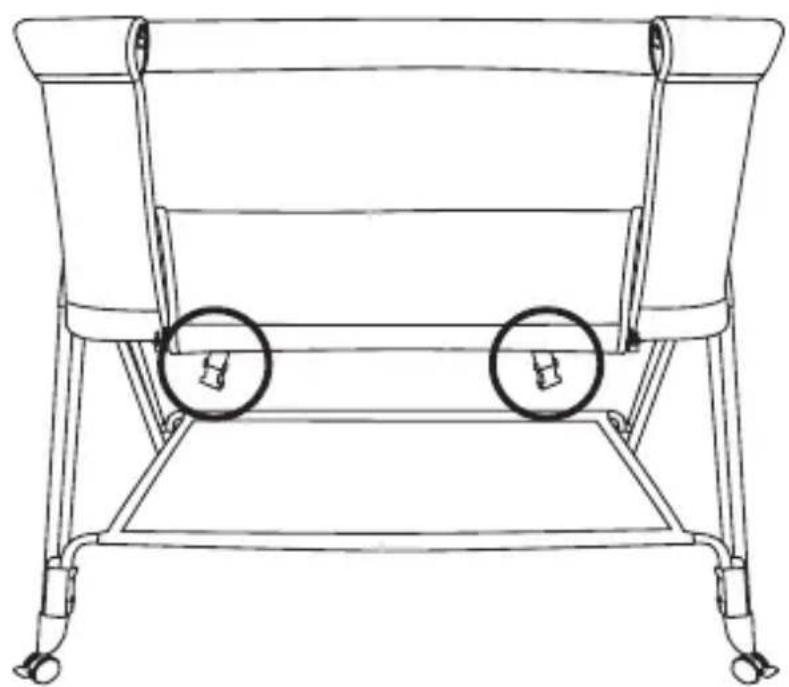
- Pass the mounting straps under the carrycot through the respective holes in the frame (fig. 5a), then into the buckles, and pull them taut (fig. 5b).
- The crib is correctly assembled.
Bedside sleeper function
To use the product as a bedside sleeper, it needs to be converted. The procedure:
- Undo the zippers on both ends of the folding side (fig. 7).
- Slide the locks (fig. 8a) to release the railing retainer (fig. 8b).
- Lower the folding side of the carrycot.
- Put the crib to the side of the adult's bed and set the crib's height so that the top of the bed's mattress is level with - or no more than 2 cm above - the top edge of the folding side.
Caution! When used as a bedside sleeper, the carrycot's bottom must be parallel to the ground. There shall be no difference in height between the crib's ends.
- Pass the crib's mounting straps under the bed's mattress and hook the ends over the adult's bed frame on the opposite side of the bed. The ends must be upright between the bed frame and the mattress.
- Secure the mounting straps to the crib using the clasps (fig. 10b).
- Tighten the mounting straps and make sure this keeps the crib stable and firmly attached to the adult's bed.
CAUTION: Before each use, make sure there is no gap between the adult's bed mattress and the side of the crib.
WARNING: This product can only be used with beds and/or mattresses which have straight edges. Do not use this product with any beds and/or mattresses which are rounded or with water beds.
Height setting
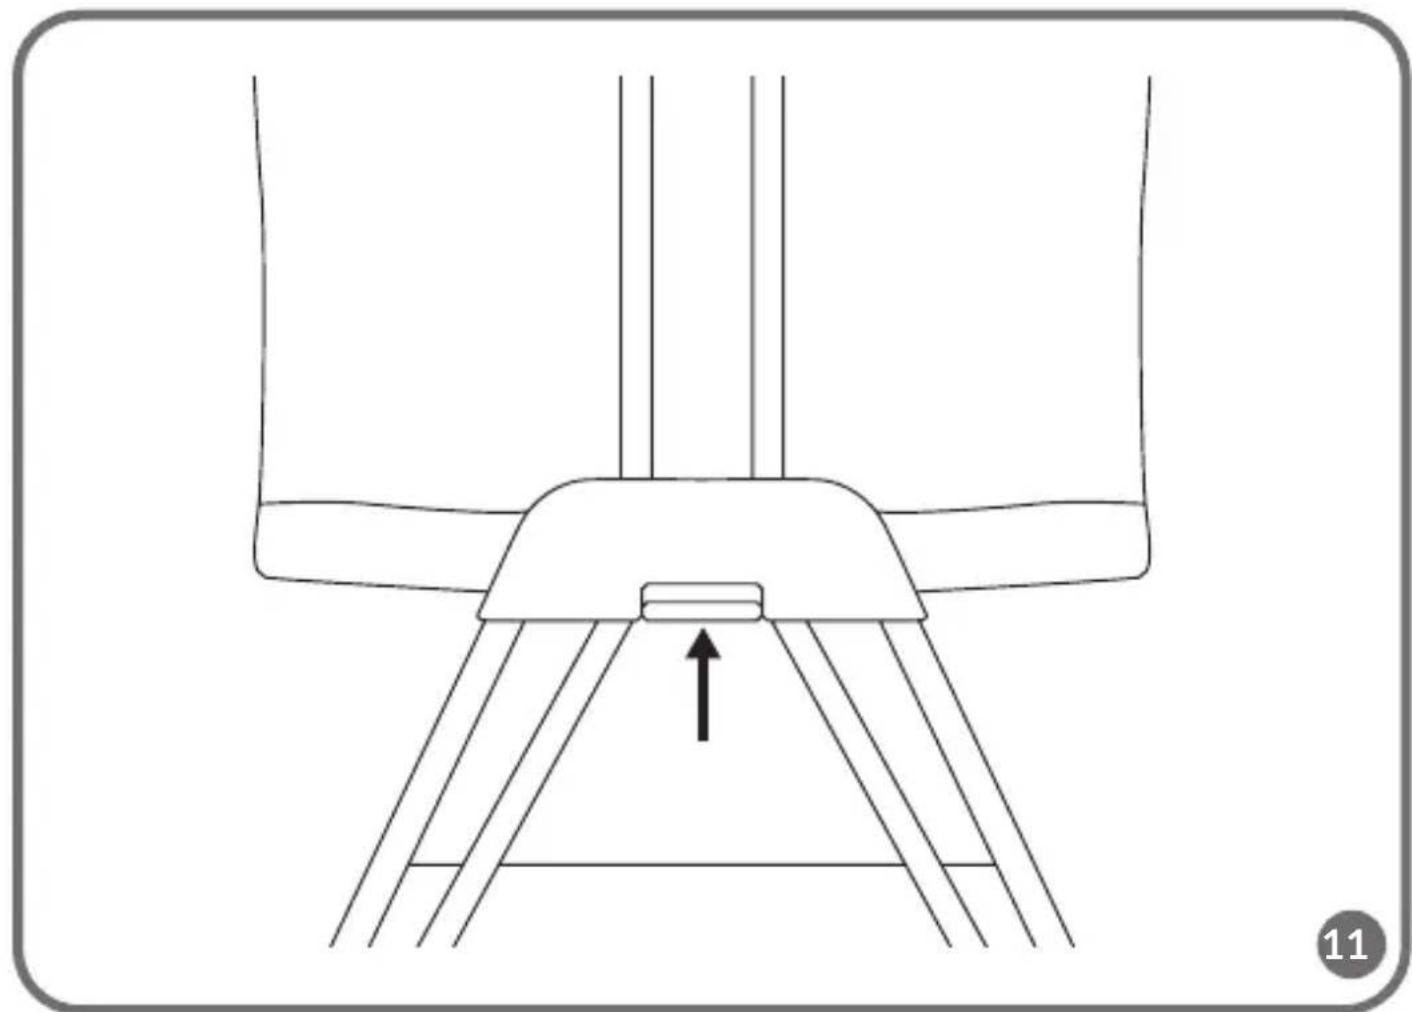
To change the crib's height, press the height adjustment levers on both ends of the crib (fig. 11) and set the carrycot at the desired height.
There are seven crib height settings available. The crib allows setting a different height of each of its ends.
WARNING: The maximum permitted tilt of the crib carrycot is a difference of two setting levels. Always keep the baby's head in the crib on the higher end of the carrycot.
Wheel brake
To lock the crib wheels, press down the brake tabs on each of the wheels (fig. 12a). To release the wheels, lift the brake tabs (fig. 12b).
Disassembly instructions
- Remove the mattress from the crib.
- Undo the carrycot covering zippers at the top part of the crib frame (fig. 13).
- Release the straps under the carrycot (fig. 5a & 5b) and remove the covering (fig. 14b).
Caution! The carrycot covering can be washed by undoing the hook and loop fasteners (A, fig. 14a), removing the folding side brace, and removing the covering (fig. 14b).
-
Remove the connecting element from under the carrycot by pressing the release buttons on both ends of the crib (A, fig. 15).
-
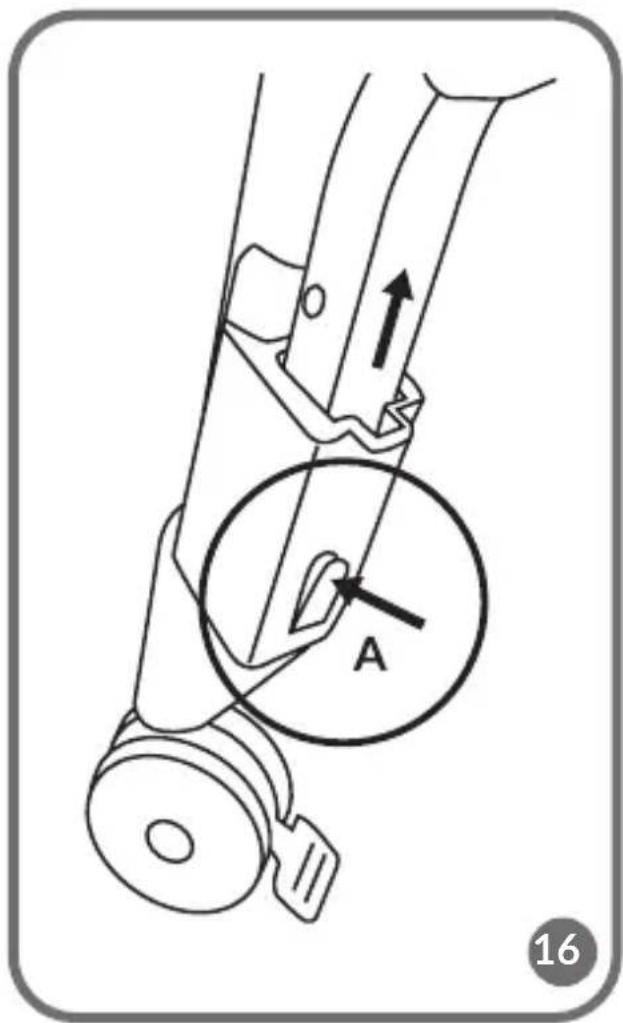
Remove the accessory basket by pressing the release buttons on each of the basket's legs (A, fig. 16).
-
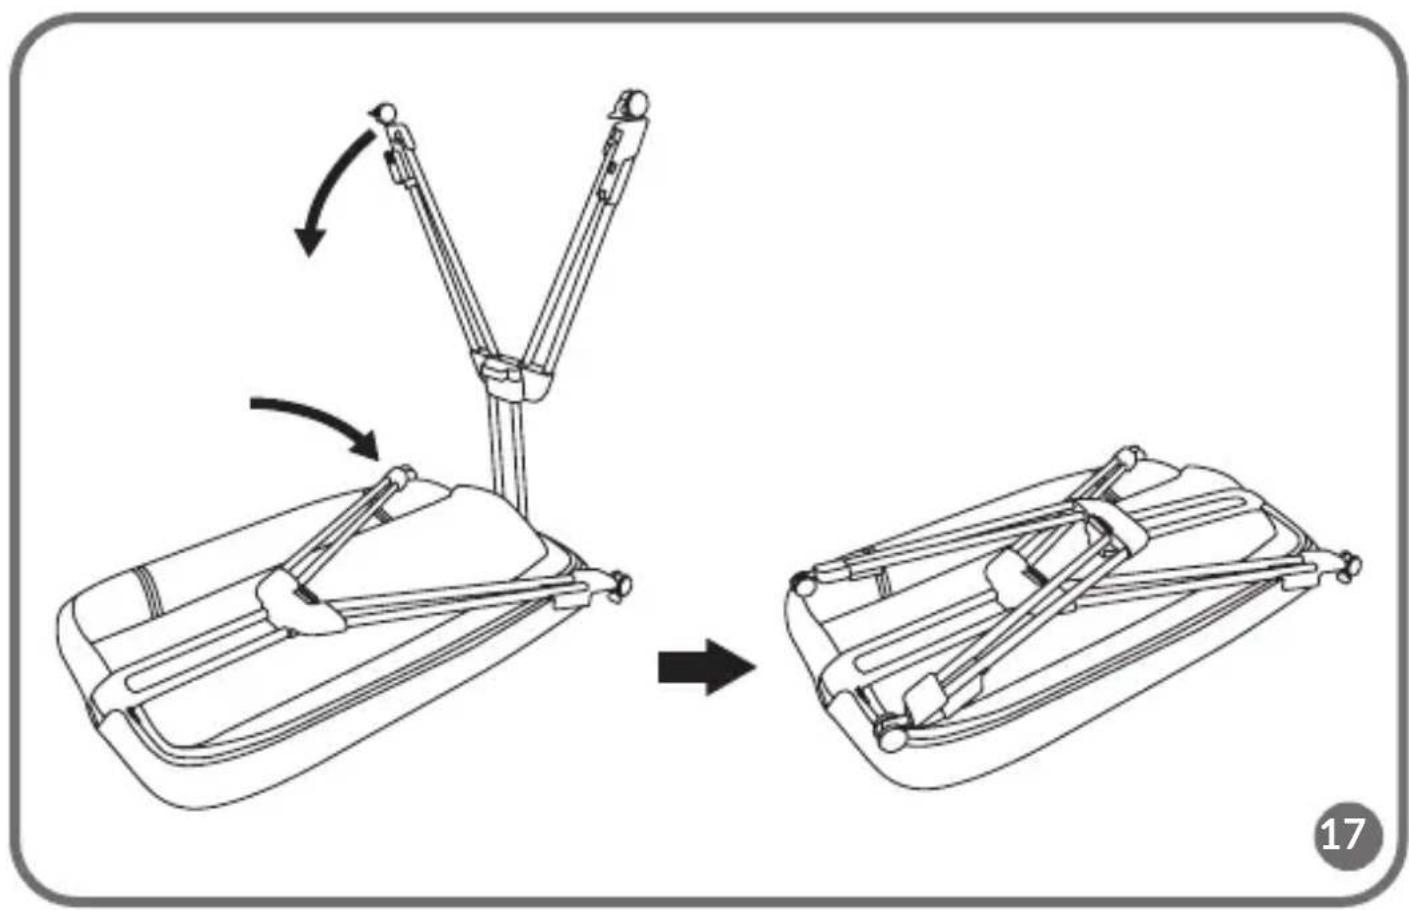
Fold down the crib frame legs (fig. 17).
Cleaning and maintenance
- The carrycot covering and the mattress case can be hand washed in 30^ C.
- Clean the metal and plastic parts with a damp cloth and a mild detergent.
- Never clean any part of the crib with abrasives, ammonia, bleach, or alcohol.
- Store the crib in a dry place, away from heat and moisture. Avoid direct exposure to sunlight.
This product has been tested and meets all requirements of EN 1130:2019+AC:2020 and EN 16890:2017+A1:2021
These pictures are for reference only, the actual appearance of the products may differ from the pictures.
Drogi Kliencie!
WAARSCHUWINGEN VOOR AANSCHUIFBEDJE:
ADVARSLER for madrass:
ADVARSLER for barneseng:
- Dear Customer!
- Producer:
- CAREFULLY AND KEEP FOR
- FUTURE REFERENCE
- WARNING
- WARNINGS FOR MATTRESS:
- Product components (Fig. B)
- Assembly instructions
- Bedside sleeper function
- Height setting
- Wheel brake
- Disassembly instructions
- Cleaning and maintenance
- This product has been tested and meets all requirements of EN 1130:2019+AC:2020 and EN 16890:2017+A1:2021
- Drogi Kliencie!
- WAARSCHUWINGEN VOOR AANSCHUIFBEDJE:
- ADVARSLER for madrass:
- ADVARSLER for barneseng:
Brand : Lionelo
Model : Luna
Category : Stroller