CleanFry 1 5 L - Deep fryer CECOTEC - Free user manual and instructions
Find the device manual for free CleanFry 1 5 L CECOTEC in PDF.


User questions about CleanFry 1 5 L CECOTEC
0 question about this device. Answer the ones you know or ask your own.
Ask a new question about this device
Download the instructions for your Deep fryer in PDF format for free! Find your manual CleanFry 1 5 L - CECOTEC and take your electronic device back in hand. On this page are published all the documents necessary for the use of your device. CleanFry 1 5 L by CECOTEC.
USER MANUAL CleanFry 1 5 L CECOTEC
natural_image
Electric kitchen electrician with a basket of fried fries being placed on it, against a light blue and white background (no text or symbols visible)natural_image
Abstract geometric design with overlapping light blue triangles (no text or symbols)ÍNDICE
Parts and components / 04
- Safety instructions / 14
- Before use / 15
- Functions / 16
- Cleaning and maintenance / 18
- Technical specifications / 19
- Disposal of old electrical appliances / 20
- Technical support service and warranty / 20
INDICE
text_image
Labeled diagram of a washing machine with numbered parts and control panel insetES
-
Lid
-
Handle
-
Control panel
-
Frying basket
-
Hook
-
Heating element with thermostat
-
Enamelled tank
-
Main body
-
Handles
-
On/Off light (Red)
-
Temperature light (Green)
-
Temperature dial
-
Safety control button
-
Cord storage
-
OilCleaner filter for foreign bodies
FR
text_image
Power Heat 170°C 170°C 170°C 170°C ✓ Power HeatB
natural_image
Technical line drawing of a mechanical component with no visible text or symbolsC
D
natural_image
Line drawing of a kitchen grater with a downward arrow indicating a drop or removal (no text or symbols present)E
natural_image
Line drawing of a mechanical device with a textured base and directional arrow (no text or symbols)F
text_image
ON/OFF OFF Turner OFF Turner OFFG
natural_image
Diagram of a medical device with tubing and a power outlet, showing bidirectional arrows indicating movement (no text or symbols)1. SAFETY INSTRUCTIONS
When using electrical appliances, basic precautions must always be followed to reduce the risk of fire, electrical shock, and injury.
- Make sure the voltage of your mains supply matches the voltage requirements specified in the rating label of the appliance (220 – 240 V).
- The room where you intend to use the appliance must be equipped with a working smoke detector.
- Use the deep fryer only for the purposes described in this instruction manual, any other use is not recommended by the manufacturer and could have a detrimental effect on the lifespan of the appliance and/or the safety of the user.
- This appliance is not intended to be used by persons with reduced physical, sensory, or mental capabilities, or lack of experience and knowledge, unless they have been given supervision and/or instruction concerning the use of the appliance in a safe way and understand the hazards involved.
- This appliance must not be used by children under the age of 8. It can be used by children aged 8 or over, as long as they are constantly supervised.
- Keep the appliance and its power cord out of reach of children under the age of 8.
- Cleaning and maintenance tasks must not be carried out by children.
- Children should be supervised to make sure that they do not play with the appliance.
- Unplug the appliance from the mains supply before moving it, carrying out any cleaning or maintenance task, or when not in use.
- Do not use outdoors.
- Do not lay the power cord under carpets or similar materials.
- Check the power cord regularly for visible damage. If the cord is damaged, it must be replaced by the official Technical Support Service of Cecotec, in order to avoid any type of danger.
- Do not twist, bend, strain, or damage the power cord in any way. Protect it from sharp edges and heat sources. Do not let it touch hot surfaces. Do not let the cord hang over the edge of the working surface or countertop.
- Do not use extension cords, unless advised by a qualified electrician; using the wrong type could cause damages or injuries to the user.
WARNING: do not use the appliance if its cord, plug, or housing is damaged, nor after it malfunctions or has been dropped or damaged in any way.
- The appliance must not be used in potentially dangerous locations, such as flammable, explosive, chemical-laden, or wet atmospheres, nor near flammable materials.
- Place the fryer on an even, heat-resistant surface. Do not place the fryer near heat sources, places with high humidity levels, or combustible materials.
-
There are no internal serviceable parts, do not attempt to disassemble the appliance.
-
The appliance is not intended to be operated by means of an external timer or separate remote-control system.
- Do not insert or allow fingers or foreign objects to enter any ventilation or exhaust openings, as it could cause an electrical shock or fire.
- Do not turn the fryer on if there is no oil in the tank.
- It is not advisable to mix different oil types or oils with different qualities.
- The fryer has a safety thermostat that turns the fryer off in case of overheating. This may happen if there is not enough oil in the tank.
WARNING: do not attempt to move the fryer until it has completely cooled down. This can take up to three hours. Use the handles at both sides.
WARNING: do not immerse the cord, plug, or any non-removable part of the fryer in water or any other liquid, nor expose the electrical connections to water. Make sure your hands are dry before handling the plug or switching on the appliance.
- Unplug from the electrical outlet when not in use and before cleaning. Allow it to cool down completely before attaching or removing parts, and before cleaning the appliance.
- Do not leave the fryer unattended while connected to the mains supply.
- Do not lean over the fryer while in use.
- Be careful not to touch the surfaces of the fryer as they will become hot when in use.
- Cleaning and maintenance must be carried out according to this instruction manual to make sure it functions properly. Turn off and unplug the appliance before moving and cleaning it. Allow it to cool completely before cleaning and storing it.
2. BEFORE USE
- Carefully unpack the appliance and remove all packaging materials. Check the contents to make sure that all the parts and accessories are present and in good condition.
- Attach the handle of the basket in its place. Note that the handle folds back and locks for storage.
- Wash the lid, basket, filter, and tank by hand with hot soapy water.
- Wipe the control panel with a damp cloth and/or kitchen paper.
IMPORTANT: do not immerse the control panel in water.
- Dry all parts of the fryer thoroughly and place the tank, filter, control panel, basket, and lid back in place. Make sure the tank is in its correct position and aligned correctly, the max/min marks should be placed to the right.
3. OPERATION
- Remove the lid and take out the frying basket.
- Pour oil into the tank up to the maximum mark.
- Recommended types of oil: olive, corn, groundnut, or vegetable oil. Do not use margarine or butter.
NOTE: do not plug the appliance into the mains supply without oil in the tank.
NOTE: the lid must not be closed while the fryer is being used.
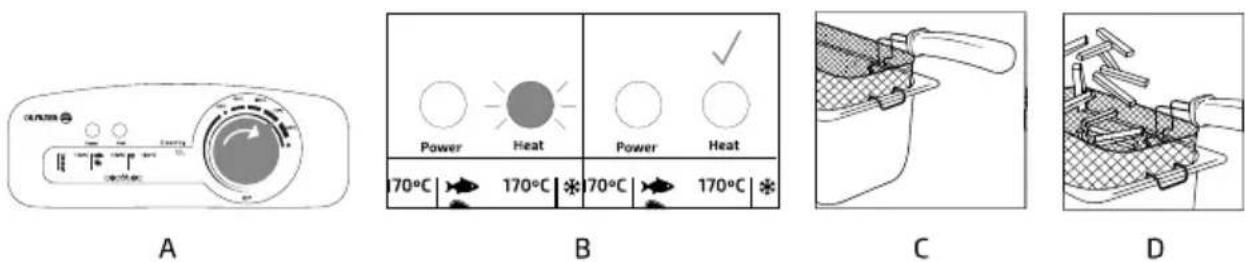
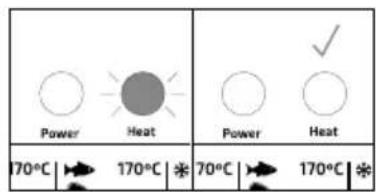
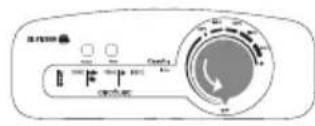
A. Remove the lid and plug the fryer into the mains supply. Turn the temperature dial to the desired heat setting.
B. When the oil reaches the desired temperature, the green light will turn off (do not add food until the selected temperature has been reached). The green light will light up again when food is placed in the oil, but will turn off when the oil reaches the selected temperature again.
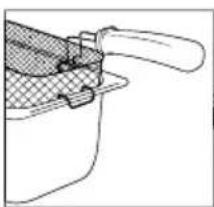
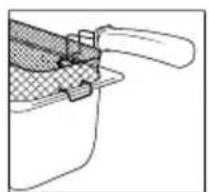
C. Hang the basket on the side of the tank (make sure the handle is locked into place and dry).
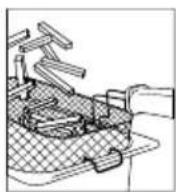
D. Place food in the frying basket (food should be as dry as possible).
natural_image
Line drawing of a kitchen grater with a downward arrow indicating a drop or removal (no text or symbols present)E
natural_image
Line drawing of a kitchen appliance with a textured interior and an upward arrow indicating motion (no text or symbols)F
text_image
GURU 100% AC 24mA 100% AC 24mA 100% ACG
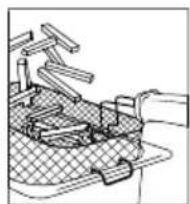
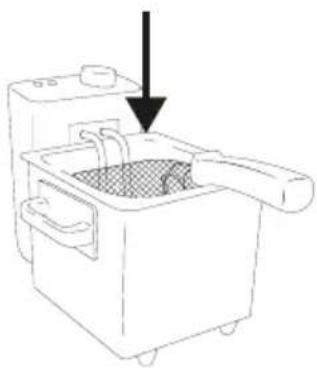
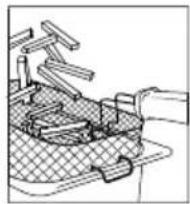
E. Carefully lower the frying basket into the hot oil (the oil may spit as it fries the foodstuffs).
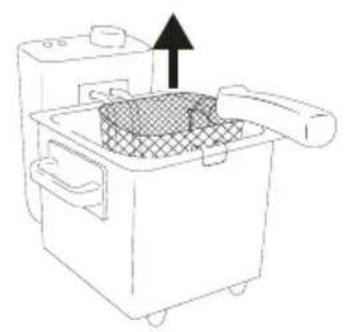
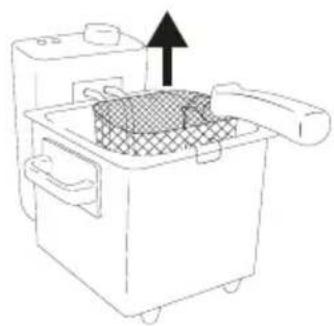
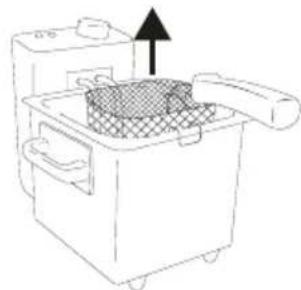
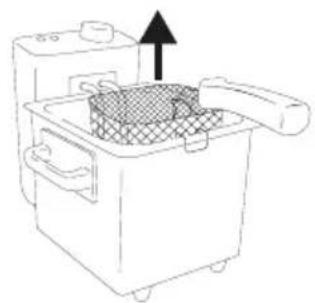
F. When the foodstuffs are ready, raise and place the basket in its resting position on the side of the tank. Let it drain the foodstuffs.
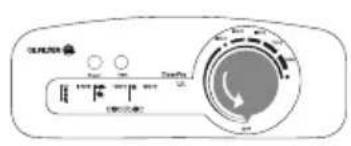
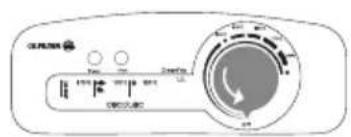
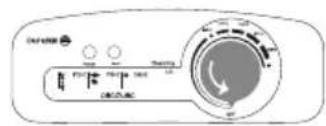
G. Turn the temperature dial off and unplug the fryer. Allow it to cool down for at least 2-3 hours before moving or cleaning it.
H. Place the foodstuffs in a dish covered with kitchen paper to remove any excess oil.
It is important not to close the lid while the fryer is being used.
The following frying times and temperatures are intended as a guide and should be adjusted to suit different quantities or thickness after your own taste.
| FOOD WEIGHT TEMPERATURE TIME | |||
| Fresh chips 800 g 190 °C 10-12 min | |||
| Frozen chips 800 g 190 °C 10 min | |||
| Frozen scampi To cover the basket 170 °C 3-5 min | |||
| Fresh battered fish 150 g 190 °C 5-10 min | |||
| Frozen battered fish 150 g 170 °C | 10-15 min | ||
| Small portions of battered chicken | 150 g 170 °C 15-20 min | ||
| Large portions of battered chicken | 150 g | 190 °C | 20-30 min |
| Fresh battered chicken drumsticks | 2 o 3 | 170 °C | 15 min |
| Beef burgers (100% meat) | 250 g | 170 °C 2-3 min |
Chicken and beef burgers can taint the oil, leaving some taste that you may not want when frying other foodstuffs.
Home battered food
Take into account that if wet batter is placed in the basket prior to cooking, the food may stick to the metal.
This method requires extreme care:
- Remove the lid and plug the fryer into the mains supply. Turn the temperature dial to the desired heat setting.
- When the oil reaches the desired temperature, the green light will turn off (do not add food until the selected temperature has been reached). The green light will light up again when food is placed in the oil, but will turn off when the oil reaches the selected temperature again.
- Coat the food in wet batter and shake it slightly to remove the excess of batter.
- Carefully lower the frying basket into the hot oil.
- Using tongs, lower the battered foodstuffs slowly into the oil.
WARNING: the oil may spit as food is added into it. Once ready, take the foodstuffs out using the frying basket.
- The fryer has a safety thermostat that switches the fryer off in case of overheating. This may happen if there is not enough oil in the tank.
- Do not overload the basket, as it may cause a drop in the temperature of the oil that may leave the food greasy or undercooked.
- The fryer will always be ready to use if it is stored with cooled and filtered oil inside, and the lid in place.
- When storing your fryer with oil inside, remove the handle and store it separately.
- Cook your food thoroughly. Remember that food may start to turn golden brown before it has been completely cooked.
- Select your cooking utensils with care. Do not use utensils that may melt. Metal utensils become hot and should have insulated handles.
IMPORTANT: When using metal utensils, take care not to damage the heating element.
- Your fryer has a maximum capacity for food of 800 g. This depends on food type (see the table above for more information). Do not fill more than half of the frying basket.
- Avoid draining food too long in the basket, as it may become soft and lose its crispness.
- Change the oil when it becomes brown or milky.
- If there are water droplets on the base of the Tank, the oil should be changed.
- Change the oil in your appliance after approximately 15 uses.
- All food items, particularly frozen food and potatoes, contain moisture. When lowered into the hot oil, the water in the food turns to steam and escapes.
• Take into account the food to be cooked before selecting the frying temperature. - As a general guide, pre-cooked food needs a higher cooking temperature than raw food.
4. CLEANING AND MAINTENANCE
- Remove the lid (1), control panel (3), frying basket (4), filter (15) and tank (7).
- Pour out the oil in the tank through fine muslin or absorbent paper placed over a funnel into a suitable container.
- Wash the lid, filter, frying basket, and tank by hand with hot soapy water.
- The tank is dishwasher safe. Take it out of the dishwasher as soon as possible and dry it thoroughly.
- Clean the control panel with a damp cloth and/or kitchen paper.
IMPORTANT: do not immerse the control panel in water.
IMPORTANT: make sure the wires connected to the heating element are not damaged while cleaning.
- Dry all parts of your fryer thoroughly and place the tank, control panel, frying basket, and lid
back in place. When placing the tank, make sure it is placed correctly, with the max/min marks to the right.
- You may keep oil in the fryer if you make sure that the lid is properly closed.
Regular cleaning of the oil with the OilCleaner filter.
Use the OilCleaner filter to clean the oil and the fryer easily. The remainders from the foodstuffs will sink when the oil cools down. If you use the filter, you will be able to remove the remainders, keeping the oil clean longer and minimising the appearance of undesired flavours. Note: wait until the oil and the heating element are completely cold before proceeding as follows:
- Unplug the fryer, remove the lid and the frying basket, and clean their
-
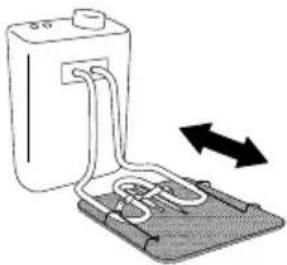
Remove the heating element raising it carefully to prevent the oil from overflowing.
-
Separate the OilCleaner filter from the heating element.
-
Clean filter with hot water and soap and dry it.
-
Attach the OilCleaner filter to the heating element, sliding it in the opposite direction.
-
Put the heating element with the OilCleaner filter in the fryer.
natural_image
Diagram of a battery connected to a device with two arrows indicating direction (no text or symbols)5. TECHNICAL SPECIFICATIONS
• Product reference: 03031
• Power: 1000 W
• Voltage: 220-240 V 50/60 Hz
- Capacity: 1.5 l
• Made in China | Designed in España
6. DISPOSAL OF OLD ELECTRICAL APPLIANCES
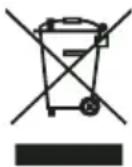
The European directive 2012/19/EU on Waste Electrical and Electronic Equipment (WEEE), specifies that old household electrical appliances must not be disposed of with the normal unsorted municipal waste. Old appliances must be collected separately, in order to optimize the recovery and recycling of the materials they contain, and reduce the impact on human health and the environment.
The crossed out "wheeled bin" symbol on the product reminds you of your obligation to dispose of the appliance correctly. If the product has a built-in battery or uses batteries, they should be removed from the appliance and disposed of appropriately.
Consumers must contact their local authorities or retailer for information concerning the correct disposal of old appliances and/or their batteries.
7. TECHNICAL SUPPORT SERVICE AND WARRANTY
This product is under warranty for 2 years from the date of purchase, as long as the proof of purchase is submitted, the product is in perfect physical condition, and it has been given proper use, as explained in this instruction manual.
The warranty will not cover the following situations:
- The product has been used for purposes other than those intended for it, misused, beaten, exposed to moisture, immersed in liquid or corrosive substances, as well as any other fault attributable to the customer.
- The product has been disassembled, modified, or repaired by persons, not authorised by the official Technical Support Service of Cecotec.
- Faults deriving from the normal wear and tear of its parts, due to use.
The warranty service covers every manufacturing defects of your appliance for 2 years, based on current legislation, except consumable parts. In the event of misuse, the warranty will not apply. If at any moment you detect any problem with your product or have any doubt, do not hesitate to contact Cecotec Technical Support Service at +34 96 321 07 28.
1. INSTRUCTIONS DE SÉCURITÉ
text_image
Diagram of a washing machine control panel with labeled buttons and rotary dialA
text_image
Power Heat 170°C 170°C * 70°C 170°C *B
natural_image
Technical line drawing of a mechanical component with no visible text or symbolsC
D
natural_image
Line drawing of a square kitchen grater with a downward arrow indicating compression or cooling (no text or symbols)E
natural_image
Line drawing of a kitchen appliance with a gridded basket and upward arrow (no text or symbols)F
text_image
Diagram of a device control panel with labeled buttons and a rotary dial indicatorG
natural_image
Diagram of a medical device with tubing and directional arrows indicating movement (no text or symbols)5. SPÉCIFICATIONS TECHNIQUES
natural_image
Line drawing of a square<|im_start|> Puerto Rico feeder with a downward arrow indicating inlet direction (no text or symbols)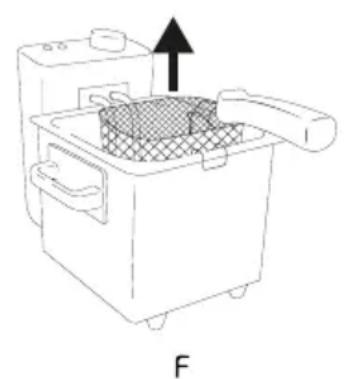
natural_image
Line drawing of a kitchen appliance with a handle and internal mesh structure, labeled 'F' at the bottom (no text or symbols on the main diagram)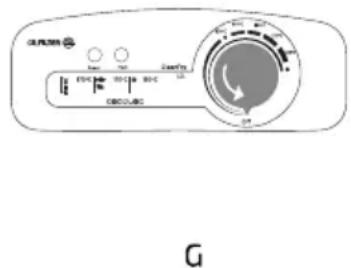
text_image
ON/OFF OFF ON ON/OFF OFF ON/OFF OFF ON/OFF OFF ON/OFF OFF ON/OFF OFF ON/OFF OFF ON/OFF OFF ON/OFF OFF ON/OFF OFF ON/OFF OFF ON/OFF OFF ON/OFF OFF ON/OFF OFF ON/OFF OFF ON/OFF OFF ON/OFF OFF ON/OFF OFF ON/OCC OFF ON/OCC OFF ON/OCC OFF ON/OCC OFF ON/OCC OFF ON/OCC OFF ON/OCC OFF ON/OCC OFF ON/OCC OFF ON/OCC OFF ON/OCC OFF ON/OCC OFF ON/OCC OFF ON/OCC OFF ON/OCC OFF ON/OCC OFF ON/OCC OFF On/OFF Off/OFF On/OFF On/OFF On/OFF On/OFF On/OFF On/OFF On/OFF On/OFF On/OFF On/OFF On/OFF On/OFF On/OFF On/OFF On/OFF On/OFF On/OFF On/OFF On/OFF On/OFF On/OFF On/OFF On/OFF On/OFF On/OFF ON/OCCnatural_image
Diagram of a battery connected to a device with arrows indicating direction (no text or symbols)5. TECHNISCE SPEZIFIKATIONEN
natural_image
Diagram of a battery pack with internal circuit connections and directional arrows indicating flow (no text or symbols)5. SPECIFICAZIONI TECNICHE
natural_image
Technical line drawing of a mechanical component or tool (no text or symbols visible)C
D
natural_image
Line drawing of a square kitchen grater with a downward arrow indicating force or pressure (no text or symbols)E
natural_image
Line drawing of a kitchen appliance with a handle and side panel, no text or symbols presentF
text_image
Control Power Pressure Balance Control Pressure Balance ControlG
natural_image
Diagram of a battery connected to a tray with wires, showing bidirectional arrows (no text or symbols)5. ESPECIFICAÇÕES TÉCNICAS
natural_image
Abstract geometric design with overlapping light blue triangles (no text or symbols)www.cecotec.es