
Fryin' Free - Deep fryer UFESA - Free user manual and instructions
Find the device manual for free Fryin' Free UFESA in PDF.


| Brand | Ufesa |
| Model | Fryin' Free |
| Product type | Air fryer |
| Power supply | Mains 220-240 V ~ 50/60 Hz |
| Cooking programs | 6 preset programs: fries, meat, fish, chicken, baking, shrimp |
| Temperature range | 80 °C to 200 °C (adjustable in 5 °C increments) |
| Timer | Up to 60 minutes (adjustable in 1 minute increments) |
| Display | LED digital screen (temperature and time) |
| Control panel | Touch: Menu, Start/Pause, temperature/time adjustment, +/-, power buttons |
| Safety | Automatic shut-off, overheat protection, fault detection (codes E0, E1, E2) |
| Maintenance | Basket and pan dishwasher safe (top rack) or hand wash with sponge and soapy water |
| Included accessories | Removable basket and pan |
| Usage instructions | Use on a flat, heat-resistant surface, leave 10 cm clearance around, do not immerse the appliance |
| Maximum altitude | 2000 m |
| Usage | Household use only |
| Warranty | 2 years (subject to warranty conditions) |
Frequently Asked Questions - Fryin' Free UFESA
User questions about Fryin' Free UFESA
0 question about this device. Answer the ones you know or ask your own.
Ask a new question about this device
Download the instructions for your Deep fryer in PDF format for free! Find your manual Fryin' Free - UFESA and take your electronic device back in hand. On this page are published all the documents necessary for the use of your device. Fryin' Free by UFESA.
USER MANUAL Fryin' Free UFESA
natural_image
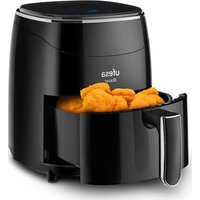
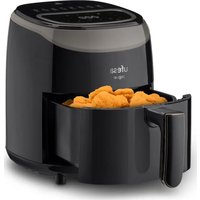
Black ufesa fryer air fryer with digital display and wooden handle (no visible text or symbols on device body)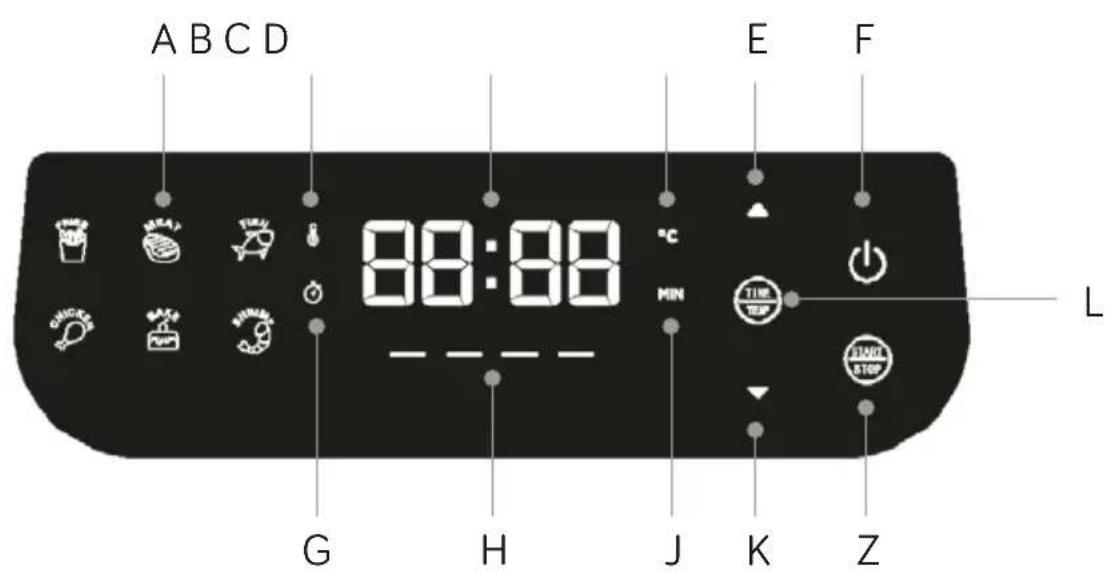
ESPAÑOL
CÓMO USAR EL PRODUCTO
WE WOULD LIKE TO THANK YOUR FOR CHOOSING UFESA AND WE WISH THE PRODUCT PERFORMS TO YOUR SATISFACTION AND PLEASURE.
WARNING
PLEASE USE THE INSTRUCTIONS FOR USE CAREFULLY PRIOR TO USING THE PRODUCT. STORE THESE IN A SAFE PLACE FOR FUTURE REFERENCE
DESCRIPTION
-
Control panel
-
Air outlet
-
Tray
-
Pot
-
Handle
SAFETY INSTRUCTIONS
If the supply cord is damaged it must be replaced by the manufacturer, its service agent or similarly qualified persons in order to avoid a hazard.
This appliance can be used by children aged from 8 years and above and persons with reduced physical, sensory or mental capabilities or lack of experience and knowledge if they have been given supervision or instruction concerning use of the appliance in a safe way and understand the hazards involved. Children shall not play with the appliance. Cleaning and user maintenance shall not be made by children unless they are older than 8 and supervised.
Keep the appliance and its cord out of reach of children younger than 8 years old.
Appliances are not intended to be operated by means of an
external timer or separate remote-control system.
Disconnect the appliance when it is not in use and before cleaning it. Let it cool before attaching or removing parts and cleaning it.
Do not submerge the appliance in water or any other liquid. This appliance is intended for use at a maximum altitude of 2000m above sea level.
IMPORTANT WARNINGS
This appliance is designed exclusively for domestic use and it should never be used for commercial or industrial purposes.
Any incorrect use or improper handling of the product shall render the warranty null and void.
Prior to plugging in the product, check that your mains voltage is the same as the one indicated on the product label.
Place the appliance on a flat and stable surface
The mains connection cable must not be tangled or wrapped around the product during use.
Do not use the device, or connect and disconnect to the supply mains with the hands and/or feet wet. Do not pull on the supply cord in order to unplug the device. Do not use the supply cord as a handle.
IMPORTANT. When operating this Air Fryer, keep at least 10 (ten) centimeters of free space on all sides of the device to allow for adequate air circulation.
DO NOT place your Air Fryer under cupboards, blinds or curtains. Risk of overheating / fire.
Do not cover any part of the Air Fryer with a cloth or similar object which will cause overheating. Risk of fire.
This is an AIR FRYER. It requires very little oil to cook. Do not fill the pot with oil or fat as this may cause a fire hazard.
Do not use any accessories other than manufacturer recommended accessories in this Air Fryer.
Always wear protective, insulated oven gloves when inserting or removing items from the hot Air Fryer.
The appliance must be used on a level, stable heat-resistant surface. A slight odor or a small amount of smoke may arise the first time you use your Air Fryer. This is normal and is just the manufacturing residues burning off.
Always place the ingredients to be fried in the basket to prevent it from coming into contact with the heating elements.
Unplug the product immediately from the mains in the event of any breakdown or damage and contact an official technical support service. In order to prevent any risk of danger, do not dismantle the device. Only qualified technical personnel from the brand's official technical support service may carry out repairs or procedures on the device.
B&B TRENDS SL. disclaims all liability for damages that may occur to people, animals or objects for the non-observance of these warnings.
BEFORE ITS FIRST USE
- Remove all packing materials and stickers from the inside and outside of the Air Fryer. Gently wipe down exterior with a damp cloth or paper towel.
WARNING: Never immerse the Air Fryer or its plug in water or any other liquids. - Pull the basket handle to remove the basket from the Air Fryer. Use the tray handle, in the center of the tray, to remove the tray. Use a sponge and warm, soapy water to wash the inside and outside of the basket and tray. The basket and the tray are top-rack dishwasher safe.
- WARNING: Do not use abrasive cleaning agents or scouring pads.
- Dry thoroughly.
CONTROL PANEL
A: Menu button: There are 6 function programs: French fries, meat, fish, chicken, bake and shrimp. The buttons are tactile with a white LED light below each button.
In preparation or pause mode, the program that is selected will flash and the rest of the menus will remain lit. Program selection can only be changed in this mode, and cannot be changed when a program is in use. In work mode, the current function menu LED will stay on while the other menu lights will be off.
B: Temperature indicator light (white LED light): When in the temperature setting mode, the indicator will light up.
C: LED digital display: displays temperature and operating time.
When the air fryer is operating, the temperature and time will be displayed with an interval of 5 seconds.
In the setting process, press the time / temperature setting button once to display the temperature.
Press the time / temperature setting button again to display the time.
D: Temperature indicator light: The unit is in Celsius degrees. When the temperature is set, this light will be on
E / K: “+/-” button: in the time setting mode, pressing up or down will increase or reduce 1 minute. In the temperature setting mode, this button will increase or reduce the temperature in 5°C with every press. A long press will increase or reduce the heat quickly.
F: " ⏻ " button: When the machine is plugged in and in standby mode, the LED will appear in red color.
To start the air fryer, press the button and the LED will turn into white and the buzzer will emit a beep. The full screen icons will light up, and the digital screen will display the initial default temperature.
Touch this button for 3\~5 seconds in working mode to exit the frying mode and the buzzer will emit 1 "beep" for entering into the standby mode. When the time is over, the fan will run on its own for 20 seconds and then the buzzer will emit 5 "beep" sounds for entering into the standby mode.
G: Time indicator.
L: Time/temperature setting button: The default mode will show the temperature display. Press the button to switch between modes and select the desirable time or temperature by pressing the up or down buttons.
J: Time indicator.
H: Work in progress indicator: When the device is operating, the indicator lights will cycle from left to right and the time interval between the two lights will be 0.5 seconds. The indicator light stays on in the pause mode or the indicator light stays off in standby mode.
Z: "Start/Pause" button: In the "ready" mode, the light will remain white. Touch this button in the preparation mode to enter the working mode of the selected menu and the buzzer will beep once. In working mode, press this button and the buzzer will beep once, the heating tube will stop working, and the indicator light will flash. At this time, you can select and change to other function menus.
After changing the cooking program, click the "Start/Pause" button, the buzzer will beep once and the device will resume work. At this time, the indicator light of the "Start/Pause" button will return to a long light state.
In working mode, press the "start/pause" button and the product will enter into pause mode. If there is no operation in 3 minutes the product will stand by in sleep mode.
In the standby mode, only the "Power" key light is on in red, and the other function keys are invalid. When the "Power" key is touched to enter the preparation mode, the function is restored.
HOW TO USE
1: Ready (power-on) mode: the appliance is powered on with rated voltage. The buzzer beeps once (1 second), all the lights on the control panel light up white, and the time and temperature patterns and unit indicator lights go back and forth.
2: Standby mode: The control panel displays the "Power" button light in red, and only this button is activated. Other buttons and lights are inactive (the buttons have no function). At this time, if you touch on the "Power" button, you will enter into the preparation mode.
In the preparation mode, if there is no operation for 3 minutes, all the lights will automatically switch off, only the "power" button light will remain on in red, and the fryer will stand by in sleep mode.
3. Operating mode :
3.1: Press the ⏻ button (light in red color) to start the air fryer control panel.
3.2 : The function menu light is always in white color; in preparation mode, the selected menu is flashing when the menu is selected; When the air fryer is started to perform the program selected, the selected menu light will remain on and the rest of menu lights will be all off. When the frying process is suspended, the menu lights will remain all on. The selected menu will flash, and the menu switching function can be executed.
3.3 : The temperature/time setting indicator will light up in white. The default temperature on the LED digital display is 200^ C and the default time is 15 minutes which will be displayed alternately for 5 seconds.
3.4 : The work in progress indicator lights will turn on (H), with an interval of 1 second.
3.5 : The temperature indicator (D) and time indicator (J) will light up corresponding to the LED digital display content.
3.6 : If you need to adjust the temperature and time, you can first click the "TIME/TEMP" button, which will activate and light up the "+"/"-" buttons. Then, you can adjust the temperature and time. After the adjustment is completed, if there is no operation for 5 seconds, the "+"/"-" button light will automatically turn off. Long button press will increment or decrement the time or temperature in a faster way.
3.7: Press "Start/Pause" button at any time for start or interrupt a frying program.
4 : End of work: The motor will be powered off after a delay of 20 seconds and will stop working. At the same time, the buzzer will beep for 5 times. At this time, hold the handle with your hand and pull out the pot from the machine.
5 : Power-down protection function: 10-minute power-down memory function and the original working mode can be continued after powering-on again the air fryer within 10 minutes of power-off in working mode.
COOKING TIPS
- Almost any food that is traditionally cooked in the oven can be air fried.
- Foods cook best and most evenly when they are of similar size and thickness.
- Smaller pieces of food require less cooking time than larger pieces.
- For best results in the shortest amount of time, air fry food in small batches. Avoid stacking or layering when possible.
- Most prepackaged foods do not need to be tossed in oil before air frying. Most already contain oil and other ingredients that enhance browning and crispiness
- Frozen appetizers air fry very well. For best results, arrange them on the tray in a single layer.
- If layering foods, be sure to shake the basket halfway through (or flip food) to promote even cooking.
- Toss foods you are preparing from scratch, such as French fries or other vegetables, with a small amount of oil to promote browning and crispiness.
- When air frying fresh vegetables, make sure to pat them dry completely before tossing with oil and
air frying to ensure maximum crispiness.
- Air fryers are great for reheating food, including pizza. To reheat your food, set the temperature to 150^ for up to 10 minutes.
MAIN COOKING RECIPES
| Ingredients | Default temperature | Default time | RemarkWeight | |
| Frozen fries | 200 °C | 15mins About 100~170g (frozen French fries) | Custom time range 15~17mins | |
| Steak/Spare Ribs 180 °C | 15mins About | 150~180 grams, | (about 8~10MM thick, frozen state, placed on the grill) | Custom time range 15~20mins |
| Fish 200 °C | 15mins About 300~350g (fresh | small crucian carp, placed on the grill) | Custom time range 13~15mins | |
| Grilled chicken, gs, chicken wings | 180 °C | 40mins About 600~700 | grams (after thawing) | Custom time range 35~40mins |
| Baking (cake) | 180 °C | 20mins About 150~170 grams | range | 15~20mins |
| Shrimp 160 °C | 15mins About 250~300 | grams | (live shrimp) | Custom time range 13~17mins |
The temperatures and times recommended below are based off of the listed recommended amounts and weights. If using a smaller amount or weight, check food sooner than the recommended time because it will likely cook faster.
Note: This table is only a guide and does not contain exact recipes.
Note: Use extreme caution while handling hot food in fryer basket. Excess oil will drip into basket when preparing greasy foods. Empty the basket after every use.
TROUBLESHOOTING GUIDE
| Problem Possible Cause Solution | ||
| The appliance cannot enter in working mode and an alarm is issued. Fault code E0. | Sensor open | Please contact our company's customer service department, or go directly to the company's designated maintenance point for repairs. Do not disassemble and repair by yourself. |
| The appliance cannot enter in working mode and an alarm is issued. Fault code E1. | Sensor shorted | Please contact our company's customer service department, or go directly to the company's designated maintenance point for repairs. Do not disassemble and repair by yourself. |
| The appliance cannot enter in working mode and an alarm is issued. Fault code E2. | Fan failure/high temperature protection | Please contact our company's customer service department, or go directly to the company's designated maintenance point for repairs. Do not disassemble and repair by yourself. |
| When the product is operated for the first time, the motor emits an unpleasant smell. | This is normal for the initial use of a new motor. | If the product still emits this odor after repeated use, please contact the customer service center. |
CLEANING AND MAINTENANCE
- Ensure the Air Fryer is unplugged and cool before cleaning.
- Once the Air Fryer and basket are cool, remove the basket from the Air Fryer (if it is not already removed). Use the tray handle to remove tray. Use a sponge and warm, soapy water to wash the inside and outside of the basket and tray.
Warning: Do not use abrasive cleaning agents or scouring pads.
- The basket and the tray are top-rack dishwasher safe.
• Gently wipe down exterior with a damp cloth or paper towel. - Never immerse the Air Fryer or its plug in water or any other liquid.
• Dry all parts thoroughly before storage.
• Store the Air Fryer in a cool, dry place.
PRODUCT DISPOSAL
This product complies with European Directive 2012/19/EU on electrical and electronic devices, known as WEEE (Waste Electrical and Electronic Equipment), provides the legal framework applicable in the European Union for the disposal and reuse of waste electronic and electrical devices. Do not dispose of this product in the bin, instead going to the electrical and electronic waste collection center closest to your home.
FRANÇAIS
NOUS VOUS REMERCIONS D'AVOIR CHOISI UFESA ET NOUS SOUHAITONS QUE CE PRODUIT VOUS APPORTE SATISFACTION ET PLAISIR.
AVERTISSEMENT
VEUILLEZ LIRE ATTENTIVEMENT LES CONSIGNES D'UTILISATION AVANT D'UTILISER LE PRODUIT. VEUILLEZ CONSERVER CES INSTRUCTIONS DANS UN ENDROIT SÛR POUR POUVOIR VOUS Y RÉFÉRER ULTÉRIEUREMENT.
DESCRIPTION
ÉLIMINATION DU PRODUIT
B&B TRENDS, SL. guarantees compliance of this product for the use for which it is intended for a period of two years. In the case of breakdown during the term of this warranty, users are entitled to repair or else the replacement of the product at no charge if the former is unavailable, unless one of these options proves impossible to fulfill or is disproportionate. In this case, you can then opt for a reduction in price or cancellation of the sale, which must be dealt with directly with the sales vendor. This also covers replacement of spare parts provided that the product has been used according to the recommendations specified in this manual for both cases, and has not been tampered with by any third party that is not authorised by B & B TRENDS, SL. The warranty will not cover any parts subject to wear and tear. This warranty does not affect your rights as a consumer in accordance with the provisions in Directive 1999/44/EC for member states of the European Union.
USE OF WARRANTY
Customers must contact a B&B TRENDS, SL., authorised Technical Service for repair of the product. Since any tampering of the same by anyone not authorised by B&B TRENDS, SL., or the careless or improper use of the same shall render this warranty null and void. The warranty must be fully com-
pleted and delivered along with the receipt or delivery docket for the effective exercise of rights under this warranty.
This warranty should be retained by the user as well as the invoice, receipt or the delivery docket to facilitate the exercise of these rights. For technical service and after-sales care outside the Spanish territory, please submit your query to the point of sale where you purchased the item
BON DE GARANTIE
- ESPAÑOL
- CÓMO USAR EL PRODUCTO
- WARNING
- DESCRIPTION
- SAFETY INSTRUCTIONS
- IMPORTANT WARNINGS
- BEFORE ITS FIRST USE
- CONTROL PANEL
- HOW TO USE
- Operating mode :
- COOKING TIPS
- TROUBLESHOOTING GUIDE
- CLEANING AND MAINTENANCE
- PRODUCT DISPOSAL
- FRANÇAIS
- AVERTISSEMENT
- ÉLIMINATION DU PRODUIT
- USE OF WARRANTY
- BON DE GARANTIE
Brand : UFESA
Model : Fryin' Free
Category : Deep fryer