
AGH 18 - Grass trimmer EINHELL - Free user manual and instructions
Find the device manual for free AGH 18 EINHELL in PDF.

User questions about AGH 18 EINHELL
0 question about this device. Answer the ones you know or ask your own.
Ask a new question about this device
Download the instructions for your Grass trimmer in PDF format for free! Find your manual AGH 18 - EINHELL and take your electronic device back in hand. On this page are published all the documents necessary for the use of your device. AGH 18 by EINHELL.
USER MANUAL AGH 18 EINHELL
GB Directions for Use Cordless Grass Cutter and Hedge Trimmer
natural_image
Illustration of stacked open and closed sheets of paper or documents (no text or symbols)©Bitte Seite 2-3 ausklappen
GBPlease fold out page 2-3
⑤Veuillez déplier les pages 2-3, s'il vous plaît
NLGelieve blz. 2-3 uit te vouwen
⑤Desdoblar página 2-3
©É favor desdobrar as páginas 2-3
⑤Fäll ut sidorna 2 - 3
natural_image
Close-up of a mechanical component with directional arrows indicating movement or force (no text or symbols)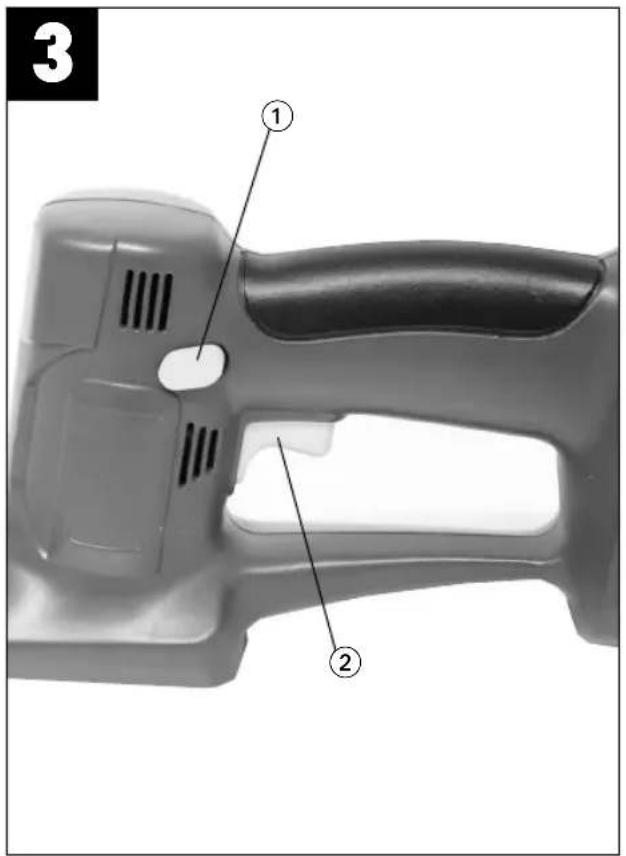

natural_image
Internal view of a mechanical gear assembly with visible gears and shafts (no text or symbols)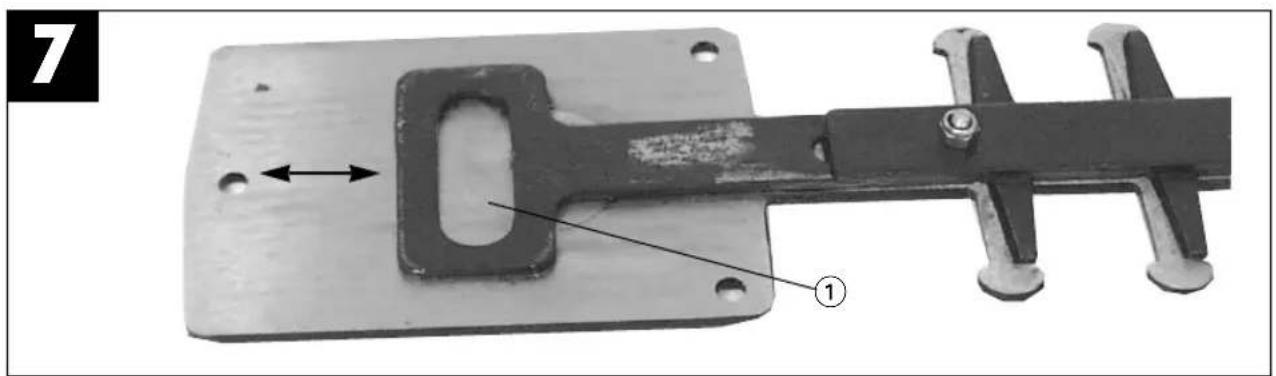
natural_image
Mechanical clamp device with metal bracket and mounting base, showing a close-up view of a component (no text or symbols visible)
D
- Cordless grass cutter
- Hedge trimmer blade
- Charging supply unit
- Charging adapter
- Case
2. General safety information
Caution! Danger!
The blade will run on for a few seconds after the tool is switched off!
Please read the directions for use carefully and observe the information provided. It is important to consult these instructions in order to acquaint yourself with the tool, its proper use and safety precautions.
Important!
For safety reasons the cordless grass cutter and hedge trimmer is not to be used by children, young people under 16 years of age, or any other persons who are not acquainted with these directions for use.
●Examine the tool each time before you use it. Do not use the tool if any safety devices and/or blades are damaged or worn. Never put safety devices out of operation.
- Use the tool only for the purpose specified in these instructions.
●You are responsible for safety in your work area.
- Inspect the items you want to cut before starting to work. Remove any foreign objects you find. Watch out for foreign objects while you work. If you still hit upon an obstacle while cutting, turn off the tool (let go of the ON button) and remove the obstacle.
- If the blades become jammed, switch off the tool (let go of the ON button) and remove the obstruction (thick branch, foreign object) with a blunt item. Never use your fingers to clear an obstruction - the pre-loaded blades can cause serious injury.
●Examine the charging cable regularly for signs of damage and age (brittleness). Use only if it is in perfect condition.
●Work only in good visibility.
●Always make sure of your footing while working. Be careful when stepping backwards. Risk of stumbling!
- If you interrupt your work to move to a different position it is imperative to switch off the tool while you are moving there.
●Never use the tool in the rain or in moist or wet conditions.
●Avoid contact with leaky batteries. In case of contact, wash the affected area of skin immediately with water and soap. If battery acid gets in your eye, rinse out the eye with water for at least 1 minute and consult a doctor at once.
●Protect the battery charger and cable from damage and sharp edges. Damaged cables are to be replaced without delay by an electrician.
●Always remove the NC storage battery before you perform any work on the tool, e.g.
- cleaning the blades
- troubleshooting
- cleaning and maintenance or before leaving the tool un
●Never work with the tool in the rain and never leave the tool outdoors. The tool must not be used if it is wet.
●We recommend that you wear safety goggles when working with the tool.
●Wear suitable working clothes such as rubber gloves and non-slip shoes. Do not wear loose garments. Keep long hair in a hairnet.
●Avoid abnormal postures and make sure of your footing.
- Be sure to hold the tool well away from your body when it is switched on.
●Make sure there are no other persons or animals within your working area (radius of swing).
- Keep cables clear of where you are cutting.
- Use the tool only when it is in good working order.
●Protect cables from heat, caustic fluids and sharp edges. Replace damaged cables immediately.
●Examine the cutting system regularly for signs of damage and, if necessary, arrange for the tool to be professionally repaired by the ISC Customer Service Center or a specialist workshop.
- Keep the tool in a dry place out of children's reach.
- When the tool is not being used, store it so that the blades cannot be touched accidentally.
●Take care not to overload the tool and do not use it on jobs for which it is not intended.
●The tool requires regular inspection and maintenance. Always replace damaged blades in pairs. If the tool suffers any damage from impact (falling on hard ground etc.), have it checked immediately by a specialist.
- Look after your tool carefully. Keep it clean and sharp to ensure efficient and safe cutting. Follow the maintenance and cleaning instructions.
GB
3. Important information
●The NC replaceable battery supplied with the tool is not charged. Before the tool can be used for the first time you must charge the battery.
●Charge the battery with the supplied charger. An empty battery takes approx. 12 hours to be charged. Do not use the supplied charger to charge other batteries.
●The battery does not reach its maximum capacitance until it has been charged and discharged approximately five times.
●NC batteries lose their charge even when they are not being used. Regular charging is therefore recommended. Capacity losses can be compensated by using a timer to top-up the charge for 30 minutes every day.
- Please check the data marked on the rating plate of the battery charger. Connect the battery charger only to an identical mains supply to that on the rating plate.
●In heavy use the battery will become warm. Allow it to cool to room temperature before commencing with the charging.
●Never throw old batteries in the fire. Risk of explosion!
●Used and defective batteries do not belong in the refuse bin. Think of the environment - cadmium is toxic. For proper disposal of used and defective batteries, send them postage-paid to the ISC company or take them to a special collecting station in your area. Ask at your local council offices for the nearest used battery collecting station.
●Protect the battery charger and cable from damage and sharp edges. Damaged cables are to be replaced without delay by an electrician.
4. Proper use
The tool is designed for cutting lawns, small areas of grass, bushes and small hedges in private and hobby gardens.
Tools for private and hobby gardens are not suitable for use in public facilities, parks and sport centers, along roadways, on farms or in the forestry sector. For the tool to be used properly it is imperative to follow the instructions set out in the manufacturer's directions for use.
Important! It is prohibited to use the tool to chop material for composting because of the potential danger to persons and property.
5. Technical data
Grass cutter mode:
Cutting width: 95 mm
Cutting capacity: approx. 70 min.
Hedge trimmer mode:
Cutting length: 182 mm
Tooth spacing: 8 mm
Cutting capacity: approx. 20 min.
Charging supply unit:
Voltage: 230V \~ 50 Hz
Output:
Nominal voltage: DC 22 V
Nominal current: 450 mA
Nominal power: 9.9 VA
6. Starting up
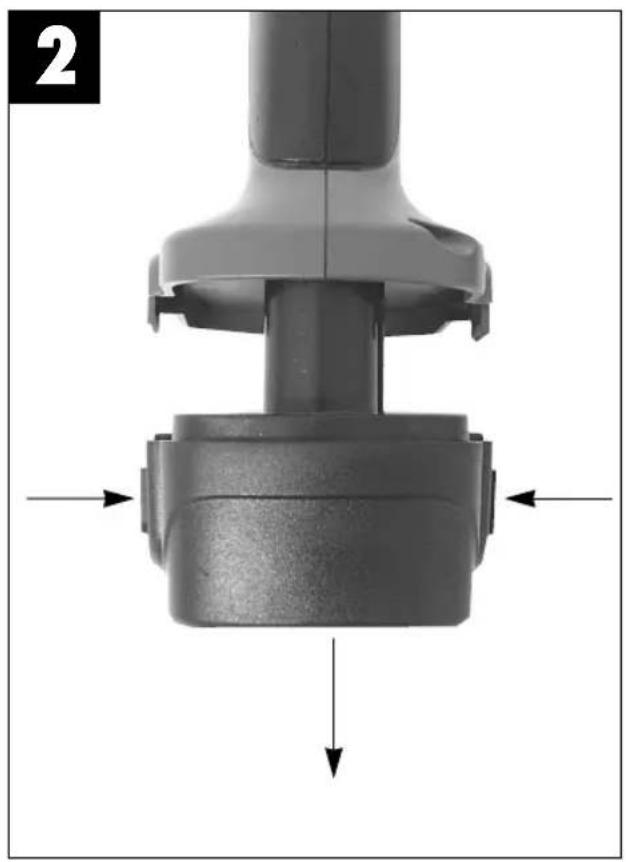
- Remove the battery from the handle (Figure 2) by pressing on the battery's pushlock buttons.
- Check that your mains voltage is the same as that marked on the rating plate of the battery charger. You can now plug the battery charger in a socket-outlet.
- Insert the battery in the charging adapter. The red LED indicates that the battery is being charged. There is no automatic switch-off when the battery is fully charged. An empty battery requires a maximum charging period of 5-7 hours. A battery with residual capacitance takes accordingly less time to charge. The temperature of the battery may rise slightly during the charging operation. This is normal.
If the battery fails to charge, please check
- whether there is voltage at the socket-outlet
- whether there is good contact at the charging contacts of the battery charger.
If you still fail to charge the battery, please return
●the power supply unit
●the charging adapter
●and the battery
to our Customer Service Center.
Timely recharging of the NC battery will help it serve you well for a long time. Recharging is always necessary when you notice a drop in the tool's performance.
Never allow the battery to become fully discharged.
The results will be a defective battery!
GB
Operation
First clear away any stones or other solid objects from where you want to cut. The safety lock-off (Figure 3 / Item 1) prevents the tool being switched on accidentally. To switch on the tool you must first release the safety lock-off with your thumb. Keep the safety lock-off pressed and at the same time actuate the On/Off switch (Figure 3 / Item 2) to start up the tool.
To switch off the tool, let go of the On/Off switch (Figure 3 / Item 2).
Cutting grass
Allow the grass cutter to glide above the ground. The best results are achieved when the lawn is dry.
When you notice a drop in cutting performance, recharge the tool immediately so that the battery does not become fully discharged.
Trimming hedges
The tool can be used to trim small hedges and shrubs.
Hold the tool slightly tilted in relation to the hedge you want to cut.
First cut the sides from the bottom up, then cut the top.
Watch out for foreign objects in or on the hedge which could damage the blades.
When is the best time to trim hedges?
●As a general rule, hedges which lose their leaves in the autumn should be trimmed in June and October.
●Hedges which do not lose their leaves should be cut in April and August.
Important!
It is prohibited to remove or bridge any of the switching elements installed on the tool by the manufacturer (e.g. by securing a button to the handle) as this would prevent the tool from switching off automatically and result in high risk of injury.
7. Changing the blades
Important!
Remove the battery from the tool before dismantling or fitting the blades. Risk of injury!
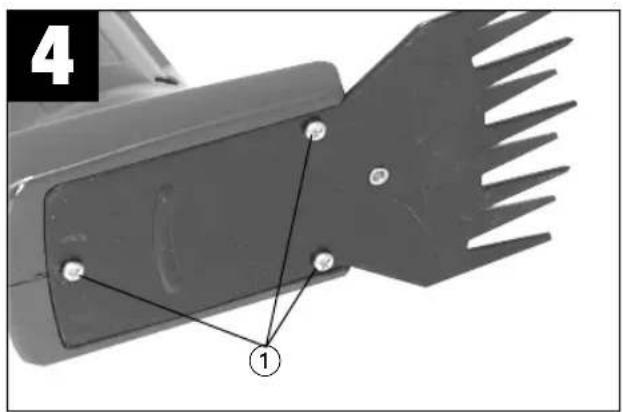
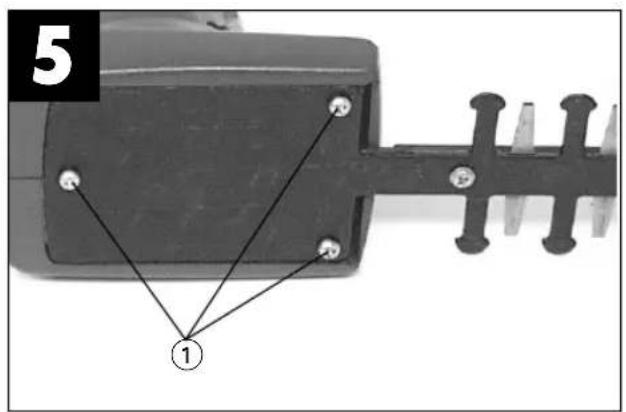
To dismantle the blades, undo the screws at the bottom of the tool (Figure 4 and Figure 5 / Item 1). When the blades have been removed you will be able to see the gear wheels (Figure 6). Make sure that no dirt gets in the gearing while you are changing the blades.
When inserting the hedge trimming blade, note the position of the eccentric pin (Figure 6 / Item 1).
Take the hedge trimming blade and slide the eccentric mount (Figure 7 / Item 1) into position so that the eccentric pin fits exactly in the eccentric mount when assembled. Fasten the hedge trimming blade with the screws.
When inserting the grass cutting blade, again note the position of the eccentric pin (Figure 6 / Item 1). With the grass cutting blade you can slide the eccentric mount (Figure 8 / Item 1) to the left or right in order to find the position where the eccentric pin fits in the eccentric mount. Re-fasten the grass cutting blade with the screws.
8. Maintenance and cleaning
To achieve good results you should keep the blades sharp at all times. In particular we recommend that you immediately level off any jags or ridges caused by stones or the like. The tool should be thoroughly cleaned both before and after use. A few drops of oil (e.g. sewing machine oil) will improve the cutting performance of the blades, but never apply any grease to the blades. To ensure constant exact cutting it is also important to remove grass remnants and dirt from between the upper and lower blade.
Important!
Never clean the tool under running water - and particularly never with high pressure - because of the potential danger to persons and property. Keep your cordless grass cutter and hedge trimmer in a dry and frost-proof place. Choose a place that children are unable to enter.
9. Troubleshooting
The tool does not cut cleanly:
Check the blades and replace them if necessary.
In case of any other faults, please contact the ISC Customer Service Center.
We draw express attention to the fact that we are not responsible within the meaning of the Product Liability Law for any damage caused by our products if said damage results from incorrect repair or the use of replacement parts which are not original Einhell parts or parts approved by us and the repair is not carried out by the ISC Customer Service Centre.
F
Notizen:
© GARANTIEURKUNDE
The guarantee period begins on the sales date and is valid for 2 years.
Responsibility is assumed for faulty construction or material or functional defects.
Any necessary replacement parts an necessary repair work are free of charge.
We do not assume responsibility for consequential damage.
Your customer service partner
F GARANTIE EINHELL
⑤ EINHELL GARANTIBEVIS
Eschenstraße 6 · D-94405 Landau/Isar (Germany)
Brook House, Brookway
North Chesire Trading Estate
Prenton, Wirral, Chesire
CH 43 3DS
Tel. 0151 6084802, Fax 0151 6086339
S.C. A Ap. 9 Sector 1
RO 75 121 Bucharest
Tel. 01 4104800, Fax 01 4103568
cz DAT spol s.r.o
Hrubeho 3
CZ 61200 Brno
Tel. 05 49211107, Fax 05 41214831
BG Slav GmbH
Podvis Str. Wbl. 30 E.G. ap. 52
9000 Varna
Tel. 052 242854, Fax 052 242854
Technical changes subject to change