LEF 200 M - Dehumidifier EINHELL - Free user manual and instructions
Find the device manual for free LEF 200 M EINHELL in PDF.

User questions about LEF 200 M EINHELL
0 question about this device. Answer the ones you know or ask your own.
Ask a new question about this device
Download the instructions for your Dehumidifier in PDF format for free! Find your manual LEF 200 M - EINHELL and take your electronic device back in hand. On this page are published all the documents necessary for the use of your device. LEF 200 M by EINHELL.
USER MANUAL LEF 200 M EINHELL
Gerätebeschreibung
Wartung und Pflege
natural_image
Line drawing of a portable air conditioner unit and its internal dish (no text or symbols)Aufbewahrung
| Power supply 230V - 50 Hz | |
| Moisture extraction capacity 10 liters per day(at a room temperature of 30°C and 80% humidity) | |
| Power consumption 200 W | |
| Temperature range 5 - 35°C | |
| Coolant R 134a/180 g | |
| Water tank 2,7 l | |
| net weight 14,5 kg | |
| Dimensions 27 x 33 x 50 cm (width x depth x height) | |
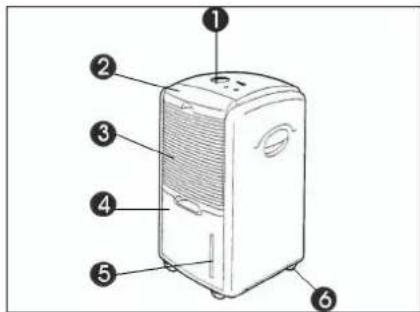
Appliance overview
1 Control panel
2 Filter
3 Air grill
4 Condensed water tray
5 Water level display
6 Castors
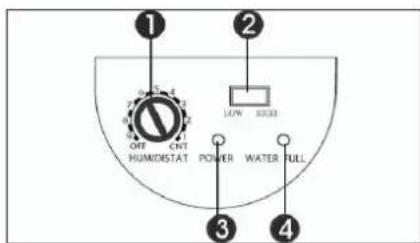
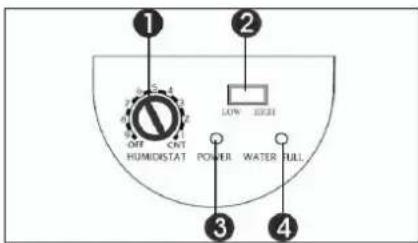
Control panel
1 Hygrostat
2 Switch for fan speed
3 LED for "Power"
4 LED for "Condensed water tray full"
Read these instructions carefully and keep them in a safe place.
Features
Moisture extraction
10 l per day (at a room temperature of 30 °C and 80% humidity).
Automatic cut-out when the water tank is full. When the water tank is full the water level indicator shines with a red light and the unit switches off automatically.
Active carbon filter
To curb the proliferation of bacteria and to absorb dust particles.
Operating principle
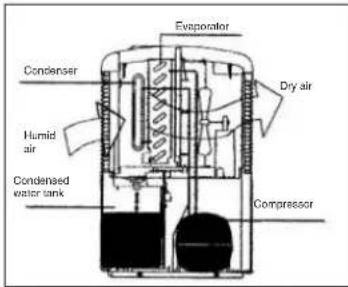
The dehumidifier controls the relative humidity of the inlet air. The humid air condenses on the cooler elements and is transferred to the water tank. The dry air is heated a little on the condenser and returned to the room.
Possible uses
Too high a level of humidity is not good for either yourself or your home. With the LEF 200 M you can create an agreeable and healthy climate in basements, storage rooms, fitted cupboards, pantries, kitchens, libraries, galleries, strong-rooms, computer rooms, archives, living-rooms and
bedrooms.
Note:
70% humidity is the upper limit with which humans feel comfortable. If it feels too warm then the water content is too high, i.e. the humidity is too high. Humidity has a certain relationship to temperature. As a general rule the following applies: 60-70% for summer and 50-70% for winter.
Before using
- Room heating
● Important safety information:
● The room temperature should lie in the range from 5 to 35°C. The dehumidifier will not work effectively outside this range.
Initially the dehumidifier creates heat, causing the room temperature to rise by a possible 1-2 °C.
The dehumidifier should always be used in vertical position.
● After transporting or tilting (angled positions) the device, do not plug into the power socket for at least 1 hour.
- There should be an air gap of approx. 15 cm on all sides of the unit so that it can draw in enough air.
- Keep the unit away from heaters or heat-generating equipment.
● Never pour or spray water over the unit.
● Never use the power plug to switch the unit on or off.
● Always use the switch on the control panel.
● Before you move the unit, switch it off with the On/Off button, pull out the power plug and empty the water tank.
● Clean the air filter before it becomes heavily soiled. The unit works best with a clean filter.
● Never use insect spray or any other combustible cleaning agents on the unit.
- If the unit develops a fault, switch it off, pull out the power plug and notify your service partner.
- If the power cable suffers any damage, it must be replaced by a specialist in order to rule out all risks.
Using for the first time
Check that the voltage from the mains power supply is the same as the voltage indicated on the rating plate. Connect the plug to the 230 V - 50 Hz power socket. The "Power" LED lights up.
GB
GB
- If the rotary switch is set to "CNT" the device will dehumidify the air on a continuous basis.
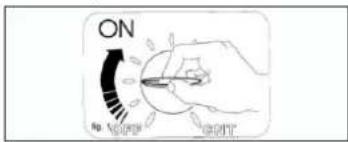
● Turning the switch in a clockwise direction sets the device to a higher level of dehumidification.
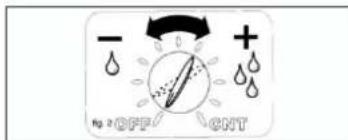
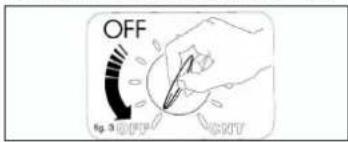
● To switch the device off, turn the switch to "OFF".
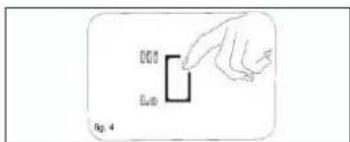
Fan speed
The unit has two speed settings. Press the button to change over to high speed. For quiet operation, particularly at night, set the switch to low speed.
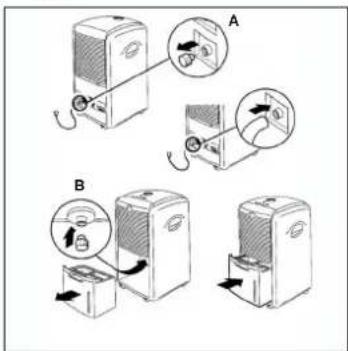
Emptying the water tank
The device switches off automatically whenever the condensed water tank is full, and the "Condensed water tank full" LED lights up.
Empty the tank as follows: Raise the tank slightly by its handle and carefully pull it out.
After emptying the tank, return it to its proper place.
Note:
If the tank is not inserted correctly the "Condensed water tank full" LED will continue to shine.
Options:
For continuous or lengthy operation, please note the following:
- Remove the water stopper at the rear of the housing. Connect the water hole to a suitable 6 mm water pipe.
- Pull out the water tank and insert the water stopper (taken from the rear of the housing) in the hole where the tank is otherwise connected.
- Please make sure that the condensed water can flow away and that the water pipe is securely fastened.
- Re-insert the water tank.
- Important: In very cold weather you should take precautions to ensure that the water does not freeze.
Care and maintenance
Always pull the power plug before starting any work of care or maintenance!
- Use only a soft cloth to clean the housing.
- Never use aggressive chemicals, detergents,
GB
chemically treated cleaning cloths or solvents as they may damage the housing.
- Is there anything in the room which is creating a great deal of humidity?
Cleaning the air filter
The air filter comes with 2 filters:
-
Dust filter
-
Activated carbon filter (binds particles in the air and prevents the development of bacteria)
a) Dust filter
Take out the filter holder and remove the activated carbon filter. Clean the filter with a vacuum cleaner or knock gently to remove dirt. If the filter is heavily soiled, wash carefully with warm water. Then allow to dry thoroughly. Never place the filter in the sun. Never insert a damp filter in the device.
b) Activated carbon filter
The activated carbon filter is situated behind the dust filter and cannot be washed. Its service life depends on the conditions under which it is used. The filter should be checked at regular intervals and replaced whenever necessary.
Storage
If you do not intend to use the dehumidifier for a long period, do the following:
● Switch off the unit, pull out the power plug and reel up the power cable.
● Empty the water tank and carefully dry it.
● Clean the ventilation grille, place a cover over the unit and store it where there is little sunlight.
Troubleshooting
● The unit fails to start:
- Check whether the power plug is correctly inserted.
- Check whether there is any electricity.
- Is there a power failure?
- Is the red lamp on the water level indicator shining? If it is, either the tank is full and must first be emptied or the tank is not correctly inserted.
● The unit seems to be having no effect:
- Is the filter dirty or contaminated?
- Is the air inlet or outlet blocked?
- Is the humidity in the room already very low?
● The unit seems to be having very little effect:
- Are too many doors and windows open?
F
natural_image
Illustration of a portable air conditioner unit and its internal filter device (no text or symbols)Stockage
natural_image
Line drawing of a portable air conditioner unit and its internal mesh device (no text or symbols)Acondicionamento
Esquema general del aparato
natural_image
Line drawing of a portable air conditioner unit and its internal mesh device (no text or symbols)natural_image
Line drawing of a portable air conditioner unit and its open lid (no text or symbols)Förvaring
Laitteen kuvaus
FIN
Huolto ja hoito
natural_image
Line drawing of a portable air conditioner unit and its internal dish (no text or symbols)Säilytys
Manutenzione e cura
natural_image
Line drawing of a portable air conditioner unit and its open base (no text or symbols)Deposito
Opis urządzenia
natural_image
Line drawing of a portable air conditioner unit and its internal mesh device (no text or symbols)Przechowywanie:
Popis prístroje
Údržba a péče
natural_image
Line drawing of a portable air conditioner unit and its open base (no text or symbols)Uložení
Popis prístroja
1 Obslužné pole
2 Filter
3 Vzduchová mriežka
4 Nádrž na kondenzovanú vodu
5 Zobrazenie stavu vody
6 Vodiace kolieska
Obslužné pole
1 Regulator vlhkosti
2 Spinač pre rýchlost ventilátora
3 Kontrolka zapnutia - LED "Power"
4 Kontrolka LED "Plná nádrž na
kondenzovanú vodu'
42
natural_image
Illustration of a portable air conditioner unit with a fan base and top-mounted top panel (no text or symbols)89/336/EWG 93/68/EEC

95/54/EG:

90/396/EWG

97/68/EG:

89/686/EWG
EN 55014-1/A2; EN 55014-2/A1; EN 61000-3-2; EN 61000-3-3/A1; EN 60335-2-40/A1
Landawlsar, den 25.11.2004
Brunhölzl
Subject to change without notice
© WARRANTY CERTIFICATE
The product described in these instructions comes with a 2-year warranty covering defects. This 2-year warranty period begins with the passing of risk or when the customer receives the product. For warranty claims to be accepted, the product has to receive the current maintenance and be put to the proper use as described in the operating instructions.
Your statutory rights of warranty are naturally unaffected during these 2 years. This warranty applies in Germany, or in the respective country of the manufacturer's main regional sales partner, as a supplement to local regulations. Please note the details for contacting the customer service center responsible for your region or the service address listed below.
© CERTIFICADO DE GARANTIA
Eschenstraße 6 - D-94405 Landau/Isar (Germany)
Info-Tel. 0180-5 120 509 • Telefax 0180-5 835 830
68 Recycling alternative to the demand to return electrical devices: As an alternative to returning the electrical device, the owner is obliged to cooperate in ensuring that the device is properly recycled if ownership is relinquished. This can also be done by handing over the used device to a returns center, which will dispose of it in accordance with national commercial and industrial waste management legislation. This does not apply to the accessories and auxiliary equipment without any electrical components which are included with the used device.
natural_image
Symbol of a trash bin crossed with diagonal lines and a circular object, representing waste sorting or environmental restriction (no text present)© Nur für EU-Länder
For EU countries only
Never place any electric tools in your household refuse.
To comply with European Directive 2002/96/EC concerning old electric and electronic equipment and its implementation in national laws, old electric tools have to be separated from other waste and disposed of in an environment-friendly fashion, e.g. by taking to a recycling depot.
natural_image
Simple line drawing of a trash bin with diagonal lines crossing it, no text or symbols present.© Len pre krajiny EÚ