FG1350 - Vacuum Cleaner FAGOR - Free user manual and instructions
Find the device manual for free FG1350 FAGOR in PDF.

| Product type | Water vacuum with spray function |
| Brand | Fagor |
| Model | FG1350 |
| Power supply voltage | 220-240 V~, 50-60 Hz |
| Power | 400 W |
| Clean water tank capacity | Approximately 1.2 L |
| Waste water tank capacity | Approximately 0.4 L |
| Hose length | Φ30 mm x 1.2 m |
| Power cord length | Approximately 3.0 m |
| Dimensions (L x W x H) | 290 mm x 180 mm x 270 mm |
| Total weight with accessories | Approximately 3.2 kg |
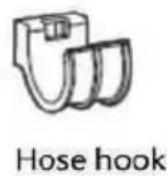
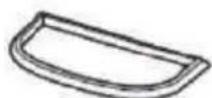
| Included accessories | Water nozzle, right-angle water nozzle, hose hook |
| Main functions | Waste water suction, clean water spray, automatic float shut-off |
| Motor protection | Overheat protection device (auto-reset after cooling) |
| Recommended water type | Tap water or ionized alkaline water (<40°C) |
| Routine maintenance | Clean filter sponges, empty and rinse tanks after each use |
| Spare parts | Lid seal, air inlet sponge, filter sponge, screw cap |
| Prohibited use | Suction of dry dust, flammable substances, sharp objects, etc. |
| Warranty | 2 years (excluding normal wear and misuse) |
Frequently Asked Questions - FG1350 FAGOR
User questions about FG1350 FAGOR
0 question about this device. Answer the ones you know or ask your own.
Ask a new question about this device
Download the instructions for your Vacuum Cleaner in PDF format for free! Find your manual FG1350 - FAGOR and take your electronic device back in hand. On this page are published all the documents necessary for the use of your device. FG1350 by FAGOR.
USER MANUAL FG1350 FAGOR
natural_image
Red circular logo with three horizontal white lines, resembling a stylized number 3 or symbol (no text or symbols present)
natural_image
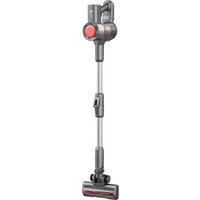
Black and white FAGOR vacuum cleaner with coiled tubing (no visible text or symbols)NETTOYEAR MULTI-SURFACES
Modèle : FG1350
MANUEL D'INSTRUCTIONS
natural_image
Technical line drawing of a mechanical component with coiled tubing and a valve (no text or symbols)Instructions
natural_image
Technical line drawing showing a U-shaped structure with internal components and an electrical outlet connected to a plug (no text or symbols present)natural_image
Line drawing of a hand inserting a component into a device (no text or symbols)natural_image
Illustration of a hand holding a handgun with an arrow indicating force or movement (no text or symbols)natural_image
Illustration of a hand holding a tool with a circular component, no text or symbols presentnatural_image
Illustration of hands using a handheld gun to adjust a circular component (no text or symbols present)natural_image
Line drawing of a hand inserting a component into a device (no text or symbols)natural_image
Illustration of hands using a tool to apply material, showing a step with arrows indicating direction (no text or symbols)natural_image
Line drawing of a hand holding a handheld device with a black arrow indicating direction (no text or symbols)
natural_image
Line drawing of a mechanical device with internal components and directional arrows (no text or symbols)3
natural_image
Illustration showing two steps of a hand removing a card into a device, with no text or symbols present.
Attention
natural_image
Illustration of a kitchen sink with a faucet, a briefcase, and a plastic bag (no text or symbols)
Attention
natural_image
Technical line drawing of a mechanical component with no visible text or symbolsnatural_image
Simple line drawing of a mechanical device with a knob and arrow indicating rotation (no text or symbols)natural_image
Line drawing of a hand inserting a component into a device (no text or symbols)
natural_image
Technical line drawing of a mechanical device with no visible text or symbols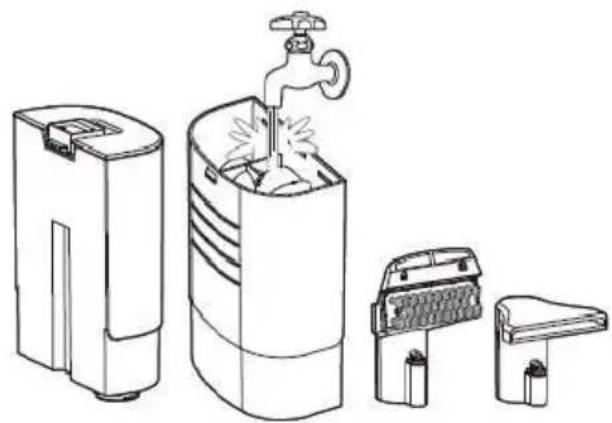
natural_image
Line drawings of various household appliances including a water dispenser, washing machine, and air purifier (no text or symbols)natural_image
Technical illustration of a mechanical component with a coiled spring and a magnified inset showing a detail (no text or symbols)natural_image
Black and white FAGOR vacuum cleaner with coiled tubing (no visible text or symbols)Spot Cleaner
Model: FG1350
INSTRUCTION MANUAL
Read this manual thoroughly before using and save it for future reference
Safety Instructions
First, please read this "Attentions" carefully and use it correctly. In order to prevent damage to people and property, protective measures must be taken:
- Regularly dispose of dust on the plug.
- Plug it in tightly when it is used.
- Unplug the machine when it is not in use for a long time
- The plug must be removed from the socket-outlet before cleaning, maintaining, inspection or moving the appliance.
- Do not touch or plug and unplug it with wet hands.
- Do not allow infants to touch the power plug.
- Do not spray pesticides, hair colorants, lubricants and other liquids.
- Do not inhale flammable and explosive substances such as cigarette ends.
- Do not inhale oil gas, heat or dry dust.
- Do not damage the power cord. Do not pull it when handling.
- Do not use the machine when the power cord and plug are broken or the plug gets loose.
- Note that the socket must not be overloaded.
-
Use it under the AC 220-240 V.
-
Stop use immediately, turn off the power and unplug in the event of an exception or failure.
- Stop using and look attached manual or consult customer service if there are abnormal sounds or smells.
- Do not disassemble, repair or transform it by oneself.
- Do not use in dangerous situations such as rain, water and strong wind.
- Do not put the main machine in water, or water the machine, in order to avoid electric shock and fire.
- Do not inhale dirt and dust with suspected infectious diseases.
- Do not use without a sewage bucket.
- Do not use for purposes other than cleaning.
- This product is designed for home use and is not suitable for commercial use.
- Keep away from fireworks, heating, etc..
- Stop working immediately when there is a foreign body blocking the spray nozzle
- Stop working immediately when a foreign body is inhaled.
-
When there is a blockage of clean water bucket or sewage bucket by foreign matters, pour out the water and clean up before continuing to use
-
Do not lean or ride.
- Do not use the machine within the reach of young children.
- Do not use it outside.
- Do not continue to use if the suction inlet is blocked
- Do not pull the power cord when plugging or unplugging it so as not to cause an electric shock.
- Remember to unplug the power cord after use
- If the supply cord is damaged, it must be replaced by the manufacturer, its service agent or similarly qualified persons in order to avoid a hazard.
- This appliance can be used by children aged from 8 years and above and persons with reduced physical, sensory or mental capabilities or lack of experience and knowledge if they have been given supervision or instruction concerning use of the appliance in a safe way and understand the hazards involved.
- Children shall not play with the appliance.
- Cleaning and user maintenance shall not be made by children without supervision.
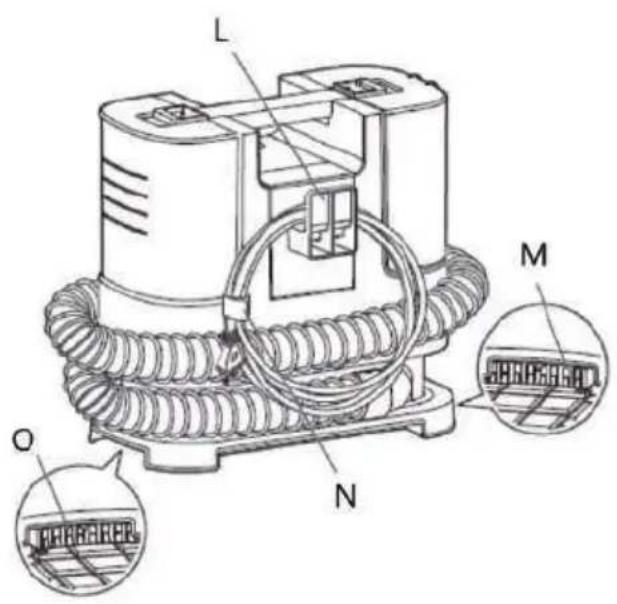
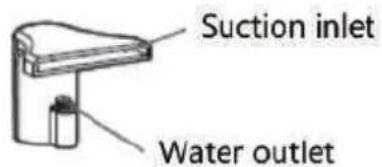
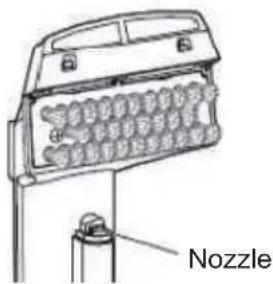
Main parts identifications:
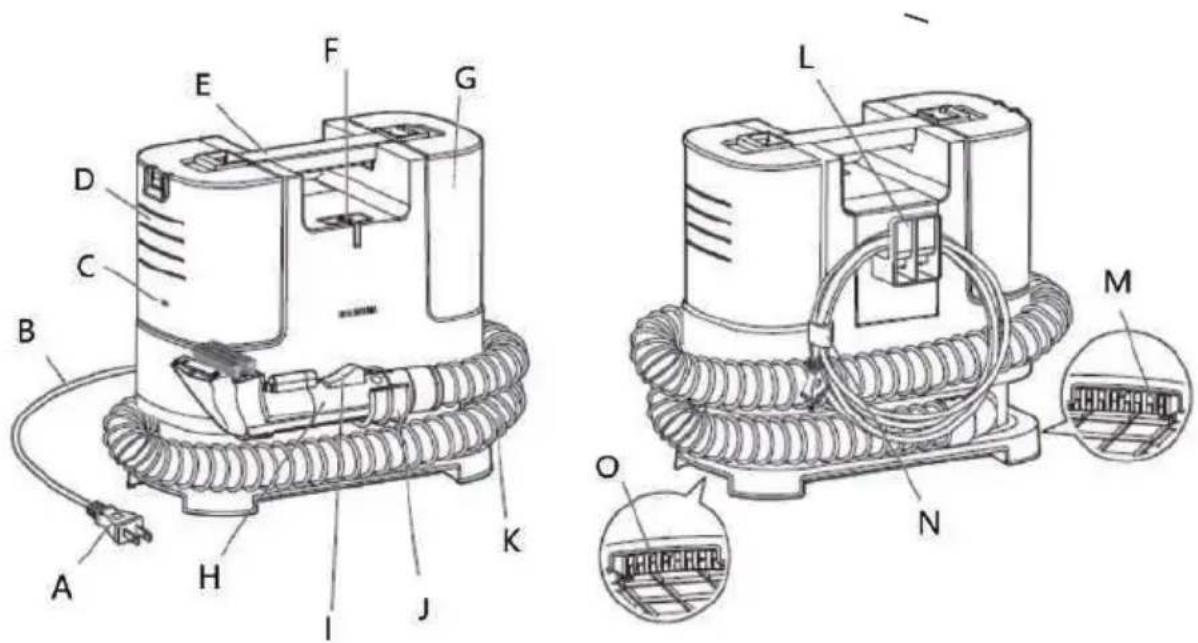
| A.Power plug I.Watering button | |
| B.Power cord J.Hose hook | |
| C.Maximum water level | K.Hose |
| D.Sewage bucket L.Power cord hook | |
| E.Handle | M.Air outlet |
| F.On/off button | N.Power cord bandage |
| G.Clean water bucket O.Air outlet | |
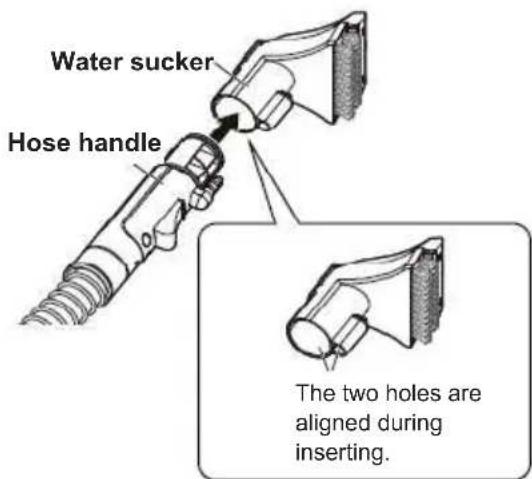
| H.Hose handle |
Remark:
● The clean water pump is built into the body.
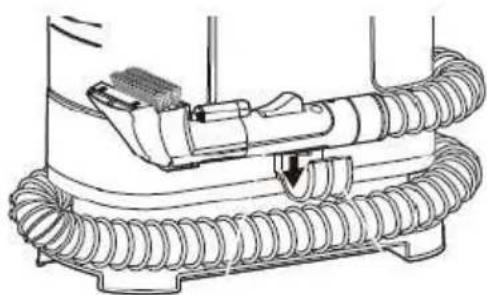
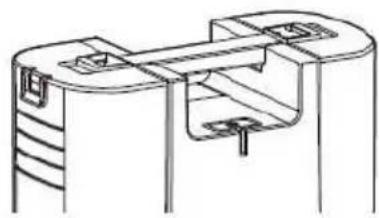
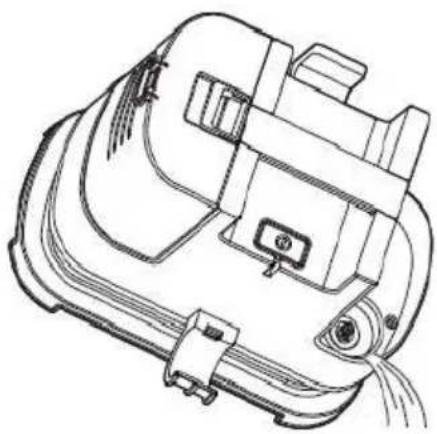
● During handling, the hose is wound around the machine and the power cord is tied and hung from the hook, as shown in the figure above.
Accessories

Water sucker with brush, for carpet, etc.
Right-angled water sucker, for cracks and the back of the chair.
WARNINGS:
- This product is used to remove dirt by rinsing. Please use tap water or alkali ionized water below 40.
- It can not be used for cleaning arts and crafts, non-waterproof fibers (nets, acetic acid, rayon, etc.), non-waterproof products (furs, leather products, white wood furniture, tea sets, etc.) and vulnerable surfaces (floors, tables).
- Do not tilt or drop the machine in the watering state, in order to avoid getting wet floors.
- When the sewage exceeds the water level, please stop the operation immediately and clean the sewage before using it.
- When using detergent, dilute the low-foaming detergent by about 50 times and spray it on the washing object.
- When using detergent, please confirm that there is no effect on the washes before using.
- When the machine is in a place such as hairy carpet, the air outlet will be blocked, and the machine may be stopped.
- If there is a lot of foam or sewage at the bottom of the machine in use, please stop using it immediately and clean up the sewage before using it.
- Do not use the foaming detergent.
Do not inhale the following items:
-
Dry dust
● Large quantities of powder (extinguishing agent, etc.)
● Large quantities of sands and pebbles -
Lots of rubbish
● Metal such as needles and pins, glass, etc.
● Big plastic bags and stockings
● Things that tend to pile up inside
Fault Prevention:
- As this product is used in wet environment, please do not inhale dry dust.
● After using in the low-temperature environment, please clean out the water inside the sewage bucket, the clean water bucket and the machine in time, so as not to freeze and affect the use. - In the dust collection process, if the hose is blocked by foreign bodies, please turn off the power and remove the foreign bodies before use
Consumables:
● The consumables can be removed and replaced when damaged or lost. Be sure to install and use
Seal ring for upper cover
Inlet air sponge
Filtering sponge

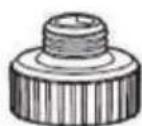
Screw cap
Protective device:
When the exhaust is not smooth, the protective device will work in order to prevent the motor overheating, and the machine will not work in a short time even if the power is turned on.
- If the protective device is started
- Press the power switch and pull the plug from the socket.
- Keep in a cool place.
After about 1 hour, the protection device is automatically off and the machine can be used again
People in need of assistance (including children) should use the machine under the supervision and direction of a guardian or responsible person.
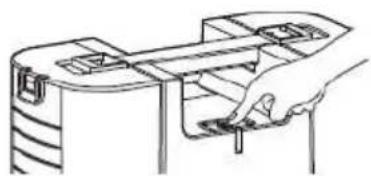
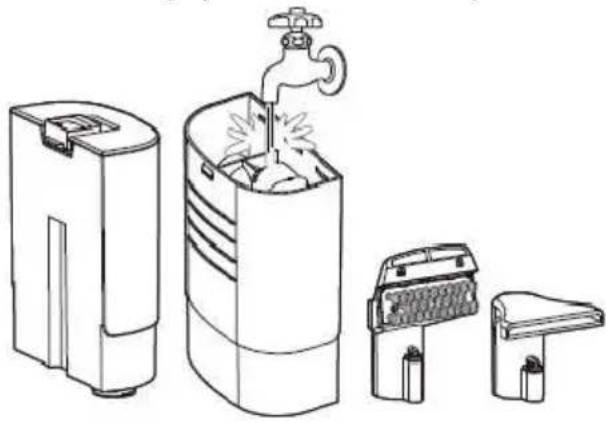
1 Insert the hose hook into the machine.

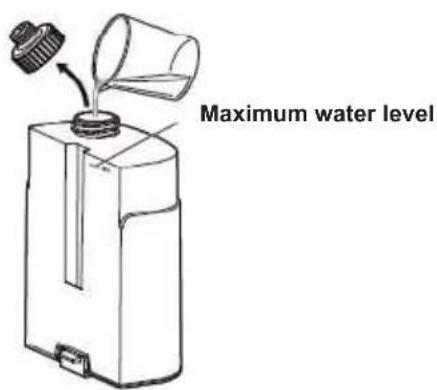
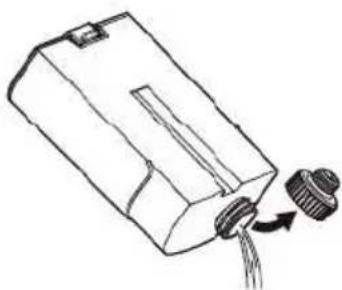
2 Remove the clean water bucket from the body.
3 Open the screw cap and fill with clean water.
• The maximum water capacity is about 1L.

Attention
● After filling with water, screw the cap tightly to prevent leakage
- Fill it with tap water or alkaline ionized water
● After use, pour away the residual water in the clean water bucket to prevent leakage and mildew.
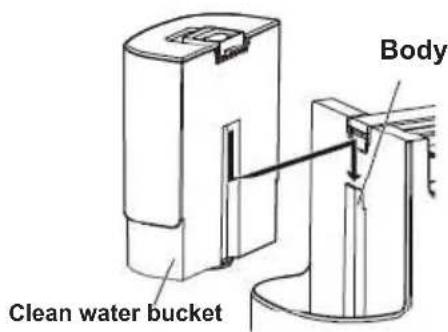
4 Install the clean water bucket into the body.

Attention
- Do not shake the clean water bucket during installation; otherwise, it may cause water leak.
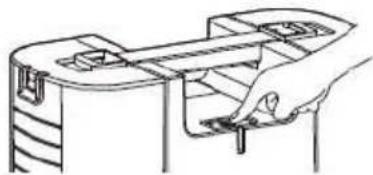
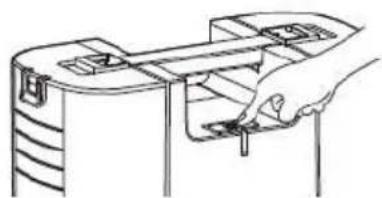
5 Insert the handle into the water sucker.
6 Fix the hose and power cord before handling.
natural_image
Technical line drawing of a mechanical component with coiled tubing and a valve (no text or symbols)Instructions
1
Plug it in
natural_image
Technical line drawing of a mechanical assembly with no visible text or symbols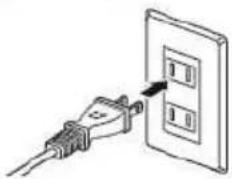
natural_image
Line drawing of a plug inserted into an electrical outlet (no text or symbols)2
Turn on the power (start)
natural_image
Line drawing of a hand inserting a small component into a device (no text or symbols)3
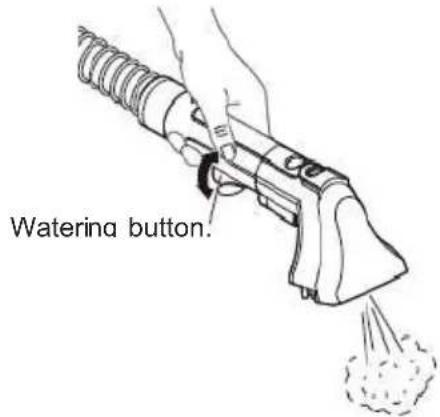
Press the watering button to spray clean water.
natural_image
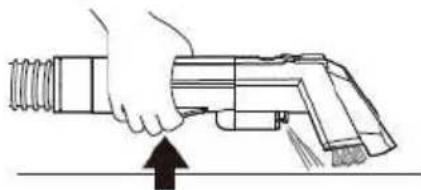
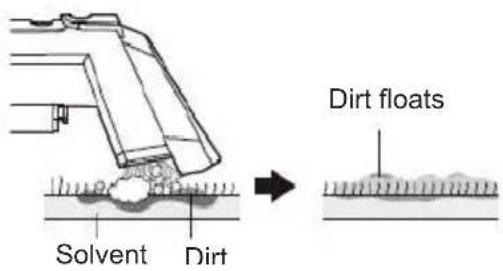
Illustration of a hand holding a cylindrical tool with an arrow indicating compression or insertion (no text or symbols present)Spray the stain with clean water to let it surface. Do not spray continuously at the same spot. After spraying, absorb the water, so as not to cause mildew and odor.
4
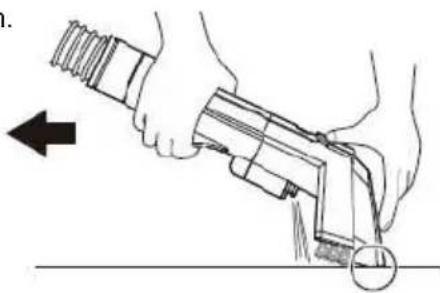
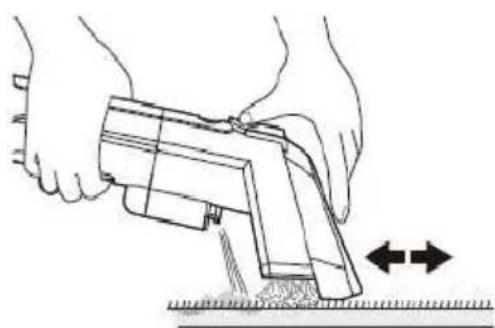
Absorb water
Spray clean water while absorbing sewage Press the water suction inlet on the stain, bring the water and dirt to the front and suck them.
natural_image
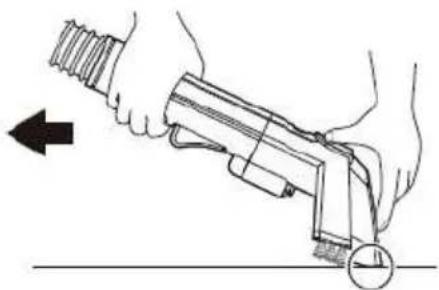
Illustration of a hand using a tool to lift a circular object, with an arrow indicating left motion (no text or symbols)Stop spraying, and absorb the sewage
natural_image
Illustration of a hand holding a firearm with a circular button, no text or symbols presentAfter using the cloth on which water is easily retained, please blow dry or air dry.
5
Turn off the power (stop)
natural_image
Line drawing of a hand inserting a component into a device (no text or symbols)6
Unplug it.

Attention
- Turn off the power before unplugging it.
● After use, please hang the coiled power cord back to its original place.
7
Pour away clean water and sewage, and clean
the sewage bucket
How to Use

For stubborn dirt
Clean with cleaning solvent first and then scrub.

Attention
- Do not put the cleaning solvent in the clean water bucket, make sure the solvent is not harmful to the carpet before use.
- Do not use diluent, aniline, chloroform and flammable solvents.
Recommended
- Alkali ionized water
- Heavy bacteria
Citric acid
• Hydrochloride acid water
Not recommended
● Neutral detergent for the kitchen
- Alkaline detergent
- Acid detergent

Apply the cleaning solvent to the carpet and rub the dirt with a brush to lift it up.

Attention
- For the amount and usage of the cleaning solvent, please read the manual carefully and use it correctly.
Spray the cleaning solvent and wipe

Suck up the dirt
natural_image
Line drawing of hands using a handheld device to press or install a surface, with no visible text or symbolsAbsorb the dirt and do not leave any solvent.

Attention
- Stop using when the water in the sewage bucket exceeds the maximum water level, clean the sewage bucket; otherwise, the water will flow into the machine.

Maximum water level Sewage bucket

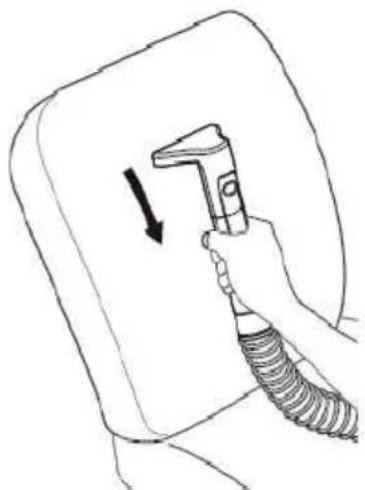
Use of right-angled water sucker
Press the water sucker on the back of the chair and move from top to bottom.
natural_image
Line drawing of a hand holding a tool with a downward arrow, next to a wall-mounted device (no text or symbols)
Cleaning of sewage

Clean the bucket, upper cover and sealing strip.
1
Turn off the power
When the sewage reaches the maximum water level, stop working and turn off the power.
2
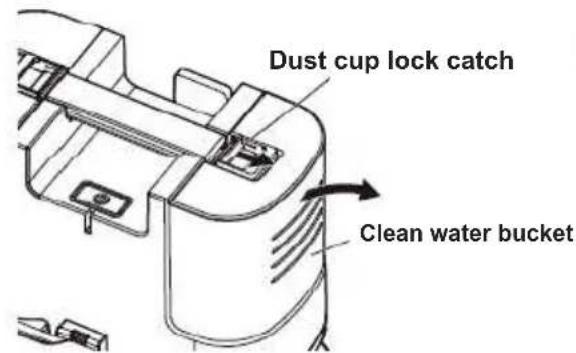
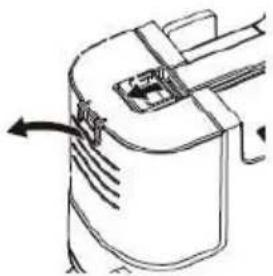
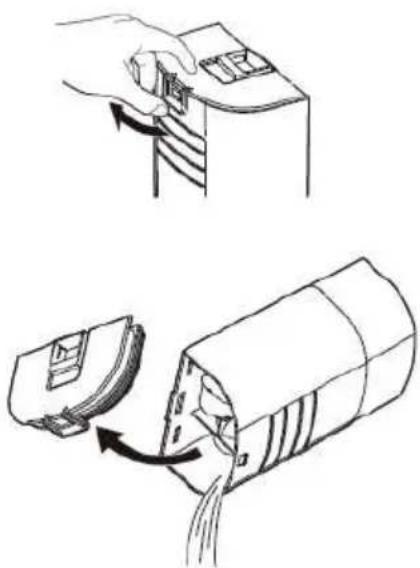
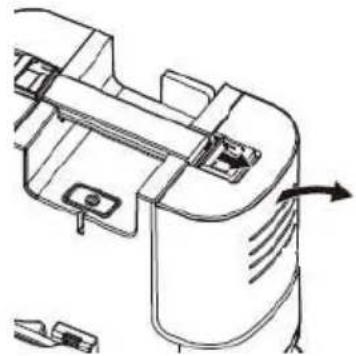
Remove the sewage bucket
Remove the sewage bucket in the direction of arrow.
natural_image
Diagram of a mechanical device with internal components and directional arrows (no text or symbols)3
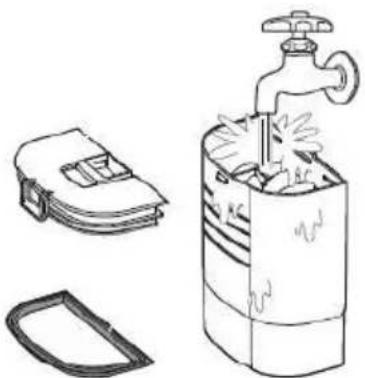
Open the upper cover of the sewage bucket and pour away the sewage
natural_image
Illustration of a kitchen sink with a faucet, a briefcase, and a plastic bag (no text or symbols)
Attention
- Clean the sewage bucket in time after use, so as not to cause bacteria and smell.
5
Install the sealing ring, cover and fasten the sewage bucket.
natural_image
Illustration showing two steps of a hand inserting a card into a device, with no text or symbols present.Attention
- Do not tilt or shake the sewage bucket when carrying it; otherwise, the sewage will outflow easily.
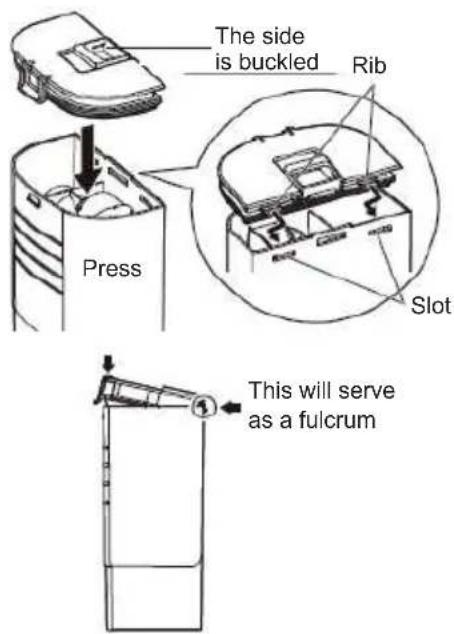
Buckle the sewage bucket into the body.
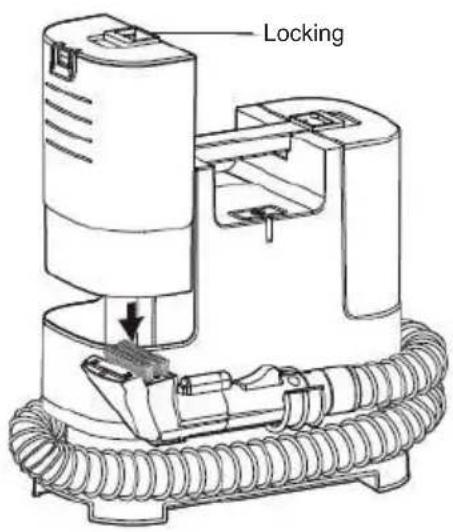

Lock the sewage bucket, do not shake; otherwise, it is easy to leak and affect
Attention the cleaning
Pour away the sewage before it exceeds the maximum water level. If the machine continues to be used after the sewage exceeds the maximum water level, the floating ball will work and the suction will stop
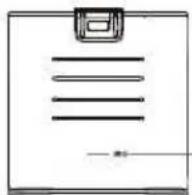
Maximum water level
Automatic water suction stop device
natural_image
Technical line drawing of a mechanical component with internal channels and a base (no text or symbols)Floating ball Maximum
Pour away the remaining water in the clean water bucket
1 Take out the clean water bucket in the direction of arrow.
natural_image
Technical line drawing of a mechanical component with an arrow indicating direction (no text or symbols present)2 Unscrew the screw cap and pour away the remaining water.
natural_image
Simple line drawing of a mechanical component with two ports and a directional arrow (no text or symbols)3 Install the empty bucket and then turn on the power again.
natural_image
Line drawing of a hand inserting a component into a device (no text or symbols)
Lock the sewage bucket, do not shake; otherwise, it is easy to leak and affect the
Attention cleaning
4 Press the watering button to remove the remaining water from the machine.
When no water is discharged, turn off the power switch and unplug it
5 Tilt the machine and pour away the remaining water at the bottom.
natural_image
Technical line drawing of a mechanical device with attached components (no text or symbols)
- Stop running and unplug it before maintenance.
- Do not water the machine to avoid
Attention electric shock
- Do not use the detergent, diluent, benzene and other chemical agents to clean the machine.
Cleaning of body
- The ordinary smudges can be wiped with a damp cloth.
● The stubborn dirt can be wiped with a damp cloth with detergent and then cleaned with a dry cloth dipped in water.
Cleaning of water sucker and bucket
After use every time
- Remove them from the body, rinse thoroughly with water and air dry.
natural_image
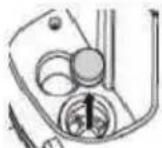
Line drawings of various household appliances including a water dispenser, shower pump, and washing machine (no text or symbols)Disassembly of water sucker
Press the button and pull out

- Remove the front cover and then rinse the water sucker.
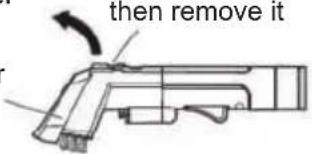
Disassembly of water sucker cover
Open it with finger and then remove it
Transparent water sucker cover
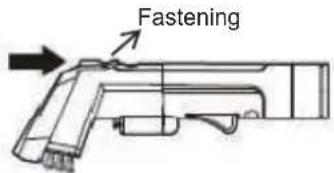
Installation of water sucker cover
① The pin and hole fit well.
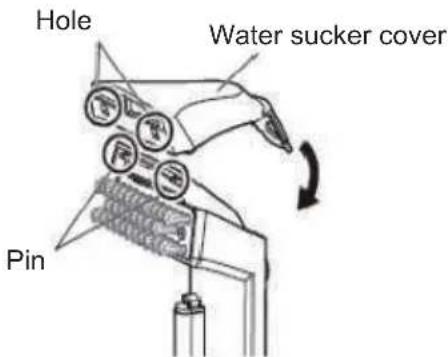
② Press in until clicking sound to make sure the installation is in place
- When cleaning the water sucker, empty the nozzle if it is blocked.
- Check the hose for breakage and leakage.

natural_image
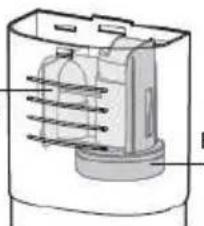
Technical illustration of a mechanical component with coiled spring and housing (no text or symbols)Cleaning of inlet air sponge and filtering sponge
- Rinse the inlet air sponge and filtering sponge after use, and replace them if they are damaged.
Inlet air sponge
(At the bottom of the sewage bucket)
Filtering sponge (At the bottom of the clean water bucket)
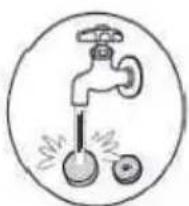
natural_image
Simple line drawing of a faucet with two coins, enclosed in a circle (no text or symbols)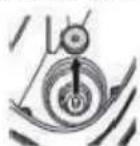
It is more convenient to pick up with tweezers.
• Air dry after cleaning.
- Install the parts back to the machine after maintenance.
● After maintenance, keep in a dry place at room temperature, and avoid direct sunlight.
Fault and Handling
In the event of exceptions in use, read this manual carefully and confirm the following points before repair.
StatusFault cause analysis Handling
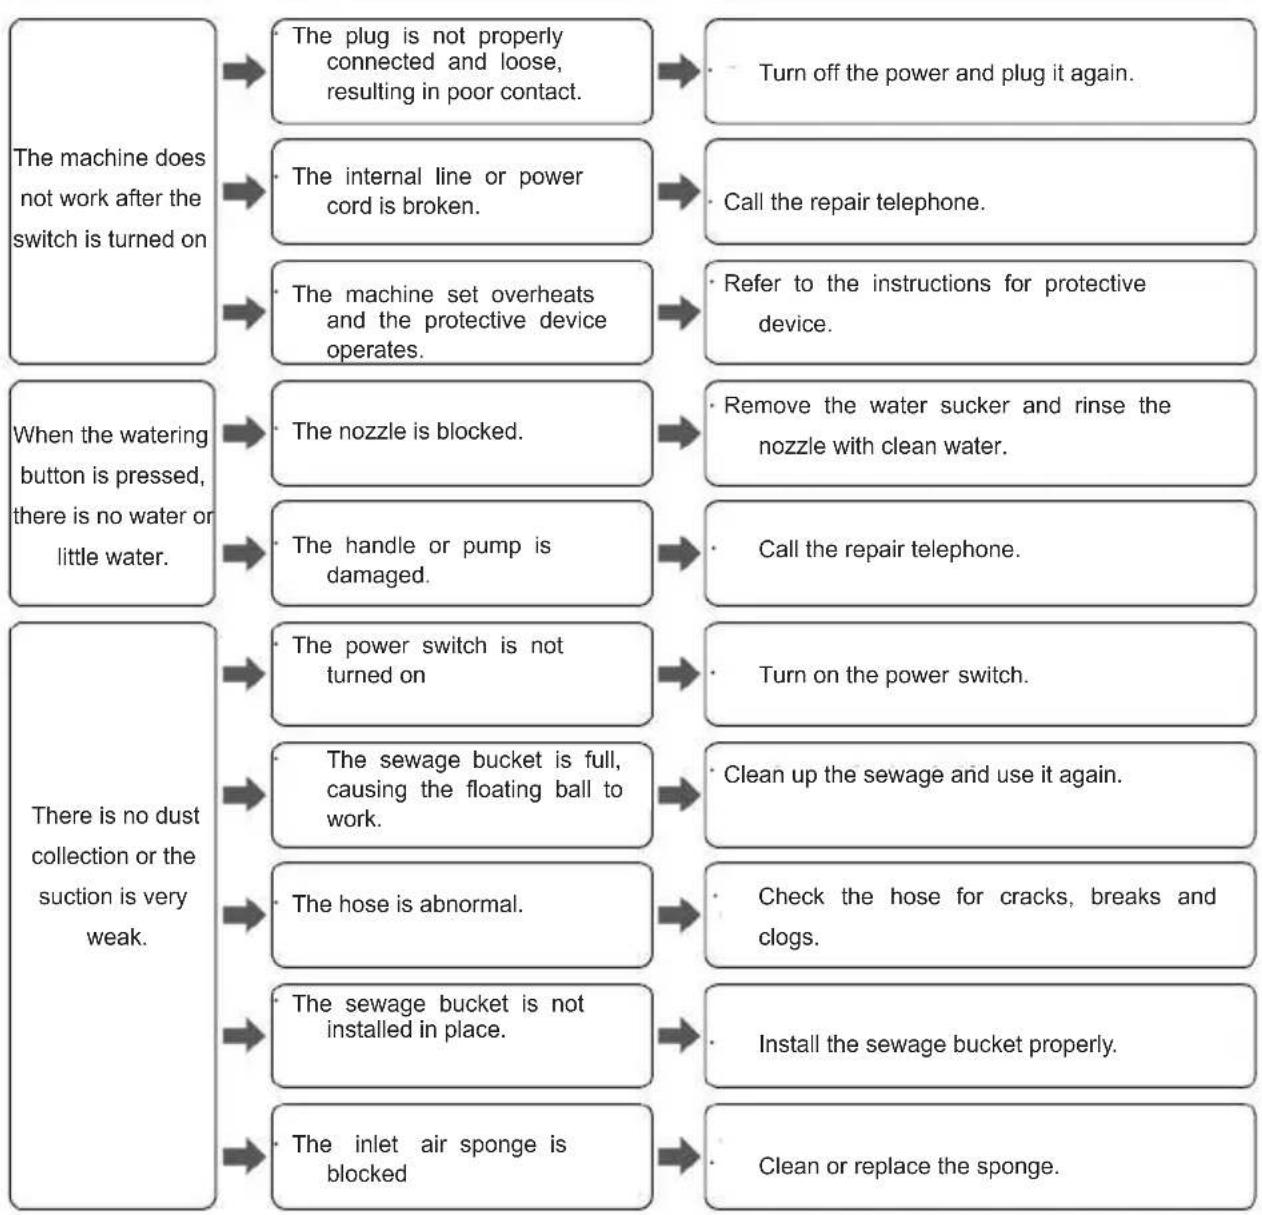
flowchart
graph TD
    A["The machine does not work after the switch is turned on"] --> B["The plug is not properly connected and loose, resulting in poor contact."]
    B --> C["Turn off the power and plug it again."]
    A --> D["The internal line or power cord is broken."]
    D --> E["Call the repair telephone."]
    A --> F["The machine set overheats and the protective device operates."]
    F --> G["Refer to the instructions for protective device."]
    H["When the watering button is pressed, there is no water or little water."] --> I["The nozzle is blocked."]
    I --> J["Remove the water sucker and rinse the nozzle with clean water."]
    H --> K["The handle or pump is damaged."]
    K --> L["Call the repair telephone."]
    M["There is no dust collection or the suction is very weak."] --> N["The power switch is not turned on"]
    N --> O["Turn on the power switch."]
    M --> P["The sewage bucket is full, causing the floating ball to work."]
    P --> Q["Clean up the sewage and use it again."]
    M --> R["The hose is abnormal."]
    R --> S["Check the hose for cracks, breaks and clogs."]
    M --> T["The sewage bucket is not installed in place."]
    T --> U["Install the sewage bucket properly."]
    M --> V["The inlet air sponge is blocked"]
    V --> W["Clean or replace the sponge."]
When we are unable to solve the problems, please consult the store or customer service.

Warning
● Disassembling, repairing and reforming the machine by oneself are strictly prohibited.
Parameters
Voltage: 220-240 V\~, 50-60 Hz
Power: 400W
Effective volume of sewage bucket: About 0.4L
Volume of clean water bucket: About 1.2L
Hose length: 30mm× 1.2m
Quality: Complete machine + accessories, about 3.2Kg
Length of the power cord: About 3.0m
Accessories: Water sucker, right-angled water sucker, hose hook
REMOVAL OF APPLIANCES USED
Directive 2012/19/EU on waste electrical and electronic Equipment (WEEE) requires that the appliance uses are not disposed of using the normal municipal waste. Old appliances must be collected separately in order to optimize the recovery and recycling of materials they contain and reduce the
impact on human health and the environment.
The symbol of the dustbin is used on all products to remind the obligations for separate collection. Consumers should contact their local authorities or dealer regarding the steps to follow for the removal of their old appliance. If you proceed with the scrapping of old equipment, be sure to render useless what could be dangerous: disconnect the power cable flush with the device.
Danger:
Never attempt to use your appliance, if it shows signs of damage or the power cord or plug is damaged. If the power cord is defective it is important to have it replaced with the after sales service to eliminate any danger.
Only qualified and authorized persons are authorized to carry out repairs to your appliance. Any repairs not in accordance with standards could significantly increase the level of risk for the user!
Defect resulting from improper handling, degradation or attempted repairs by third parties voids the warranty on the product. This also applies in case of normal wear and accessories from the appliance.
Important!
We recommend that you keep the packaging of your device at least for the duration of the warranty. The guarantee does not apply without the original packaging.
Warranty:
Your device has two years warranty. Accessories and spare parts are only available during the 2 years of the product warranty. The warranty does not cover wear and breakage following a wrong use of the product. The customer is responsible for all returns. You remain responsible for the costs and risks associated with the product shipment; it is therefore recommended to ship the product with an acknowledgement of receipt and transport insurance in case of significant value of the product.
KEEP OUT OF REACH OF CHILDREN
Children should be supervised to ensure that they do not play with the appliance.
Service E-mail relations.clients@euromenage.com
FAGOR

EUROMENAGE