
PVQ711HGA6 - Cooker BOSCH - Free user manual and instructions
Find the device manual for free PVQ711HGA6 BOSCH in PDF.

| Brand | Bosch |
| Model | PVQ711HGA6 |
| Product type | Cooktop |
| Net weight | ≤ 25 kg |
| Load supported by the worktop | Up to 60 kg |
| Round duct diameter | 150 mm |
| Equivalent flat duct area | ≈ 177 cm² |
| Minimum slope of exhaust duct | 1° |
| Maximum temperature of the installation cabinet | 90 °C |
| Power supply | 230 V ~, 50 Hz |
| Protection class | 1 |
| CE anti-interference compliance | Yes |
| Ventilation modes | External exhaust, recirculation |
| Included filters | Grease filter, odor filter, acoustic filter |
| Total number of filters | 4 (2 grease + 2 odor/acoustic) |
| Electrical connection type | 3N, 2N, 1N, 2L/2N depending on configuration |
| Installation QR code | Available |
| Languages of the manual | FR, DA, DE, EL, EN, ES, FI, IT, NL, NO, PL, PT, RU, SV, TR |
Frequently Asked Questions - PVQ711HGA6 BOSCH
User questions about PVQ711HGA6 BOSCH
0 question about this device. Answer the ones you know or ask your own.
Ask a new question about this device
Download the instructions for your Cooker in PDF format for free! Find your manual PVQ711HGA6 - BOSCH and take your electronic device back in hand. On this page are published all the documents necessary for the use of your device. PVQ711HGA6 by BOSCH.
USER MANUAL PVQ711HGA6 BOSCH
m = 311
29
m = 311
31
m = 311
33

34
35
36
m = 311 ;
38
m = 311
40
41
42
43
12 =
45
m = 311
47
m = 311
49
220-240V/380-415V 2N~
50
220-240V 1N~
51
es
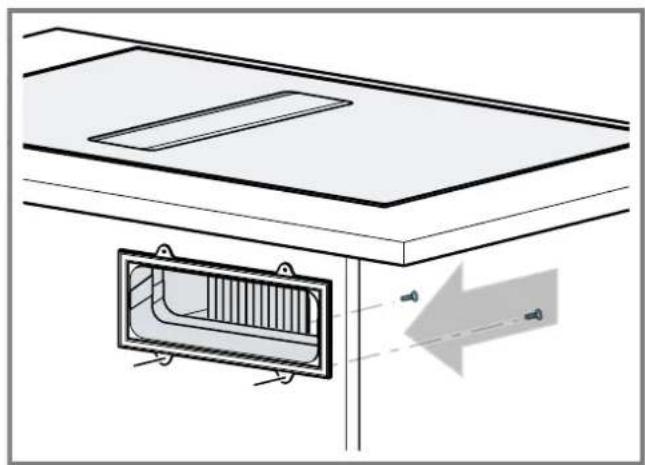
After unpacking all parts, check for any damage in transit and completeness of the delivery.
Fig. 1
QR code for the installation video
This is were you will find the QR code for the installation video.
Fig. 2
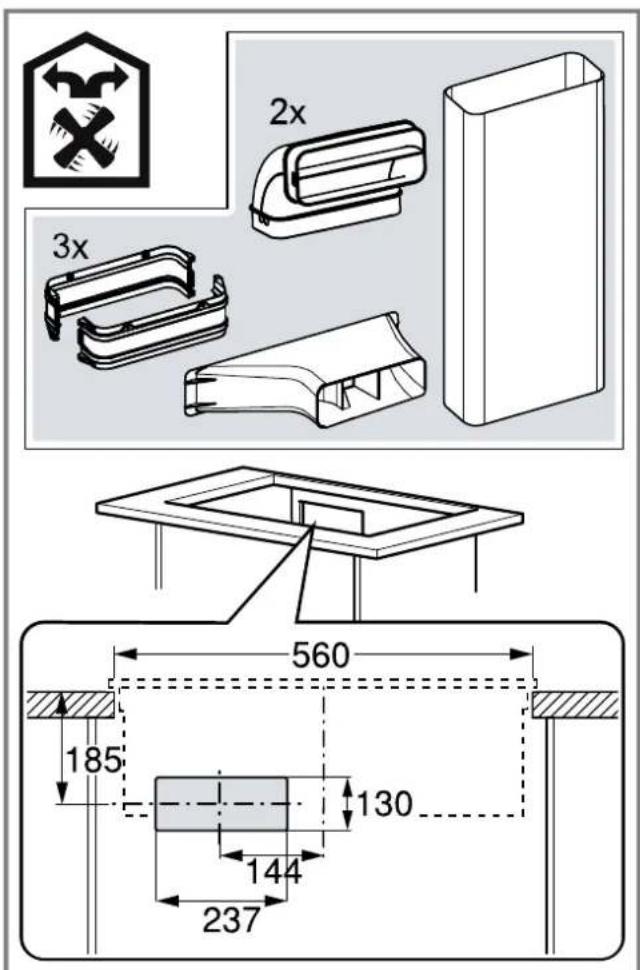
Appliance dimensions
You will find the dimensions of the appliance here
Fig. 3
Installation dimensions for flat duct bends
This is where you can find an overview of the installation dimensions for the flat duct bends.
Side view:
Fig. A F ig. B F ig.
Front view:
Fig. 7
Installation variants
This is where you can find an overview of the different installation variants.
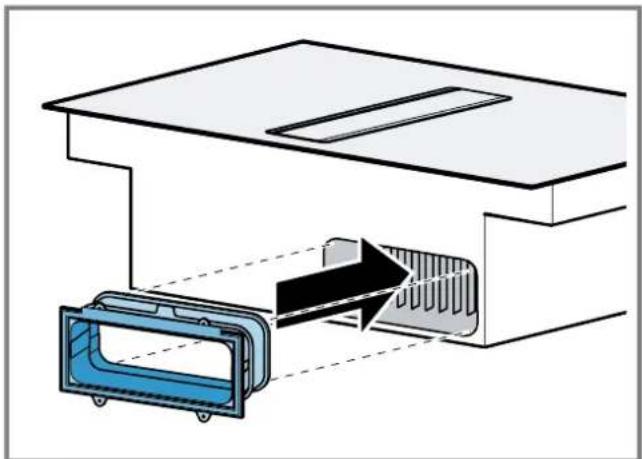
Odour filter and adapter for circulating-air mode:
Fig. 8
Acoustics filter and seal for air extraction mode: Fig. 9
Note: Channels suitable for installation can be obtained from customer service, our website or from specialist retailers.
Safety clearances
Comply with the safety clearances for the appliance. Clearances to the overflow container:
Fig. 10
Position of the overflow container:
Fig. 11
The performance is optimal at a clearance of 50mm between the unit back panel and the wall. The performance is reduced at a smaller clearance.
Fig. 12
Observe the safety clearances for the worktop cutout.
Do not place any objects in the drawer which exceed the maximum height of the drawer. The objects may come into contact with the base of the appliance and thus disrupt the functions.
→Fig.13

General information
- Read this instruction manual carefully.
Only a licensed expert may connect the appliance. - Switch off the power supply before carrying out any work.
- Never use this appliance in boats or in vehicles.
- Follow the worktop manufacturer's recommendations.
Safe installation
Follow these safety instructions when installing the appliance.
The appliance can only be used safely if it is correctly installed according to the safety instructions.
The installer is responsible for ensuring that the appliance works perfectly at its installation location.
Note: This appliance is designed to capture steam from cookware on the cooking zone. If the vapours are captured by other appliances (such as universal kitchen machines or hobs), the efficiency of the ventilation system depends on the distance between the air inlet and the source of the vapours.
WARNING - Danger: Magnetism!
The appliance contains permanent magnets. They may affect electronic implants, e.g. pacemakers or insulin pumps.
Persons with electronic implants must stand at least 10cm away from the appliance.
WARNING - Risk of poisoning!
Risk of poisoning from flue gases being drawn back in. Room-air-dependent heat-producing appliances (e.g. gas, oil, wood or coal-operated heaters, continuous flow heaters or water heaters) obtain combustion air from the room in which they are installed and discharge the exhaust gases into the open through an exhaust gas system (e.g. a chimney). With the extractor hood switched on, air is extracted from the kitchen and the adjacent rooms. Without an adequate supply of air, the air pressure falls below atmospheric pressure. Toxic gases from the chimney or the extraction shaft are sucked back into the living space.
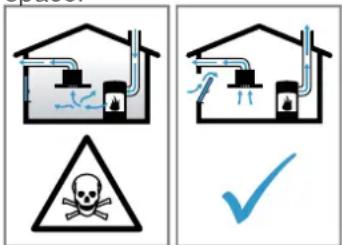
Always ensure adequate fresh air in the room if the appliance is being operated in exhaust air mode at the same time as a room-air-dependent heat-producing appliance is being operated.
It is only possible to safely operate the appliance if the pressure in the room in which the heating appliance is installed does not fall below 4Pa (0.04 mbar). This can be achieved whenever the air needed for combustion is able to enter through openings that cannot be sealed, for example in doors, windows, incoming/exhaust air wall boxes or by other technical means. An incoming/exhaust air wall box alone is not sufficient to ensure compliance with the limit.
In any case, consult your responsible chimney sweep. They are able to assess the house's entire ventilation setup and will suggest the suitable ventilation measures to you.
Unrestricted operation is possible if the appliance is operated exclusively in circulating-air mode.
WARNING - Risk of fire!
The grease deposits in the grease filter may catch fire.
- Never work with naked flames close to the appliance (e.g. flambéing).
- Do not install the appliance near a heat-producing appliance for solid fuel (e.g. wood or coal) unless a closed, non-removable cover is present. There must be no flying sparks.
WARNING - Risk of injury!
Changes to the electrical or mechanical assembly are dangerous and may lead to malfunctions.
- Do not make any changes to the electrical or mechanical assembly.
Parts that are accessible during installation may have sharp edges and may lead to cutting injuries.
Wear protective gloves.
The appliance is heavy.
To move the appliance, two people are required.
Use only suitable tools and equipment.
WARNING - Risk of suffocation!
Children may put packaging material over their heads or wrap themselves up in it and suffocate.
- Keep packaging material away from children.
Do not let children play with packaging material.
WARNING - Risk of poisoning!
Risk of poisoning from flue gases being drawn back in.
- Do not emit the exhaust air into a smoke or exhaust gas flue that is in operation.
- Do not emit the exhaust air into a shaft that is used to ventilate installation rooms for heat-producing appliances.
If the exhaust air is to be conveyed into a smoke or exhaust gas flue, you must obtain the consent of the heating engineer responsible.
Risk of poisoning from flue gases being drawn back in.
If an extractor hood with an open-flued heat production source is installed, the power supply for the extractor hood must be provided with a suitable safety switch.
Information about the electrical connection
In order to safely connect the appliance to the electrical system, follow these instructions.
WARNING - Risk of electric shock!
It must always be possible to disconnect the appliance from the electricity supply. The appliance must only be connected to a mains socket that has been installed correctly.
An all-pole isolating switch must be integrated into the permanent electrical installation in accordance with the conditions of overvoltage category III and in accordance with the installation regulations.
The permanent electrical installation must only be wired by a professional electrician. We recommend installing a residual-current circuit breaker (RCCB) in the appliance's power supply circuit.
- Do not kink or trap the connection cable, and keep it away from sharp edges.
- Route the connection cable in such a way that it does not touch the hot casing.
- Use only the connection cable that is supplied with the appliance or is provided by technical after-sales service.
This appliance complies with the EC interference suppression regulations.
- The appliance corresponds to protection class 1. You should therefore only use the appliance with a protective earth connection.
The manufacturer shall assume no liability for malfunctions or damage resulting from incorrect electrical wiring.
Preparing the electrical connection
Requirement: Only after-sales service staff who have been trained accordingly may carry out work on the inside of the appliance or replace the power cord.
- Observe the information about the electrical connection.
An incorrect installation, an improper installation or connection invalidates the warranty. - If a longer mains power cable is required, contact the after-sales service. Connecting cables up to 2.20m are available.
- On appliances without a preinstalled cable, insert the power cable into the mains socket.
Opening the mains socket
- Use a screwdriver to lift the cover of the mains outlet.
→Fig. 14
Preparing the mains socket
- Undo the screw. → Fig. 15
2.Use a screwdriver to lift the strain relief. Fig.16 - Loosen the strain relief. Fig. 17
Connecting the cable to the mains socket
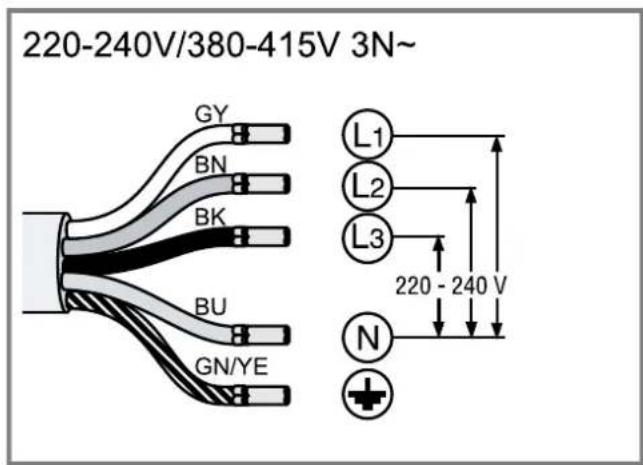
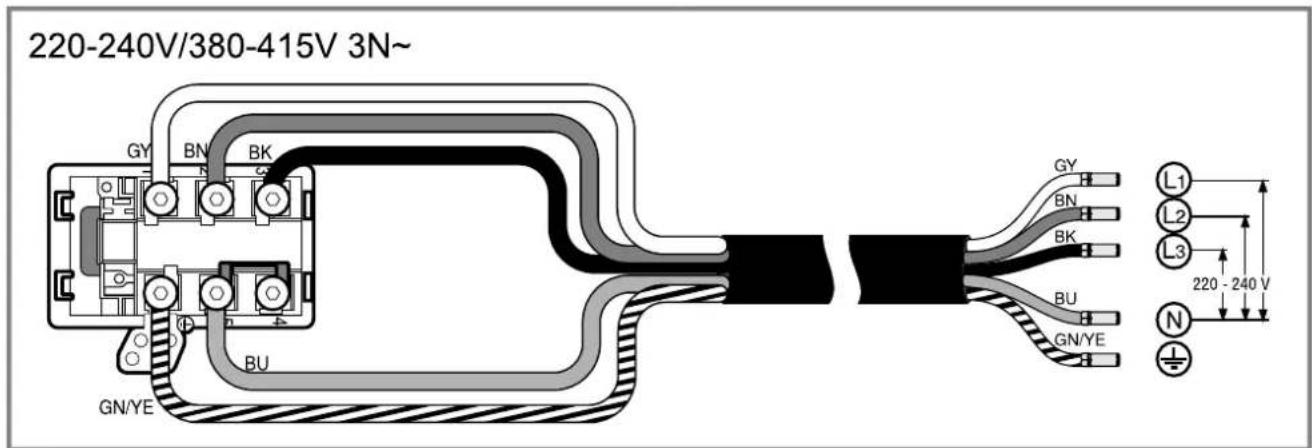
- For 3N connect the cable to the mains socket in accordance with the following figure. Fig. 18
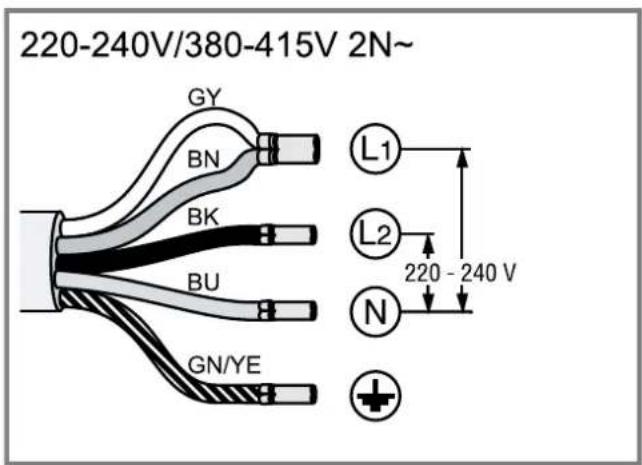
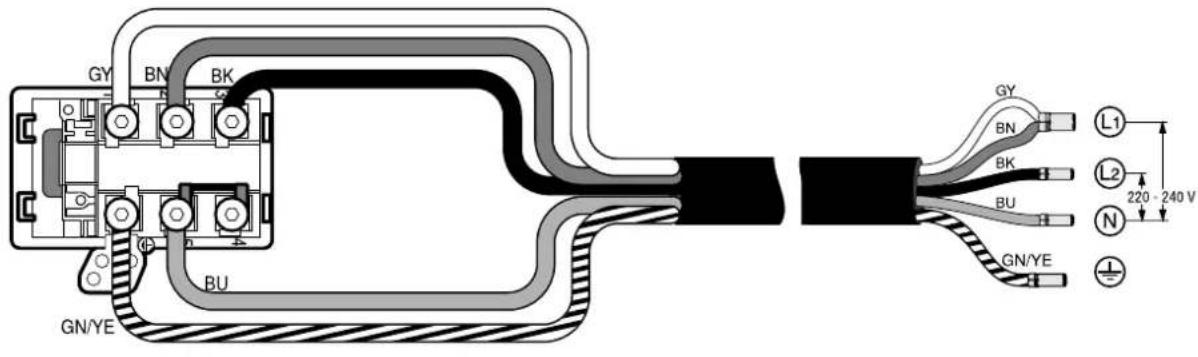
- For 2N connect the cable to the mains socket in accordance with the following figure. Fig. 19
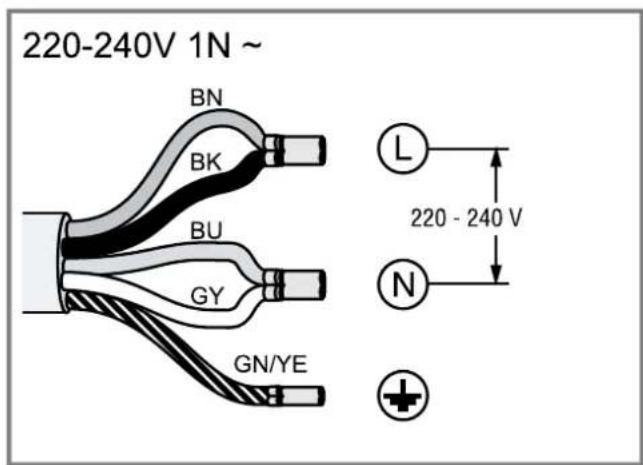
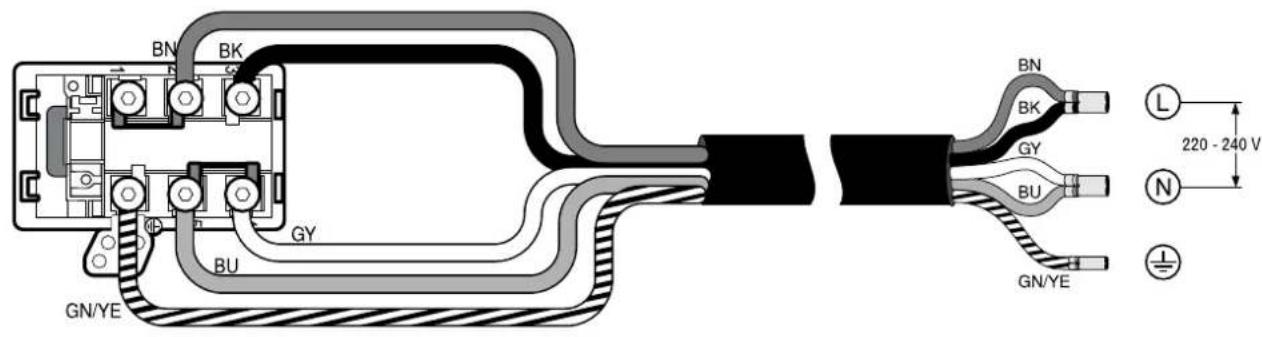
- For 1 N, connect the cable to the mains socket in accordance with the following figure. Fig.20
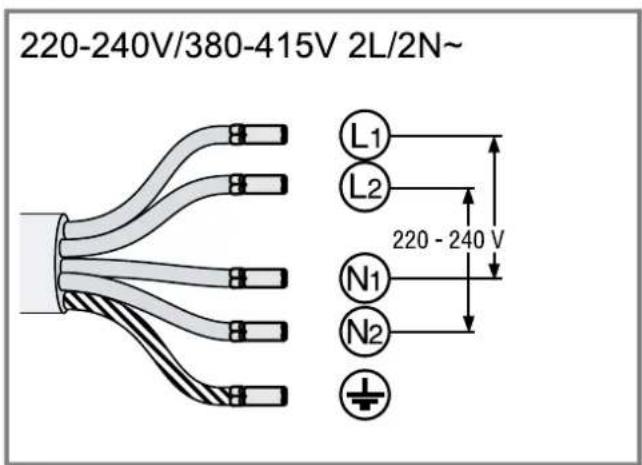
- For 2L / 2N connect the cable to the mains socket in accordance with the following figure. Fig. 21
-
Note the colours of the cables.
-
BN: Brown
- BU: Blue
- GN/YE: Yellow and green
- BK: Black
-
GY: Grey
-
If required, install the enclosed copper bridges in accordance with the connection diagram.
-
Connect the cables and then tighten the screws of the mains socket.
- For a 1N^ or 2L/2N connection in accordance with the connection diagram, 1 corresponds to the fan motor.
- For a 2N^ / 3N^ connection, phase L1 (grey) corresponds to the fan motor.
Secure the cable in the mains socket
- Use the strain relief to secure the power cable in place.
-
Tighten the screw at the correct position.
-
Do not use a cordless screwdriver.
→Fig.
- To facilitate closing the mains socket, arrange the cables in the central area of the mains socket.
- Close the cover on the mains socket.
Instructions for the exhaust air pipe
The appliance manufacturer does not provide any warranty for faults attributable to the pipeline.
Use a short, straight exhaust air pipe with as large a pipe diameter as possible.
- Long, rough exhaust air pipes, many pipe bends or small pipe diameters reduce the suction power and increase the fan noise.
Use an exhaust air pipe that is made of non-combustible material.
To prevent condensate from returning, fit the exhaust pipe with a 1^ gradient from the appliance.
Flat ducts
Use flat ducts with an inner cross-section that corresponds to the diameter of the round pipes:
Diameter of 150mm corresponds to approx. 177~cm^2
Use sealing strips for different pipe diameters.
- Do not use any flat ducts with sharp bends.
Round pipes
Round pipes with an inner diameter of 150~mm
Instructions for the air extraction mode
For air extraction mode, a one-way flap should be installed.
Notes
If a one-way flap is not included with the appliance, one can be ordered from a specialist retailer.
If the exhaust air is conveyed through the external wall, a telescopic duct should be used.
Checking the units
- Check whether the fitted unit is level and has sufficient load-bearing capacity.
The maximum weight of the appliance is approx. 25kg
The worktop into which you are fitting the appliance must be able to withstand loads of approx. 60kg
- Ensure that the stability of the fitted unit is also guaranteed following cut-out work.
- Use suitable substructures to ensure the load-bearing capacity and stability, particularly in the case of thin worktops.
Take the appliance weight, including additional load, into consideration.
- Use heat-resistant and moisture-resistant reinforcement material.
- Ensure that the fitted unit is heat-resistant up to 90^ .
- Do not support any other appliances, e.g. ovens, refrigerators, dishwashers or washing machines.
- Only check that the appliance is level once it has been installed in the installation opening.
- You can freely select the clearance to a top cabinet. In doing so, take into consideration the ease of use and ergonomics when using the plate.
Preparing the units
Requirement: The fitted units are heat-resistant up to 90^
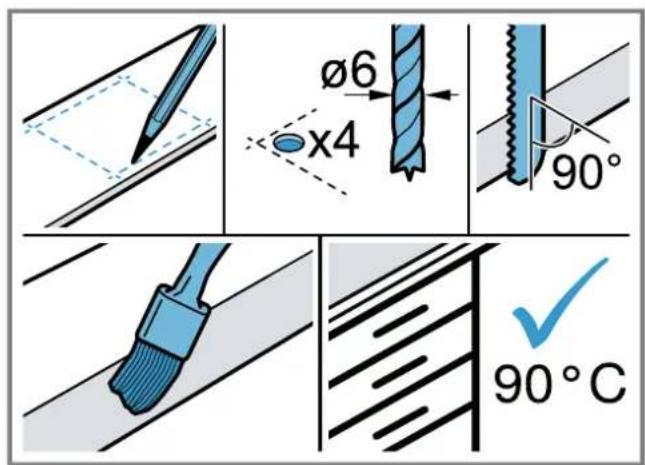
- Mark the unit cut-out in accordance with the installation diagram.
→Fig. - Drill four holes with a diameter of 6mm
Fig. 23 - Ensure that the angle of the cut surface to the worktop is 90^ .
→Fig.23
Observing the minimum clearances when installing above a drawer
- When removing the overflow container on integrated appliances, take the minimum clearances into consideration.
→Fig. 10 - Observe the position of the overflow container.
→Fig. 11
Preparing the unit for circulating-air mode with the adapter
Notes
We do not recommend to install on a nonthermally insulated outer wall or above a cold floor ( ≥ 0.5W / m^2 C).
Air outlets must not be directed at other appliances, they should be parted by a separation panel. If you cannot install any separation panels, refer to other installation types..
- Observe the relevant dimensions when combining with the adapter for the cut-out in the back wall. Fig. 24
- Measure the thickness of the worktop. Transfer the measurement to the template and draw a line that corresponds to it. Fig. 25
- Cut the template along the marked line for worktop thickness A, the cut centre line B and the reference line to the inner air outlet C.
- Mark the centre of the cut-out in the worktop as the centre line on the back panel of the unit. Fig. 26
- Align the template to the centre line of the back panel of the unit and to the lower edge of the work surface.
- Use the template to make the cut-out in the back panel.
- After making the cut-outs, remove any shavings.
- Seal the cut surfaces so that they are heat-resistant and waterproof. Fig. 23
Ventilation
-
In circulating-air mode, establish an air outlet in the unit's plinth.
-
Provide a minimum air outlet cross-section of approx. 400~cm^2
- Make the outlet opening in the base panel as large as possible in order to keep draughts and noise to a minimum.
-
Make the outlet opening by shortening the plinth or by using suitable ventilation grilles or a lamellar plinth.
-
To guarantee that the appliance works correctly, ventilate the hob appropriately via an air outlet with a minimum cross-section of 200~cm^2 in the base unit.
Installing an appliance featuring circulating-air mode with adapter
Attaching the seal to the adapter
- Attach the seal to the adapter with max. 5 mm to the edge.
Fig. 27
Attaching the adapter
- Clean and degrease the adhesive surface around the cut-out in the unit's back panel.
- Insert the adapter into the outlet opening on the rear of the hob.
→Fig.28
- Remove the adhesive tape's protective film from the adapter.
Fig. 29
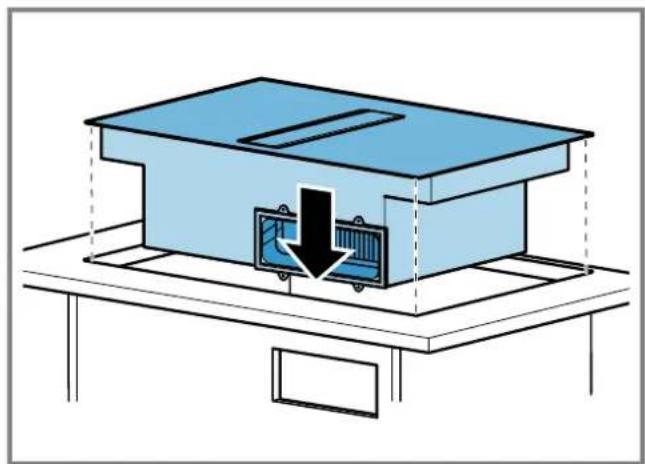
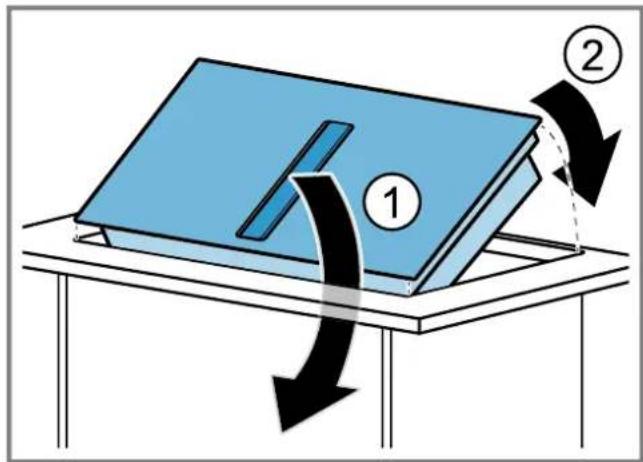
Inserting the appliance into the worktop cut-out
- Ensure that the connection cable is connected to the appliance.
- Carefully insert the appliance into the worktop cutout.
Fig. 30
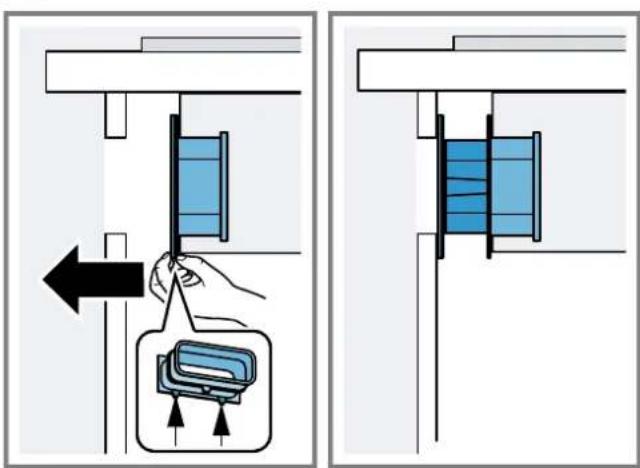
Securing the adapter
- Hold the adapter at the central holder and use the side holders to slide it towards the unit's back panel in the base unit, then affix it.
Fig. 31 - If required, also use screws to secure it.
Fig. 32
Preparing the unit for circulating-air mode with a circulating-air duct
-
If required, remove the unit's back wall.
-
Observe the relevant dimensions when combining with the flat duct elbow for the cut-out in the back wall.
Fig. 33
-
In circulating-air mode, establish an air outlet in the unit's plinth.
-
Provide a minimum air outlet cross-section of approx. 400~cm^2
- Make the outlet opening in the base panel as large as possible in order to keep draughts and noise to a minimum.
-
Make the outlet opening by shortening the plinth or by using suitable ventilation grilles or a lamellar plinth.
-
To guarantee that the appliance works correctly, ventilate the hob appropriately via an air outlet with a minimum cross-section of 200~cm^2 in the base unit.
- After making the cut-outs, remove any shavings.
- Seal the cut surfaces so that they are heat-resistant and waterproof.
→Fig.23
Installing the appliance for air recirculation mode with circulating-air duct
- For circulating-air mode, use the seal, the circulating-air duct, the diffuser and the odour filter.
- Observe the dimensions for the different flat duct bends. Page 19
Securing the seal
- Secure the enclosed seal on the flat duct elbow at a maximum of 5mm from the edge.
Fig. 34
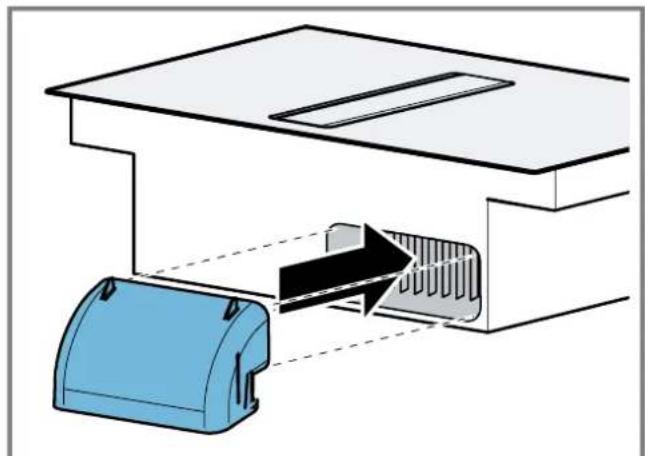
Inserting the flat duct elbow
- Insert the flat duct elbow into the outlet opening on the rear of the appliance.
→Fig.
Inserting the appliance into the worktop cut-out
- Ensure that the connection cable is connected to the appliance.
- Carefully insert the appliance into the worktop cutout.
Fig. 36
Establishing the pipework between the appliance and the diffuser
-
Connect the components of the circulating-air duct to each other.
-
Secure the flat duct pipe connector by engaging it in place.
- For an additional fixing, screw the flat duct pipe connector together using 4 × PT 4 × 8 ~mm screws for plastic.
→Fig.37
- Connect the circulating-air duct to the flat duct elbow on the rear of the hob.
Fig. 38 - Connect the diffuser to the circulating-air duct.
→Fig. 39
Preparing the unit for air extraction mode
- If required, remove the unit's back wall.
- Observe the relevant dimensions when combining with a flat duct elbow for the cut-out in the back wall.
→Fig. 20
- After making the cut-outs, remove any shavings.
- Seal the cut surfaces so that they are heat-resistant and waterproof.
→Fig.41
Install the appliance for air extraction mode
- For air extraction mode, use the seal and the acoustics filters.
- Observe the instructions for the exhaust air pipe. Page 21
Securing the seal
- Secure the enclosed seal on the flat duct elbow at a maximum of 5mm from the edge. Fig. 34
Establishing the piping
- Insert the flat duct elbow into the outlet opening on the rear of the appliance. Fig. 35
- If required, install additional piping elements.
Inserting the appliance into the worktop cut-out
- Ensure that the connection cable is connected to the appliance.
- Carefully insert the appliance into the worktop cutout. Fig. 36
Connecting the exhaust air pipe
- Secure the exhaust air pipe to the flat duct bend.
- Establish the connection to the exhaust air opening.
- Seal the joints appropriately.
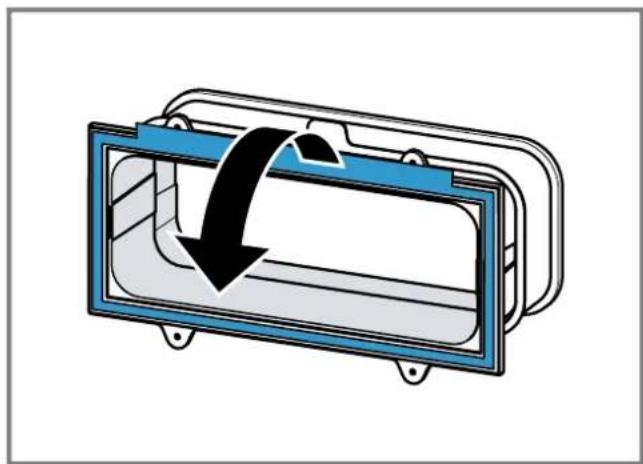
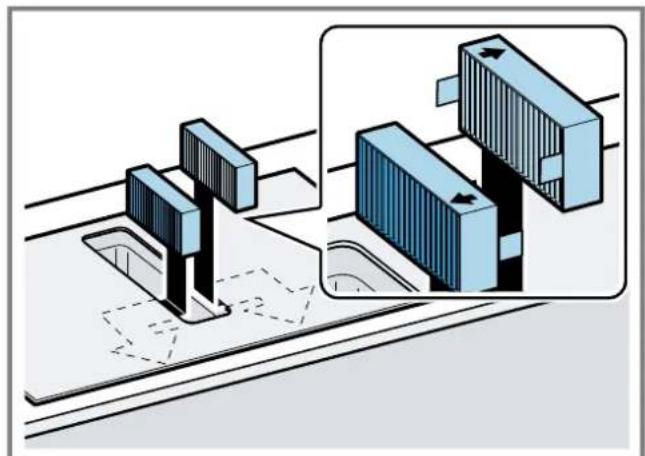
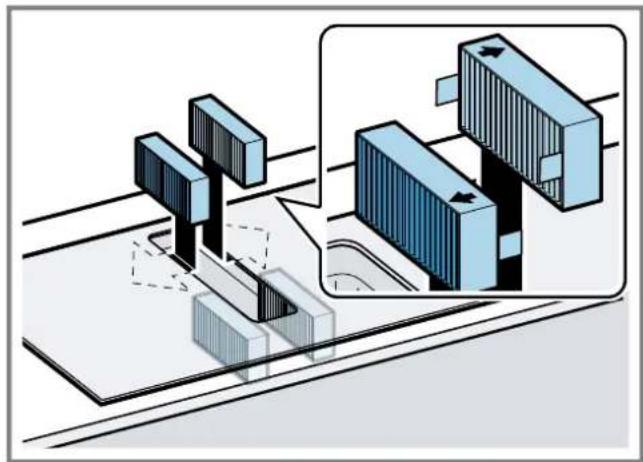
Inserting filters
Note: For circulating-air mode, insert the odour filters.
For air extraction mode, insert the acoustics filters.
- Observe the filters' air flow direction.
- Insert two of the filters into the left and right of the appliance, and slide them forwards. Fig. 12
- Insert the other filters into the left and right of the appliance.
$$ \rightarrow \text {F i g .} \quad \boxed {4 3} $$
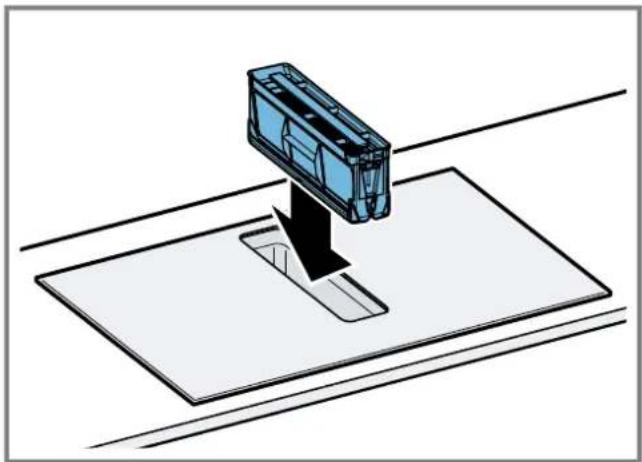
Inserting grease filters
- Insert the grease filter.
$$ \rightarrow \text {F i g .} 4 4 $$
Establishing the connection to the power supply
- Observe the connection data on the rating plate.
- For 3N connect the cable to the mains socket in accordance with the figure. Fig.45
- For 2N connect the cable to the mains socket in accordance with the figure. Fig.46
- For 1 N, connect the cable to the mains socket in accordance with the figure. Fig. 47
5.For 2L / 2N connect the cable to the mains socket in accordance with the figure. Fig.48 -
Note the colours of the cables.
-
BN: Brown
- BU: Blue
- GN/YE: Yellow and green
BK: Black -
GY: Grey
-
If required, arrange the supplied wire end ferrules differently depending on the type of connection.
- To connect two cables, if required, use a wire end ferrule.
Shorten the wires.
- Remove the insulation.
Checking the function
- Switch on the appliance.
- If 48880518 up the appliance is not connected correctly. "Checking and correcting the electrical connection", Page 23
- If no faults appear in the appliance's display, use the operating instructions to check that the ventilation is working.
Checking and correcting the electrical connection
- Disconnect the appliance from the power supply.
-
Check whether the connection to the appliance and the building-side connection correspond to the connection diagram in these installation instructions. "Preparing the electrical connection", Page 20 "Establishing the connection to the power supply", Page 23
-
For 3 N ,observe the following figure.
$$ \rightarrow \text {F i g .} 4 9 $$
- For 2N observe the following figure.
$$ \rightarrow \text {F i g .} 5 0 $$
- For 1 N, observe the following figure.
$$ \rightarrow \text {F i g .} \quad 5 1 $$
Switching the display for air extraction mode
- If required for the air extraction mode and the air recirculation mode, change the display of the electronic control in the basic settings.
- Observe the basic settings section in the instruction manual.
Removing the appliance
ATTENTION!
Tools may damage the appliance frame.
Do not perish out the appliance from above.
1. Disconnect the appliance from the power supply.
2. Remove the exhaust air duct or undo the circulating-air connections.
3. Push out the appliance from below.
fr
Positie van overlooppreservoir:
Fig. 1
ADVARSEL-Fare for forgiving!
ADVARSEL - Brandfare!
ADVARSEL-Fare for forgiving!
Fastgoring at taeling
Fastgoring at taeling
Monteringsmal for flat rorbend
Her finner du en oversikt over monteringsmalene for flate rorbend.
Sett fra sider:
Fig. 4, Fig. 5, Fig. 6
Sett forfra:
Fig. 7
ADVARSEL-Fare for forgiving!
ADVARSEL-Fare for forgiving!
→EIK.4,→EIK.5,→EIK.6
Mtpoovn oyn:
I K 7
IapaaayecEyKataoTaoNc
Edw 8a Bpeite mia eTIOKOTNON yia TIC dIafopec nopaalayec EyKatataonc.
ΦIATPO Ooov KAI npooappuoyec yia Tn
Ynoeic yia Tov aywyo aaywnc Tou aepa
O kataaekuaaTNC TNC OoKeuNC Dv avaalapavei Kaia eunynia TIC diaapupieC, nou oEiAovTaI OTO TmuTsw OAnVwV.
Xpnoiomoinote evav kovto, eueuypaumoo oanva 1eepioou uia kaTTo duvatov evaann diaetpo ownv.
Oi eyaaioi, traxei c oanvnc anaywnc tou aepa, oi naaec kaunuec n iui kpec diuetpoi oanvuv meiwov tvxuc avappoonc kai auavovtov 0puo tou avmuotnpa.
Xpoaioioiote evav oawivα eepiou aio uEuΦAekTO uAIko.
Tia va aioouyete nV eIIOtpooh ouuTuKwauTOc, TOnoEeHote ToV oAInva Eaepiou ao Tn epia Tnc ouakeunc me kian 1°.
EniTeδα κανλια
Xpnoiopoioite e nite kavai, two oioiw n oowte pikn diatoun avtoioxie otn diapetpo two oponyyuaw owv:
OTIOKHeHnJXnpaB XnpoynabNBAUoUeM FnIbTpE MOryT BCnblxHyTb.
Hikorda He pa6oTaIe C oTKpbITbIM pIaMeHem prdom c np6opom (Haipmep, pIam6npoBaHne).
Pn6op MoKHO yCtHaBnBaTb B6H3n HcToHnKa dIa CxKraHn TBepDOro TOnNBA (HanpIMep, DpoBa IINyrolb), cEIN PpeDyCMToPeHa uehha HecbEmHa 3a- uHTHa NaHeB. He donKHO 6bITb pa3netaOuXxCnKp.
I PNEUYPENKDEHNE -OnacHocTb TpaBMnpoBaHHa!
H3meHeHne MexaHuecko Hn 3JeKtpuecko KOHcTpkyu MoKet CTaTb HCTOCHKOM ONaCHOCTN IN PpNBecTN K BblXoNy pnp6opa n3 cTpor.
- 13MeHHeMexaHnueeckoIIN3JIeKTPnueecko KOHCTpykCm3aPpeUeHO.
JETAHN,OTKpbItbIe npn MOHTaXe,MORYT 6bITb OCTpbIMN nnpBecTu K Nope3aM.
HcnoIb3yIte 3aunTHbIe nepuATKn.
Pnp6op TAnKebIbI.
Iraero nepemeseHHN noTpebyOTc2 yeLoBeKa.
HcnoIb3yIe ToIbKO NoXoAunHe BcNOMaTeIbHbIe cpeICTBa.
A NPEyIpeJxDEHNE -Onachoctb ydybja!
TeMOry3aBepHyTbCByyNaKOBOUHbMaTePnAINHa-DeTbeeroce6eHa roIoBOyN3aOxHyTbCra.
He noDnyckaTe DeTe K ynaKoBOOHMy MaTePnany.
He no3BOJnTe DeTm HrpaTb C yNaKOBuHbM MaTePnaJOM.
NPEyPExKDEHNE -OnacHocTb OTPaBJeHnA!
Brahytble o6paTHOBnmeHne Otpa6oTabuine ra3bl MoryT CTaTB npuHHoI OtpaBJIeHnI.
BbTJHKHO B03DyH He DOnJIKeH BByXOAnTb uepe3 DblMOByTOpy6y HnN Bo3DyXoBOd npn INx 3KcnnyaTaun.
IIT OTOBDA BbTAKHORO BO3dyxa He CNEyET HcNtB3oBaTb BEHTKaHaJI, CnykaUIN dJIBEHTnlaUIN NOMEUeHH, B KOTOpBX YCTaHOBJEHy ICTOUYHK INaMeHN.
PnIOdkHoueHNBbITAKKKKHeNCNoJIb3yeMOMyDbIMOxOy, Heo6XoJIMO NOIpyNTb pa3peJHHe B CneuaNBHOH INCTaHcN,OTBeauOeJ3a 3KcPiyaTaunu N UInCTky Tpy6.
Brahytbe 6bpatHO B nomeeHne Otpa6oTabuine ra3bl MoryT CTaTB npuHNO OTpaBLeHH.
Pn yctaHOBKe BbTTAAKKN B NOMEueHnAX, rIe PncyTCTByeNTOCUHNIPLaMeHH C NOBODOM BO3dyXa H3 NOMEuHNA, CNCTema NIOaUNIINTAHNA BbTTAAKKN DOJHKHa 6bItbO6OpyIDoBaHa FyHKUne aBapnHoro OTKIOUeHN.
Yka3aHnno no NOdkHoueHHIO K 3JIeKTpocetN
He nCnoJb3yIe aKKymyIaTOpHbI raIKoBept.
→PUC.22
- Yto6bl ynpocNTb 3aKpbBaHne pacnPpeDenIteBHO KoPob6Kn, pacnoJIOKHTe Ka6eIN B cpeHne qacTn Kopo6Kn.
- 3aKpoIe KpbIuKy po3eTKN.
Yka3aHnnoOTbOyBO3dyxa
PpOINBODInTeIb PnIO6Opa He Daet rapaHTnB Cnuyae peKnaMaun, KacaHouXxCryyacTKOB Tpy6oNPOBOda IINr OTBODa BO3dyxa.
IcnoB3yTe KOPOTkyIO nprMyIO BbITXHyIO Tpy6y, HMeIOUyIO NO BO3MOxHOCHTo 60JIbWoINaMaTeP.
IIINHHbIe WepoxOBaTbe BbITaXHbIe TpybI,60nbUoe KOJIInueCTBO KOnEn HnN TpybMaJrO DaNaMeTp aYMeNbAaIOT MOuHOCTb BbITaXKn YBeJIuHbAHT OyM OT paBoTbI BeHTnIaTopa.
IcnoB3yTe BbITXHbIE Tpy6bI n3 HeBOcPnAmEHHIOx-Cr MaTePnaIOB.
YTo6bI npedOTBpaNTb BO3BpaT KOHDeHCata, yCTaHOBtEBBTRKHyIO Tpy6y noD yRnom 1° K npn60py.
ПлOCKи Каналы
HcnoIb3yTe PIOCKNE KaHaJIbI, BHYTpEHHee CeeyHee KOTOp bIX COOTBETCTByet DnAmEtpy KpyIbIX Tpy6:
DnaMeTp 150 MM COOTBETCTByET npM. 177 cm².
-Пи HeCOOTBETCTBnДиAMetpoB Tpy6 NcNoIb3yIte repMeTn3npyuOuIyINeHTy.
He nCnoNb3yIte nnOckne KaHaJIbI c pe3KIMn HrN6aMn.
KpyrIbIe Tpy6bl
PekomeHnyeMbI BHyTppeHHN dHaMeTp Kpyrblx Tpy6- 150 MM.
Yka3aHnIpeKnMaOTB0aBO3yXa
BpeKIMe OTObOa BO3dyxa DOJIkHa 6bITb yCTaHOBJeHa 3acNoHka 6oPaTHoI Tn.
PpIMeuaHn
Ecnn 3acnoHka o6paTHoN Tn He BXOaNT B KOMnneKT noCTaBKn np6opa, e MoKHO npNo6peTn B CneuaHn3npoBaHHOM MaarHHe.
Ecnn BbTTaHKHOB03dyX OTBOHTCn Hpe3 HapyKHyIO CTeHy, cIeNyET NcNOJIb3OBaTb TeteCKONuYeCKN BeHTINrOHHbIK KaHaJ, npoxoAunB CteHe.
PpOBepKa Me6eHn
- Y6eIntecb, yTO Me6eIb IJI BCTpaINBaHnY cTaHOBNeHa pOBHo n CnOc6Ha BbIepKaTb HArpy3Ky. MakcImaJIbHiB Bec npIbOpa coCTaBnHT npIM. 25 Kr. CToJeuHnua, B KOTOpU BCTpaINBaETC npIbOp, DoJXHa BblepKINBaTb HArpy3Ky npIM. 60 Kr.
2.ПослЕБынгеля Вь�рету yctоивocь Me6elenДагВстpanBaHЯ. -
CnEduT oBecneuHb HecCyUyO cnOCo6HOCTb uYcToUHBOCTb c NOMOUsbIOJxOaIux ONOpHBIX KOHCTpyKUn, OcOeHHo y ToHKX CTJeUHnU.
-
YuHTbIaBte Bec npH6opa, BKIOUaA DOONHITeNbHyHO Harpy3ky.
-
NcnoIb3yIe JkapOpnpOHyB IN BnaorocToiKm MaTePnAn.
-
Y6eIITecb, yTO Me6eIb IJI BCTpaBHaIcNOCo6Ha Bbl-epKnBaTb TempePaTy pO 90 ^ C
5.He BcTpaHbAte DyXOBbIe WkaΦbl, XONoDnBnHKn, NocyDOMoeuHbIe MaunHbI, CTnpaJIbHbIe MaunHbI n DpyryIO TexHNky IOp np6opom. - Tocnoctb pacnoJokhen npnbopa B ropu3oHTaIbHOI pIOCKOCTn CneJyET npOBepNTb nocJe erO yCTaHOBKn B MOHTaKhbI npoem.
- PacToHHe Do HaBeCHOro ⅢKaΦa MoKHO BbIbIpaTb NcBOeMy yCMOTpeHHIO. Pn HcNoJIb3OBaHH NaHeHN YUHTbBaIte yDIO6CTBO n 3pRoHOMKy.
Poirotobka Me6eJn
Tpe6oBaHHe:Me6eBnIb BCTpaBHaHn BbIepKnBaETemnepatypDo 90^
- Pa3MeTbTe MeCTo BbIpe3a B Me6eHN B COOTBeTCTBHN CO CXEMO yCTaHOBN.
→PUC.13
2.ПорсеверпenteутбpeOTBepCTHnДиametpOM6MM.
→Puc.23 - Y6eIntecb, yTO yrO1 cpe3a OTHOCHTBHO NOBepxHOCTN CToneuHnUcB coCTaBnE90°
→PUC.23
Pn yCTaHOBKe HaB BbIDBHXHbIM AUNKOM BblepXHBaIe MHHMaJIbHbIe OTCTynbl.
1.ПиСHTIN EMKOCTNДЯСЛВА ПИшЕн JИДКOCTNHa yCTaHOBHeHOM Пибove CO6IIOdaTe MInHMaJIbHbIe OT-CTybl.
→PnC.
2.YuHTbBaIte paacnoIOXKeHHe EMKoCTn DJIa CInBa IINJHHe JNIDKoCTn.
→PNC.11
IodrotOBKa Me6eJN K yctaHOBKe npH6opa IJIa UHPKUJIaUN BO3dyxa c aJaANTepOM
PpIMeuaHn
YcTaHOBKa Ha BHeUHei CTeHe 6e3 TeIIOJIOJIaUNn HnHaI HeOTaIIINBaEMbIM NOnOM He peKOMeHdyETCA ( ≥ 0,5BT / M^2 C)
He nodklouaHTe cTOpOHy Ha BbIyB HAnpMyIO KdpYrMn np6opam 6e3 neperopoJok. EcnH HeBO3MOxHO yCTaHOBt b neperopoKn CM. pyrHne cnocobbl yctaHOBKn
1.ПиКOM6HINHPOBAHINc aadantepom yuHTbIaIte COOTBeTCTBn pa3MepOB BbIpe3a B 3aHHei CTeHKe.
→PNC.24
2.ИЗмербтToIинHy cToIeшиUbI.IpeHecnte 3aMepHa Ⅲa6NoH nIpoBEdITE COOTBETCTByIOUyIO IINHO.
PNC. 25
3. BbipeKbTe Wb6HOn no pa3MeueHHo HnHn DnTToIuHbI CToneuHnucB A, CEHTpaNbHOH nHHn Bbpe3a B n KOHTpOJIbHOH nHHn DnBbHTpeHHero BbInyCKHoro OTBepCTnC.
4. OTMeTbTe ueHTp BbIpe3a B CToneuHnue ueHTpaJbHOJ HnHe Ha 3aDHeI CTeHKe Me6eJIi.
→PUC.26
- BbipOBHnTe WApON POHTpaIbHOJ IINHH Ha 3aHne CTeHKe Me6eN N IO HxKHeMy KpaO CToneuHnUbl.
- CdelaIaTe Bbpe3 B 3aHHe CTeHKe B COOTBeTCTBnC Ila- 6IOHOm.
- NocJe BbInOnHeHnB BBye3a ydaJIte OINIKN.
- 3aRepMeTHN3HpyIe CTbIKN TePMOCTOKNM IN BOHOHeNPO-HNuCAeMbIM RePMeTNIKOM.
→PUC.28
BeHTnlaIaIa
1.YcTaHOBnTe Bo3DyUHbI KlaNaH B LOKone IJIpeKIMa CInPKyJUzIN BO3DyXa.
-
MinHmAbHoe nonepueHoe ceeyHe BO3dyuHoro KlaHa HdoJHHo 6bIb npM.400 cm².
BbIyckHoe OTBepCTHe BcOKoJe DOnJHKo 6bITb DOCTaTOHO 60JIbWM, YTO6bI CHN3NTb MOUHOCTb TARn I OBeCneHTb Hn3Km yPoBeHb Lyma.
CdeNaTe BbIXoHoe OTBepCTne, YKOPOTNB 0OKoNbHbIe peKN, NIOBOcNOB3yIe COOTBeTCTBYIOUHe BEHTINRAuONHbIe peWETKn INI INIHTyCa. -
TTo6bI np60op fHyHKUHOHPOBaI npaBnIbHo, oBeCneBTe npTOK Bo3Dyxa K BapOHH NaHeH Yepe3 OTBepCTne DIIra BixOda Bo3Dyxa C MINHMajlbHbIM NOpEpeHbIM Ce-ueHem 200cM² B HnKHeM uKaФy.
YcTaHOBka npH6opa c peKHMOM UnpKyIaun Bo3dyxa c aanTePOM Kpenenne ynIoTHHTeHa aanTepe
3aKpeNTE yIIOTHnTeIb Ha aIaIaTepe Ha paccToHnn He 60JIe 5 MM OT Kpa.
→PUC.27
YcTaHOBKa aDanTepa
- OuHCTHe N o6e3KnPbTe NOBepxHocTb PnPKJIeNBaHN BOKpyr Bbipe3a B 3aDHei CTehKe Me6eN.
2.YcTaHOBnTe aAnTep B BbInyckHoe OTBepCTne B 3aHHe yactn BapOHH naHEn.
→PUC.28
- CHIMITE 3aunthyIO nnEHKy c aadantepa.
→Puc.29
YctaHOBKa np6opa B Bbipe3 B cToJeHHne
- Y6eIntecb, yTO cTeBoi Ka6eBn IOnKJIIOUeH K np60py.
2.AkkypaTHO yctAHOBITE np60B V Bblpe3 cToJeWHHbI.
→PnC.30
Фнкациаадпета
-
YdepknBaCpeHnI depKaTeB aadTepa, CdbNbTe ero 60KOBbIMN depKaTeJIaMn K 3aDHe nCTeHKe B HxHHeM Shkafo npknKeNeTe.
→PUC.31 -
Pn HeoXoHMOCTN DOONIHHTeIbHO 3aΦHKcpyTe aanTep BNHTAMN.
→PUC.32
IodrotobKa Me6eH K yctaHOBKe npH6opa IJRA CHPKylAunn BO3dUxac HbIM KaHaJOM
1.Пи Heo6xOdHMOcTH CHIMITE 3aHIO TO CTeHKy Me6eHn.
2.ПиКOM6HINHPOBAHN CПLOCKIM KaHaJOM yuHTbIaTe COOTBETCTBNE pa3MepOB BbIpe3a B 3aDHeN CTeHKe.
→PUC.
3.YCTaHOBnTe BO3dyuHbI KnaHaN B LOKOJe DnpeKMa CHPkyJauuBO3dyxa.
-
MinHmAlbHoe nOppeuHoe ceeHne BO3dyuHoro KlananaHa DoJXHO 6bTb npM. 400 cm².
BbinyckHoe OTBepCTne BcOKoJe DoJIKHO 6bIbIOCTaTOUHO 60nbHM, YTO6bI CHN3HTb MOUHOCTb TARn I o6ecneHTb Hn3Kn ypoBeHb Wyma.
CdeNaTe BbIXoHoe OTBepCTne, YKopoTnB 0OKoNbHbIe peiKn, nio hCnObl3yIte COOTBeTCTBYIOUne BEHTINLAuONHbIe peWetkn nn nnNTyca. -
TTo6bI npH6Op FyHKUHOHPOBaI npaBnIbHo, o6ecneYbTe npTOK Bo3dyxa K BapOuHoi NaHei Ype3 OTBepCTne DnB BixOda Bo3dyxa C MINHmAlbHbIM NonepeHybIM ceHHeM 200cM² B HnKHeM WkaFy.
- NocJe BbInonHeHH BBype3a ydaJIte OINIKN.
- 3aRepeMTeH3npyIe CTbIKN TePMoCTOKNIM N BOHOHePONHuaembIM TepMeTNIKOM.
→PNC.23
YctaHOBka np6opa IJIpa6oTbI B peHXIME cHpKUJIaUN BO3dUxac HpKUJIaUNOHbIM KaHaJOM
- HcnoIb3yIte yNIOTHIeIb, cIpyKyIaIIOHHb KaHaI, dIΦ-Фу3Op IФИbTp dIy ydaIeHn 3aIaxOB bpeKIMpe- CInpKyJIaIIN BO3dYxa.
2 YHTbIaIte pa3Mepepa3NHybIX nIOCKNX BO3dyXOBO- IOB. CtpaHua 73
ФнкацулnotHTteJA
3aKpeNTe BXOJIINB KOMNJIeKT NocTaBN yNIOHTeNB Ha NIOCKOM KaHane He daJIbwe 5 MM OT Kpa.
→PnC.
YctaHOBka IIOCKORO KaHaJa
- YctaHOBNTe NIOCKN KaHaN B BbInyCKHoe OTBepCTne Ha 3aDHeN CTehKe np6opa.
→PUC.35
YctaHOBka np6opa B Bbipe3 B CToJeHHne
- Y6eIntecb, yTO cTeBOI Ka6eJIb NOdKIIHOeH K npH6Opy.
2.AKKypaTHO yCTaHOBNTe np6Op B BVipe3 cToJeuHnUbl.
→PUC.36
YcTaHOBbCA ChTeMbI Tpy6 MeKdy npH6Opom HnΦΦy3OpOM
- CoeINHnTe KOMnHOENTbI UINPKylnaIOHHoro KaHaJa MeKdy co6oJ.
3aKpeHnTe coeHNHTeHn NIOCKHX BO3DyXoBOIOB, 3a-ΦHKcnpOBaB IN CO ΚeHcOM.
-ДяболгeeHaJdEckHOnФИKcaUIN pIrkpyTnte coeHNHTenbПLOCKORO BO3DyXOBo4 BnHTaMnДЯ ПlaCTNkAPT 4x8MM.
→PUC.37
- POnCoeDnHInTe UINPKyIaIOHOHHb KaHaI C NIOCKM BO3- DxyXOBODM K 3aDHeY qACTn BapOuHOH NaHEII.
→PUC.38
3.ПодсоeДинHTe ДИФуЗОК ПИХКУЛЯUNHOMу KaHaIy.
→PUC.39
IodrotOBKa Me6eJn IJIy yCTaHOBKn peKIMa OTBOda BO3dyxa
1.Пи Heo6xOДMOCTH CHIMITE 3aHIOCTeHKy Me6eIi.
2.ПиКOM6HINHPOBAHN CПLOCKHM KaHAnOM yuHTbIaTe COOTBETCTBNE pa3MepOB BbIpe3a B 3aHHeI CTeHKe.
→PUC.40
3. NocJe BbInonHeHH BBype3a ydaJIte OINIKN.
4. 3aRepMeTHN3HpyIe CTbIKN TepMOCTOKNIM N BOHOHePNOHNuzaeMbIM TepMeTNIKOM.
→PUC.41
YcTaHOBbI npH6opa IJIpa6Otbl B peKHMe OTBODa BO3dyxa
- B pexnme otB0da Bo3dyxa nCnoB3yIe yNIOHTHInTeIb IyMOnorNoaIoUne ΦIbTpbl.
- Co6IIOJaTe yka3aHn no pa6ote B peKIme OTbOda BO3dyxa. CtpaHnua 75
ФнкациулnotHTteJIa
3aKpeHnTe BxoJnB KOMnEKT NocTaBN yNIOTHeNB Ha NIOCKOM KaHane He daJIbwe 5 MM OT Kpa.
→PUC.34
YctaHOBKa CnCTeMbI Tpy6
- YcTaHOBInTe NIOCKn KaHaN B BbInyCKHoe OTBepCTne Ha 3aDHeN CTeHKe np6opa.
→PUC.35
2.Пи Heo6xOaMOCn MOHTpyIte DoNoHHTeJIbHbIe 3neMeHTbI CnCTEmbl Tpy6.
YctaHOBKa np6opa B Bbipe3 CTOJeHHne
- Y6eIntecb, yTO cTeBoi KaebIb NpIKHoueH K npHbOpy.
2.AkkypaTHO yCTAHOBNTe np6op B BBpe3 CToneWHNUbl. P_NC 36
POncoeHHeHne BbITaXHoTpy6bl
- 3aKpeHNTe BbITAAKHyIO Tpy6y Ha KoneHe NIOCKORO BO3dYxOBoJa.
- BbINOHNHe coeINHeHnC BbITAAHHbIM OTBepcTHeM.
- 3a repmetn3npyte Mecta coeHHeHH COOTBETCTByIO-
YctaHOBkaΦHbTPOB
3aMeKa:BpeKHeMueuRkyLauyucTaHOBHTeΦnIbTpbl, norgloaioune 3anax.
BpeKHeMe OToBa BO3Dyxa yCTaHOBtE WymOnOrNoaIOU 1Ie QnIbTpbl.
1. 06paTHe BnMaHHe Ha HAnpaBHeHne Bo3DyUHOro NToKaΦnIbTpOvB.
2.BcTaBbTe B npH6Op DbΦnIbTpca CneBa N cnpaBa N CdBnHbTe IX Bnpei.
→PUC.49
- BcTaBbTe B npn6op npyrgne DBA pnlbtpbl cneBa n cnpaBa.
→PNC.48
YcTaHOBkA HnpoylaBnBaIOUeO hNlbTpa
YcTaHOBNTe KInpoynaBnBaIOuNn HnIbTp. P_NC 44
3NeKtpnueecKoe noDKJIIOUeHne
- YuHTbBaIe npaMeTpbl NOdkKIOueHnHa TINOBO Ta-6JIuKe.
2.ПоДКЛЮЧИТЕКLEММУ3Nka6eЯKpacpepeHITeHbHOKopo6Ke,KaK NOKa3aHoHa pucyHKe.→Pnc.45
3.ПоДКЛЮЧИТЕКLEММу2NkaБЕЯнКpacпpeДЕЛNTeьнО Kopo6Ke, KaK NOKa3aHoHa pncyHKe. →PnC.46
4.ПоdkлочteКнemmy1NKa6eЯKpacpeJeNTeHOB Kopo6Ke,KaK NOKa3aHoHa pucyHKe. P_sc 47
5.ПоДКЛIOHHTe KIeMMy 2L/2N Ka6eЯ KpacpepeHITeHbHOI Kopo6Ke, KaK nOKa3aHo Ha pUCyHKe. P_NC 48 -
YyntbIaBte UBeT KaBenei.
-
BN: KopnyHeBbI
- BU: cHHN
-
GN/YE: JkTbH 3eHbH
-BK:HpHbI
-GY:cepbl -
B 3aBnCmOCTN OT TINa NODKJIIOUeHn, INH Heo6xOIMOCTH paONoXHTe Ka6eNBHbIe 3aKIMbl, NOCTaBnREMbIe B KOMPJIeKTe, No-pa3HOMy.
-
PnHHeOxOaHMoCTN HcNoIb3yIte Ka6eIbHbIe 3aKIMbl dIra coeDInHeHH DaByX Ka6eIe.
-
YkopoTeJxHnblKaBen.
- YdaIaIte H3OJIaIcHIO.
PpOBepka pa6oTbI
1.BkIIOUHTe npH6Op.
2. Ecnn 3aropaetc8 Oop nKIO-ueH HeKOppeKTHO. "PpOBepKa N OTnAdka NOkIIOueHH K 3neKtpocTeN", CtpaHnua 77
3. EcJn Ha dncnnee npnbopa He noBnIeTcHnDnKaun OoN6ok, npOBepbTe paOToY BeHTnlau, cneDyR pyKOBOCTBy NO 3KcNpyataun.
PpOBeRka H OTlaIaKa POnKJIIOUeHnK 3JneK- TpocetN
- OToeHNHnTe npHbOp OT cETN.
2.Y6eIntecb,yTO NOKIIIOueHHe Ha npIbope n NOKIIIOueHHe Ha CTeHe COOTBeTCTByIOT CXEme NOKIIIOueHnB INCHTpKUIN NMOHTaKy. "PiDroTobKa K 3NeKtpOnOJ KIOUeHnO",CTpaHnua 74 "3NeKtpnueEckoE NOKIIIOueHne",CTpaHnua 77
3.ДЯ3NOBpaNTeBHIMaHHeHaCneIyIOuINpucyHOK. →PnC.49
4.ДЯ2NobpaTneBHIMaHHeHaCneIyUOuINpucyHOK. →Pnc.50
5.ДЯ1N O6paTne BHMaHHe Ha cIeIyUoIu npCyHOK. →PnC.51
IpepeHaCTpoKa HnDnKaaun Ha peKHM OTBOda BO3dyxa
- Пи Нeo6хоДмOCТи NepeHAcTpoIe COOTBETCTByIOUIM O6pa3OM 3JIeKTpOHHoe YnpaBHeHne B 6a3OBbIX yCTaHOB-Kax ДЯ ржIMа OTbOda BO3dYxa.
- CM. rnaBy «Ba30BbIe yCTaHOBKN» B pyKOBoIDCTBe no 3Kc- nlyataun.
Demontan npn6opa
BHIMAHNE!
PnHNCNoJIb3OBAHmN HnCTpyMeHTOB MoXHO NOBpeDITb paMy np60pa.
He n3BnkeKaIte npnbop cBepxy.
1. OToeDHHte npHbOp ot 3neKtpocetn.
2. CHIMITE BbITXHON KaHaN INOcIa6Be coeDINHeHne DnR CUPKyIaUN BO3Dyxa.
3. N3BLeKeHte npH6Op, BbIToJIKNHyB eO CHN3y.