Xelsis Deluxe SM8782 - Coffee machine SAECO - Free user manual and instructions
Find the device manual for free Xelsis Deluxe SM8782 SAECO in PDF.

| Product type | Automatic coffee machine |
| Brand | Saeco |
| Model | Xelsis Deluxe SM8782 |
| Dimensions (W x H x D) | 287 x 396 x 487 mm |
| Weight | 11 - 12.4 kg |
| Power supply | 230 V, 50 Hz (see rating plate) |
| Water tank capacity | 1.7 L |
| Bean hopper capacity | 450 g |
| Coffee grounds capacity | 15 doses |
| Milk container capacity | 600 ml |
| Adjustable dispensing spout height | 75 - 148 mm |
| Grinder type | Ceramic, 12 settings |
| Special functions | BeanMaestro, CoffeeMaestro, CoffeeEqualizer Touch+, HygieSteam, ExtraShot |
| Connectivity | Wi-Fi 2.4 GHz (802.11 b/g/n) |
| Water filter | AquaClean (recommended) |
| Cleaning and maintenance | Removable brew group, HygieSteam for milk, descaling with Philips descaling solution |
| Safety | Automatic shut-off, water level detection, overheat protection |
| Spare parts available | AquaClean filter (CA6903), grease (HD5061), degreasing tablets (CA6704), milk circuit cleaner (CA6705), maintenance kit (CA6707) |
| Package contents | Machine, milk container, intake spout, cleaning brush, grease tube, AquaClean filter, measuring spoon, water hardness test strip |
| Warranty | See warranty booklet |
Frequently Asked Questions - Xelsis Deluxe SM8782 SAECO
User questions about Xelsis Deluxe SM8782 SAECO
0 question about this device. Answer the ones you know or ask your own.
Ask a new question about this device
Download the instructions for your Coffee machine in PDF format for free! Find your manual Xelsis Deluxe SM8782 - SAECO and take your electronic device back in hand. On this page are published all the documents necessary for the use of your device. Xelsis Deluxe SM8782 by SAECO.
USER MANUAL Xelsis Deluxe SM8782 SAECO
natural_image
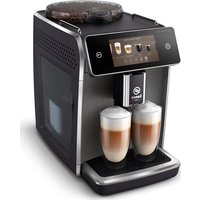
Saopec coffee maker with two glass cups on a black counter, displayed on a digital screen (no visible text or symbols on the main device)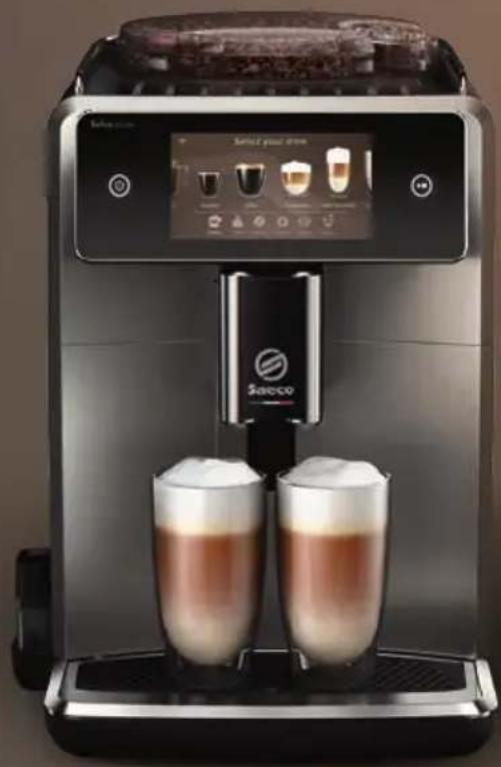
natural_image
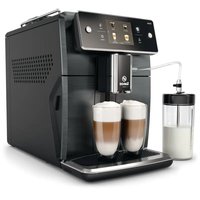
Modern coffee machine with two cups of brown liquid, displayed on a digital screen (no visible text or symbols)EN USER MANUAL
C
Xelsis DELUXE: SM8780, SM8782, SM8785
D
English 4
Azərbaycanca 25
Čeština 47
Crnogorski 68
Dansk 90
Deutsch 111
Eesti 135
Español 156
Français 179
Hrvatski 201
Italiano 223
Latviešu 246
Lietuviškai 267
Magyar 288
Nederlands 310
Norsk 332
O'zbek 353
Polski 375
Português 397
Română 419
Shqip 441
Slovenščina 463
Slovensky 484
Srpski 506
Suomi 528
Svenska 549
Türkmençe 570
Ελληνικά 592
Български 616
Кыргызча 639
Македонски 663
Русский 687
Точикй 712
Українська 737
Қазақша 760
Ruijtntu 782
งษัฒน์ 806
הכלה 830
Contents
Machine overview (Fig. A) 4
Control panel 5
Introduction 5
Special functions 6
Brewing drinks 7
Adjusting machine settings 10
AquaClean water filter 11
Removing and inserting the brew group 12
Cleaning and maintenance 13
Descaling procedure 15
Error codes 16
Ordering accessories 17
Software updates 18
Troubleshooting 18
Technical specifications 23
Declaration of Conformity 24
Wi-Fi 24
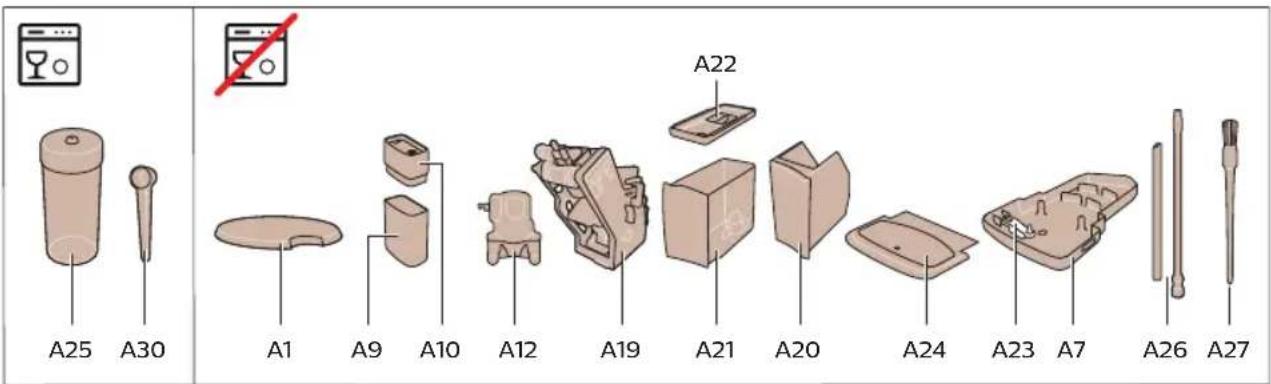
Machine overview (Fig. A)
A1 Lid of bean hopper
A2 Lid of pre-ground coffee compartment
A3 Cup tray
A4 Control panel
A5 Socket for cord
A6 Main switch
A7 Drip tray
A8 Drip tray release grip
A9 HygieSteam container
A10 HygieSteam cover with milk tube holder
A11 Height-adjustable coffee and milk dispensing spout
A13 Power cord with plug
A14 Grind setting knob (to learn more, visit www.saeco.com/care)
A15 Bean hopper
A16 Service door
A17 Coffee funnel
A18 Coffee residues drawer
A19 Brew group (to learn more, visit www.saeco.com/care)
A20 Coffee grounds container
A21 Water tank
A22 Lid of water tank
A23 'Drip tray full' indicator
A24 Drip tray cover
Accessories
A25 Milk container
A26 Milk tube
A27 Cleaning brush
A28 Grease tube
A29 AquaClean filter
A30 Measuring spoon
A31 Water hardness test strip
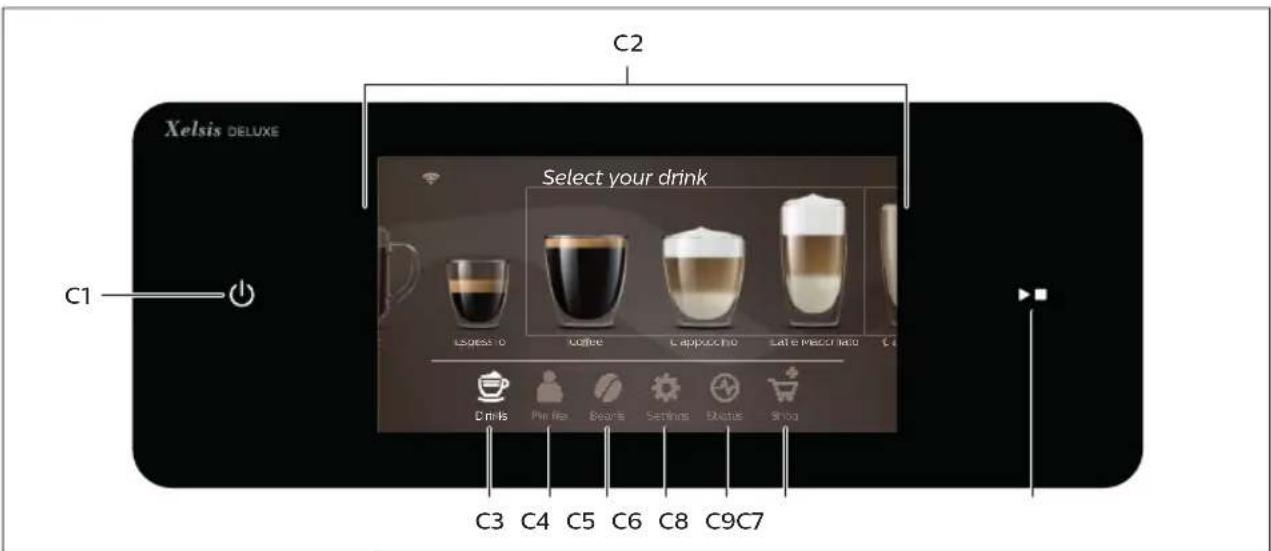
Control panel
There are two versions of this espresso machine. Their control panels look different, but all icons work the same way. Refer to figures B and C for an overview of all icons. Below you can find the descriptions.
B1 Off icon
B5/C5 Beans
C1 On/off icon
B6/C6 Machine settings
B2/C2 Drinks
B7/C7 Status menu
B3/C3 Drinks menu
B8/C8 Shop
B4/C4 Personal profiles
B9/C9 Start/stop icon
Introduction
Congratulations on your purchase of a Saeco full-automatic coffee machine! To fully benefit from the online support that Saeco offers, you can use the control panel to register your machine via the built-in Wi-Fi connection, or go to www.saeco.com/MyCoffeeMachine and register your product there.
Read the separate safety booklet carefully before you use the machine for the first time and save it for future reference.
Your Saeco full-automatic coffee machine allows you to connect with your Wi-Fi network to enhance your coffee experience.
By connecting your machine to your Wi-Fi network, you will be able to:
- receive personalized recommendations based on machine learning
- enjoy regular software updates to enhance your user experience
- make use of the shop functionality, if available in your country
- you can link your machine to your Amazon account for accessory replenishment, if this option is available in your country
- connect to your Alexa home device to make use of voice control, if available in your country
Note: This machine has been tested with coffee. Although it has been carefully cleaned, there may be some coffee residues left. We guarantee, however, that the machine is absolutely new.
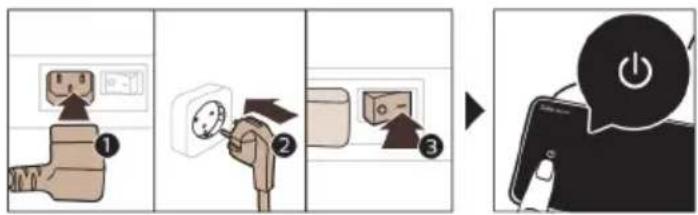
Switching on the machine when you have a Xelsis SUPREMA (SM8885, SM8889 only)
Switch on the machine by pressing the main switch on the back of the machine. Touch the center of the control panel to make the 'on' icon appear on the screen. Tap the 'on' icon and follow the step-by-step instructions on the control panel.
flowchart
graph LR
    A["1: Top panel with plug, 5x power supply"] --> B["2: Left-hand plug installing socket"]
    B --> C["3: Down panel with switch"]
    C --> D["4: Bottom panel with switch"]
Please connect and update the machine at first installation and regularly check for manual updates.
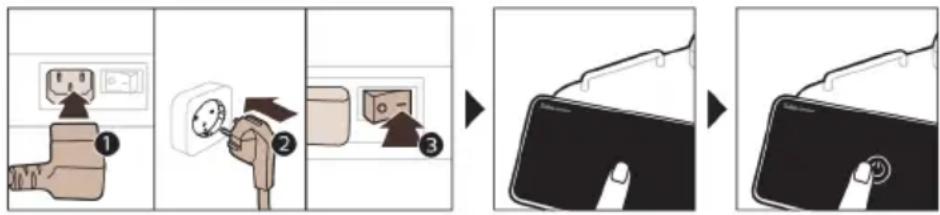
Switching on the machine when you have a Xelsis DELUXE (SM8780, SM8782, SM8785 only)
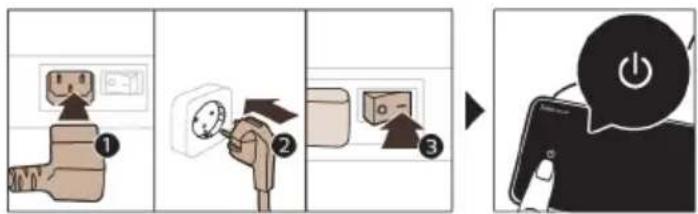
Switch on the machine by pressing the main switch on the back of the machine. Tap the 'on' icon and follow the step-by-step instructions on the control panel.
⚠️ Please connect and update the machine at first installation and regularly check for manual updates.
Connecting to Wi-Fi
Connect your coffee machine to a 2.4 GHz 802.11 b/g/n home Wi-Fi network.
i Connecting your coffee machine to your home Wi-Fi network, provides you with an enhanced user experience.
i Make sure that the coffee machine and the Wi-Fi router are within range of each other.
Follow the steps below to connect your coffee machine to your Wi-Fi network.

flowchart
graph LR
    A["Device Setup"] --> B["Software Update"]
    B --> C["Updates"]
    C --> D["WiFi Update"]
    D --> E["Current Network"]
    E --> F["Windows Interface"]
1 Tap the Settings icon and swipe from left to right to find the Wi-Fi icon.
2 Tap the Wi-Fi icon.
3 Follow the steps on the screen to connect your machine to your Wi-Fi network.
You are now ready to start your connected experience.
The machine will perform the automatic rinsing cycle when it is switched on and off via voice control and when the machine has been inactive for a while and switches off. Please make sure that the environment of the machine is safe.
Special functions
Special function Purpose

With BeanMaestro you are able to select the type and roast of your beans. It then optimizes the brewing settings automatically, to get the best out of your coffee beans.

natural_image
HygieSteam logo with circular design and wavy line inside, no text or symbols on backgroundHygieSteam function automatically cleans the milk system, removing microorganisms: use it after brewing cappuccino or other milk-based drinks.
Special function Purpose

natural_image
Simple line drawing of a ceramic grinder with no text or symbolsOur durable grinder is made from 100% ceramic to be exceptionally hard and precise. It can be adjusted to your taste with 12-step levels.
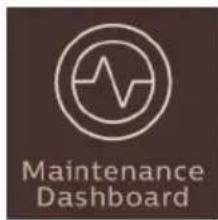
The Maintenance Dashboard gives you a helpful overview and notifies you with status information on things like your water level or tell you that the AquaClean is running low.
Brewing drinks
General steps
To brew a drink, you need to follow a few simple steps.

flowchart
graph LR
    A["Start: Coffee in a coffee machine"] --> B["Select: Breakfast, Espresso, and Beverage"]
    B --> C["Check up menu, 2nd or 3rd place"]
    C --> D["Make a coffee cup with menu, click 'OK', 'Cancel', 'Finish' buttons"]
    D --> E["Final: Paper feeding into a coffee cup with menu, click 'OK', 'Cancel', 'Finish'"]
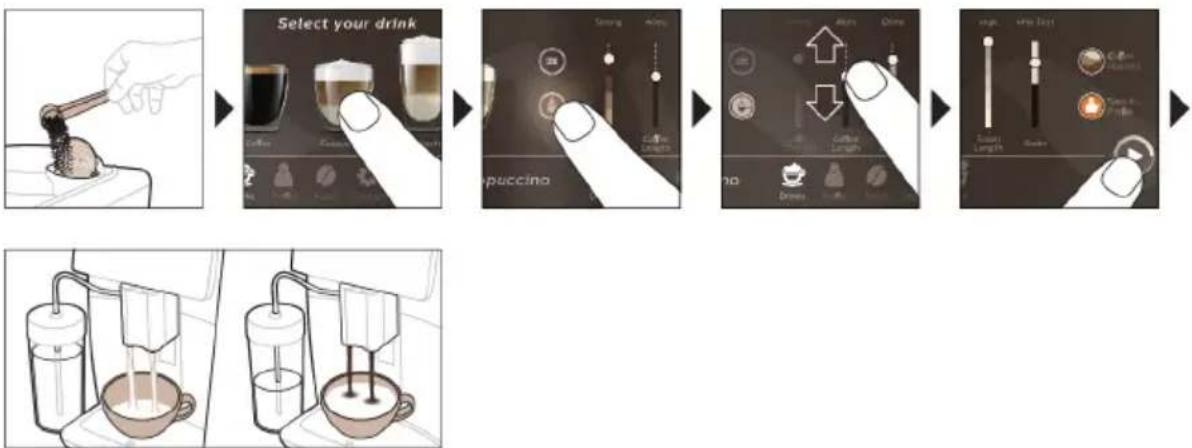
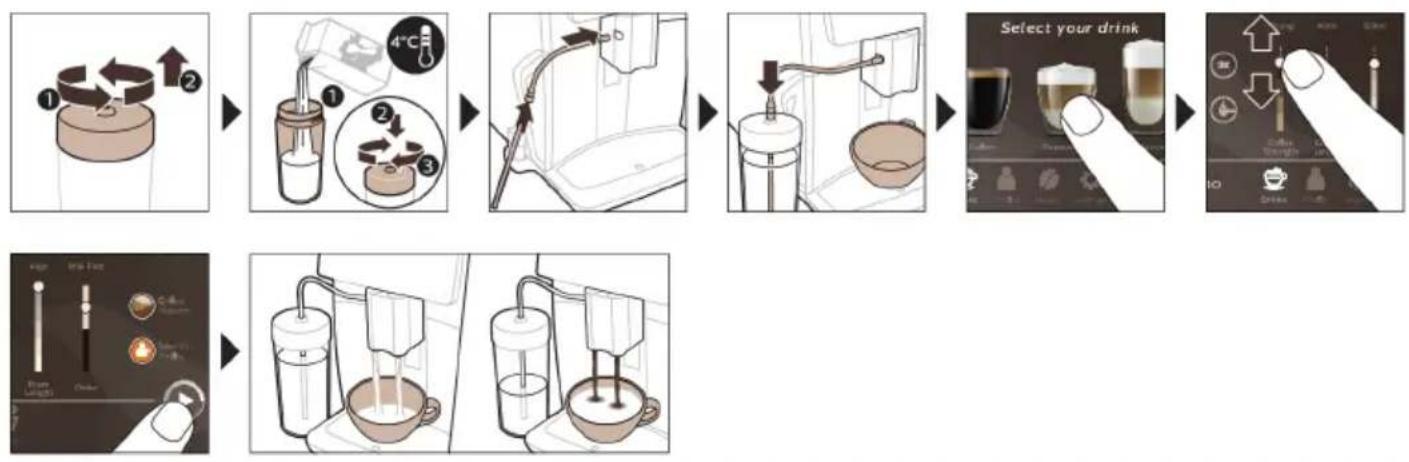
1 Fill the water tank with tap water and fill the bean hopper with beans.
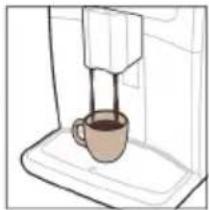
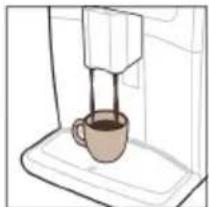
2 Place one or two cups under the height-adjustable dispensing spout. Slide the dispensing spout up or down to adjust the height to the size of the cup or glass you are using.
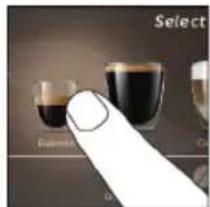
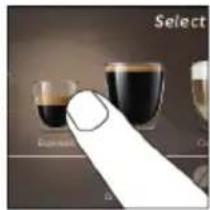
3 Tap the Drinks 🎨 icon to enter the 'Drinks' menu. Swipe from left to right to select your drink by tapping on it.
- Tap the '2x' icon if you want to brew two cups. The machine automatically carries out two grinding cycles in sequence of the selected drinks.
i The '2x' icon is not available for all drinks.
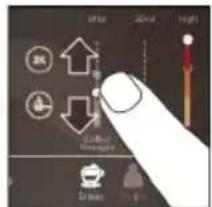
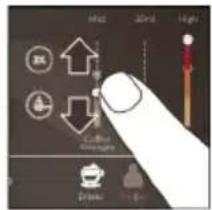
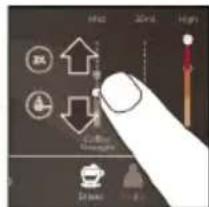
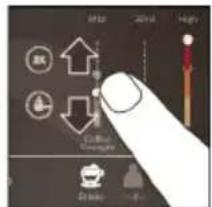
4 After selecting a drink, you can adjust the settings to your preference by swiping the adjustable bars up and down.
5 Press the start/stop icon to start brewing the selected drink.
Do not use caramelized or flavored coffee beans.
i Turn the grind setting knob in small steps and after brewing 5 cups of coffee you start to taste the difference.
Support on drink parameters
To get additional information about a specific drink parameter, press and hold an adjustable bar for 3 seconds.

Brewing milk-based drinks
To brew milk-based drinks, you need to follow a few simple steps.

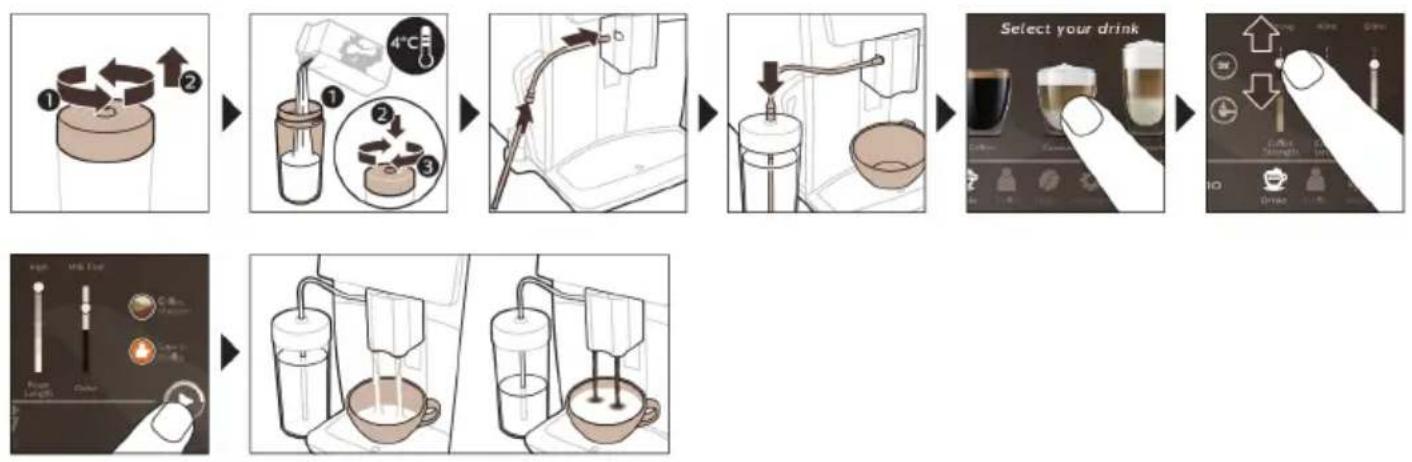
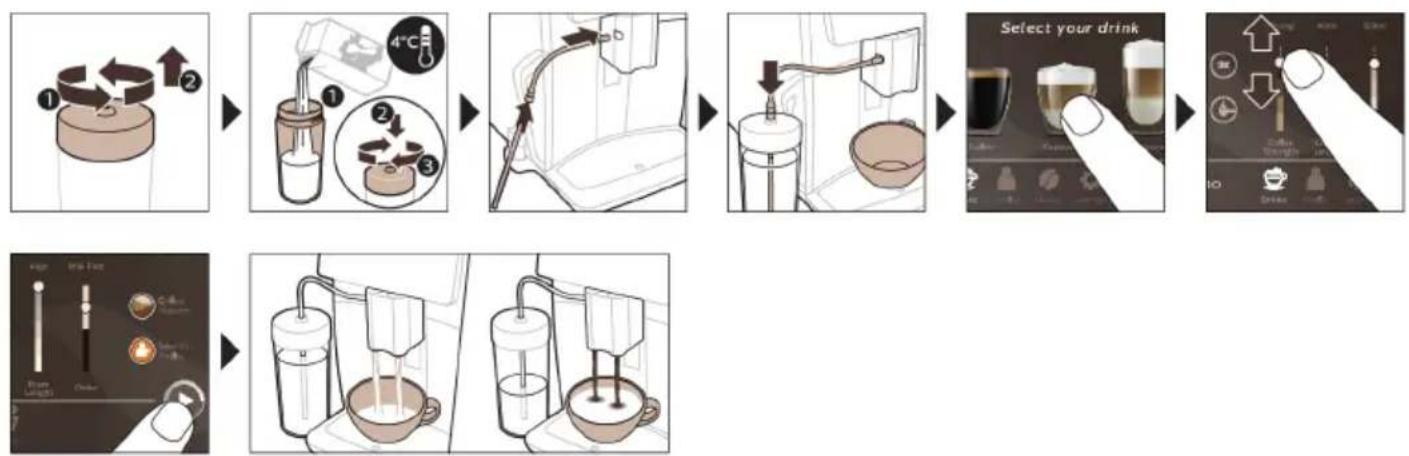
1 Fill the water tank with tap water and fill the bean hopper with beans.
Tip: When the flexible milk tube is connected to the cappuccinatore, slide the dispensing spout to the uppermost position for easy access to the water tank.
2 Unscrew the lid of the milk container and fill the milk container with milk.
Always use milk coming directly from the fridge for optimal results.
3 Connect the flexible milk tube to the cappuccinatore.
4 Place the metal milk tube in the container.
5 Tap the Drinksicon, scroll and select the milk-based drink icon of your choice.
6 You can adjust the settings to your preference by swiping the adjustable bars up and down.
7 Press the start/stopicon at any time to start brewing the selected drink.
- For specific drinks, the machine first dispenses milk and then coffee. For a number of other drinks this is the other way around, the machine will first dispense coffee and then milk.
- To stop dispensing milk before the machine has dispensed the preset amount, press the start/stop icon (SM8780, SM8782, SM8785 only) or press the stop icon (SM8885, SM8889 only).
- To stop dispensing the complete drink (milk and coffee) before the machine is finished, press and hold the start/stop icon (SM8780, SM8782, SM8785 only) or press the stop icon (SM8885, SM8889 only).
Directly after dispensing the milk, the 'HygieSteam Shot' is performed. The machine shoots steam through the internal milk system to rinse it quickly. The metal part of the milk tube may become hot. To avoid the risk of burns, let it cool down first.
Tip: You can also use a regular milk carton to brew your milk-based drinks. Place the metal milk tube directly into the milk carton.
Brewing coffee with pre-ground coffee
To brew coffee with pre-ground coffee, you need to follow a few simple steps.
1 Open the lid of the pre-ground coffee compartment and pour one measuring spoon of pre-ground coffee into it. Then close the lid.
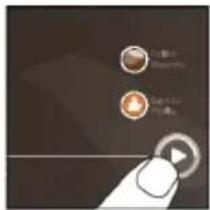
2 Tap the Drinks icon, scroll from left to right and select your drink.
3 Tap the pre-ground coffee icon.
4 You can adjust the settings to your preference by swiping the adjustable bars up and down.
5 Press the start/stop icon to start brewing the selected drink.
i If you select pre-ground coffee, you cannot adjust the coffee strength or brew more than one drink at the same time.
Dispensing hot water
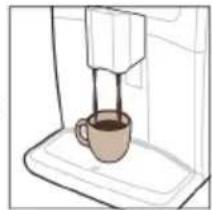
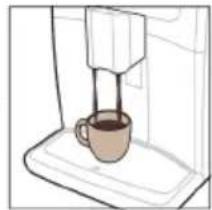
1 Make sure that the internal cappuccinatore is correctly attached to the machine (Fig. 1).
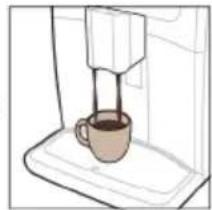
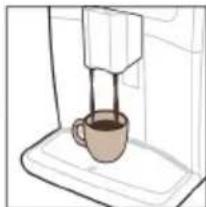
2 Place a cup under the spout.
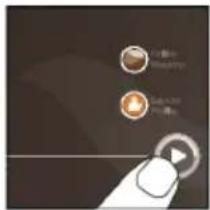
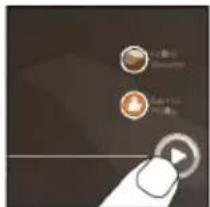
3 Tap 'Hot Water' (Fig. 2).
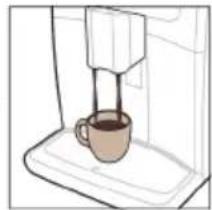
4 Slide the adjustable bars up and down to adjust the hot water quantity or temperature to your preference (Fig. 3).
5 Press the start/stop▶icon.
6 To stop dispensing hot water before the machine is finished, press the start/stop▶■ icon again (SM8780, SM8782, SM8785 only) or press the stop icon again (SM8885, SM8889 only).
Personalization
The machine allows you to adjust the settings of a drink to your own preference and to store the adjusted drink in a personal profile. You can choose your own icon and your own profile name.
Get the best out of your beans with the BeanMaestro function
With BeanMaestro you are able to select the type and roast of your beans. It then optimizes the brewing settings automatically, to get the best out of your coffee beans.
1 Tap on the Beans icon in the main menu (Fig. 4).
2 Tap the BeanMaestro function (Fig. 5).
3 Select the type of beans. You can choose between Arabica and Robusta blend.
4 Select the roasting level of your beans.
5 The brewing settings are optimized automatically.
6 Enjoy your next coffee.
Speed up with CoffeeMaestro
Your machine offers the possibility to select taste profiles instead of adjusting all settings separately with the CoffeeMaestro function. You can choose between Delicato, Intenso and Forte. To select a
CoffeeMaestro taste profile:
1 Tap the drink icon of your choice (Fig. 6).
2 Tap the CoffeeMaestro icon repeatedly (Fig. 7).
- The main settings of the drink are now adjusted accordingly.
3 Press the start/stop icon to start brewing the drink.
Personalize your drink with the CoffeeEqualizer Touch+ function
After selecting a drink, the CoffeeEqualizer Touch ^+ function is activated automatically, allowing you to adjust the drink settings. Long press on each of the items on the display to activate the help function and receive further information.
With the CoffeeEqualizer Touch ^+ function you can adjust the following settings:
1 Aroma strength
6 Foam amount
2 Coffee quantity
7 Coffee flavor
3 Milk quantity
8 You can also decide to prepare 1 or 2 cups
4 Water quantity
9 The order of first dispensing coffee or milk
5 Drink temperature
Note: It depends on the drink you choose which settings you can adjust.
Save your favorite drinks in a profile
The machine allows you to adjust the settings of a drink to your own preference and to store the adjusted drink in a personal profile. You can select a profile and store a recipe using the profiles.
You can create a profile and add a drink using the profile 🖱con.
1 Tap the profile icon on the main menu (Fig. 8).
2 Tap the Plus icon (Fig. 9).
3 Type your name and select your favorite icon.
4 You are ready to add a drink. Tap the drink icon of your choice.
5 Personalize the drink via the CoffeeEqualizer Touch + or the CoffeeMaestro function.
6 Tap on the 'Safe to profile' icon to store it in your personal profile (Fig. 10).
Extra shot (ExtraShot)
Your machine offers you the possibility to add an extra shot of Ristretto to your coffee and milk drinks, for example if you want to have a stronger coffee.
1 Place a cup under the spout.
2 Tap one of the one-touch drinks icons to select a drink (Fig. 6).
3 Slide the adjustable bar up to set the strength to the top level and select the ExtraShot function (Fig. 11).
4 Then press the start/stop▶■ icon (SM8780, SM8782, SM8785 only) or press the start icon (SM8885, SM8889 only) to start brewing the drink.
5 To stop dispensing the drink before the machine has finished, press the start/stop ▶■ icon again (SM8780, SM8782, SM8785 only) or press the stop icon again (SM8885, SM8889 only).
When you have selected the ExtraShot function, you can only brew one coffee at a time.
i The extra shot function is not available for all drinks.
Adjusting machine settings
You can adjust most machine settings by tapping the Settings icon and follow the steps on the screen.
For online support (frequently asked questions, movies etc.), scan the QR code on the cover of this booklet or visit www.saeco.com/care
Setting the water hardness
We advise you to adjust the water hardness setting to the water hardness level in your region for optimal performance and a longer lifetime of the machine. This also prevents you from having to descale the machine too often. The default water hardness setting is 4: hard water.
Use the water hardness test strip supplied in the box to determine the water hardness in your region:
1 Immerse the water hardness test strip in tap water or hold it under the tap for 1 second (Fig. 12).
2 Wait 1 minute. The number of squares on the test strip that turn red indicate the water hardness (Fig. 13).
Set the machine to the correct water hardness:
1 Tap the Settings icon and scroll from left to right to select 'Water hardness'.
2 Select the water hardness level. The number of red squares selected on the display should be the same as the number of red squares on the test strip (Fig. 14).
3 When you have set the correct water hardness, tap the confirmation on to confirm.
Adjusting the grind setting
You can change the coffee strength with the grind setting knob inside the bean container. The lower the grind setting, the finer the coffee beans are ground and the stronger the coffee becomes. There are 12 different grind settings you can choose from.
The machine has been set up to get the best taste out of your coffee beans. Therefore we advise you not to adjust the grind setting until you have brewed 100-150 cups (approx. 1 month of use).
i You need to brew 2 to 3 drinks before you can taste the full difference.
Do not turn the grind setting knob more than one notch at a time to prevent damage to the grinder.
1 Tap the Beans icon in the main menu.
2 Tap on "Grinder".
3 Watch the how to video.
Restoring factory settings
The machine offers you the possibility to restore the factory settings at any moment.
1 Tap the Settings icon.
2 Scroll from left to right to select 'Factory settings'. Confirm by tapping the confirmation √ icon.
- The settings are now restored.
i The following factory settings are restored to default: water hardness, standby time, display brightness, sound, front illumination, profiles, tank light, measure/units, home screen settings, BeanMaestro preferences, Wi-Fi credentials, software update preferences, Saeco credentials, Amazon credentials.
AquaClean water filter
Your machine is AquaClean enabled. You can place the AquaClean water filter in the water tank to preserve the taste of your coffee. It also diminishes the need for descaling by reducing limescale build-up in your machine. You can purchase an AquaClean water filter from your local or online retailer or from authorized service centers.
AquaClean filter status indication
The status of the AquaClean filter is always visible in the 'Status' menu as a percentage.
- If the status of the AquaClean filter is 10% or less, the screen shows a message for 2 seconds each time you switch on the machine. This message advises you to buy a new filter.
- If the status of the filter is 0%, the machine asks you to replace the AquaClean filter every time you switch on the machine.
Activating the AquaClean water filter (5 min.)
i The machine does not automatically detect that a filter has been placed in the water tank. Therefore you need to activate each new AquaClean water filter that you install in the 'Status' menu.
When the machine stops showing the filter activation message, you can still activate an AquaClean water filter, but you will need to descale the machine first.
i Your machine has to be completely limescale-free before you start using the AquaClean water filter.
Before activating the AquaClean water filter, it has to be prepared by soaking it in water as described below. If you don't do this, air might be drawn into the machine instead of water, which makes a lot of noise and prevents the machine from being able to brew coffee.
1 Tap the 'Status' icon and scroll from left to right to select 'AquaClean'.
2 Tap the confirmation √ icon again when the activation screen appears. Follow the instructions on the screen.
Replacing the AquaClean water filter (5 min.)
After 95 liters of water have flowed through the filter, the filter will cease to work. The AquaClean status indicator drops to 0% to remind you to replace the filter. If you do not replace the AquaClean water filter in time, you can still replace the filter but you first need to descale the machine.
When the AquaClean status indicator drops to 0% or when the machine reminds you to replace the AquaClean filter:
1 take out the old AquaClean water filter.
2 install a new filter and activate it as described in chapter 'Activating the AquaClean water filter (5 min).'
i Replace the AquaClean water filter at least every 3 months, even if the machine does not yet indicate that replacement is required.
Removing and inserting the brew group
Go to the 'Status' menu on the screen and select 'Brew group clean' or visit www.saeco.com/care for detailed video instructions on how to remove, insert and clean the brew group.
Removing the brew group from the machine
1 Open the service door (Fig. 15).
2 Remove the coffee residues drawer (Fig. 16).
3 Press the PUSH button (Fig. 17) and pull at the grip of the brew group to remove it from the machine (Fig. 18).
Reinserting the brew group
Before you slide the brew group back into the machine, make sure it is in the correct position.
1 Check if the arrow on the yellow cylinder on the side of the brew group is aligned with the black arrow and N (Fig. 19).
- If they are not aligned, push down the lever until it is in contact with the base of the brew group (Fig. 20).
2 Make sure that the yellow locking hook on the other side of the brew group is in the correct position.
- To position the hook correctly, push it upwards until it is in uppermost position (Fig. 21).
3 Slide the brew group back into the machine along the guiding rails on the sides (Fig. 22) until it locks into position with a click (Fig. 23). Do not press the PUSH button.
4 Place back the coffee residues drawer and close the service door.
Cleaning and maintenance
Your machine will advise you when to perform cleaning and maintenance.
Regular cleaning and maintenance keeps your machine in top condition and ensures good-tasting coffee for a long time with a steady coffee flow.
Consult the table below for a detailed description of when and how to clean all detachable parts of the machine. You can find more detailed information and video instructions on www.saeco.com/care. See figure C for an overview of which parts can be cleaned in the dishwasher.
Item When to clean How to find in the control panel/
| What to do | |
| AquaClean filter When the machine asks you or every three months. | STATUS->CLEANING->AQUACLEAN. Follow the steps to activate the AquaClean filter. |
| i The machine does not automatically detect that a filter has been placed in the water tank. Therefore you need to activate each new AquaClean filter that you install in the 'Status' menu. | |
| i Your machine has to be completely limescale-free before you start using the AquaClean filter. | |
| i Replace the AquaClean filter at least every 3 months, even if the machine does not yet indicate that replacement is required. | |
| Brew group Weekly STATUS -> PERFORMANCE ->BREW GROUP | |
| Before you slide the brew group back into the machine, make sure it is in the correct position. The arrow on the yellow cylinder on the side of the brew group has to be aligned with the black arrow and N (Fig. 19). | |
| Monthly STATUS -> PERFORMANCE ->COFFEE OIL | |
| Milk system/internal cappuccinatore | After every day of use STATUS -> HYGIESTEAM. Follow the steps of the self-cleaning process to clean the milk system. Wipe the outside of the metal milk tube with a damp cloth before placing it into the milk tube holder. |
| Weekly Remove and disassemble the internal cappuccinatore. Rinse all parts under the tap with some washing-up liquid. | |
Item When to clean How to find in the control panel/
| What to do | ||
| Monthly STATUS -> HYGIESTEAM -> DEEP MILK CLEAN.Follow the steps of the self-cleaning process to clean the milk system. | ||
| Milk container Weekly Disassemble the milk container (Fig. 24) and push out the ball using the pin of the milk tube (Fig. 25). Clean all parts of the milk container under the tap or in the dishwasher. | ||
| HygieSteam container (milk tube holder) | Weekly or when the machine reminds you | Remove the HygieSteam container from the machine (Fig. 26) and remove the HygieSteam cover (Fig. 27). Clean the HygieSteam container and cover under the tap. |
| Pre-ground coffee compartment | Check the pre-ground coffee compartment weekly to see if it is clogged | Unplug the machine and remove the brew group. Open the lid of the pre-ground coffee compartment and insert the spoon handle into it. Move the handle up and down until the clogged ground coffee falls down (Fig. 28). Go to www.saeco.com/care for detailed video instructions. |
| Coffee grounds container | Empty the coffee grounds container when prompted by the machine. Clean it weekly | Remove the coffee grounds container while the machine is switched on. Rinse it under the tap with some washing-up liquid. |
| Drip tray Empty the drip tray daily or as soon as the red 'drip tray full' indicator pops up through the drip tray (Fig. 29). Clean the drip tray weekly | Remove the drip tray (Fig. 30) and rinse it under the tap with some washing-up liquid. | |
| Lubrication of the brew group | Every 2 months Lubricate the brew group with the by-packed grease (see 'Lubricating the brew group'). Go to www.saeco.com/care for detailed video instructions. | |
| Water tank Weekly Rinse the water tank under the tap. | ||
| Machine front Weekly Clean with a non-abrasive cloth. | ||
| Descaling of the machine | When the machine asks you to descale | STATUS -> DESCALING. Follow the steps to descale the machine. When descaling is needed, the machine asks you to descale it, press the OK icon to start and follow the steps. |
www.saeco.com/care
Cleaning the brew group
Regular cleaning of the brew group prevents coffee residues from clogging up the internal circuits. Go to the 'Status' menu on the screen and select 'Brew group clean' or visit www.saeco.com/care for support videos on how to remove, insert and clean the brew group.
Cleaning the brew group under the tap
1 Tap the 'Status' icon and scroll to select 'Brew group clean'.
2 Tap the confirmation icon to confirm and then follow the instructions on the screen.
Cleaning the brew group with the coffee oil remover tablets
Only use Philips coffee oil remover tablets.
1 Tap the 'Status' icon and scroll to select 'Brew group clean'.
2 Tap the confirmation icon to confirm and then follow the instructions on the screen.
Lubricating the brew group
To improve your machine's performance, we suggest that you lubricate the brew group every 2 months, to ensure that the moving parts continue to move smoothly.
1 Apply a thin layer of grease on the piston (grey part) of the brew group (Fig. 31).
2 Apply a thin layer of grease around the shaft (grey part) in the bottom of the brew group (Fig. 32).
3 Apply a thin layer of grease to the guiding rails on both sides (Fig. 33).
Cleaning programs for the internal cappuccinatore
i The machines tells you when to clean the internal cappuccinatore.
The machine has three programs to clean the internal cappuccinatore:
- 'HygieSteam Shot': during the preparation of a milk-based drink, the machine automatically shoots steam through the internal cappuccinatore to rinse it quickly.
- 'HygieSteam': the machine thoroughly cleans the internal milk system with steam. Make sure that the HygieSteam container is correctly assembled (Fig. 34) and attached to the machine (Fig. 35). Place the milk tube in the milk tube holder (Fig. 36) and follow the instructions on the screen.
- 'Deep Milk Clean': Perform the 'Deep Milk Clean' procedure with the Philips milk circuit cleaner for a thorough cleaning of the internal milk system.
Cleaning the internal cappuccinatore under the tap
1 Open the door of the internal cappuccinatore (Fig. 37).
2 Remove the internal cappuccinatore by pulling it down (Fig. 38).
3 Disassemble the internal cappuccinatore by pulling the bottom part off the top part (Fig. 39).
4 Disassemble all parts (Fig. 40) and clean them under the tap.
5 Reassemble the internal cappuccinatore.
6 To place back the internal cappuccinatore, put it in upright position and make sure the holes are aligned with the two tubes on the machine. Then move the internal cappuccinatore upwards until it locks into place (Fig. 1).
7 Close the door.
Visit www.saeco.com/care for detailed video instructions.
Descaling procedure
Please use Philips descaler only. Under no circumstances should you use a descaler based on sulfuric acid, hydrochloric acid, sulfamic or acetic acid (vinegar) as this may damage the water circuit in your machine and will not dissolve the limescale properly. Not using the Philips descaler will void your warranty. Failure to descale the appliance will also void your warranty. You can buy Philips descaler from your local or online retailer or from authorized service centers.
1 When the machine asks you to descale it, tap the confirmation √ icon to start. To start descaling without being prompted by the machine, tap the 'Status' icon and select 'Descale'.
2 Remove the drip tray, the coffee grounds container and the HygieSteam container (Fig. 26), empty them and put them back into place.
3 Remove the water tank and empty it. Then remove the AquaClean filter.
4 Pour the whole bottle of Philips descaler into the water tank and then fill it with water up to the CALC CLEAN level (Fig. 41). Then place the water tank back into the machine.
5 Place a large container (1.5 l) under the coffee dispensing spout.
6 Make sure that the HygieSteam container is correctly assembled (Fig. 34) and attached to the machine (Fig. 35). Place the milk tube in the milk tube holder.
7 Follow the instructions on the screen to start the descaling procedure. The descaling procedure lasts approx. 30 minutes and consists of a descaling cycle and a rinsing cycle.
8 Once the descaling cycle is finished, you need to rinse the water tank and water circuit. Follow the instructions on the screen.
9 Place a new AquaClean filter in the water tank and activate it (see 'Activating the AquaClean water filter (5 min).'
Tip: Using the AquaClean filter reduces the need for descaling!
What to do if the descaling procedure is interrupted
You can exit the descaling procedure by pressing the on/off icon on the control panel. If the descaling procedure is interrupted before it is completely finished, some descaling liquid may remain in the water tank or the water circuit. In that case, do the following:
1 Empty and rinse the water tank thoroughly.
2 Fill the water tank with fresh water up to the CALC CLEAN level indication and switch the machine back on. The machine will heat up and perform an automatic rinsing cycle.
3 Before brewing any drinks, perform a manual rinsing cycle. To perform a manual rinsing cycle, first dispense half a water tank of hot water and then brew 2 cups of pre-ground coffee without adding ground coffee.
Note: If the descaling procedure was not completed, the machine will require another descaling procedure as soon as possible.
Error codes
Below you find a list of the error codes showing problems that you can solve yourself. Video instructions are available on www.saeco.com/care. If another error code appears, please contact the Consumer Care Center in your country. For contact details, see the warranty leaflet.
Error code Problem Possible solution
| 01 The coffee funnel is clogged. | Switch off the machine and unplug it. Remove the brew group. Then open the lid of the pre-ground coffee compartment and insert the spoon handle. Move the handle up and down until the clogged ground coffee falls down (Fig. 28). Visit www.saeco.com/care for detailed video instructions. |
| 03 The brew group is dirty or not well-greased. | Switch off the machine. Rinse the brew group with fresh water, let it air-dry and then lubricate it (see 'Lubricating the brew group'). Consult chapter 'Cleaning the brew group' or visit www.saeco.com/care for detailed video instructions. Then switch the machine on again. |
Error code Problem Possible solution
| 04 The brew group is not positioned correctly. | Switch off the machine. Remove the brew group and reinsert it. Make sure that the brew group is in the correct position before you insert it. Consult chapter 'Handling the brew group' or visit www.saeco.com/care for detailed video instructions. Then switch the machine on again. |
| 05 There is air in the water circuit. | Restart the machine by switching it off and on again. If this works, dispense 2-3 cups of hot water. Descale the machine if you have not done so for a longer period of time. |
| The AquaClean filter was not prepared properly before installation or it is clogged. | Remove the AquaClean filter and try to brew a coffee again. If this works, make sure that the AquaClean filter is prepared properly before you place it back (see 'Activating the AquaClean water filter (5 min.)'). Put the AquaClean filter back into the water tank. If this still does not work, the filter might be clogged and needs to be replaced. |
| 11 The machine needs to adjust to room temperature | Allow some time for the machine to adjust from transport/outdoor temperature to room temperature. Switch off the machine for 30 minutes and switch it on again. If this does not work, contact the Consumer Care Center in your country. For contact details, see the warranty leaflet. |
| 14 The machine is overheated. | Switch off the machine and switch it back on after 30 minutes. |
| 19 The machine is not connected to the wall socket properly. | Make sure that the small plug of the power cord is properly connected to the socket on the back of the machine. |
Ordering accessories
To clean and descale the machine, only use Philips maintenance products. These products can be purchased by enabling Amazon Smart Reorders, from your local or online retailer or from authorized service centers.
To be able to use Amazon Smart Reorders, you first need to activate this service on Amazon. Then follow the steps on the screen of your machine to connect your Amazon account to your Saeco account. After you have completed these steps, you can use the Amazon Smart Reorder service.
In the 'Shop' menu on the control panel of the machine you can view the availability of Philips maintenance products and accessories at local retailers.
To find a full list of spare parts online, enter the type number of your machine. You can find the type number on the inside of the service door.
Maintenance products and type numbers:
- Descaling solution CA6700
- AquaClean filter CA6903
- Brew group grease HD5061
- Coffee oil remover tablets CA6704
- Milk circuit cleaner CA6705
- Maintenance kit CA6707
Software updates
Updating is essential to safeguard your privacy and proper functioning of your coffee machine. You can set whether you want to update your machine manually or whether you want it to be done automatically.
When you have selected automatic updates, make sure that the machine is also plugged in at night and Wi-Fi is enabled, so that the machine can receive the software updates overnight.
i Updates are made available when there are software improvements, new features for the machine and to prevent a possible security issue.
i Mandatory firmware updates are started automatically when the coffee machine is in stand-by mode. During a firmware update the coffee machine cannot be used.
Troubleshooting
This chapter summarizes the most common problems you could encounter with the machine. Support videos and a complete list of frequently asked questions are available on www.saeco.com/care. If you are unable to solve the problem, contact the Consumer Care Center in your country. For contact details, see the warranty leaflet.
Problem Cause Solution
| There are some coffee residues inside my new coffee machine. | This machine has been tested with coffee. | Although it has been carefully cleaned, there may be some coffee residues left. However, the machine is absolutely new. |
| The machine is in DEMO mode. | You pressed the standby icon for more than 8 seconds. | Switch the machine off and then on again with the main switch on the back of the machine. |
| The drip tray fills up quickly / there is always some water in the drip tray. | This is normal. The machine uses water to rinse the internal circuit and brew group. Some water flows through the internal system directly into the drip tray. | Empty the drip tray daily or as soon as the red 'drip tray full' indicator pops up through the drip tray cover (Fig. 29). Tip: place a cup under the dispensing spout to collect rinsing water that comes out of it. |
| The 'empty coffee grounds container' icon remains on. | You emptied the coffee grounds container while the machine was unplugged from the wall socket, or you placed it back too fast. | Remove the coffee grounds container, wait at least 5 seconds and then insert it again. |
| The machine prompts to empty the coffee grounds container even though the container is not full. | The machine did not reset the counter the last time you emptied the coffee grounds container. | Always wait approx. 5 seconds when you place back the coffee grounds container. In this way, the coffee pucks counter will be reset to zero and the number of coffee pucks is counted correctly. |
| The coffee grounds container is too full and the 'empty coffee grounds container' icon did not appear on the display. | You removed the drip tray without emptying the coffee grounds container. | When you remove the drip tray, also empty the coffee grounds container even if it contains only a few coffee pucks. This ensures that the coffee pucks counter is reset to zero and that the number of coffee pucks is counted correctly. |
Problem Cause Solution
| I cannot remove the brew group. | The brew group is not in the correct position. | Reset the machine in the following way: close the service door. Switch the machine off and back on again and wait until the machine is ready for use. Try to remove the brew group again. See chapter 'Removing and inserting the brew group' for step-by-step instructions. |
| I cannot insert the brew group. | The brew group is not in the correct position. | Reset the machine in the following way: close the service door. Leave the brew group out. Switch off the machine and unplug it. Wait for 30 seconds and then plug the machine back in, switch it on and wait until the machine is ready for use. Then put the brew group in the correct position and reinsert it into the machine. See chapter 'Removing and inserting the brew group' for step- by-step instructions. |
| The coffee is watery. The brew group is dirty or needs to be lubricated. | Remove the brew group, rinse it under the tap and leave it to dry. Then lubricate the moving parts (see 'Lubricating the brew group'). | |
| The machine is performing its self-adjustment procedure. This procedure is started automatically when you use the machine for the first time, when you change to another type of coffee beans or after a long period of non-use. | Brew 5 cups of coffee initially to allow the machine to complete its self-adjustment procedure. | |
| The grinder is set to a too coarse setting. | Set the grinder to a finer (lower) setting. Brew 2 to 3 drinks to be able to taste the full difference. | |
| The coffee is not hot enough. | The temperature is set too low. Set the temperature to the maximum setting (Fig. 42). | |
| A cold cup reduces the temperature of the drink. | Preheat the cups by rinsing them with hot water. | |
| Adding milk reduces the temperature of the drink. | Regardless of whether you add hot or cold milk, adding milk always reduces the temperature of the coffee. Preheat the cups by rinsing them with hot water. | |
| Coffee does not come out or coffee comes out slowly. | The AquaClean water filter was not prepared properly for installation. | Remove the AquaClean filter and dispense some hot water. If this works, the AquaClean filter was not installed properly. Reinstall and activate the AquaClean filter and follow all steps in chapter 'AquaClean water filter'. |
Problem Cause Solution
| After a long period of non-use, you need to prepare the AquaClean water filter for use again and dispense 2-3 cups of hot water. | |
| The AquaClean water filter is clogged. | Replace the AquaClean water filter every 3 months. A filter that is older than 3 months can become clogged. |
| The grinder is set to a too fine setting. | Set the grinder to a coarser (higher) setting. Note that this will impact the coffee taste. |
| The brew group is dirty. Remove the brew group and rinse it under the tap (see 'Cleaning the brew group under the tap'). | |
| The coffee dispensing spout is dirty. | Clean the coffee dispensing spout and its holes with a pipe cleaner or needle. |
| The pre-ground coffee compartment is clogged | Switch off the machine and remove the brew group. Open the lid of the pre-ground coffee compartment and insert the spoon handle into it. Move the handle up and down until the clogged ground coffee falls down (Fig. 28). |
| The machine circuit is blocked by limescale. | Descale the machine with Philips descaler (see 'Descaling procedure'). Always descale when the machine prompts you. |
| The milk does not froth. The internal cappuccinatore is dirty or not inserted correctly. | Clean the internal cappuccinatore and make sure that you position and insert it correctly (see 'Cleaning the internal cappuccinatore under the tap'). |
| The type of milk used is not suitable for frothing. | Different types of milk result in different amounts of froth and different froth qualities. |
| The milk is splashing. The milk you use is not cold enough. | Make sure you use cold milk coming directly from the fridge. |
| ' The flexible milk tube is not connected properly. | Open the door of the coffee dispensing spout (Fig. 37) and check if the flexible milk tube is fully connected to the cappuccinatore (Fig. 43). Note that the cappuccinatore and milk tubes may be hot. Let the cappuccinatore and the tubes cool down before you touch them. |
Problem Cause Solution
| The cappuccinatore and milk tubes are not clean. | Remove and disassemble the internal cappuccinatore (see 'Cleaning the internal cappuccinatore under the tap'). Rinse all parts under the tap. For thorough cleaning, use Philips milk circuit cleaner and perform the Deep Milk Clean procedure via the 'Status' and 'Hygiesteam' menu. Note that if the parts have been cleaned in the dishwasher, they may have become clogged by food particles or detergent residues. A visual check that they are not obstructed is also recommended. | |
| We advise you to perform the HygieSteam program every day: 1) Press 'Status' on the control panel. 2) Select 'HygieSteam'. 3) Then confirm all steps on the display. | ||
| The milk tubes are clogged. Always store the milk container without the milk tubes in the refrigerator. Leftover milk could accumulate inside the milk tubes and block the flow of milk through the tubes. Rinse the milk tubes before storage. | ||
| The machine seems to be leaking. | The machine uses water to rinse the internal circuit and brew group. This water flows through the internal system directly into the drip tray. This is normal. | Empty the drip tray every day or as soon as the 'drip tray full' indicator pops up through the drip tray cover (Fig. 29). Tip: Place a cup under the dispensing spout to collect rinsing water and reduce the amount of water in the drip tray. |
| The drip tray is too full and has overflowed which makes it look like the machine is leaking. | Empty the drip tray every day or as soon as the 'drip tray full' indicator pops up through the drip tray cover (Fig. 29). | |
| The water tank is not fully inserted, some water is leaking out of the water tank and air is drawn into the machine. | Make sure the water tank is in the correct position: remove it and reinsert it into the machine as far as possible. | |
| The brew group is dirty/clogged. Rinse the brew group. | ||
| The machine is not placed on a horizontal surface. | Place the machine on a horizontal surface so that the drip tray does not overflow and the 'drip tray full' indicator works properly. | |
| I cannot activate the AquaClean water filter and the machine asks for descaling. | The filter has not been installed or replaced in time after the screen showed the AquaClean reminder. This means your machine is not completely free of limescale anymore. | Descale your machine first and then install the AquaClean water filter. |
Problem Cause Solution
| The new water filter does not fit. | You are trying to install another filter than the AquaClean water filter. | Only the AquaClean water filter fits into the machine. |
| The rubber ring on the AquaClean water filter is not in place. | Place back the rubber ring on the AquaClean water filter. | |
| The machine is making a loud noise. | It is normal that your machine makes some noise during use. | If the machine starts to make a different kind of noise, clean the brew group and lubricate it (see 'Lubricating the brew group'). |
| The AquaClean water filter was not prepared properly and air is now drawn into the machine. | Remove the AquaClean water filter from the water tank and prepare it for use properly before you place it back. See chapter 'AquaClean water filter' for step-by-step instructions. | |
| The water tank is not fully inserted and air is drawn into the machine. | Make sure the water tank is in the correct position: remove it and reinsert it by pushing it into the machine as far as possible. | |
| When I try to connect the machine to Wi-Fi for the first time, the machine cannot connect to the Wi-Fi network. | Your Wi-Fi name and password are not correct. | Check your Wi-Fi name and password. |
| The coffee machine and the Wi-Fi router are not within range of each other. | Ensure that the coffee machine and the Wi-Fi router are within range of each other.or use a Wi-Fi repeater. | |
| The machine is not able to find the home Wi-Fi network. | The Wi-Fi router is not working properly. | Please make sure that the Wi-Fi router is working properly and is connected to the internet. |
| The machine is not within range of the router. | Make sure the machine is within range of the router. You can also use a Wi-Fi signal repeater. | |
| The router your coffee machine is trying to connect to is 5 GHz dual-band and your coffee machine is not trying to connect to a 2.4 GHz network. | 5 GHz networks are not supported.Temporarily switch off the 5 GHz band in your router and try to pair your coffee machine again to another band of the same router (2.4 GHz). Switch on your 5 GHz band again after successful pairing |
Problem Cause Solution
| I cannot use Alexa and Amazon Smart Reorders yet. | You have not yet connected to your Amazon to your Saeco account. | Please follow the instructions on the control panel of the machine to connect your Amazon account to your Saeco account to be able to use Alexa voice control and Amazon Smart Reorders.Note: To be able to use these features you need to have an Alexa app or an Alexa device and you need to enable the Smart Reorders service on Amazon. |
| The Wi-Fi connectivity of the machine used to work but is not working anymore. | Your Wi-Fi name and/or password has changed. | Follow the instructions of section 'Connecting to Wi-Fi' and choose the network with the new Wi-Fi name to connect to. |
| The Wi-Fi password has changed. | Follow the instructions of section 'Connecting to Wi-Fi' and enter the new Wi-Fi password. | |
| Your Wi-Fi router is not working properly. | Check the router and make sure it is working. | |
| The Wi-Fi connectivity can be interrupted by electromagnetic or other interferences. | Keep the appliance away from other electronic devices that may cause interferences. | |
| None of the solutions mentioned above work. | Switch the machine off and then on again with the main switch on the back to recheck the Wi-Fi connection. |
Technical specifications
The manufacturer reserves the right to improve the technical specifications of the product. All the preset quantities are approximate.
Description Value
| Size (w x h x d) 287 x 396 x 487 mm |
| Weight 11 - 12.4 kg |
| Power cord length 1200 mm |
| Water tank 1.7 liters, removable |
| Bean hopper capacity 450 g |
| Coffee grounds container capacity 15 pucks |
| Milk container capacity 600 ml |
| Height-adjustable spout height 75-148 mm |
| Nominal voltage - Power rating - Power supply See data plate on the inside of service door |
| Wi-Fi frequency band 2.4 GHz 802.11 b/g/n |
Declaration of Conformity
Hereby, DAP B.V. declares that the fully automatic espresso machines SM8780, SM8782, SM8785, SM8885 and SM8889 are in compliance with Directive 2014/53/EU.
The full text of the EU declaration of conformity is available at the following internet address:
https://www.saeco.com.
The fully automatic espresso machines SM8780, SM8782, SM8785, SM8885 and SM8889 are equipped with a Wi-Fi module, 2.4 GHz 802.11 b/g/n (channels 1..13). Maximum transmitting power <100 mW(20 dBm).
Wi-Fi
The machine is a networked equipment, in compliance with reg. (EU) No 801/2013, and it is intended to be used permanently connected to a 2.4 GHz 802.11 b/g/n network.
Mündəricat
natural_image
Simple line drawing of a ceramic grinder with gear and handle (no text or symbols)natural_image
Simple line drawing of a coffee machine with a cup on the tray (no text or symbols)


natural_image
Line drawing of a coffee machine with a cup on a tray (no text or symbols)flowchart
graph TD
    A["1: Stirrer with 2°C"] --> B["2: Stacking into tank"]
    B --> C["3: Cooling in water bath"]
    C --> D["4°C to 5°C"]
    D --> E["5°C to 6°C"]
    E --> F["6°C to 7°C"]
    F --> G["7°C to 8°C"]
    G --> H["8°C to 9°C"]
    H --> I["9°C to 10°C"]
    I --> J["Select your drink"]
    J --> K["Select 10 glasses, 100% volume"]
    K --> L["Select 10 glasses, 100% volume"]
    L --> M["Select 10 glasses, 100% volume"]
    M --> N["Select 10 glasses, 100% volume"]
    N --> O["Select 10 glasses, 100% volume"]
    O --> P["Select 10 glasses, 100% volume"]
flowchart
graph LR
    A["Start: Coffee in a coffee machine"] --> B["Select: Open cup, Open cup with 'Close' label"]
    B --> C["Add 2x20% of coffee using 'Close' icon"]
    C --> D["Apply 3x20% usage with 'Close' icon and 'High' level"]
    D --> E["End: Use of coffee in a coffee machine"]
B7/C7 Status menu (B7/C7 Meni statusa)
B2/C2 Drinks (B2/C2 Napitci)
B9/C9 Start/stop icon (B9/C9 Ikona za
B3/C3 Drinks menu (B3/C3 Meni napitaka)
pokretanje/zaustavljanje
B4/C4 Personal profiles (B4/C4 Lični profili)
B5/C5 Beans (Zrna)
Uvod
Čestitamo na kupovini potpuno automatskog aparata za kafu kompanije Saeco! Da biste koristili sve prednosti podrške na mreži koju nudi Saeco, možete da registrujete aparat preko ugrađene Wi-Fi veze koristeći komandnu tablu. Možete i da odete na www.saeco.com/MyCoffeeMachine i tamo registrujete proizvod.
Prije prve upotrebe aparata pažljivo pročitajte zasebnu brošuru o bezbjednosti i sačuvajte je za buduće potrebe.
Povežite i ažurirajte aparat prilikom prve instalacije i redovno provjeravajte postoje li ručna ažuriranja.
natural_image
Simple line drawing of a gear and a doughnut on a brown background (no text or symbols)Kontrolna tabla za održavanje pruža koristan pregled i obavještenja s informacijama o statusu stvari kao što je nivo vode ili vas informiše da je nivo sredstva AquaClean nizak.
Kuvanje napitaka
Opšti koraci
Da biste skuvali napitak, potrebno je da slijedite nekoliko jednostavnih koraka.

natural_image
Simple line drawing of a coffee machine with a cup on the tray (no text or symbols)


natural_image
Line drawing of a coffee machine with a cup on a tray (no text or symbols)1 Napunite rezervoar vodom iz česme i napunite posudu za kafu zrnima kafe.
2 Stavite jednu ili dvije šolje ispod mlaznika za ispuštanje koji je podesiv po visini. Prevucite nagore ili nadole mlaznik za ispuštanje da biste prilagodili njegovu visinu veličini šolje ili čaše koju koristite.
3 Dodirnite ikonu Drinks 🚙️ (Napici) da biste pristupili meniju „Drinks” (Napici). Prevucite prstom slijeva nadesno i izaberite napitak tako što ćete ga dodirnuti.
- Dodirnite ikonu „2x“ ako želite da skuvate dvije šolje. Aparat automatski obavlja dva ciklusa mljevenja u nizu za izabrane napitke.
Kuvanje napitaka na bazi mlijeka
Da biste napravili napitke na bazi mlijeka, morate da slijedite nekoliko jednostavnih koraka.
B9/C9 Start/stop icon (Start/stop-ikon)
Introduktion
natural_image
Simple line drawing of a gear and a tool icon labeled 'Ceramic Grinder' (no additional text or symbols)natural_image
Simple line drawing of a coffee machine with a cup on the tray (no text or symbols)


natural_image
Line drawing of a coffee machine with a cup on the tray (no text or symbols)natural_image
Simple line drawing of a ceramic grinder with gear and handle (no text or symbols)flowchart
graph LR
    A["Start: Cup with coffee cup"] --> B["Select: 20% volume, 10% weight"]
    B --> C["Interactive: 3D tracking, 2D tracking, 1D tracking, 3D tracking, 2D tracking"]
    C --> D["End: Packaging: 10% volume, 5% weight, 5% weight"]
flowchart
graph TD
    A["1: Stirrer with 4°C"] --> B["2: Stacking into a bottle"]
    B --> C["3: Cooling in a glass tube"]
    C --> D["4: Stacking into a bottle with a funnel"]
    D --> E["5: Stacking into a glass tube with a bowl"]
    E --> F["6: Stacking into a bottle with a spoon"]
    F --> G["7: Select your drink with clear color gradient"]
    G --> H["8: Stacking into a glass tube with clear color gradient"]
    H --> I["9: Stacking into a glass tube with clear color gradient"]
    I --> J["10: Stacking into a glass tube with clear color gradient"]
B9/C9 Start/stop icon (B9/C9
B4/C4 Personal profiles (B4/C4 Isiklikud profiilid)
natural_image
HygieSteam logo with circular design and wavy line inside (no text or symbols beyond the logo)natural_image
Simple line drawing of a ceramic grinder with no text or symbolsflowchart
graph LR
    A["Start: Coffee in a coffee machine"] --> B["Select: Breakfast, Beverage, Coffee"]
    B --> C["Check: 100% zoom, 2x3 grid, 1x4 steps"]
    C --> D["Check: 100% zoom, 2x3 steps, 1x4 steps"]
    D --> E["Final: Paper in a coffee machine"]
A6 Interruptor principal
A7 Bandeja de goteo
natural_image
Simple line drawing of a gear and a doughnut on a brown background (no text or symbols)flowchart
graph LR
    A["Start: Breakfast with coffee cup"] --> B["Select: Screen with coffee cup"]
    B --> C["Action: Click to monitor, Zoom, Print, Save, Cancel"]
    C --> D["Next Step: Display on laptop with icons for menu, watch, play, and control buttons"]
B2/C2 Drinks (Boissons)
B3/C3 Drinks menu (Menu des boissons)
B4/C4 Personal profiles (Profils personnels)
B5/C5 Grains
natural_image
Simple line drawing of a ceramic grinder with gear and handle (no text or symbols)flowchart
graph LR
    A["Start: Cup with coffee cup"] --> B["Select: 20% volume, 10% weight"]
    B --> C["Interactive: 3D tracking, 2D tracking, 1D tracking, 3D tracking, 2D tracking"]
    C --> D["Final: Paper handling with color palette and play button"]
flowchart
graph TD
    A["1: Stirrer with 4°C"] --> B["2: Stacking into a bottle"]
    B --> C["3: Cooling in a bowl"]
    C --> D["4: Stacking into a glass tube"]
    D --> E["5: Stacking into a cup"]
    E --> F["6: Stacking into a spoon"]
    F --> G["7: Select your drink with color gradient"]
    G --> H["8: Stacking into a glass with hands"]
    H --> I["9: Stacking into a cup with hands"]
B2/C2 Drinks (Napitci)
B7/C7 Status menu (Izbornik statusa)
B3/C3 Drinks menu (Izbornik napitaka)
B8/C8 Trgovina
B4/C4 Personal profiles (Osobni profili)
B9/C9 Start/stop▶ikona (Pokreni/zaustavi)
Uvod
Spojite i ažurirajte uređaj pri prvoj instalaciji i redovito provjeravajte jesu li dostupna ručna ažuriranja.
natural_image
Simple line drawing of a gear and a tool icon labeled 'Ceramic Grinder' (no additional text or symbols)Naš izdržljivi mlinac izrađen je u potpunosti od 100% keramike kako bi bio iznimno čvrst i precizan. Možete ga prilagoditi prema vašem ukusu pomoću razina u 12 koraka.
Nadzorna ploča održavanja omogućavaj koristan pregled i pruža vam informacije o stanju pojedinih stavki, npr. javlja vam koja je razina vode preostala i je li filtra AquaClean uskoro potrebno zamijeniti.
Kuhanje napitaka
Opći koraci
Kako biste pripremili napitak, morate slijediti nekoliko jednostavnih koraka.

flowchart
graph LR
    A["Start: Cup with coffee cup"] --> B["Select: 200 gm of coffee cup"]
    B --> C["Interactive: 100% zoom, 30% zoom, 50% zoom"]
    C --> D["Close: 100% zoom, 30% zoom, 50% zoom"]
    D --> E["Packaging: 100% zoom, 30% zoom, 50% zoom"]
flowchart
graph TD
    A["1: Stirrer with 4°C"] --> B["2: Stacking into a bottle"]
    B --> C["3: Cooling in a bowl"]
    C --> D["4: Stopping into a tube"]
    D --> E["5: Stopping into a glass tube"]
    E --> F["6: Select your drink"]
    F --> G["7: Stopping into a coffee cup"]
    G --> H["8: Stopping into a water bath"]
    H --> I["9: Stopping into a coffee cup with 30% volume"]
    I --> J["10: Stopping into a coffee cup with 30% volume"]
natural_image
Simple line drawing of a ceramic grinder with gear and handle (no text or symbols)natural_image
Simple line drawing of a coffee machine with a cup on the base (no text or symbols)


natural_image
Line drawing of a coffee maker using a pour-over machine (no text or symbols)flowchart
graph TD
    A["1: Stirrer with 2°C"] --> B["2: Stacking into tank"]
    B --> C["3: Cooling in water bath"]
    C --> D["4°C to 5°C"]
    D --> E["5°C to 6°C"]
    E --> F["6°C to 7°C"]
    F --> G["7°C to 8°C"]
    G --> H["8°C to 9°C"]
    H --> I["9°C to 10°C"]
    I --> J["Select your drink"]
    J --> K["Select 10 glasses, 100% volume"]
    K --> L["Select 10 glasses, 100% volume"]
    L --> M["Select 10 glasses, 100% volume"]
    M --> N["Select 10 glasses, 100% volume"]
Switch on the machine by pressing the main switch on the back of the machine. Tap the 'on' icon and follow the step-by-step instructions on the control panel.
natural_image
Simple line drawing of a ceramic grinder with gear and handle (no text or symbols)flowchart
graph TD
    A["1: Stirrer with 4°C"] --> B["2: Stacking into a bottle"]
    B --> C["3: Cooling in a glass tube"]
    C --> D["4: Stacking into a water tank"]
    D --> E["5: Stacking into a glass jar"]
    E --> F["6: Stacking into a coffee cup"]
    F --> G["7: Select your drink with color adjustment"]
    G --> H["8: Stacking into a glass container with color change"]
    H --> I["9: Stacking into a coffee cup with color change"]
natural_image
Simple line drawing of a ceramic grinder with gear and handle (no text or symbols)flowchart
graph LR
    A["Start: Cup with coffee cup"] --> B["Select: 100% coffee in glass"]
    B --> C["Next Step: Click to 25% volume, 30% drop"]
    C --> D["Action: Click to 25% volume, 30% drop"]
    D --> E["End: Capture in coffee cup with coffee cup"]
Gèrimù pieno pagrindu virimas
Norèdami virti gèrimus pieno pagrindu, turite atlikti kelis paprastus veiksmus.
flowchart
graph TD
    A["1: Stirrer with 2°C"] --> B["2: Stacking into tank"]
    B --> C["3: Cooling in water bath"]
    C --> D["4°C to 5°C"]
    D --> E["5°C to 6°C"]
    E --> F["6°C to 7°C"]
    F --> G["7°C to 8°C"]
    G --> H["8°C to 9°C"]
    H --> I["9°C to 10°C"]
    I --> J["Select your drink"]
    J --> K["Select 10 glasses, 100% volume"]
    K --> L["Select 10 glasses, 100% volume"]
    L --> M["Select 10 glasses, 100% volume"]
    M --> N["Select 10 glasses, 100% volume"]
    N --> O["Select 10 glasses, 100% volume"]
natural_image
HygieSteam logo with circular design and wavy line inside (no text or symbols beyond the logo)natural_image
Simple line drawing of a ceramic grinder with no text or symbolsflowchart
graph LR
    A["Start: Breakfast with coffee cup"] --> B["Select: 200 gm, 100 gm, 50 gm"]
    B --> C["Next Step: 200 gm, 100 gm, 50 gm, 200 gm, 100 gm, 50 gm, 200 gm, 100 gm"]
    C --> D["End: Breakfast with coffee cup"]
B3/C3 Menu Drinks (Dranken)
B8/C8 Kopen
natural_image
Simple line drawing of a gear and a tool icon labeled 'Ceramic Grinder' (no additional text or symbols)flowchart
graph LR
    A["Start: Coffee in a coffee machine"] --> B["Select: 200 gm, 30 gm, 40 gm"]
    B --> C["Take steps to access coffee using app icons and interactive controls"]
    C --> D["Load: 100g / 50g / 200g / 100g / 50g / 20g / 10g"]
    D --> E["End: Use of coffee into a coffee machine"]
flowchart
graph TD
    A["1: Stirrer with 2°C"] --> B["2: Stacking into tank"]
    B --> C["3: Cooling in water bath"]
    C --> D["4°C to 5°C"]
    D --> E["5°C to 6°C"]
    E --> F["6°C to 7°C"]
    F --> G["7°C to 8°C"]
    G --> H["8°C to 9°C"]
    H --> I["9°C to 10°C"]
    I --> J["Select your drink"]
    J --> K["Select 10 glasses, 100% volume"]
    K --> L["Select 10 glasses, 100% volume"]
    L --> M["Select 10 glasses, 100% volume"]
    M --> N["Select 10 glasses, 100% volume"]
    N --> O["Select 10 glasses, 100% volume"]
    O --> P["Select 10 glasses, 100% volume"]
Extra shot (ExtraShot)
B3/C3 Drinks menu (B3/C3 Drikkemeny)
B4/C4 Personal profiles (B4/C4 Personlige profiler)
B5/C5 Beans (Bønner)
B6/C6 Machine settings (B6/C6
Maskininnstillinger)
B7/C7 Status menu (B7/C7 Status-meny)
B8/C8 Butikk
B9/C9 Start/stop icon (Ikon for B9/C9)
Start/stopp)
Innledning
natural_image
Simple line drawing of a ceramic grinder with gear and handle (no text or symbols)natural_image
Simple line drawing of a coffee machine with a cup on the tray (no text or symbols)


natural_image
Line drawing of a coffee machine with a cup on a base (no text or symbols)AquaClean-vannfilter
A Birinchi marta o'rnatishda mashinani ulang va yangilang hamda qo'llanma yangilanishlarini muntazam ravishda tekshirib turing.
Wi-Fi tarmoqqa ulanish
i Qahva mashiningizni 2.4 GGs 802.11 b/g/n uy Wi-Fi tarmog'iga ulang.
i Qahva mashinangizni uy Wi-Fi tarmog'iga ulash sizga yaxshilangan foydalanuvchi taassurotini taqdim etadi.
i Qahva mashinasi va Wi-Fi router bir-birining diapazonida ekanini tekshiring.
Qahva mashinangizni Wi-Fi tarmoqqa ulash uchun quyidagi ko'rsatmalarni bajaring.

1 Sozlamalar belgisini bosing va Wi-Fi belgisini topish uchun chapdan o'ngga suring.
2 Wi-Fi belgisini bosing.
3 Mashinangizni Wi-Fi tarmoqqa ulash uchun ekrandagi ko'rsatmalarni bajaring.
HygieSteam funksiyasi mikroorganizmlarni yo'q qilish orqali sut tizimini avtomatik tozalaydi: undan kapuchino yoki boshqa sutli ichimliklarni damlagandan keyin foydalaning.

natural_image
Simple line drawing of a ceramic grinder with no text or symbolsChidamli yanchgichimiz juda qattiq va mustahkam bo'lishi uchun 100% keramikadan tayyorlangan. Uni 12 ta daraja yordamida didingizga moslashingiz mumkin.

Profilaktika paneli sizga foydali axborot beradi va suvingiz darajasi yoki AquaClean kam qolgani kabi holat haqidagi axborotni eslatadi.
Ichimliklar damlash
Umumiy bosqichlar
Ichimlik damlash uchun quyidagi oddiy amallarni bajaring.

natural_image
Simple line drawing of a coffee machine with a cup on the tray (no text or symbols)


natural_image
Line drawing of a coffee machine with a cup on a tray (no text or symbols)1 Suv idishini jo'mrak suvi bilan, qahva donlari idishini esa qahva donlari bilan to'ldiring.
2 Balandligi sozlanadigan chiqarish jo'mragi bir yoki ikki finjon qahvani qo'ying. Balandlikni siz foydalanadigan finjonning yoki stakanning o'lchamiga sozlash uchun dispenserni yuqoriga yoki pastga suring.
3 "Ichimliklar" menyusiga kirish uchun Ichimliklar belgisini bosing. Ichimligingizni unga bosish orqali tanlash uchun chapdan o'ngga suring.
- Agar ikki finjon qahva tayyorlamoqchi bo'lsangiz, "2x" belgisini bosing. Mashina tanlangan ichimliklar ketma-ketligida yanchish siklini avtomatik bajaradi.
Sutli ichimliklar damlash
Sutli ichimliklar damlash uchun quyidagi oddiy amallarni bajaring.
flowchart
graph TD
    A["1: Stirrer with 4°C"] --> B["2: Stacking into a bottle"]
    B --> C["3: Cooling in a glass tube"]
    C --> D["4: Stacking into a bottle with a funnel"]
    D --> E["5: Stacking into a glass tube with a bowl"]
    E --> F["6: Stacking into a bottle with a spoon"]
    F --> G["7: Select your drink with clear color gradient"]
    G --> H["8: Stacking into a glass tube with clear color gradient"]
    H --> I["9: Stacking into a glass tube with clear color gradient"]
    I --> J["10: Stacking into a glass tube with clear color gradient"]
1 Suv idishini jo'mrak suvi bilan, qahva donlari idishini esa qahva donlari bilan to'ldiring.
Maslaxat: Egiluvchan sut naychasi kapuchinatorga ulanganida suv idishdan qulay foydalanish uchun quyish jo'mragini eng yuqori holatga suring.
2 Sut idish qopqog'ini burab oching va uni sut bilan to'ldiring.
Maqbul natijalar uchun har doim bevosita sovitkichdan olingan sut ishlating.
3 Egiluvchan sut naychasini kapuchinatorga ulang.
4 Metal sut naychasini idishga soling.
5 Ichimliklar 📋 belgisini bosing, aylantiring va xohishingizga qarab sutli ichimlik belgisini bosing.
6 Sozlanuvchi panellarni yuqoriga va pastga surish orqali sozlamalarni xohishingizga moslashingiz mumkin.
7 Tanlangan ichimlikni damlashni boshlash uchun istalgan paytda start/stop-belgisini bosing.
- Maxsus ichimliklar uchun mashina avval sut, keyin esa qahva quyadi. Boshqa bir qator ichimliklar uchun buning teskarisi, mashina avval qahva, keyin esa sut quyadi.
- Mashina dastlabki belgilangan miqdorda quyishidan avval sut quyishni to'xtatmoqchi bo'lsangiz, start/stop▶belgisini (faqat SM8780, SM8782, SM8785) yoki stop belgisini (faqat SM8885, SM8889) bosing.
- Mashina yakunlashidan avval to'liq ichimlikni (sut yoki qahva) quyishni to'xtatish uchun start/stop▶■ belgisini (faqat SM8780, SM8782, SM8785) yoki stop belgisini (faqat SM8885, SM8889) bosib turing.
B3/C3 Drinks menu (B3/C3 Menu Drinks (Napoje))
B4/C4 Personal profiles (B4/C4 Profile osobiste)
B5/C5 Ziarna
B7/C7 Status menu (B7/C7 Menu Status (Stan))
B8/C8 Sklep
B9/C9 Start/stop icon (B9/C9 Ikona
natural_image
Simple line drawing of a ceramic grinder with gear and handle (no text or symbols)flowchart
graph LR
    A["Start: Coffee in a coffee machine"] --> B["Select: 100% of coffee in a machine"]
    B --> C["App Selection: 2x3 grid with icons for zoom, speed, and color"]
    C --> D["Final: 100% of coffee in a machine"]
flowchart
graph TD
    A["1: Roundaker with 4°C"] --> B["2: Microwel with 2°C"]
    B --> C["3: Microwel with 3°C"]
    C --> D["4: Water inlet with 4°C"]
    D --> E["5: Drop funnel into sink"]
    E --> F["6: Cup holder with 6°C"]
    F --> G["7: Select your drink with 6°C"]
    G --> H["8: Hand press with 6°C"]
    H --> I["9: Reset for coffee cup with 6°C"]
    I --> J["10: Screen with 6°C"]
A6 Interruptor principal
A9 Recipiente HygieSteam
B9/C9 Start/stop icon (B9/C9 Ícone de
início/paragem
Introdução
natural_image
Simple line drawing of a ceramic grinder with no text or symbolsflowchart
graph LR
    A["Start: Breakfast with coffee cup"] --> B["Select: Open cup with coffee cup"]
    B --> C["App Select: 2x4x2 conversion to 10x10x1 conversion"]
    C --> D["Action: Click, Save, Print, Apply"]
    D --> E["Play: Click, Save, Print, Apply"]
    E --> F["End: Stop at coffee cup with coffee cup"]
flowchart
graph TD
    A["1: Stirrer with 2°C"] --> B["2: Stacking into tank"]
    B --> C["3: Cooling in water bath"]
    C --> D["4°C to 5°C"]
    D --> E["5°C to 6°C"]
    E --> F["6°C to 7°C"]
    F --> G["7°C to 8°C"]
    G --> H["8°C to 9°C"]
    H --> I["9°C to 10°C"]
    I --> J["Select your drink"]
    J --> K["Select 10 glasses, 100% volume"]
    K --> L["Select 10 glasses, 100% volume"]
    L --> M["Select 10 glasses, 100% volume"]
    M --> N["Select 10 glasses, 100% volume"]
    N --> O["Select 10 glasses, 100% volume"]
Encomendar acessórios
A9 HygieSteam Recipient
B9/C9 Start/stop icon (B9/C9 Pictograma
B4/C4 Personal profiles (B4/C4 Profiluri personale)
pornire/oprire▶
B5/C5 Boabe
Introducere
natural_image
Simple line drawing of a ceramic grinder with gear and handle (no text or symbols)flowchart
graph LR
    A["Start: Cup with coffee cup"] --> B["Select: 200g/100g glass"]
    B --> C["Interactive: 3D tracking with icons for speed, speed, and volume"]
    C --> D["Take the next step to press coffee into a coffee cup"]
    D --> E["End: Paper feeding into a coffee cup"]
flowchart
graph TD
    A["1: Stirrer with 4°C"] --> B["2: Washing into tank"]
    B --> C["3: Cooling in water bath"]
    C --> D["4: Water transfer to sink"]
    D --> E["5: Washing bottle with liquid"]
    E --> F["6: Clear glass, clear mouth"]
    F --> G["7: Select your drink with glass and cup"]
    G --> H["8: Hand press with hand, down arrow, down arrow, down arrow, down arrow, down arrow, down arrow, down arrow, down arrow, down arrow, down arrow, down arrow, down arrow, down arrow, down arrow, down arrow, down arrow, down arrow, down arrow, down arrow, down arrow, down arrow, down arrow, down arrow, down arrow, down arrow, down arrow, down arrow, down arrow, down arrow, down arrow, down arrow, down arrow, down arrow, down arrow"]
natural_image
Simple line drawing of a ceramic grinder with gear and handle (no text or symbols)natural_image
Simple line drawing of a coffee machine with a cup on the base (no text or symbols)


natural_image
Line drawing of a coffee machine with a cup on a base (no text or symbols)flowchart
graph LR
    A["1: Stirrer with 4°C"] --> B["2: Stabilizing water bath"]
    B --> C["3: Cooling process"]
    C --> D["4: Water filtration setup"]
    D --> E["5: Select your drink with glass, coffee cup, and hand gesture"]
    E --> F["6: Selection of clear glass, hot pot, and coffee cup"]
    F --> G["7: Final product selection with color gradient and brush speed"]
B7/C7 Status menu (B7/C7 Meni stanja)
B2/C2 Drinks (B2/C2 Napitki)
B8/C8 Shop (Trgovina)
B3/C3 Drinks menu (B3/C3 Meni za napitke)
B9/C9 Start/stop icon (B9/C9 Ikona ▶■
B4/C4 Personal profiles (B4/C4 Osebni profili)
začni/ustavi)
B5/C5 Beans (Zrna)
Uvod
flowchart
graph TD
    A["1: Top panel with plug"] --> B["2: Left panel with switch"]
    B --> C["3: Right panel with battery"]
    C --> D["4: Power switch application on phone"]
natural_image
Simple line drawing of a gear and a tool icon labeled 'Ceramic Grinder' (no additional text or symbols)flowchart
graph LR
    A["Start: Breakfast with coffee cup"] --> B["Select: Open cup with coffee cup"]
    B --> C["Next Step: Click menu with icons for 'OK', 'Cancel', 'High' actions"]
    C --> D["Action: Click menu with icons for 'OK', 'Cancel', 'High' actions"]
    D --> E["Next Step: Click menu with icons for 'OK', 'Cancel', 'High' actions"]
Vodni filter AquaClean
(DELOVANJE) -> COFFEE OIL REMOVAL
(ODSTRANJEVANJE KAVNEGA OLJA).
B3/C3 Drinks menu (B3/C3 Ponuka nápojov)
B9/C9 Start/stop icon (B9/C9 Ikona
B4/C4 Personal profiles (B4/C4 Osobné profily)
spustenia/zastavenia
B5/C5 Kávové zrná
Úvod
natural_image
Simple line drawing of a gear and a tool icon labeled 'Ceramic Grinder' (no additional text or symbols)flowchart
graph LR
    A["Start: Cup with coffee cup"] --> B["Select: 20% volume, 10% weight"]
    B --> C["Interactive: 3D tracking, 2D tracking, 1D tracking, 3D tracking, 2D tracking"]
    C --> D["Final: 3D packaging with color palette and play button"]
B7/C7 Status menu (B7/C7 Meni statusa)
B2/C2 Drinks (B2/C2 Napici)
B3/C3 Drinks menu (B3/C3 Meni sa napicima)
B9/C9 Start/stop icon (B9/C9 Ikona za početak/zaustavljanje)
B4/C4 Personal profiles (B4/C4 Lični profili)
B5/C5 Zrna kafe
Uvod
Čestitamo na kupovini potpuno automatskog Saeco aparata za kafu! Da biste na najbolji način iskoristili podršku koju nudi kompanija Saeco, koristite kontrolnu tablu da biste registrovali aparat putem ugrađene Wi-Fi veze ili idite na stranicu www.saeco.com/MyCoffeeMachine i na njoj registrujte proizvod.
Povežite se i ažurirajte aparat prilikom prve instalacije i redovno proveravajte da li postoje ručne ispravke.
Funkcija HygieSteam automatski čisti sistem za mleko, uklanjajući mikroorganizme: koristite ga nakon kuvanja kapućina ili drugih napitaka na bazi mleka.

natural_image
Simple line drawing of a gear and a tool icon labeled 'Ceramic Grinder' (no additional text or symbols)natural_image
Simple line drawing of a coffee machine with a cup on the counter (no text or symbols)


natural_image
Line drawing of a coffee machine with a cup on a tray (no text or symbols)1 Napunite rezervoar vodom iz česme i napunite posudu za kafu zrnima kafe.
2 Stavite jednu ili dve šolje ispod grlića za ispuštanje podesive visine. Da biste prilagodili visinu grlića za ispuštanje veličini šolje ili čaše koju koristite, prevucite ga nagore ili nadole.
3 Dodirnite ikonu „Napici“ da biste otvorili meni „Drinks“ (Napici). Prevucite sleva nadesno da biste izabrali napitak dodirom na njega.
- Dodirnite ikonu „2x“ ako želite da skuvate dve šolje. Aparat automatski obavlja dva ciklusa mlevenja u nizu za izabrane napitke.
natural_image
Simple line drawing of a ceramic grinder with gear and eraser (no text or symbols)flowchart
graph LR
    A["Start: Coffee in a coffee machine"] --> B["Select: 100% volume, 20% speed, 10% height"]
    B --> C["Interactive tracking: 100% speed, 20% speed, 10% height"]
    C --> D["Final packaging: 100% volume, 20% speed, 10% height"]
B6/C6 Machine settings (B6/C6
C1 On/off icon (C1 Av/på-ikon)
B3/C3 Drinks menu (B3/C3 Dryckmeny)
B8/C8 Butik
B4/C4 Personal profiles (B4/C4 Personliga profiler)
B9/C9 Start/stop icon (B9/C9 Start/stopp-ikon)
B5/C5 Bönor
Inledning
natural_image
Simple line drawing of a ceramic grinder with gear and blade (no text or symbols)flowchart
graph LR
    A["Start: Breakfast with coffee cup"] --> B["Select: Screen, Clip, Cut"]
    B --> C["User Interaction: Click Button, Save Button, Print Back"]
    C --> D["User Interaction: Play Button, Listen Button, Print Back"]
    D --> E["End: Stop at the counter with coffee cup"]
B4/C4 Şahsy profiler
Gaýnadyjyny birinji gezek gurnanyňyzda birikdiriň we täzelään, täzelenmeleri yzygiderli görnüşde elde barlap duruň.
natural_image
Simple line drawing of a ceramic grinder with gear and eraser (no text or symbols)Biziň çydamly owradyjymyz adatdan daşary berk we takyk bolmagy üçin 100% keramikadan yasaldy. Ony 12 ädimli derejeler bilen öz halayan tagamyňyza düzüp bolýar.

natural_image
Simple line drawing of a coffee machine with a cup on the tray (no text or symbols)


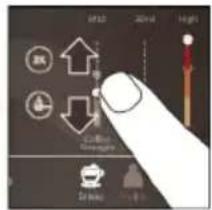


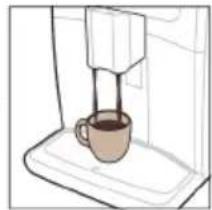
natural_image
Line drawing of a coffee machine with a cup on a tray (no text or symbols)natural_image
Simple line drawing of a ceramic grinder with gear and handle (no text or symbols)natural_image
Simple line drawing of a coffee machine with a cup on the tray (no text or symbols)


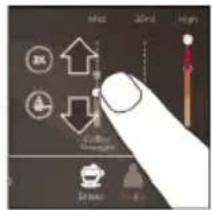


natural_image
Line drawing of a coffee machine with a cup on a tray (no text or symbols)flowchart
graph TD
    A["1: Stirrer with 4°C"] --> B["2: Stacking with 4°C"]
    B --> C["3: Cooling with 2°C"]
    C --> D["4: Water filtration with 2°C"]
    D --> E["5: Stacking with 2°C"]
    E --> F["6: Cooking with 2°C"]
    F --> G["7: Stacking with 2°C"]
    G --> H["8: Water filtration with 2°C"]
    H --> I["9: Cooking with 2°C"]
    I --> J["10: Stacking with 2°C"]
    J --> K["Select your drink"]
flowchart
graph LR
    A["Start: Breakfast with coffee cup"] --> B["Select: Open cup, Save cup"]
    B --> C["Take steps to access coffee using app icons and UI elements"]
    C --> D["Load: 100% of coffee in the coffee cup"]
    D --> E["End: Stop coffee on a coffee cup"]
flowchart
graph TD
    A["1: Roundaker with 4°C"] --> B["2: Microwel with 2°C"]
    B --> C["3: Microwel with 3°C"]
    C --> D["4: Water inlet with 4°C"]
    D --> E["5: Drop funnel into sink"]
    E --> F["6: Cup holder with 6°C"]
    F --> G["7: Select your drink with 6°C"]
    G --> H["8: Hand press with 6°C"]
    H --> I["9: Reset hand press with 6°C"]
    I --> J["10: Screen with 6°C"]
natural_image
Simple line drawing of a ceramic grinder with gear and handle (no text or symbols)flowchart
graph LR
    A["Start: Coffee in a coffee machine"] --> B["Select: Open cup, Close cup"]
    B --> C["Action: Click, Save, Print, Apply"]
    C --> D["Action: Select, Close, Print, Apply"]
    D --> E["End: Open cup on a coffee machine"]
flowchart
graph TD
    A["1: Stirrer with 4°C"] --> B["2: Microwater with 3°C"]
    B --> C["3: Water bath with 2°C"]
    C --> D["4: Outlet with 2°C"]
    D --> E["5: Dish cleaning with 2°C"]
    E --> F["6: Selection of drinks with 2°C"]
    F --> G["7: Hand gesture with 2°C"]
    G --> H["8: Cover/Storage with 2°C"]
    H --> I["9: Bagging with 2°C"]
    I --> J["10: Finish with 2°C"]
flowchart
graph LR
    A["Step 1: Screen icon"] --> B["Step 2: Washer or lamp switch"]
    B --> C["Step 3: Switch with power button"]
    C --> D["Final device with power button"]
natural_image
Simple line drawing of a gear and a tool icon labeled 'Ceramic Grinder' (no additional text or symbols)flowchart
graph LR
    A["Start: Coffee in a coffee machine"] --> B["Select: 1 cup of coffee"]
    B --> C["Interactive: 3D/4D conversion with icons for steps 1-2"]
    C --> D["Add 10x 10x 10x 10x 10x 10x 10x 10x 10x 10x 10x 10x 10x 10x 10x"]
    D --> E["Final: 1 cup of coffee in a coffee machine"]
flowchart
graph TD
    A["1: Stirrer with 4°C"] --> B["2: Stacking cup"]
    B --> C["3: Stopping cup"]
    C --> D["4°C to 5°C"]
    D --> E["5°C to 6°C"]
    E --> F["6°C to 7°C"]
    F --> G["7°C to 8°C"]
    G --> H["8°C to 9°C"]
    H --> I["9°C to 10°C"]
    I --> J["Select your drink"]
    J --> K["10°C to 12°C"]
    K --> L["12°C to 15°C"]
    L --> M["15°C to 20°C"]
    M --> N["20°C to 25°C"]
    N --> O["25°C to 30°C"]
    O --> P["30°C to 35°C"]
    P --> Q["35°C to 40°C"]
    Q --> R["40°C to 45°C"]
    R --> S["45°C to 50°C"]
    S --> T["50°C to 55°C"]
    T --> U["55°C to 60°C"]
    U --> V["60°C to 65°C"]
    V --> W["65°C to 70°C"]
    W --> X["70°C to 75°C"]
    X --> Y["75°C to 80°C"]
    Y --> Z["80°C to 85°C"]
    Z --> AA["85°C to 90°C"]
    AA --> AB["90°C to 95°C"]
    AB --> AC["95°C to 100°C"]
flowchart
graph TD
    A["1: Top panel with plug"] --> B["2: Switch with socket"]
    B --> C["3: Power outlet with plug"]
    C --> D["4: Display screen with plug"]
flowchart
graph TD
    A["Step 1: Temperature Sensor"] --> B["Step 2: Pressure Gauge"]
    B --> C["Step 3: Pressure Gauge with Dip"]
    C --> D["Step 4: Pressure Gauge with Valve"]
    D --> E["Step 5: Select your drink"]
    E --> F["Step 6: Select your drink with Water Tap"]
    F --> G["Step 7: Select your drink with Dish & Sauce"]
    G --> H["Step 8: Select your drink with Drink & Sauce"]
natural_image
Simple line drawing of a gear and a tool icon labeled 'Ceramic Grinder' (no additional text or symbols)natural_image
Simple line drawing of a coffee machine with a cup on the tray (no text or symbols)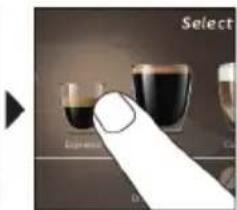
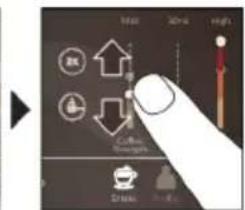
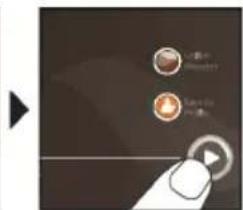
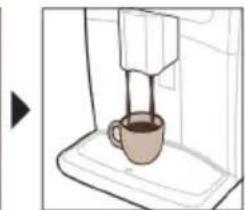
natural_image
Simple line drawing of a coffee machine with a cup on a base (no text or symbols)flowchart
graph TD
    A["1: Stir & Roll Temperature"] --> B["2: Washing & Drying"]
    B --> C["3: Stacking & Recycling"]
    C --> D["4°C: Water Drop"]
    D --> E["5: Washing & Drying"]
    E --> F["6: Cooking & Drying"]
    F --> G["7: Select your drink"]
    G --> H["8: Breakfast & Lunch & Drink"]
natural_image
Simple line drawing of a gear and a doughnut on a brown background (no text or symbols)flowchart
graph LR
    A["Start: Coffee in a coffee machine"] --> B["Select: 100% of coffee, 20% of coffee"]
    B --> C["Action: Click, Save, Print, Apply"]
    C --> D["End: Use of coffee machine with icons for use, consumption, and engagement"]
natural_image
Two diagrams showing a hand washing a cup and another with a stand mixer (no text or symbols present)Utptüwjh wylüwnly (Uywn A) 782
ЧWNWUWNUWU WWHWUWU 783
Utunwðnupjntü 783
Rwunnily qnpòwnnyjāutn 784
Cuiyihputnh wwnnnwnnnu 785
Utptüwjh lwwnqwulnnniśutnh lwwunwnniś 789
AquaClean qnh qunh2 790
Unǎtúh huúph hānwgnuǐ u untnwnpnuǐ 791
Uwwpnniu la uwwuuwnplniu 792
Unwihu uunulwoputnh uwpnuiwu wngtynniwu 795
Uhuwih ynntin 796
Tuwhtuunwudwutph wwwunuhnniw 797
Ônwaŋwlywquh pəwnúwgnuñutn ____ 797
Uuuwnpnupnniutuh 2unlnuü ____ 798
Sthuuhlywlywù pùnjuāwqntn 804
Ruwuuwunwuuhuwunipu wujwnwnwnwnqhn 804
Wi-Fi 805
Utptuwjh wlywny (Uwn A)
A1 Uninǎh hwnhlùtnh unwnwjh ywwuhwnh
A2 Unwgud uninah hughyh ywhwnh
A3 9wylwrah ulynintn
A15 Unipah hwnhlyutph unwpw
A16 Uwwwwwnluyw# n#uw#
A17 Unipǎh àwqwn
A18 Unipah uuwgnnntuph nwnwly
B9/C9 Utywnyh/ŋwnwnh ▶qwnytnwly
Utwnölnjniü
Cunphwulnnniú túp Saeco jnhú wulnnúwùn unǎtúh útíptìwù qùtǐnì lwwuwlgnipajwúp: Saeco-h lynúhg wuzwqwnlyunn wngwǔg wzgwulgniājnìuhg jhwndtp oqnuṭlīnì hwiúwn lwwnn túp lyuzuwluqnúwù lwhwuìwlyh úhqngnu qnwǔgtíl àtn uwnpn` oqnuwqqnòtǐnú ltylnywnnigluwò Wi-Fi úhwgniún lyuú wùgùtìl www.saeco.com/MyCoffeeMachine hnniúnú l u qnwǔgtíl àtn uwnpù wjùuntín:
Utptiuwù wnnghù wùqwiú oqunwqnδtǐnìg wnnw g ni2wnh n lwwnŋwgtp wùlunwùqnjiāwù wnnwùàhù qnpnǐyīn l u wwhwùwǔtp wjù htīnwqu oqunwqnδúwù hwiúwùn:
2tn Saeco jnhul wulnnuun unotuh utiptiuwù wwwwnlnui § Wi-Fi gwughù ywwuwugutni hùwnwulnniŋniù` unipoh wwwnnwnuúwù qnnópúəwgn puntiwutni tiwwwnwnl:
2tn uwnpn Wi-Fi gwughu shwgutni 2unnhhul npip lywnnnwuwp.
- uunwùwì wǔhwnuŋwǔwǔgwǔwǒ hūnphnīnnǔtn hǎwúwlywnqzwjhù niunigúwù útṛnnh hhuìwù ylnw
- uunwùwì dǎnwqnwjhù wùwuhnúlǜwù wùnptīnwlywù jāwnúwgníuṭīn` oqīnwqnnònnh zhnnàwzniŋajnīn' pwnṭīwultīn hwiūwn
- oqunulti hwwùnuih qnpòwùnnyàutnhg, tṛatī n̥nwūp àtn t̥nlynniú hwwuūtūh tǔ
- uwnpn ywwuwlygtl àtn Amazon hw2uhù l huúwintl wühnwdt2n wwnwquwuttn, tṛāt wju hūwnwulnnniŋniùn hwwuutih ʒ àtn tnlynniú
- ǔhwùwì àtn Alexa unwù uwnphù u oqunwqnnòti àwjùwjhù ywnwùwnúwù qnnòwnnijpàutīn, tātā wju hùwnwùnnniŋniùn huuwùtih ṭ àtn tṛnlynni
U_2niù' Uju útptùwù ひnpàwnŋyúlì unipǎny: Αθιu wjù húwúpnú úwpnúlì , húwɪnwʊŋn , nn unipǎh uúwɡnnηút n úuwgwò jhùbù: Ujùniwútǔwjǔhy, útúp tρωzhuwʊŋnniú bùp, nn útptùwù pugwnàwlywwytu ünn :
hùwǒu uḥwǔtǐ útptùwù, tǔp ŋnīp niùtp Xelsis SUPREMA (úhwjù SM8885, SM8889)
Utŋutp útptiùwjh htunluh úwuniú qinǔulnn hnuuùph ühnhuwugwnhyn lü úhwgntip útptiùwù: 3wtp lquzwlupnúwù uwhwúwlyh ytiùnnnúhù, nnwtaugh ʒlnwúhù hwjnúzh «úhwgylwð» wwwnlytnwyn: 3wtp «úhwgylwð» wwwnlytnwlyhù lü htunlutp lquzwlupnúwù uwhwúwlyh ytnw gnigwnpnunn pwjl wn pwjl hnwhwuqutphù:
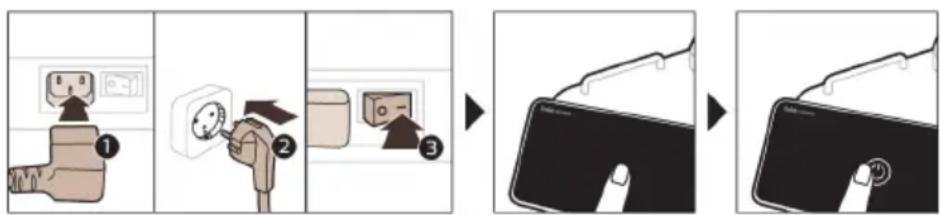
⚠️ Uhwqntp uwnpn l u pwnúwqntp wnwghù untnwnpnúwù dwúwùwly: Τwnptnwpwn uunniqtp nş wülnnúwn pwnúwgniúutph wnlywjniajntiún:
hùwǒu uḥwǔtǐ útptùwù, tnp ŋnɪp niʊtp Xelsis DELUXE (úhwju SM8780, SM8782, SM8785)
Utnútp útptúwjh htunuh úwuniú qúnúlnn hnuwúph yhnhuwúgwunhsn u úhwgntp útptúwù: 3wútp «úhwgúwò» wjuinylánwuhù u htunutp ywnwúwnúwù ywhuàwuh ynw gnigwunnúnn pujl wn pujl hnwhuúqútnhù:
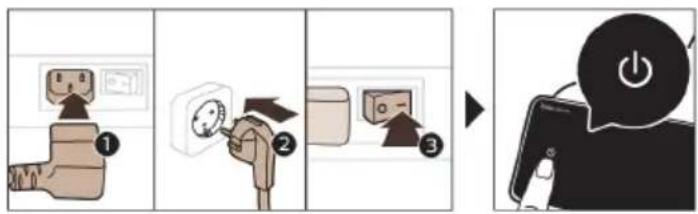
⚠ Uhwqntp uwnpn l pawnuwqntp uwqhù untwnpnúwù dwúwùwù: Πωnptnwpwn uunniqtāp n2 wulnnúwun pawnuwgniwutnh wnlywjnijajniūn:
ЧWWWUgniún Wi-Fi gwùghù
i Unātūh útptūwù yuwwuŋgtp 2.4 93g 802.11 b/g/n unwù Wi-Fi guìghù:
i 4wwuylugtlnl dtn unatuh utptuwu dtn unwu Wi-Fi gwughu' pwnbjuwluŋniu 5 oqnwnqndnnh uhnnawznujntun:
i Rwúnqultp, nn unátuh útptúwù u Wi-Fi tŋnənhʒn qunúlnu ñu úhújwùg nùŋqnlynjuṇiū:
3tunlutp uunnnu 124w06 pwjltphu` undtuh utptiuwu atn Wi-Fi gwughu ywwwugtni hwuwn:

flowchart
graph LR
    A["Device Setup"] --> B["Software Uburation"]
    B --> C["Updates"]
    C --> D["WiFi"]
    D --> E["Current Network Interface"]
    E --> F["Next Step"]
    style A fill:#f9f,stroke:#333
    style B fill:#ccf,stroke:#333
    style C fill:#cfc,stroke:#333
    style D fill:#fcc,stroke:#333
    style E fill:#cff,stroke:#333
    style F fill:#ffc,stroke:#333
1 Rwtp Gwnqwnpnnwutn Qwnlytnwlyhù u uwhwhwnplwdtp dwhuhg w2, nnwltuqh qnutip Wi-Fi-h wwnlytnwlyn:
2 3w1p Wi-Fi wwnlytnwlyhù:
3 Rtunltp ʒynwùhù túzluò pujltnhù` unǎtǔh útptìwù àtn Wi-Fi gwùghù lwwuqwlgtǐnì huuúwn: Țnip wjdú lwwuqlgulwò tāp huuúwguìghù:
2wjuwjhu ywnwujwnuwu hwnwylwnqh uhngny uhwiwnni ywu wugwinytini, huzwtu uwu npn2 dwuwuwu nz wynhui hhtjni wunawwny wugwinytini ntwpiui ubptiwu yquwnwnh wulnniwn wqnqwgnuwu ghyl: 3wúnqutp, nn ubptiwu qnuclni t wwwhnl uhgwujwnni:
Rwinnily qnpdwinnijp#tn
Змунніц qnєдшніця

Luwunwly
HygieSteam \$niùlghwù wùnnúwùn lṭpnwnu ùwpnniš Ģ lyurah huuúwlywnqn` htīnwǔtīnul uḥlynnonqwùhqūtānp: oqunwqqnδtāp wjù lyuwwnishūn lyuú lyurah ynw hhuúquwǒ wjj núwtyhpūtn wwwwnwuuntīng htānn:

natural_image
Simple line drawing of a gear and a tool icon labeled 'Ceramic Grinder' (no additional text or symbols)Utn nhúwglniù unǎwnwgn wwinnwunulwǒ t 100% ytnwúhlywjhg, nnwbuqh wjù jħùh pwgwnzwwbu lyn2n u ā2qphn: Ujù lwwnn t hwnúwntgutl àtn āw2wlyhù 12 ħnhíwǔng úwlywnŋnwýutpnú:

Sthuúhlywlyu uwwuwnyúwú ywnwylwhwún ðtq oqnwlqwn wúhnyh untntlynipajniúutn ̄ unwju lu ðwùnigniú ̄ ðtq ywnqwuhǎwlyh úwuhǔ untntlynipajniúutn, onhùwú ̈ ðtn gnh úwylwnŋwlyh úwuhǔ ywu untntlywgūniú ̄, nn AquaClean-ñ uwwunyniú ̄:
Cuiwthputnh wwnnwnnniu
Cunhwünin pwjln
Unut puwthp wwnnwnntni hwuwn nnp wtunp t uh puuh wwnq qnpnnnijnlu wwnwntp:
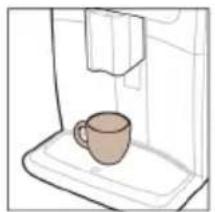
natural_image
Simple line drawing of a coffee machine with a cup on the tray (no text or symbols)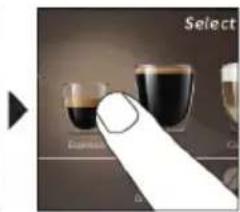
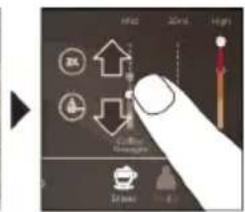

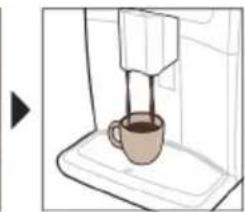
natural_image
Illustration of a coffee machine with a cup on a tray (no text or symbols visible)1 2nh pwpn igntp dnnwuh gnnu, huy unipah hwnhlyutph wnwnwjh utg igntp hwnhlyutpn:
2 Stnwnntp útly ywiú tlnyni qwulwa ywnqwulnnunn pwnànnijawup úwwnwlywnwnúwù dnnwlyh unwly: Fwnànwgntp ywiú hgtgntp úwwnwlywnwnúwù dnnwlyn` pwnànnijajniún àtn oqunwqnòwó qwulwph ywiú pwdwlyh zwwhhù hwnúwntgútini hwúwn:
3 Ruyip Cuiyihputn uwnyltnwlyhù, nnwtaqh unutip «Cuiyihputn» nünnwgwuly: Uwhwhwnylwotp dawhg wg u hwtlnl atn nuiyihph ynu` nünntip wjù:
Чупаушніhhúpnu núwthputnh wwnnwnnniun
Чумену пуштиhp Austin buhtini hwúwun chnip wbtup 5 uh pwùh wwnq qnnδηημημι μωνωπρ:
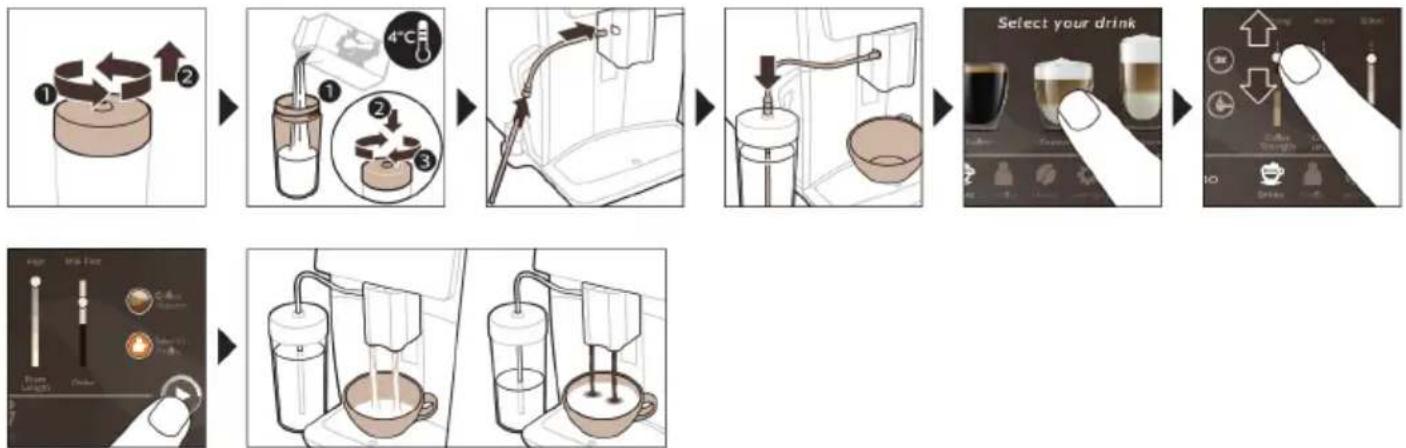
flowchart
graph TD
    A["1: Round-over coffee maker"] --> B["2: Stacking with 4°C hot water"]
    B --> C["3: Stacking with 2°C drop"]
    C --> D["4: Water washing machine"]
    D --> E["5: Stacking with 1°C drop"]
    E --> F["6: Selection of a drink"]
    F --> G["7: Select your drink with glass, coffee, and beer using hand gestures"]
    G --> H["8: Selection of a drink with color gradient, coffee, and beer using hand gestures"]
    H --> I["9: Selection of a drink with color gradient, coffee, and beer using hand gestures"]
1 2nh puwp ngtp ohnwuh gnu, huy unipah hwnhlyutnh unwnwjh utg igntp hwnhlyutnn: lunphnnn. tnpr ywrah oyniu hunnnuwrn uhwgulw6 t ywwnishuwunnnhu, uwwnwynwnpuwu onnwyn uwhtgntip ntwh wutuwultnhu nhnp zgh puwp ht2un uniup qnndtini hwiwn:
2 3tzuwqntp lyujah unwnwjh lyuwhwnhsh wunniunwlyuttnl u lyujah unwnwu igntp lyujanu:
Ownhúwl wnnjniuputnh hwuwn uh2n oqnuwqnndtp wùuhgwwtu uwnzüwnwuhgh hwuwwd lyuja:
3 Uhwqntp ywrah dyniu hunnuwrwn ywwynishuwunnhhu:
4 Ununtjutnh utg ntp ywph utunwnwlwi hunnyuyn:
5 3wtp Cúwtihpùtnówwnlytnwlyhù, wùnntp u pùnntp wjù ywraüwjhù núwtiħpn, nnp gwúlywùniú tþ:
6 ৬৭৭৭৭৭৭৭৭৭৭৭৭৭৭৭৭৭৭৭৭৭৭৭৭৭৭৭৭৭৭৭৭৭৭৭৭৭৭৭৭৭৭৭৭৭৭৭৭৭৭৮
7 Utnútp útlyùwnlyh/ŋwnwnh▶quwnlytnwnyn gwùlywgwò wwhhù nùnnuìwò núwytǐhph wwwnnwuuinniún ulyutīnì hwiúwn:
- Ωην2ωγή πύωτιλρύτηνη τωγρημί υτρετώμα υγρημί χωρεύ ξιςικυί, θιτην υπορό: Κην2ωγή πύωτιλρύτηνη τωγρημί ωυγωνωγμί ξ' υτρετώμα χωρη υπορό ξιςικυί, ωυγων χωρεύ:
- ⁴ωμή υωυνωλγωνωρωνη ηωηωτβύτιπι Ηωύων ὑωθυρωὰ υτρετύωμή ληηύħg υωθύωτύωσ δ ρωύωνημαζωμίρ υωυνωλγωνωρωνηλη` υτηύτρ υτλύωνηλή/ηωηωπΗ▶ψωυνλγτηωμη (ύħωμὰ SM8780, SM8782, SM8785) Υωμί υτηύτρ ηωηωπΗ υωυνλγτηωμη (ύħωμὰ SM8885, SM8889):
- Uúpnnqwlywù núwytjph (ywɪən l u uninǎn) úwwunwlywnwnniún nwnwnptgútǐn hwiúwn` úwhupwù útþtǔwù ywuwrwnh hn wzhwiwnwùpn, utnútip l u wwhtp útyǔwnlyh/nwnwnh▶quwnlytnwlyn (úhwjù SM8780, SM8782, SM8785) ywú utnútip nwnwnh wwwnytnwlyn (úhwjù SM8885, SM8889):
«HygieSteam Shot» qnlnn2ni gwjunngn untnh 5 niutuniu lwwp igutinig wuuhgwwtu htunn: Uptiuw u qnlnn2h 5 wnawlynui lwwp pw2huuwu utnphu hwuwlywnqh uhqnul' wju wnwa gwjtni uwwnwnynu:
A5 6mm800n 3s0g0nn0n3nl
A31 6ymnblnbnlghnl gubdbs8m3mgnn fglu-bs8n
∂υπομησι δυμμησι
gubfghlmls sd sbsmsgnbl mhn zgmns smbgdomd. dson dsmngnbl dmmzn bbzsqslbzsbsnnmns, mgdygs bshygmygdn gnmbsnfsmo deydsmd. yzgmns mnmsnbl bsbsbszgo, nbnmgon byfmsngd on B qos C. smgbfngdnl bsbsy degyndmnss on jzgdmm.
B1 გამორთვის ხატულა
B5/C5 მარცვლები
natural_image
Simple line drawing of a gear and a tool icon labeled 'Ceramic Grinder' (no additional text or symbols)natural_image
Simple line drawing of a coffee machine with a cup on the tray (no text or symbols)▶
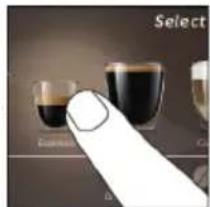
▶

▶

▶
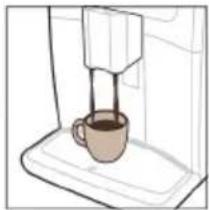
natural_image
Line drawing of a coffee machine with a cup on a base (no text or symbols)flowchart
graph TD
    A["1: Stir & Roll"] --> B["2: Stacking & Recycling"]
    B --> C["3: Stabilization & Reuse"]
    C --> D["4°C Control"]
    D --> E["5: Process & Collection"]
    E --> F["6: Cover & Wash"]
    F --> G["7: Packaging & Finishing"]
    G --> H["8: Select your drink with 10% volume control"]
    H --> I["9: Display & Capture"]
    I --> J["10: Screen & Mask"]
phosphorus phosphorus phosphorus phosphorus phosphorus phosphorus phosphorus phosphorus phosphorus phosphorus phosphorus phosphorus phosphorus phosphorus phosphorus phosphorus phosphorus phosphorus phosphorus phosphorus phosphorus phosphorus phosphorus phosphorus phosphorus phosphorus phosphorus phosphorus phosphorus phosphorus phosphorus phosphorus phosphorus phosphorus phosphorus phosphorus phosphorus phosphorus phosphorus phosphorus phosphorus phosphorus phosphorus phosphorus phosphorus phosphorus phosphorus phosphorus phosphorus phosphorus phosphus phosphorus phosphorus phosphorus phosphorus phosphorus phosphorus phosphorus phosphorus phosphorus phosphorus phosphorus phosphorus phosphorus phosphorus phosphorus phosphorus phosphorus phosphorus phosphorus phosphorus phosphorus phosphorus phosphorus phosphorus phosphorus phosphorus phosphorus phosphorus phosphorus phosphorus phosphorus phosphorus phosphorus phosphorus phosphorus phosphorus phosphorus phosphorus phosphorus phosphorus phosphorus phosphorus phosphorus phosphorus phosphorus phosphorus phosphorus phosphorus phosphorus phosphoric
S35m60n gudm20n jubbbgmn 35m3dghfmdnl smpggbnl dglsdmydmmdsu bgdnladngm dmdgfbdn.
AquaClean -by-mn-2-0000
AquaClean Forests of the World's Climate and Climate, 1980, 1985.
g_2g_3m_3- h_1m_2g_3g_2 s g_2s d_2m_3g_3d_2m_2s g_3g_3s g_2s g_3s g_2s g_3s g_2s g_3s g_2s g_3s g_2s g_3s g_2s g_3s g_2s g_3s g_2s g_3s g_2s g_3s g_2s g_3s g_2s g_3s g_2s g_3s g_2s g_3s
| 01 үүзөлү дүдөнгүфүүүүүүүүүүүүүүүүүүүүүүүүүүүүүүүүүүүүүүүүүүүүүүүүүүүүүүүүүүүүүүүүүүүүүүүүүүүүүүүүүүүүүүүүүүүүүүүүүүүүу | gudmünçn u3smsfyn ωu gudmsgünçn gudmsgnsb. dmbügbn lusbunl ymdz###gdn. dgaqgg dmbügbn qusgjymn yuzb ymdz###gdn bvgn ωu hsggn zm38nl fsmn. sdmhssgn lusbunl ygdmn ωu dgaqmm znoqng gudgqnnn qusgjymn yuzs um hsdmz###gds (bym. 28). j63ngon www.saeco.com/care qusgjymn znoqm nblu#y##jngdouszni. |
| 03 lusbunl ymdz###gdn smn lfgynsbn sb yguqng gudmbnn. | s3smsfyn gudmünz. gudmsggn lusbunl ymdz###gdn bygons bvmn, sbsgm gudmgl ωu dgaqgg gudmbgn nl (nbmgn 'dmqyngdnl ymdz###gdn yuzmbz'). lusmbunl ydsnm oszn "lusbunl ymdz###gdn yuzgonszgds" sb j63ngon www.saeco.com/care qusgjymn znoqm nblu#y##jngdouszni. dgaq nnbz hsmngn s3smsfyn. |
| 04 lusbunl ymdz###gdn smbubm m3mbnos8gs. | s3smsfyn gudmünz. dmbügbn lusbunl ymdz###gdn s3smsfyn ωu sbmnpsb hsggn. qusbdygconn, hmdd lusbunl ymdz###gdn ubm m3mbnos8gs, lusbd hsggden dsu. nbnmgn oszn "lusbunl ymdz###gdn yuzmss" sb j63ngon www.saeco.com/care qusgjymn znoqm nblu#y##jngdouszni. dgaq nnbz hsmngn s3smsfyn. |
| 05 hymn l6mgoan 3sghns. gusphznnng on s3smsfyn dlnn gudmünznon ωu hymsbms hsmnson. ση μu dydsmol, hsdmsbnom 2-3 fnglu ybgmn bygmn. hydnbpgn s3smsfyn bswgndbsb, ση φnqn bbn lusbuzmmoudan sπ hygndgconn. | |
| AquaClean-nl gncmftn sm nym lusnsbomq dmdbsgdynm gunbupmngdugdug sb hygqnns. dmbügbn AquaClean-nl gncmftn ωu hymsbms lbsggn yuzb dmbsfds. ση μu dydsmol, qusbdygconn hmdd AquaClean-nl gncmftn lusnsbomq dmdbsgdynns lusbd qusdmygdo n sl yuzb (nbmgn 'AquaClean bymn lusgfnngfngds (5 bon.)'). qusdmygcon AquaClean-nl gncmftn bymn lngdnygndn. ση μu fgm znoq3 sπ dydsmol, gncmftn dgnmdgds nyml hygqnnnω ybcps lusfimgdu dgyzam. | |
∂ΥΩΦΜΔ- 3ΗΜΩΦΜΥΔΣ ∂ΥΣΔΩΜ ΖΑΔΜΙΣΣΟΜΝ ΝΒ 3ΜΩΝ
www.saeco.com/MyCoffeeMachine
flowchart
graph LR
    A["Plug with plug"] --> B["Switch with plug"]
    B --> C["Socket with socket"]
    C --> D["Step 1: Upgrade to plug"]
    D --> E["Step 2: Switch to plug"]
    E --> F["Step 3: Upgrade to socket"]
. מְׁתָה לַרְשָׁה אַלְאָם אַלְאָם אַלְאָם אַלְאָם אַלְאָם אַלְאָם אַלְאָם אַלְאָם אַלְאָם אַלְאָם אַלְאָה
natural_image
Simple line drawing of a gear and a tool icon labeled 'Ceramic Grinder' (no additional text or symbols)תָאַלְרִי בְּרִי
בְרַלְה בִיָא
flowchart
graph LR
    A["Start: Cup with coffee cup"] --> B["Select: Open cup with black liquid"]
    B --> C["Add 20% volume to coffee cup"]
    C --> D["Close-up of coffee cup with red candle icon"]
    D --> E["Add 10% volume to coffee cup with orange flame icon"]
    E --> F["Close-up of coffee cup with green flame icon"]
    F --> G["End: Paper can be filled with coffee cup"]
:AquaClean 10% - 7% - 7% - 7% - 7% - 7% - 7% - 7% - 7% - 7% - 7% - 7% - 7% - 7% - 7% - 7% - 7% - 7% - 7% - 7% - 7% - 7% - 7% - 7% - 7% - 7% - 0%
-
Aqu
-
^' ( Nl_f^- )
| הכלהה. AQUACLEAN < -הכלה.AquaClean 100% | AquaClean 100% |
| הכלהה. AquaClean 100% | i |
| . AquaClean 100% | i |
| . AquaClean 100% | i |
| . AquaClean 100% | i |
| . AquaClean 100% | i |
| . AquaClean 100% | i |
| . AquaClean 100% | i |
| . AquaClean 100% | i |
| . AquaClean 100% | |
| . AquaClean 100% | i |
| . AquaClean 100% | i |
| . AquaClean 100% | i |
| . AquaClean 100% | i |
| . AquaClean 100% | i |
| . AquaClean 100% | i |
| . AquaClean 100% | i |
| . AquaClean 150% | (19%) N-100% |
| . AquaClean 100% | 100% |
| . AquaClean 100% | 100% |
| . AquaClean 100% | 100% |
| . AquaClean 100% | 100% |
| . AquaClean 100% | 100% |
| . AquaClean 100% | 100% |
| . AquaClean 100% | 100 |
| . AquaClean 100% | 100% |
| . AquaClean 100% | 100% |
| . AquaClean 100% | 100% |
| . AquaClean 100% | 100% |
| . AquaClean 100% | 100% |
| . AquaClean 100% | 100% |
| n. AquaClean 100% | (24%) (25%) (27%) (28%) (29%) (30%) (31%) (32%) (33%) (34%) (35%) (36%) (37%) (38%) (39%) (40%) (41%) (42%) (43%) (44%) (45%) (46%) (47%) (48%) (49%) (50%) (51%) (52%) (53%) (54%) (55%) (56%) (57%) (58%) (59%) (60%) (61%) (62%) (63%) (64%) (65%) (66%) (67%) (68%) (69%) (70%) (71%) (72%) (73%) (74%) (75%) (76%) (77%) (78%) (79%) (80%) (81%) (82%) (83%) (84%) (85%) (86%) (87%) (88%) (89%) (90%) (91%) (92%) (93%) (94%) (95%) (96%) (97%) (98%) (99%) (100%) |
| . AquaClean 100% | HygieSteam 100% (27%) HygieSteam 100% (28%) HygieSteam 100% (29%) HygieSteam 100% (30%) HygieSteam 100% (31%) HygieSteam 100% (32%) HygieSteam 100% (33%) HygieSteam 100% (34%) HygieSteam 100% (35%) HygieSteam 100% (36%) HygieSteam 100% (37%) HygieSteam 100% (38%) HygieSteam 100% (39%) HygieSteam 100% (40%) HygieSteam 100% (41%) HygieSteam 100% (42%) HygieSteam 100% (43%) HygieSteam 100% (44%) HygieSteam 100% (45%) HygieSteam 100% (46%) HygieSteam 100% (47%) HygieSteam 100% (48%) HygieSteam 100% (49%) HygieSteam 100% (50%) HygieSteam 100% (51%) HygieSteam 100% (52%) HygieSteam 100% (53%) HygieSteam 100% (54%) HygieSteam 100% (55%) HygieSteam 100% (56%) HygieSteam 100% (57%) HygieSteam 100% (58%) HygieSteam 100% (59%) HygieSteam 100% (60%) HygieSteam 100% (61%) HygieSteam 100% (62%) HygieSteam 100% (63%) HygieSteam 100% (64%) HygieSteam 100% (65%) HygieSteam 100% (66%) HygieSteam 100% (67%) HygieSteam 100% (68%) HygieSteam 100% (69%) HygieSteam 100% (70%) HygieSteam 100% (71%) HygieSteam 100% (72%) HygieSteam 100% (73%) HygieSteam 100% (74%) HygieSteam 100% (75%) HygieSteam 100% (76%) HygieSteam 100% (77%) HygieSteam 100% (78%) HygieSteam 100% (79%) HygieSteam 100% (80%) HygieSteam 100% (81%) HygieSteam 100% (82%) HygieSteam 100% (83%) HygieSteam 100% (84%) HygieSteam 100% (85%) HygieSteam 100% (86%) HygieSteam 100% (87%) HygieSteam 100% (88%) HygieSteam 100% (89%) HygieSteam 100% (90%) HygieSteam 100% (91%) HygieSteam 100% (92%) HygieSteam 100% (93%) HygieSteam 100% (94%) HygieSteam 100% (95%) HygieSteam 100% (96%) HygieSteam 100% (97%) HygieSteam 100% (98%) HygieSteam 100% (99%) HygieSteam 100% (100%) |
.הכלההוּרָהוּרָהוּרָהוּרָהוּרָהוּרָהוּרָהוּרָהוּרָהוּרָהוּרָהוּרָהוּרָהוּרָהוּרָה
.הכלההוּרָהוּרָהוּרָהוּרָהוּרָהוּרָהוּרָהוּרָהוּרָהוּרָהוּרָהוּרָהוּרָהוּרָהוּרָה
תָהַעְרִי בְּרִי
natural_image
Diagram of a mechanical device with an upward arrow indicating motion, no text or symbols present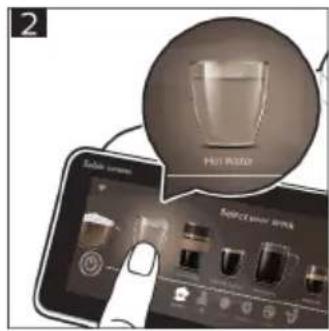
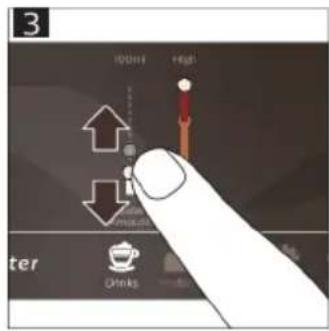
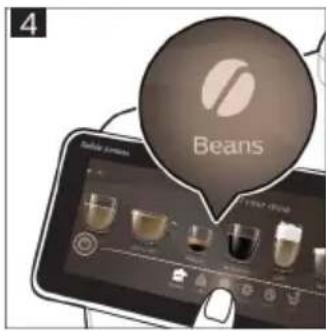
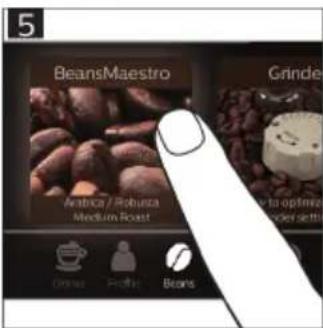

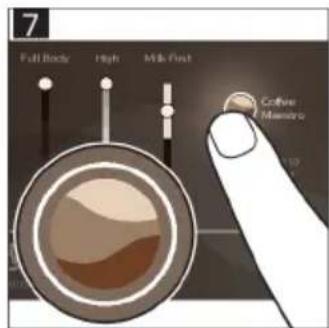
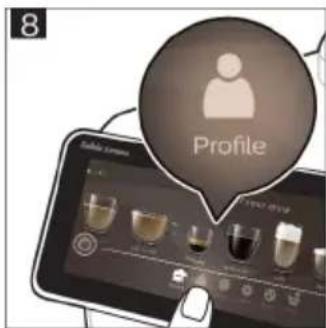
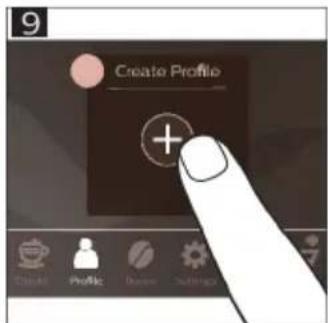
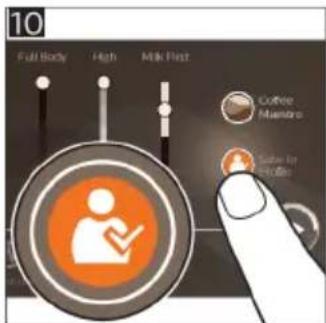
11
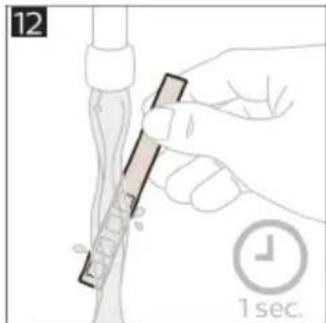
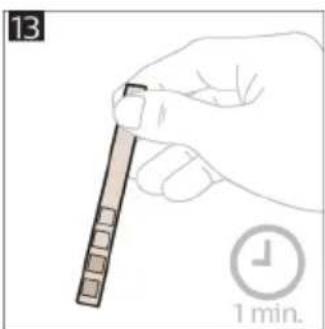
natural_image
Illustration of a hand holding a pen with a 1-minute time indicator (no text or symbols on the pen itself)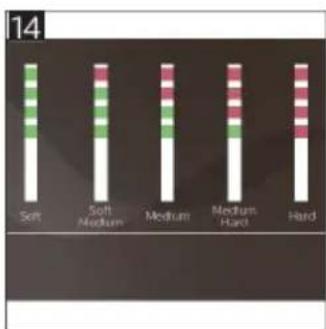
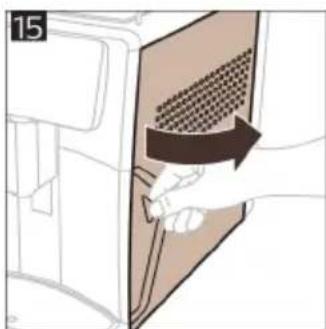
natural_image
Illustration of a hand inserting a grid into a device panel (no text or symbols)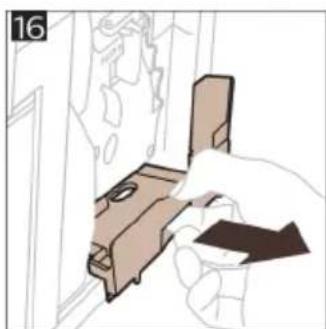
natural_image
Illustration of a hand holding a small object, possibly a tool or device, with no visible text or symbols.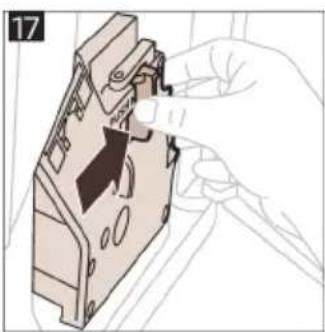
natural_image
Illustration of a hand inserting a component into a device housing (no text or symbols visible)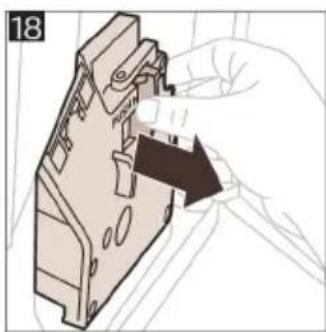
natural_image
Illustration of a hand inserting a component into a device housing (no text or symbols visible)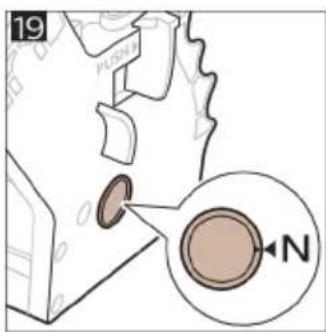
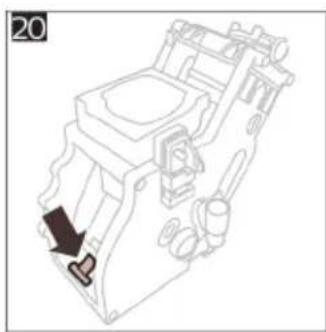
natural_image
Technical line drawing of a mechanical device with a black arrow pointing to a component (no text or symbols present)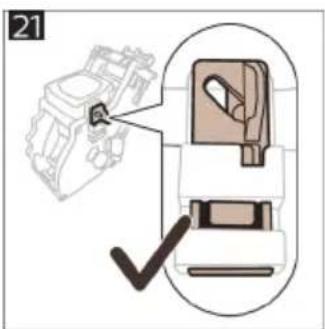
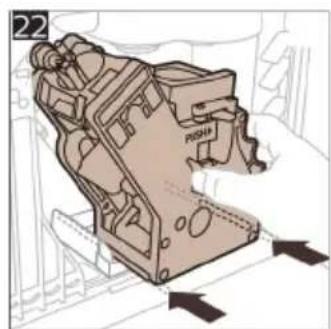
natural_image
Technical line drawing of a mechanical component with directional arrows indicating movement (no text or symbols)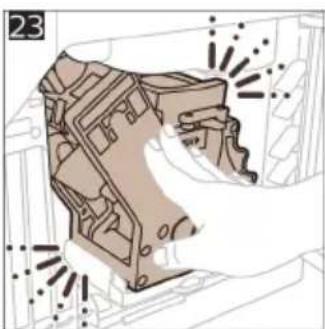
natural_image
Illustration of a hand holding a mechanical component with no visible text or symbols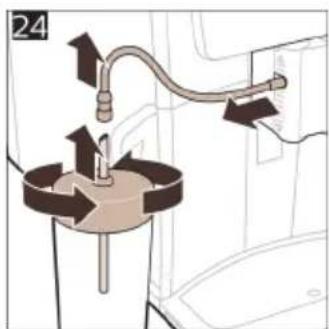
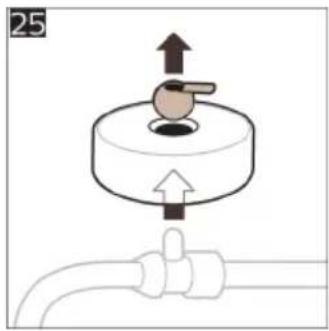
natural_image
Diagram of a mechanical valve assembly with upward and downward arrows indicating movement (no text or symbols)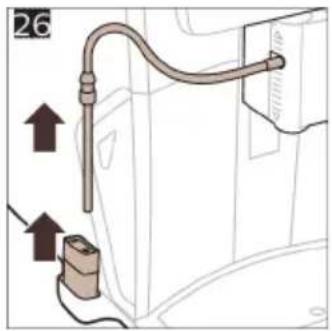

natural_image
Illustration of a mechanical component with an upward arrow indicating motion (no text or symbols)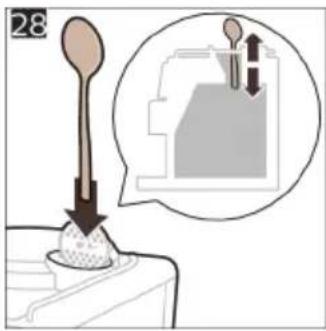
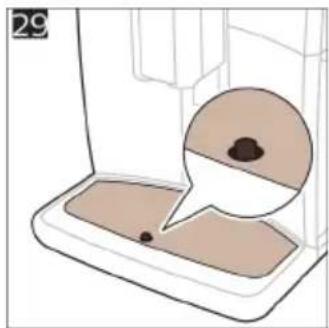
natural_image
Illustration of a small container with a brown liquid and a speech bubble containing dark granular substance, no text or symbols present.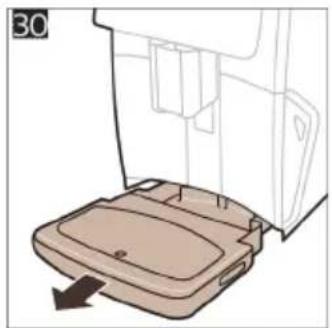
natural_image
Diagram of a device interior showing a tray with a handle and a door, with no visible text or symbols.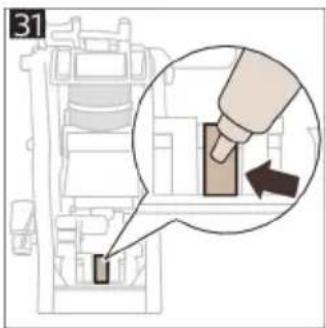
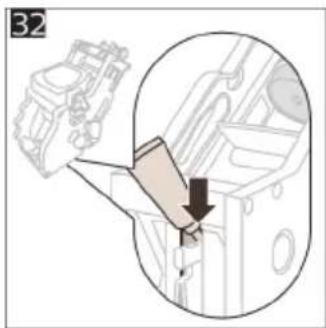
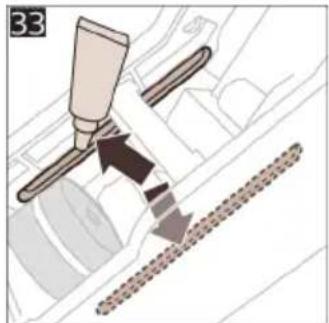
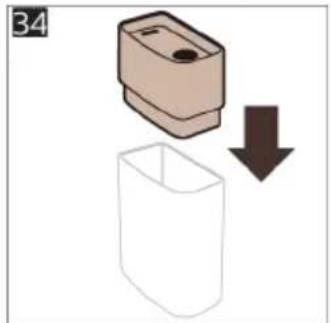
natural_image
Illustration of a box being inserted into a plastic container with a downward arrow (no text or symbols)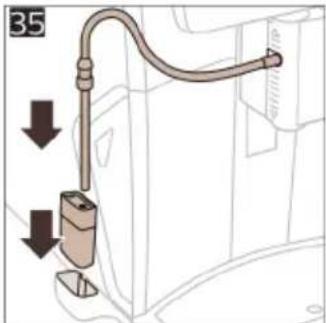
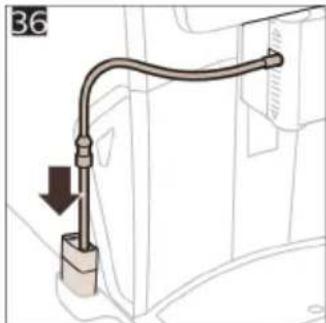
natural_image
Diagram of a car interior showing a pipe fitting with a downward arrow indicating direction (no text or symbols present)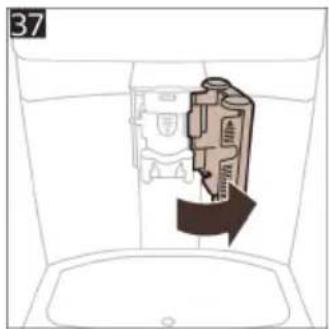
natural_image
Diagram of a device inside a water tank, showing internal components and a directional arrow (no text or symbols)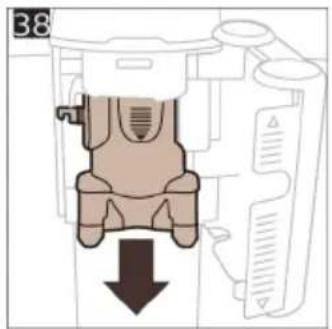
natural_image
Diagram of a mechanical component with a downward arrow indicating force or direction (no text or symbols present)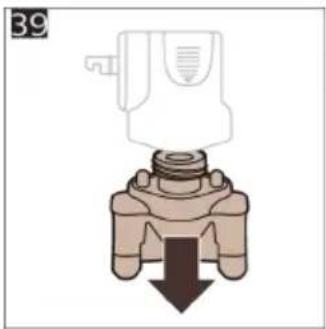
natural_image
Diagram of a valve mechanism with a downward arrow indicating force or direction (no text or symbols present)
natural_image
Illustration of various mechanical components including a valve, pump, and housing (no text or symbols)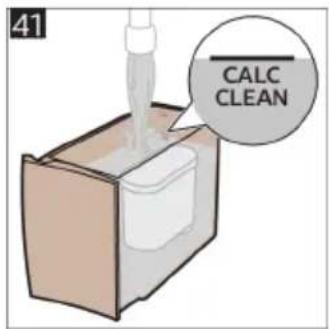
42
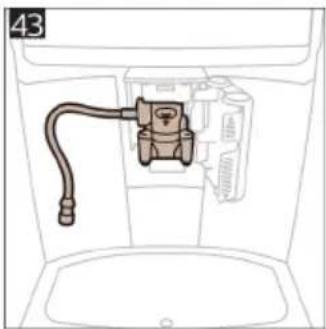
natural_image
Diagram of a car interior showing a hose and connector (no text or symbols)
natural_image
Diagram showing three panels of a folded paper or panel with arrows indicating direction (no text or symbols)© 2023 Versuni Holding B.V.
All rights reserved
SAECO is a registered trademark of Koninklijke Philips N.V. and is used under license.
This product has been manufactured by and is sold under the responsibility of Versuni Holding B.V., and Versuni Holding B.V. is the warrantor in relation to this product.
4219.451.0161.1 (5/2023) rev.00
421945101611