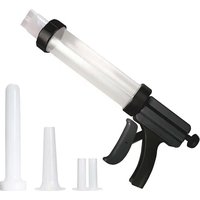
37-0260-W - Kitchen accessory Weston - Free user manual and instructions
Find the device manual for free 37-0260-W Weston in PDF.


User questions about 37-0260-W Weston
0 question about this device. Answer the ones you know or ask your own.
Ask a new question about this device
Download the instructions for your Kitchen accessory in PDF format for free! Find your manual 37-0260-W - Weston and take your electronic device back in hand. On this page are published all the documents necessary for the use of your device. 37-0260-W by Weston.
USER MANUAL 37-0260-W Weston
RECONNECT WITH REAL FOOD
natural_image
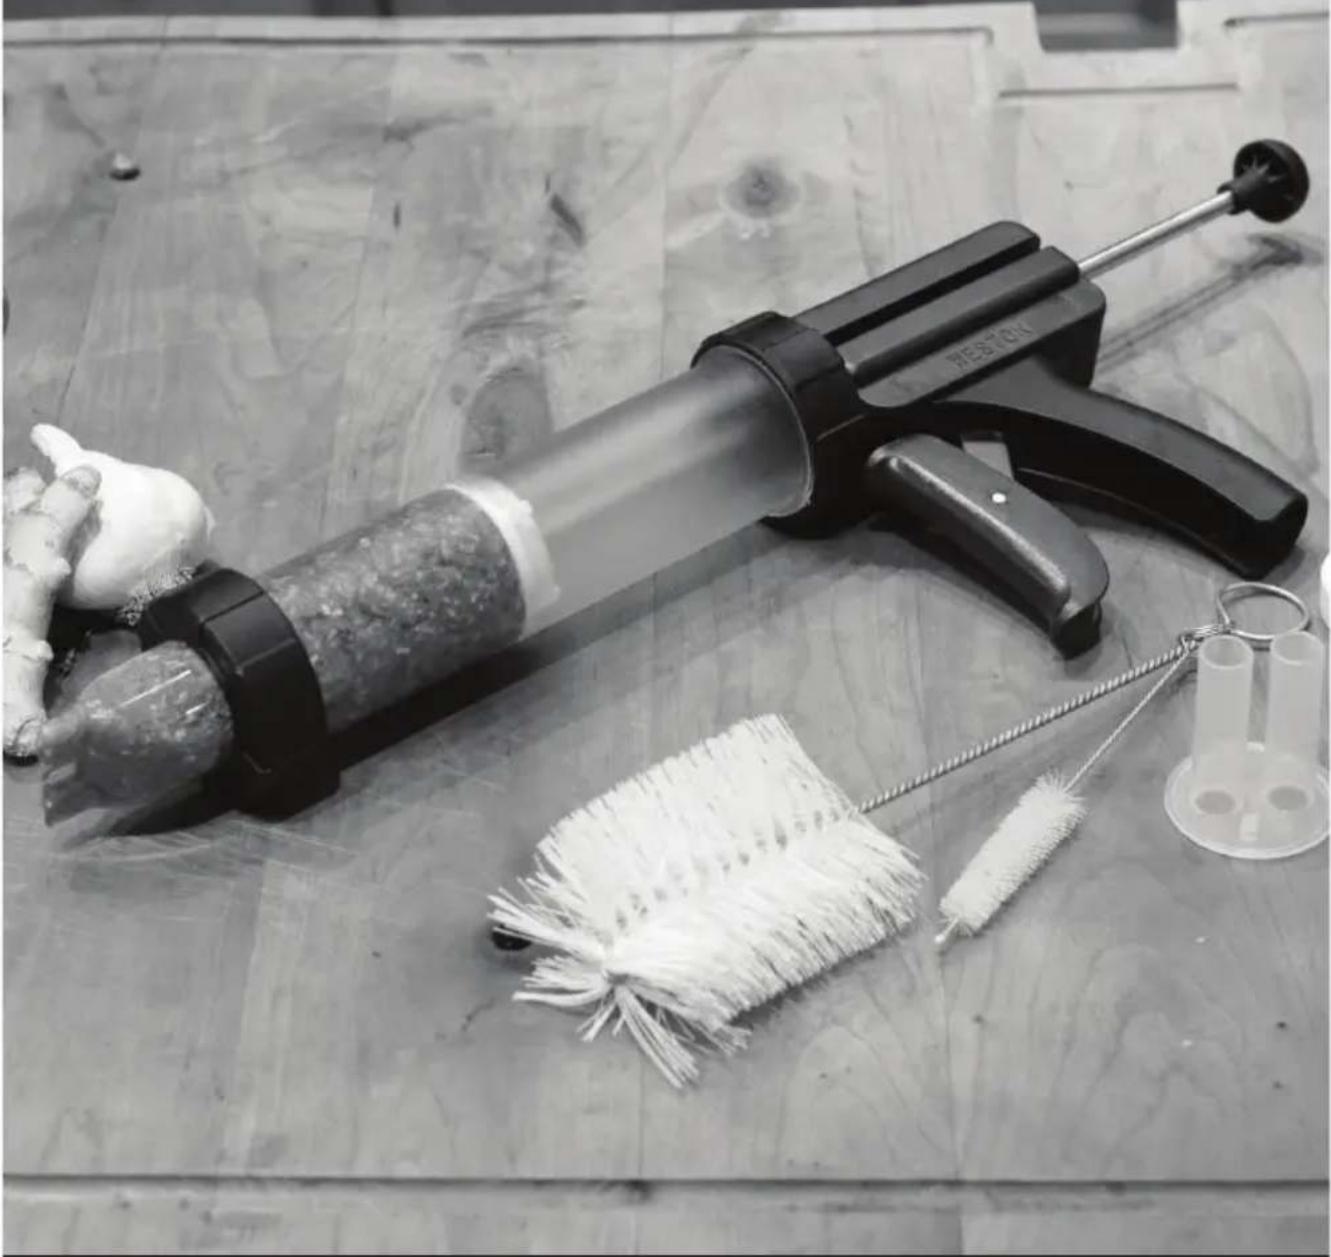
Black-and-white photo of a prosthetic spray gun with cleaning tools and a small brush on a wooden surface (no text or symbols visible)THE ORIGINAL
JERKY GUN JR.
37-0211-W
DUE TO CONSTANT FACTORY IMPROVEMENTS, THE PRODUCT PICTURED MIGHT DIFFER SLIGHTLY FROM THE PRODUCT IN THIS BOX. 040915
COMPONENT LIST 4-5
CLEANING 6
ASSEMBLY & JERKY MAKING INSTRUCTIONS 7-8
PRE-FILLING TUBE INSTRCUTIONS 9
COOKING INSTRUCTIONS 10
STORING OF JERKY 10
FOOD SAFETY 11
WARRANTY 12
natural_image
Black-and-white kitchen scene with a grater, oven, and food items on a counter (no visible text or symbols)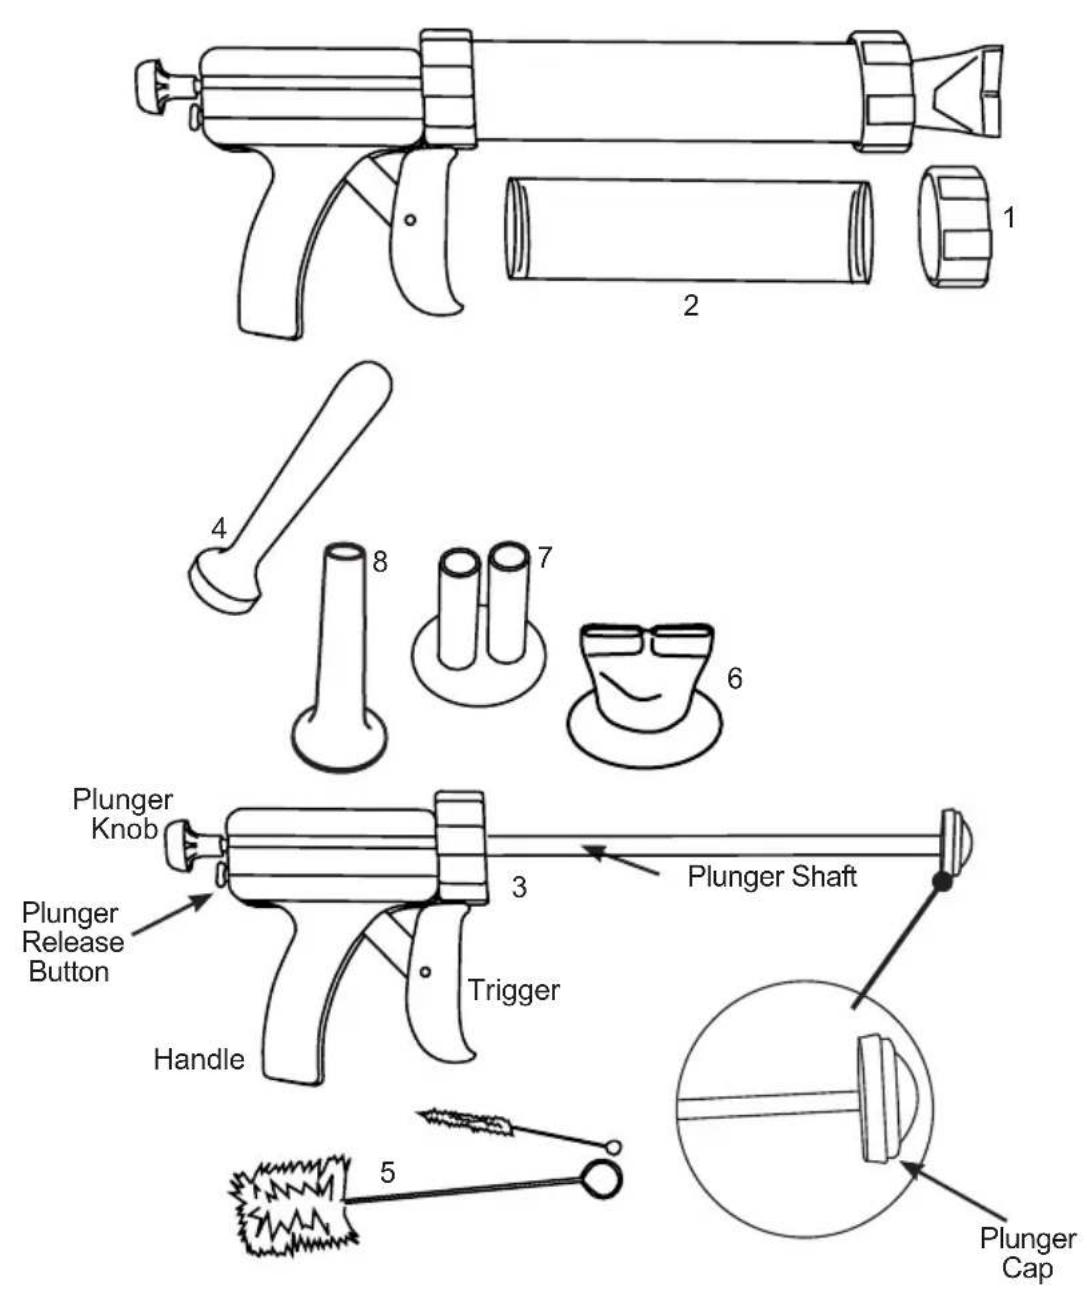
COMPONENT LIST
| DIAGRAM NUMBER PART DESCRIPTION PART NUMBER | ||
| 1 FRONT RING NUT 37-0505 | ||
| 2 PLASTIC TUBE 37-0502 | ||
| 3 JERKY GUN HANDLE ASSEMBLY 37-0203 | ||
| 4 STOMPER 37-0507 | ||
| 5 CLEANING BRUSH (2) 37-0506 | ||
| 6 PLASTIC DOUBLE JERKY STRIPATTACHMENT | 37-0328 | |
| 7 PLASTIC DOUBLE SNACK STICKATTACHMENT | 37-0524 | |
| 8 SAUSAGE FUNNEL 37-0509 | ||
If any components of this unit are broken, the unit does not operate properly or you need a replacement instruction manual, visit us on the web at
WestonProducts.com
Or call Weston Brands LLC Toll Free at 1-800-814-4895
Monday thru Friday 8:00am-5:00pm ET. Outside the U.S. call 001-440-638-3131
CLEANING INSTRUCTIONS
Clean all parts thoroughly before and after use.
- Remove the Front Ring Nut any Jerky/Snack Stick Attachments and the Jerky Tube from the Handle Assembly.
- NOTE: The Handle Assembly is NOT dishwasher safe. Keep the Handle Assembly out of water.
Hand-wash the plastic Jerky Tube, Plunger Shaft, Jerky Drying Racks and all parts that come into contact with food with warm, soapy water and the Cleaning Brush Set.
Using warm, soapy water, and the Cleaning Brush Set, thoroughly clean inside Jerky Tube and Jerky/Snack Stick Attachments. Thoroughly wash all parts of the Jerky Gun that come in contact with food.
- Dry all parts thoroughly before storing. Reassemble the Jerky Gun and store for the next use.
CAUTION! It is important to follow the "Food Safety" guidelines outlined in this manual. For the most up to date instruction visit the USDA website.
ASSEMBLY & JERKY MAKING INSTRUCTIONS
- Thoroughly clean all equipment before use.
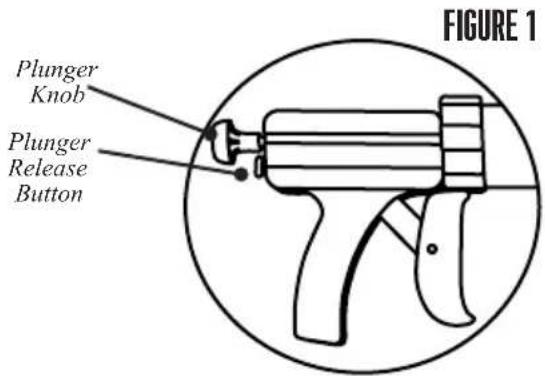
- Push in the Plunger Release Button and pull the Plunger Knob back until it is in the full retracted position (FIGURE 1 & 1A)
- Attach the Tube to the Handle Assembly of the Jerky Gun (FIGURE 2).
- Thoroughly mix ground meat with desired seasoning.
- With wet hands, form balls of the ground meat mixture and drop them into the Tube. Using the Stomper, press the mixture firmly into the Tube, squeezing out any trapped air. Repeat this step until the Tube is filled up to 1" (2.5 cm) from the top (FIGURE 3).
- Attach the Jerky/Snack Stick Attachment to the Jerky Tube by screwing the Front Ring Nut clockwise, until finger tight, onto the Tube (Figure 4). NOTE: The Double Jerky Attachment has a Front Ring Nut already attached.
text_image
FIGURE 1 Plunger Knob Plunger Release Button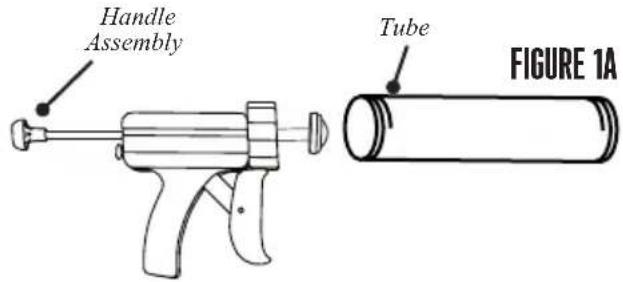
text_image
Handle Assembly Tube FIGURE 1A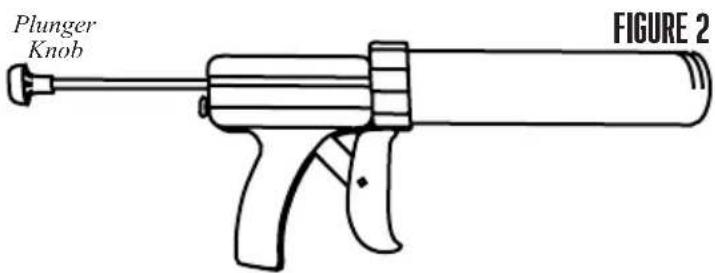
text_image
Plunger Knob FIGURE 2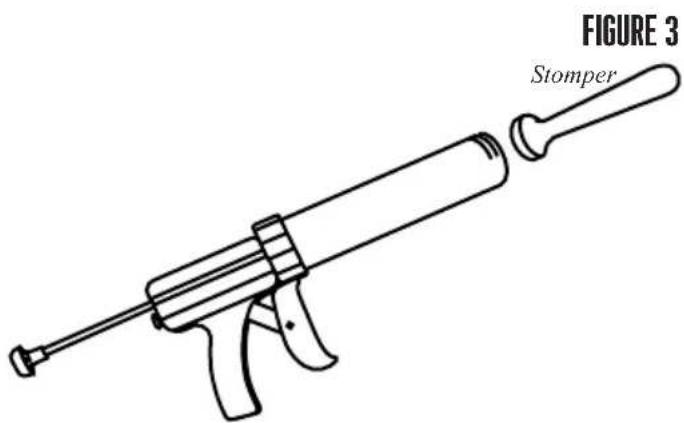
text_image
FIGURE 3 Stomper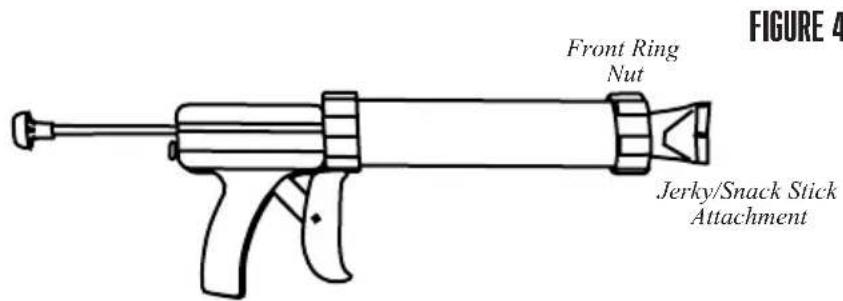
text_image
FRIGURE 4 Front Ring Nut Jerky/Snack Stick Attachment-
Place a drying rack onto a baking sheet (not included). NOTE: Using a drying rack will decrease the drying time of the jerky/snack sticks, by allowing the hot air from your oven to circulate freely through the racks.
-
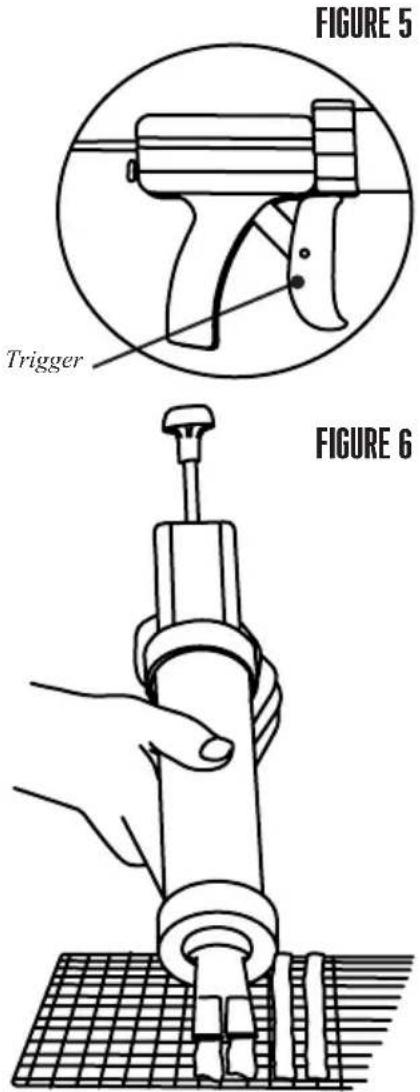
With the Jerky/Snack Stick* Attachment close to the far end of the drying rack, squeeze the Trigger to start the Plunger Assembly to push the meat forward and out of the Jerky Tube. Pull the Trigger repeatedly, until the jerky begins to extrude (FIGURE 5).
*Snack Sticks can be extruded into casings. Stuff the casing to a length of about 24" (61 cm), then tie knots in the open ends of the casings. Pinch the casing in the middle and twist to form two links about 12" (30.5 cm) each.
-
While squeezing the Trigger, slowly pull the Jerky Gun across the full length of the drying rack to form long strips of meat (FIGURE 6).
-
Continue extruding strips of jerky/snack sticks, until the drying rack is filled or the Jerky Tube is empty. Be sure to leave about 1/2" (1.3 cm) between the strips for even and consistent drying.
text_image
FIGURE 5 Trigger FIGURE 6PRE-FILLING TUBE INSTRUCTIONS EXTRA TUBES SOLD SEPARATELY
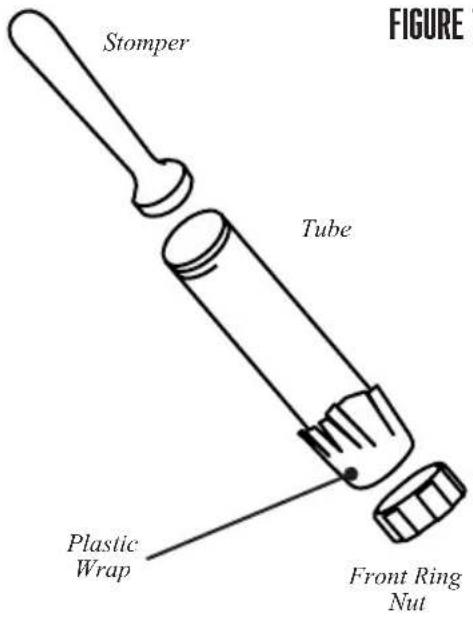
- Cover one end of the Tube with plastic wrap. Screw the Front Ring Nut clockwise, until finger tight, onto the Tube (FIGURE 7).
- With wet hands, form balls of the ground meat mixture and drop them into the Tube. Using the Stomper, press the mixture firmly into the Tube, squeezing out any trapped air. Repeat this step until the Tube is filled up to 1/2" (1.3 cm) from the end of the Tube.
- Cover the open end of the Tube with plastic wrap to store in the refrigerator until use.
- Remove the plastic wrap on both ends of the Tube prior to use.
text_image
Stomper Tube Plastic Wrap Front Ring Nut FIGURE 7FIGURE 7
COOKING INSTRUCTIONS
OVEN METHOD JERKY
- Place the jerky filled Drying Racks and Baking Sheet in a 175^ F ( 79^ C) preheated oven for approximately 1 hour. Meat must reach an internal temperature of 160^ F ( 71^ C).
- Remove the Drying Racks from the oven and turn the strips over.
- Return the Drying Racks to the oven and bake for an additional 30 minutes. Check for desired dryness. If the jerky is not dry enough, replace the Drying Racks of jerky into the oven and bake at 30 minute intervals, turning the jerky each time, until the desired dryness is achieved.
- Allow the jerky to cool, then follow "Storage Instructions," as outlined in this manual.
OVEN METHOD SNACK STICKS
- Place the snack stick filled Drying Racks and Baking Sheet in a 150^ F ( 66^ C) pre-heated oven for approximately 2 hours.
- Then increase the oven temperature to 180-200°F (82-93°C) and bake until the internal temperature of the snack sticks reaches 156°F (69°C).
- Remove the snack sticks from the oven and shower with cold water until the internal temperature drops to 100^ F ( 38^ C). NOTE: If you desire a dryer, more wrinkled look to your snack sticks, do not shower.
- Allow the snack sticks to cool, then follow "Storage of Jerky or Snack Sticks" instructions, as outlined in this manual.
SMOKER OR DEHYDRATOR METHOD
If using a smoker or a dehydrator, follow the instructions included with that appliance.
IMPORTANT: Before you place the meat in a dehydrator, it is highly recommended to heat the meat to 160^ F ( 71^ C) BEFORE the dehydrating process. This step assures that any bacteria present will be destroyed by wet heat. After heating to 160^ F ( 71^ C), maintaining a constant dehydrator temperature of 130-140^ F ( 55-60^ C) during the drying process is important because:
1.) the process must be fast enough to dry food before it spoils; and
2.) it must remove enough water that microorganisms are unable to grow.
STORAGE OF JERKY OR SNACK STICKS
Wrap jerky/snack sticks in aluminum foil and store in a thick plastic food storage bag, or place jerky/snack sticks in a jar with a tight lid. Avoid storage in plastic containers or bags without wrapping in aluminum foil or wax paper first. Jerky/snack sticks should be stored in a dark, dry, place between 50-60°F (10-16°C). You can store properly dried jerky/snack sticks at room temperature for 1 to 2 months. To extend the shelf life to up to 6 months, store jerky/snack sticks in the freezer. Be sure to label and date all packages.
FOOD SAFETY
There are basic rules to follow when handling food.
They are COOK, SEPARATE, CLEAN, and CHILL.
COOK
It's crucial to cook food to a safe internal temperature to destroy bacteria that is present. The safety of hamburgers and other foods made with ground meat has been receiving a lot of attention lately, and with good reason. When meat is ground, the bacteria present on the surface is mixed throughout the ground mixture. If this ground meat is not cooked to at least 160^ to 165^ (71°C to 74°C), bacteria will not be destroyed and there's a good chance you will get sick.
Solid pieces of meat like steaks and chops don't have dangerous bacteria like E. coli on the inside, so they can be served more rare. Still, any beef cut should be cooked to an internal temperature of at least 145^ (63°C) (medium rare). The safe temperature for poultry is 165^ (75°C) and solid cuts of pork should be cooked to 145^ (63°C).
SEPARATE
Foods that will be eaten uncooked and foods that will be cooked before eating MUST ALWAYS be separated. Cross-contamination occurs when raw meats or eggs come in contact with foods that will be eaten uncooked. This is a major source of food poisoning. Always double-wrap raw meats and place them on the lowest shelf in the refrigerator so there is no way juices can drip onto fresh produce. Then use the raw meats within 1-2 days of purchase, or freeze for longer storage. Defrost frozen meats in the refrigerator, not on the counter.
When grilling or cooking raw meats or fish, make sure to place the cooked meat on a clean platter. Don't use the same platter you used to carry the food out to the grill. Wash the utensils used in grilling after the food is turned for the last time on the grill, as well as spatulas and spoons used for stir-frying or turning meat as it cooks.
Make sure to wash your hands after handling raw meats or raw eggs. Washing hands with soap and water, or using a pre-moistened antibacterial towelette is absolutely necessary after you have touched raw meat or raw eggs. Not washing hands and surfaces while cooking is a major cause of cross-contamination.
CLEAN
Wash your hands and work surfaces frequently when you are cooking. Washing with soap and warm water for at least 15 seconds, then dry with a paper towel.
CHILL
Chilling food is very important. The danger zone where bacteria multiply is between 40^ F and 140^ F ( 4^ C and 6^ C). Your refrigerator should be set to 40^ F ( 4^ C) or below; your freezer should be 0^ F (- 17^ C) or below. Simple rule: serve hot foods hot, cold foods cold. Use chafing dishes or hot plates to keep food hot while serving. Use ice water baths to keep cold foods cold. Never let any food sit at room temperature for more than 2 hours - 1 hour if the ambient temperature is 90^ F ( 32^ C) or above. When packing for a picnic, make sure the foods are already chilled when they go into the insulated hamper. The hamper won't chill food - it just keeps food cold when properly packed with ice. Hot cooked foods should be placed in shallow containers and immediately refrigerated so they cool rapidly. Make sure to cover foods after they are cool.
NOTE: Special considerations must be made when using venison or other wild game, since it can become heavily contaminated during field dressing. Venison is often held at temperatures that could potentially allow bacteria to grow, such as when it is being transported. Refer to the USDA Meat and Poultry Department for further questions or information on meat and food safety.
WESTON WARRANTY INFORMATION
SAVE THIS WARRANTY INFORMATION FOR YOUR RECORDS!
Weston Brands LLC warrants to the ORIGINAL RETAIL PURCHASER of this product that if operated in accordance with the printed instruction accompanying it, then for a period of 1 year from the date of purchase, the product shall be free from defects in material and workmanship.
The Warranty Card, along with a copy of the original receipt, must be received by Weston Brands LLC within 30 days from purchase date for the warranty to apply. Failure to send the completely filled out Warranty Card, along with a copy of the original receipt, will void the warranty.
The product must be delivered to or shipped freight prepaid to Weston Brands LLC for warranty services, in either its original packaging or similar packaging affording an equal degree of protection. Damage due to shipping is not the responsibility of the company. Weston Brands LLC charges a \$35.00 per hour bench charge. NOTE: No repairs will be started without the authorization of the customer. The return shipping cost to the customer will be added to the repair invoice.
Prior to returning the product for Warranty Repair, the product must be thoroughly cleaned and free from any food particles or other debris. Failure of the purchaser to comply with this standard will result in the unit being returned without repair. In some cases, a \$50 cleaning surcharge may apply.
Weston Brands LLC will repair (or at its discretion, replace) the product free of charge, if in the judgment of the company, it has been proven to be defective as to seller's labor and material, within the warranty period.
New or rebuilt replacements for factory defective parts will be supplied for one (1) year from the date of purchase. Replacement parts are warranted for the remainder of the original warranty period.
For non-warranty repairs, contact Weston Brands LLC's Customer Service at 1-800-814-4895 M-F 8am-5pm ET (outside of the United States 001-440-638-3131) to obtain a Return Merchandise Authorization Number (RMA Number).
Weston Brands LLC will refuse all returns that do not contain this number. DO NOT RETURN THE UNIT WITHOUT PROPER AUTHORIZATION FROM WESTON BRANDS LLC.
LIMITATIONS: The warranty is void if the product is used for any purpose other than that for which it is designed. The product must not have been previously altered, repaired, or serviced by anyone else other than Weston Brands LLC. If applicable, the serial number must not have been altered or removed. The product must not have been subjected to accident in transit or while in the customer's possession, misused, abused, or operated contrary to the instructions contained in the instruction manual. This includes failure caused by neglect of reasonable and necessary maintenance, improper line voltage and acts of nature. This warranty is not transferable and applies only to U.S. and Canadian sales. Except to the extent prohibited by applicable law, no other warranties whether expressed or implied, including warranty merchantability and fitness for a particular purpose, shall apply to this product. Under no circumstances shall Weston Brands LLC be liable for consequential damages sustained in connection with said product and Weston Brands LLC neither assumes nor authorizes any representative or other person to assume for it any obligation or liability other than such as is expressly set forth herein. Any applicable implied warranties are also limited to the one (1) year period of the limited warranty.
This warranty covers only the product and its specific parts, not the food or other products processed in it. Weston is not responsible for missing or damaged parts on discounted/clearance, resale or final sale items where the seller may not be able to guarantee full functionality or completeness of the unit.
CUT ALONG THE DOTTED LINE AND SEND THE WARRANTY CARD ALONG WITH A COPY OF YOUR ORIGINAL PURCHASE RECEIPT TO:
Weston Brands LLC / WARRANTY
20365 Progress Drive, Strongsville, OH 44149 USA
WESTON WARRANTY CARD
SEND THIS CARD ALONG WITH A COPY OF YOUR ORIGINAL PURCHASE RECEIPT TO: WESTON BRANDS LLC / WARRANTY, 20365 PROGRESS DRIVE, STRONGSVILLE, OH 44149 USA
Customer Name:
Address:
City/State/Zip/Country:
Telephone Number:
E-Mail Address:
Original Date of Purchase:
Product Model #:
Serial # (if applicable):
I have read the warranty information. Initial here:
Copy of Receipt Included

WESTON
RECONNECT WITH REAL FOOD
natural_image
Black-and-white photo of a prosthetic spray gun with cleaning tools and a small container on a wooden surface (no text or symbols visible)LA PISTOLA
PARA CECINA ORIGINAL
JERKY GUN JR.
37-0211-W
Weston Brands LLC / WARRANTY
20365 Progress Drive, Strongsville, OH 44149 USA
TARJETA DE GARANTÍA WESTON
ENVÍE ESTA TARJETA JUNTO CON UNA COPIA DE SU RECIBO DE COMPRA ORIGINAL A:
WESTON BRANDS LLC/WARRANTY, 20365 PROGRESS DRIVE. STRONGSVILLE, OH 44149 USA
RECONNECT WITH REAL FOOD
natural_image
Black-and-white photo of a prosthetic spray gun with cleaning tools and a beaker on a wooden surface (no text or symbols visible)LE PISTOLET
TABLETTES DE VIANDE SÉCHÉE AU FOUR
BÂTONS DE VIANDE SÉCHÉE AU FOUR
Weston Brands LLC / WARRANTY
20365 Progress Drive, Strongsville, OH 44149 USA
CARTE DE GARANTIE
ENVOYEZ CETTE CARTE DE GARANTIE AVEC UNE COPIE DE VOTRE REÇU D'ACHAT ORIGINAL À: WESTON BRANDS LLC / WARRANTY, 20365 PROGRESS DRIVE, STRONGSVILLE, OH 44149 USA
Nom du Client:
Adresse:
Province/Code postal/Région:
PLEASE INSPECT THIS PACKAGE THOROUGHLY FOR MISSING PARTS OR ANY PRODUCT DAMAGE. IF YOUR PRODUCT CONTAINS SHIPPING DAMAGE, PLEASE CONTACT RETAILER FOR ASSISTANCE.
For all other questions regarding product usage, missing parts, product damage, difficulty or warranty activation, please contact the Weston Brands Customer Service Team: 8:00 am to 5:00 pm ET, Monday thru Friday
CustomerService@WestonProducts.com
U.S. Residents Customer Service Line: 1-800-814-4895 (Outside U.S. Call: 001-440-638-3131)
Weston Brands LLC, Cleveland, Ohio 44149
WestonProducts.com
Please DO NOT return this item to the retailer before contacting Weston Brands Customer Service.
SAVE THESE INSTRUCTIONS!
Refer to them often and use them to instruct others.
ATTENTION!
VEUILLEZ INSPECTER CET EMBALLAGE AVEC SOIN POUR Y DÉTECTER
TOUTE PIÈCE MANQUANTE OU ENDOMMAGÉE.
SI DES PIÈCES ONT ÉTÉ ENDOMMAGÉES PENDANT LE TRANSPORT, VEUILLEZ
COMMUNIQUER AVEC LE DÉTAILLANT POUR OBTENIR DE L'AIDE.
Weston Brands LLC, Cleveland, Ohio 44149
WestonProducts.com