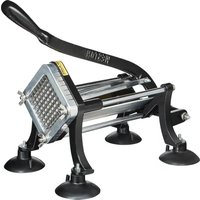
36-3550-W - Slicer Weston - Free user manual and instructions
Find the device manual for free 36-3550-W Weston in PDF.


| Brand | Weston |
| Model | 36-3550-W |
| Product type | Manual french fry cutter |
| Category | Vegetable slicer |
| Main use | Cutting potatoes into fries, firm vegetables |
| Materials | Stainless steel for grids, reinforced plastic for body |
| Approximate dimensions | 30 x 25 x 35 cm |
| Approximate weight | 2.5 kg |
| Power source | None (manual) |
| Grid size | 1 cm (3/8 in) |
| Mechanism | Crank with push rods |
| Mounting | Horizontal (suction cups) or vertical (wall mount) |
| Feet | Suction cups for horizontal mounting, bolt holes for vertical mounting |
| Included parts | Crank, push plate, push rods, grid, nuts, screws, suction cup feet |
| Safety | Very sharp grids, keep fingers away, use protective gloves (Kevlar® recommended) |
| Cleaning | Wash with hot soapy water, brush, dry completely |
| Warranty | 1 year against defects in materials and workmanship (registration within 30 days required) |
| Customer service | 1-800-814-4895 (U.S.), 001-216-901-6801 (outside U.S.) |
| Foods not recommended | Frozen foods, meat with bones, fish, non-food items |
| Precautions | Do not use after consumption of alcohol or drugs |
Frequently Asked Questions - 36-3550-W Weston
User questions about 36-3550-W Weston
0 question about this device. Answer the ones you know or ask your own.
Ask a new question about this device
Download the instructions for your Slicer in PDF format for free! Find your manual 36-3550-W - Weston and take your electronic device back in hand. On this page are published all the documents necessary for the use of your device. 36-3550-W by Weston.
USER MANUAL 36-3550-W Weston
FRENCH FRY CUTTER
36-3550-W
840315901

IMPORTANT SAFEGUARDS
READ AND FULLY UNDERSTAND ALL INSTRUCTIONS AND WARNINGS PRIOR TO USING THIS UNIT. YOUR SAFETY IS MOST IMPORTANT! FAILURE TO COMPLY WITH PROCEDURES AND SAFE GUARDS MAY RESULT IN SERIOUS INJURY OR PROPERTY DAMAGE. REMEMBER: YOUR PERSONAL SAFETY IS YOUR RESPONSIBILITY!
- Read all instructions.
- This appliance is not intended for use by persons with reduced physical, sensory, or mental capabilities, or lack of experience and knowledge, unless they are closely supervised and instructed concerning use of the appliance by a person responsible for their safety.
- This appliance shall not be used by children.
- Close supervision is necessary when any appliance is used near children. Children should be supervised to ensure that they do not play with the appliance.
- KEEP FINGERS CLEAR of the cutting blade at all times. NEVER hold the product with your hands in line of the cutting blade. Failure to keep fingers and hands away from the cutting blade may result in personal injury.
- KEEP CHILDREN AWAY. NEVER LEAVE THE FRENCH FRY CUTTER UNATTENDED.
- CHECK FOR DAMAGED PARTS. Before using the french fry cutter, check that all parts are operating properly, and perform the intended functions. Check for alignment of moving parts, binding of moving parts, mounting and any other conditions that may affect the operation.
- CAUTION! Cut Hazard: The cutting plates are sharp. Use care when handling. The use of cut-resistant gloves such as Kevlar® is recommended when handling the cutting plates.
- The manufacturer declines any responsibility in the case of improper use of this machine.
- Be sure the french fry cutter is stable during use. All four feet could be securely mounted to a wall, sturdy work surface, and the machine should not move during the cutting process.
- DO NOT USE this french fry cutter for frozen foods, boned meat, fish or anything other than food stuffs.
- The french fry cutter should not be mounted to drywall, paneling or particle board. Only mount the french fry cutter to a solid surface, such as wall studs.
- DO NOT USE the french fry cutter while under the influence of drugs or alcohol.
SAVE THESE INSTRUCTIONS
PARTS AND FEATURES
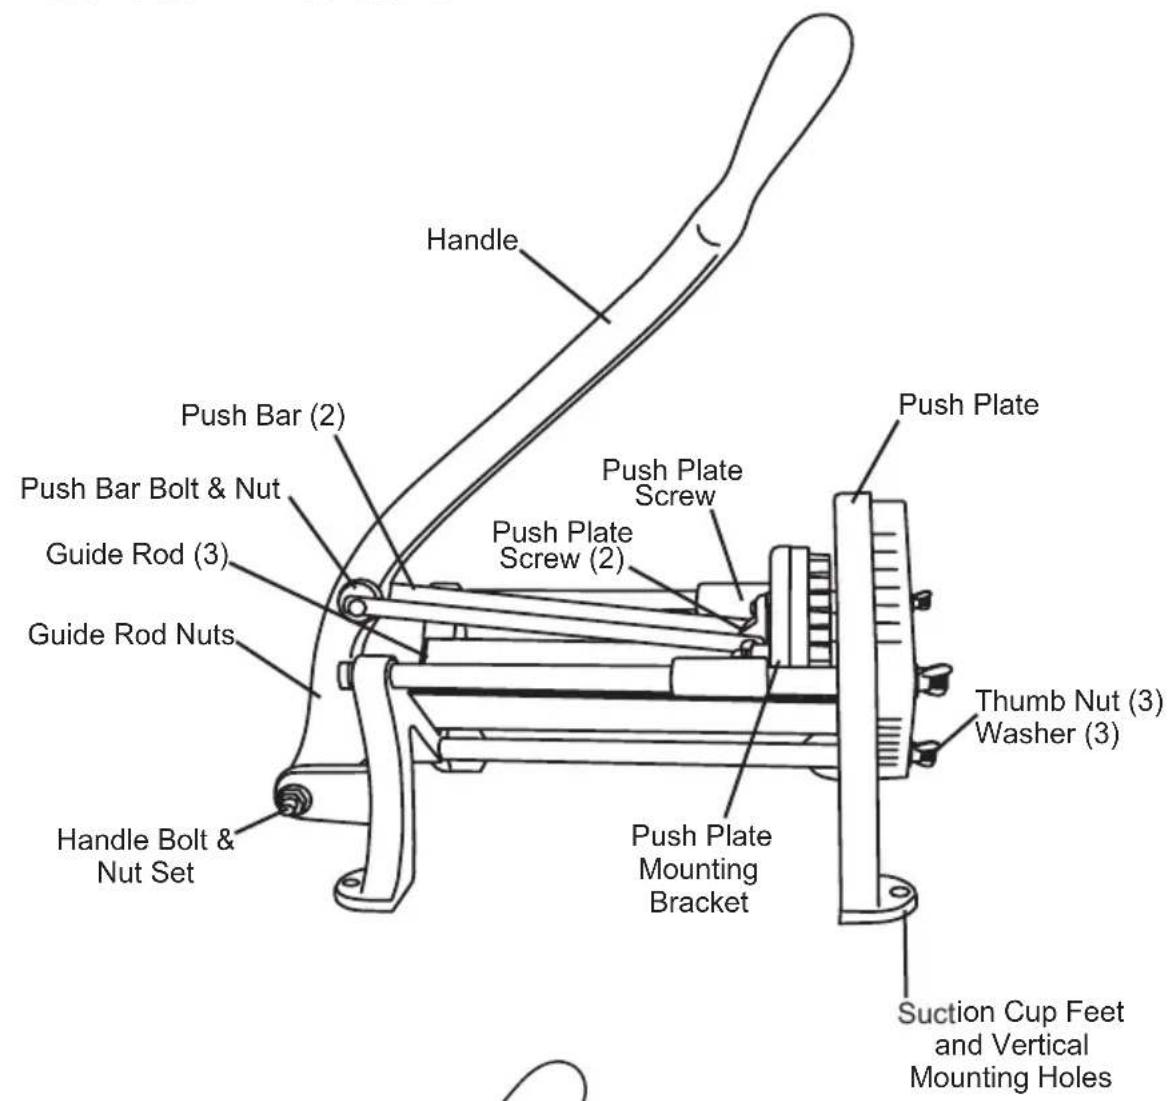
![Shield 3/8" (1 cm) Cutting Plate NECESSARY #2 PL 6" [15]](/content/2026/04/704712/images/be7dd2e445495cdb26937b1f8a607a5ca92edd553b73b8f1f7eb5448a9bf02e7.jpg)
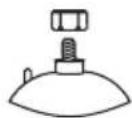
Suction Cup Foot with Nyloc Nut (4-Piece Set)
NECESSARY TOOLS FOR ASSEMBLY
| #2 PHILLIPS HEAD SCREWDRIVER |
| 6” (150 MM) ADJUSTABLE WRENCH |
| M10 OPEN-END WRENCH |
| M13 OPEN-END WRENCH |
If any components of this unit are broken, the unit does not operate properly or you need a replacement instruction manual, visit us on the web at
WestonSupply.com Or call Weston Brands, LLC Toll Free at 1-800-814-4895 Monday thru Friday 8:00am-5:00pm ET. Outside the U.S. call 001-216-901-6801.
ASSEMBLY INSTRUCTIONS
⚠️ CAUTION Cut Hazard. The cutting plates are sharp. Use care when handling. The use of cut-resistant gloves is recommended when handling the cutting plates.
- Remove French fry cutter from packaging and verify that you have received all of the parts.
- Remove protective poly bag covering shield.
- Insert the shield into the French fry cutter body. NOTE: Be certain that the shield is positioned in the notches and pushed all the way down so that it sits on top of the cutting plate.
- Locate the handle, handle bolt, handle washers, and handle nuts.
- Line up the holes in the handle with the corresponding holes in the handle base of the French fry cutter.
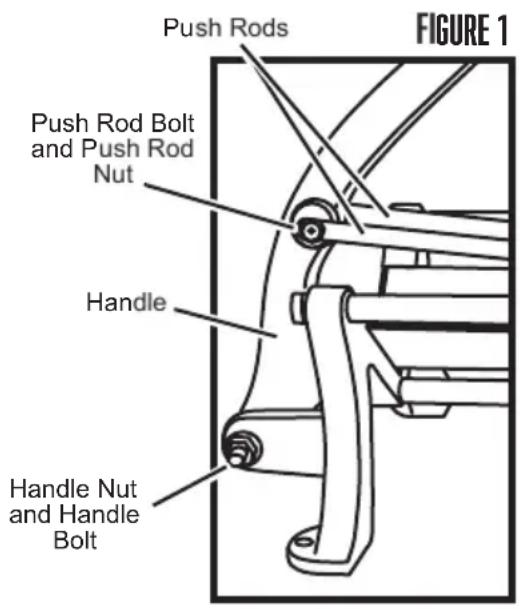
- Insert the handle bolt through the handle base and handle, then secure using the handle nuts and handle washers (FIGURE 1).
- To attach the push rods to the handle, position the push rods on each side of the handle and line up the corresponding holes.
-
Insert the push rod bolt through the push rod and the handle, then secure together using a push rod nut.
-
Make sure the push rod and bolt have a loose fit. If tightened too tightly, the push rod will bind on the handle, making it difficult to move.
CHANGING THE CUTTING PLATE
⚠️ CAUTION Cut Hazard. The cutting plates are sharp. Use care when handling. The use of cut-resistant gloves is recommended when handling the cutting plates.
- Remove the 3 thumb nuts and washers from the cutting plate.
NOTE: When removing the last thumb nut, hold onto the cutting plate. Failure to do so may result in the cutting plate falling, causing damage. - To remove the push plate, put the handle in the down position and remove the 2 push plate screws from the top of the push plate.
- Once the push plate screws are removed, raise the handle and remove the push plate.
- Replace the push plate and secure with 2 push plate screws (FIGURE 6).
- Replace the cutting plate and secure with the 3 thumb nuts and washers.
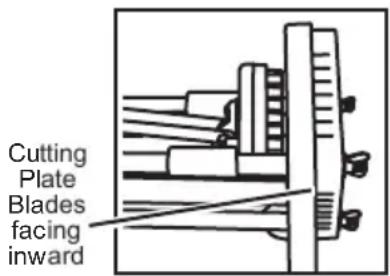
NOTE: The cutting plate needs to be facing inward (FIGURE 2). The dull portion of the blades should be facing outward.
FIGURE 2
VERTICAL MOUNTING INSTRUCTIONS
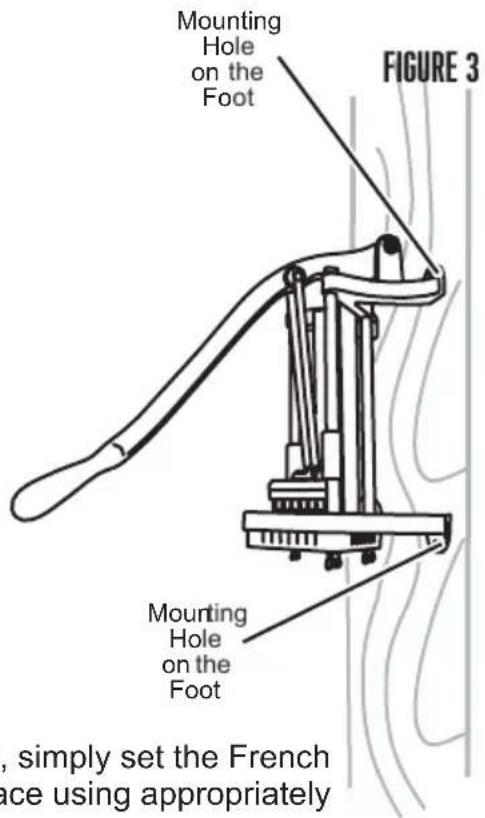
Make sure the French fry cutter is mounted to a solid surface. DO NOT mount to drywall that has no structural support behind it. The French fry cutter needs to be mounted to the studs of the wall or any solid surface.
When mounting the French fry cutter, position it at a distance from the floor that is a comfortable height and will provide the best leverage for cutting a potato.
Mount the French fry cutter through the mounting holes on the 4 feet using appropriately sized bolts (not included) (FIGURE 3).
HORIZONTAL MOUNTING INSTRUCTIONS
To mount your French fry cutter on a tabletop or stand, simply set the French fry cutter down on its legs and secure to the work surface using appropriately sized screws (not included).
NOTE: Even though horizontal mounting is an option, it is recommended to mount the French fry cutter vertically on a structurally supported wall. More leverage can be applied when mounted vertically than can be applied when mounted horizontally.
HORIZONTAL SUCTION CUP MOUNTING INSTRUCTIONS
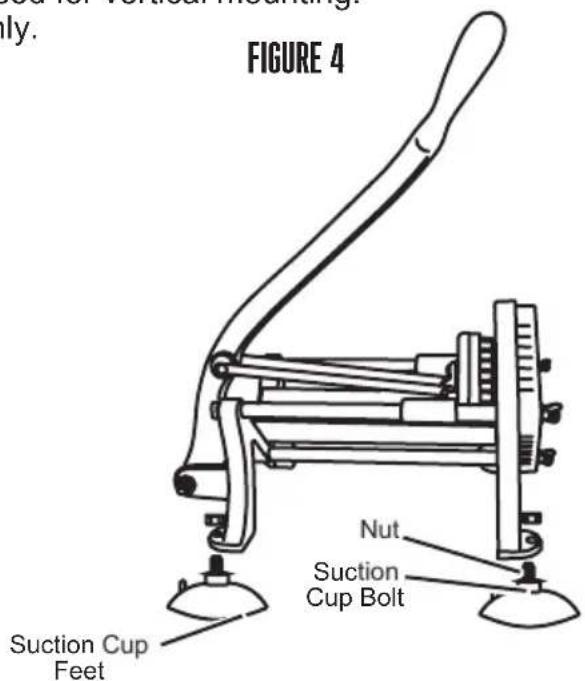
To install the suction cup feet to your French fry cutter, place the bolt of each suction cup through the holes in the feet of the French fry cutter. Thread the nut onto each bolt tightly (FIGURE 4). Press firmly down on the French fry cutter to create suction between the work surface and the suction cup feet. Suction cups work best on a smooth, clean horizontal surface. To create more of a suction, a damp cloth can be swiped across the suction cup prior to adhering. Be certain to check the stability of the French fry cutter to the work surface prior to use.
NOTE: The suction cups are not meant to be used for vertical mounting. Use the suction cups for horizontal mounting only.
CUTTING POTATOES
⚠️ CAUTION Cut Hazard. The cutting plates are sharp. Do not hold items to be cut while pushing down on the handle.
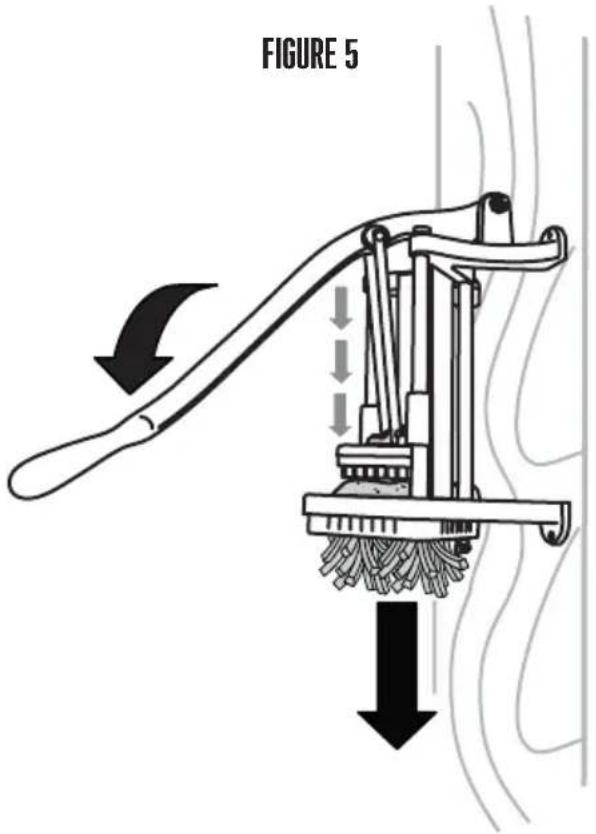
- Raise the handle of the French fry cutter so that the push plate is away from the cutting plate.
- Insert a potato into the cutter length-wise (standing on end) and slowly lower the handle until the potato is held securely between the push plate and cutting plate.
- Push down on the handle and the potato will be forced out through the bottom of the cutting plate (FIGURE 5).
NOTE: For large potatoes, it is necessary to cut a small, flat edge on the end of the potato. Place the sliced flat end of the potato against the blade and cut. Microwave sweet potatoes or other firm fruits or vegetables for 30 seconds to soften slightly, if necessary.
CLEANING INSTRUCTIONS
⚠️ CAUTION Cut Hazard. The cutting plates are sharp. Use care when handling. The use of cut-resistant gloves is recommended when handling the cutting plates.
It is recommended to thoroughly clean your French fry cutter before and after each use. Clean with hot, soapy water, then rinse with clean water and dry thoroughly.
- Remove the 3 thumb nuts and washers from the cutting plate.
NOTE: When removing the last thumb nut, hold onto the cutting plate. Failure to do so may result in the cutting plate falling, causing damage. - To clean between the blades of the cutting plate, use a long bristle brush to remove debris. DO NOT use your fingers!
- To remove the push plate, put the handle in the down position and remove the 2 push plate screws from the top of the push plate (FIGURE 6).
- Once the push plate screws are removed, raise the handle and remove the push plate.
- To clean the push plate, remove any remaining debris with a blunt object, such as a butter knife, then thoroughly clean with a long bristle brush.
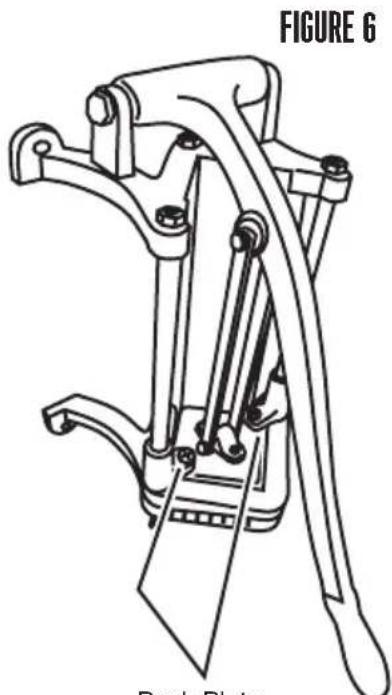
Push Plate Screws
ONE-YEAR LIMITED WESTON WARRANTY
This warranty applies to products purchased and used in the U.S. and Canada. This is the only express warranty for this product and is in lieu of any other any other warranty or condition. This product is warranted to be free from defects in material and workmanship for a period of one (1) year from the date of original purchase. During this period, your exclusive remedy is repair or replacement of this product or any component found to be defective, at our option. If the product or component is no longer available, we will replace with a similar one of equal or greater value.
This warranty does not cover unauthorized repairs or service to products, products sold "as-is" by retailers, glass, filters, wear from normal use, use not in conformity with the printed directions, or damage to the product resulting from accident, alteration, abuse, or misuse. This warranty extends only to the original consumer purchaser or gift recipient and is not transferable. Keep the original sales receipt, as proof of purchase is required to make a warranty claim.
This warranty is void if the product is subjected to any voltage and waveform other than as specified on the rating label (e.g., 120V \~ 60 Hz).
We exclude all claims for special, incidental and consequential damages caused by breach of express or implied warranty. All liability is limited to the amount of the purchase price. Every implied warranty, including any statutory warranty or condition of merchantability or fitness for a particular purpose, is disclaimed except to the extent prohibited by law, in which case such warranty or condition is limited to the duration of this written warranty.
This warranty gives you specific legal rights. You may have other legal rights that vary depending on where you live. Some states or provinces do not allow limitations on implied warranties or special, incidental, or consequential damages, so the foregoing limitations may not apply to you.
Before returning the product for any repair or service: it must be clean and free from any food particles or other debris; otherwise, we will return it or impose a \$50 cleaning surcharge, at our option.
To make a warranty claim do not return this product to the store: Please go to www.westonsupply.com; or call 1.800.814.4895 in the U.S. and 001.216.901.6801 outside the U.S., Monday – Friday, 8 am – 5 pm Eastern. You are responsible for all costs associated with shipping us the product freight prepaid. If the product qualifies for a warranty repair or replacement, we will bear the cost of returning it to you. We are not responsible for shipping damage.
For non-warranty work: call 1.800.814.4895 in the U.S. and 001.216.901.6801 outside the U.S., Monday – Friday, 8 am – 5 pm Eastern, to obtain a Return Merchandise Authorization Number (RMA Number). We will refuse all returns without an RMA Number. We charge US\$35/hour for all diagnostic, service, repair and processing work. We will not start any service or repair work without prior authorization. You are responsible for all costs associated with shipping us the product freight prepaid and our returning it to you.

PRÉCAUTIONS IMPORTANTES
LIRE ET COMPRENDRE COMPLÈMENT TOUTES LES DIRECTIVES ET AVERTISSEMENTS AVANT D'UTILISER, CE PRODUIT. LE PLUS IMPORTANT EST VOTRE SÉCURITÉ! LE DÉFAUT D'OBSERVER LES PROCÉDURES ET MISES EN GARDE PEUT ENTRAINER DES BLESSURES GRAVES OU DES DOMMAGES MATÉRIELS. N'OUBLIEZ PAS : VOTRE SÉCURITÉ PERSONNELLE EST VOTRE RESPONSABILITE!
INSTRUCTIONS DE MONTAGE HORIZONTAL
Vis de la plaque
GARANTIE DE WESTON LIMITÉE DE UN AN
Tornillos de la placa de empujar
UN AÑO DE GARANTÍA WESTON LIMITADA
PLEASE INSPECT THIS PACKAGE THOROUGHLY FOR MISSING PARTS OR ANY PRODUCT DAMAGE. IF YOUR PRODUCT CONTAINS SHIPPING DAMAGE, PLEASE CONTACT RETAILER FOR ASSISTANCE.
For all other questions regarding product usage, missing parts, product damage, difficulty or warranty activation, please contact the Weston Brands Customer Service Team: 8:00 am to 5:00 pm ET, Monday thru Friday
CustomerService@WestonBrands.com
U.S. Residents Customer Service Line: 1-800-814-4895 (Outside U.S. Call: 001-216-901-6801)
Weston Brands LLC, Southern Pines, NC 28387
WestonSupply.com
Please DO NOT return this item to the retailer before contacting Weston Brands Customer Service.
SAVE THESE INSTRUCTIONS!
Refer to them often and use them to instruct others.
ATTENTION!
VEUILLEZ INSPECTER CET EMBALLAGE AVEC SOIN POUR Y DÉTECTER
TOUTE PIÈCE MANQUANTE OU ENDOMMAGÉE
SI DES PIÈCES ONT ÉTÉ ENDOMMAGÉES PENDANT LE TRANSPORT, VEUILLEZ
COMMUNIQUER AVEC LE DÉTAILLANT POUR OBTENIR DE L'AIDE.
CustomerService@WestonBrands.com
Southern Pines, NC 28387
WestonSupply.com
CustomerService@WestonBrands.com
- FRENCH FRY CUTTER
- IMPORTANT SAFEGUARDS
- SAVE THESE INSTRUCTIONS
- ASSEMBLY INSTRUCTIONS
- CHANGING THE CUTTING PLATE
- VERTICAL MOUNTING INSTRUCTIONS
- HORIZONTAL MOUNTING INSTRUCTIONS
- HORIZONTAL SUCTION CUP MOUNTING INSTRUCTIONS
- CUTTING POTATOES
- CLEANING INSTRUCTIONS
- ONE-YEAR LIMITED WESTON WARRANTY
- PRÉCAUTIONS IMPORTANTES
- INSTRUCTIONS DE MONTAGE HORIZONTAL
- GARANTIE DE WESTON LIMITÉE DE UN AN
- UN AÑO DE GARANTÍA WESTON LIMITADA
- ATTENTION
Brand : Weston
Model : 36-3550-W
Category : Slicer