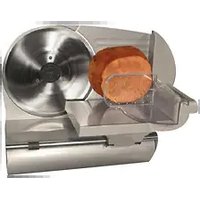
61-0901-W - Slicer Weston - Free user manual and instructions
Find the device manual for free 61-0901-W Weston in PDF.


| Product type | Electric meat slicer |
| Brand | Weston |
| Model | 61-0901-W |
| Power | 120 V, 60 Hz, 150 W |
| Blade diameter | 21.9 cm (8 5/8 in) |
| Blade material | Stainless steel |
| Thickness adjustment | Continuous adjustment knob |
| Sliding carriage | Yes, with safety pusher |
| Switch | Toggle On/Off |
| Motor | 150 W, cooling required after 15 min |
| Suction cup feet | 4 feet for stability |
| Power cord | Grounded (3-prong) |
| Housing material | Plastic and steel |
| Cleaning | Removable blade, hand wash, do not immerse motor |
| Safety | Use pusher, wear resistant gloves, unplug before maintenance |
| Warranty | 1 year (upon sending warranty card) |
| Spare parts available | Yes, references provided (blade, screw, carriage, etc.) |
| Use | Boneless meat, fish, cheese, non-frozen foods |
| Continuous operating duration | 15 minutes maximum, then cooling 30-60 min |
Frequently Asked Questions - 61-0901-W Weston
User questions about 61-0901-W Weston
0 question about this device. Answer the ones you know or ask your own.
Ask a new question about this device
Download the instructions for your Slicer in PDF format for free! Find your manual 61-0901-W - Weston and take your electronic device back in hand. On this page are published all the documents necessary for the use of your device. 61-0901-W by Weston.
USER MANUAL 61-0901-W Weston
RECONNECT WITH REAL FOOD
9"
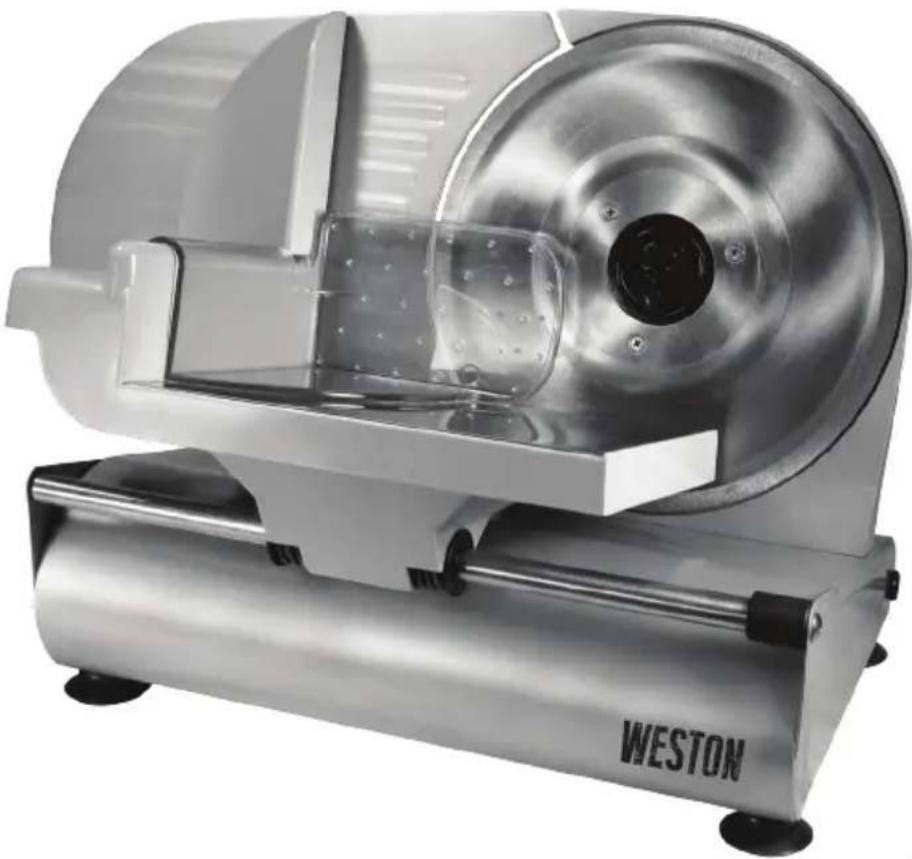
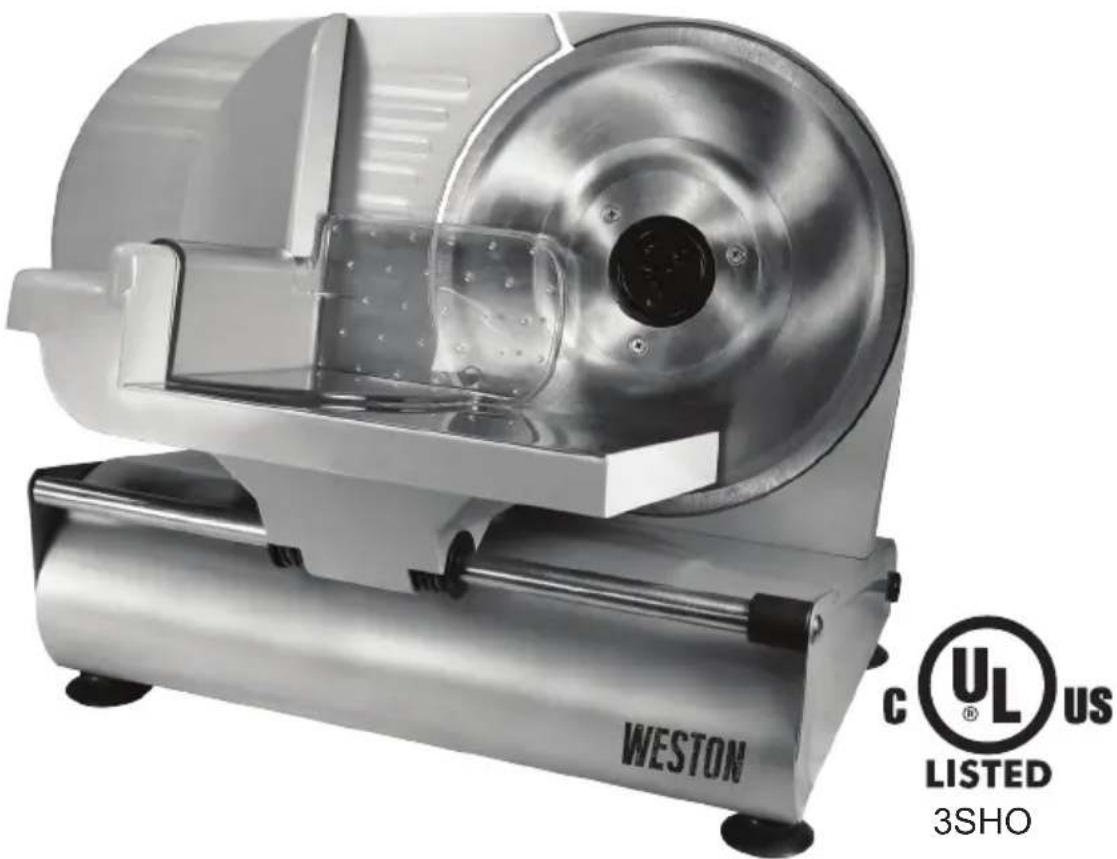
MEAT SLICER
61-0901-W

3SHO

Household Use Only AC 120V\~60Hz 150W
Due to constant factory improvements, the product pictured might differ slightly from the product in this box.
REV121514
GENERAL SAFETY LIST 3
GROUNDING INSTRUCTIONS 4
COMPONENT LIST 6-7
DIRECTIONS FOR USE 8-9
CLEANING INSTRUCTIONS 10
FOOD SAFETY 11
WARRANTY 12
- CAUTION! THE BLADE IS EXTREMELY SHARP. Handle the Blade carefully when cleaning, removing and inserting. DO NOT TOUCH THE SHARP EDGE OF THE BLADE. It is recommended that cut-proof Kevlar gloves be worn when handling the blade. NEVER TOUCH THE BLADE WHEN THE SLICER IS IN USE.
- Be careful, the Blade continues to spin after the Slicer has been turned off. Wait for the Blade to stop. NEVER TRY TO STOP THE BLADE in any way whatsoever. DO NOT touch moving parts. Personal injury may result.
- Remove the Blade periodically to clean behind. Clean with hot soapy water. Carefully wipe Blade with rubbing alcohol and allow to dry.
- Periodically inspect the Blade diameter. DO NOT USE THE SLICER IF THE DIAMETER OF THE BLADE HAS DECREASED BY 3/8" (0.95 cm). Replace the Blade if necessary.
- DO NOT use the Meat Slicer without the Food Presser and the Food Carriage secured into place.
- ALWAYS DISCONNECT Meat Slicer from power source before servicing, changing accessories, when the Meat Slicer is not in use or cleaning the unit.
- Plug the Meat Slicer into a standard 120 Volt, 60 Hz wall outlet.
- DO NOT use the Meat Slicer if the Power Cord, Plug or any other parts are damaged. DO NOT use with a damaged cord or plug or after the appliance malfunctions or is dropped or damaged in any manner. If the Meat Slicer is damaged, call Customer Service to return the Meat Slicer for examination, repair or electrical or mechanical adjustment.. DO NOT ATTEMPT TO REPLACE THE CORD. Be sure to not allow the Power Cord to drape into your work area or onto hot surfaces. Check that all parts are operating properly, and perform the intended functions. Check for alignment of moving parts or any other conditions that may affect the operation.
- NEVER use any accessories or parts from other manufacturers. Doing so will VOID YOUR WARRANTY and may cause fire, electrical shock or injury.
-
TO PROTECT AGAINST RISK OF ELECTRICAL SHOCK: DO NOT SUBMERGE THE Meat Slicer INTO WATER OR LIQUID. BE SURE THE Meat Slicer IS DISCONNECTED FROM THE POWER SOURCE BEFORE CLEANING. Wash all parts by hand and thoroughly dry. Thoroughly clean all parts that will come in contact with food before using the appliance. NEVER rinse appliance Meat Slicer under tap, only use a moist cloth to clean the Meat Slicer Motor Unit.
-
Reduce risk of unintentional starting. Make sure the Power Switch is in the "OFF" position before attaching to the power source.
- KEEP FINGERS CLEAR of the Blade AT ALL TIMES. NEVER REACH INTO THE Blade, doing so may cause serious injury. ALWAYS USE THE PROVIDED FOOD PRESSER, NEVER FEED FOOD BY HAND.
- NEVER use fingers to scrape food away from the Blade while the Meat Slicer is in operation. NEVER feed the food into the Meat Slicer by hand. SEVERE INJURY MAY RESULT.
- NEVER LEAVE THE Meat Slicer UNATTENDED. Be safe, DISCONNECT the Meat Slicer from power source before leaving the work area or when the Meat Slicer is not in use. Close supervision is necessary when any appliance is used near children. This appliance is NOT to be used by children.
- Wait until all moving parts have stopped before you remove any part of the Meat Slicer.
- TIE BACK loose hair and clothing, and roll up long sleeves before operating the Meat Slicer. REMOVE ties, rings, watches, bracelets, or other jewelry before operating the Meat Slicer.
- Be sure the Meat Slicer is on a stable work surface. Be sure all the Meat Slicer Feet are stable.
- Operate the Meat Slicer only when the Blade Locking Screw is properly engaged and tightened. To avoid danger or injury, only use the Meat Slicer when fully assembled.
- DO NOT attempt to slice fish, boned meats, frozen or other hard items.
- WEAR EYE PROTECTION. Wear safety glasses. Everyday eye glasses are not safety glasses. Safety glasses conform to ANSI Z87.1 requirements. Note: approved safety glasses have Z87 printed or stamped on them.
- DO NOT use outdoors.
- DO NOT use the Meat Slicer while under the influence of drugs, medications or alcohol.
- DO NOT let the Power Cord hang over edge of work surface.
- DO NOT attempt to operate the Meat Slicer if the Meat Slicer itself is cold. The Meat Slicer temperature should be at least 45° F ( 7° C) before beginning.
- The manufacturer declines any responsibility in the case of improper use of this machine.
WARNING! Before cleaning, assembling or disassembling the Meat Slicer, make sure the Meat Slicer Motor is OFF and the PLUG IS REMOVED FROM THE OUTLET/POWER SOURCE!

WARNING! SHARP BLADE
HANDLE CAREFULLY!
KEEP FINGERS AWAY FROM THE BLADE!
NEVER FEED FOOD BY HAND.
ALWAYS USE THE FOOD PUSHER!
Always use completely assembled Meat Slicer
with Food Carriage and Food Pusher.
Protective/cut-resistant gloves are recommended
whenever handling the Blade!
GROUNDING INSTRUCTIONS
GROUNDING
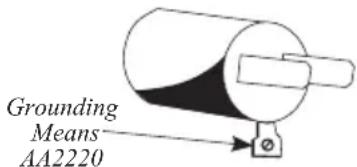
This appliance must be grounded while in use to protect the operator from electrical shock. The appliance is equipped with a 3-conductor cord and a 3-prong grounding type plug to fit the proper grounding-type receptacle. The appliance has a plug that looks like Figure A. An adapter, Figure B, should be used for connecting Figure A plugs to two-prong receptacles. The grounding tab which extends from the adapter must be connected to a permanent ground such as a properly grounded outlet box as shown in Figure C using a metal screw.
EXTENSION CORDS
Use only 3-wire extension cords which have 3-prong grounding-type plugs and a 3-pole cord connector that accepts the plug from the appliance. Use only extension cords having an electrical rating not less than the rating of the appliance. Do not use damaged extension cords. Examine extension cord before using and replace if damaged. Do not abuse extension cord and do not yank on any cord to disconnect. Keep cord away from heat and sharp edges.
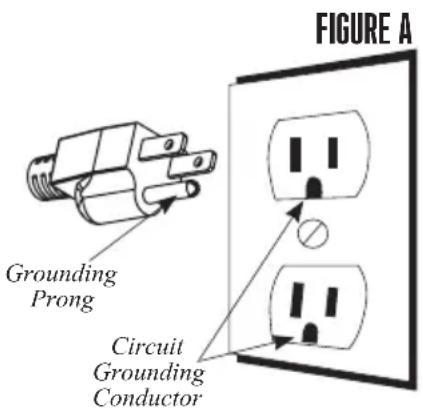
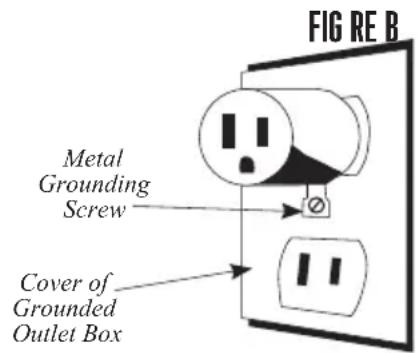
FIGURE C
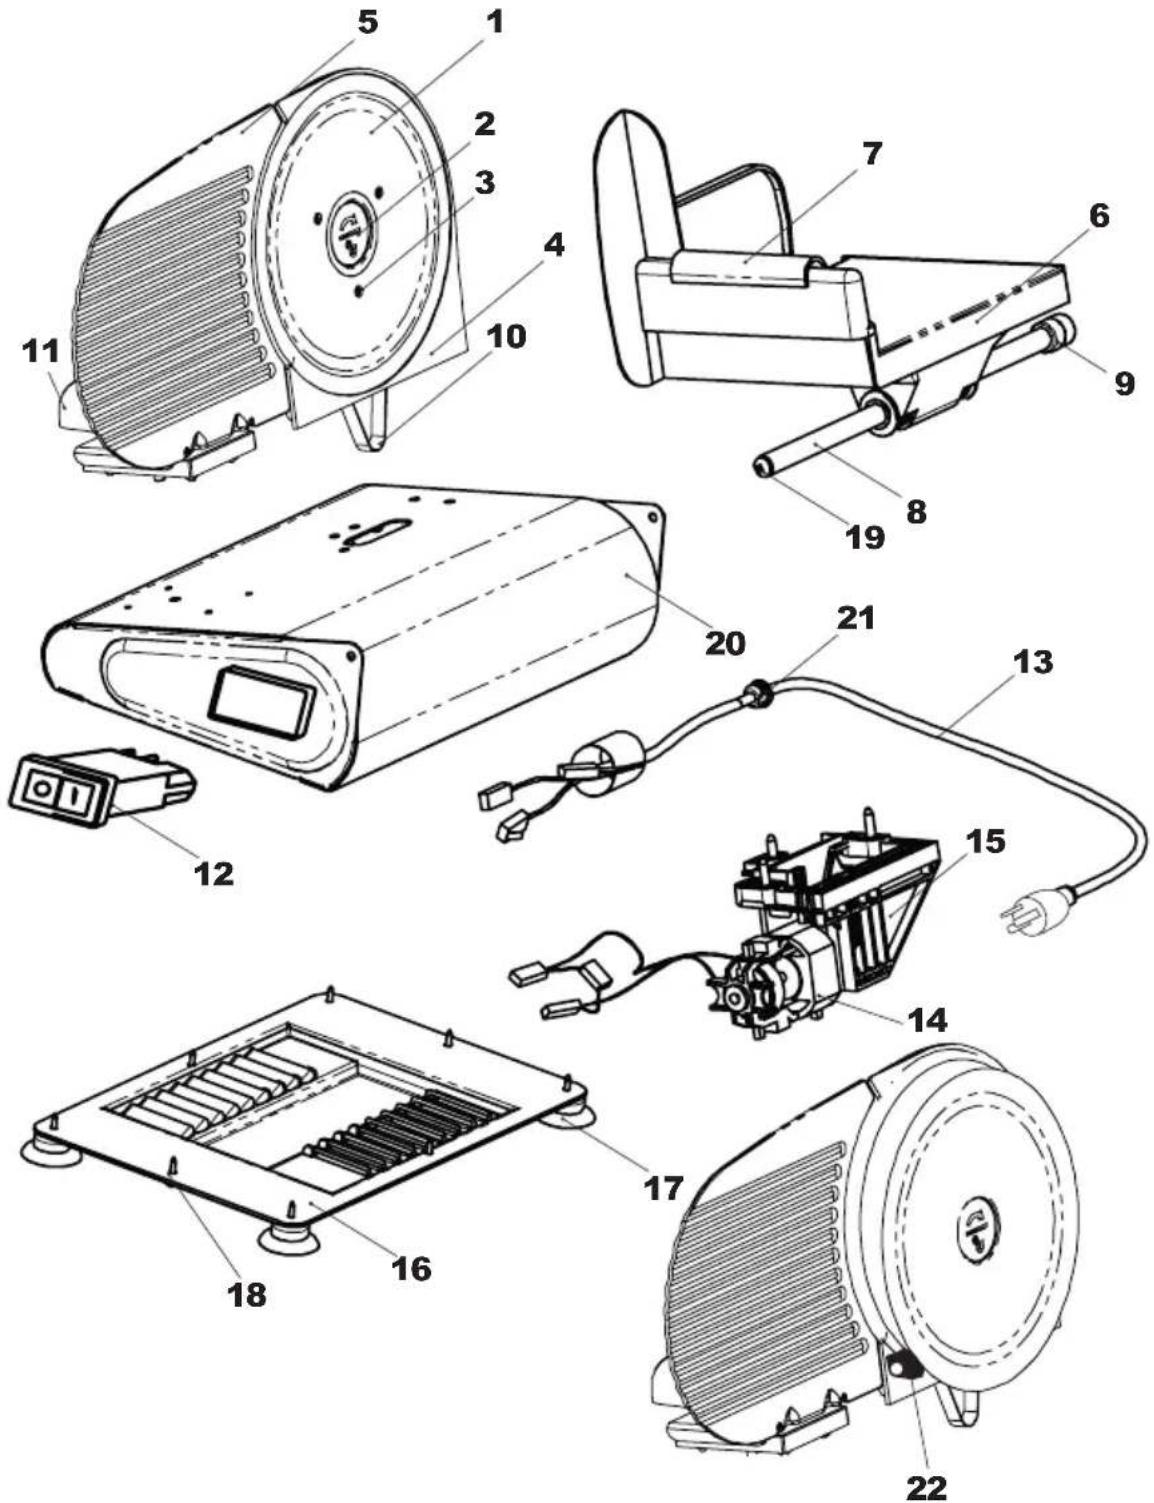
COMPONENT LIST
| DIAGRAM NUMBER PART DESCRIPTION PART NUMBER | ||
| 1 8 5/8" STAINLESS STEEL BLADE 61-0902 | ||
| 2 BLADE LOCKING SCREW 61-0903 | ||
| 3 BLADE RETAINING SCREW (3) 61-0904 | ||
| 4 BLADE HOUSING 61-0905 | ||
| 5 GAUGE PLATE 61-0906 | ||
| 6 SLIDING FOOD CARRIAGE 61-0907 | ||
| 7 FOOD PUSHER 61-0908 | ||
| 8 | SLIDING SHAFT | 61-0909 |
| 9 | SLIDING SHAFT SPACER (2) | 61-0910 |
| 10 | BELT | 61-0911 |
| 11 THICKNESS ADJUSTMENT KNOB 61-0912 | ||
| 12 | POWER SWITCH 61-0913 | |
| 13 | POWER CORD | 61-0914 |
| 14 | 150 WATT MOTOR | 61-0915 |
| 15 | MOTOR BRACKET ASSEMBLY | 61-0916 |
| 16 BASE COVER | 61-0917 | |
| 17 | SUCTION CUP SLICER FOOT (4) | 61-0918 |
| 18 | BASE COVER AND FOOT SCREW (8) | 61-0919 |
| 19 | SLIDING SHAFT SCREW | 61-0920 |
| 20 SLICER BASE HOUSING 61-0921 | ||
| 21 | POWER CORD STRAIN RELIEF 61-0922 | |
| 22 | FOOD GUIDE | 61-0926 |
If any components of this unit are broken, the unit does not operate properly or you need a replacement instruction manual, visit us on the web at
WestonProducts.com
Or call Weston Brands LLC Toll Free at 1-800-814-4895
Monday thru Friday 8:00am-5:00pm ET. Outside the U.S. call 001-440-638-3131
WARNING! Before cleaning, assembling or disassembling the Meat Slicer, make sure the Meat Slicer Motor is OFF and the PLUG IS REMOVED FROM THE OUTLET/POWER SOURCE!

HANDLE CAREFULLY! KEEP FINGERS AWAY FROM THE BLADE! NEVER FEED FOOD BY HAND. ALWAYS USE THE FOOD PUSHER!
Always use completely assembled Meat Slicer with Food Carriage and Food Pusher. Protective/cut-resistant gloves are recommended whenever handling the Blade!
PRIOR TO USE
Before using your Meat Slicer for the first time, wash all parts thoroughly, taking particular care to remove all grease and oil from surfaces. Dry all parts thoroughly before reassembling. See “Cleaning Instructions” section of this booklet.
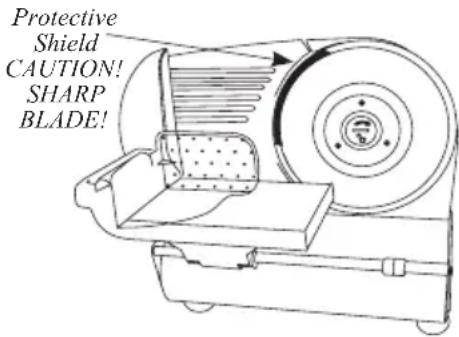
Carefully remove the black protective shield from the Meat Slicer Blade. (FIGURE 1) CAUTION! This exposes the Sharp Blade!
FIGURE 1
DIRECTIONS FOR USE
WARNING! Before cleaning, assembling or disassembling the Meat Slicer, make sure the Meat Slicer Motor is OFF and the PLUG IS REMOVED FROM THE OUTLET/POWER SOURCE!

HANDLE CAREFULLY! KEEP FINGERS AWAY FROM THE BLADE! NEVER FEED FOOD BY HAND. ALWAYS USE THE FOOD PUSHER! Always use completely assembled Meat Slicer with Food Carriage and Food Pusher. Protective/cut-resistant Kevlar gloves are recommended whenever handling the Blade!
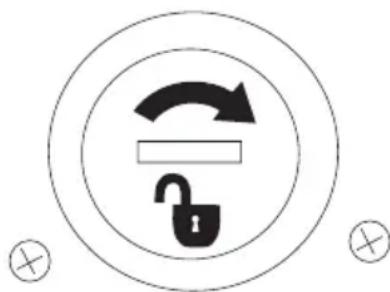
- Make sure the Blade Locking Screw is properly engaged and tightened. (FIGURE 2)
- Place the Meat Slicer on a flat stable surface. Be sure the Meat Slicer is in the "OFF" position. Plug the appliance into a properly rated electrical outlet (120V AC, 60Hz).
- Place a tray or plate behind the Meat Slicer and below the Blade to collect the sliced food as it exits the Blade area.
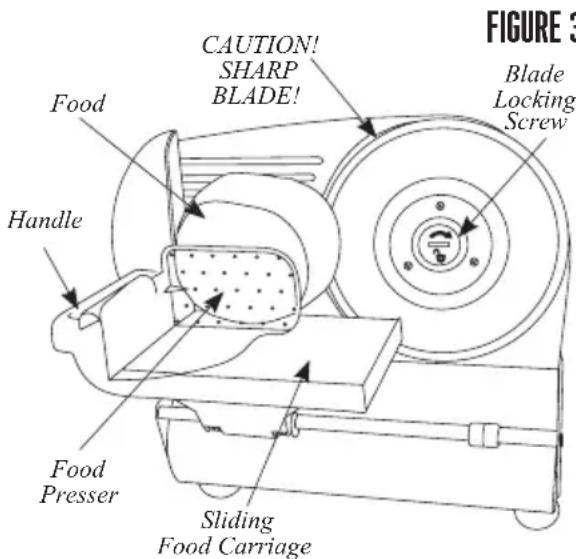
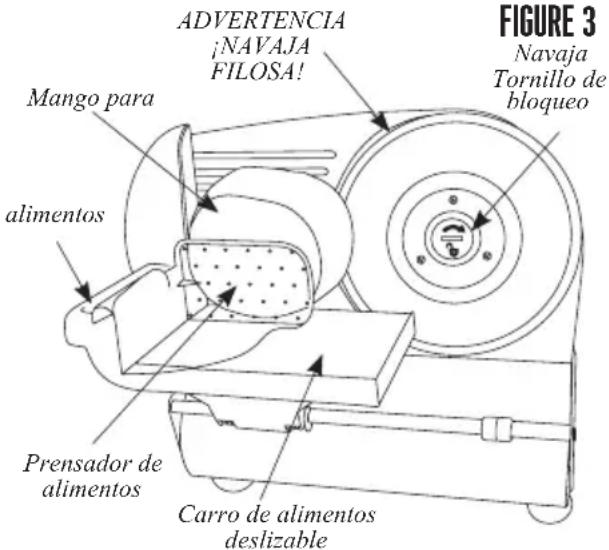
- Place food on to the Sliding Food Carriage between the Gauge Plate and the Food Presser. To avoid danger of injury, ALWAYS use the Food Carriage and Food Presser while slicing. (FIGURE 3)
FIGURE 2
Rotate counter-clockwise to lock.
- Rotate the Thickness Adjustment Knob to set the Gauge Plate to the desired cutting thickness. (FIGURE 4)
- Start the Meat Slicer by depressing the green "ON" button on the Power Switch.
- Hold the Food Presser and Sliding Food Carriage Handle; keep your hands protected behind the Food Presser.
- To begin slicing, push food in toward the Gauge Plate with the Food Presser and slide food over with the Sliding Food Carriage until it reaches the end of its travel. Slide the Sliding Food Carriage back and repeat until you have sliced the desired amount of food.
- When finished, depress the red "OFF" button on the Power Switch to turn off the Meat Slicer.
- For safety, always return the Thickness Adjustment Knob to "0" after use to properly shield the sharp edge of Blade.
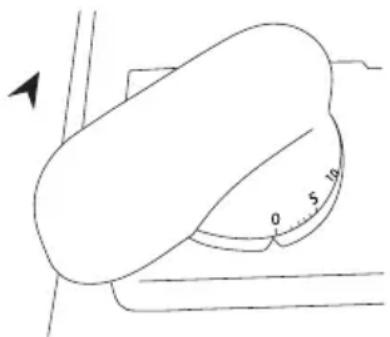
FIGURE 4
Rotate clockwise to increase cutting depth, counter-clockwise to decrease cutting depth.
NOTE: DO NOT OPERATE THE APPLIANCE CONTINUOUSLY FOR MORE THAN 15 MINUTES. Be sure to allow the appliance to cool down for 30-60 minutes before operating again. Failure to allow the slicer motor to cool down may result in damage to the motor.
CLEANING INSTRUCTIONS

WARNING! Before cleaning, assembling or disassembling the Meat Slicer, make sure the Meat Slicer Motor is OFF and the PLUG IS REMOVED FROM THE OUTLET/POWER SOURCE!

WARNING! SHARP BLADE
HANDLE CAREFULLY!
KEEP FINGERS AWAY FROM THE BLADE! NEVER FEED FOOD BY HAND. ALWAYS USE THE FOOD PUSHER!
Always use completely assembled Meat Slicer with Food Carriage and Food Pusher.
Protective/cut-resistant Kevlar gloves are recommended whenever handling the Blade!
- ALWAYS disconnect the appliance from the power source before cleaning.
- Never immerse the Motor Assembly of this appliance in water or other liquid.
- The Blade, Food Presser, and Food Tray can all be hand washed in hot soapy water. Because these parts come in contact with food, they should be sanitized by being dipped in a solution of 2 ounces (0.06 L) of unscented non-chlorine bleach mixed with 5 gallons (19 L) of water. Allow sanitized parts to air dry. Do not use harsh
abrasives to clean any part of the Meat Slicer. Use extreme caution when handling or cleaning the Blade, as it is extremely sharp! Do not leave Blade underwater; trying to handle sharp objects in water can be hazardous. It is highly recommended to wear cut-resistant Kevlar Gloves when removing, cleaning and re-installing the Blade.
- Set the Thickness Adjustment Knob to "0".
- Remove Food Presser and rotate the Sliding Food Carriage out of the way in order to allow for easy access to the Blade.
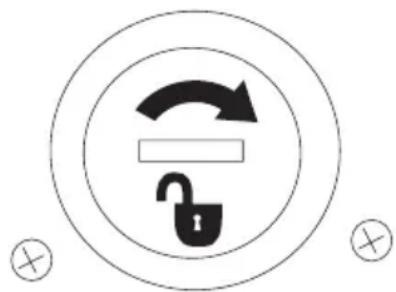
- To remove the Blade hold the Blade with one hand and use a coin to unlock the Blade Locking Screw by turning it clockwise Figure 5. Carefully pull the Blade off and hold it by using the hole in the center of the Blade.
- Clean the outer surface of the Meat Slicer Body & Base with a damp cloth. Mild detergent or water can be used to dampen the cloth. Wipe away from the Blade, NEVER wipe toward the Blade. Never immerse Motor Assembly in water or any other liquid. Do not use steel wool, abrasive cleaners, or sharp utensils to clean.
- To allow for easier cleaning, the Thickness Adjustment Knob can be turned past "0" to allow the Gauge Plate to slide back. NOTE: Use this feature only with Blade removed. (After cleaning and before reassembly, reset the Thickness Adjustment Knob to "0".)
- After cleaning and drying, install the Blade and Blade Screw to the Motor Assembly in reverse order of step 6. Make sure the Blade Locking Screw is properly engaged and tightened. Rotate the Sliding Food Carriage back to its proper position and re-install the Food Presser.
FIGURE 5
Rotate clockwise to remove.
FOOD SAFETY
There are basic rules to follow when handling food.
They are COOK, SEPARATE, CLEAN, and CHILL.
COOK
It's crucial to cook food to a safe internal temperature to destroy bacteria that is present. The safety of hamburgers and other foods made with ground meat has been receiving a lot of attention lately, and with good reason. When meat is ground, the bacteria present on the surface is mixed throughout the ground mixture. If this ground meat is not cooked to at least 160°F to 165°F (71°C to 74°C), bacteria will not be destroyed and there's a good chance you will get sick.
Solid pieces of meat like steaks and chops don't have dangerous bacteria like E. coli on the inside, so they can be served more rare. Still, any beef cut should be cooked to an internal temperature of at least 145°F (63°C) (medium rare). The safe temperature for poultry is 165°F (75°C) and solid cuts of pork should be cooked to 145°F (63°C).
SEPARATE
Foods that will be eaten uncooked and foods that will be cooked before eating MUST ALWAYS be separated. Cross-contamination occurs when raw meats or eggs come in contact with foods that will be eaten uncooked. This is a major source of food poisoning. Always double-wrap raw meats and place them on the lowest shelf in the refrigerator so there is no way juices can drip onto fresh produce. Then use the raw meats within 1-2 days of purchase, or freeze for longer storage. Defrost frozen meats in the refrigerator, not on the counter.
When grilling or cooking raw meats or fish, make sure to place the cooked meat on a clean platter. Don't use the same platter you used to carry the food out to the grill. Wash the utensils used in grilling after the food is turned for the last time on the grill, as well as spatulas and spoons used for stir-frying or turning meat as it cooks.
Make sure to wash your hands after handling raw meats or raw eggs. Washing hands with soap and water, or using a pre-moistened antibacterial towelette is absolutely necessary after you have touched raw meat or raw eggs. Not washing hands and surfaces while cooking is a major cause of cross-contamination.
CLEAN
Wash your hands and work surfaces frequently when you are cooking. Washing with soap and warm water for at least 15 seconds, then dry with a paper towel.
CHILL
Chilling food is very important. The danger zone where bacteria multiply is between 40° F and 140° F ( 4° C and 6° C). Your refrigerator should be set to 40° F ( 4° C) or below; your freezer should be 0° F (- 17° C) or below. Simple rule: serve hot foods hot, cold foods cold. Use chafing dishes or hot plates to keep food hot while serving. Use ice water baths to keep cold foods cold. Never let any food sit at room temperature for more than 2 hours - 1 hour if the ambient temperature is 90° F ( 32° C) or above. When packing for a picnic, make sure the foods are already chilled when they go into the insulated hamper. The hamper won't chill food - it just keeps food cold when properly packed with ice. Hot cooked foods should be placed in shallow containers and immediately refrigerated so they cool rapidly. Make sure to cover foods after they are cool.
NOTE: Special considerations must be made when using venison or other wild game, since it can become heavily contaminated during field dressing. Venison is often held at temperatures that could potentially allow bacteria to grow, such as when it is being transported. Refer to the USDA Meat and Poultry Department for further questions or information on meat and food safety.
WESTON WARRANTY INFORMATION
SAVE THIS WARRANTY INFORMATION FOR YOUR RECORDS!
Weston Brands LLC warrants to the ORIGINAL RETAIL PURCHASER of this product that if operated in accordance with the printed instruction accompanying it, then for a period of 1 year from the date of purchase, the product shall be free from defects in material and workmanship.
The Warranty Card, along with a copy of the original receipt, must be received by Weston Brands LLC within 30 days from purchase date for the warranty to apply. Failure to send the completely filled out Warranty Card, along with a copy of the original receipt, will void the warranty.
The product must be delivered to or shipped freight prepaid to Weston Brands LLC for warranty services, in either its original packaging or similar packaging affording an equal degree of protection. Damage due to shipping is not the responsibility of the company. Weston Brands LLC charges a \$35.00 per hour bench charge. NOTE: No repairs will be started without the authorization of the customer. The return shipping cost to the customer will be added to the repair invoice.
Prior to returning the product for Warranty Repair, the product must be thoroughly cleaned and free from any food particles or other debris. Failure of the purchaser to comply with this standard will result in the unit being returned without repair. In some cases, a \$50 cleaning surcharge may apply.
Weston Brands LLC will repair (or at its discretion, replace) the product free of charge, if in the judgment of the company, it has been proven to be defective as to seller's labor and material, within the warranty period.
New or rebuilt replacements for factory defective parts will be supplied for one (1) year from the date of purchase. Replacement parts are warranted for the remainder of the original warranty period.
For non-warranty repairs, contact Weston Brands LLC's Customer Service at 1-800-814-4895 M-F 8am-5pm ET (outside of the United States 001-440-638-3131) to obtain a Return Merchandise Authorization Number (RMA Number).
Weston Brands LLC will refuse all returns that do not contain this number. DO NOT RETURN THE UNIT WITHOUT PROPER AUTHORIZATION FROM Weston Brands LLC.
LIMITATIONS: The warranty is void if the product is used for any purpose other than that for which it is designed. The product must not have been previously altered, repaired, or serviced by anyone else other than Weston Brands LLC. If applicable, the serial number must not have been altered or removed. The product must not have been subjected to accident in transit or while in the customer's possession, misused, abused, or operated contrary to the instructions contained in the instruction manual. This includes failure caused by neglect of reasonable and necessary maintenance, improper line voltage and acts of nature. This warranty is not transferable and applies only to U.S. and Canadian sales. Except to the extent prohibited by applicable law, no other warranties whether expressed or implied, including warranty merchantability and fitness for a particular purpose, shall apply to this product. Under no circumstances shall Weston Brands LLC be liable for consequential damages sustained in connection with said product and Weston Brands LLC neither assumes nor authorizes any representative or other person to assume for it any obligation or liability other than such as is expressly set forth herein. Any applicable implied warranties are also limited to the one (1) year period of the limited warranty.
This warranty covers only the product and its specific parts, not the food or other products processed in it. Weston is not responsible for missing or damaged parts on discounted/clearance, resale or final sale items where the seller may not be able to guarantee full functionality or completeness of the unit.
CUT ALONG THE DOTTED LINE AND SEND THE WARRANTY CARD ALONG WITH A COPY OF YOUR ORIGINAL PURCHASE RECEIPT TO:
Weston Brands LLC / WARRANTY
20365 Progress Drive, Strongsville, OH 44149 USA
WESTON WARRANTY CARD
SEND THIS CARD ALONG WITH A COPY OF YOUR ORIGINAL PURCHASE RECEIPT TO: Weston Brands LLC / WARRANTY, 20365 PROGRESS DRIVE, STRONGSVILLE, OH 44149 USA
Customer Name:
Address:
City/State/Zip/Country:
Telephone Number:
E-Mail Address:
Original Date of Purchase:
Product Model #:
Serial # (if applicable):
I have read the warranty information. Initial here:
Copy of Receipt Included

WESTON
RECONNECT WITH REAL FOOD
9"
REBANADORA DE CARNE
61-0901-W

3SHO

ANTES DE USAR
FIGURE 1
Weston Brands LLC / WARRANTY
20365 Progress Drive, Strongsville, OH 44149 USA
TARJETA DE GARANTÍA WESTON
ENVÍE ESTA TARJETA JUNTO CON UNA COPIA DE SU RECIBO DE COMPRA ORIGINAL A: Weston Brands LLC/WARRANTY, 20365 PROGRESS DRIVE. STRONGSVILLE, OH 44149 USA
RECONNECT WITH REAL FOOD
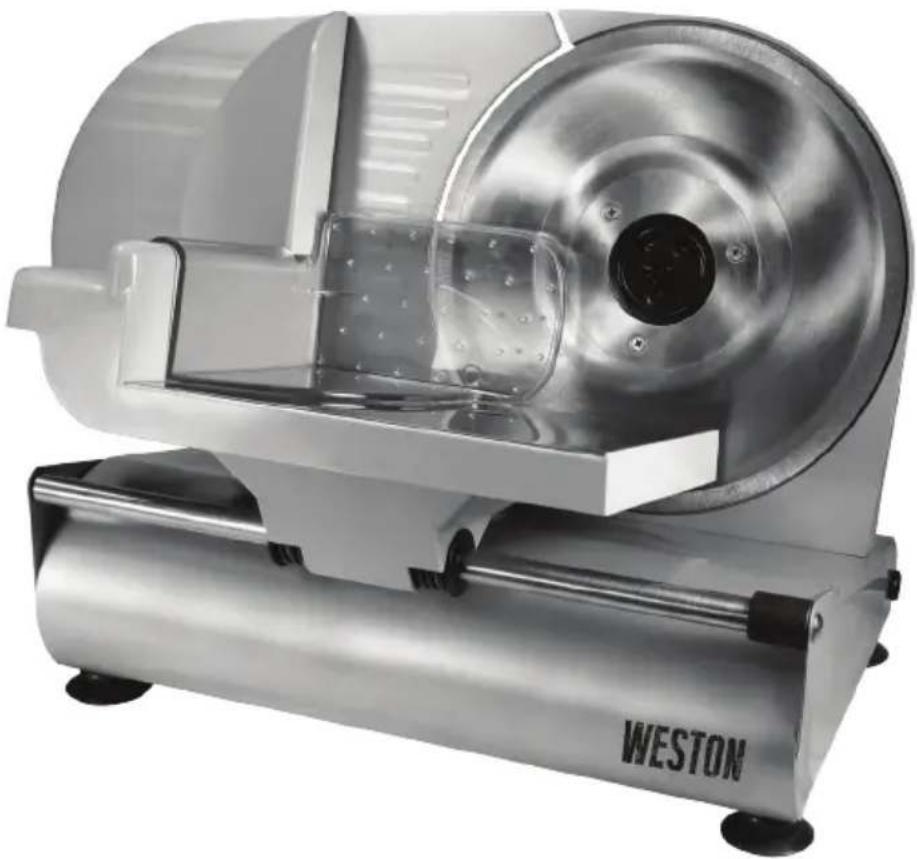
TRANCHEUSE À VIANDE
de 22 cm
61-0901-W

3SHO
CE
Utilisation
domestique
uniquement
120 V c.a. - 60 Hz
150 W
AVANT D'UTILISER L'APPAREIL
AVERTISSEMENT!
LAME TRANCHANTE
FIGURE 3
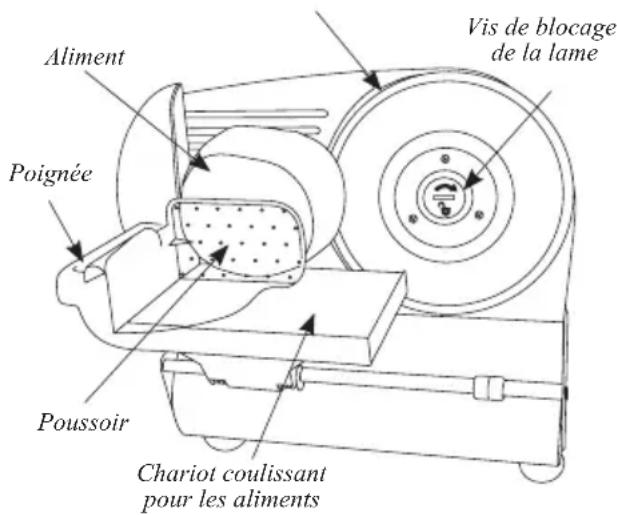
FIGURE 4
Weston Brands LLC / WARRANTY
20365 Progress Drive, Strongsville, OH 44149 USA
CARTE DE GARANTIE
ENVOYEZ CETTE CARTE DE GARANTIE AVEC UNE COPIE DE VOTRE REÇU D'ACHAT ORIGINAL À: Weston Brands LLC / WARRANTY, 20365 PROGRESS DRIVE, STRONGSVILLE, OH 44149 USA
Nom du Client:
Adresse:
Province/Code postal/Région: ____
ATTENTION!
PLEASE INSPECT THIS PACKAGE THOROUGHLY FOR MISSING PARTS OR ANY PRODUCT DAMAGE. IF YOUR PRODUCT CONTAINS SHIPPING DAMAGE, PLEASE CONTACT RETAILER FOR ASSISTANCE.
For all other questions regarding product usage, missing parts, product damage, difficulty or warranty activation, please contact the Weston Brands Customer Service Team: 8:00 am to 5:00 pm ET, Monday thru Friday
CustomerService@WestonProducts.com
U.S. Residents Customer Service Line: 1-800-814-4895 (Outside U.S. Call: 001-440-638-3131)
Weston Brands LLC, 20365 Progress Drive, Strongsville, Ohio 44149
WestonProducts.com
Please DO NOT return this item to the retailer before contacting Weston Brands Customer Service.
SAVE THESE INSTRUCTIONS!
Refer to them often and use them to instruct others.
ATTENTION!
VEUILLEZ INSPECTER CET EMBALLAGE AVEC SOIN POUR Y DÉTECTER TOUTE PIÈCE MANQUANTE OU ENDOMMAGÉE. SI DES PIÈCES ONT ÉTÉ ENDOMMAGÉES PENDANT LE TRANSPORT, VEUILLEZ COMMUNIQUER AVEC LE DÉTAILLANT POUR OBTENIR DE L'AIDE.
- RECONNECT WITH REAL FOOD
- 9
- MEAT SLICER
- GROUNDING INSTRUCTIONS
- GROUNDING
- EXTENSION CORDS
- PRIOR TO USE
- DIRECTIONS FOR USE
- CLEANING INSTRUCTIONS
- FOOD SAFETY
- COOK
- SEPARATE
- CLEAN
- CHILL
- WESTON WARRANTY INFORMATION
- SAVE THIS WARRANTY INFORMATION FOR YOUR RECORDS
- WESTON WARRANTY CARD
- WESTON
- REBANADORA DE CARNE
- ANTES DE USAR
- TARJETA DE GARANTÍA WESTON
- TRANCHEUSE À VIANDE
- AVANT D'UTILISER L'APPAREIL
- CARTE DE GARANTIE
- ATTENTION
- SAVE THESE INSTRUCTIONS
Brand : Weston
Model : 61-0901-W
Category : Slicer