07-1201-W - Food Processor Weston - Free user manual and instructions
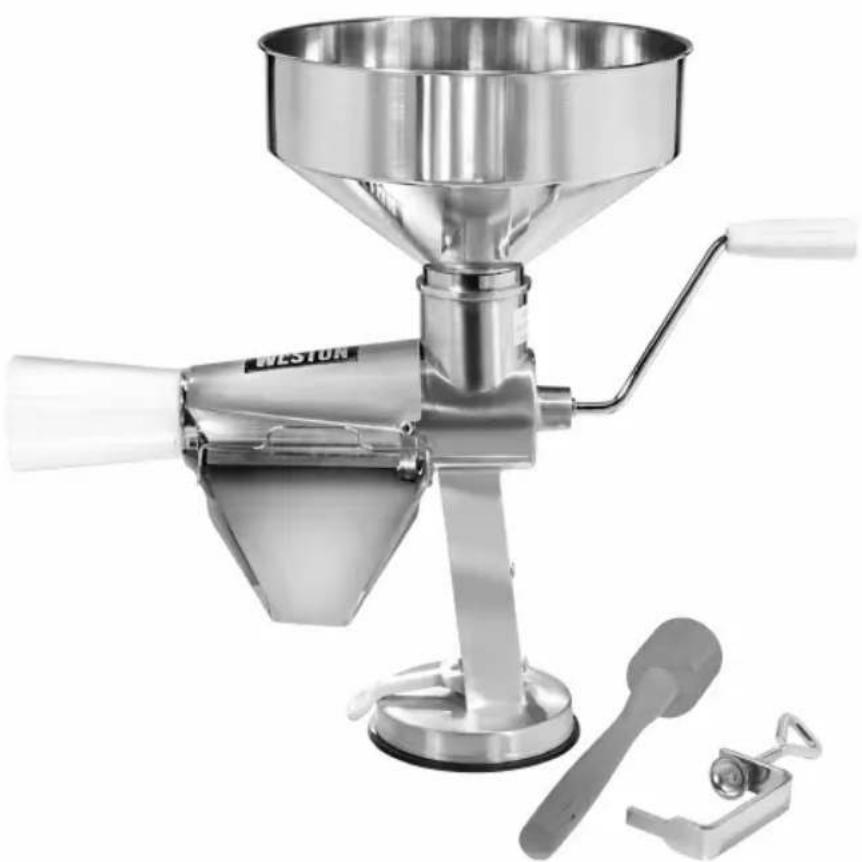
Find the device manual for free 07-1201-W Weston in PDF.


| Product Type | Food mill (tomato press and manual food mill) |
| Brand | Weston |
| Model | 07-1201-W |
| Approximate Dimensions | 30 cm × 20 cm × 20 cm |
| Approximate Weight | 2.5 kg |
| Power Type | Manual (crank) |
| Main Functions | Press, puree, remove seeds and skins |
| Compatible Fruits and Vegetables | Tomatoes, apples, pears, berries, pumpkins, squashes, potatoes, grapes, peaches, cherries, mangos, avocados |
| Strainer / Filter Included | Multi-purpose filter (standard) |
| Additional Accessories | Berry filter (07-0855), pumpkin filter (07-0857), grape spiral (07-0856) sold separately |
| Attachment Method | Suction cup or clamp |
| Main Materials | Plastic housing, metal shaft, stainless steel strainer |
| Care and Cleaning | Disassemble completely, wash in warm soapy water, brush the strainer, dry all parts before storing |
| Lubrication Tips | Apply a drop of vegetable oil on the O-ring and rubber strainer gasket |
| Safety | Never insert hand into the feed opening; do not run empty |
| Warranty | 1 year, limited (defects in material and workmanship) |
| Customer Service | Weston Brands LLC: 1-800-814-4895 (US), 001-216-901-6801 (outside US) |
| Country of Manufacture | Not specified |
| Repairability | Spare parts available at WestonSupply.com |
| Storage Instructions | Keep original box for storage; do not soak the wooden pusher |
Frequently Asked Questions - 07-1201-W Weston
User questions about 07-1201-W Weston
0 question about this device. Answer the ones you know or ask your own.
Ask a new question about this device
Download the instructions for your Food Processor in PDF format for free! Find your manual 07-1201-W - Weston and take your electronic device back in hand. On this page are published all the documents necessary for the use of your device. 07-1201-W by Weston.
USER MANUAL 07-1201-W Weston
RECONNECT WITH REAL FOOD
METAL TOMATO STRainer
07-1201-W
COMPONENT LIST 5
ASSEMBLY INSTRUCTIONS 6-7
FOOD TIPS 8
CLEANING INSTRUCTIONS 9
HELPFUL HINTS 9
RECIPIES 10
WARRANTY 12
ENGLISH INSTRUCTIONS
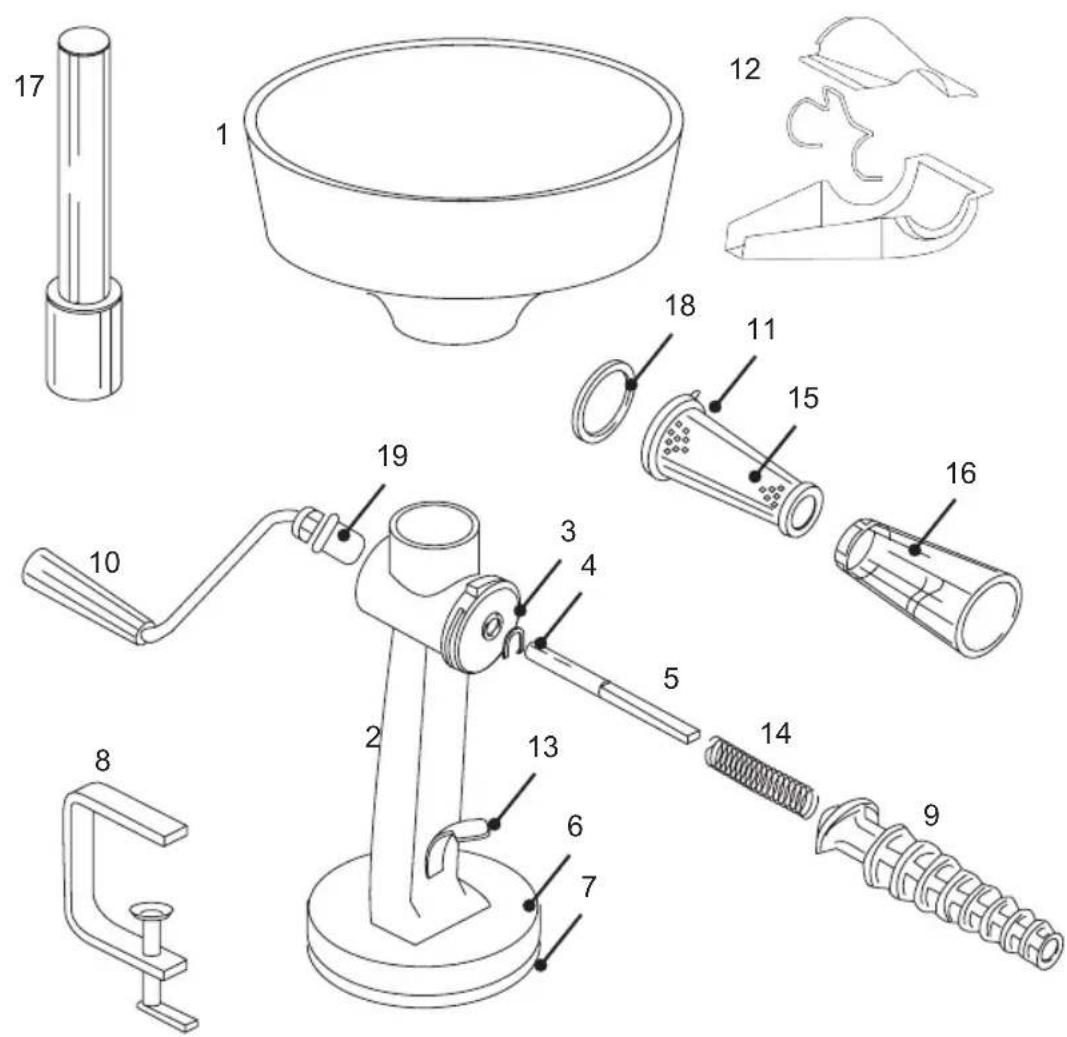
COMPONENT LIST
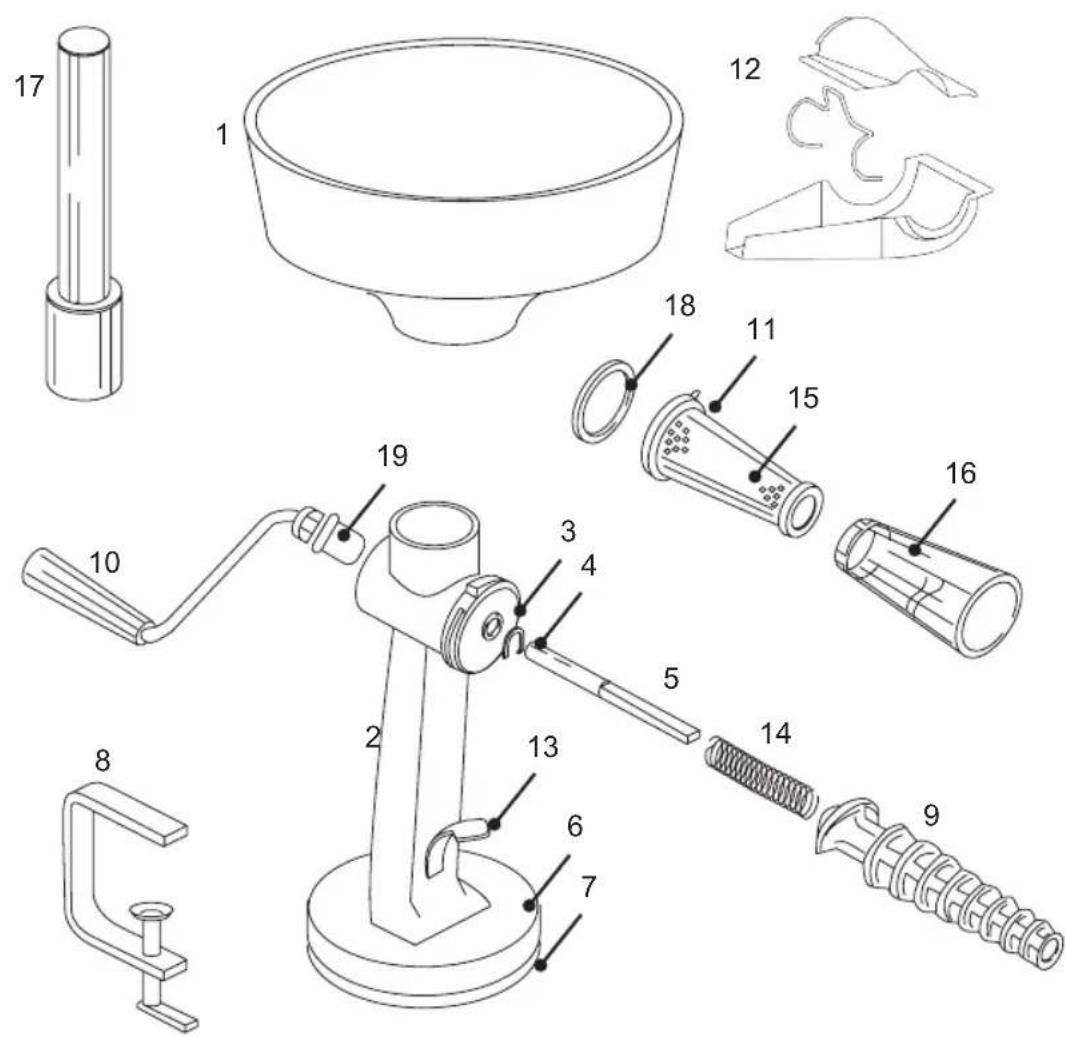
| DIAGRAM NUMBER PART DESCRIPTION | |
| 1 HOPPER | |
| 2 BODY | |
| 3* DRIVE SHAFT | O-RING SEAL |
| 4* DRIVE SHAFT | CLIP |
| 5 DRIVE SHAFT | ASSEMBLY(SPRING, E-CLIP, O-RING INCLUDED) |
| 6 SUCTION CUP | BODY |
| 7 SUCTION CUP | |
| 8 C-CLAMP | |
| 9 SPIRAL | |
| 10 HANDLE | |
| 11 SCREEN THUMBSCREW | |
| 12 CHUTE ASSEMBLY | |
| 13 SUCTION CUP | LEVER |
| 14* DRIVE SHAFT | SPRING |
| 15 MULTI-PURPOSE SCREEN | |
| 16 WASTE FUNNEL | |
| 17 STOMPER | |
| 18 | SCREEN GASKET |
| 19 | PLASTIC BUSHING |
*PARTS 3, 4, & 14 ARE ASSEMBLED ON PART 5
If any components of this unit are broken, the unit does not operate properly or you need a replacement instruction manual, visit us on the web at
WestonSupply.com
Or call Weston Brands, LLC Toll Free at 1-800-814-4895
Monday thru Friday 8:00am-5:00pm ET. Outside the U.S. call 001-216-901-6801
ASSEMBLY INSTRUCTIONS
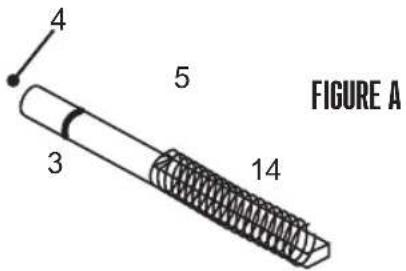
- Apply a few drops of vegetable oil to the rubber Drive Shaft O-Ring (3).
- Ensure the Drive Shaft Clip (4) and Drive Shaft O-Ring seal (3) are in place on the drive shaft. NOTE: This configuration is pre-assembled on first use (5). FIGURE A
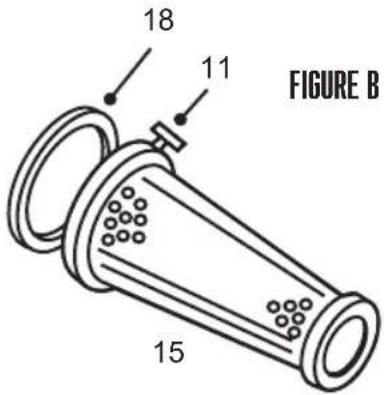
- Insert the Screen Gasket (18) into the large end of the Screen (15), making sure the Gasket is under the Thumbscrew (11). FIGURE B
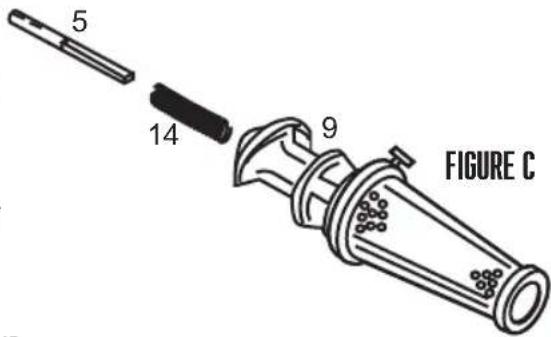
- Slide the red plastic Spiral (9) onto the Drive Shaft (5) over the Spring (14). Be sure to match the flats on the Drive Shaft to the metal insert in the side of the Spiral. FIGURE C
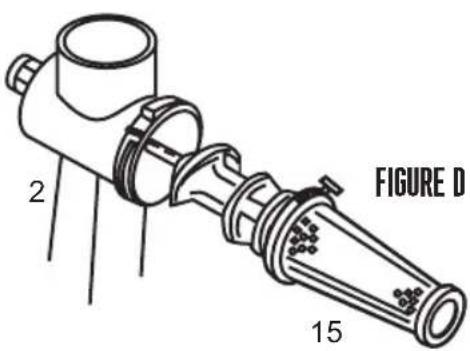
- Align the notches of the Body (2) with the notches in the Multi-Purpose Screen (15). FIGURE D
- Holding the Body firmly in one hand, push the Multi-Purpose Screen (15) over the Spiral (9) and Drive Shaft Assembly (5) and compress, then turn 1/8th of a turn counter-clockwise to lock it in place. (NOTE: The "ON" - "OFF" direction arrows are on the base of the Multi-Purpose Screen.)
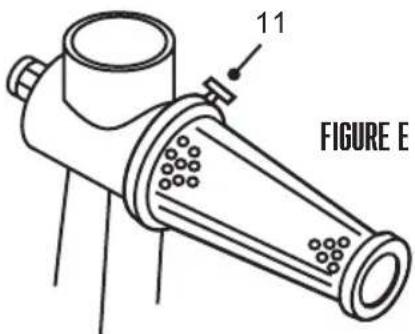
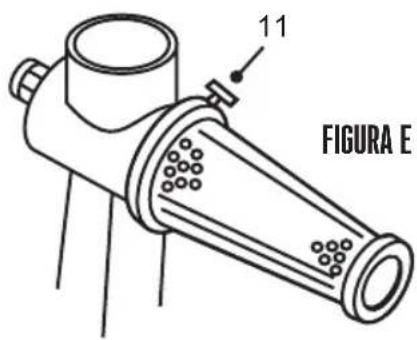
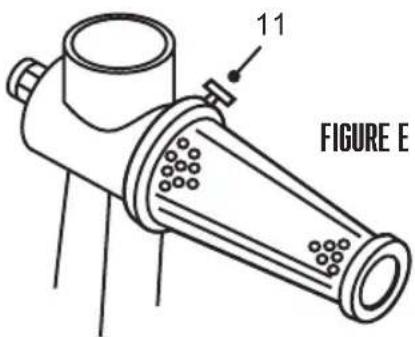
- Tighten the Screen Thumbscrew (11) to lock the Screen in place (NOTE: Finger tighten only, do not over tighten). FIGURE E
NOTE: Operating the Tomato Press & Sauce Maker while empty is NOT recommended. The juice from the fruits and vegetables act as a lubricant for the mechanisms and reduce wear on the components.
WARNING
Entanglement Hazard: To avoid serious injury do not reach into grinder inlet. Always use stomper.
- At this point you can attach the Tomato Press & Sauce Maker to your work space. If utilizing the Suction Cup (7), be sure the area you wish to adhere to is smooth, clean, and dry. Simply raise the Suction Cup Lever (13) and hold the Tomato Press & Sauce Maker firmly in place with the Suction Cup (7) in contact with the table surface, then press the Suction Cup Lever (13) down. The Suction Cup Lever will require firm pressure to lock it into place. NOTE: If you have a rough or dirty surface, the Suction Cup may not adhere to the surface.
- If utilizing the C-Clamp (8), simply position the Tomato Press & Sauce Maker near the edge of a table or counter. Slide the top end of the C-Clamp into the slot at the base of the Tomato Press & Sauce Maker and tighten the screw to the underside of the work surface.
- Slide the Handle (10) into the Tomato Press & Sauce Maker making sure to align the slots in the Drive Shaft (5) to the tabs on the Handle.
- Attach the Waste Funnel (16) to the end of the Screen (15) by pushing the small end with the tabs over the end of the Screen. NOTE: Use caution not to break the Waste Funnel when attaching or detaching.
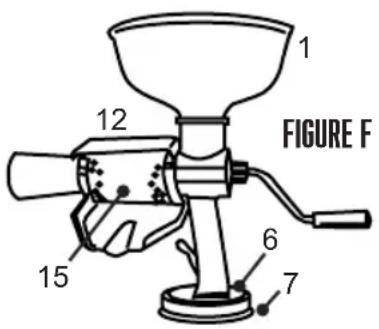
- Attach the Chute Assembly (12) to the Screen by sliding the lower half of the assembly under the Screen (15). Securing the underside, insert the hinges of the upper half of the assembly into the lower half. Once in place, snap the wire clamp in place. The Chute Assembly should be positioned so that it covers the Screen in its entirety. FIGURE F
- Attach the Hopper (1) to the top of the Strainer by sliding the small neck section of the Hopper into the throat of the Body (2).
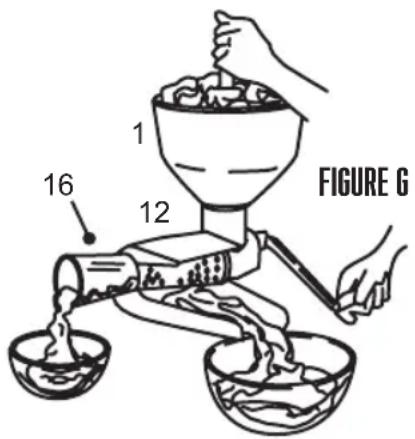
- Before placing any food in the Hopper (1) be sure to have a bowl or jar under both the Waste Funnel (16) and the Squirt Guard/Chute (12). FIGURE G
FOOD TIPS
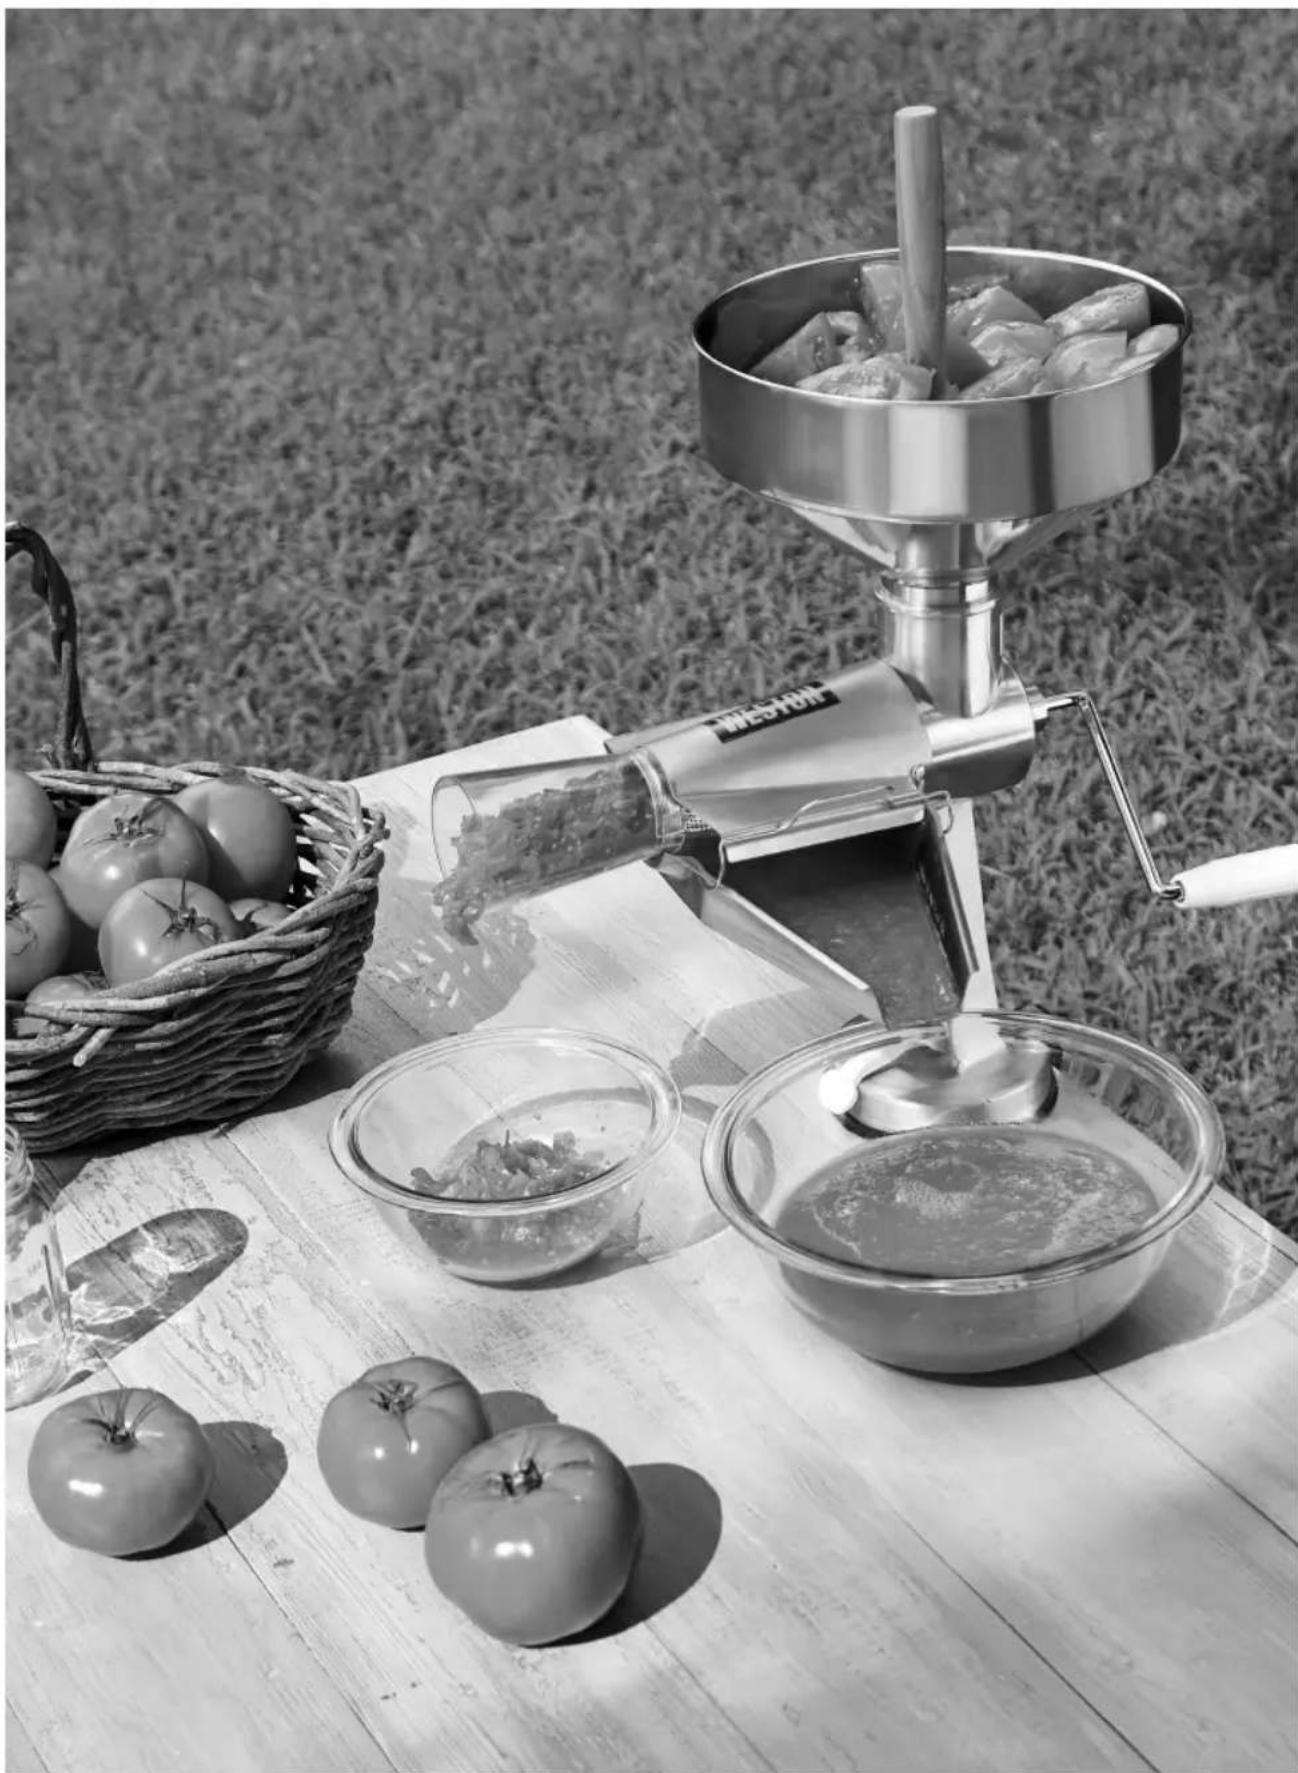
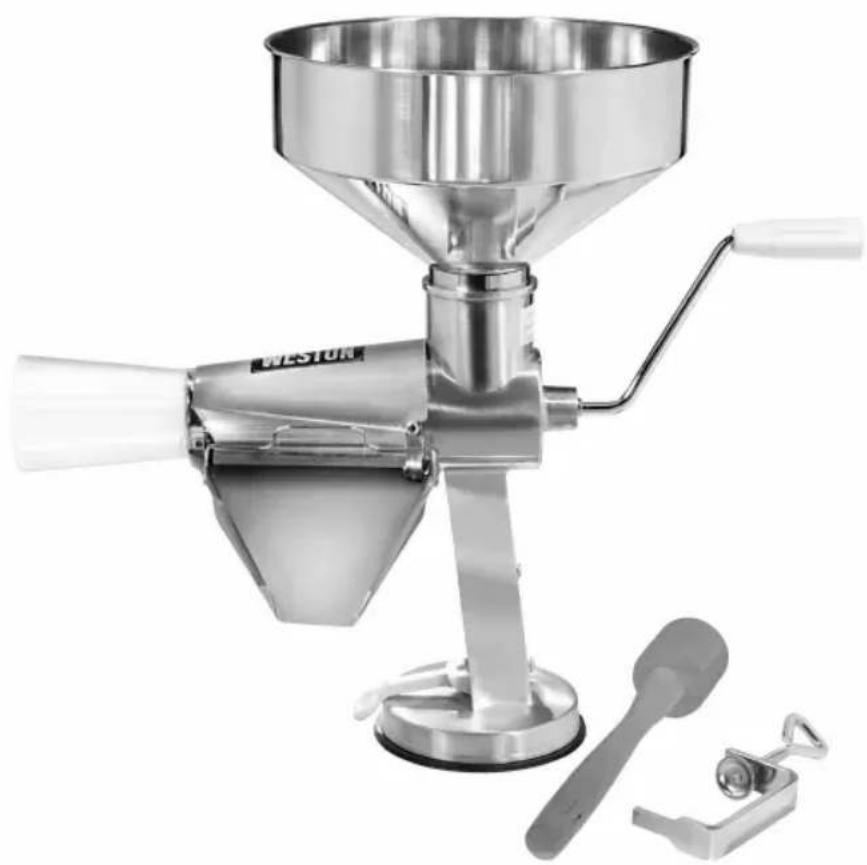
TOMATOES: The Tomato Press & Sauce Maker will easily puree fresh tomatoes, remove the seeds, core and skin with no pre-cooking whatsoever. Fresh vine ripened tomatoes work best. Remove the stems, wash and quarter the tomatoes, then load the Hopper half way full with the quartered tomatoes. Guide the tomatoes into the neck of the Tomato Press & Sauce Maker using the Stomper, turn the Handle in a clockwise direction. The skins and seeds will come out of the Waste Funnel, while the delicious puree slides into your bowl ready to be seasoned and eaten. If the tomatoes are extra pulpy, a little unripe or difficult to strain, parboil them to make them softer. After parboiling, allow to cool before straining. If excessive liquid backs up into the Hopper continue turning the Handle until the liquid runs through the machine before guiding more tomatoes into the neck of the Strainer.
APPLES AND PEARS: For best results apples and pears should be softened before processing with the Tomato Press & Sauce Maker. This is easily accomplished without peeling or even coring the apples! Quarter the fruit before or after softening. Place the fruit in a pot with about 1/2 full of water. Set the heat to medium, cover, and let them steam until they are soft. For a little extra flavor you can use cider to steam the apples. After removing the fruit from the pot, strain it through the Tomato Press & Sauce Maker using the multi-purpose Screen. The cores, skins and seeds will come out of the Waste Funnel, while the delicious puree slides into your bowl ready to be seasoned and eaten. If the Tomato Press & Sauce Maker is too hard to turn, or it jams, the fruit may need further softening.
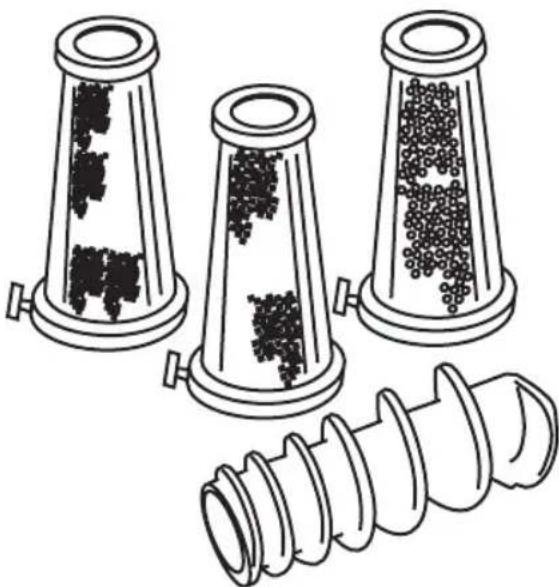
BERRIES: The Tomato Press & Sauce Maker will make it easy to create homemade jams and jellies. Combine different berries and fruits to create custom flavors. With the optional Berry Screen (Model No. 07-0855 sold separately) you can easily separate even the tiniest seeds from raspberries and strawberries. If you like your jellies thicker just add a few crushed berries to the puree or use a Screen with larger holes.
PUMPKIN, SQUASH, POTATOES, ETC: Using the optional Pumpkin Screen (Model No. 07-0857 sold separately) creates incredibly smooth pie fillings or purees. Use this Screen to also make breads, cakes, or even mashed potatoes without peeling. Just cut these products into 1" (2.5 cm) squares or slices. Boil or bake until tender. Allow to cool. For pumpkin and squash scoop the pulp out of its skin and run it through the Tomato Press & Sauce Maker. Potatoes can be cut into cubes, boiled until tender then run right through the Tomato Press & Sauce Maker for super smooth or chunky mashed potatoes with no peeling.
GRAPES: Using the optional Grape Spiral (Model No. 07-0856 sold separately) and standard Screen, to create gallons of delicious grape juice in just minutes. Just wash the grapes, pull them from the stems, and the Tomato Press & Sauce Maker does the rest. Great for the home wine maker.
FRUITS WITH LARGER PITS: For fruits like peaches, cherries, mangos, avocados*, and anything else with a large seed, you must remove the seed to prevent jamming the mechanism. Don't worry about the skin or the core, the Tomato Press & Sauce Maker will easily remove them and send them out through the Waste Funnel. If the fruit is firm like an apple or pear, remember to soften them by steaming or baking slightly before loading them into the Tomato Press & Sauce Maker. * Avocados and mangos must be peeled before straining.
CLEANING INSTRUCTIONS
- Fully disassemble the Tomato Press & Sauce Maker.
- Wash all parts in hot soapy water. A stiff-bristled bottle brush may be needed to clean the Screen. Pay extra attention to the seams of the Screen as seeds and skin may gather there.
- Before storing or reassembling the Tomato Press & Sauce Maker be sure all the parts are thoroughly dry. It is recommended to apply a drop of vegetable oil on the rubber Screen Gasket to keep it from drying and becoming brittle.
- Keep the box the Tomato Press & Sauce Maker came in for easy storage.
NOTE: To prevent damage to the wooden stomper, do not leave submerged in water and dry after washing.
HELPFUL HINTS
- It is normal when straining large quantities of food with a high moisture content like tomatoes, to see liquid back up into the Hopper. Simply continue turning the Handle until all the liquid disappears from the Hopper and neck of the Tomato Press & Sauce Maker.
- Depending on the food you are processing, it may be necessary to occasionally scrape pulp from the Screen of the Tomato Press & Sauce Maker. A rubber spatula is ideal for this.
- The Tomato Press & Sauce Maker is equipped with an extra Large Hopper. It is best to fill the Hopper half full leaving space around the middle to guide food into the throat of the Tomato Press & Sauce Maker using the Stomper.
- If there is excessive pulp exiting the Waste Funnel, run the pulp through the Tomato Press & Sauce Maker a second time to fully extract every bit of juice. To get the most out of the fruits and vegetables, strain the skins and seeds from the Waste Funnel a second time.
- Operating the Tomato Press & Sauce Maker while empty is not recommended. The juice from the fruits and vegetables act as a lubricant for the mechanism and reduces wear on the components.
- The standard Screen that comes with the Tomato Press & Sauce Maker is ideal for most foods, such as: Apples*, Tomatoes, Apricots*, Avocados (must be peeled), Carrots*, Cherries, Cranberries*, Peaches (remove pit before straining), Potatoes*, Pears*. *These foods should be softened by steaming, parboiling or baking before straining.
- IMPORTANT NOTE: ALWAYS FOLLOW RECOMMENDED CANNING, FREEZING AND DEHYDRATING PROCEDURES WHEN PRESERVING ANY FOODS.
RECIPIES
LARGE BATCH ITALIAN TOMATO SAUCE
| INGREDIENTS | |
| 1/2 CUP OLIVE OIL 3 MEDIUM ONIONS, CHOPPED | |
| 3 TBSP BROWN SUGAR 1 TBSP DRIED OREGANO | |
| 2 TSP DRIED BASIL 1 TSP BLACK PEPPER | |
| 2 CLOVES GARLIC, MINCED 4 TSP SALT | |
| 12LB FRESH TOMATOES | |
INSTRUCTIONS
- Run the fresh tomatoes through the Tomato Press & Sauce Maker using the Multi-Purpose Screen to yield 12 cups of fresh tomato puree
- Heat the olive oil in a large pan
- Sauté the onions and garlic until tender, do not overly brown
- Add the rest of the ingredients
- Bring mixture to a boil, reduce heat and simmer partially covered for 2 hours or until sauce has reduced to desired consistency
- Stir occasionally
- Serve or allow to cool then refrigerate or freeze
- Ingredients like sliced mushrooms, cooked/drained sausage, hamburger, etc. can be added to taste
MARINARA SAUCE
| INGREDIENTS | |
| 1 CUP CARROTS, FINELY MINCED 6 L | BS RIPE ITALIAN-STYLE TOMATO PUREE |
| 1 CUP ONION, FINELY MINCED 1/2 CU | P CELERY, FINELY MINCED |
| 1/2 CUP OLIVE OIL 1 TSP SUGAR | |
| 2 CLOVES GARLIC, MINCED 4 TSP SALT | |
| GROUND WHITE PEPPER, TO TASTE | |
OPTIONAL SEASONING (ANY ONE OF THE FOLLOWING):
2 TSP GROUND CORIANDER
1/2-1 TSP DRIED MARJORAM
1 TSP DRIED BASIL
1/4 TO 1/2 TSP DRIED OREGANO
1 TO 2 TSP SALT
INSTRUCTIONS
- Heat the olive oil in a large saucepan
- Cover and cook the onions, celery, and carrots over medium-low heat for about 15 minutes, stir occasionally
- Uncover and stir over heat for an additional 5 to 10 minutes, or until the vegetables are soft and slightly golden
- Add the tomato sauce, sugar, and pepper
• Cover and simmer gently for 15 minutes - Serve or allow to cool then refrigerate or freeze
WESTON
ONE-YEAR LIMITED WARRANTY
This warranty applies to products purchased and used in the U.S. and Canada. This is the only express warranty for this product and is in lieu of any other warranty or condition.
This product is warranted to be free from defects in material and workmanship for a period of one (1) year from the date of original purchase. During this period, your exclusive remedy is repair or replacement of this product or any component found to be defective, at our option. If the product or component is no longer available, we will replace with a similar one of equal or greater value.
This warranty does not cover unauthorized repairs or service to products, products sold "as-is" by retailers, glass, filters, wear from normal use, use not in conformity with the printed directions, or damage to the product resulting from accident, alteration, abuse, or misuse. This warranty extends only to the original consumer purchaser or gift recipient and is not transferable. Keep the original sales receipt, as proof of purchase is required to make a warranty claim.
We exclude all claims for special, incidental and consequential damages caused by breach of express or implied warranty. All liability is limited to the amount of the purchase price. Every implied warranty, including any statutory warranty or condition of merchantability or fitness for a particular purpose, is disclaimed except to the extent prohibited by law, in which case such warranty or condition is limited to the duration of this written warranty.
This warranty gives you specific legal rights. You may have other legal rights that vary depending on where you live. Some states or provinces do not allow limitations on implied warranties or special, incidental, or consequential damages, so the foregoing limitations may not apply to you.
To make a warranty claim, do not return this appliance to the store. Please call 1.800.814.4895 (001.216.901.6801 outside the US) or visit WestonSupply.com.
WESTON
RECONNECT WITH REAL FOOD
ADVERTENCIA
CONSEJOS DE COMIDA
WESTON
GARANTÍA LIMITADA DE UN AÑO
RECONNECT WITH REAL FOOD
PRESSE-TOMATE EN MÉTAL
07-1201-W
INSTRUCTIONS EN FRANÇAIS
LISTE DES PIÈCES
| NUMÉRO DE SCHEMA DESCRIPTION DE LA PIÈCE | |
| 1 TREMIE | |
| 2 CORPS | |
| 3* JOINT TORIQUE D'ARBRE D'ENTRAINEMENT | |
| 4* ATTACHE D'ARBRE D'ENTRAINEMENT | |
| 5 | ASSEMBLAGE D'ARBRE D'ENTRAINEMENT (RESSORT, ANNEAU D'ARRÊT ET JOINT TORIQUE COMPRIS) |
| 6 CORPS DE VENTOUSE | |
| 7 VENTOUSE | |
| 8 SERRE-JOINT | |
| 9 SPIRALE | |
| 10 POIGNÉE | |
| 11 VIS À SERRAGE À MAIN DU FILTRE | |
| 12 ASSEMBLAGE DE GOULOTTE | |
| 13 LEVIER DE LA VENTOUSE | |
| 14* RESSORT DE L'ARBRE D'ENTRAINEMENT | |
| 15 FILTRE À USAGE MULTIPLE | |
| 16 | ENTONNOIR POUR ÉCOULEMENT DES ROGNURES |
| 17 | POUSSOIR |
| 18 | JOINT DE FILTRE |
| 19 | MANCHON EN PLASTIQUE |
*LES PARTIES 3, 4 ET 14 SONT ASSEMBLÉES À LA PARTIE 5
AVERTISSEMENT
CONSEILS ALIMENTAIRES
GARANTIE LIMITÉE D'UN AN
PLEASE INSPECT THIS PACKAGE THOROUGHLY FOR MISSING PARTS OR ANY PRODUCT DAMAGE. IF YOUR PRODUCT CONTAINS SHIPPING DAMAGE, PLEASE CONTACT RETAILER FOR ASSISTANCE.
For all other questions regarding product usage, missing parts, product damage, difficulty or warranty activation, please contact the Weston Brands Customer Service Team: 8:00 am to 5:00 pm ET, Monday thru Friday
CustomerService@WestonBrands.com
U.S. Residents Customer Service Line: 1-800-814-4895 (Outside U.S. Call: 001-216-901-6801)
Weston Brands, LLC, Southern Pines, NC 28387
WestonSupply.com
Please DO NOT return this item to the retailer before contacting Weston Brands Customer Service.
SAVE THESE INSTRUCTIONS!
Refer to them often and use them to instruct others.
ATTENTION!
VEUILLEZ INSPECTER CÉT EMBALLAGE AVEC SOIN POUR Y DÉTECTER
TOUTE PIÈCE MANQUANTE OU ENDOMMAGÉE.
SI DES PIÈCES ONT ÉTÉ ENDOMMAGÉES PENDANT LE TRANSPORT, VEUILLEZ
COMMUNIQUER AVEC LE DÉTAILLANT POUR OBTENIR DE L'AIDE.
CustomerService@WestonBrands.com
Weston Brands, LLC, Southern Pines, NC 28387
WestonSupply.com
CustomerService@WestonBrands.com


- METAL TOMATO STRAINER
- COMPONENT LIST
- WESTONSUPPLY.COM
- ASSEMBLY INSTRUCTIONS
- WARNING
- FOOD TIPS
- CLEANING INSTRUCTIONS
- HELPFUL HINTS
- RECIPIES
- INSTRUCTIONS
- OPTIONAL SEASONING (ANY ONE OF THE FOLLOWING)
- WESTON
- ONE-YEAR LIMITED WARRANTY
- ADVERTENCIA
- CONSEJOS DE COMIDA
- GARANTÍA LIMITADA DE UN AÑO
- PRESSE-TOMATE EN MÉTAL
- LISTE DES PIÈCES
- AVERTISSEMENT
- CONSEILS ALIMENTAIRES
- GARANTIE LIMITÉE D'UN AN
- SAVE THESE INSTRUCTIONS
- ATTENTION
Brand : Weston
Model : 07-1201-W
Category : Food Processor