
LL506DC - Laser pointer Vonroc - Free user manual and instructions
Find the device manual for free LL506DC Vonroc in PDF.

| Product type | 360° cross line laser pointer |
| Brand | Vonroc |
| Model | LL506DC |
| Beam color | Green |
| Wavelength | 510-530 nm |
| Laser class | 2 (EN60825-1:2014) |
| Laser power | < 1 mW |
| Working range | 40 m |
| Accuracy | ±0.5 mm/m |
| Self-leveling range | ±6° |
| Leveling time | 4 s |
| Protection rating | IP20 |
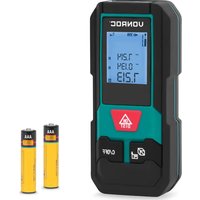
| Power supply | Li-ion battery 3.7 V, 2600 mAh |
| Battery life | 4 hours |
| Charging time | 3 hours |
| Operating temperature | -10 to 40 °C |
| Storage temperature | -20 to 70 °C |
| Weight (without bracket) | 380 g |
| Dimensions (without bracket) | 105 x 60 x 115 mm |
| Mounting | Magnetic bracket, tripod thread 1/4" and 5/8" |
| Functions | Horizontal and vertical lines, manual mode, self-leveling |
| Maintenance | Clean with a dry cloth. Do not use solvents. |
| Safety | Do not look directly into the laser beam. Class 2. |
Frequently Asked Questions - LL506DC Vonroc
User questions about LL506DC Vonroc
0 question about this device. Answer the ones you know or ask your own.
Ask a new question about this device
Download the instructions for your Laser pointer in PDF format for free! Find your manual LL506DC - Vonroc and take your electronic device back in hand. On this page are published all the documents necessary for the use of your device. LL506DC by Vonroc.
USER MANUAL LL506DC Vonroc
natural_image
Simple icon of a surveying instrument on tripod, no text or symbols presentEN Original Instructions 05
B1 B2

natural_image
Top-down view of a gray cylindrical mechanical component with a central hole and a vertical line marked '10' (no text or symbols on the object itself)C
D

natural_image
Simple line drawing of a 3D cube with a camera on top, no text or symbols presentE1
E2

F1
F2

F3
F4
1. SAFETY INSTRUCTIONS
Read the enclosed safety warnings, the additional safety warnings and the instructions. Failure to follow the safety warnings and the instructions may result in electric shock, fire and/or serious injury. Save the safety warnings and the instructions for future reference.
The following symbols are used in the user manual or on the product:

Read the user manual.

Denotes risk of personal injury, loss of life or damage to the tool in case of non-observance of the instructions in this manual.

Do not use in rain.

Indoor use only.

Do not dispose of the product in unsuitable containers.

The product is in accordance with the applicable safety standards in the European directives.
Risk of eye injury due to laser beams! Never look directly into the laser and do not direct the laser beam towards reflecting surfaces!
GENERAL SAFETY WARNINGS
- To operate this device safely, the user must have read and understood these instructions for use before using the device for the first time.
- Observe all safety instructions! Failure to do so may cause harm to you and others.
- Retain all instructions for use, and safety instructions for future reference.
- If you sell or pass the device on, you must also hand over these operating instructions.
- The device must only be used when it functions properly. If the product or part of the product is defective, it must be taken out of operation and disposed of correctly.
- Never use the device in a room where there is a danger of explosion or in the vicinity of flamma-
ble liquids or gases.
- Keep children away from the device! Keep the device out of the way of children and other unauthorized persons.
SPECIFIC SAFETY WARNINGS
- The device is intended for using in dry environment.
- Avoid the influence of humidity and dirt as well as direct sun rays.
- Do not operate the device in the proximity of welding machines, induction heaters and other electromagnetic fi elds.
- Do not expose the device to high temperatures for a longer period of time.
- Symbols appearing on your device may not be removed or covered. Signs on the device that are no longer legible must be replaced immediately.
SAFETY WARNINGS FOR BATTERY
a) Do not open the battery. Danger of shortcircuiting.
b) Protect the battery against heat, e. g., against continuous intense sunlight, fi re, water, and moisture. Danger of explosion.
c) In case of damage and improper use of the battery, vapours may be emitted. Ventilate the area and seek medical help in case of complaints. The vapours can irritate the respiratory system.
d) Use the battery only in conjunction with your Vonroc product. This measure alone protects the battery against dangerous overload.
e) The battery can be damaged by pointed objects such as nails or screwdrivers or by force applied externally. An internal short circuit can occur and the battery can burn, smoke, explode or overheat.
Handling of laser beams
- Do not look directly into the beam, not even from great distances.
- Never direct the measuring beam towards people, other living creatures or reflecting surfaces.
- Conventional laser glasses do not protect against the dangers of laser beams. They only serve for improved recognition of the laser beam.
LL505DC red laser:

Warning - Laser beam
Never look into the light beam Laser Class 2
according to EN60825-1: 2014;
λ: 620-690 nm; P< _ 1mW
LL506DC green laser:

Warning - Laser beam
Never look into the light beam Laser Class 2
according to EN60825-1: 2014;
λ: 510-530 nm; P< _ 1mW
2. MACHINE INFORMATION
Intended use
The 360° cross line laser is intended for determining and checking horizontal and vertical lines onto the wall and is therefore designed for aligning objects such as kitchens, walls, ceilings, tiles or pictures. The line laser is suitable for indoor use.
TECHNICAL SPECIFICATIONS
| Model No. LL505DC LL506DC | ||
| Direction of beams Vertical / 360° horizontal | ||
| Colour of laser line Red Green | ||
| Laser Wavelength 620~690 nm 510~530 nm | ||
| Laser class II (<1mW) according to EN60825-1:2014 | ||
| Working range* 20m 40m | ||
| Accuracy ± 0.5 mm/m | ||
| Self-levelling range ± 6° | ||
| Levelling time 4 s | ||
| Protection | IP 20 | |
| Tripod connection device | 1/4" | |
| Tripod connection bracket | 1/4" and 5/8" | |
| Recommended tripod | LL801AA | |
| Operating time, max. | 12.5 hours | 4 hours |
| Operating temperature | -10~40 °C | |
| Storage temperature | -20~70 °C | |
| Rechargeable Battery pack | 3.7V, 2600mAh (Lithium battery) |
| Battery charging time | 3 hours |
| Weight (without magnetic bracket) | 380 g |
| Dimensions (without magnetic bracket) | 105x60x115 mm |
* The working range may be reduced by unfavourable environmental conditions (e.g. direct sunlight).
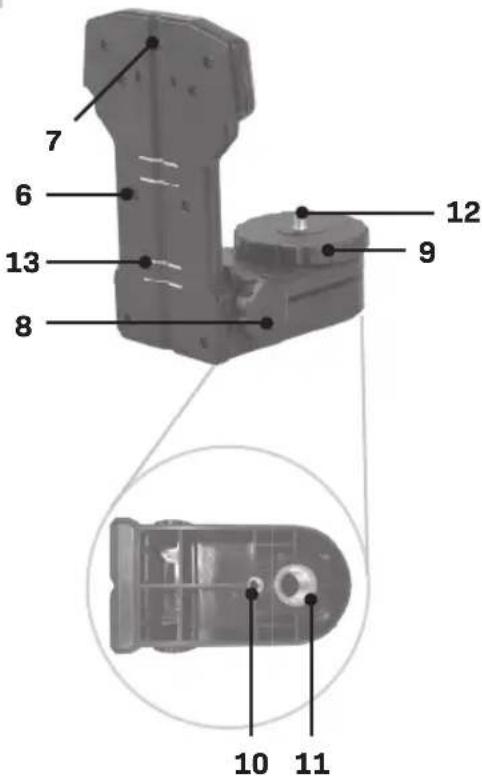
DESCRIPTION
The numbers in the text refer to the diagrams on page 2-4.
- On / off button
- Lock switch
- Laser beam outlet
- LED indicator
- Operating mode LED
- Magnetic bracket
- Hanging hole
- Adjusting knob (for height)
- Mounting wheel
- 14 inch tripod connection
11.5/8" tripod connection
12.1/4" male threat - Magnets
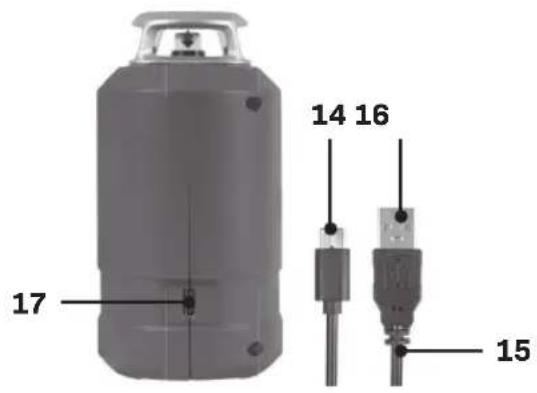
- USB type-C plug*
- USB cable*
- USB type-A plug*
- USB type-C connector*
* USB Type-C® and USB-C® are trademarks of USB Implementers Forum.
3. ASSEMBLY
Using the magnetic bracket (Fig. B)
This bracket (6) allows the unit to be mounted to any upright surface made of steel or iron by using the magnets (13) at the back. The bracket also has a hanging hole (7) allowing the unit to be hung from a nail or screw on any suitable surface.
To fit the 360^ cross line laser to the mounting, proceed as follows:
- Screw the bracket male thread (12) into the tripod connection (10) at the device with the
help of the wheel (9).
- Use the height adjuster (8) to adjust the 360 cross line laser to the required height. To dismantle, proceed in reverse order.
Using the tripod (not included) (Fig. B)
-
Place the device with tripod connection (10, 11) on the thread of the tripod or a conventional camera tripod.
-
Roughly align the tripod before switching on the device.
4. OPERATION

Only the centre of the laser line must be used for marking. The width of the laser line changes depending on the distance.

It's recommended to carry out an accuracy check before first use and periodic checks during future use, especially for precise layouts. Also when the laser may have been dropped.

Danger of injury due to defective components! The product must only be put into operation if no defects are found. Ensure that any defective parts are replaced before the product is used again.

WARNING! Risk of injury due to laser beam! Never direct the laser beam towards people, other living creatures or reflecting surfaces.
Charging the device (Fig. C)

The device must be charged before first use.
- Plug the USB type-C plug (14) into the USB type-C connector (17) on the device.
- Plug the USB type-A plug (16) into an power adapter (not included) or device (e.g. computer, powerbank) with suitable female USB connector. Please note that the device should be able to deliver constant 5V 2A power.
- The Battery LED indicator (4) will lighten up and show the charging status.
| LED Charger status | |
| Red Battery charging in progress | |
| Green Charging finished, battery fully charged |
- After the battery is fully charged remove the USB type-C plug (14) from the USB type-C connector (17).

It is also possible if the battery is empty to power the device with the charger or with a power bank. Follow the steps as above.

When the device is not being used over a longer period of time it is best to store the battery in charged condition.
Check the device:
- Make sure all parts are fitted on the machine firmly.
- Check whether there are any visible defects: broken parts, cracks, etc.
- Check the accuracy when it is the first time you are using the laser or when the laser has not been checked for accuracy in a while.
- Also check the accuracy when the laser may have been dropped.
Self- levelling mode (Fig. A, D)
The lasers are aligned automatically by the pendulum so that the vertical and horizontal lines are displayed level on the wall.
- Place the laser on a flat surface or fit it to the magnetic bracket (6) or tripod (not included) and fasten it as described above.
- Slide the lock switch (2) to the right.
- The laser lines can be powered one at a time or all at the same time.
- Press the ON / OFF button (1) on the device to power on the horizontal line and the front vertical line.
- Pressing two times the ON/OFF button (2) for the vertical front laser.
-
Pressing three times the ON/OFF button (2) for the horizontal laser.
-
If the operating mode LED (5) is illuminated in red and the laser flashes, the permissible inclination range of 6 degrees is exceeded. Position the device horizontally until the operating mode LED (5) lights green and the laser stops flashing.
-
To switch off, slide the lock switch (2) to the left and hold down the ON/OFF button (1). The laser switches off and the pendulum will be locked.

Slide the lock switch (2) to the left when transporting it. This locks the pendulum unit, as it can otherwise be damaged.
Manual mode (Fig. A)
The laser can be aligned manually to the angle you require, to enable for example a diagonal line to be displayed.
- Place the laser on a flat surface or fit it to the magnetic bracket (6) or tripod (not included) and fasten it as described above.
- Check if the lock switch (2) is set to the left. If not, slide the lock switch (2) to the left.
- The laser lines can be powered one at a time or all at the same time.
- Press the ON / OFF button (1) on the device to power on the horizontal line and the front vertical line.
- Pressing two times the ON/OFF button (2) for the vertical front laser.
- Pressing three times the ON/OFF button (2) for the horizontal laser. The operating mode LED (5) lights up red, because the pendulum is blocked.
- Now you can tilt the laser to the angle you require, so that the lines are displayed diagonally on the wall, ground or ceiling.
- Hold down the ON/OFF button (1) to switch off the equipment. Check if the lock switch (2) is set to the left. If not, slide the lock switch (2) to the left.
5. MAINTENANCE
Accuracy check

Only the centre of the laser line must be used for marking. The width of the laser line changes depending on the distance.
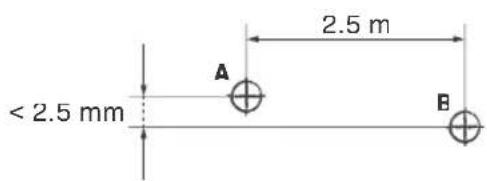
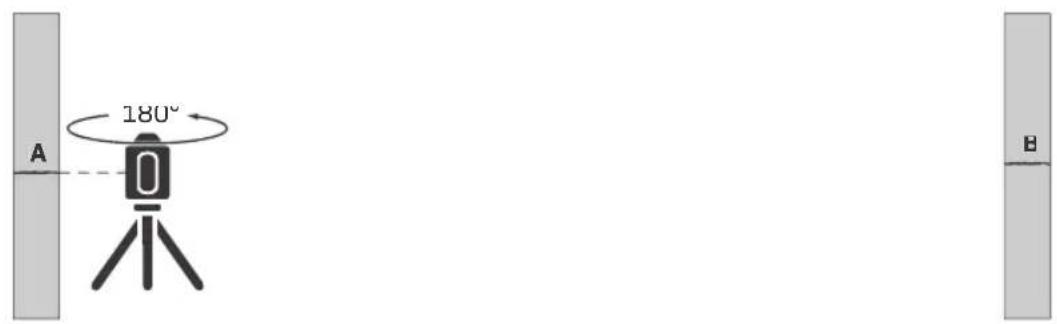
Quick horizontal line check (Fig. A, E1)
- Set the device at approximately 5 meters from the wall.
- Slide the lock switch (2) to the right. Pressing three times the ON/OFF button(2) for the horizontal laser. If the operating mode LED (5) is illuminated in red and the laser flashes, the
permissible inclination range of 6 degrees is exceeded. Position the device horizontally until the operating mode LED (5) lights green and the laser stops flashing.
- After it self-levels, make a horizontal mark on the wall as shown in figure E1. Label this as point A.
- Turn the laser 2.5 m to the right.
- Turn the laser on, and after it self-levels, make a horizontal mark on the wall. Label this as point B as shown in figure E1. When points A and B are more than 2.5mm apart from a vertical perspective, a calibration check is necessary.
Quick vertical line check (Fig. A, E2)
- Set the device at approximately 5 meters from the wall.
- Hang a 2.5 meter rope on the wall with a weight on the end of the rope as shown in figure E2. The rope must be able to swing freely.
- Slide the lock switch (2) to the right. Pressing two times the ON/OFF button(2) for the vertical front laser. Position the vertical line next to the wire. If the operating mode LED (5) is illuminated in red and the laser flashes, the permissible inclination range of 6 degrees is exceeded. Position the device horizontally until the operating mode LED (5) lights green and the laser stops flashing. After it self-levels, the difference must not exceed ± 2.5 mm. When it's more than 2.5mm apart, a calibration check is necessary.
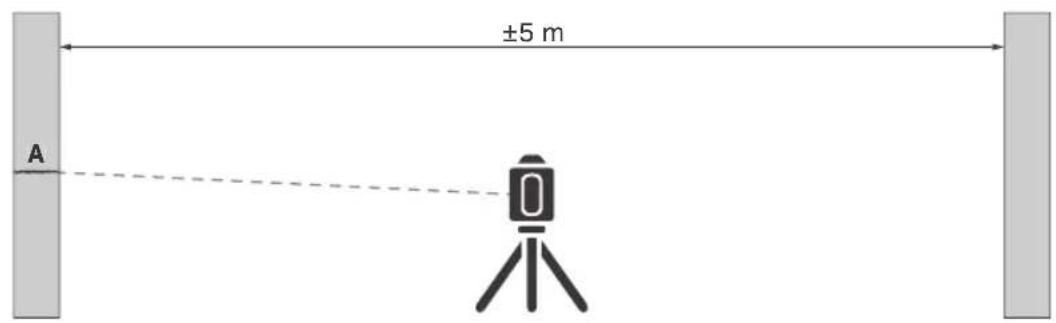
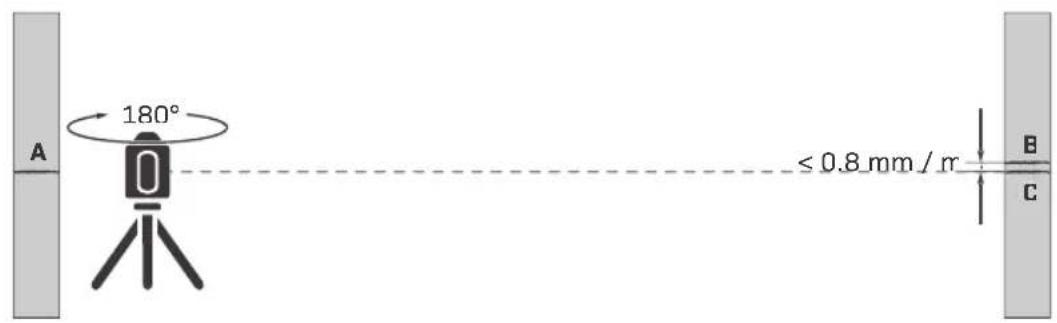
Calibration check (Fig. A, F)
The accuracy of the horizontal beam can be checked by following these steps:
- Set the device on a tripod, centered in a room with walls ideally 5 meter away.
- Slide the lock switch (2) to the right. Pressing three times the ON/OFF button(2) for the horizontal laser. If the operating mode LED (5) is illuminated in red and the laser flashes, the permissible inclination range of 6 degrees is exceeded. Position the device horizontally until the operating mode LED (5) lights green and the laser stops flashing.
- After it self-levels, make a horizontal mark on the wall anywhere along the horizontal line to indicate the height of the beam. Label this as point A as shown in Fig. F1.
-
Turn the device 180°, and after it self-levels, mark point B as shown in Fig. F2.
-
Turn the device 180°. Position the device as near as possible to the wall at the height of point A as shown in Fig. F3.
- Turn the device 180°, and after it self-levels, mark point C. This mark should either be directly above, below or on top of point B as shown in Fig. F4. The difference between points B and C is the tolerance. When B and C are more than 0.5 mm/m apart, an adjustment is necessary. Contact your authorized dealer or else the Vonroc Service Department.
Cleaning

NOTICE! Risk of product damage! Never submerge device in water while cleaning.
Do not use cleaning agents or solvents. Wipe the device using a dry cloth.
Storage

NOTICE! Risk of product damage! Always handle measuring instruments with care.
- Store the product in a dry, well-ventilated place.
- Only store and transport the product in its original packaging.
- Prevent large temperature fluctuations: Always temper the product for a while before use in extremely cold or hot environments.

NOTICE! Risk of product damage! Old, leaky batteries can damage the product. Check the battery regularly.
ENVIRONMENT

Faulty and/or discarded electrical or electronic apparatus have to be collected at the appropriate recycling locations.
Only for EC countries
Do not dispose of power tools into domestic waste. According to the European Guideline 2012/19/EC for Waste Electrical and Electronic Equipment and its implementation into national right, power tools that are no longer usable must be collected separately and disposed of in an environmentally friendly way.
WARRANTY
VONROC products are developed to the highest quality standards and are guaranteed free of defects in both materials and workmanship for the period lawfully stipulated starting from the date of original purchase. Should the product develop any failure during this period due to defective material and/or workmanship then contact VONROC directly.
The following circumstances are excluded from this guarantee:
- Repairs and or alterations have been made or attempted to the machine by unauthorized service centers;
- Normal wear and tear;
- The tool has been abused, misused or improperly maintained;
- Non-original spare parts have been used.
This constitutes the sole warranty made by company either expressed or implied. There are no other warranties expressed or implied which extend beyond the face hereof, herein, including the implied warranties of merchantability and fitness for a particular purpose. In no event shall VONROC be liable for any incidental or consequential damages. The dealers remedies shall be limited to repair or replacement of nonconforming units or parts.
The product and the user manual are subject to change. Specifications can be changed without further notice.
VEILIGHEIDSVOORSCHRIFTEN VOOR DE ACCU
2. INFORMATIONS RELATIVES A LA MACHINE
Utilisation prévue
DECLARATION OF CONFORMITY LL505DC / LL506DC - CROSS LINE LASER
(EN) We declare under our sole responsibility that this product is in conformity with directive 2011/65/EU of the European parliament and of the council of 8 June on the restriction of the use of certain hazardous substances in electrical and electronic equipment is in conformity and accordance with the following standards and regulations:
(DE) Der Hersteller erklärt eigenverantwortlich, dass dieses Produkt der Direktive 2011/65/EU des Europäischen Parlaments und des Rats vom 8. Juni 2011 über die Einschränkung der Anwendung von bestimmten gefährlichen Stoffen in elektrischen und elektronischen Geräten entspricht. den folgenden Standards und Vorschriften entspricht:
(NL) Wij verklaren onder onze volledige verantwoordelijkheid dat dit product voldoet aan de conform Richtlijn 2011/65/EU van het Europees Parlement en de Raad van 8 juni 2011 betreffende beperking van het gebruik van bepaalde gevaarlijke stoffen in elektrische en elektronische apparatuur en in overeenstemming is met de volgende standaarden en reguleringen:
(FR) Nous déclarons sous notre seule responsabilité que ce produit est conforme aux standards et directives suivants: est conforme à la Directive 2011/65/EU du Parlement Européen et du Conseil du 8 juin 2011 concernant la limitation d'usage de certaines substances dangereuses dans l'équipement électrique et électronique.
(ES) Declaramos bajo nuestra exclusiva responsabilidad que este producto cumple con las siguientes normas y estándares de funcionamiento: se encuentra conforme con la Directiva 2011/65/UE del Parlamento Europeo y del Consejo de 8 de junio de 2011 sobre la restricción del uso de determinadas sustancias peligrosas en los equipos eléctricos y electrónicos.
(IT) Dichiariamo, sotto la nostra responsabilità, che questo prodotto è conforme alle normative e ai regolamenti seguenti: è conforme alla Direttiva 2011/65/UE del Parlamento Europeo e del Consiglio dell'8 giugno 2011 sulla limitazione dell'uso di determinate sostanze pericolose nelle apparecchiature elettriche ed elettroniche.
- SAFETY INSTRUCTIONS
- GENERAL SAFETY WARNINGS
- SPECIFIC SAFETY WARNINGS
- SAFETY WARNINGS FOR BATTERY
- Handling of laser beams
- LL505DC red laser:
- Warning - Laser beam
- LL506DC green laser:
- MACHINE INFORMATION
- Intended use
- DESCRIPTION
- ASSEMBLY
- Using the magnetic bracket (Fig. B)
- Using the tripod (not included) (Fig. B)
- OPERATION
- Charging the device (Fig. C)
- Check the device:
- Self- levelling mode (Fig. A, D)
- Manual mode (Fig. A)
- MAINTENANCE
- Accuracy check
- Quick horizontal line check (Fig. A, E1)
- Quick vertical line check (Fig. A, E2)
- Calibration check (Fig. A, F)
- Cleaning
- Storage
- ENVIRONMENT
- Only for EC countries
- WARRANTY
- VEILIGHEIDSVOORSCHRIFTEN VOOR DE ACCU
- INFORMATIONS RELATIVES A LA MACHINE
- Utilisation prévue
- DECLARATION OF CONFORMITY LL505DC / LL506DC - CROSS LINE LASER
Brand : Vonroc
Model : LL506DC
Category : Laser pointer