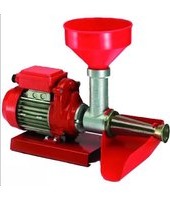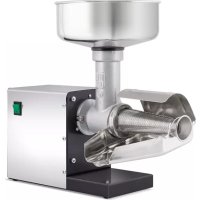
9005 N - Food Processor Reber - Free user manual and instructions
Find the device manual for free 9005 N Reber in PDF.


User questions about 9005 N Reber
0 question about this device. Answer the ones you know or ask your own.
Ask a new question about this device
Download the instructions for your Food Processor in PDF format for free! Find your manual 9005 N - Reber and take your electronic device back in hand. On this page are published all the documents necessary for the use of your device. 9005 N by Reber.
USER MANUAL 9005 N Reber
ART.: 9602 N - 92xx Nxy - 91xx Nxy - 95xx Nxy
ART. 9508 NEB - 9011 N - 9011 NX - 20820 N - 20830 N - 20800 N -
20810 N - 20810 NP - 9508 N - 20610 N - 20660 N - 20706 N - 20700 N
ART.: 9603 N - 96xx Nxy - 95xx Nxy
ART.: 8700 N - 8810 N - 8811 N - 8400 N - 8900 N - 8300 N
2022

text_image
Yellow warning sign with black exclamation mark and open book icon below, indicating educational or operational hazard symbolCE
GB User's Instructions: Use and Maintenance - Original instructions. Read all instructions before use and save them until the end of the product's life.
The supplier will be not responsible of any damage to people or objects different from the machine concerned by these instructions.
The supplier does not guarantee the conformity of the machine to the rules in force in the extra UE countries where the machines could be installed and particularly regarding accident prevention.
In this case the adaptation of the machines to the locally applicable accident prevention regulations is the total responsibility of the customer, who assumes all related responsibilities, consequently releasing the manufacturer / supplier of these responsibilities.
The manufacturer will not be held responsible for inconveniences, breakages, accidents, etc. due to lack of knowledge (or in any case non-application) of the provisions contained in this manual.
The same applies to the implementation of modifications, variations and / or the installation of accessories not mentioned in this manual.
RESPONSABILITÉ DU FABRICANT
- This appliance can be used by persons with reduced physical, sensory or mental capabilities or lack of experience and knowledge if they have been given supervision or instruction concerning use of the appliance in a safe way and if they understand the hazards involved.
This appliance shall not be used by children.
Cleaning and user maintenance shall not be made by children. Keep the appliance and its cord out of reach of children.
- Children shall not play with the appliance.
- Do not use the appliance in case of contact with water or if the plug or power cable seems to be wet.
- Appliance must be unplugged before any intervention, including cleaning after use.
- If the supply cord is damaged, in order to avoid a hazard, it must be replaced by a qualified expert using only a cable of the same type supplied by the producer.
- Place the device on a flat surface and avoid positions that could cause the device to fall.
- The device must be connected to a mains socket which is always easily accessible and of the same voltage than the one mentioned on the technical nameplate affixed to the device.
- This appliance is intended for household use only.
- At the end of use always unplug the appliance, especially when left unattended, disassemble, wash and wipe all parts of the machine in contact with food.
- Be particularly careful in the presence of children that it is advisable to keep away.
- Do not use outdoors.
- The use of accessories not recommended or sold by the manufacturer may damage the appliance, cause fire, electric shock or injury.
- Do not let the mains cord hang over edge of table or counter.
- Sound pressure level - less than 80 dBa.
AVERTISSEMENTS DE SECURITE
Type Approved Safety Regular Production Surveillance
www.tuv.com ID 1111256512
ART. 9600 N - V 230/50 Hz / 9651 N - V 120/60 Hz
ART. 9601 N - V 230/50 Hz / 9654 N - V 120/60 Hz
ART. 9602 N - V 230/50 Hz / 9657 N - V 120/60 Hz
ART. 9603 N - V 230/50 Hz / 9658 N - V 120/60 Hz

ART. 9650 N / 9653 N / 9656 N / 9659 N - V 240/50 Hz

text_image
Technical diagram of a mechanical assembly with numbered parts for identification

Type Approved Safety Regular Production Surveillance
www.tuv.com ID 1111256512
ART. 8710 N / 9008 N V230/50 Hz / 9107 N - V 120/60 Hz
ART. 8700 N / 9004 N V230/50 Hz / 9103 N - V 120/60 Hz
ART. 8700 N / 9000 N V230/50 Hz/ 9101 N - V 120/60 Hz
ART. 9000 NSP V230/50 Hz / 9105 N - V 120/60 Hz

V 230/50 Hz
1200 W: ART. 20850 N - 600 W: ART. 9006 N / 20840 N
500 W: ART. 9005 N / 20835 N - 450 W: ART. 9508 NEB / 9011 N / 9011 NX /
20820 N / 20830 N / 20800 N / 20810 N / 20810 NP
V240/50 Hz: ART. 9106 N / 9104 N / 9100 N / 9108 NP
text_image
10 13 7 8a 9 8 11

Type Approved Safety Regular Production Surveillance
www.tuv.com
ART. 8820 N / 9502 N V 230/50 Hz / 9557 N - V 120/60 Hz
ART. 8810 N / 8811 N / 9501 N - 20706 N V 230/50 Hz // 9554 N - V 120/60 Hz
ART. 8800 N / 8800 NC / 9500 N V 230/50 Hz / 9500 NC V 230/50 Hz / 9551 N - V 120/60 Hz / 9551 NC - V 120/60 Hz
ART. 8830 N / 9503 NSP V 230/50 Hz / 9504 N V 230/50 Hz / 9503 NC V 230/50 Hz /
9664 N - V 120/60 Hz / 9668 N - V 120/60 Hz / 9558 N - V 120/60 Hz

V230/50 Hz:
600 ART. 9504 NSPI / 20640 N / 20690 N / 20730 N
600 W : ART. 9500 NSPI / 9512 NSP / 20630 N / 20620 N / 20680 N / 20670 N /
20720 N - 500 W : ART.20710 N
Type Approved Safety Regular Production Surveillance
www.tuv.com ID 1111256512
ART. 8910 N / 9030 N - V 230/50 Hz / 9661 N V 120/60 Hz
ART. 8900 N / 9020 N - V 230/50 Hz / 9660 N V 120/60 Hz
ART. 9010 N - V 230/50 Hz / 9662N V 120/60 Hz
ART. 9010 NSP - V 230/50 Hz / 9663 N V 120/60 Hz
text_image
11 9 10 12 8 7 CEART. 8410 N / 9040 N - V 230/50 Hz
ART. 9060 N - V 230/50 Hz / 8400 N
text_image
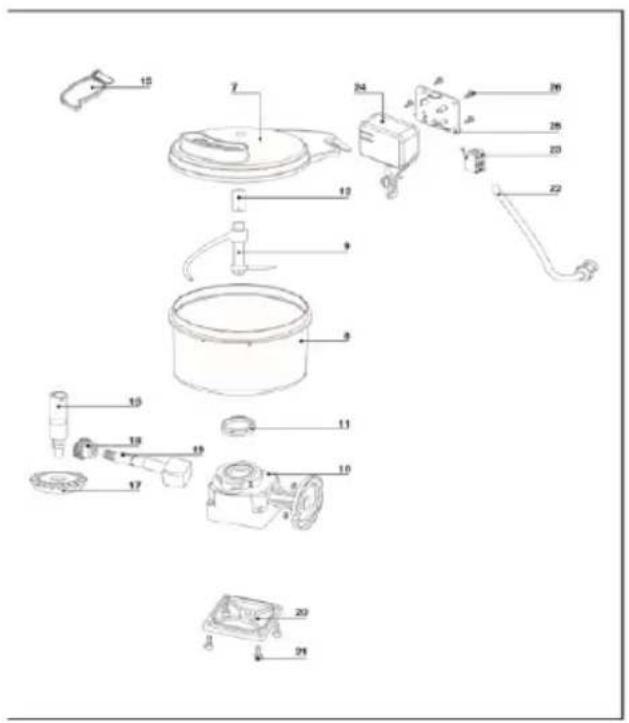
Exploded view diagram of a mechanical assembly with numbered parts for identification
Type Approved Safety Regular Production Surveillance
www.fuv.com ID 1111256512
ART. 8310 N / 9208 N - V 230/50 Hz
ART. 8300 N / 9204N - V 230/50 Hz
ART. 9200N - V 230/50 Hz
ART. 9200 NSP - V 230/50 Hz

9229 N - V 240/50 Hz
9225 N - V 240/50 Hz
9221N-V240/50Hz
9221 NP - V 240/50 Hz
TRITACARNE MISURA #8, #12, #22, #32
Reber is in a continuous development of its products to improve technical, safety, ecological and commercial features; products could be different from this data sheet due to this nonstop evolution.
IMPORTANT SAFEGUARDS
When using electrical appliances, basic safety precautions should always be followed including the following:
Read all instructions.
To protect against risks of electrical shock do not put in water or other liquid.
Close supervision is necessary when any appliance is used by or near children.
Unplug from outlet when not in use, before putting on or taking off parts and be-fore cleaning.
Avoid contacting moving parts.
Do not operate any appliance with a damaged cord or plug or after the appliance malfunction, or is dropped or damaged in any manner.
Return appliance to the nearest authorized service facility for examination, repair or electrical or mechanical adjustment.
The use of attachments not recommended or sold by the manufacturer may cause fire, electric shock or injury. h) Do not use outdoors.
Do not let cord hang over edge of table or counter.
Never feed food or dough by hand. Always use food pusher.
Blades are sharp. Handle carefully.
Do not use fingers to scrape food away from discharge disc while appliance is operating. Cut type injury may result. m) Household use only.
This appliance can be used by children aged from 8 years and above and persons with reduced physical, sensory or mental capabilities or lack of experience and knowledge if they have been given supervision or instruction concerning use of the appliance in a safe way and understand the hazards involved
Acoustic level less than 80 dBA.
Children shall not play with the appliance
Cleaning and user maintenance shall not be made by children without supervision
SAVE THESE INSTRUCTION
Electric Motor legend
Electric motor
1) Reduction gear flange
2) Small gear
3) Twin gear
4) Gear with hub
5a) Reduction gear cap
5) Reduction gear cover
14) Reduction gear cover oil seal
14a) Reduction gear internal seal
15) Base
Tomato squeezer legend
7) Pestle
8) Funnel
8a) Funnel gasket
9) Cast iron casing
10) Propeller
11) Filter cone
12) Drip pan
13) Tow pin with spring
16) Splash-guard
Meat mincer legend
7) Cast iron casing
8) Propeller
20) Cover Conical transmission tank
21) Fixing screws for Cover Conical transmission tank
22) Cable for Security switch
23) Security switch
25) Cover for Security switch box
26) Fixing screws for Cover for Security switch box
7) Casing
8) Screw
9) Die plate
10) Pestle
11) Ring nut
12) Reduction gear (only model N.5)
TECHNICAL DATA ART. 9600 N – V 230/50 Hz; 9650 N – V 240/50 Hz; 9651 N - V 115/60 Hz
Single-phase asynchronous electric motor for continuous service 450 W. Fan cover cap, switch/capacitor box and cooling fan made in plastic material. Watertight IP X5 motorization. Axial reduction gear in oil bath with nylon gears inserted on bronze self-lubricating bush. Long-life oil suitable for occasional food contact. The mod. 9508 N / 20610 N / 20660 N / 20706 N are equipped with reverse gear.
TECHNICAL DATA ART. 9601 N – V 230/50 Hz; 9653 N – V 240/50 Hz; 9654 N - V 115/60 Hz
Single-phase asynchronous electric motor for continuous service 500 W. Fan cover cap, switch/capacitor box and cooling fan made in plastic material. Watertight IP X5 motorization. Axial reduction gear in oil bath. Long-life oil suitable for occasional food contact.
TECHNICAL DATA ART. 9602 N – V 230/50 Hz; 9656 N – V 240/50 Hz; 9657 N - V 115/60 Hz
Single-phase asynchronous electric motor for continuous service 600 W. Gear switch forward/reverse to use only in case of block of the meat mincer attachment; do not use reverse function with other attachments to avoid risks of injury. Fan cover cap, switch/capacitor box and cooling fan made in plastic material. Watertight IP X5 motorization. Axial reduction gear in oil bath. Long-life oil suitable for occasional food contact.
TECHNICAL DATA ART. 9603 N – V 230/50 Hz; 9659 N – V 240/50 Hz; 9658 N - V 115/60 Hz
Single-phase asynchronous electric motor for continuous service 1200 W. Gear switch forward/reverse to use only in case of block of the meat mincer attachment;
do not use reverse function with other attachments to avoid risks of injury (no forward/reverse for 9658N UL-CSA model). Fan cover cap, switch/capacitor box and cooling fan made in plastic material. Watertight IP X5 motorization. Axial reduction gear in oil bath. Long-life oil suitable for occasional food contact.
USING THE APPLIANCE
The geared motor is supplied as standard with the right amount of oil necessary for its proper operation. It is a long-life oil suitable for occasional food contact, it is not subject to deterioration due to machine operation, and Reber suggest replacing oil not before 3 of 4 years. The reduction gear contains 40 grams (only art. 9600 N – V 230/50 Hz : 9650 N – V 240/50 Hz : 9651 N - V 115/60 Hz) other models 100 grams of oil and any excess after topping up can damage the appliance.
To operate, the appliance must be connected to a power point that is always easily accessible during use. All operations not specified in this manual must be done by a qualified operator. The machine must be located on a plain surface and positions which can produce the falling of the machine must be avoided.
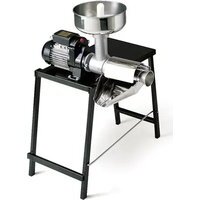
Tomato squeezer propeller made in acetal resin suitable for food contact, body in cast iron tested for foodstuffs and treated with epoxy paint for foodstuffs. Nylon tow pin inserted on tin-plated steel. Filter cone, funnel and drip pan are entirely made of 18/10 stainless steel.
USING THE ELECTRIC TOMATO SQUEEZER
Cleaning and user maintenance shall not be made by children unless they are aged from 8 years and above and supervised. Keep the appliance and its cord out of reach of children aged less than 8 years.
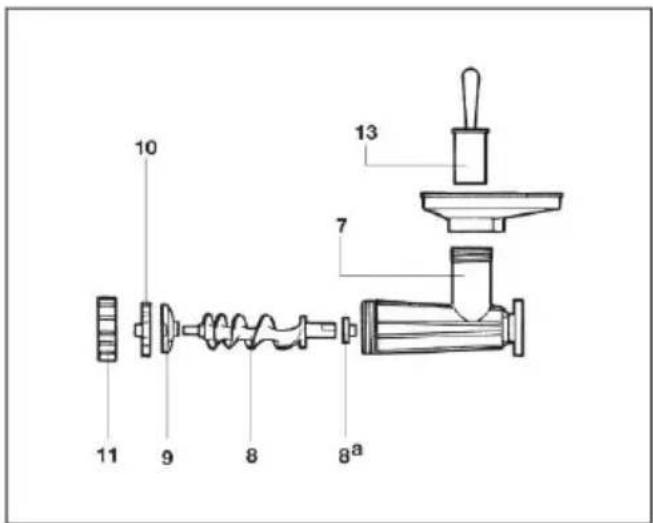
For space requirements, the machine is partially disassembled in the packing; it is necessary to insert the tow pin with the spring into the hole in the cast iron body (9). Insert the propeller (10) into the cast iron body fitting it onto the square of the tow pin. Then put the filter cone (11) onto the propeller pressing and turning it anticlockwise to fit the tabs of the ring nut into the niches in the cast iron body. Screw the funnel (8) onto the threaded neck of the cast iron body and hook the drip pan (12) onto the filter cone and onto the cast iron casing by means of the clips.
The machine is then ready for use: the machine must definitely not be run dry (with no tomato).
The appliance can pass cooked and uncooked tomatoes. If the tomato is cooked, let it cool and place it in the machine at room temperature; if it is raw, cut it into pieces of adequate size so that they can fall into the neck of the body without having to press. During use, fibrous parts can block the filter holes. To be able to continue to work correctly without dismantling the device, pass with the blade of a knife on the filter to eliminate the residues.
If the propeller (10) jams, before taking any further action on the machine put the switch onto the “OFF” (-0-) position and unplug from the power point. When the work is finished, unscrew the funnel (8), unhook the drip pan (12), and turn the filter cone (11) clockwise to remove the propeller (10) and the tow pin with the spring. Remove the cast iron casing (9) from the reduction gear cover (6), then wash, carefully dry and eventually grease all the parts that have been exposed to the food.
MEAT MINCER UNIT
Body and ring nut are made in aluminum for ART. 8820 N: 9502 N V 230/50 Hz: 9556 N – V 240/50 Hz: 9557 N – V 115/60 Hz, other models Body, ring nut and propeller are made of tin-plated cast iron (or Stainless Steel Aisi 304), plate and self-sharpening knife in hardened steel, pestle in Moplen, dish in 18/10 stainless steel. On request there are crown for fitting and funnels for bagging in Moplen, plates with holes of different sizes according to need.
USING THE ELECTRIC MEAT MINCER
This appliance shall not be neither used nor handled nor cleaned by children. Keep the appliance and its cord out of reach of children
Before operate, wash with boiling water and carefully dry all the parts that have been exposed to the food. On first utilization, grind for 5 min. some meat scrap to eliminate all possible processing residues.
Before each use, lubricate the propeller pin (where the plate is mounted) and the nylon bush in contact with the propeller to prevent overheating friction.
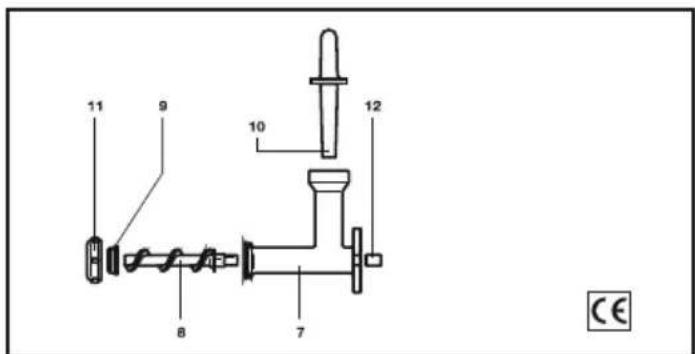
Screw the ring nut and never remove during the functioning of the meat mincer When the work is finished, to dismantle the meat chopper, turn the ring nut (11) anticlockwise, remove the knife (10), the plate (9) and the propeller (8). Remove the cast iron body (7) from the reduction gear cover (6), then wash, carefully dry and eventually grease all the parts that have been exposed to the meat. “Reber” electric meat choppers are fitted for operation with plates having holes of diameter from 3 mm to 12 mm. Reber decline all liability concerning damage or accidents deriving from using plates having holes of diameter greater than 12 mm.
GRATER UNIT
Body and handle in aluminum, roller in tin-plated steel and collection drawer in a plastic material for foodstuffs. The grater is inserted onto the geared motor by means of an axial revolution multiplier with nylon gears supplied in the package.
USING THE GRATER
Cleaning and user maintenance shall not be made by children unless they are aged from 8 years and above and supervised. Keep the appliance and its cord out of reach of children aged less than 8 years.
Before operate, wash with boiling water and carefully dry all the parts that have been exposed to the food. When used for the first time, to eliminate all possible processing residues, run the appliance with dry bread for a few minutes and discard the product.
When the work is finished, undo the screws (11) and remove the nylon cover (10) to take out the toothed roller (9) to which are fixed the pin (4) and the small gear (3). Wash, carefully dry and eventually grease all the parts that have come into contact with the food.
DOUGH MIXER UNIT
Dough mixer base in die-cast aluminum alloy; steel bevel reduction gear; mixing shaft in precision-cast stainless steel AISI 316; mixer container and cover in highly resistant semitransparent polycarbonate, detachable for easy cleaning (even in dishwasher). Safety switch preventing the mixer shaft from operating when the cover is open. Suitable for any kind of dough: pasta, bread, pizza, cakes.
This appliance shall not be neither used nor handled nor cleaned by children. Keep the appliance and its cord out of reach of children
The unit is delivered ready for use, before operate, wash and carefully dry all the parts that have been exposed to the food
The conical transmission of the dough mixer is lubricated with specific grease of Long Life type, which does not have to be changed or added.
The Accessories start key (13) must be used to let the motor start using the accessories of the motor other than the dough mixer.
Make sure that the switch is in the position OFF before changing the accessories and before introducing the blocking of the safety switch.
When changing the accessories, please follow carefully the installation instructions supplied with the machine.
The machine is prepared for putting into practice:
-Remove the cap (7) rotating it counterclockwise.
-Fill in the tank (8) according to the quantities and ingredients mentioned in the paragraph called Recipes and Advice for Usage.
-Place the cap (7) on the tank (8) (rotate the cap in such a way in order to fasten it, and rotate clockwise and block it at the end in order to allow the putting into practice of the machine.
-During the functioning, if necessary, add liquid or flour through the slots of the cap (7) without turning off the machine.
-After a period of functioning of approximately 2,5/3 min., if the dough is well mixed (if it is not, you may continue with the functioning) turn off the dough machine, rotate the cap (7) counterclockwise in order to dismantle it and remove the dough. If you have observed the dosages mentioned in the Recipes and Advice for Usage paragraph, the dough must be compact and can be easily removed from the tank
(8). The dough may be at this point manipulated in order to give it a specific form or it may be cut in order to be used for Reber pasta press, which you can assemble on the same engine by replacing the dough machine in order to make spaghetti or one of the 11 types of pasta.
-Once you have finished the job, rotate de mixer (9) counterclockwise in order to remove it from the base, rotate the tank in the same direction (8) and dismantle it from the base, wash and perfectly dry all the accessories.
-The cap (7) and the tank (8) are made of food grade plastic material and they can be washed in the dish-washer taking into account the fact that very aggressive detergents or very high cleaning temperatures may damage the esthetic features of the product, but not their technical features.
-The mixer (9) is made of corrosion proof steel AISI 316 and may be washed in the dish-washer taking into account the fact that very aggressive detergents or very high cleaning temperatures may damage the esthetic features of the product, but not their technical features.
-Once you have cleaned the components, fit on the tank (8) on the base (rotate the cap in order to fit it on), rotating clockwise and block it until the end (the first times the tank shall be swung over in order to fix it properly), place the mixer at the end (9) and block it on the drive pin slots rotating it clockwise, secure the cap on the tank (rotate the cap in order to secure it), rotate clockwise. We advise you not to block it until the end of the fitting in order to avoid damaging the safety switch.
Recipes and Advices for Usage
- The type of mixture that best fits for the usage of the Reber pasta cutter in order to prepare spaghetti, macaroni or other types of pasta consists of 1.000 gr. of flour type 0 or 00 and of 430 gr. of liquid (water and/or eggs according to the local tastes and traditions). If you use only eggs the dough will become very compact, which is a good thing when using the Reber pasta cutter.
- The type of mixture for the preparation of bread or pizza consists of 1.000 gr. of flour type 0 or 00 and of 580 gr. of liquid (water, oil and/or eggs and baking powder according to the local tastes and traditions).
- The type of mixture for preparing the tender dough for cakes or biscuits consists of 500 gr. of flour type 00, 250 gr. of butter at room temperature, 250 gr. of sugar, 1 full egg and 2 yolks of egg.
Advertisements:
1 -The liquid quantity and the weight of the mixture can be changed according to the degree of humidity and type of flour that is being used.
2 -The full corn flours and/or of other cereals have a different kind of adhesion capacity versus the refined corn flour. The result can be a less flexible and less compact mixture; therefore, we advise you to reduce the total quantity of dough in order to avoid damaging the dough-machine.
3 -Too much liquid can produce the sticking of the mixture on the mixer (9) and on the tank (8) – If you add flour through the slots of the cap, (7) an improvement of the mixture will be obtained, but the remains that stuck to the mixer or to the tank may remain attached and you will have to remove them by hand when doing the cleaning of the accessories.
4 - Less liquid can restrain the adhesion of the dough. – Add liquid through the slots of the cap () until obtaining a satisfying mixture. We advise you to add liquid little by little in order to avoid the problems mentioned at point 3.
5 - Check the total volume of the mixture and avoid filling in the tank (8) with more than 1,6 l of flour and liquid. Overcharging can damage the tank (8) and the cap (7).
6 - Dismantle and clean the cap (7), the mixer (9) and the tank (8) at the end of each dough kneading in order to avoid any accidental outflow of liquid, which can damage the machine.
PASTA PRESS UNIT
Aluminum body, screw and die plates in highly resistant acetal resin. Materials for food use. Supplied with 10 die plates to obtain different kinds of pasta (spaghetti, tagliatelle, macaroni, pappardelle, etc.).
USING PASTA PRESS
The electric presses are protected from overheating by means of a thermal protector which blocks the motor if a predetermined degree of temperature is reached.
To restart the machine once the engine has cooled down, the machine must be switched off and on again using the start switch.
This appliance shall not be neither used nor handled nor cleaned by children. Keep the appliance and its cord out of reach of children This appliance can be used in continuous service not more than 5 min. (+/- 1,5 Kg. of dough)
DOUGH
The dough for the correct use of the Press is indicatively composed by Kg. 2,0 of floor and Kg. 0,750 of a blend of eggs and water in the proportion you more like it. DRAWING
Prepare the dough and form lumps as big as a nut. Check that the ring nut (11) is locked and the die plate (9) is mounted correctly. Introduce the lumps into the press top until it is completely full. Switch on the motor: pasta will start coming out of the press. Cut it with a knife at the desired length. Introduce additional lumps into the press.
Switch off the motor as soon as no more dough is available.
REPLACING THE DIE PLATE
Switch off the motor and disconnect the plug from the socket. Unscrew the ring nut (11) by rotating it in counterclockwise direction. Extract the die plate (9) and replace it with a new one.
Lock the unit by screwing the ring nut (11) in clockwise direction. Before putting away the replaced die plate, clean it and remove dough residuals (if any) from the holes.
DISASSEMBLYING AND CLEANING THE PRESS
After every drawing operation disassemble the press and clean all its parts carefully. Switch off the motor and disconnect the plug from the socket. Unscrew the two stop nuts securing the press to the geared motor cover (6) and remove it. Remove the reduction gear (12) (only for model N.5).
Unscrew the ring nut (11) by rotating it in counterclockwise direction. Extract the die plate (9) and the screw (8) from the front of the casing (7). Wash, clean and dry all parts carefully.
ASSEMBLYING THE PRESS
Switch off the motor and disconnect the plug from the socket. Introduce the screw (8) into the casing (7), making sure that its square part goes out of the rear hole of the casing. Insert the reduction gear (12) into the square part of the screw (8) (only in model N.5). Insert the die plate (9) so that the larger base goes into the casing (7) mouth. Screw the ring nut (11) on the casing (7) mouth by rotating it in clockwise direction as long as it is locked. Couple the press to the geared motor having the screw square part inserted in the square seat of the geared motor. Tighten the stop nuts.
WARNINGS
Before carrying out assembly, disassembly, die plate replacement and cleaning operations, switch off the motor and disconnect the cable with plug, to avoid risks of electric shock.
- Do not press the dough into the unit with your hands; use the supplied pestle.
- After every use disassemble, wash and dry all press parts carefully.
- Clean the die plates by putting them in a warm water bath immediately after use. - Before use, warm the die plates in warm water (cold die plates produce irregularly shaped pasta)
- The pasta obtained can show a darker or lighter color, according to the amount of pressure applied when coming out of the unit. When pressure is lower, lighter pasta will be produced (this happens, for example, when the dough is introduced into the press too slowly compared with the capacity of the unit). This does not alter pasta quality and features.
- In case of blockage of the press, disconnect the plug cable from the socket immediately to avoid risks of damage the machine.
- Close supervision is required when this product is used near children.
Assistance and warranty service information on web site www.rebersrl.it Assistance and warranty service Canada www.auroraimporting.com Assistance and warranty service Australia and New Zealand www.foodquip.com.au
CONDITIONS DE GARANTIE
All Reber products are covered against manufacturing defects by a 24 month guarantee for private users and 12 month guarantee for professionals users. The warranty runs from the date of purchase. The purchasing date shall be that indicated on the receipt issued when the dealer delivers the machine. The
manufacturer undertakes to repair free of charges those parts showing manufacturing defects within the warranty period, or to replace these free of charge. Defects not clearly attributable to materials or manufacture shall be examined by our technical assistance center or in our plant and shall be charges according to the outcome of the examination. The guarantee shall not cover: accidental damage, caused by transport, neglect or inadequate treatment, incorrect or improper use and installation failing to comply with the indications in the instruction manual or in any case resulting from causes that do not depend on normal operation use of the machine. The warranty becomes void when the machine has been repaired or rishandled by unauthorized third parties. The warranty shall not cover replacement of the machine or extension of the guarantee resulting from a breakdown. The machine shall reach us (or our authorized assistance center) carriage free, i.e. with transport expenses at user's charge. The warranty shall not cover any cleaning operations to which the operative components may be subjected.
IMPORTANT NOTICE! REBER develops its products by destination country. The after sales REBER services are trained only for reparations concerning products sent directly from REBER on the after sales service country market, or at least the service center may have difficulty doing any work on specific products unknown to him. If you need assistance on products sent from third dealers on countries for which the same were not designed, the article have STRICTLY to be returned to the dealer for under warranty or not assistance. The costs of repatriation of the proceeds will be paid by the buyer or the seller in accordance with commercial agreements between the parties. Once repatriation Reber will be cover warranty as required by current regulations.
natural_image
Simple line drawing of a trash bin with crossed lines indicating no waste or restriction (no text or symbols)Disposal of Waste Equipment by Users in Private Households in the European Union. This symbol on the product or on its packaging indicates that this product must not be disposed of with your other household waste. Instead, it is your responsibility to dispose of your waste equipment by handing it over to a designated collection point for the recycling of waste electrical and electronic equipment. The separate collection and recycling of your waste equipment at the time of disposal will help to conserve natural resources and ensure that it is recycled in a manner that protects human health and the environment. For more information about where you can drop off your waste equipment for recycling, please contact your local city office, your household waste disposal service or the shop where you purchased the product.