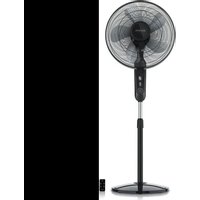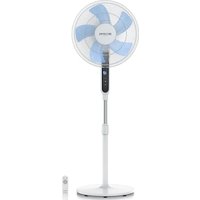
306535 - Fan Brandson - Free user manual and instructions
Find the device manual for free 306535 Brandson in PDF.


User questions about 306535 Brandson
0 question about this device. Answer the ones you know or ask your own.
Ask a new question about this device
Download the instructions for your Fan in PDF format for free! Find your manual 306535 - Brandson and take your electronic device back in hand. On this page are published all the documents necessary for the use of your device. 306535 by Brandson.
USER MANUAL 306535 Brandson
text_image
QR code image containing encoded data, no visible human-readable textENG: Current drivers, user manuals and other relevant documents for this product can be found on our homepage.
natural_image
Diagram of a circular mechanical component with a curved arrow indicating rotation or force direction (no text or symbols)Important safety instructions for this appliance
- Use the appliance only for private and intended use. This product is not intended for commercial use. Do not use it outdoors and keep it away from heat as well as direct sunlight.
- Do not place the appliance in the direct vicinity of water sources such as a bathtub, shower, washbasin or swimming pool.
- Do not use the product with wet hands.
- Unplug the appliance immediately if it becomes damp or wet. Take care of your own safety and do not touch any conductive materials on the appliance.
- Protect the product from moisture (it must never be immersed in liquid),
sharp edges or large sources of dust.
- Do not place the unit directly next to sources of heat (e.g. ovens or heating).
- Choose a suitable base to prevent it from tipping over.
- Disconnect the mains plug from the socket when not in use, for transport or cleaning.
- Never leave the fan unattended and choose a location where animals or children cannot get within reach.
- Operate the appliance only at the voltage corresponding to the appliance labelling.
- This appliance can be used by children aged from 8 years and above and persons with reduced physical, sensory or mental capabilities or lack of experience and knowledge if they have been gi-
ven supervision or instruction concerning use of the appliance in a safe way and understand the hazards involved.
- Children must not play with the appliance. Cleaning and user maintenance must not be carried out by children without supervision.
- Keep the appliance and its connecting lead away from children under 8 years of age.
- For the safety of your children, do not leave any packaging parts (plastic bags, foil, cardboard or polystyrene) within reach.
- Do not let small children play with foil or plastic bags. There is a danger of suffocation!
-
Operate the unit only with the protective grille closed.
-
The fan as well as the rotary control and switches must not be blocked!
- Ensure that the fan is disconnected from the mains supply before removing the protective guard.
- Never put parts of your body (e.g. fingers) or objects through the protective grille.
- Make sure that no hair comes within reach of the protective grille; it can be sucked in by the air flow.
- If the mains cable of this appliance is damaged, it must be replaced by the manufacturer, its customer service or by a similarly qualified person in order to avoid hazards.
- Allow the unit to cool down before cleaning it or disconnecting the mains plug from the socket.
- Wipe the casing of the appliance with a damp cloth and then dry it with a clean dry cloth,. Never immerse the housing in water for cleaning.
Thank you for choosing a Brandon product. To ensure that you enjoy your purchased appliance for a long time, please read the following brief instructions carefully. Before using the delivered product, check that it is complete, free of defects and undamaged.
1. scope of delivery
- Fan
- Remote control incl. batteries (2x AAA battery)
- Quick guide
2. technical data
| Input voltage 220-240 V AC 50Hz | |
| Power consumption 35W | |
| Noise generation Workplace-related emission value LpA < 70 dB(A) | |
| Rotor diameter approx. 39 cm | |
| Oscillation approx. 80° can be switched on/off | |
| Inclination angle ca. 25° | |
| Dimensions | Width approx. 45cm, depth approx. 40cm, height approx. 115 - 130cm (adjustable) |
| Features | 12 speed settingsSwitchable oscillationTimer functionDC motor (direct current motor)Low-noise operation |
3. functions
The Brandon stand fan with an efficient DC motor and the approx. 39cm rotor blade provides optimal ventilation even on warm days. With 12 speed levels, an adjustable tilt angle and an oscillation function, you can adapt the fan to your individual needs. Compared to conventional AC fans, the fan with DC motor can save up to 60% in energy costs with the same air flow rate in m^3 . The input voltage of 220-240 VAC is converted to the DC voltage required by the DC motor by an internal power supply unit.
4. product details
Assembly
text_image
1 2 3 4 5 6 7 8 9 1 2 3 4 5 6 7 8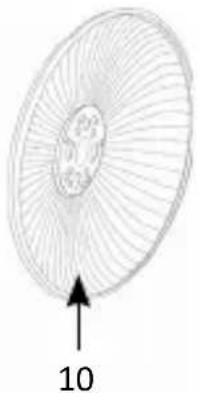
natural_image
Diagram of a biological structure with radial lines and a labeled arrow pointing to a number 10 (no text or symbols beyond the label)
Attention!
Fastening screw (13) with left-hand thread!
flowchart
graph TD
    A["11"] --> B["4"]
    B --> C["5"]
    C --> D["6"]
    D --> E["7"]
    E --> F["13"]
    F --> G["14"]
    style A fill:#f9f,stroke:#333
    style G fill:#bbf,stroke:#333
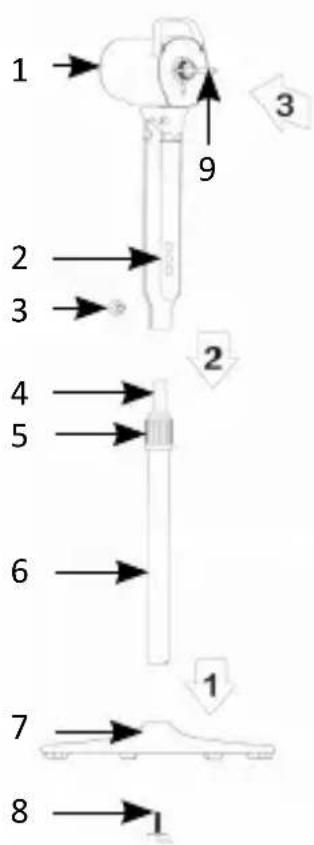
| 1 Motor unit |
| 2 Control panel |
| 3 Inner tube fixing screw |
| 4 Inner pipe |
| 5 Mutter zur Höhenverstellung |
| 6 Outer pipe |
| 7 Stand |
| 8 Stand locking screw |
| 9 Motor axle |
| 10 Rear protective grille |
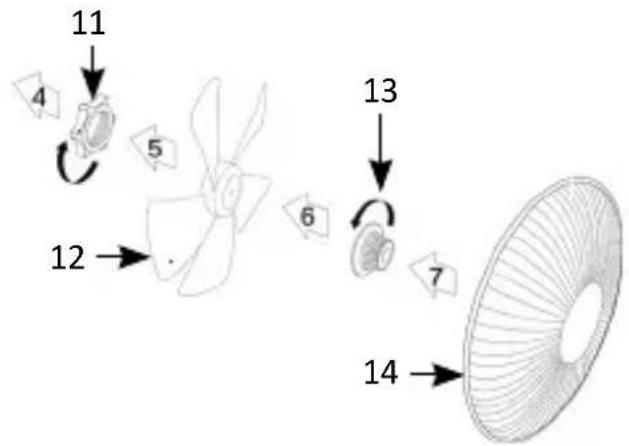
| 11 Protective grid lock nut |
| 12 Rotor blade |
| 13 Rotor fixing screw (left-hand thread) |
| 14 Front guard grille |
5. assembly
Remove the fan from the packaging and check the unit and the scope of delivery listed in the table. Please contact the seller if any part is missing or damaged.
-
To mount the fan correctly, first screw the stand (7, 8) to the outer tube (6). Take the stand (7) and screw the outer tube (6) to the stand from below using the fastener (8).
-
To connect the motor unit (1), to the inner tube (4), insert it into the fan control inlet and secure it with the inner tube fixing screw (3).
natural_image
Pure technical diagram of concentric circular components with directional arrows, no text or symbols present-
Now place the rear protective grille (10) on the fan unit (9).
-
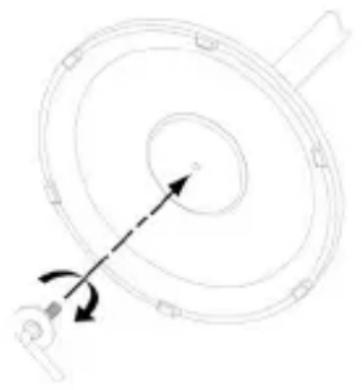
Screw the rear grille in place using the locking nut (11).
-
Then put the rotor blade (12) on the motor axle (9) and fasten it with the appropriate fastening screw (13). Make sure that the individual components are mounted properly on the motor axle (9) to avoid vibrations!
-
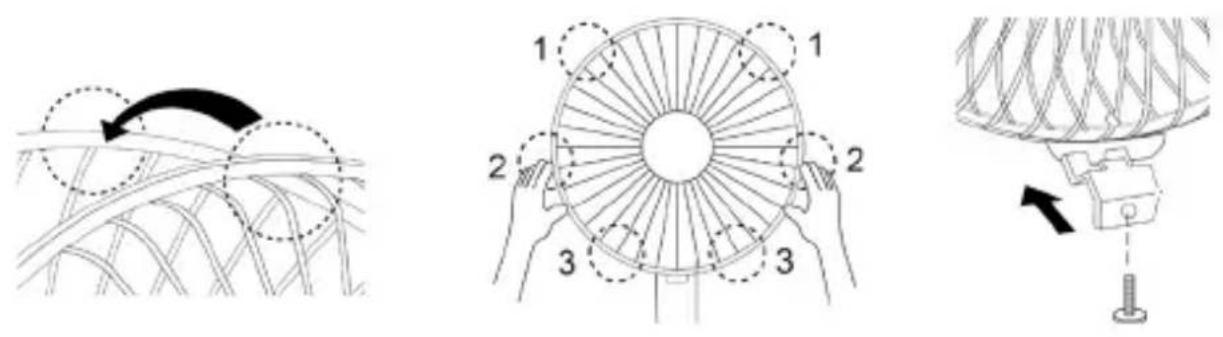
Align the locking device of the front guard with the illustrated position of the rear guard (see illustration below left).
-
Press the guards one after the other with both hands.
-
Finally, tighten the safety screw of the fan grille (see illustration below right).
Note: Screws, if they are not in the bag, are usually all pre-assembled in the place where they would otherwise be.
6. Use
Place the fan in a suitable location and connect the unit to a properly installed 220-240V AC socket.
By tilting the protective cage, you can change the angle of inclination by up to 25^ as desired.
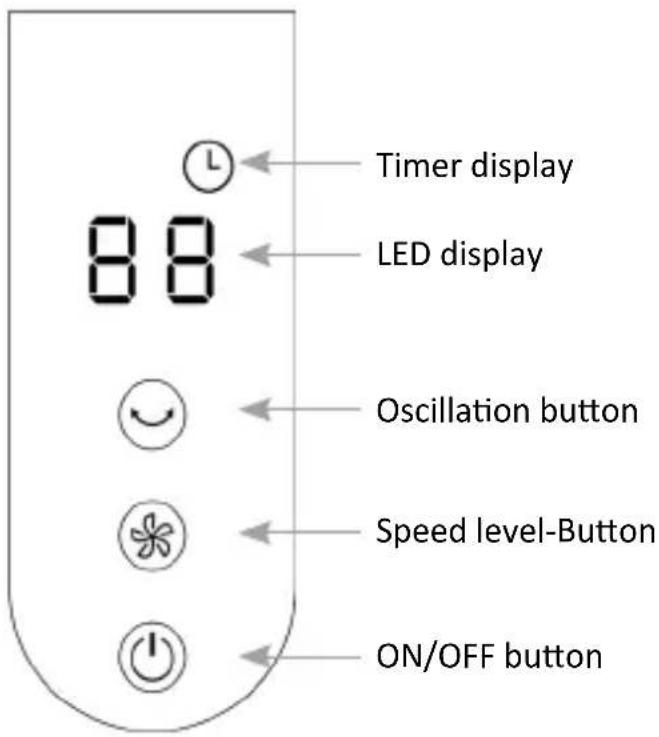
Press the „Oscillation“ key ( ) on the control element or on the remote control to switch on the oscillation.
The fan has 12 different speed levels, which you can change with the „speed level“ button ( ) on the control element or on the remote control. The current speed level is shown in the display.
Attention: The display switches off automatically after a period of 30 seconds without operation, and can be reactivated by e.g. pressing the speed step key!
6.1 Button functions
| Key Function | |
 (speed level button) (speed level button) | Switch between 12 different speed levels |
 (oscillation button) (oscillation button) | Oscillation on / off |
 (Timer button) (Timer button) | Switch on timer |
 (ON/OFF button) (ON/OFF button) | Unit On / Off |
6.3 Timer function
The fan offers 22 different timer levels that can be adjusted every half hour from 0.5 - 10 hours and then every hour from 10 up to a maximum time of 12 hours. To do this, press the “Timer” button on the remote control. The currently selected timer time is shown in the display. The timer display also lights up. Press it again to increase the duration of the timer.
Example: If you want to set a timer of 5.5 hours, press the "Timer" button until the display on the fan shows "5.5".
6.4 Fan control
text_image
Timer display 88 LED display Oscillation button Speed level-Button ON/OFF button6.5 Height adjustment
To adjust the height of the fan, first loosen the height adjustment nut (5) slightly. You can then adjust the height of the fan by grasping the fan control (2) and pushing the unit upwards a little. As soon as the desired height is reached, tighten the height adjustment nut (5) again.
Attention! Always switch off the unit for height adjustment and make sure that the fan can be lowered again abruptly by releasing the height adjustment if the unit is not held at the top, e.g. by the motor unit (1).
7. cleaning
Please disconnect the mains plug from the socket before you start cleaning! Use a cloth slightly moistened with water for cleaning. Under no circumstances should the unit be immersed in water for cleaning. This could result in an electric shock or fire!
8. safety instructions and disclaimer
Never attempt to open the unit to carry out repairs or modifications on your own. Avoid contact with the mains voltage. The unit is only voltage-free when the plug is pulled out. Please do not short-circuit the product either. Also, do not forget to unplug the mains plug completely when not in use or during a thunderstorm. The unit is not approved for outdoor use. Therefore, please use it only in dry areas. Protect it from high humidity, water and snow. Be sure to keep the unit away from high temperatures. Do not expose the unit to sudden temperature changes or strong vibrations as this could damage the electronic parts. Check the unit for any damage before use. The unit should not be used if it has been knocked or otherwise damaged. Please also observe national regulations and restrictions. Do not use the appliance for purposes other than those described in this manual. This product is not a toy. Keep it out of the reach of children or mentally impaired persons. Any repair or modification to the unit not carried out by the original supplier will invalidate the warranty or guarantee. The appliance may only be used by persons who have read and understood these instructions. The specifications of the appliance are subject to change without prior notice.
9. disposal instructions
According to the European WEEE Directive, electrical and electronic equipment must not be disposed of with household waste. Their components must be recycled or disposed of separately because toxic and hazardous components can cause lasting damage to the environment if disposed of improperly. As a consumer, you are obliged under the Electrical and Electronic Equipment Act (ElektroG) to return electrical and electronic equipment free of charge at the end of its service life to the manufacturer, the point of sale or to public collection points set up for this purpose. Details are regulated by the respective national law. The symbol on the product, the operating instructions or/and the packaging indicates these regulations. By separating, recycling and disposing of old appliances in this way, you are making an important contribution to protecting our environment.
WEEE Directive: 2012/19/EU WEEE Register No: DE 67896761
WD Plus GmbH hereby declares that the appliance 306535 is in conformity with the essential requirements and other relevant provisions of the Directive. A complete declaration of conformity can be obtained from: WD Plus GmbH, Wohlenbergstraße 16, 30179 Hannover, https://downloads.ganzeinfach.de/
natural_image
Diagram of a circular mechanical component with a rotating arrow and base, no text or symbols presentnatural_image
Diagram showing curved arrows over a grid-like structure with dashed outlines (no text or symbols)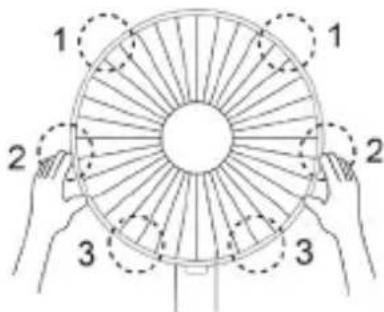
text_image
1 1 2 2 3 3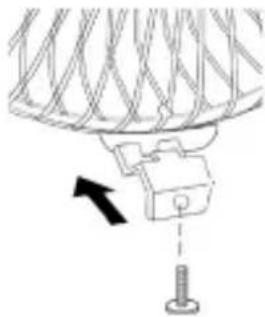
natural_image
Diagram of a mechanical device with a rotating shaft and mounting base, showing no text or symbolsnatural_image
Diagram of a circular mechanical component with a curved arrow indicating rotation or force direction (no text or symbols)natural_image
Diagram of a biological structure with radial lines and a labeled arrow pointing to a numbered point (10), no readable text or symbols present.
¡Atención!
natural_image
Pure technical diagram of concentric circular components with directional arrows, no text or symbols presentMO-FR 9:30am - 18pm CET

text_image
QR code image containing encoded data, no visible human-readable textbrandson-equipment.de