USER MANUAL SD-PN100KXE PANASONIC
natural_image
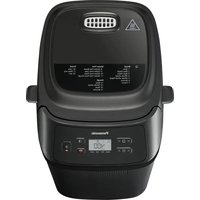
Black Bosch air fryer with digital display and control panel (no visible text or symbols)
SD-PN100KXE

Scan the QR code for more recipes and version of Operating Instructions.
Thank you for purchasing the Panasonic product.
- For this product, there are 2 instructions. This is "OPERATING INSTRUCTIONS". The other one is "OPERATING INSTRUCTIONS AND RECIPES". Please read 2 instructions carefully to use the product correctly and safely.
- Before using this product please give your special attention to "Safety Precautions (See P. GB2 – GB3)" and "Important Information" (See P. GB4) of this instructions.
- Please keep this Operating Instructions for future use.
- Panasonic will not accept any liability if the appliance is subject to improper use, or failure to comply with these instructions.
Contents
| Safety Precautions | GB2 |
| Important Information | GB4 |
| Parts Names and Instructions | GB4 |
| Making Basic Bread | GB5 |
| Troubleshooting | GB6 |
| Cleaning & Care | GB7 |
| Specifications | GB7 |
| Quick Guide | GB8 |
Safety Precautions
PLease make sure to follow these instructions.
To reduce the risk of personal injury, electric shock or fire, please observe the following:
■ The following signals indicate the degree of harm and damage when the product is misused.

WARNING:
Indicates potential hazard that could result in serious injury or death.

CAUTION:
Indicates potential hazard that could result in minor injury or property damage.
■ The symbols are classified and explained as follows.

This symbol indicates prohibition.

This symbol indicates requirement that must be followed.

WARNING
To avoid risk of electric shock, fire due to short circuit, smoke, scalding or injury.

- Do not allow infants and children to play with packaging material. (It may cause suffocation.)
- Do not disassemble, repair or modify this appliance.
→ Consult the place of purchase or Panasonic service centre.
- Do not damage the mains lead or mains plug.
The following behaviors are strictly prohibited:
Damaging, processing or placing it near the heating pipe, forcibly bending, twisting, pulling, pulling the mains lead over sharp edges, placing heavy objects on the mains lead, bundling the mains lead, and using the mains lead to lift the product.
- Do not use the appliance if the mains lead or mains plug is damaged or the mains plug is loosely connected to the household mains socket.
→ If the mains lead is damaged, it must be replaced by the manufacturer, its service centre or similarly qualified person in order to avoid a hazard.
- Do not plug or unplug the mains plug with wet hands.
- Do not immerse the appliance in water, or splash it with water and / or any liquid.
- Do not touch, block or cover the steam vent during use.
• Especially pay attention to children.

- This appliance can be used by children aged from 8 years and above and persons with reduced physical, sensory or mental capabilities, or lack of experience and knowledge if they have been given supervision or instruction concerning use of the appliance in a safe way and understand the hazards involved.
Children should not play with the appliance.
Cleaning and user maintenance should not be made by children unless they are older than 8 and supervised.
WARNING

- Keep the appliance and its mains lead out of reach of children less than 8 years.
Make sure the voltage indicated on the label of the appliance corresponds to your local supply.
Also avoid plugging other devices into the same household mains socket to prevent electrical overheating. However, if you are connecting a number of mains plugs, make sure the total wattage does not exceed the rated wattage of the household mains socket.
Insert the mains plug firmly.
Dust off the mains plug regularly.
■→Unplug the mains plug, and wipe with a dry cloth.
- Discontinue using the appliance immediately and unplug in the unlikely event that this appliance stops working properly.
Example for abnormal occurrences or breaking down:
• The mains plug and the mains lead become abnormally hot.
- The mains lead is damaged or the appliance power fails.
- The main body is deformed, has visible damage or is abnormally hot.
• There is abnormal turning noise while in use.
• There is unpleasant smell.
• There is another abnormality or failure.
■→Consult the place of purchase or Panasonic service centre for inspection or repair.
- Do not use the appliance if the parts of the appliance is deformed or damaged such as having visible cracks or chips.
■→Consult the place of purchase or Panasonic service centre for inspection or repair.
CAUTION
To avoid risk of electric leakage, electric shock, fire due to short circuit, scalding, injury or property damage.

- Do not use the appliance on following places.
- On uneven surfaces, on electrical appliances such as a refrigerator, on materials such as tablecloths or on carpets, etc.
- Places where it may be splashed with water or near a heat source.
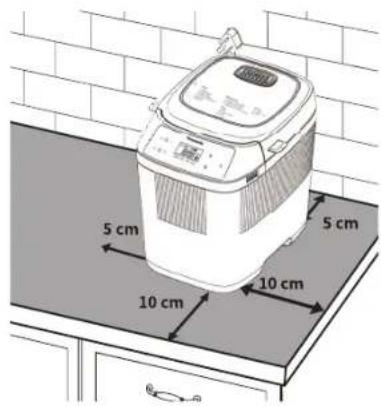
■→Position the appliance on a firm, dry, clean, flat heatproof worktop at least 10 cm from edge of worktop and at least 5 cm from adjacent walls and other objects.
- Do not remove the bread pan or unplug the appliance during use.
Do not use an external timer etc.
- This appliance is not intended to be operated by means of an external timer or separate remote - control system.
- Do not touch hot area such as bread pan, inside of unit, heating element or inside of the lid while the appliance is in use or immediately after use.
The accessible surfaces may become hot during use. Be careful with the residual heat source especially after use.
- To avoid burns, always use oven gloves to remove the bread pan or the finished bread. (Do not use wet oven gloves.)
Do not insert any object in the gaps.
- Do not exceed the maximum quantities of bread (280 g), dough (280 g) and raising ingredients such as dry yeast (4.2 g) or baking powder (7 g). (See P. GB7)
Unplug the mains plug when the appliance is not in use.
Make sure to hold the mains plug when unplugging it. Never pull on the mains lead.
●Before handling, moving or cleaning, unplug the appliance and allow it to cool down.
This appliance is intended for household use only.
- Ensure to clean the appliance especially surfaces in contact with food after use. (See P. GB7)
- Do not use the appliance outdoors, in rooms of high humidity, or use excessive force on the parts as is illustrated on the right to avoid malfunction or deformation.
- Do not use a knife or any other sharp tool to remove residues.
- Do not drop the appliance to avoid damaging it.
- Do not store any ingredients or bread in the bread pan.
- When taking the handle of bread pan, hold the central part of the handle to avoid shaking or collision.
Temperature sensor
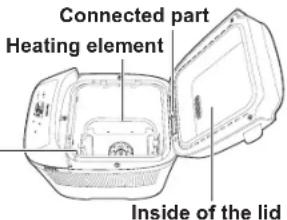

This symbol on the appliance indicates "Hot surface and should not be touched without caution".
Parts Names and Instructions

Main Unit
- Before using the appliance for the first time, please wash the bread pan, blade, etc.
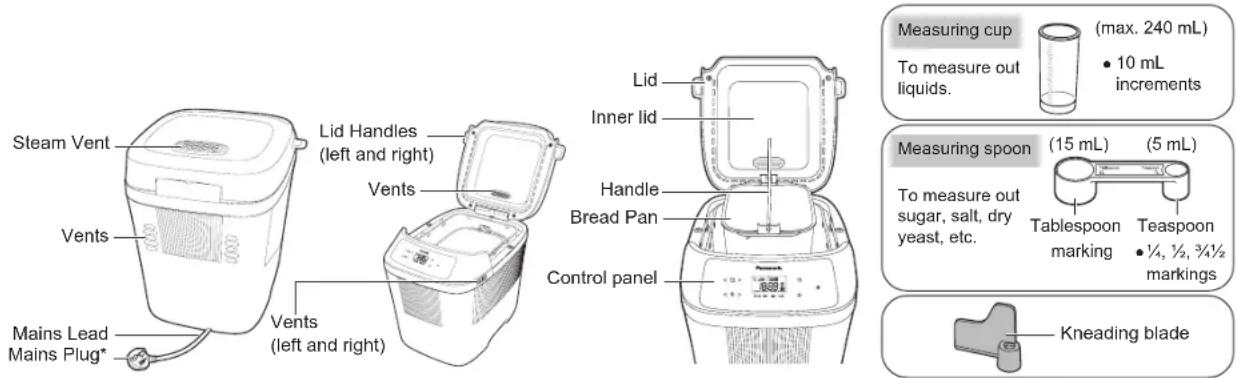

Control Panel And Display
• After the mains plug is unplugged, the LCD display will go out.
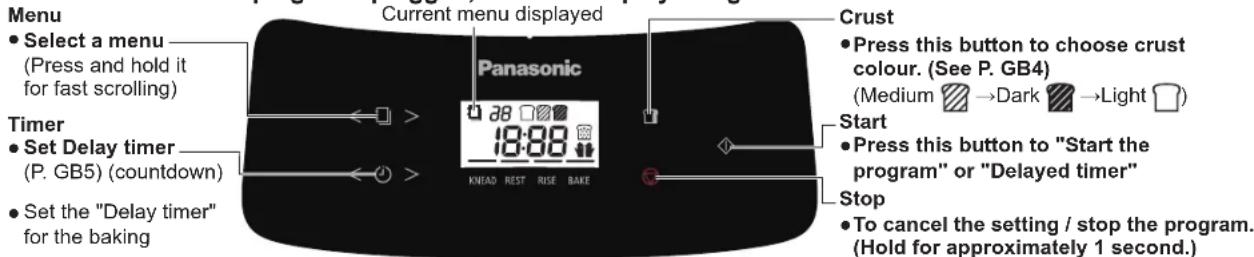
- The figure above shows all text and icons, whereas only the contents related to the current menu are displayed during actual use.
Continue to bake / Reheat / Stir (Menus that can be set: 16 - 18) ("Continue to bake" is taken as an example shown on the right)
In case of insufficient baking due to the addition of ingredients, etc. (Insert a skewer into the centre the cake or bread if the mixture sticks to the skewer continue to bake.), "Continue to bake" can be performed up to 2 times after the baking is finished.
- "Continue to bake" should be performed within 15 minutes after the baking is finished, and cannot be performed after the temperature of the inside of the main body drops.
① Select the corresponding menu number.
② Set the baking time.
- The duration of "Continue to bake" will be different for
different menus.
③ Press the "button.
- Press and hold the "button to cancel "Continue to bake"
■ "Continue to bake" can also be performed in the following ways:
- When "is not pressed after the baking is finished and the buzzer beeps.
① Press the "<" or " > of "" button to set the baking time.
② Press the "button to start baking.
Crust
"☐" can be set to "☐" Medium, "☐" Dark or "☐" Light.
① After selecting a program listed on the menu, press the "☐" button to select the desired colour of the crust.
② Press the "button.
- The program listed on the menu and for which "☐" is available is marked with "☐"
- The more sugar, the darker the crust colour. The less sugar, the lighter the crust colour.
GB4
Timer
The baking finishes at the set time by the "💡" program.
① For example, daily-made soft bread.
- It is 9:00 pm now and you want the bread to be ready at 6:30 am tomorrow.
② After selecting the program on the menu, press the "or" > of "button to adjust the time to the desired
baking finishing time. (The displayed time is the difference between the finishing time and the present.)
③ Press the "button. (to finish the delay timer)
- For the program for which the "☐" program is available, please set the "☐" program after setting the "☐" program.
④ For available menu, it can be set up to 13 hours.
Raisin
Addition amount should not exceed 50 g.
Menu 3 has the Raisin program by default. When any ingredients need to be added, you can add the ingredients at the time specified in the manual.
Manual addition ("☐" is displayed on the LCD).
After the appliance beeps, you should manually add the ingredients, close the lid and press the "◇" button again within 3 minutes.
※ If the ingredients are not added or the "◇" button is not pressed within 3 minutes, the buzzer will beep and the appliance will start automatically.
- The ingredients addition time varies with the room temperature.
● The more ingredients, the less puffy the bread.
- Depending on different types of ingredients, there may be cases where the original shape cannot be maintained.
Please follow the proportion and amount of ingredients for each menu. Otherwise, the ingredients may pop out of the bread pan, be burnt by the heater, smell bad or smoke.
● Too hard ingredients added may cause peeling of the fluoride coating on the bread pan, etc. Please be careful when using them.
- Accidental intake of the peeled fluoride coating will not affect your health.
Making Basic Bread
| Dry yeast 1 tspStrong white bread flourButter 15 gSugar 1 tbspSalt 1 tspWater 170 mL | |
The options of each recipe and necessary operation are indicated as the following icons:
Raisins, nuts and other ingredients can be added manually. The time indicated in the recipe section for adding extra ingredients such as raisins is the addition time in the non-timer program.
Crust colour can be set to "Medium", "Dark" or "Light". The bread baking finishing time can be set.
- Range of set finishing time: 4 hours - 13 hours (P. GB5)
- Ingredients addition time: About 37 minutes - 1 hours 2 minutes (P. GB5)
Place measured ingredients into bread pan in the order listed in the recipe.
Do manual operation (such as adding extra ingredients, scraping the flour from sidewall of bread pan) when the beep sounds.
Preparation
- Place the appliance on a stable, dry, clean, flat, heat-resistant worktop.
-
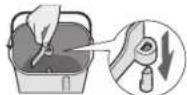
Open the lid. Turn the bread pan anticlockwise to remove the bread pan. Install the kneading blade onto the mounting shaft.
-
Gently touch the kneading blade, and its front end will move about 3 cm from side to side.
-
Make sure that there is no dough around the mounting shaft.
-
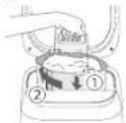
Put the ingredients in the range indicated by the icons into the bread pan in the order listed in the recipe and as follows:
① Yeast ② Flour ③ Other ingredients ④ Liquids
Put the bread pan clockwise in place, close the lid and insert the mains plug.
- When adding the dry yeast, keep it away from the kneading blade and mounting shaft. If some yeast gets into it, the bread may not rise well.
- Place the measured ingredients into the bread pan. Cover the yeast with the flour, followed by the rest of the dry ingredients.
Followed by the liquid.
Setting
- Press the left and right arrows of "☐" to switch over between the menus.
After selecting menu 1, you can choose to set the following shortcut programs. (The programs available for each menu are indicated by the following icons beside the recipe.)
Menu 3 has the Raisin program by default. The machine will beep to remind you to add the ingredients within the required time while the display "💡" will blink.
Press the "☐" button to set the crust colour. (Standard by default.)
Press the "💡" button to set the bread baking finishing time. (From the present by default.)
See P.GB4-P.GB5 for details of the above shortcut programs.
- Press the "◇" button, and then screen will display the approximate finishing time.
- If the menu has selected the Raisin program, please open the lid when the buzzer beeps, manually put the ingredients into the bread pan, and press the "button again.
If the ingredients are not added or the "◇" button is not pressed within 3 minutes, the buzzer will beep and the appliance will start automatically.
Taking out
- The machine will beep when the program has finished.
Press "▽" button and unplug the machine.
-
For best results remove the bread immediately.
-
Carefully remove the hot bread pan with dry heat protective oven gloves.
- Tip the bread out of the pan and leave it to cool on a wire rack.
● Make sure the blade is not embedded in the bread before slicing.
- Do not use any sharp implements to remove the bread as this will damage the bread pan.
Troubleshooting
Please check the following first. If there is still an anomaly, contact Panasonic Service Centre immediately.
| US3 | Motor overload. | Weigh materials correctly.Crush large particles of ingredients such as walnuts and add them.(Press "▽") |
| USO | It means that due to continuous running, the machine is hot (above 40 °C). | Open the lid until the inside is cooled thoroughly.(It should be cooled for about 1 hour after finishing the baking.) |
| HO1 ~ HO2 | This is a malfunction.Please contact Panasonic Service Centre for repair. |
Problem Caus
and Action
| Buttons do not work. | Check whether or not the mains plug is loose or has fallen.→Insert the mains plug. |
| The appliance does not run (knead the dough) after the "button is pressed. | The delay timer program is started from "Dough standing" so that the appliance does not run at the beginning.→None |
| The blade rattles. | It is because there is a gap between the blade and the main shaft. (The front end moves about 3 cm)→None |
| The appliance sounds during use or reservation. | During "Dough kneading" or "Venting", the following sounds are not abnormal.→Squeaks and patters......dough kneading sound→Hums......motor running sound |
| The appliance stops halfway. (the blade does not rotate) | When there are too much ingredients or the blade is stuck in the hard ingredients so that the motor is overloaded, the protection device starts working and the appliance stops halfway. (Disconnect the power immediately, remove and discard the ingredients from the bread pan. Rest for more than 30 minutes, and then restart with the amount of ingredients stated in the recipe.)→If the product still does not operate normally after the above operation, please contact Panasonic Service Centre for repair. |
| Baking still cannot proceed and there is still powdery. | Whether or not you have forgotten to install the blade.→Install the blade. (P. GB4)Whether or not the blade mounting shaft in the bread pan is too tight to rotate.→When the blade is installed but the blade mounting shaft does not rotate, replace the bearing of the spindle. (Please contact Panasonic Service Centre.) |
| There is dough leakage at the bottom of the bread pan. | During use, a small amount of dough is discharged from the outlet of the bread pan. (The dough that has entered the rotating part is discharged so as not to interfere with the rotation.) This is not abnormal. However, please make sure that the blade mounting shaft can rotate.→When the blade is installed but the blade mounting shaft does not rotate, replace the bearing of the spindle. (Please contact Panasonic Service Centre.) |
| The bottom of the bread pan turns dark. | The bottom of the bread pan may turn dark due to the stirring friction. Wipe the darkening part with a wet kitchen paper.→None |
| Abnormal shape of bread (Insufficient or excessive fermentation). | You have used too much dry yeast / water.→Check the recipe and measure out the correct amount using the measuring spoon (dry yeast) / measuring cup (water) provided.→Check that excess water amount is not included in other ingredients.→You have used too much flour.→Carefully weigh the flour using scales.→Is the room temperature too high?→For the room temperature above 25 °C, it is recommended to use water at 5 °C and reduce the amount of water by 10 g (mL) |
- When the appliance starts to run, it smokes and smells. But the smoke and smell gradually disappear as the appliance continues to run. This does not affect the use of the appliance.
- It is normal that the motor may not run immediately when the appliance is started.
Cleaning & Care
- Before cleaning the unit, unplug and allow to cool.
- Do not use anything abrasive! (cleansers, scouring pads etc).
- Use a soft damp cloth.
- Do not wash any part of the bread maker in the dishwasher.
- Keep the bread maker clean and dry.
Bread Pan • Kneading Blade
Twist the bread pan anti-clockwise to remove.
Remove the kneading blade and wash in warm soapy water.
① Ensure the area around the shaft and inside the kneading blade are cleaned thoroughly. There should be no dough residue left around the kneading shaft.
② If the kneading blade is difficult to remove from the pan, place a small quantity of warm water into the pan and soak for 5 - 10 mins. Do not submerge the pan in water.
Main Unit
Wipe with a soft damp cloth.
- Wipe gently to avoid damaging the temperature sensor.
Lid
Once cooled, wipe the inner lid with a soft damp cloth as soon as possible after baking.
Specifications
| Power Supply | 230V ~ 50 Hz |
| Heating Power 340 W | |
| Mixing Power 45 W | |
| Dimensions (W × D × H)(approximately) | 25.5 × 30.7 × 29.0 cm |
| Weight 3.5 kg | |
| Overheating Prevention Device Thermal fuse |
| Length of the Mains Lead (Approx.) 0.9 m |
| Capacity | Strong bread flour | Bread max. 280 g min. 200 g | |
| Dough max. 280 g min. 200 g | |
| Dry yeast max. 4.2 g min. 1.4 g | | |
| Baking powder max. 7 g min. 3 g | | |
| Standby Mode Power | 0.4 W |
Automatic Standby Mode
When the appliance is connected to the power supply, it immediately enters standby mode.
When the appliance is running, if you press the stop button, it will immediately enter standby mode.
Disposal of Old Equipment
Only for European Union and countries with recycling systems.
This symbol on the products, packaging, and / or accompanying documents means that used electrical and electronic products must not be mixed with general household waste.
For proper treatment, recovery and recycling of old products, please take them to applicable collection points in accordance with your national legislation.

By disposing of them correctly, you will help to save valuable resources and prevent any potential negative effects on human health and the environment.
For more information about collection and recycling, please contact your local authority.
Penalties may be applicable for incorrect disposal of this waste, in accordance with national legislation.
SD-PN100
QUICK GUIDE
Thank you for choosing Panasonic. We will work towards our own goal to realize a better life and a more sustainable global environment.
Full manual in web

Less Plastic Package
Digital manual support

CONTROL PANEL AND DISPLAY
- Select a menu — (Press and hold it for fast scrolling)
Timer
- Set Delay timer ____ (P. GB5) (countdown)
- Set the "Delay timer" for the baking
Crust
- Press this button to choose crust colour. (See P. GB4)
(Medium → Dark Light)
Start
- Press this button to "Start the program" or "Delayed timer"
Stop
- To cancel the setting / stop the program. (Hold for approximately 1 second.)
ACCESSORIES
Measuring cup Measuring spoon Kneading blade

HOW TO USE (Program 1)
Clean all parts before using the appliance for the first time or when you have not used it for a while. (Please follow the cleaning instructions on P. GB7.)
1 Remove the bread pan and set the kneading blade.
2 Measure the Ingredients accurately, for example as just a spoonful illustration.


3 Place the ingredients into bread pan
4 Select a bread menu

5 Press Start button

6 When bread is ready, press Stop button, remove it, and place on a wire rack.

GB8
RECIPES
Place the measured ingredients into bread pan in the order listed in the recipe.
| Function | Menu No. | Menu Item | Time | Ingredients |
| Dry yeast | Strong whole wheat bread flour | Strong white bread flour | Butter | Sugar | Skimmed milk powder | Salt Oil | Egg | Butter Water | | |
| Bread | 1 Basic | 4 h - 4 h 10 min | 1 tsp - | 250 | g | 15 g | 1 tbsp - | 1 tsp - | - 170 mL | | | | |
| 4 | Whole Wheat | 5 h 1 tsp 125 | g | 125 g | 15 g | 1 tbsp - | 1 tsp - | - 190 mL | | | | |
| 6 Brioche 3 h | 15 min 3⁄4 tsp - 200 | | g | 30 g*1 | 2 tbsp | 1 tbsp | 3⁄4 tsp - | | 140 mL*2 | 40 g*3 | - |
| Dough 14 | Pizza 45 min 1⁄2 tsp - 280 | | | | g | --- 1 tsp | | | | 2 1⁄2 tbsp | -- 150 mL | | |
*1 Cut into 2 – 3 cm cubes and keep in refrigerator.
*2 Mixture/Beat *3 Cut into 1 - 1 egg (M) + 2 cm cubes Egg yolk + and keep in Water refrigerator.
| Time | Ingredients |
| Milk Egg | Cider vinegar | Oil | Honey | Salt | Brown rice flour | Potato Starch | Xanthan gum | Dry yeast | |
| Gluten Free | 8 | Gluten Free Bread | 1 h 50 min - 1 h 55 min | 160 g | 50 g^*1 | 8 g | 1 tbsp | 30 g | 1 tsp | 75 g | 150 g | 1 tsp | 112 tbsp |
*1 Egg (M), beaten
| Time | Ingredients |
| Butter | Sugar | Milk Egg | | Baking powder | Plain flour | Rum or brandy | Lemon peel |
| Sweet | 16 | Cake | 1 h 30 min - 1 h 40 min | 110 g | 100 g | 1 tbsp | 100 g^*1 | 7 g | 180 g | A little | A whole |
*1 2 Eggs (M), beaten

Scan the QR code for more recipes and version of Operating Instructions.
https://www.panasonic.com
Representative in EU :
Panasonic Marketing Europe GmbH
Panasonic Testing Centre
Winsbergring 15, 22525 Hamburg, Germany
Panasonic Manufacturing.Xiamen.Co.,Ltd.
https://www.panasonic.com
©Panasonic Manufacturing (Xiamen) Co., Ltd. 2024

DZ50B236
MX0724L0

Printed in China