
Milano - Loudspeaker Auna - Free user manual and instructions
Find the device manual for free Milano Auna in PDF.

| Product Type | Active speaker with wireless charging station |
| Brand | Auna |
| Model | Milano |
| Power supply | 220-240 V ~ 50/60 Hz (16 V / 3 A mains adapter) |
| RMS power | 30 W (2 x 15 W) |
| Frequency response | 90 Hz - 18 kHz |
| Signal-to-noise ratio | ≥ 75 dB |
| Channel separation | ≥ 35 dB |
| Bluetooth transmission range | Up to 10 m |
| Bluetooth | Yes, version 5.0 |
| Audio input | AUX 3.5 mm |
| USB charging ports | 1 x 5 V / 2.1 A, 1 x 5 V / 1 A |
| Wireless charging (Qi) | 5 W (5 V / 1 A) |
| Table top load capacity | Max. 5 kg |
| Hands-free function | Yes, with built-in microphone |
| TWS (True Wireless Stereo) function | Yes, to connect two speakers |
| Auto-off | After 10 minutes without BT connection or LINE IN signal |
| Maintenance | Clean with a soft, dry cloth. Do not use abrasive products. |
| Included accessories | Main body, table top, 3 legs, power cord, mains adapter, AUX 3.5 mm cable, bolts, nuts, key, covers, protective pads |
| Weight | Approx. 5 kg (estimate) |
| Dimensions (W x D x H) | Approx. 30 x 30 x 40 cm (estimate) |
Frequently Asked Questions - Milano Auna
User questions about Milano Auna
0 question about this device. Answer the ones you know or ask your own.
Ask a new question about this device
Download the instructions for your Loudspeaker in PDF format for free! Find your manual Milano - Auna and take your electronic device back in hand. On this page are published all the documents necessary for the use of your device. Milano by Auna.
USER MANUAL Milano Auna
INHALTSVERZEICHNIS
Technische Daten 4
Member of Berlin Brands Group
Handwerkerstr. 11
15366 Dahlwitz-Hoppegarten
Deutschland
natural_image
Symbol of a trash bin crossed with a diagonal line, representing no waste or discharge (no text or labels)Berlin Brands Group UK Ltd
PO Box 1145
Oxford, OX1 9UW
United Kingdom
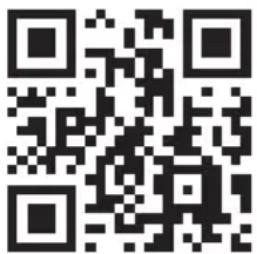
Congratulations on purchasing this device. Please read the following instructions carefully and follow them to prevent possible damages. We assume no liability for damage caused by disregard of the instructions and improper use. Scan the QR code to get access to the latest user manual and more product information.
CONTENT
Technical Data 18
Safety Instructions 18
Assembly 20
Device Overview and Key Functions 22
Operation 23
Cleaning and Care 27
Hints on Disposal 27
Declaration of Conformity 28
TECHNICAL DATA
| Item number 10034605, 10034606 | |
| Power supply (power supply unit) 220-240 V ~ 50/60 Hz | |
| BT transmission distance up to 10 m | |
| BT frequency 2.402 - 2.480 GHz | |
| RMS 30 W (15 W x 2) | |
| Frequency range 90 Hz - 18 kHz | |
| Signal to noise ratio ≥ 75 dB | |
| Separation ratio ≥ 35 dB | |
| Operating voltage DC 16 V / 3 A | |
| USB charging socket 5 V / 2.1 A and 5 V / 1 A | |
| Wireless charging 5 W (5 V / 1 A) | |
SAFETY INSTRUCTIONS
Special notes about the device
- The maximum load capacity of this product is 5 kg. Do not place objects weighing more than 5 kg on the device, otherwise we do not assume any liability.
- Do not use the product as a seat. Also make sure that children do not sit on it.
- Use only the original power supply to charge the speaker, otherwise the speaker may be slowly charged or not charged at all. In extreme cases, the AC adapter may burn out or damage the unit.
General information
- Lightning - If you are not going to use the device for a long time or if there is a storm, disconnect the plug from the electrical outlet and disconnect the device from the antenna connector. This will avoid damage to the product that may be caused by lightning or overvoltage.
- Overload - Do not overload power outlets, extension cords, or built-in power outlets, as this may result in a fire or electric shock.
- Foreign objects and liquid - Never push objects of any kind through openings in the device as they may touch dangerous voltage points or short out parts, which could result in a fire or electric shock. Never spill liquids of any kind on the device.
- Repairs and maintenance - Do not attempt to service this product yourself, as opening or removing covers will expose you to dangerous voltages or other hazards. Leave all maintenance to qualified service personnel.
- Damage requiring service - Disconnect the power plug from the outlet and consult a qualified specialist if any of the following conditions occur:
a) If the power cord or plug is damaged.
b) If liquid has been spilled or objects have fallen onto the product.
c) If the product has been exposed to rain or water.
d) If the product has been dropped or damaged.
e) If the product has a markedly reduced performance.
- Replacement parts - When replacement parts are required, make sure that the service professional who replaces the parts only uses replacement parts that have been approved by the manufacturer or that have the same characteristics as the original part. Unauthorized replacement may result in fire, electric shock or other hazards.
- Heat - Do not place the unit near heat sources such as radiators, heaters, stoves or other products (including amplifiers).
Note: This device may be only used by children 8 years old or older and persons with limited physical, sensory and mental capabilities and / or lack of experience and knowledge, provided that they have been instructed in use of the device by a responsible person who understands the associated risks.
ASSEMBLY
Parts
1 Main body (1x) Main body (1x) | 2.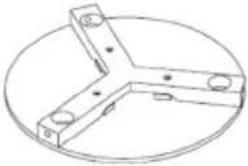 Table top (1x) Table top (1x) | 3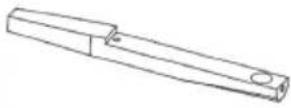 Legs (3x) Legs (3x) |
4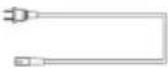 Power cord (1x) Power cord (1x) | 5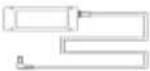 Power adaptor (1x) Power adaptor (1x) | 6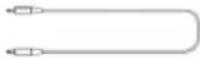 3.5 mm cable (1x) 3.5 mm cable (1x) |
A.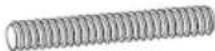 Bolt (6x) Bolt (6x) | B. D-Nut (6x) D-Nut (6x) | C.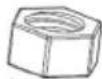 Nut (6x) Nut (6x) |
D.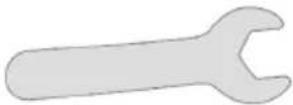 Spanner (1x) Spanner (1x) | E.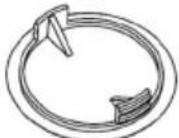 Cover (6x) Cover (6x) | F Protective Pads (3x) Protective Pads (3x) |
| 123 | ||
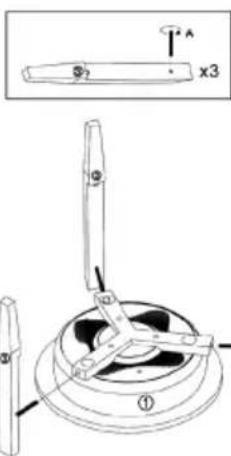 |  | 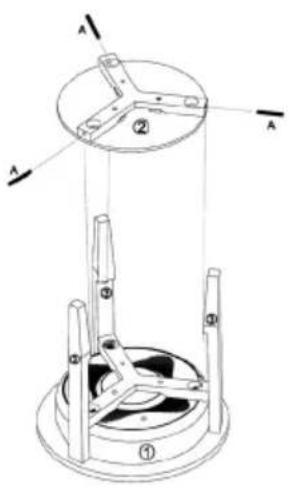 |
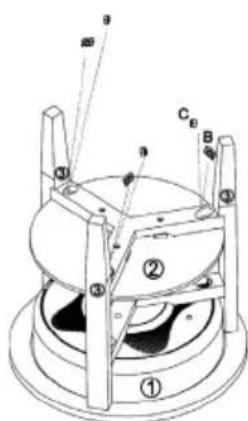
| Insert the bolts (A) into the holes in the main body (1). Insert the legs (3) into the main body and screw the bolts (A) into the holes in the legs. | Screw the D nuts (B) and nuts (C) into the main body (1) from above as shown. | Insert the bolts (A) into the holes in the table top. Place the table top on the notches of the legs (3) and screw the bolts (A) into the holes in the legs (3). |
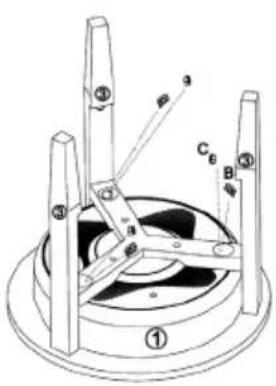
| 456 | ||
 | 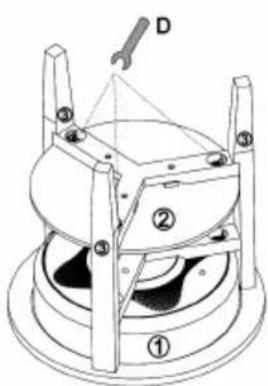 |  |
| Screw the D nuts (B) and the nuts (C) into the table top (1) from above as shown. | Tighten all fasteners with the key (D). | Place the covers (E) on the holes on the main body and on the table top and finally attach the protective pads to the legs. |
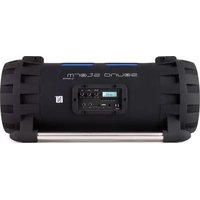
DEVICE OVERVIEW AND KEY FUNCTIONS

| 1 Power button 7 USB ports | ||
| 2 Play/Pause button 8 Charging light | ||
| 3 Volume+ 9 Mains inlet | ||
| 4 Loudness 10 AUX input | ||
| 5 Microphone 11 Reset | ||
| 6 LED light 12 Wireless loading dock |
OPERATION
Voice output
In the following situations, you will hear voice output from the speakers:
- When the unit is turned on,
- When the unit is turned off,
- When waiting for a bt connection,
- When a bt connection is established,
- When a bt connection is disconnected,
- When the volume is set to maximum,
- When the battery is weak and needs charging.
Switching the unit on/off
- Press and hold the On button and you will hear „Power on“ from the speakers. The unit will automatically activate BT and you will hear „BT waiting for connection“ from the speakers. You can now connect your smartphone or pad to the speakers via BT.
- Press and hold the Off button and you will hear „Power off“ from the loudspeakers. The device will then turn off.
AUX Auto Switch
- Plug the AUX cable into the AUX jack on the back of the speaker. The speaker will automatically switch to AUX mode and the blue and green LED lights will illuminate. BT mode is automatically turned off.
- After removing the AUX cable, the BT mode is automatically turned on again, then „BT waiting for connection“ sounds from the speakers.
Establish BT connection
- When the speaker is in BT mode, it automatically switches to pairing mode. The blue LED flashes slowly.
- Open the BT settings on your smartphone/pad and search for the loudspeaker in the BT device list. As soon as your smartphone/pad is connected to the loudspeaker, „BT is connected“ sounds and the blue LED lights up permanently. If the connection is disconnected, the blue LED flashes slowly.
- If this speaker is connected to the smartphone and you are playing music via BT, the speaker will stop when you briefly press the Play/Pause/button. To resume playback, press the Play/Pause button again.
- When this speaker is connected to the smartphone, press and hold the Play/Pause button to disconnect the BT connection. You can now make a BT connection to another device.
Note: The best distance between Smartphone/Pad and speaker is ≤ 10m.
Answering calls via BT
- When a call comes in, the phone number of the incoming call sounds with the sound „dudu“ or the sound „Cell phone rings“ from the speaker, if it is connected to an Android smartphone. If the speaker is connected to an iPhone, the phone number of the incoming call sounds and „Cell phone rings“ from the speaker.
- Briefly press the Play/Pause button to answer the call and talk through the microphone. Briefly press the Play/Pause button again to end the call.
- Press and hold the Play/Pause button to reject the call.
- Press the Play/Pause button twice to call back the last connected phone number.
Adjusting the Volume
- Press the (+) button to increase the volume.
- Press the (-) button to decrease the volume.
USB charging
- When the speaker is on, you can charge iPhones and Android phones simultaneously via the USB ports (2.1 A / 1 A).
- If the speaker is turned off but connected to the AC adapter, you can charge iPhones and Android phones simultaneously via the USB ports (2.1 A / 1 A).
- If the speaker is turned off and not connected to the AC adapter, no external devices can be charged from the USB port.
Wireless charging
The charger coil of the wireless charger (only for mobile phones that support the Qi wireless charger standard) must point to the wireless charger mark located in the middle of the table. The speaker must either be turned on or connected to the AC adapter, otherwise it cannot charge the device. Once the unit is connected and uncharged, the „di“ signal will sound.
Low battery and charging
- If the battery capacity is low, the „Low Battery" message will sound to remind the user that the speaker needs charging. If you do not charge the speaker, it will automatically turn off.
- After connecting the AC adapter to the wall outlet, the red LED light on the back of the speaker lights up while the speaker is charging. When the battery is fully charged, the red LED goes out.
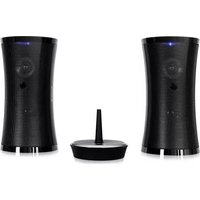
Connecting multiple speaker tables
The TWS function allows you to connect two speaker tables together. The first table is the master, which is connected to the BT unit and controls all functions. The second table is the sub-loudspeaker that delivers True Wireless Sound.
- Turn on both speaker tables and double-click the On/Off button on either speaker table. Both speakers will go into pairing mode and you will hear an audible signal. The blue LED indicators on both speaker tables will flash rapidly at the same time. After pairing, the LED indicator of the first speaker (master) flashes slowly, the LED of the second speaker (sub-loudspeaker) lights up green. After connection to a smartphone or another BT device, the master loudspeaker LED lights up continuously blue, the sub-loudspeaker LED lights up continuously green.
- When the speaker tables are successfully paired, briefly press the On/Off button on the master speaker or sub-speaker to exit TWS mode.
- If the speakers are connected to a BT device in paired TWS mode, the two speakers can still work as paired speakers if you plug the AUX cable into the AUX jack on the first speaker (master). On the master speaker, the LED lights up green and blue, on the sub-speaker, the LED lights up green. The TWS mode is deactivated when an AUX cable is also connected to the AUX jack of the sub-speaker.
- In TWS mode, calls can only be accepted at the master speaker.
Auto power off
If no BT connection is established after switching on the loudspeaker, the BT connection has been disconnected or no LINE IN signal is received, the loudspeaker automatically switches off after 10 minutes and „Power off“ sounds.
CLEANING AND CARE
- Use a soft cloth or cotton dipped in a neutral solution for cleaning the surface of the speaker. Do not use the type of cloth that you use for washing dishes or aggressive chemical agents.
- If the speaker is not working properly during a storm, please disconnect the plug from the power socket and reinsert it after a minute.
- Do not drop small items or a liquid into the speaker.
- In the event that you find small items or a liquid inside the speaker, you see smoke or smell an odour, immediately disconnect the speaker from the power grid. send the speaker to an authorised service centre.
DISPOSAL CONSIDERATIONS
natural_image
Symbol of a trash bin crossed with a diagonal line, no text or numbers presentIf there is a legal regulation for the disposal of electrical and electronic devices in your country, this symbol on the product or on the packaging indicates that this product must not be disposed of with household waste. Instead, it must be taken to a collection point for the recycling of electrical and electronic equipment. By disposing of it in accordance with the rules, you are protecting the environment and the health of your fellow human beings from negative consequences. For information about the recycling and disposal of this product, please contact your local authority or your household waste disposal service.
DECLARATION OF CONFORMITY
CE UK CA
Manufacturer:
Chal-Tec GmbH, Wallstrasse 16, 10179 Berlin, Germany.
Importer for Great Britain:
Berlin Brands Group UK Ltd
PO Box 1145
Oxford, OX1 9UW
United Kingdom
Hereby, Chal-Tec GmbH declares that the radio equipment type Milano is in compliance with Directive 2014/53/EU. The full text of the EU declaration of conformity is available at the following internet address: use.berlin/10034605
For Great Britain: Hereby, Chal-Tec GmbH declares that the radio equipment type Milano is in compliance with the relevant statutory requirements. The full text of the declaration of conformity is available at the following internet address: use.berlin/10034605
Estimado cliente:
ÍNDICE DE CONTENIDOS
Datos técnicos 30
natural_image
Symbol of a trash bin crossed with a diagonal line, no text or labels presentnatural_image
Symbol of a trash bin crossed with a diagonal line, representing no waste or discharge (no text or labels)SOMMAIRE
Fiche technique 42
| 1 Touche d'alimentation 7 Ports USB | ||
| 2 Touche lecture / pause 8 Témoin de charge | ||
| 3 Volume + 9 Prise d'alimentation | ||
| 4 Volume - 10 Entrée AUX | ||
| 5 Micro 11 Reset | ||
| 6 Voyants LED 12 Dock de charge sans fil | ||
UTILISATION
Message vocal
natural_image
Symbol of a trash bin crossed out by a diagonal line, with no text or labels present.DÉCLARATION DE CONFORMITÉ

Fabricant :
Chal-Tec GmbH, Wallstraße 16, 10179 Berlin, Allemagne.
Berlin Brands Group UK Ltd
PO Box 1145
Oxford, OX1 9UW
United Kingdom
INDICE
Dati tecnici 54
natural_image
Symbol of a trash bin crossed out by a diagonal line, with no text or labels present.Berlin Brands Group UK Ltd
PO Box 1145
Oxford, OX1 9UW
United Kingdom
natural_image
Abstract white logo design on dark background, resembling stylized letter 'S' or wave form (no text or symbols)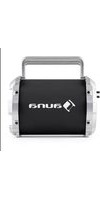
- INHALTSVERZEICHNIS
- Member of Berlin Brands Group
- Handwerkerstr. 11
- Dahlwitz-Hoppegarten
- Deutschland
- CONTENT
- TECHNICAL DATA
- SAFETY INSTRUCTIONS
- Special notes about the device
- General information
- ASSEMBLY
- DEVICE OVERVIEW AND KEY FUNCTIONS
- OPERATION
- Voice output
- Switching the unit on/off
- AUX Auto Switch
- Establish BT connection
- Answering calls via BT
- Adjusting the Volume
- USB charging
- Wireless charging
- Low battery and charging
- Connecting multiple speaker tables
- Auto power off
- CLEANING AND CARE
- DISPOSAL CONSIDERATIONS
- DECLARATION OF CONFORMITY
- CE UK CA
- Manufacturer:
- Importer for Great Britain:
- Estimado cliente:
- ÍNDICE DE CONTENIDOS
- SOMMAIRE
- UTILISATION
- Message vocal
- DÉCLARATION DE CONFORMITÉ
- Fabricant :
- INDICE
Brand : Auna
Model : Milano
Category : Loudspeaker