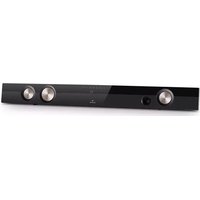
Areal Bar 460 - Loudspeaker Auna - Free user manual and instructions
Find the device manual for free Areal Bar 460 Auna in PDF.


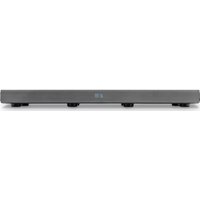
| Product Type | Soundbar |
| Brand | Auna |
| Model | Areal Bar 460 |
| Dimensions (W x H x D) | 460 x 70 x 80 mm |
| Weight | 2.5 kg |
| Power Output (RMS) | 40 W |
| Frequency Response | 100 Hz - 20 kHz |
| Connectivity | Bluetooth 5.0, AUX, USB, HDMI ARC, Optical |
| Power Supply | AC 100-240V, 50/60Hz |
| Remote Control | Included |
| Wall Mountable | Yes (brackets included) |
| Driver Configuration | 2 x 2.5" full-range drivers, built-in subwoofer |
| Audio Formats | MP3, WMA, WAV (via USB) |
| Input Sensitivity | 500 mV |
| Impedance | 4 Ohm |
| Signal-to-Noise Ratio | ≥85 dB |
| Total Harmonic Distortion | ≤1% |
| Included Accessories | Remote control, power cable, AUX cable, wall brackets, user manual |
| Cleaning Instructions | Wipe with a dry, soft cloth. Do not use liquid cleaners. |
| Safety Notes | Keep away from water and heat sources. Do not open the device. Use only the provided power adapter. |
| Repairability | Spare parts and service available through authorized centers. Contact Auna support. |
Frequently Asked Questions - Areal Bar 460 Auna
User questions about Areal Bar 460 Auna
0 question about this device. Answer the ones you know or ask your own.
Ask a new question about this device
Download the instructions for your Loudspeaker in PDF format for free! Find your manual Areal Bar 460 - Auna and take your electronic device back in hand. On this page are published all the documents necessary for the use of your device. Areal Bar 460 by Auna.
USER MANUAL Areal Bar 460 Auna
natural_image
Black and white photo of a digital TV player with three circular dials and a 'TV' label (no readable text or symbols beyond branding)
natural_image
Technical line drawing of a battery pack and its internal component (no text or symbols)Bedienung
Basisfunktionen
natural_image
Diagram of a device with two circular components connected to a USB port, showing a battery inserted (no text or symbols present)natural_image
Symbol of a trash bin crossed with a diagonal line, no text or labels presentElektroaltgeräte
Congratulations on purchasing this product. Please read and follow these instructions, in order to avoid damaging the item. We do not cover any damages that may arise from improper use of the item or the disregard of the safety instructions.
Important Safety Advice
- Read all instructions before using.
- To protect against a fire, electric shock or personal injury, do not immerse cord, electric plugs or device in water or other liquids.
- Do not expose the appliance to extreme temperatures. The appliance shall be used in moderate climates.
- The use of attachments that are not recommended by the appliance manufacturer may result in fire, electric shock or personal injury.
- Do not open the unit by removing any cover parts. Do not attempt to repair the unit. Any repairs or servicing should be done by qualified personell only.
- Only qualified persons may perform technical work on the product. The product may not be opened or changed. The components cannot be serviced by the user. The manufacturer is not responsible for any radio or TV interference caused by unauthorized modifications.
- The appliance is not a toy. Do not let children play with it. Never let children insert foreign objects into the appliance.
- Never clean the surface of the device with solvents, paint thinners, cleansers or other chemical products. Instead, use a soft, dry cloth or soft brush.
- Save these instructions.
Small objects
Keep small objects (i.e. screws, mounting material, memory cards etc.) and packaging out of the range of children. Do not let Children play with foil. Choking hazard!
Transporting the device
Please keep the original packaging. To gain sufficient protection of the device while shipment or transportation, make sure to put it back in its original packaging.
Cleaning the surface
Do not use any volatile liquids, detergents or the like. Use a clean dry cloth.
Technical Data
| Article # | 10029138 |
| General | |
| Output power | 60W |
| Frequency response | 20Hz - 20KHz (±3dB) |
| Input sensitivity | 550mV |
| Power supply | Power adapter:In: 100-240V ~ 50-60Hz; Out: 24V 1.5A |
| Power consumption | 25W (Standby ≤0,5W) |
| Speakers | Full Range: 4 Ohm, 65mm (2.5"), frequency response250Hz - 20KhzWoofer: 8 Ohm, 78mm (3"), frequency response45~250Hz |
| Dimension | 900 x 90 x 60mm |
| Mains cable length | ,5m |
| Remote Control | |
| Power supply | Battery „CR2025“ |
| BT | |
| Compatibility | EDR, A2DP, AVRCP |
| BT Version | 2.1 |
Controls
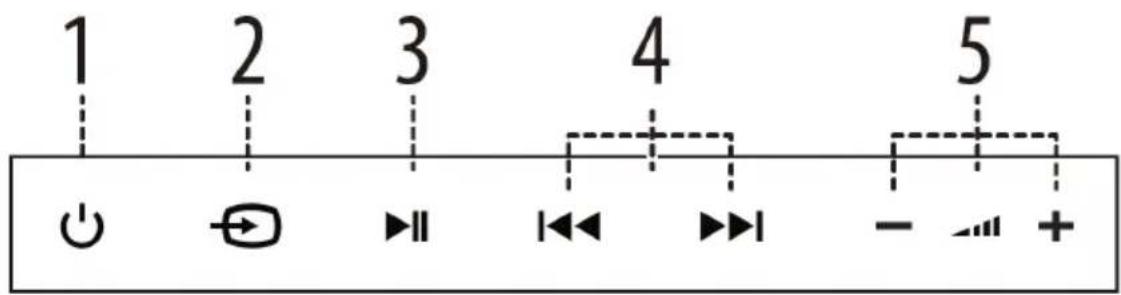
Front panel

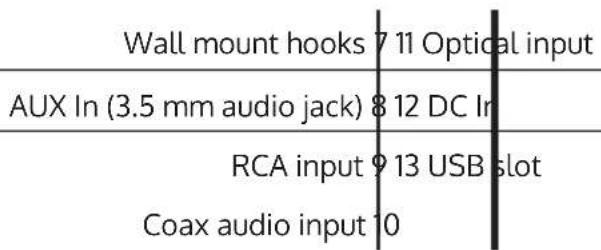
Connections / rear terminal

Remote control:

| Play / pause | 14 20 Sleep timer | |
| (input source) | 15 21 Dim (reduce display light) | |
| (on/standby) | 16 22 Bass (+/-) | |
| Previous track | 17 23 Mute | |
| VOL- | 18 24 Skip track | |
| miss BT connection | 19 25 EQ modes (Standard / Movie / M |
Initial Use: Preparation and Connections
Preparation and Use of the Remote Control
- First push to inside as the direction indicated by the arrow (See 1) and then Remove the battery holder as the direction indicated by the arrow (See 2).
- Replace the battery Set a new battery property with (+)side up as illustrated (See 3).
- Insert the battery holder. Push in the holder to the original position (See 4).

natural_image
Simple line drawing of a vehicle with a directional arrow pointing left (no text or symbols)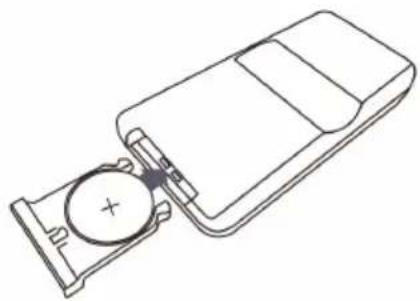
natural_image
Line drawing of a device with a circular component and a rectangular housing (no text or symbols)Face the remote control towards the player front face IR mark (remote control signal receiver). Operation angle: About 30 degree in each the direction of the front of the IR mark.
Note: The lithium cell in the battery compartment of remote control has been secured for transport with a foil. Before initial use please remove this foil so that the remote control is ready for operation.
Connection Options
A) Connecting a TV, DVD or GAMES CONSOLE using the RCA - RCA audio cable:

B) DIGITAL connection to a TV, DVD or Blu-ray player using the COAXIAL cable:
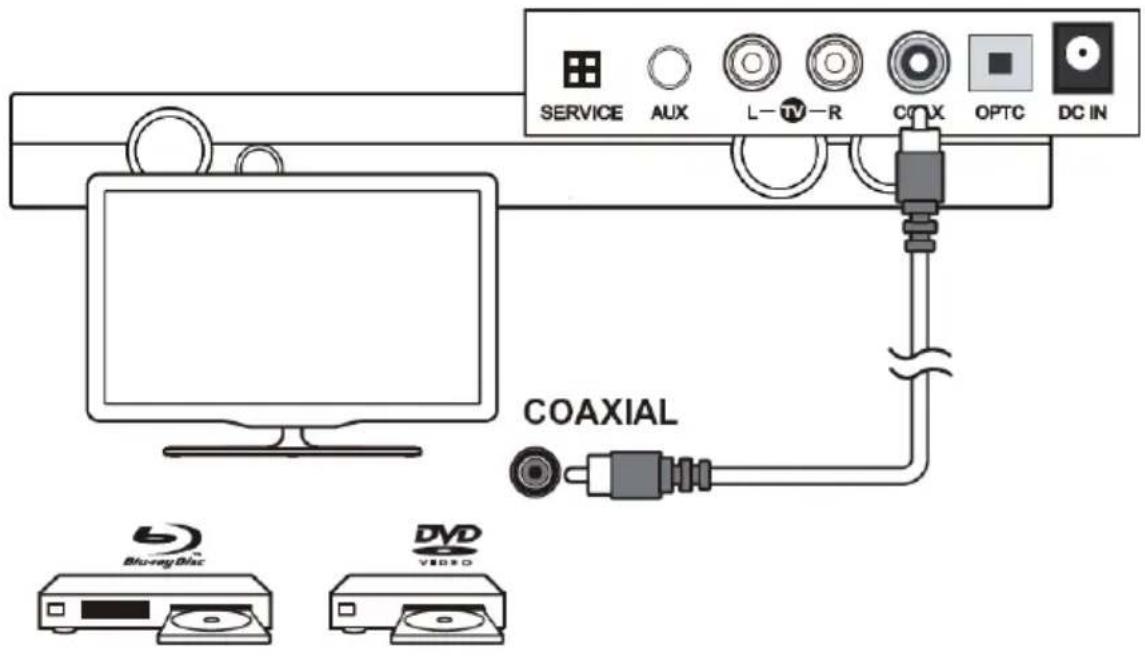
C) DIGITAL connection to a TV, DVD or Blu-ray player using the OPTICAL cable:

D) Connection to a TV using the RCA - 3.5mm audio cable:

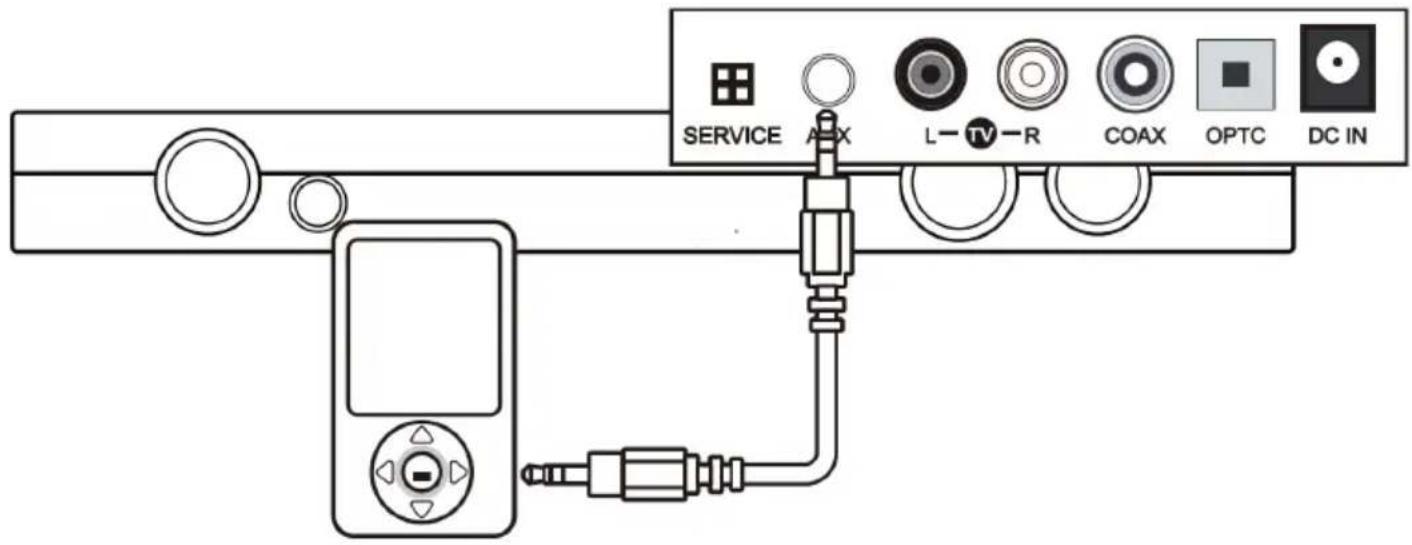
E) AUX connection: The below diagram shows the connection to an audio device such as an MP3 player, using a 3.5mm audio cable.
Operation
Basic Functions
Standby / On
Press ⏻ (On/Standby) on the front panel or on the RC to switch the sound bar on - press again to switch to standby.
Choose Audio Source
Press → repeatedly to choose from the available audio inputs (TV, AUX, COAX, BT, OPTC and USB). Please keep in mind that those are named by the connection they are supposedly used for - which is not necessarily the one you actually use it for.
Adjusting the volume and tone (EQ, BASS-Enhancement, MUTE)
Use VOL+/- on the front panel or on the RC to adjust the output volume.
Press EQ on the RC repeatedly to circle through the available EQ presets (Standard - Movie - Music - News).
Use the BASS+ and BASS- buttons to adjust the bass output (isolated from the other frequencies)
Press MUTE to mute sound output; press again to un-mute.
Sleep Timer
Press SLEEP repeatedly to set the sleep timer (for the period of time until the device switches off to standby automatically). Available options: 5, 10, 15, 30, 45, 60, 90 minutes or „off“.
Display Brightness
Press DIM repeatedly to adjust the display brightness (LOW, MED, HIGH).
BT Operation
- Press the source button repeatedly until you see 'BT' appear on the display.
- When selected, the 'BT' text on the display will flash while the unit tries to connect to previously paired BT devices. If no devices are found the 'BT' text will still flash but to indicate it is ready for pairing a new device.
- Enable the BT function on your smart phone and search for a device labelled 'Areal Bar' in the available list.
- Select and enable pairing for the 'Areal Bar' device. If prompted for a password enter '0000'.
- If pairing is successful the sound bar will beep and the 'BT' text will stop flashing.
- If the connected device goes out of range, the sound bar will attempt to connect for 2 minutes. When the device comes into range the sound bar will reconnect again automatically.
- To remove the currently paired device from the sound bar, press and hold the OPTION button for 3 seconds (19) on the remote control. The 'BT' text will begin flashing again.
- Once connected you can either use the controls on the audio device to begin playback, skip tracks etc. Or you can use the control buttons on the sound bar & remote.
USB Operation
natural_image
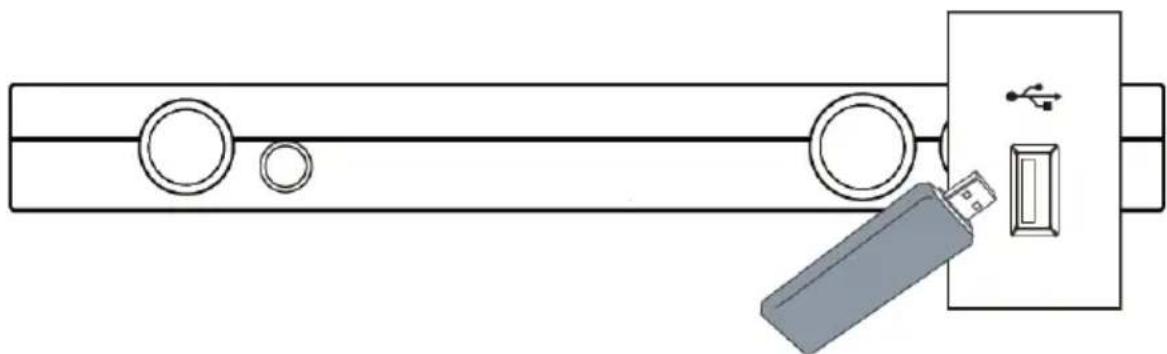
Diagram of a USB port with two circular ports and a USB switch, showing no text or symbols.- Connect any USB drive (USB stick, mobile HDD, MP3 player etc.) with the USB slot on the rear.
- Use NEXT/PREV. as well as Play/Pause to navigate through your mobile media library.
- Press OPTION repeatedly to circle through the available playback modes: REPEAT (current track will be played in repeat) - REPEAT ALL (repeats all al available tracks) - RANDOM (available tracks will be played in random order).
Wall Mounting
- Align the Sound bar in the chosen location. Use a pencil to mark the drilling positions 630mm (24.8") apart:

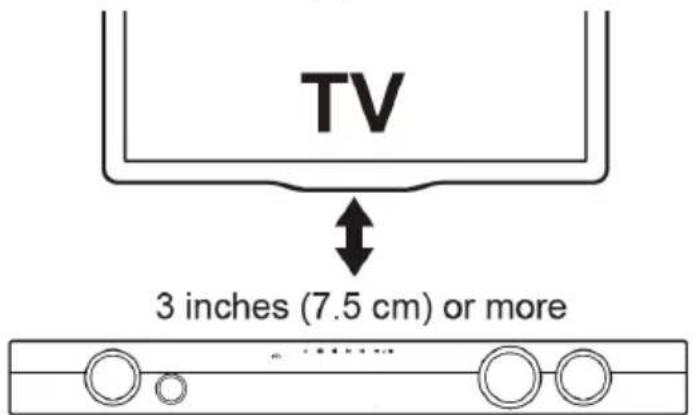
- The Sound bar should be located at least 7.5cm (3") below the bottom of the TV:
- Drill holes as marked in step 1. Insert 2 screws (not supplied) into the holes and tighten. Take care to leave 5mm between the screw heads and the wall. Hook the Sound bar into the screws. For secure mounting ensure the screw heads slide firmly into the narrow part of the brackets.
- In order to avoid damage to the equipment and personal injury you should get a qualified person to drill the fixing surface and fit the appropriate wall fixings.
• Take care not to allow the main unit to fall while attempting to hook onto the wall mount brackets.
• Before mounting, check the wall strength, if it is not clear then consult relevant qualified personnel. - When drilling into walls, always check that there are no hidden wires or pipes etc.
- Make sure the screws & wall plugs are suitable for supporting the unit.
Troubleshooting
| Problem Possible Solution | |
| No power | ·Ensure the mains plug is connected to a pow-er supply, and is switched ON.·Make sure there is power to the mains socket. |
| No sound | ·Make sure if playing from the AUX input, the external source has the volume turned up and is playing a track.·Make sure the volume is turned up.·If using the digital coaxial or optical cable connection ensure the source DIGITAL output is set to PCM, LPCM, PCM 2Ch stereo or PCM downmix.·Bluetooth device not paired. Check 'Bluetooth operation'. |
| No response from the unit | Unplug the power cable for 1 minute then plug back in again |
| RC does not work | ·Reduce the distance between the remote and main unit·Check the batteries are installed correctly.·Replace the batteries·Aim the remote directly at the Sound bar |
| Unit powers off after 20 minutes | This unit is designed to enter STANDBY mode automatically after 20 MINUTES of inactivity. Press the STANDBY button to wake the unit. |
Environment Concerns

natural_image
Symbol of a trash bin crossed with a diagonal line, no text or numbers presentAccording to the European waste regulation 2002/96/EG this symbol on the product or on its packaging indicates that this product may not be treated as household waste. Instead it should be taken to the appropriate collection point for the recycling of electrical and electronic equipment. By ensuring this product is disposed of correctly, you will hep prevent potential negative consequences for the environment and human health, which could otherwise be caused by inappropriate waste handling of this product. For more detailed information about recycling of this product, please contact your local council or your household waste disposal service.
Declaration of Conformity
Manufacturer: CHAL-TEC GmbH, Wallstraße 16, 10179 Berlin, Germany.
This product is conform to the following European directives:
1999/05/EC
(R&TTE)
2011/65/EU
(RoHS)
CE
- Bedienung
- Basisfunktionen
- Elektroaltgeräte
- Important Safety Advice
- Small objects
- Transporting the device
- Cleaning the surface
- Controls
- Initial Use: Preparation and Connections
- Preparation and Use of the Remote Control
- Connection Options
- Operation
- Basic Functions
- Standby / On
- Choose Audio Source
- Adjusting the volume and tone (EQ, BASS-Enhancement, MUTE)
- Sleep Timer
- Display Brightness
- BT Operation
- Wall Mounting
- Environment Concerns
- Declaration of Conformity
Brand : Auna
Model : Areal Bar 460
Category : Loudspeaker