
CBL3518EK - Refrigerator CANDY - Free user manual and instructions
Find the device manual for free CBL3518EK CANDY in PDF.
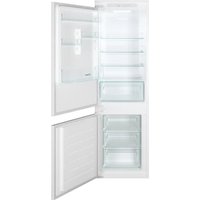


| Product Type | Refrigerator |
| Brand | Candy |
| Model | CBL3518EK |
| Category | Refrigerator |
| Power Supply | 220-240 V ~ 50 Hz |
| Control Panel | Touch with LED screen |
| Refrigerator Temperature | Adjustable from 2°C to 8°C (Super Cool: 2°C) |
| Freezer Temperature | Adjustable from -16°C to -24°C (Super Freeze: -22°C) |
| Super Cool Function | Yes, accelerates cooling of fresh food |
| Super Freeze Function | Yes, accelerates freezing of food |
| Eco Mode | Yes, optimizes preservation at 4°C/-18°C |
| Vacation Mode | Yes, reduces energy consumption |
| Demo Mode | Yes, for in-store use |
| Open Door Alarm | Yes, audible after 3 minutes |
| Defrost | Manual, recommended if frost > 3 mm |
| Connectivity | Wi-Fi via hOn app |
| Climate Class | N (ambient temperature 16°C to 32°C) [estimated] |
| Refrigerant | R600a [estimated] |
Frequently Asked Questions - CBL3518EK CANDY
User questions about CBL3518EK CANDY
0 question about this device. Answer the ones you know or ask your own.
Ask a new question about this device
Download the instructions for your Refrigerator in PDF format for free! Find your manual CBL3518EK - CANDY and take your electronic device back in hand. On this page are published all the documents necessary for the use of your device. CBL3518EK by CANDY.
USER MANUAL CBL3518EK CANDY
APP CONNECTION (Content only). 8
TROUBLESHOOTING. 9
PRODUCT DESCRIPTION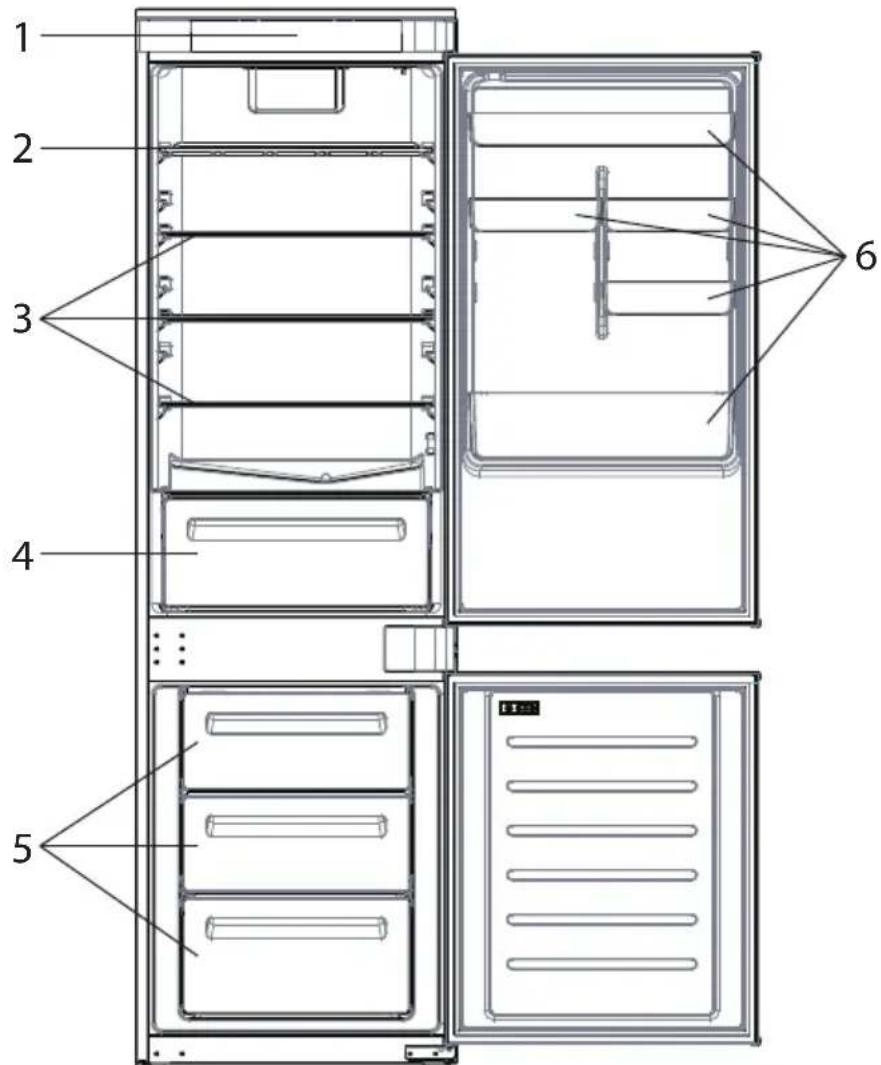
- Control Panel
- Wine Rack
- Shelves
- Crisper
- Freezer Boxes
- Door Rack
- The most energy-saving configuration requires drawers, food box and shelves to be positioned in the product and fan to be off, please refer to the above pictures. ** The pictures above are only for reference. The actual configuration will depend on the physical product or statement by the distributor.
Space requirements
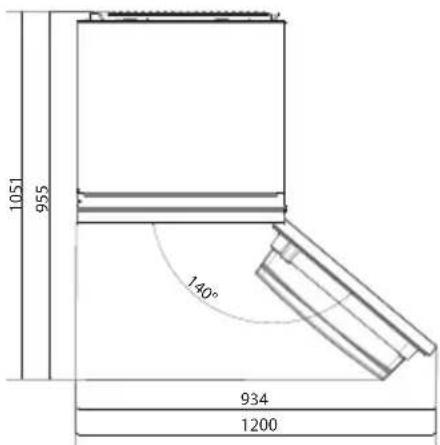
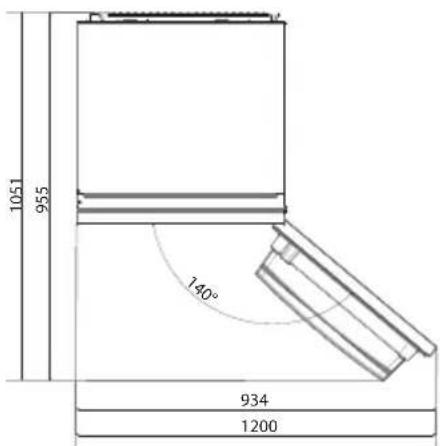
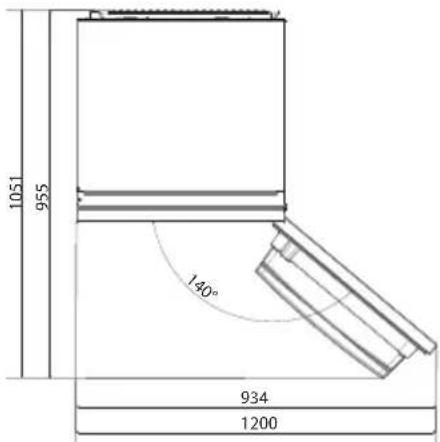
The unit's door must be able to fully open as shown.
Spare enough space for convenient opening of the doors and drawers.
Keep a distance of at least 50 mm between the side walls of the product and adjacent parts.
540 mm Cabinet: Width: 934 mm
Depth: 955 mm
700 mm Cabinet: Width: 1200 mm
Depth: 1051 mm
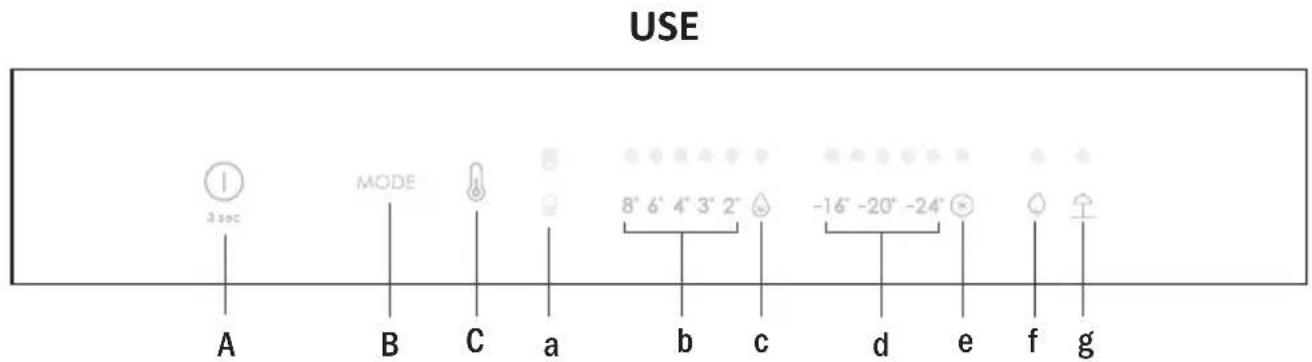
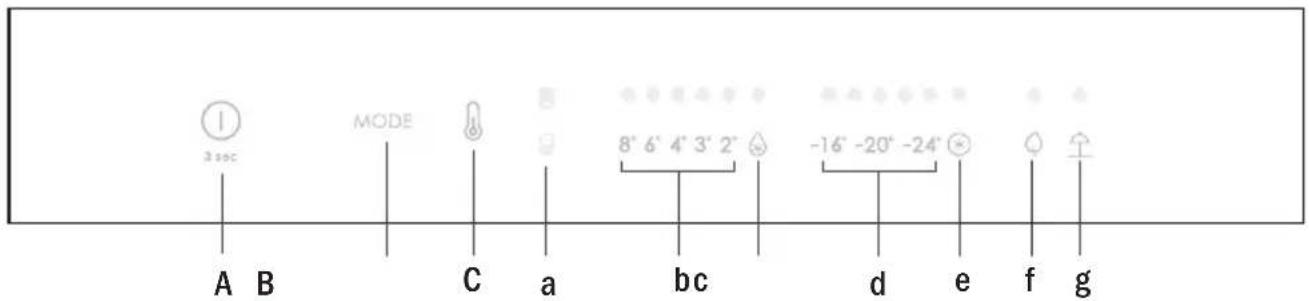
A. ON/OFF key, push for 3 seconds. Appliance turns on with a long acoustic feedback (1 sec) B. Mode key, used to select between Fridge, Freezer, Eco and Holiday C. TEMP key, used to select between temperatures levels (also Super Cool and Super Freeze)
a. Fridge/Freezer area icon, shows which compartment of the appliance is selected b. Fridge temperature levels, shows which is the selected temperature c. Super Cool icon, shows if the Super Cool function is activated d. Freezer temperature levels, shows which is the selected temperature in the freezer e. Super Freeze icon, shows if the Super Freeze function is activated f. Eco mode icon, shows whether the Eco mode is activated g. Holiday function icon, shows whether the holiday function is activated
Use • Plug in the appliance and it automatically turns on with a long acoustic feedback (1 sec) All LEDs turn on (1 sec), then the Fridge temperature LED and Freezer LED turn on fixed.
The temperature will automatically set at 4°C in the fridge and -18°C in the freezer. NOTE: wait at least 2/3 hours before putting food in the appliance, so as to ensure the temperature inside the fridge. - In case of power loss, the last cooling level set will be restored. - To restore the default setting, keep pressed the door switch inside the refrigerator and simultaneously press the ON/OFF key for 5 seconds. - Under the normal operating condition (in spring and autumn), it is recommended to set the temperature at 4°C. In summer when the ambient temperature is high, it is recommended to set temperature at 6~8°C, so as to guarantee the fridge and freezer temperatures and reduce the refrigerator continuous running time; and in winter when the ambient temperature is low, it is recommended to set temperature at 3~4°C to avoid frequent start/stop of the refrigerator.
Display stand by mode management
- If the door is closed -> display in standby (all LEDs switched off)
- If the door is open -> current fridge temperature LED and freezer temperature LED are turned on (fixed).
- ECO mode LED + Holiday mode LED are turned on (fixed) if previously selected.
- Display is ready to receive inputs (no need to activate it by touch).
Mode
The mode button is used to switch between the different modes.
The related LED turns on and selection is immediately confirmed (no blink).
Short acoustic feedback confirms the selection.
Fridge temperature setting
When the display panel is on, select the "fridge temperature setting" by pushing the MODE button.
The fridge area LED turns on. Push the "TEMP" button until the desired temperature is set.
The temperature value changes in this way: 8°C → 6°C → 4°C → 3°C → 2°C → super cooling → >8°C ...
The related LED turns on and selection is immediately confirmed (no blink).
Short acoustic feedback confirms the selection.
Freezer temperature setting
When the display panel is on, select the "freeze temperature setting" by pushing the MODE button. The freezer area LED turns on.
Push the "TEMP" button until the desired temperature is set.
The temperature value changes in this way: -16°C → -18°C → -20°C → -22°C → -24°C → Super freezing → -16°C ...
The related LED turns on and selection is immediately confirmed (no blink).
Short acoustic feedback confirms the selection.
Note
Switching from fridge to freezer areas and vice versa is immediate when the user pushes the MODE button, and the selection is immediately active.
Temperature LEDs do not blink.
Super Cool function
It is suggested to switch on the Super Cool function if a large quantity of food should be stored (for example after the purchase). The Super-Cool function accelerates the cooling of fresh food and protects the goods already stored from undesirable warming. When the function is activated, the temperature of the fridge is automatically set at 2°C . How to use the Super Cool function:
- The function can be activated by long pressing TEMP key to select the fridge compartment, and then quick pressing the TEMP key until the Super Cool icon led is turned on, or it can be turned on from the app. When the function is activated, the Super Cool LED is always ON.
- To exit the Super Cool function, press the TEMP key or turn it off from the app.
- The Super Cool function automatically ends when the function has lasted for more than 12 hours.
- When the Super Cool ends, the icon of the control panel is switched off and the previously set cooling level is restored.
Note: Super Cool and Super Freeze function cannot be activated simultaneously.
Super Freeze function
The super freezing function accelerates the freezing of fresh food and protects the goods already stored from undesirable warming. If a large amount of food has to be freeze, it is recommended to set the Super-Freeze function on 24h before the usage. When the function is activated, the temperature is automatically set at -22°C .
How to use the Super Freeze function:
- The function can be launched by long pressing TEMP key to select the freezer compartment, and then quick pressing TEMP key until the Super Freeze icon led is turned on, or it can be turned on from the app. When the function is activated, the Super Freeze LED is always ON.
- To exit the Super Freeze function, press the TEMP key or turn it off from the app.
- The Super Freeze function automatically ends when the function has lasted for more than 50 hours.
- When the Super Freeze ends, the icon on the control panel switches off and the previously set freezing level is restored.
Note: The Super Cool and Super Freeze functions cannot be activated simultaneously.
Eco mode
The Eco mode can be activated to optimize the performance of the appliance, while obtaining the best food storage. The Eco mode will automatically set the temperature at 4°C in the fridge and at -18°C in the freezer.
How to use the Eco mode:
- The function can be activated from the control panel by pressing the "mode" key until the Eco mode icon turns on (an acoustic signal confirms the selection), or by selecting the function from the app. When the function is activated, the Eco mode icon is always ON.
- To exit the Eco mode, turn it off from the app or choose another function from the control panel.
- When the Eco mode ends, the icon on the control panel switches off and the previously set cooling levels are restored.
Holiday function
The Holiday function can be used to reduce the energy consumption of the appliance when it is not used regularly. When the function is on, the LED lights will be off (even if the door is open) and the fridge will work on low power consumption mode, whereas the freezer will keep working normally.
How to use the Holiday function:
- The function can be activated from the control panel by pressing the "mode" key until the Holiday icon turns on (an acoustic signal confirms the selection), or by selecting the function from the app. When the function is activated, the Holiday icon is always ON.
- To exit the Holiday function, turn it off from the app or choose another function from the control panel.
- When the Holiday function ends, the icon on the control panel switches off and the previously set cooling levels are restored.
Defrosting
When the layer of frost present in the freezer compartment exceeds 3 mm, it is recommended to proceed with the defrosting as it increases energy consumption.
- Switch off the appliance and disconnect the power cord.
- Remove the frozen food and temporarily place them in a cool place.
- Leave the freezer door open and collect the water on the bottom of the product.
- When defrosting is completed, dry the interior thoroughly.
- Reconnect the power cord and set the desired values. Wait a moment and reintroduce the frozen foods.
Demo mode
To enter or exit the demo mode, with the door open, long press the ON/OFF key and simultaneously quick press the MODE key 5 times (within 5 seconds).
Error Codes
Communication error
8°C - 6°C - 4°C - 3°C - 2°C LED lights turn on sequentially, it means there has been a communication error between the main control board and the display board. Please, contact the technical assistance to help solve the problem
APP CONNECTION (Content only)
In app pairing procedure
Step 1
- Download the hOn app from the app stores.


Step 2
- Create your account on the hOn App or log in if you already have an account.
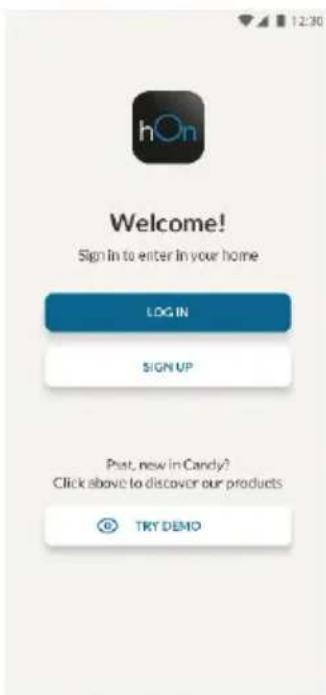
Step 3
- Follow the pairing instructions in the hOn App.
TROUBLESHOOTING
| The inside light bulb does not turn on. | ·No electricity. | ·The power cable is not properly plugged in. ·Check if the appliance is switched off (see Temperature Adjustment). ·Check the power socket is working correctly (e.g. with another electric device). |
| ·Holiday Mode is activated. | ·Deactivate Holiday mode. | |
| The internal temperature of the refrigerator and/or freezer is not cold enough. | ·The doors are not closed. | ·Check that the door and gaskets close properly. |
| ·The doors are frequently opened. | ·Avoid opening the doors unnecessarily for some time. | |
| ·Incorrect temperature setting. | ·Check the temperature setting and, if possible, set a lower temperature (see Temperature Adjustment). | |
| ·The refrigerator and/or freezer are too full. | ·Wait for the temperature of the refrigerator/ freezer to stabilise. ·Avoid filling the refrigerator and freezer excessively. | |
| ·The surrounding temperature is too low. | ·Move the unit to a warmer place or heat the current room. | |
| ·Warm items have been stored. | ·Always allow items to cool before storing them. | |
| The food in the refrigerator freezes. | ·Incorrect temperature setting. | ·Check the temperature setting and, if possible, increase the temperature. |
| ·Food in contact with the back wall. | ·Keep the food away from the refrigerator's back wall. | |
| The bottom of the refrigerator compartment is wet or water droplets are present. | ·The drain hose could be clogged. | ·Clean the drain hose with a stick or similar item to allow the water to drain. |
| Presence of drops of water or frost on the rear wall of the refrigerator. | ·Depending on the function, drops of water or frost form on the rear wall of the refrigerator during operation. | ·It is not a defect. |
| ·Warm items have been stored. | ·Always allow items to cool before storing them. | |
| ·There are open food containers or liquids. | ·Always cover food and liquids. | |
| ·The doors are not closed. | ·Check that the door and gaskets close properly. | |
| ·The doors are frequently opened. | ·Avoid opening the doors unnecessarily for some time. | |
| Presence of water in the vegetable drawer. | ·Lack of air circulation. | ·Verify that your appliance is not too full. |
| ·Vegetables and fruit with too much moisture. | ·Wrap the fruit and vegetables in plastic materials, e.g. cling film, bags or containers. | |
| The motor runs continuously. | ·The doors are not closed. | ·Make sure the doors are closed and check the seals close properly. |
| ·The doors are opened frequently. | ·Avoid opening the doors unnecessarily for some time. | |
| ·Ambient temperature is very high. | ·Verify that the ambient temperature is in the range set out in the specifications on the appliance tag. ·Set the display screen/thermostat to a warmer temperature. | |
| ·The appliance has been off (no power) for some time. | ·It normally takes the appliance 8-12h to cool completely. | |
| The frozen food is thawing. | ·Surrounding temperature is too low. | ·Move the unit to a warmer place or heat the current room. |
| ·The freezer door is not closed. | ·Make sure the door is closed and that the gasket is sealing properly. | |
| Fridge door alarm. | ·Fridge door alarm (acoustic beep) activates whenever the door is left open for more than 3 minutes. | ·Avoid leaving the door open when not needed. The beep ceases when the door is closed. |
| The appliance makes noises such as gurgling, buzzing, clicking, creaking. | ·No breakdowns. An engine is running, e.g. refrigeration unit, fan. The refrigerant flows into the pipes. Motor, switches and solenoid valves are switched on or off. | ·No action needed. |
| ·The appliance is not located on level ground. | ·Adjust the feet to level the appliance. | |
| ·The appliance touches an object around it. | ·Remove objects around the appliance. | |
| The appliance does not cool, the temperature and lighting indicators are on. | ·Demo mode is activated. | ·Deactivate DEMO mode. |
| Strong ice and frost in the freezer compartment. | ·The items were not adequately packaged. | ·Always pack the items well. |
| ·A door/drawer of the appliance is not tightly closed. | ·Close the door/drawer. | |
| ·The door/drawer has been opened too frequently or for too long. | ·Do not open the door/drawer too frequently. | |
| ·The door/drawer gasket is dirty, worn, cracked or mismatched. | ·Clean the door/drawer gasket or replace it with a new one. | |
| ·Something on the inside prevents the door/drawer from closing properly. | ·Reposition the shelves, door racks or internal containers to allow the door/drawer to close. | |
| The sides of the appliance are warm. | ·This is normal. |
SUMMARY
Setting the refrigerator temperature
When the display is on, select "Refrigerator temperature setting" by pressing the MODE button. The indicator light for the refrigerator zone lights up. Press the TEMP button until the desired temperature is set.
The temperature changes in sequence: 8°C → 6°C → 4°C → 3°C → 2°C → super cool → 8°C ...
The corresponding indicator light turns on and the selection is confirmed (without blinking).
A short audible signal confirms the selection.
Setting the freezer temperature
When the display is on, select "Freezer temperature setting" by pressing the MODE button. The indicator light for the freezer zone lights up.
Press the TEMP button until the desired temperature is set.
The ambient temperature changes according to the specification: -16 ° C -> -18 ° C -> -20 ° C -> -22
°C -> -24 °C -> Super Freeze -> -16 °C...
The corresponding button is pressed (without holding).
A short acoustic signal indicates the selection.
Please note:
Switching from cooling to freezer zones and vice versa becomes immediate when the user presses the MODE button and the selection is immediately active. The temperature indicator does not blink.
| Бытrewиата сеньгоста Крушик небети. | • HЯма тok. | • 3хараловату кабеле не вешлошени. • Пбогороте даму уралу не вешлошени (Вадсторika на Tempe�ату). • Пбогороте даму поалу вешлошени. • Вадсторika на Tempe�ату. • Вадсторika на Tempe�ату. • Вадсторika на Tempe�ату. • Вадсторika на Tempe�ату. • Вадсторika на Tempe�ату. • Вадсторika на Tempe�ату. • Вадсторika на Tempe�ату. • Вадсторika на Tempe�ату. • Вадсторika на Timяп. • Вадсторika на Timяп. • Вадсторika на Timяп. • Вадсторika на Timяп. • Вадсторika на Timяп. • Вадсторika на Timяп. • Вадсторika на Timяп. • Вадсторika на Timяп. • Вадсторika на Timяп. • Вадсторika на Timяп • Вадсторika на Timяп. • Вадсторika на Timяп. • Вадсторika на Timяп. • Вадсторika на Timяп. • Вадсторika на Timяп. • Вадсторika на Timяп. • Вадсторika на Timяп. • Вадсторika на Timяп. • Вадсторika на Timяп. * Двуханы с толуху. • Бернайся поалу вешлошени. • Двуханы с толуху. • Двуханы с толуху. • Двуханы с толуху. • Двуханы с толуху. • Двуханы с толуху. • Двуханы с толуху. • Двуханы с толуху. • Двуханы с толуху. • Двуханы с tолуху. • Двуханы с tолуху. • Двуханы с tолуху. • Двуханы с tолуху. • Двуханы с tолуху. • Двуханы с tолуху. • Двуханы с tолуху. • Двуханы с tолуху. • Двinoxу. • Двinoxу. • Двinoxу. • Двinoxу. • Двinoxу. • Двinoxу. • Двinoxу. • Двinoxу. • Двinoxу. • Двinoxу. • Двinoxу. • Двinoxу. • Двinoxу. • Двinoxу. • Двinoxу. • Двinoxу. • Двinoxу. •Двinoxу. •Двinoxу. •Двinoxу. •Двinoxу. •Двinoxу. •Двinoxу. •Двinoxу. •Двinoxу. •Двinoxу. •Двinoxу. •Двinoxу. •Двinoxу. •Двinoxу. •Двinoxу. •Двinoxу. •Двinoxу. •Двinoxу •Двinoxу. •Двinoxу. •Двinoxу. •Двinoxу. •Двinoxу. •Двinoxу. •Двinoxу. •Двinoxу. •Двinoxу. •Двinoxу. •Двinoxу. •Двinoxу. •Двinoxу. •Двinoxу. •Двinoxу. •Двinoxу. •Двimuth. •Двimuth. •Двimuth. •Двimuth. •Двimuth. •Двimuth. •Двimuth. •Двimuth. •Двimuth. •Двimuth. •Двimuth. •Двimuth. •Двimuth. •Двimuth. •Двimuth. •Двimuth. •Двimuth. •Двimuth. •Двimuth. •Двimuth. •Дв azimuth. •Дв azimuth. •Дв azimuth. •Дв azimuth. •Дв azimuth. •Дв azimuth. •Дв azimuth. •Дв azimuth. •Дв azimuth. •Дв azimuth. •Дв azimuth. •Дв azimuth. •Дв azimuth. •Дв azimuth. •Дв azimuth. •Дв azimuth. •Дв azimuth. •Дв azimuth. •Дв azimuth. •Дв azimuth. •Двimuth. •Дв azimuth. •Дв azimuth. •Дв azimuth. •Дв azimuth. •Дв azimuth. •Дв azimuth. •Дв azimuth. •Дв azimuth. •Дв azimuth. •Дв azimuth. •Дв azimuth. •Дв azimuth. •Дв azimuth. •Дв azimuth. •Дв azimuth. •Дв azimuth. •Дв azimuth. •Дв azimuth. •Двimuth. •Двimuth. •Дв azimuth. •Дв azimuth. •Дв azimuth. •Дв azimuth. •Дв azimuth. •Дв azimuth. •Дв azimuth. •Дв azimuth. •Дв azimuth. •Дв azimuth. •Дв azimuth. •Дв azimuth. •Дв azimuth. •Дв azimuth. •Дв azimuth. •Дв azimuth. •Дв azimuth. •Двimuth. •Дв azimuth. •Двimuth. •Дв azimuth. •Дв azimuth. •Дв azimuth. •Дв azimuth. •Дв azimuth. •Дв azimuth. •Дв azimuth. •Дв azimuth. •Дв azimuth. •Дв azimuth. •Дв azimuth. •Дв azimuth. •Дв azimuth. •Дв azimuth. •Дв azimuth. •Дв azimuth. •Дв azimuth. •Двimuth. •Двimuth. •Двimuth. •Дв azimuth. •Дв azimuth. •Дв azimuth. •Дв azimuth. •Дв azimuth. •Дв azimuth. •Дв azimuth. •Дв azimuth. •Дв azimuth. •Дв azimuth. •Дв azimuth. •Дв azimuth. •Дв azimuth. •Дв azimuth. •Дв azimuth. •Дв azimuth. •Двimuth. •Дв azimuth. •Дв azimuth. •Двimuth. •Дв azimuth. •Дв azimuth. •Дв azimuth. •Дв azimuth. •Дв azimuth. •Дв azimuth. •Дв azimuth. •Дв azimuth. •Дв azimuth. •Дв azimuth. •Дв azimuth. •Дв azimuth. •Дв azimuth. •Дв azimuth. •Дв azimuth. •Дв azimuth. •Двimuth. •Дв azimuth. •Двimuth. •Двimuth. •Дв azimuth. •Дв azimuth. •Дв azimuth. •Дв azimuth. •Дв azimuth. •Дв azimuth. •Дв azimuth. •Дв azimuth. •Дв azimuth. •Дв azimuth. •Дв azimuth. •Дв azimuth. •Дв azimuth. •Дв azimuth. •Дв azimuth. •Дв azimuth. •Двimuth. •Двimuth. •Дв azimuth. •Двimuth. •Дв azimuth. •Дв azimuth. •Дв azimuth. •Дв azimuth. •Дв azimuth. •Дв azimuth. •Дв azimuth. •Дв azimuth. •Дв azimuth. •Дв azimuth. •Дв azimuth. •Дв azimuth. •Дв azimuth. •Дв azimuth. •Дв azimuth. •Дв azimuth. •Двimuth. •Двimuth. •Двimuth. •Двimuth. •Дв azimuth. •Дв azimuth. •Дв azimuth. •Дв azimuth. •Дв azimuth. •Дв azimuth. •Дв azimuth. •Дв azimuth. •Дв azimuth. •Дв azimuth. •Дв azimuth. •Дв azimuth. •Дв azimuth. •Дв azimuth. •Дв azimuth. •Двimuth. •Дв azimuth. •Дв azimuth. •Дв azimuth. •Двimuth. •Дв azimuth. •Дв azimuth. •Дв azimuth. •Дв azimuth. •Дв azimuth. •Дв azimuth. •Дв azimuth. •Дв azimuth. •Дв azimuth. •Дв azimuth. •Дв azimuth. •Дв azimuth. •Дв azimuth. •Дв azimuth. •Дв azimuth. •Двimuth. •Дв azimuth. •Дв azimuth. •Двimuth. •Двimuth. •Дв azimuth. •Дв azimuth. •Дв azimuth. •Дв azimuth. •Дв azimuth. •Дв azimuth. •Дв azimuth. •Дв azimuth. •Дв azimuth. •Дв azimuth. •Дв azimuth. •Дв azimuth. •Дв azimuth. •Дв azimuth. •Дв azimuth. •Двimuth. •Дв azimuth. •Двimuth. •Дв azimuth. •Двimuth. •Дв azimuth. •Дв azimuth. •Дв azimuth. •Дв azimuth. •Дв azimuth. •Дв azimuth. •Дв azimuth. •Дв azimuth. •Дв azimuth. •Дв azimuth. •Дв azimuth. •Дв azimuth. •Дв azimuth. •Дв azimuth. •Дв azimuth. •Двimuth. •Дв azimuth. •Двimuth. •Двimuth. •Двimuth. •Дв azimuth. •Дв azimuth. •Дв azimuth. •Дв azimuth. •Дв azimuth. •Дв azimuth. •Дв azimuth. •Дв azimuth. •Дв azimuth. •Дв azimuth. •Дв azimuth. •Дв azimuth. •Дв azimuth. •Дв azimuth. •Дв azimuth. •Двimuth. •Двimuth. •Дв azimuth. •Дв azimuth. •Двimuth. •Дв azimuth. •Дв azimuth. •Дв azimuth. •Дв azimuth. •Дв azimuth. •Дв azimuth. •Дв azimuth. •Дв azimuth. •Дв azimuth. •Дв azimuth. •Дв azimuth. •Дв azimuth. •Дв azimuth. •Дв azimuth. •Дв azimuth. •Двimuth. •Двimuth. •Дв azimuth. •Двimuth. •Двimuth. •Дв azimuth. •Дв azimuth. •Дв azimuth. •Дв azimuth. •Дв azimuth. •Дв azimuth. •Дв azimuth. •Дв azimuth. •Дв azimuth. •Дв azimuth. •Дв azimuth. •Дв azimuth. •Дв azimuth. •Дв azimuth. •Дв azimuth. •Двimuth. •Двimuth. •Двimuth. •Дв azimuth. •Двimuth. •Дв azimuth. •Дв azimuth. •Дв azimuth. •Дв azimuth. •Дв azimuth. •Дв azimuth. •Дв azimuth. •Дв azimuth. •Дв azimuth. •Дв azimuth. •Дв azimuth. •Дв azimuth. •Дв azimuth. •Дв azimuth. •Дв azimuth. •Двimuth. •Двimuth. •Двimuth. •Двimuth. •Двimuth. •Дв azimuth. •Дв azimuth. •Дв azimuth. •Дв azimuth. •Дв azimuth. •Дв azimuth. •Дв azimuth. •Дв azimuth. •Дв azimuth. •Дв azimuth. •Дв azimuth. •Дв azimuth. •Дв azimuth. •Дв azimuth. •Двimuth. •Дв azimuth. •Дв azimuth. •Дв azimuth. •Дв azimuth. •Двimuth. •Дв azimuth. •Дв azimuth. •Дв azimuth. •Дв azimuth. •Дв azimuth. •Дв azimuth. •Дв azimuth. •Дв azimuth. •Дв azimuth. •Дв azimuth. •Дв azimuth. •Дв azimuth. •Дв azimuth. •Дв azimuth. •Двimuth. •Дв azimuth. •Дв azimuth. •Дв azimuth. •Двimuth. •Двimuth. •Дв azimuth. •Дв azimuth. •Дв azimuth. •Дв azimuth. •Дв azimuth. •Дв azimuth. •Дв azimuth. •Дв azimuth. •Дв azimuth. •Дв azimuth. •Дв azimuth. •Дв azimuth. •Дв azimuth. •Дв azimuth. •Двimuth. •Дв azimuth. •Дв azimuth. •Двimuth. •Дв azimuth. •Двimuth. •Дв azimuth. •Дв azimuth. •Дв azimuth. •Дв azimuth. •Дв azimuth. •Дв azimuth. •Дв azimuth. •Дв azimuth. •Дв azimuth. •Дв azimuth. •Дв azimuth. •Дв azimuth. •Дв azimuth. •Дв azimuth. •Двimuth. •Дв azimuth. •Дв azimuth. •Двimuth. •Двimuth. •Двimuth. •Дв azimuth. •Дв azimuth. •Дв azimuth. •Дв azimuth. •Дв azimuth. •Дв azimuth. •Дв azimuth. •Дв azimuth. •Дв azimuth. •Дв azimuth. •Дв azimuth. •Дв azimuth. •Дв azimuth. •Дв azimuth. •Двimuth. •Дв azimuth. •Двimuth. •Дв azimuth. •Дв azimuth. •Двimuth. •Дв azimuth. •Дв azimuth. •Дв azimuth. •Дв azimuth. •Дв azimuth. •Дв azimuth. •Дв azimuth. •Дв azimuth. •Дв azimuth. •Дв azimuth. •Дв azimuth. •Дв azimuth. •Дв azimuth. •Дв azimuth. •Двimuth. •Дв azimuth. •Двimuth. •Дв azimuth. •Двimuth. •Двimuth. •Дв azimuth. •Дв azimuth. •Дв azimuth. •Дв azimuth. •Дв azimuth. •Дв azimuth. •Дв azimuth. •Дв azimuth. •Дв azimuth. •Дв azimuth. •Дв azimuth. •Дв azimuth. •Дв azimuth. •Дв azimuth. •Двimuth. •Дв azimuth. •Двimuth. •Двimuth. •Дв azimuth. •Двimuth. •Дв azimuth. •Дв azimuth. •Дв azimuth. •Дв azimuth. •Дв azimuth. •Дв azimuth. •Дв azimuth. •Дв azimuth. •Дв azimuth. •Дв azimuth. •Дв azimuth. •Дв azimuth. •Дв azimuth. •Дв azimuth. •Двimuth. •Дв azimuth. •Двimuth. •Двimuth. •Двimuth •Дв azimuth •Дв azimuth •Дв azimuth •Дв azimuth •Дв azimuth •Дв azimuth •Дв azimuth •Дв azimuth •Дв azimuth •Дв azimuth •Дв azimuth •Дв azimuth •Дв azimuth •Дв azimuth •Дв azimuth •Дв azimuth •Дв azimuth •Дв azimuth •Дв azimuth •Дв azimuth •Двimuth •Дв azimuth •Дв azimuth •Дв azimuth •Дв azimuth •Дв azimuth •Дв azimuth •Дв azimuth •Дв azimuth •Дв azimuth •Дв azimuth •Дв azimuth •Дв azimuth •Дв azimuth •Дв azimuth •Дв azimuth •Дв azimuth •Дв azimuth •Дв azimuth •Дв azimuth |
Summary
PRODUCT DESCRIPTION 2 USE 3
Download on the App Store

EXPLORE IT ON AppGallery
Step 2
Super Freeze function 6
Eco mode 6
Vacation function 7
Defrosting 7
Error codes 7
Download on the App Store

EXPLORE IT ON AppGallery
Step 2
Download on the App Store

EXPLORE IT ON AppGallery
Step 2
Download on the App Store

EXPLORE IT ON AppGallery
Step 2
PRODUCT DESCRIPTION 2
USE 3
Use 3
Download on the App Store

EXPLORE IT ON AppGallery
Step 2
Superfreezing -> -16 °C ...
In the app pairing procedure
Step 1
Download on the App Store

EXPLORE IT ON AppGallery
Step 2
540 mm cabinet: Width: 934 mm
Depth: 955 mm
700 mm cabinet: Width: 1200 mm
Depth: 1051 mm
USING THE APPLIANCE
Download on the App Store

EXPLORE IT ON AppGallery
Step 2
The temperature setting does not matter
Super Cool function
It is recommended to turn on the Super Cool function if you need to store a large quantity of products (for example, after shopping). The Super Cool function accelerates the cooling of fresh products and protects already stored goods from unwanted warming. When this function is activated, the temperature of the refrigerator compartment is automatically set to 2°C.
How to use the Super Cool function:
You can activate this function by pressing the TEMP button to select the refrigerator compartment, followed by a quick press of the TEMP button until the Super Cool indicator lights up; or you can activate this function in the app. When the function is activated, the Super Cool indicator will be constantly on. - To turn off the Super Cool function, press the TEMP button; or turn off this function in the app. - The Super Cool function automatically turns off after more than 12 hours from its activation. When the Super Cool function turns off, the indicator on the control panel turns off, and the previously set cooling level is restored.
Note: The Super Cool and Super Freeze functions cannot be activated at the same time.
Super Freeze function
The Super Freeze function accelerates the freezing of fresh products and protects already stored goods in the freezer compartment from unwanted warming. If you need to freeze a large quantity of products, it is recommended to activate the Super Freeze function 24 hours before use. When the function is activated, the temperature is automatically set to -22°C.
How to use the Super Freeze function:
- You can activate this function by pressing the TEMP button to select the freezer compartment, followed by a quick press of the TEMP button until the Super Freeze indicator lights up; or you can activate this function in the app. When the function is activated, the Super Freeze indicator will be constantly on. - To turn off the Super Freeze function, press the TEMP button; or turn off this function in the app. - The Super Freeze function automatically turns off after more than 50 hours from its activation. When Super Freeze turns off, the indicator on the control panel turns off, and the previously set freezing level is restored.
Note: The Super Cool and Super Freeze functions cannot be activated at the same time.
Eco mode
Eco mode can be activated to optimize the performance of the appliance while ensuring good storage conditions for food products. Eco mode automatically sets the temperature to 4°C in the refrigerator compartment and -18°C in the freezer compartment.
How to use Eco mode:
TROUBLESHOOTING 9
PRODUCT DESCRIPTION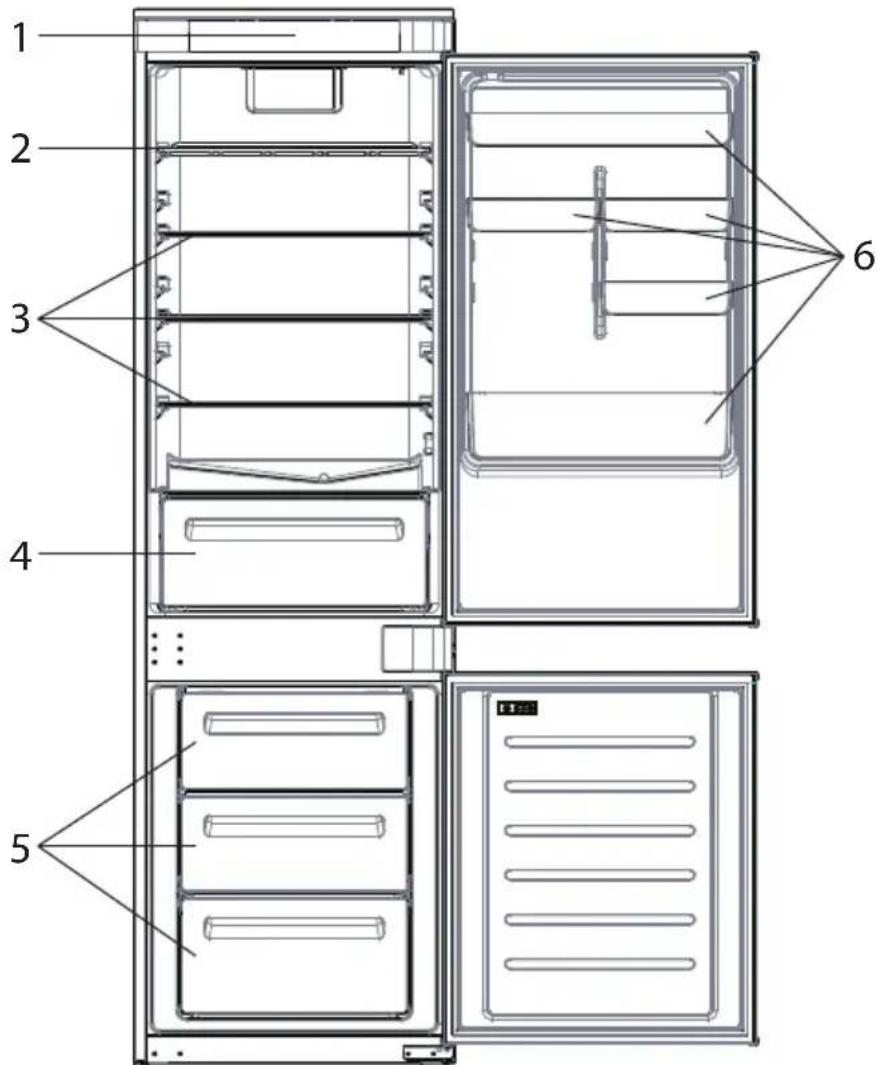
Temperature setting for fries 4
Download on the App Store

EXPLORE IT ON AppGallery
Step 2
- Create your account in the hOn app or log in if you already have an account
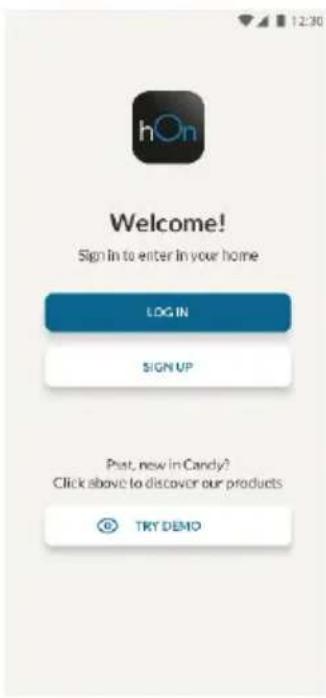
Step 3
Setting the freezer temperature 4
Super Cool function 5
Super Freeze function 6
Eco mode 6
Holiday function 7
Defrosting 7
USING WI-FI 7
3. OPERATION WITH THE APPLIANCE (see figure 8)
TROUBLESHOOTING AND CORRECTION OF MALFUNCTIONS 9
PRODUCT DESCRIPTION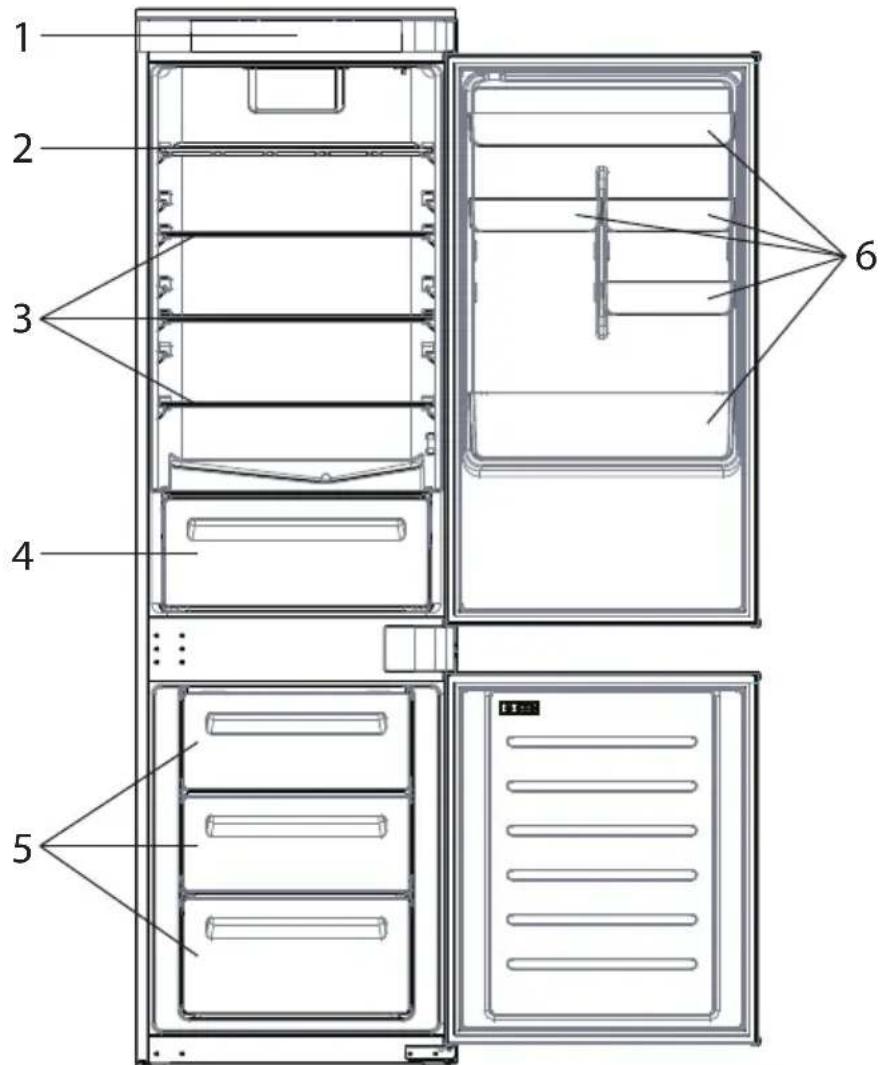
1. Control panel 2. Door shelf 3. Cabinet screws 4. Shelves 5. Fruit and vegetable drawer 6. Freezer compartment drawer 7. Door shelf
* The figure shows the energy-efficient configuration of the appliance. For this configuration, all drawers, fruit and vegetable drawers, and shelves must be installed, and the fan must be switched on as shown above. ** The figure above is for illustrative purposes only. The actual configuration of the appliance depends on the model or the distributor's specifications.
INSTALLATION INSTRUCTIONS
The door opens completely as shown. Ensure sufficient free space for easy opening of the door and drawers. Maintain a distance of at least 50 mm between the appliance's side walls and adjacent parts.
Height: 540 mm Width: 934 mm
Depth: 955 mm
Height: 700 mm Width: 1200 mm
Depth: 1051 mm
OPERATION
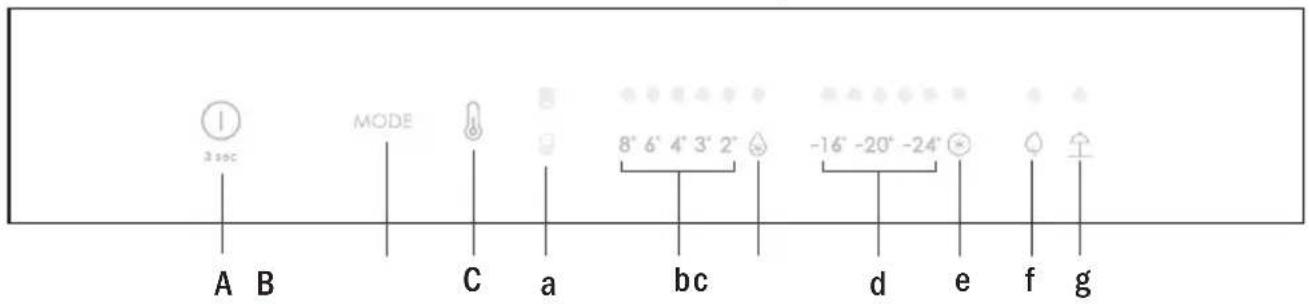
A. ON/OFF button: press for 3 seconds. The appliance turns on with a long audible signal from the feedback system (1s). B. Mode button: used to select between Fridge, Freezer, Eco, and Holiday modes. C. TEMP button: used to select between temperature levels (also Super Cool and Super Freeze). a. Indicator for the fridge/freezer compartment, showing which compartment is selected. b. Fridge temperature levels, showing the selected temperature. c. Super Cool pictogram, showing if the Super Cool function is active. d. Freezer temperature levels, showing the selected temperature in the freezer compartment. e. Super Freeze pictogram, showing if the Super Freeze function is active. f. Eco mode pictogram, showing if Eco mode is active. g. Holiday function pictogram, showing if the Holiday function is active.
Operation
- Plug the appliance into the mains, and it will turn on automatically with a long audible signal (1 second). All lights turn on (1 second), then the temperature indicator lights for the fridge and freezer turn on continuously. The temperature is automatically set to 4 °C in the fridge compartment and -18 °C in the freezer compartment. NOTE: Wait at least 2/3 hours before placing products in the appliance to ensure reliable temperature inside the fridge. In case of a power outage, the last set cooling level will be restored. To restore the default settings, open the fridge door and simultaneously press the ON/OFF button for 5 seconds.
- Under normal operating conditions (canopy and spring), it is recommended to set the temperature to 4 °C. In summer, when the ambient temperature is high, it is recommended to set the temperature to 6~8 °C to guarantee the temperature of the refrigerator compartment and freezer compartment and to reduce the continuous operation time of the refrigerator; and in winter, when the ambient temperature is low, it is recommended to set the temperature to 3~4 °C to avoid frequent starts/stops of the refrigerator.
Control of the defrosting mode
- If the door is closed -> the control display is turned off (all LED indicators are off). - If the door is opened -> the LED indicators of the current temperature of the refrigerator and freezer compartments are turned on (constantly). - The LED indicators of the ECO and Holiday modes are turned on (constantly) if they were selected earlier. - The display is ready for data entry (no need to activate it by touch).
Modes
The Mode button is used to select different modes:
The corresponding LED indicator turns on, and the selected option is immediately confirmed
(without blinking).
The selection will be confirmed by a short audible signal from the feedback system.
Setting the refrigerator temperature
After turning on the appliance, first set the refrigerator temperature by pressing the MODE button. The LED indicator of the refrigerator compartment turns on.
Press the TEMP button until the required temperature is set.
The temperature value changes as follows: 8°C→ 6°C→ 4°C→ 3°C→ 2°C→ intensive cooling → 8°C...
The corresponding LED indicator turns on, and the selected option is immediately confirmed (without blinking). The selection will be confirmed by a short audible signal from the feedback system.
Setting the freezer temperature
Press the TEMP button until the required temperature is set.
The temperature changes as follows: -16 °C -> -18 °C -> -20 °C -> -22 °C -> -24 °C -> intensive freezing -> -16 °C ...
The corresponding indicator lights up, and the selected option will be immediately confirmed.
(without flashing).
The selection will be confirmed with a short audible signal from the feedback system.
Please note!
The temperature of the refrigerator or freezer compartment is set immediately when the user presses the MODE button. The selected option is not saved.
The temperature indicators do not light up.
Super Cool function
It is recommended to activate the Super Cool function when you need to store a large quantity of products (for example, after shopping). The Super Cool function accelerates cooling of the products and protects them from unwanted warming while stored in the appliance. When the function is activated, the refrigerator compartment temperature is automatically set to 2 °C.
How to use the Super Cool function:
This function can be activated by pressing the TEMP button repeatedly to select the refrigerator compartment, then pressing the TEMP button again until the Super Cool pictogram turns on; or the function can be activated directly. When the function is activated, the Super Cool indicator will light up and turn on. - To turn off the Super Cool function, press the TEMP button again until the pictogram turns off. - The Super Cool function automatically turns off after more than 12 hours of activation. - When the Super Cool function is turned off, the pictogram on the control panel disappears, and the previously set cooling level is restored.
Note: The Super Cool and Super Freeze functions cannot be activated simultaneously.
Super Freeze function
The Super Freeze function accelerates the freezing of fresh food and protects already stored goods from unwanted warming. If you need to freeze a large quantity of products, it is recommended to activate the Super Freeze function 24 hours before use. When the function is activated, the temperature is automatically set to -22 °C.
How to use the Super Freeze function:
- The Super Freeze function can be activated by pressing the TEMP button repeatedly until the Super Freeze pictogram appears, or the function can be activated via the app. When the function is activated, the Super Freeze indicator light will remain on.
- To deactivate the Super Freeze function, press the TEMP button again or deactivate the function in the app. The Super Freeze function automatically deactivates after more than 50 hours of activation. After deactivating the Super Freeze function, the pictogram on the control panel turns off and the previously set freezing level is restored.
Note: The Super Cool and Super Freeze functions cannot be activated simultaneously.
Eco Mode
Eco Mode can be activated to optimize the productivity of the appliance while ensuring optimal storage conditions. Eco Mode automatically sets the temperature to 4 °C in the refrigerator compartment and -18 °C in the freezer compartment.
How to use Eco Mode:
The function can be activated from the control panel by pressing the "mode" button until the Eco Mode pictogram appears (an audible signal confirms the selection); or the function can be selected in the app. After activation, the Eco Mode pictogram will remain on. To exit Eco Mode, deactivate it in the app or select another function on the control panel. After deactivating Eco Mode, the pictogram on the control panel turns off and the previously set cooling levels are restored.
Holiday Function
The Holiday function can be used to reduce the energy consumption of the appliance when it is not used regularly. When the function is activated, the indicator lights turn off (unless the doors are open), and the refrigerator compartment switches to low energy consumption mode, while the freezer compartment continues to operate normally.
How to use the Holiday function:
- The function can be activated from the control panel by pressing the "mode" button until the Holiday function pictogram appears (an audible signal confirms the selection); or the function can be selected in the app. When the function is activated, the Holiday pictogram will remain on.
- To deactivate the Holiday function, deactivate it in the app or select another function on the control panel.
- After deactivating the Holiday function, the pictogram on the control panel turns off and the previously set cooling levels are restored.
Defrosting
When the ice layer in the freezer compartment exceeds 3 mm, it is recommended to proceed with defrosting, as such an ice layer increases energy consumption.
Unplug the appliance and remove the frozen products. Place them temporarily in a cool place. Open the freezer door and collect the water that accumulates at the bottom. After defrosting is complete, thoroughly wipe the inside surfaces of the appliance dry. Plug the appliance back in and set the desired temperature. Wait a bit and then put the frozen products back into the appliance.
Demonstration mode
To enter or exit demonstration mode, with the appliance switched on, press and hold the ON/OFF button and simultaneously press the MODE button 5 times (within 5 seconds).
Error codes
-Data exchange error
The LED indicators 8°C - 6°C - 4°C - 3°C - 2°C light up sequentially; this means that between the main control board and the display board a data exchange error has occurred. Contact technical support for assistance in resolving the problem.
"Super Cool
Joo. (e) Jolal jlll lsc) paball no s yss aas cns jzj Super Cool aag Jus Super-Cool
g 2.
Super Cool
bniinai i aiai i 1aie iienl TEMP 1e aiai aiai binaillnne nne
Super Cool SuperCool
Super Cool LED
Super Cool SuperCool
Aclu 12 no jy Aabgall Jaaa Laoie Super Cool aabg
i Super Cool 1000
a
Super Freeze, Super Cool
"Super Freeze
Jr 24 Super-Freeze 22-15
Super Freeze
| (Haj) | (الله) | (الله) |
| Holiday | Holiday | Holiday |
| Holidays | Holiday | Holiday |
| Holidays | Holiday | Holiday |
| Holidays | Holiday | Holiday |
| Holidays | Holiday | Holiday |
| Holidays | Holiday | Holiday |
| Holidays | Holiday | Holiday |
| Holidays | Holiday | Holiday |
| Holidays | Holiday | Holiday |
| Holidays | Holiday | Holiday |
| Holidays | Holiday | Holiday |
| Holidays | Holiday | Holiday |
| Holidays (Holiday) (Holiday) (Holiday) (Holiday) (Holiday) (Holiday) (Holiday) (Holiday) (Holiday) (Holiday) (Holiday) (Holiday) (Holiday) (Holiday) (Holiday) (Holiday) (Holiday) (Holiday) (Holiday) (Holiday) (Holiday) (Holiday) (Holiday) (Holiday) (Holiday) (Holiday) (Holiday) (Holiday) (Holiday) (Holiday) (Holiday) (Holiday) (Holiday) (Holiday) "Holiday" (Holiday) (Holiday) (Holiday) (Holiday) (Holiday) (Holiday) (Holiday) (Holiday) (Holiday) (Holiday) (Holiday) (Holiday) (Holiday) (Holiday) (Holiday) (Holiday) (Holiday) (Holiday) (Holiday) (Holiday) (Holiday) (Holiday) (Holiday) (Holiday) (Holiday) (Holiday) (Holiday) (Holiday) (Holiday) (Holiday) (Holiday) (Holiday) (Holiday) Holidays (Holiday) (Holiday) (Holiday) (Holiday) (Holiday) (Holiday) (Holiday) (Holiday) (Holiday) (Holiday) (Holiday) (Holiday) (Holiday) (Holiday) (Holiday) (Holiday) (Holiday) (Holiday) (Holiday) (Holiday) (Holiday) (Holiday) (Holiday) (Holiday) (Holiday) (Holiday) (Holiday) (Holiday) (Holiday) (Holiday) (Holiday) (Holiday) Holidays Holidays Holidays Holidays Holidays Holidays Holidays Holidays Holidays Holidays Holidays Holidays Holidays Holidays Holidays Holidays Holidays Holidays Holidays Holidays Holidays Holidays Holidays Holidays Holidays Holidays Holidays Holidays Holidays Holidays Holidays Holidays Holidays Holidays (Holiday) (Holiday) (Holiday) (Holiday) (Holiday) (Holiday) (Holiday) (Holiday) (Holiday) (Holiday) (Holiday) (Holiday) (Holiday) (Holiday) (Holiday) (Holiday) (Holiday) (Holiday) (Holiday) (Holiday) (Holiday) (Holiday) (Holiday) (Holiday) (Holiday) (Holiday) (Holiday) (Holiday) (Holiday) (Holiday) (Holiday) (Holiday) "Holiday" "Holiday" "Holiday" "Holiday" "Holiday" "Holiday" "Holiday" "Holiday" "Holiday" "Holiday" "Holiday" "Holiday" "Holiday" "Holiday" "Holiday" "Holiday" "Holiday" "Holiday" "Holiday" "Holiday" "Holiday" "Holiday" "Holiday" "Holiday" "Holiday" "Holiday" "Holiday" "Holiday" "Holiday" "Holiday" "Holiday" "Holiday" "Holiday" "Holiday" 'Holiday" "Holiday" "Holiday" "Holiday" "Holiday" "Holiday" "Holiday" "Holiday" "Holiday" "Holiday" "Holiday" "Holiday" "Holiday" "Holiday" "Holiday" "Holiday" "Holiday" "Holiday" "Holiday" "Holiday" "Holiday" "Holiday" "Holiday" "Holiday" "Holiday" "Holiday" "Holiday" "Holiday" "Holiday" "Holiday" "Holiday" "Holiday" "Holiday" "H Holiday" "H Holiday" "H Holiday" "H Holiday" "H Holiday" "H Holiday" "H Holiday" "H Holiday" "H Holiday" "H Holiday" "H Holiday" "H Holiday" "H Holiday" "H Holiday" "H Holiday" "H Holiday" "H Holiday" "H Holiday" "H Holiday" "H Holiday" "H Holiday" "H Holiday" "H Holiday" "H Holiday" "H Holiday" "H Holiday" "H Holiday" "H Holiday" "H Holiday" "H Holiday" "H Holiday" "H Holiday" "H Holiday" "H Holiday") "H Holiday" "H Holiday" "H Holiday" "H Holiday" "H Holiday" "H Holiday" "H Holiday" "H Holiday" "H Holiday" "H Holiday" "H Holiday" "H Holiday" "H Holiday" "H Holiday" "H Holiday" "H Holiday" "H Holiday" "H Holiday" "H Holiday" "H Holiday" "H Holiday" "H Holiday" "H Holiday" "H Holiday" "H Holiday" "H Holiday" "H Holiday" "H Holiday" "H Holiday" "H Holiday" "H Holiday" "H Holiday" "H Holiday" " | H holidays H holidays H holidays H holidays H holidays H holidays H holidays H holidays H holidays H holidays H holidays H holidays H holidays H holidays H holidays H holidays H holidays H holidays H holidays H holidays H holidays H holidays H holidays H holidays H holidays H holidays H holidays H holidays H holidays H holidays H holidays H holidays H holidays H holidays HA holidays HA holidays HA holidays HA holidays HA holidays HA holidays HA holidays HA holidays HA holidays HA holidays HA holidays HA holidays HA holidays HA holidays HA holidays HA holidays HA holidays HA holidays HA holidays HA holidays HA holidays HA holidays HA holidays HA holidays HA holidays HA holidays HA holidays HA holidays HA holidays HA holidays HA holidays HA holidays HA holidays HA holiday HA holidays HA holidays HA holidays HA holidays HA holidays HA holidays HA holidays HA holidays HA holidays HA holidays HA holidays HA holidays HA holidays HA holidays HA holidays HA holidays HA holidays HA holidays HA holidays HA holidays HA holidays HA holidays HA holidays HA holidays HA holidays HA holidays HA holidays HA holidays HA holidays HA holidays HA holidays HA holidays HA holidays | H holidays H holidays H holidays H holidays H holidays H holidays H holidays H holidays H holidays H holidays H holidays H holidays H holidays H holidays H holidays H holidays H holidays H holidays H holidays H holidays H holidays H holidays H holidays H holidays H holidays H holidays H holidays H holidays H holidays H holidays H holidays H holidays H holidays |
Summary
PRODUCT DESCRIPTION 2 USE 3
- SPACE REQUIREMENTS
- DISPLAY STAND BY MODE MANAGEMENT
- MODE
- FRIDGE TEMPERATURE SETTING
- FREEZER TEMPERATURE SETTING
- NOTE
- SUPER COOL FUNCTION
- SUPER FREEZE FUNCTION
- ECO MODE
- HOLIDAY FUNCTION
- DEFROSTING
- DEMO MODE
- ERROR CODES
- APP CONNECTION (CONTENT ONLY)
- IN APP PAIRING PROCEDURE
- STEP
- SUMMARY
- SETTING THE REFRIGERATOR TEMPERATURE
- SETTING THE FREEZER TEMPERATURE
- PLEASE NOTE
- PRODUCT DESCRIPTION
- USE
- IN THE APP PAIRING PROCEDURE
- USING THE APPLIANCE
- OPERATION WITH THE APPLIANCE (SEE FIGURE 8)
- TROUBLESHOOTING AND CORRECTION OF MALFUNCTIONS
- INSTALLATION INSTRUCTIONS
- OPERATION
- CONTROL OF THE DEFROSTING MODE
- MODES
- DEMONSTRATION MODE
- SUPER COOL
- SUPER FREEZE
Brand : CANDY
Model : CBL3518EK
Category : Refrigerator