
303956 - Camera Aplic - Free user manual and instructions
Find the device manual for free 303956 Aplic in PDF.


| Product type | Mini-camera / Camera |
| Brand | Aplic |
| Model | 303956 |
| Input voltage | 5 V DC |
| Maximum video resolution | 1920 x 1080p @ 30 fps |
| Secondary video resolution | 1280 x 720p @ 30 fps |
| Photo resolution | 12 MP (4032 x 3024) |
| Battery | 180 mAh built-in, rechargeable |
| Charging time | Approximately 2 hours |
| Maximum memory card capacity | 32 GB |
| Memory card type | microSD (8-32 GB, FAT32) |
| Connectivity | MicroUSB port, TV output (RCA) |
| Main functions | Video recording 720p/1080p, photo, motion detection, infrared night vision, date/time stamp |
| Motion detection | Yes, in 720p and 1080p |
| Night vision | Infrared lights can be turned on/off |
| Card formatting | Requires FAT32, via computer |
| Auto shutdown | After 1 minute of inactivity in standby mode |
| Safety instructions | Do not open, avoid moisture, high temperature, shocks |
| Disposal | Do not discard with household waste, follow WEEE directive |
| Operating temperature | Dry conditions, avoid extreme temperatures |
| Country of origin | Not specified |
Frequently Asked Questions - 303956 Aplic
User questions about 303956 Aplic
0 question about this device. Answer the ones you know or ask your own.
Ask a new question about this device
Download the instructions for your Camera in PDF format for free! Find your manual 303956 - Aplic and take your electronic device back in hand. On this page are published all the documents necessary for the use of your device. 303956 by Aplic.
USER MANUAL 303956 Aplic
Thank you for choosing an aplic product. Please read the following user manual carefully so as to get the most from the product you have purchased.
1. Scope of delivery
- Mini camera
- User manual
2. Technical data
| Input voltage 5V DC | |
| Video format | • 1280 x 720p @ 30fps • 1920 x 1080p @ 30fps |
| Battery 180 mAh | |
| Photo resolution 12 MP (4032 x 3024) | |
| Memory card max. 32 GB microSD | |
3. Product details
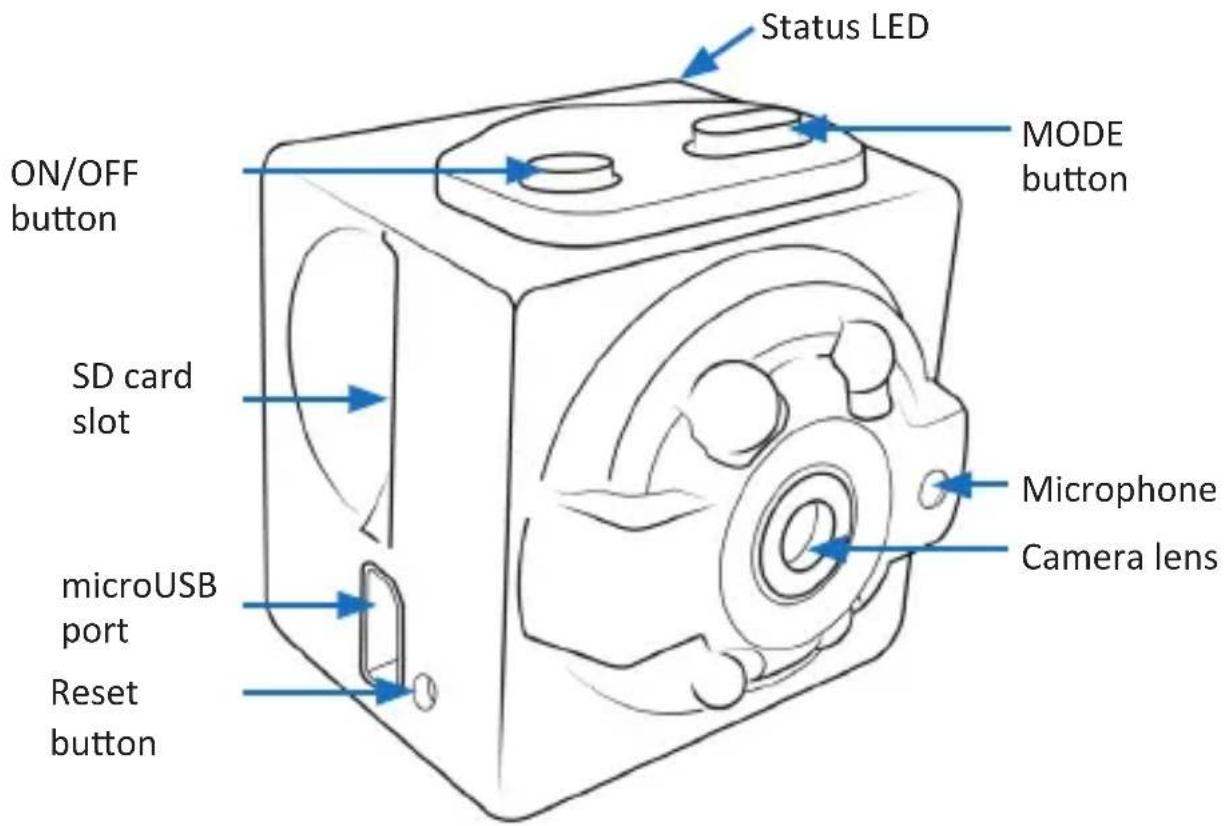
4. Use - First steps
4.1 Charging
The device has an inbuilt rechargeable lithium battery. Charge the battery completely before using it for the first time.

The battery requires about 2 hours to charge completely. The device may become slightly hot while charging.
- Connect a microUSB cable to the micro USB port on the camera. And connect it to a USB port on a computer or alternatively to a 5V DC mains adapter.
- The device can be charged during recording. For this purpose, use a power bank or a 5V DC mains adapter.
- The red status LED flashes during charging. Once the device is fully charged, the LED stops flashing.
4.2 Inserting a microSD card
The camera supports only microSD cards with a memory capacity of 8 to 32 GB. Ensure that the device has been switched off.
- Inserting or removing a memory card during operation may damage the card and the device.
- Insert the microSD card into the microSD card slot.
- Insert the card carefully. You will feel the card snapping into place when it is in the correct position.
- To remove the card, gently press it until you feel a click. Release it again. Then remove the card.

If the card is not inserted as described above, or if excessive force is applied, this may damage the memory card and the card slot.
4.3 Formatting the memory card

CAUTION! Formatting will delete all the data on the microSD card.
Before formatting, save all the important information on another storage medium.
- Insert the card into the microSD card slot.
- Then format the card if necessary and use the FAT32 file system for this purpose. For more information on formatting a storage medium, refer to the user manual of your computer.
4.4 Date/time watermark
If you want to view or hide the date or time watermark in the video, proceed as follows:
- Insert the card into the microSD card slot.
- The camera automatically creates a text document. Open the text document "TIME REST".
- In this text file, you will find a number combination that is generated from the current date. You can see a Y (watermark on) or a N (watermark off) before the number combination.
- Change the letter to the desired setting.
5. Operating modes
5.1. 720p Video mode
Proceed as follows if you want to record in 720p:
- Press the ON/OFF button for about 1-2 seconds to switch on the camera. The blue LED glows continuously in standby mode.
- Press the ON/OFF button briefly to start the 720p recording. If the blue light flashes three times, then it is a 720p video. The light is not displayed during recording.
- Press the ON/OFF button again to stop recording and to return to the constantly glowing blue light.

Caution! The recording can only be stopped manually!
5.2.1080p Video mode
Proceed as follows if you want to record in 1080p:
- Press the ON/OFF button for about 1-2 seconds to switch on the camera. The blue LED glows continuously in standby mode.
- Press the MODE button briefly in standby mode (blue light glowing continuously) to select 1080p recording. The blue and red light start glowing.
- Press the ON/OFF button to start the 1080p recording. The blue light glows while the red light flashes 3 times. Then both lights go out during the recording.
- Press the ON/OFF button again to stop recording and to return to the constantly glowing blue and red light.

Caution! The recording can only be stopped manually! A recording segment in 1080p resolution takes about 5 minutes.
5.3 Photo mode
- Press the ON/OFF button for about 1-2 seconds to switch on the camera. The blue LED glows continuously in standby mode.
- Please press the MODE button twice.
- The red light for the photo mode starts glowing.
- Press the ON/OFF button once to take a photo. The red light will flash once when taking a photo.
6. Infrared lights On/Off
6.1 Infrared lights On
- Press the ON/OFF button for about 1-2 seconds to switch on the camera. The blue LED glows continuously in standby mode.
- Press and hold the ON/OFF button for about 2 seconds in standby mode (blue light glows continuously). The red light flashes twice, and the infrared night vision light is switched on to enable night vision recording.
6.2 Infrared lights Off
- Press the ON/OFF button for about 1-2 seconds to switch on the camera. The blue LED glows continuously in standby mode.
- Press and hold the ON/OFF button for about 2 seconds in standby mode (blue light glows continuously). The red light flashes three times and the infrared night vision light is switched off.
7. Motion detection
7.1. 720p motion detection
- Press the ON/OFF button for about 1-2 seconds to switch on the camera. The blue LED glows continuously in standby mode.
- Press and hold the MODE button for about 3 seconds in standby mode (blue light glows continuously). The blue light continues to glow and the red light flashes three times. Then both lights go off.
- The motion detection mode is switched on. Once the object is detected, the red and blue light glow simultaneously. The time duration is now automatically recorded and stored.
- The function is stopped if object movement is not detected up to the stand-by mode or if the SD card is full.
Press any button to cancel the motion detection mode.
7.2. 1080p motion detection
- Press the ON/OFF button for about 1-2 seconds to switch on the camera. The blue LED glows continuously in standby mode.
- Press the MODE button briefly in standby mode (blue light glowing continuously) to select 1080p recording. The blue and red light start glowing.
- Press and hold the MODE button for about 3 seconds in 1080p mode (blue light _ red light glow continuously). The red light flashes three times. Then both lights go off.
- The motion detection mode is switched on. Once the object is detected, the red and blue light glow simultaneously. The time duration is now automatically recorded and stored.
- The function is stopped if object movement is not detected up to the stand-by mode or if the SD card is full.
Press any button to cancel the motion detection mode.
8. Manual switching off
You can switch off the device by pressing and holding the ON/OFF button for 6 seconds. Alternatively, the device switches off automatically after 1 minute of inactivity in standby mode.
9. Cable functions
- Can be connected to the computer to charge the device and for data transmission.
- Can be connected to a monitor. Connect the USB TV cable to the camera and switch on the TV monitor. Connect the yellow RCA cable to your TV. Select the correct source for your TV. You can then see the image on the TV monitor.
- 5V DC power supply for charging when not in use or during recording.

10. Safety instructions and disclaimer
Never try to open the device to repair or make modifications. Avoid contact with the mains voltage. Do not short-circuit the product. The device is not approved for outdoor use. Therefore please use it only in dry surroundings. Protect it from high humidity, water and snow. Do not expose the device to high temperatures. Do not expose the device to sudden changes in temperature or strong vibrations, as this could damage the electronic components. Check the device for any damage before using it. The device should not be used if it was subject to impact or has been damaged in some other manner. Please comply with the local regulations and restrictions. Do not use the device for any purposes other than those described in the user manual. This product is not a toy. Keep it out of the reach of children or mentally disabled persons. Any repair or modifications to the device, which is not carried out by the original supplier will void any warranty and guarantee claims. The device should only be used by those who have read and understood this user manual. The specifications of the device may be changed without prior notice.

11. Disposal instructions
In line with the European WEEE directive, electrical and electronic devices should not be disposed of along with domestic waste. Their components have to be sent separately for recycling or disposal, as improper disposal of toxic and dangerous components may permanently damage the environment.
According to the electrical and electronic equipment act (ElektroG), you are obliged (as a consumer) to return (free of charge) all electrical and electronic devices to the manufacturer, the point of sale or public collection points at the end of their service life. The relevant local laws regulate the details in this regard. The symbol displayed on the product, in the user manual or/and on the packaging refers to these regulations. With this manner of sorting, recycling and disposal of used devices, you make an important contribution towards protecting our environment.

12. Instructions for battery disposal
In conjunction with the sale of batteries along with the supply of devices that include batteries, the supplier is obliged to point out the following to the customer: The customer is legally obliged to return used batteries. He can return used batteries which the supplier offers or has offered as new batteries in his assortment free of charge to the supplier's dispatch warehouse (shipping address). The symbols shown on the batteries indicate the following: Pb = battery contains more than 0.004 percent lead by weight, Cd = battery contains more than 0.002 percent cadmium by weight, Hg = battery contains more than 0.0005 percent mercury by weight.

WEEE directive: 2012/19/EU
WEEE Register no.: DE 67896761
The company WD Plus GmbH hereby certifies that the devices 303956/20191029SZ262 complies with the fundamental requirements and all other relevant stipulations. A complete conformity statement can be obtained from: WD Plus GmbH, Wohlenbergstraße 16, 30179 Hanover

- Scope of delivery
- Technical data
- Product details
- Use - First steps
- Charging
- Inserting a microSD card
- Formatting the memory card
- Date/time watermark
- Operating modes
- 720p Video mode
- 5.2.1080p Video mode
- Photo mode
- Infrared lights On/Off
- Infrared lights On
- Infrared lights Off
- Motion detection
- 720p motion detection
- 1080p motion detection
- Manual switching off
- Cable functions
- Safety instructions and disclaimer
- Disposal instructions
- Instructions for battery disposal
Brand : Aplic
Model : 303956
Category : Camera