302626 - Camera Aplic - Free user manual and instructions
Find the device manual for free 302626 Aplic in PDF.


| Product Type | Dashcam |
| Brand | Aplic |
| Model | 302626 |
| Charging Voltage | DC 5V |
| Battery Capacity | 300 mAh |
| Video Resolutions | 1080p, 720p, WVGA, VGA, QVGA |
| Camera Resolutions | 12M, 10M, 8M, 5M, 3M, 2MHD, 1.3M, VGA |
| Memory | MicroSD card up to 32 GB |
| Languages | 13 language options |
| Special Functions | G sensor, Motion detection, Loop recording, Auto off, Date display |
| Interfaces | miniHDMI, mini USB charging port, microSD socket |
| Display | Integrated LCD display |
| Power Supply | 12-24V vehicle adapter |
| Mounting | Suction cup holder with locking switch |
| Dimensions (Approx.) | Not specified, typical dashcam size |
| Weight (Approx.) | Not specified, typical dashcam weight |
| Maintenance | Keep dry, avoid high humidity and temperature changes |
| Safety | Do not open, short-circuit, or use outdoors; keep away from children |
| Spare Parts / Repairability | Contact manufacturer; unauthorized repair voids warranty |
| Disposal | WEEE compliant, recycle separately from household waste |
| General Information | User manual available for download in PDF |
Frequently Asked Questions - 302626 Aplic
User questions about 302626 Aplic
0 question about this device. Answer the ones you know or ask your own.
Ask a new question about this device
Download the instructions for your Camera in PDF format for free! Find your manual 302626 - Aplic and take your electronic device back in hand. On this page are published all the documents necessary for the use of your device. 302626 by Aplic.
USER MANUAL 302626 Aplic
natural_image
Blue abstract logo shape resembling a stylized letter 'Q' or partial circle (no text or symbols)aplic
DASHCAM, FULL HD
flowchart
graph TD
    A["Camera"] --> B["0"]
    B --> C["AWB"]
    C --> D["10"]
    D --> E["ISO AUTO"]
    E --> F["14:24:37"]
    F --> G["01/01/2016"]
    G --> H["3M Display"]
    H --> I["000001"]
    I --> J["1"]
    style H fill:#000,stroke:#fff,color:#fff
    note right of H 3M
    note right of G 10
    note right of G 9
natural_image
Two identical diagrams showing a mechanical device with a central component and two directional arrows indicating motion (no text or symbols)
Thank you for choosing an aplic product. Please read the following user manual carefully to have an enjoyable experience with your purchased product.
1 Scope of supply
- Dashcam
• 12-24V vehicle adapter - USB to miniUSB cable
- Holder with suction cup
2 Technical data
| Charging voltage DC 5V | |
| Battery capacity 300mAh | |
| Video resolutions 1080p, 720p, WVGA, VGA, QVGA | |
| Camera resolutions 12M, 10M, 8M, 5M, 3M, 2MHD, 1.3M, VGA, | |
| Memory external microSD card (up to 32GB) | |
| Languages 13 different language options | |
| Features • Motion detection• G sensor• Auto Off• Loop recording• Date display |
3 Functions
The Dashcam allows you to make videos or take photos and save them externally. Dashcams are popular in many countries. Under certain circumstances, the recordings can be useful as evidence in insurance claims or other legal proceedings.
Note: In Germany, recordings with Dashcams have not been acknowledged so far as evidence in most court or insurance cases.
4 Product details

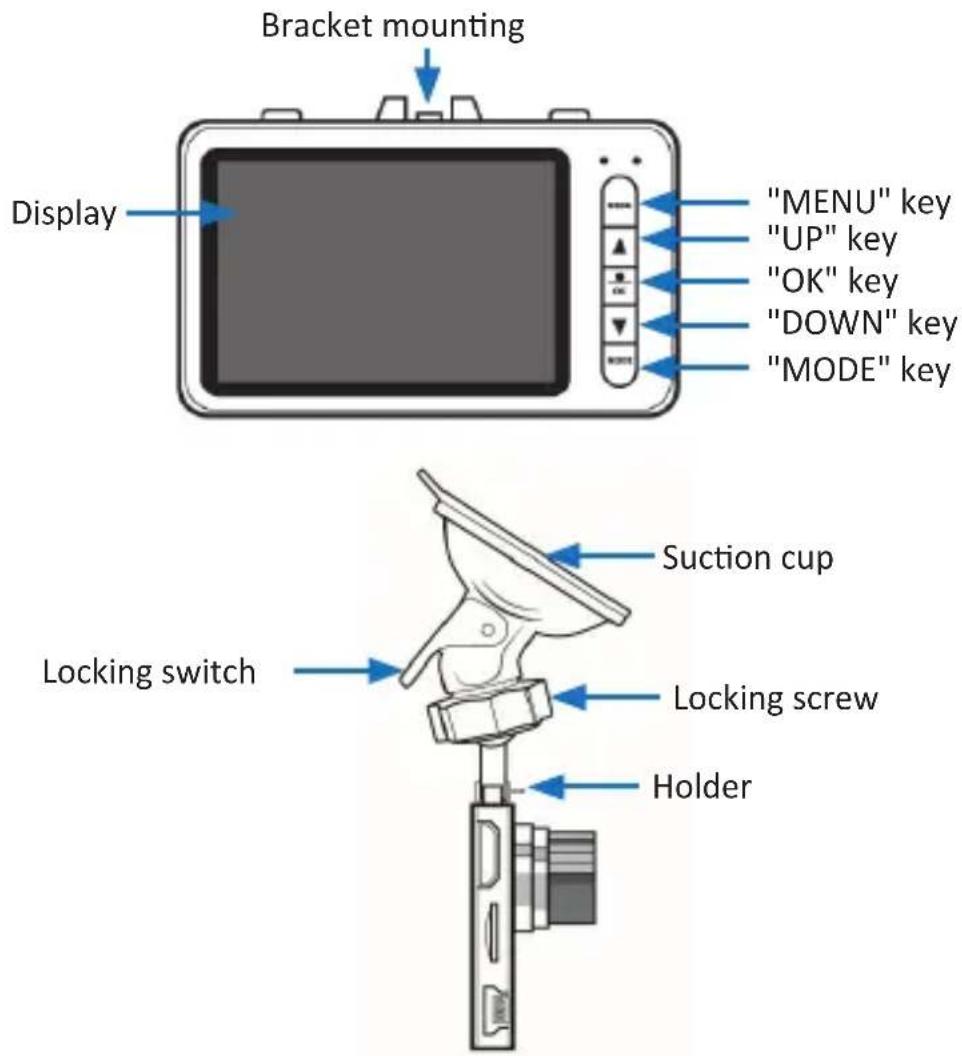
5 Special functions
G sensor
The Dashcam is equipped with a G sensor. If the camera detects accelerations, delays or special movements (e.g. in the case of a collision or an unexpected acceleration), the recording starts and the recorded video material is protected from overwriting.
Alternatively, you have the option of protecting the latest recording by pressing the MENU key. Press the key again to switch off the function.
Motion detection
The motion detection should not be activated during driving. This mode is basically meant for video surveillance while the car is parked in a street for instance. In this case, ensure that power is supplied to the Dashcam by an external power source, e.g. a power bank. The Dashcam registers each and every motion in front of the camera and records it automatically.
Loop recording
In this mode, the Dashcam records a video. Whenever the memory space is completely exhausted, the device begins to overwrite the memory card. This feature extends the recording time in a limited memory space.
Media playback via HDMI
Thanks to the miniHDMI interface, it is possible to playback the contents of the SD card on a TV.
6 Key functions
| ON/OFF Key • Press and hold to switch on or switch off the devicePress while the camera is switched on to switch on or off the LED at the front side | |
| "MENU" key | • Press to open the Video and Settings menu• Press during active recording to protect the current recording from overwriting |
| "UP" key Up (navigation in the Menu) + zoom | |
| "OK" key Confirm (OK) | |
| "DOWN" key Down (navigation in the Menu) + zoom | |
| "MODE" key Press to change the mode (Video, Photo, Gallery) | |
| "RESET" key Press to reset the device |
7 Setting up
Insertion of the memory card
First insert a memory card with up to 32GB capacity in the SD-card slot of the camera.
Switch on / off
Press and hold the "ON/OFF" key to switch on or switch off the device. As soon as the vehicle adapter is connected to the camera in your car and the charging socket of the vehicle supplies the power, the camera is switched on. The moment the charging socket stops supplying power, the camera is switched off.
Change mode
Video mode is the default mode of the camera. When the device is switched on, press the "MODE" key to change between Video, Photo and Gallery mode.
Video mode
If the Dashcam is connected to the power supply, the video recording starts directly after the device is switched on. Press the "OK" key to start or stop the video recording.
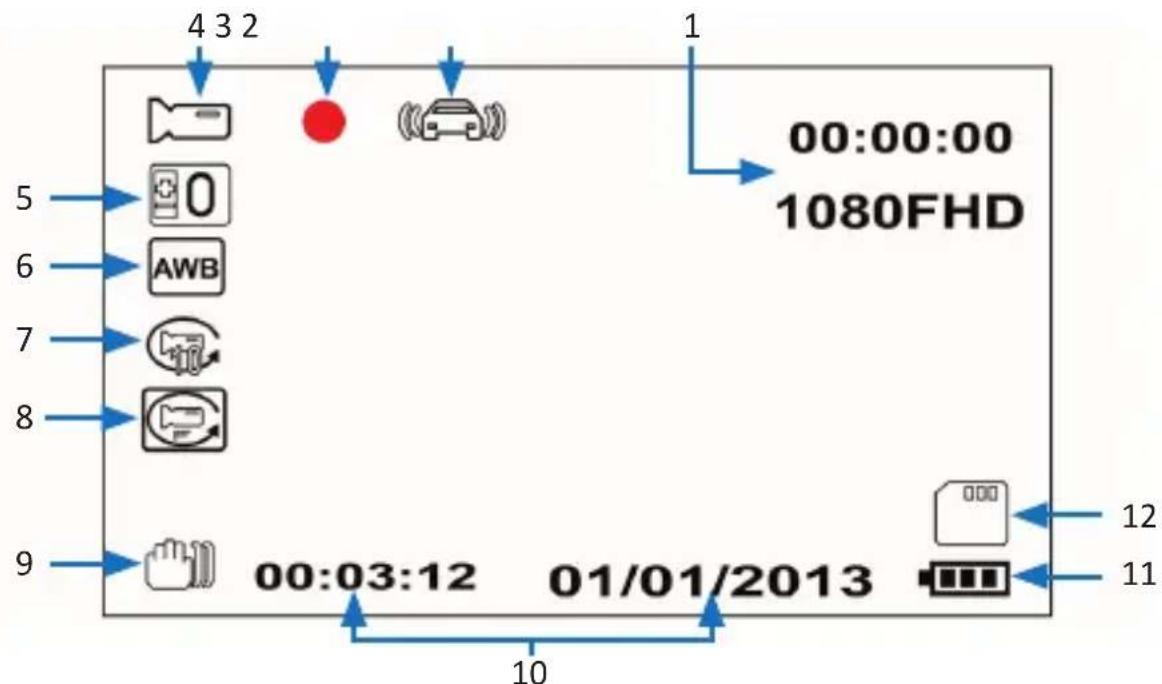
| 1 Resolution and recording time |
| 2 G sensor |
| 3 Recording |
| 4 Mode (Camera, Photo, Video) |
| 5 Exposure |
| 6 White balance |
| 7 Loop recording time |
| 8 Motion sensor (is switched on if the symbol appears on the display) |
| 9 Anti vibration |
| 10 Time and date |
| 11 Battery capacity |
| 12 SD card inserted |
Video settings menu
Press the "MENU" key to open the Video settings menu Pause the running video by pressing the "OK" key, before you open the menu. Then the following window is displayed.
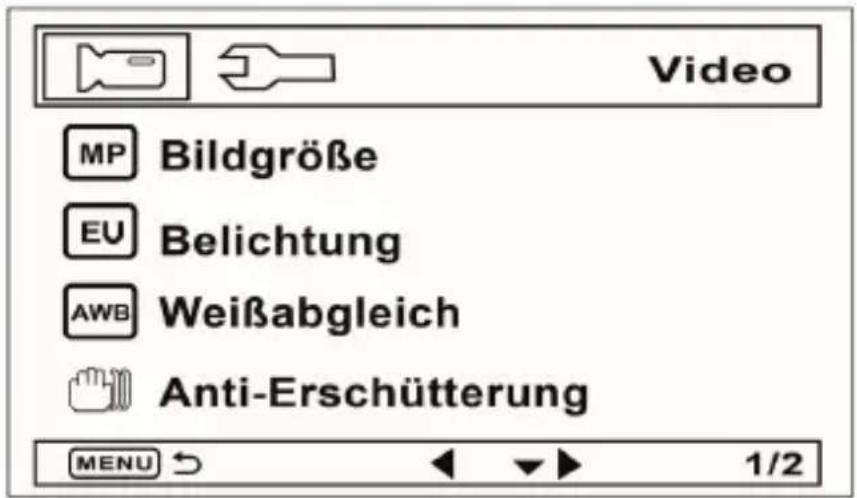
You can change all video settings in this menu and navigate through the menu using the "UP" and "DOWN" keys. With the "OK" key you can open the respective menu and change the settings.
| Setting Brief description | |
| Image size Setting of image size | |
| Exposure Adjustment of exposure | |
| White balance Adjustment of white balance | |
| Anti vibration Switch Anti vibration mode on or off | |
| Loop recording Adjust or switch off Loop recording function | |
| Motion detection Switch Motion detection function on or off | |
| Audio recording Audio recording settings (switch on or off) | |
| Date display Display or hide date |
Photo mode
If the Dashcam is connected to the power supply, the video recording starts directly after the device is switched on. To reach the Photo mode, press the MODE key until the photo symbol is shown on the display.

| 1 Resolution and number of possible photos |
| 2 Mode (Camera, Photo, Video) |
| 3 Exposure |
| 4 White balance |
| 5 Pre-settings (e.g. portrait, night portrait, etc.) |
| 6 Timer duration |
| 7 ISO setting |
| 8 Anti vibration |
| 9 Time and date |
| 10 Battery capacity |
| 11 SD card inserted |
Photo settings menu
Press the "MENU" key in the Photo mode to open the Photo menu. Then the following window is displayed.

In this menu you can change all photo settings. You can navigate in the menu using the "UP" and "DOWN" keys and open the respective menu with "OK", and change the settings.
| Setting Brief description | |
| Record mode Timer settings | |
| Resolution Adjustment of resolution | |
| Quality Adjustment of quality | |
| Sharpness Adjustment of sharpness | |
| Exposure Adjustment of exposure | |
| White balance Adjustment of white balance | |
| Colour Colour settings | |
| ISO ISO setting | |
| Scene Scene options | |
| Face detection Face detection on or off | |
| Anti vibration Anti vibration mode switch on or off |
System settings
Press the "MENU" key in the Video or Camera mode twice to reach the System settings. The following table shows you the setting options in this menu. You can navigate in the respective menu using the "UP" and "DOWN" keys. With "OK" key confirm your setting..
| Setting Brief description | |
| Date Date and time settings (on/off/setting) | |
| Auto off Set automatic switch off | |
| G sensor G sensor settings | |
| License no. Determine licence number (shown in the video) | |
| Acoustic signal Key tones on or off | |
| Back light Set time of back light (1min/ 3min/5min/off) | |
| Language Language settings | |
| Frequency Frequency settings (50Hz / 60Hz) | |
| TV mode TV mode settings (PAL/NTSC) | |
| Image rotation Image rotation (180°) on/off | |
| Format Memory formatting | |
| Factory settings | Resetting to factory settings |
| FW version Call up firmware | |
Date and time setting
Select "Date" in the System settings and confirm with the "OK" key. Select "On" or "Off" to switch on or off the date. To adjust date and time, navigate up to "adjust date" and confirm with the "OK" key. Using the "UP" and "DOWN" keys you can increase or decrease the values. Confirm the settings in the Date and time settings with the "MODE" key.
8 Installation
To fix the holder with the suction cup on the camera, insert the holder into the slot at the camera until it locks into place. To remove the holder, press the locking downwards and pull out the holder.

Mounting place
Ensure that the Dashcam is placed in such a way that it does not block your view during driving. It is recommended to attach the Dashcam behind the interior mirror. Guide the cable around the outside up to the vehicle charging socket. Connect the cable of the Dashcam to the charging adapter and insert the adapter into the vehicle charging socket.

natural_image
Two identical diagrams showing a mechanical device with a rotating blade and a base, each with an arrow indicating direction (no text or symbols present)
9 Safety instructions and liability disclaimer
Never try to open the device to carry out repairs or conversions. Avoid contact with mains voltages. Do not short-circuit the product. The device is not certified for use in the open air; only use it in dry conditions. Protect it from high humidity, water and snow. Keep it away from high temperatures. Do not subject the device to sudden changes in temperature or heavy vibration as this might damage electronic components.
Examine the device for damage before using it. The unit should not be used if it has received an impact or has been damaged in any other way. Please observe national regulations and restrictions. Do not use the device for purposes other than those described in the instructions. This product is not a toy. Keep it out of the reach of children or mentally impaired persons. Any repair or alteration to the device not carried out by the original supplier, will invalidate the warranty or guarantee.
The product may only be used by persons who have read and understood these instructions. The device specifications may change without any separate prior notice to this effect.

10 Disposal instructions
Electrical and electronic devices may only be disposed of in accordance with the European WEEE Directive and not with household rubbish. Components must be disposed of or recycled separately as dangerous, toxic elements can inflict sustained damage on the environment if they are disposed of incorrectly. As a consumer, you are bound by the Electrical and Electronic Devices Act (ElektroG) to return electrical and electronic goods free of charge at the end of their useful life to the manufacturer, the place of purchase or to specially set up, public collection points. The details in each case are governed by national law.
The symbol on the product, the operating instructions and/or the packaging refers to these regulations. By separating materials in this way, recycling and disposing of old devices, you are making an important contribution towards protecting our environment.

WEEE guideline: 2012/19/EU WEEE register number: DE 94495668
WD Plus GmbH, herewith declares that this product 302626/20161109SZ181 conforms to the principle requirements and other relevant stipulations. The complete Declaration of Conformity can be obtained from: WD Plus GmbH, Wohlenbergstraße 16, 30179 Hanover
Notes



WD Plus GmbH
- aplic
- Scope of supply
- Technical data
- Functions
- Product details
- Special functions
- G sensor
- Motion detection
- Loop recording
- Media playback via HDMI
- Setting up
- Insertion of the memory card
- Switch on / off
- Change mode
- Video mode
- Video settings menu
- Photo mode
- Photo settings menu
- System settings
- Date and time setting
- Installation
- Mounting place
- Safety instructions and liability disclaimer
- Disposal instructions
- Notes
Brand : Aplic
Model : 302626
Category : Camera