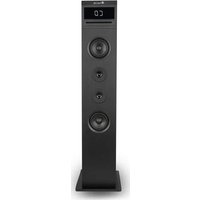
Sky Gazer - Docking station NGS - Free user manual and instructions
Find the device manual for free Sky Gazer NGS in PDF.


| Product type | Docking station with speaker |
| Brand | NGS |
| Model | Sky Gazer |
| Output power | 120 W |
| Audio configuration | 2.1 system (1 woofer + 2 tweeters) |
| CD player | Yes, CD slot |
| Wireless charger | Yes, 10 W |
| Display | LED |
| Bluetooth connectivity | Yes, 10 meter range |
| USB audio input | Yes |
| USB charging port | 5 V / 2 A |
| AUX input | Yes (3.5 mm jack) |
| Remote control | Included |
| Power supply | Mains (power cable provided) |
| Main functions | Timer, alarm, silent mode, repeat, random, CD playback, USB, AUX, Bluetooth |
| Time setting | Yes, via TIME/ALARM button |
| Cleaning and maintenance | Clean with a soft dry cloth. Avoid moisture and abrasive products. |
| Safety | Do not force screws to avoid damaging the speakers. Disconnect before cleaning. |
| Repairability | Spare parts available through NGS after-sales service (not provided in the manual) |
| General information | 72-page user manual available online |
Frequently Asked Questions - Sky Gazer NGS
User questions about Sky Gazer NGS
0 question about this device. Answer the ones you know or ask your own.
Ask a new question about this device
Download the instructions for your Docking station in PDF format for free! Find your manual Sky Gazer - NGS and take your electronic device back in hand. On this page are published all the documents necessary for the use of your device. Sky Gazer by NGS.
USER MANUAL Sky Gazer NGS
ENGLISH I FRANÇAIS I ESPAÑOL I DEUTSCH
ITALIANO I PORTUGUÊS I POLSKI I NEDERLANDS
ČEŠTINA I SLOVENČINA I EΛΛΗΝΙΚΑ


www.ngs.eu
USER'S MANUAL
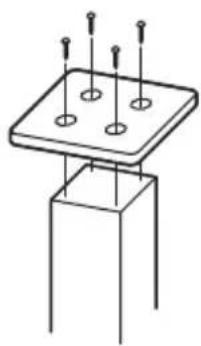
INSTALLATION DESCRIPTION
- After all the screws are screwed in, tighten them evenly clockwise to avoid misplacement of the stand and the base plate.
- Do not force excessively in case of irreparable damage to the speaker cabinet.
natural_image
Simple line drawing of a rectangular base with four circular holes and three vertical supports (no text or symbols)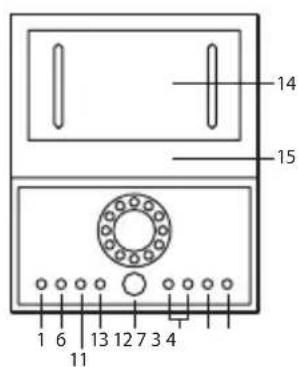

ENGLISH

NGS
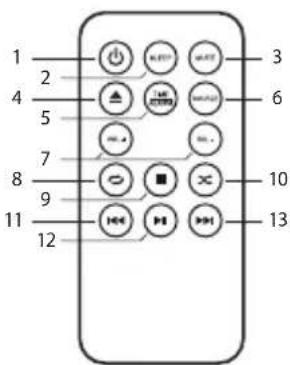
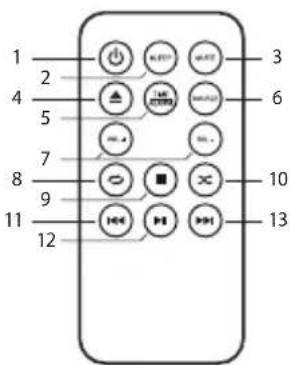
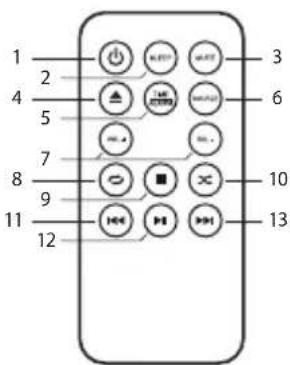
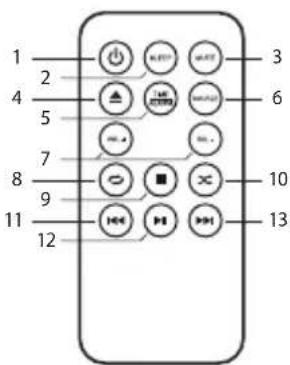
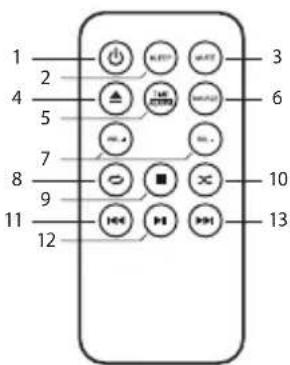
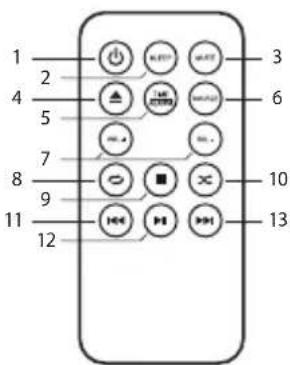
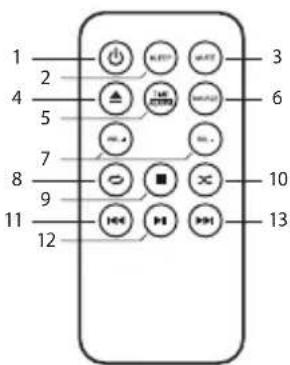
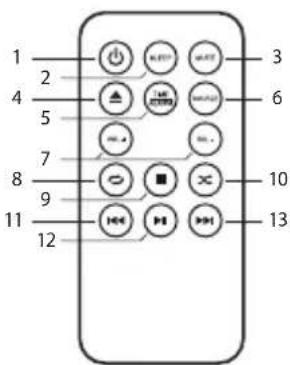
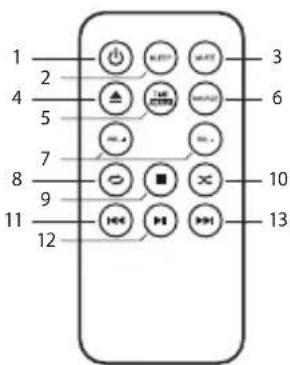
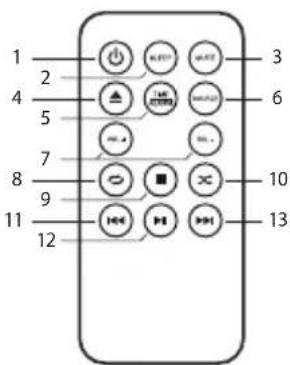
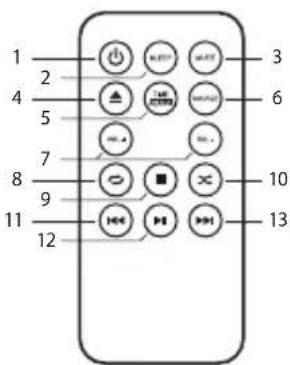
1 Power ON/OFF
2 Auto power off mode: Press repeatedly to select the timer and the speaker will turn off when the time is up.
3 Mute: Mutes the speaker.
4 Eject CD tray
5 Time / Alarm: Press to enable or disable the alarm and set the time.
6 Change mode: CD, Bluetooth, USB, AUX.
7 Audio volume
8 Repeat: Only in CD mode.
9 Stop
10 Random: Only in CD mode.
11 Skip to previous track
12 Play / Pause: Hold for 5 seconds to disconnect the connected Bluetooth device.
13 Skip to next track
14 Wireless charging base
15 Support for mobile device or tablet
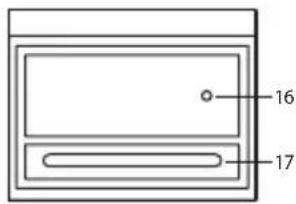
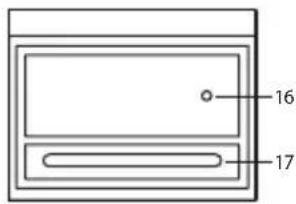
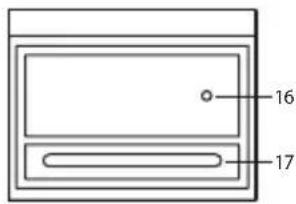
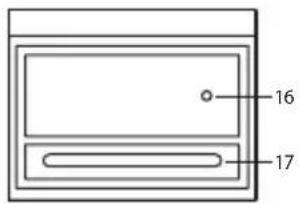
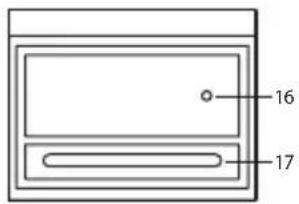
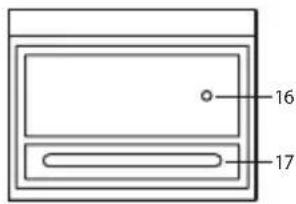
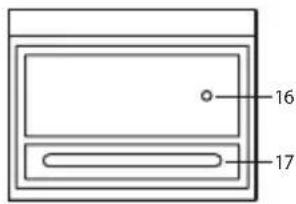
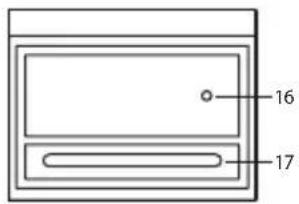
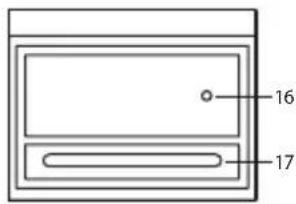
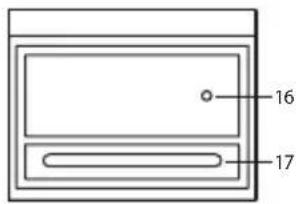
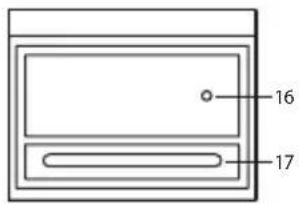
16 LED display
17 CD slot
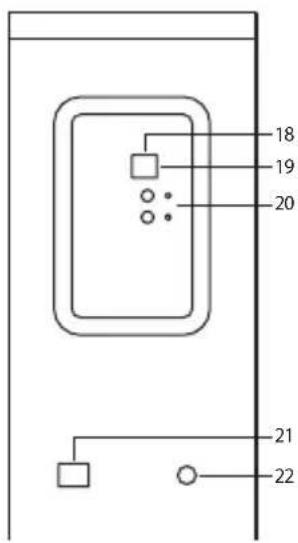
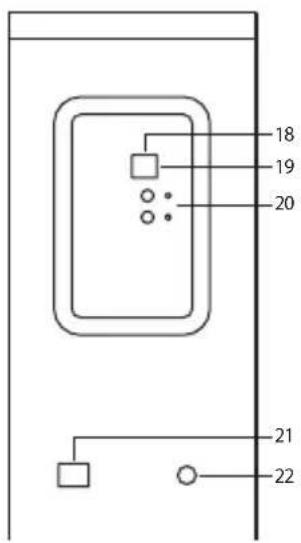
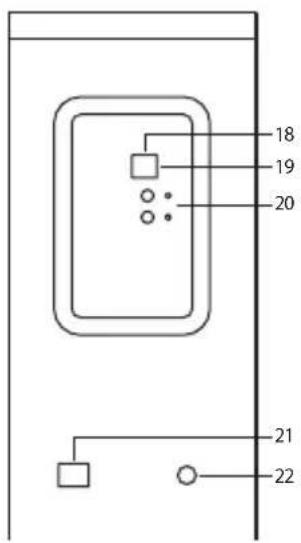
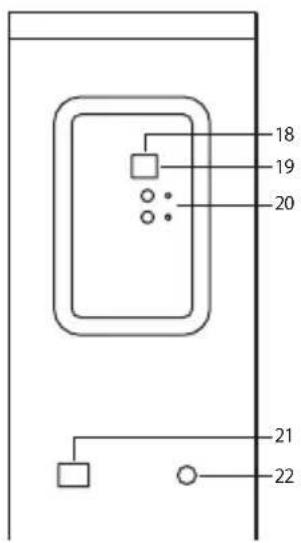
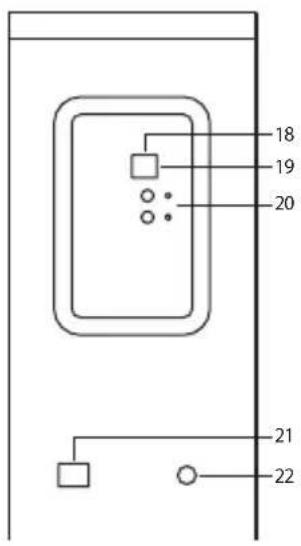
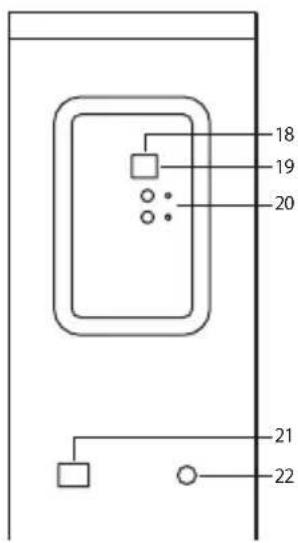
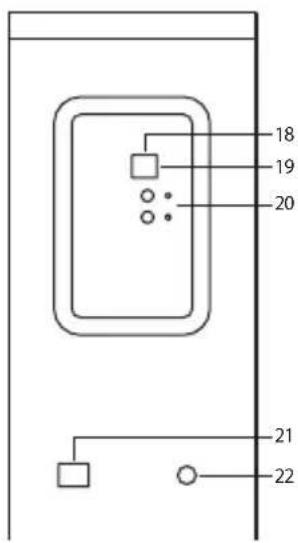
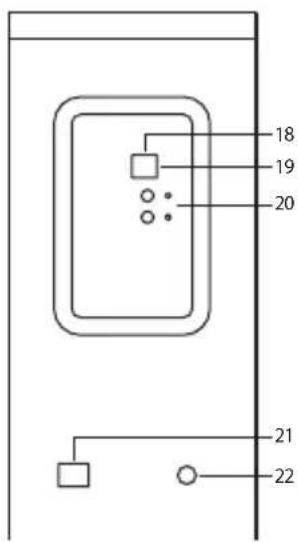
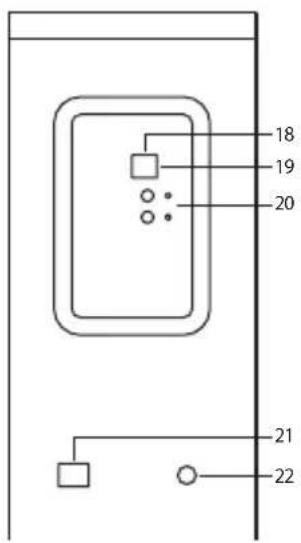
18 USB charging input
19 USB audio input
20 AUX input
21 Power switch
22 Power cord
USER'S MANUAL
TIME SETUP
When the speaker is connected to the power supply, the display will show 00:00. To set the desired time, keep the loudspeaker connected to the power supply but turned off.
- Press TIME/ALARM. The numbers will flash.
- Press the buttons repeatedly until the correct time is selected.
- Press TIME/ALARM again to confirm the time and the next 2 digits of the minute hand will flash.
- Press I again to select the minutes and then press TIME/ALARM to save the time.
ALARM SETUP
This speaker can be used as an alarm.
- Make sure the speaker is turned off.
-
Make sure you have set the time correctly.
-
Press and hold the TIME/ALARM button. The display will show ON. Switch between ON and OFF with the ▶ button and press TIME/ALARM again, when the display will flash.
- Press I do select the alarm time. Confirm by pressing TIME/ALARM. Select the minute and press TIME/ALARM again.
- Finally select CD/USB and confirm by pressing TIME/ALARM. As a result, the speaker will start to play at the desired time in the selected mode.
- The volume will gradually rise from 0 to 20.
SLEEP MODE SETUP
Press and hold the SLEEP button until the display flashes. Press again repeatedly until the desired time is selected. You can select from 90 minutes to 10 minutes. It will flash 3 times to indicate confirmation. If you want to cancel it, just repeat the process and select "00".
BLUETOOTH MODE
- Turn on the speaker and then switch to Bluetooth mode: a beep will sound and the display will show BT intermittently. Keep the speaker and Bluetooth enabled device within 10 meters or less of each other during paring process. Different environments may affect the transmission distance.
- Set your mobile phone or the Bluetooth enabled device to search for Bluetooth devices.
- When the Bluetooth enabled finds the speaker, select "NGS SKYGAZER" from the list of found devices.
- If required, enter the password "0000". Select OK or YES to pair the two units.
- After successfully being paired, BT will remain lit up on the screen.
- Press and hold the ▶ button for 5 seconds to enter the search mode.
AUX MODE
- Keep the unit powered on. Plug one end of the AUX cord to the headphone jack on your device (phone, tablet, MP3, etc.).
- Plug the other end of the AUX cord into the AUX jack on the speaker.
- Select the AUX playback mode with the SOURCE button.
- Use the connected device's audio controls for music playback.
USB PLAYBACK MODE
- Turn on the unit. Connect the USB device with MP3 music to the USB port and select the USB playback mode with the SOURCE button.
USER'S MANUAL
- Select CD mode with the SOURCE button.
- Insert a CD into the CD slot under the display.
- Press the▲ button to remove the CD.
- During playback, the elapsed time of the track being played will be shown on the display.
TECHNICAL SPECIFICATIONSCD MODE
Output power: 120W
2.1 speaker system
Woofer speaker x 1
Tweeter speaker x 2
CD player
Wireless charger (10W)
LED display
Bluetooth
USB audio input
USB charger 5V/2A
Aux In
Remote control
ENGLISH

NGS
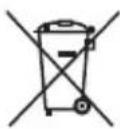
If at any time in the future you should need to dispose of this product please note that:
Waste electrical products should not be disposed of with household waste. Please recycle where facilities exist.
Check with your Local Authority or retailer for recycling advice.
(Waste Electrical and Electronic Equipment Directive)
MANUEL DE L'UTILISATEUR
INSTALLATION DESCRIPTION
natural_image
Simple line drawing of a rectangular base with four circular holes and three vertical supports (no text or symbols)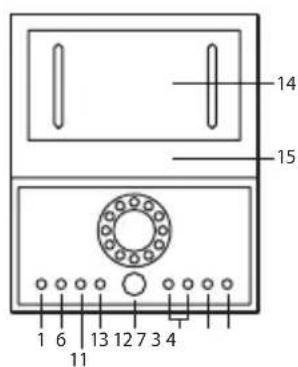
natural_image
Simple line drawing of a rectangular base with four circular holes and three vertical supports (no text or symbols)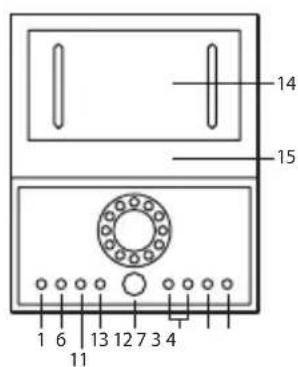
ESPAÑOL

NGS
natural_image
Simple line drawing of a rectangular base with four circular holes and three vertical supports (no text or symbols)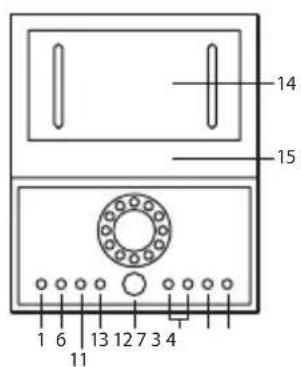
natural_image
Simple line drawing of a rectangular base with four circular holes and three vertical supports (no text or symbols)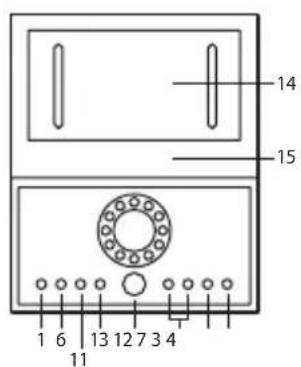
ITALIANO

NGS
natural_image
Simple line drawing of a rectangular base with four circular holes and three vertical supports (no text or symbols)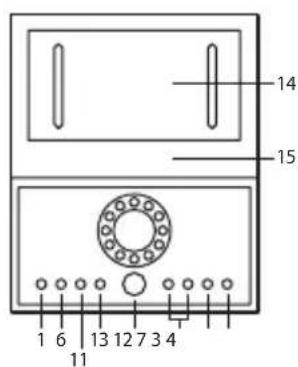
natural_image
Simple line drawing of a rectangular base with four circular holes and three vertical supports (no text or symbols)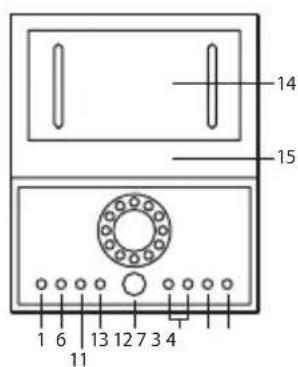
INSTALLATIE OMSCHRIJVING
natural_image
Simple line drawing of a rectangular base with four circular holes and three vertical supports (no text or symbols)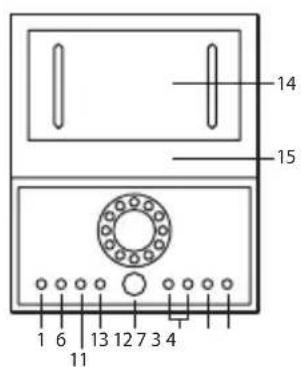

natural_image
Simple line drawing of a rectangular base with four circular holes and three vertical supports (no text or symbols)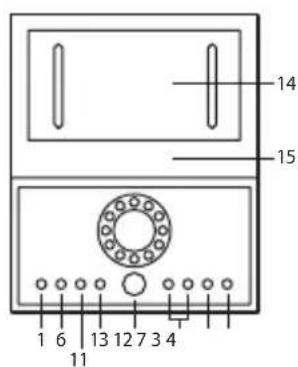
ČEŠTINA

NGS
natural_image
Simple line drawing of a rectangular base with four circular holes and three vertical supports (no text or symbols)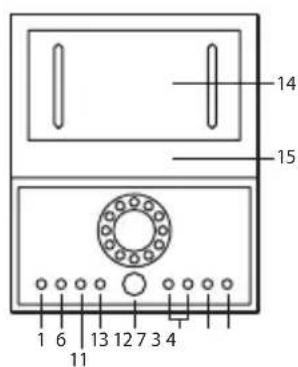
SLOVENČINA

NGS
natural_image
Simple line drawing of a rectangular base with four circular holes and vertical supports (no text or symbols)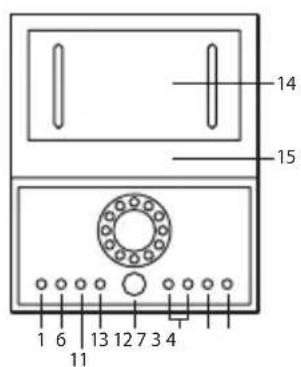
HAS BEEN TESTED AND FOUND IN CONFORMITY WITH THE FOLLOWING HARMONIZED EUROPEAN STANDARDS:
HA SIDO TESTADO EN CONFORMIDAD CON LAS SIGUIENTES NORMAS STANDARD EUROPEAS ARMONIZADAS:
ETSI EN 301 489-1 V 1.9.2 (2011-09) EN 62479:2010
ETSI EN 301 489-17 V 2.2.1 (2012-09) EN 60065:2014
ETSI EN 300 328 V 1.8.1 (2012-06)
AND THEREFORE COMPLY WITH THE ESSENTIAL REQUIREMENTS AND PROVISIONS OF THE FOLLOWING DIRECTIVES OF THE EUROPEAN PARLIAMENT AND EUROPEAN COUNCIL:
Y, POR LO TANTO, CUMPLE CON LOS REQUERIMIENTOS Y PROVISIONES DE LAS SIGUIENTES DIRECTIVAS DEL PARLAMENTO EUROPEO:
ELECTROMAGNETIC COMPATIBILITY DIRECTIVE (EMC) 2014/30/EU
RADIO EQUIPMENT DIRECTIVE 2014/53/EU
LOW VOLTAGE DIRECTIVE (LVD) 2014/35/EU
ROHS DIRECTIVE 2011/65/EU
DIRECTIVA DE COMPATIBILIDAD ELECTROMAGNÉTICA (EMC) 2014/30/EU
RAÚL MARTÍN
PRODUCT MANAGER
LURBE GRUP S.A, SAN SEBASTIÁN, ESPAGNE, SOUS SA RESPONSABILITÉ EXCLUSIVE, CERTIFIE LA CONFORMITÉ DU PRODUIT :
LURBE GRUP S.A, SAN SEBASTIÁN, ESPAÑA, DECLARA SOB A SUA EXCLUSIVA RESPONSABILIDADE A CONFORMIDADE DO PRODUTO:
FR
PT
NGS: HAUT-PARLEUR BLUETOOTH NGS / MODÈLE: SKYGAZER
NGS: ALTO-FALANTE BLUETOOTH NGS / MODELO: SKYGAZER
A ÉTÉ TESTÉ CONFORMÉMENT AUX NORMES STANDARD EUROPÉENNES HARMONISÉES SUIVANTES :
FOITESTADO EM CONFORMIDADE COM AS SEGUINTES NORMAS STANDARD EUROPEIAS HARMONIZADAS:
ETSI EN 301 489-1 V 1.9.2 (2011-09) EN 62479:2010
ETSI EN 301 489-17 V 2.2.1 (2012-09) EN 60065:2014
ETSI EN 300 328 V 1.8.1 (2012-06)
ET RESPECTE DONC LES EXIGENCES ET LES DISPOSITIONS DES DIRECTIVES SUIVANTES DU PARLEMENT EUROPÉEN :
E, POR CONSEGUINTE, CUMPRE COM OS REQUISITOS E PROVISÕES DAS SEGUINTES DIRECTIVAS DO PARLAMENTO EUROPEU:
DIRECTIVE DE COMPATIBILITÉ ÉLECTROMAGNÉTIQUE (EMC) 2014/30/EU
DIRECTIVE SUR LES ÉQUIPEMENTS RADIO 2014/53/EU
DIRECTIVE BASSE TENSION (LVD) 2014/35/EU
DIRECTIVE ROHS 2011/65/EU
DIRECTIVA DE COMPATIBILIDADE ELECTROMAGNÉTICA (EMC) 2014/30/EU
RAÚL MARTÍN
PRODUCT MANAGER
CE

technical support: www.ngs.eu/support
www.ngs.eu
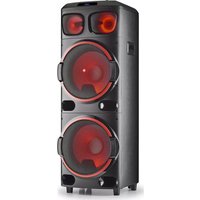
Brand : NGS
Model : Sky Gazer
Category : Docking station