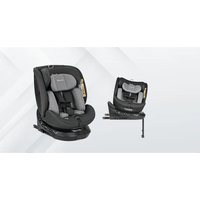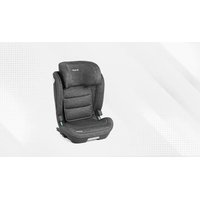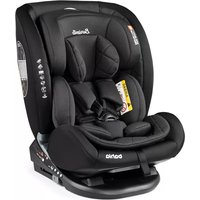
Bahia - Child car seat Burigotto - Free user manual and instructions
Find the device manual for free Bahia Burigotto in PDF.


User questions about Bahia Burigotto
0 question about this device. Answer the ones you know or ask your own.
Ask a new question about this device
Download the instructions for your Child car seat in PDF format for free! Find your manual Bahia - Burigotto and take your electronic device back in hand. On this page are published all the documents necessary for the use of your device. Bahia by Burigotto.
USER MANUAL Bahia Burigotto
EN Instructions for use
FR Noticed'emploi
Child Restraint System
natural_image
Line drawing of a car comfort seat with seats and seatbelt (no text or symbols)Bwrigotto

IMPORTANT READ INSTRUCTION MANUAL before using this child restraint
text_image
Technical diagram of a car seat assembly with numbered parts and labeled featurestext_image
AIRBAG No pictogram A family can sit up A family can sit up A family can sit upnatural_image
Line drawing of a car seatbelt seat with hand inserting a button (no text or symbols)natural_image
Diagram of a car seatbelt buckle with blue belt and orange belt (no text or symbols)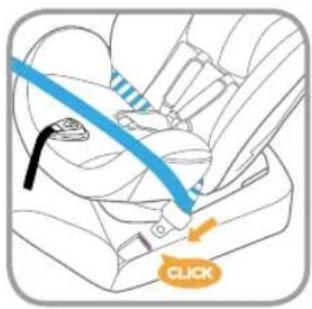
text_image
Diagram showing car seatbelt usage with a blue belt and an orange click button labeled 'CLICK'text_image
Medical illustration showing a car seatbelting technique with labeled steps 1 and 2, illustrating how to adjust the seatbelt.natural_image
Illustration of a syringe with a blue tip and red grip, marked with an 'X' symbol (no text or labels)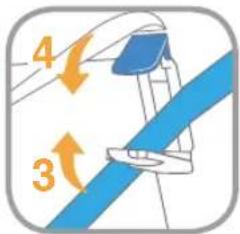
text_image
4 3text_image
Technical diagram of a mechanical device with labeled parts and directional arrows indicating motion or force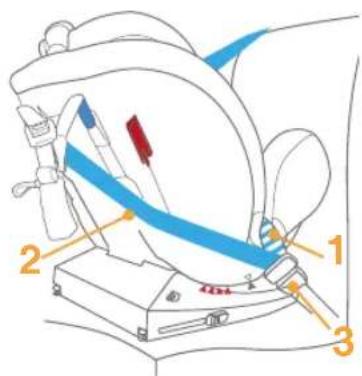
text_image
Technical diagram of a medical device with numbered parts labeled 1, 2, and 3natural_image
Simple line drawing of a symmetrical abstract shape with no text or symbolsnatural_image
Simple line drawing of a robot head with no text or symbolsnatural_image
Illustration of hands holding a medical device with a yellow arrow indicating motion (no text or symbols)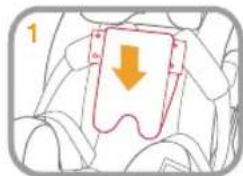
text_image
1natural_image
Simple line drawing of a person holding a rectangular object, no text or symbols presentnatural_image
Illustration of a hand holding a stylized object with arrows indicating motion (no text or symbols)natural_image
Line drawing of a car seat assembly with hands adjusting the seatbelt (no text or symbols)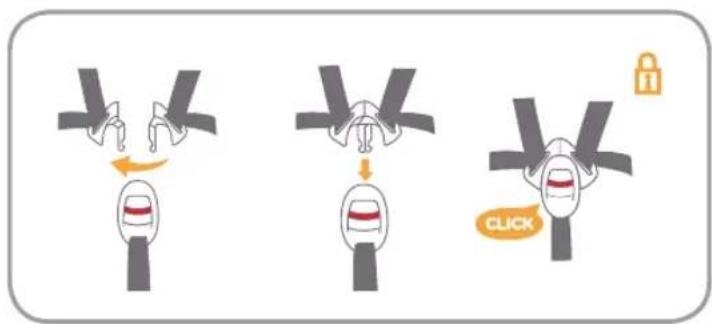
text_image
Diagram illustrating three steps of a car door lock operation: before, after, and after click.text_image
Diagram showing a car seatbelt with a red belt and orange arrow indicating direction, labeled with letters 'i' and 'li'.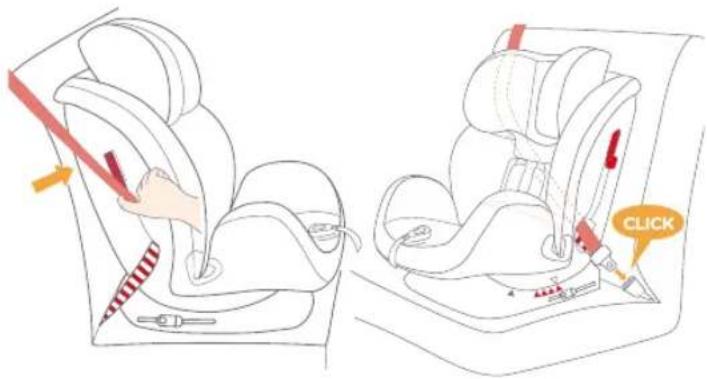
text_image
Diagram showing car seat assembly with a hand using a red tool to press the seat, labeled 'CLICK' with an orange speech bubble.natural_image
Illustration of a person using a tool to adjust or install a seatbelt, with no visible text or symbols.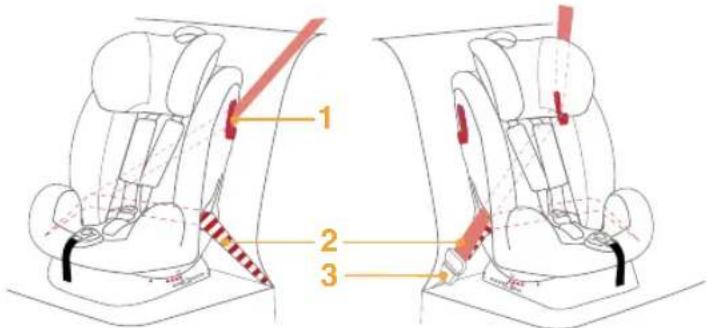
text_image
Diagram showing car seat assembly with numbered parts and safety markingsnatural_image
Simple line drawing of a container with four hanging items and directional arrows indicating movement (no text or symbols)text_image
Diagram showing a car seat with a red trigger and a hand holding a push button, alongside a magnified view of the device's handle.text_image
PUSH 1 X ✓ CLICK OK X2text_image
Diagram showing a car seatbelt buckle with labeled parts 1 and 2, indicating seatbelt usage.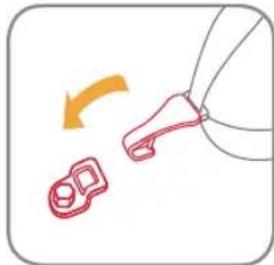
natural_image
Diagram showing a red outline of a mechanical component and an orange arrow indicating rotation (no text or symbols)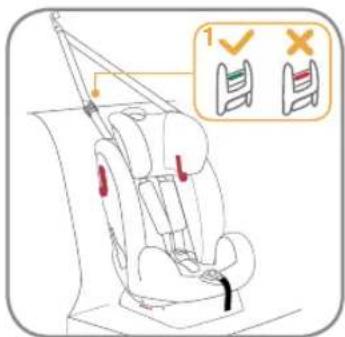
text_image
Diagram showing car seatbelt usage with checkmark and X mark instructions for lifting a seatbeltnatural_image
Diagram of a medical procedure with arrows indicating movement or force direction (no text or symbols)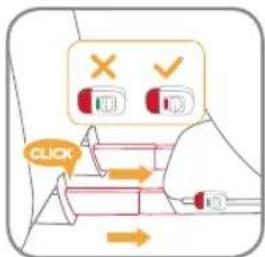
text_image
CLICK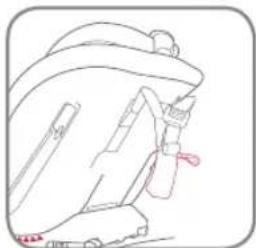
natural_image
Line drawing of a car seatbelt with a red belt (no text or symbols)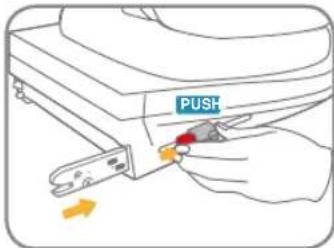
text_image
PUSHnatural_image
Illustration of a car seatbelt with hands adjusting the seatbelt (no text or symbols)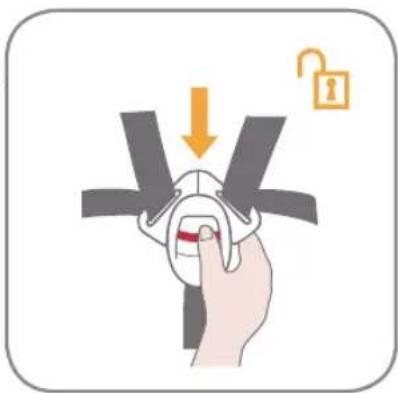
natural_image
Illustration of a hand holding a device with a lock icon and downward arrow (no text or symbols)text_image
Illustration showing a child in a car seatbelt with a checkmark and arrow indicating the correct seatbelt replacement.Modalità Junior
text_image
Diagram of car seat assembly with numbered parts and labeled parts in Chinese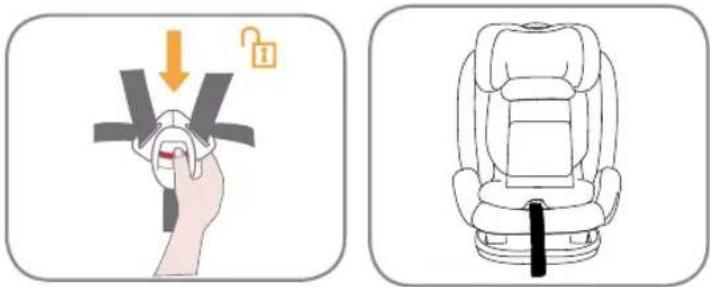
text_image
Diagram showing car seat lock mechanism and seat assembly instructions with Chinese labelstext_image
Illustration showing a child in a car seat with two directional arrows indicating movement or force, labeled 1 and 2.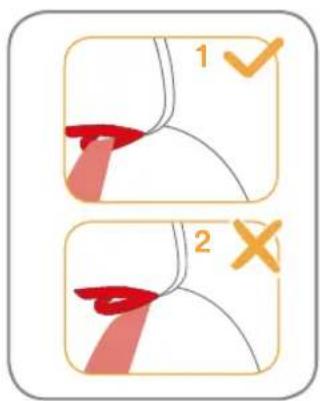
text_image
1 2text_image
Illustration showing a child in a car seat with four numbered instructions for using a device to interact with another person.This child restraint is approved to UN ECE regulation 44, 04 series of amendments.
Please read all the instructions in this manual before installing and using the product.
Congratulations
You have purchased a high quality, fully certified child safety child restraint.
This product is suitable for the use of children weighing UNDER 36kg (approximately 12 years old or under).
Carefully read this Instruction Manual and follow the installing steps because this is the ONLY way to protect your child from an accident, and to provide comfort to your child while using this product.
Keep this instruction manual for future reference.
Make sure that your vehicle is equipped with 3-point retractor safety-belt.
Seat belts may be different in design and length according to maker, manufacturing date, and type of the vehicle. This child restraint is only suitable for use in the listed vehicles fitted with 3-point retractor safety-belts and approved to UN ECE regulation 16. This child restraint is approved to and UN ECE regulation 44, 04 series of amendments.
For warranty information.
! Please keep the instruction manual in the storage compartment of the rear cover for future reference.
Parts List
Make sure all parts are available before assembly. If any part is missing, please contact local retailer. No tools are required for assembly.
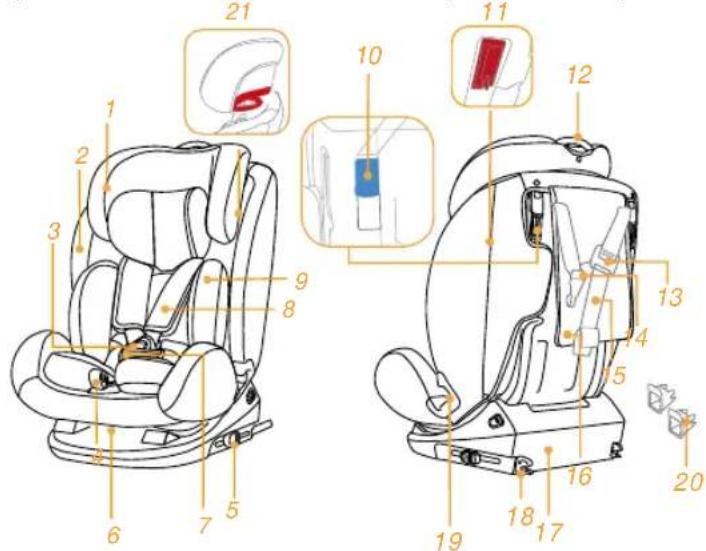
text_image
Technical diagram of a car seat assembly with numbered parts and labeled features1 Head Support
2 Seat cover
3 Buckle
4 Webbing Adjuster
5 ISOFIX Attachments Releasing Button
6 Recline Adjustment Handle
7 Crotch Strap
8 Shoulder Strap
9 Infant Insert(0-9kg)
10 Rear-facing Lock-off
11 Group 1 Lock-off Device
12 Head Support Adjustment Lever
13 Tether Strap Adjuster
14 Tether Hook
15 Top Tether Strap
16 Instruction Manual Storage Compartment
17 Base
18 ISOFIX Attachments Connector
19 Seat Belt Guiding
20 ISOFIX Attachments Guides
21 Seat Belt Guiding Gr2+3(15-36kg)
Soft goods include Head Support, Seat Pad, Shoulder Strap, Crotch Strap and Infant Insert. Please make sure there are no missing parts. Please contact the retailer if anything is missing.
GENERAL SAFETY NOTES
- This child restraint is designed ONLY for child weighing under 36kg (approximately 12 years old or under).
- Any straps holding the restraint to the vehicle should be tight, that any straps restraining the child should be adjusted to the child's body, and that straps should not be twisted.
- When use this child restraint in baby or toddler mode, the safety belt must be used correctly, and ensure that any lap strap is worn low down, so that the pelvis is firmly engaged.
- The child restraint should be changed when it has been subject to violent stresses in an accident. An accident can cause damage to the child restraint that you cannot see.
- Concern the danger of making any alterations or additions to the device without the approval of the Type Approval Authority, and a danger of not following closely the installation instructions provided by the child restraint manufacturer.
- Please keep this child restraint away from sunlight, otherwise it may be too hot for the child's skin.
- Child is not left in the child restraint system unattended.
- Any luggage or other objects liable to cause injuries in the event of a collision shall be properly secured.
- The child restraint shall not be used without the soft goods.
- The soft goods should not be replaced with any other than the one recommended by the manufacturer, because the soft goods constitutes an integral part of the restraint performance.
- DO NOT use any load bearing contact points other than those described in the instructions and marked in the child restraint.
- NO child restraint can guarantee full protection from injury in an accident. However, proper use of this child restraint will reduce the risk of serious injury or death to your child.
- DO NOT use forward facing mode before the child's weight exceeds 9kg.
- DO NOT use or install this child restraint until you read and understand
the instructions in this manual and in your vehicle owner's manual.
- DO NOT use this child restraint if it has damaged or missing parts.
- DO NOT have your child in unfitted clothes when use this child restraint in baby or toddler mode, because this may prevent your child from being properly and securely fastened by the shoulder harnesses and the harnesses between thighs.
- DO NOT leave this child restraint unbelted or unsecured in your vehicle because unsecured child restraint can be thrown around and may injure occupants in a sharp turn, sudden stop, or collision. Remove it if not in regular use.
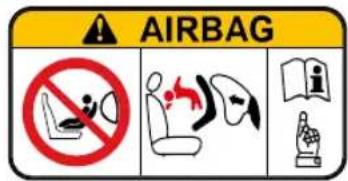
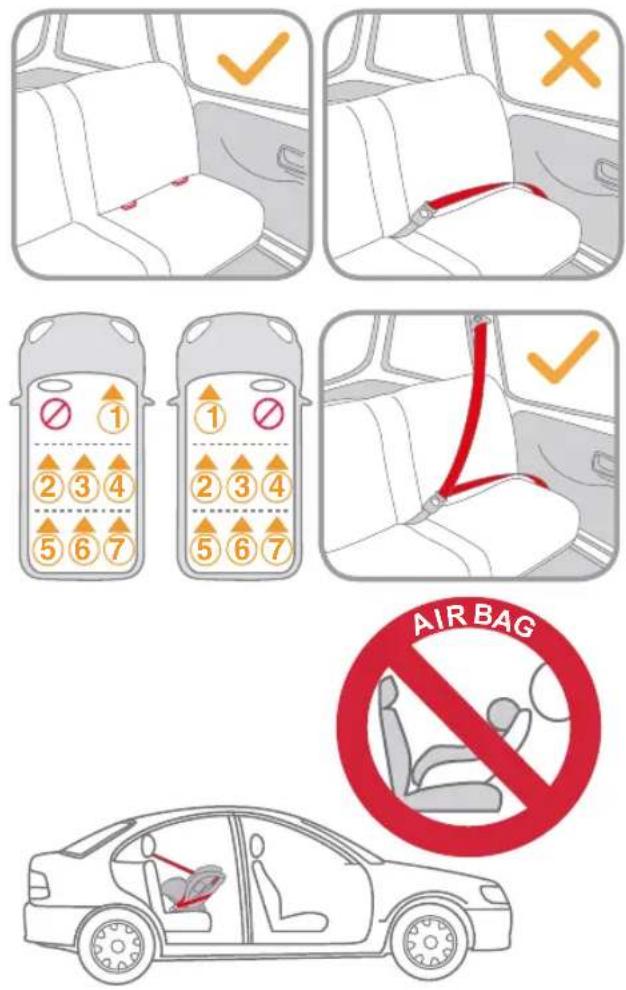
- DO NOT place the child restraint in seating positions where an active frontal airbag is installed if your child is still in rear facing mode.
- NEVER use a second-hand child restraint or a child restraint whose history you do not know because they may have structural damage that endangers your child's safety.
- NEVER use ropes or any other substitutes in place of seat belts in case of injuries from restraint.
- DO NOT use this child restraint as a regular chair as it tends to fall down and injure the child.
- DO NOT put anything other than the recommended inner cushions in this child restraint.
- DO NOT carry this child restraint with a child in it.
- DO NOT allow the child restraint harness or buckles to become trapped or caught in the vehicle seat or door.
- To avoid suffocation, remove plastic bag and packaging materials before using this product. The plastic bag and packaging materials should then be kept away from babies and children.
- Remove this child restraint from the vehicle seat when it is not in use for a long period of time.
- Consult the distributor for issues concerning maintenance, repair and part replacement.
- Frequently check the ISOFIX attachments guides for dirt and clean them if necessary. Reliability can be effected by ingress of dirt, dust, food particles etc.
WARNING
DO NOT install this child restraint under the following conditions:
- Vehicle seats with 2-point safety belts.
- Vehicle seats facing sideward or rearward with respect to the running direction of the vehicle.
- Vehicle seats unstable during installation.
Emergency
In case of emergency or accidents, it is most important to have your child taken care of with first aid and medical treatment immediately.
Product Information
Read all the instructions in this manual before using this product. If in doubt, consult either the child restraint manufacturer or the retailer.
Isofix Information
- This is an ISOFIX CHILD RESTRAINT SYSTEM. It is approved to Regulation No. 44, 04 series of amendments for general use in vehicles fitted with ISOFIX anchorages systems.
- It will fit vehicles with positions approved as ISOFIX positions (as detailed in the vehicle handbook), depending on the category of the child seat and of the fixture.
- The mass group and the ISOFIX size class for which this device is intended is: Group I (9-18kg) B1
Universal category Information
- This is a installed 'Universal' child restraint. It is approved to UN ECE regulation 44, 04 series of amendments, for general use in vehicles and it will fit most, but not all, car seats.
-
A correct fit is likely if the vehicle manufacturer has declared in the vehicle handbook that the vehicle is capable of accepting a "Universal" child restraint for this age group.
-
This child restraint has been classified as "Universal" under more stringent conditions than those which applied to earlier designs which do not carry this notice.
- If in doubt, consult either the child restraint manufacturer or the retailer.
Semi-universal category Information
This child restraint is classified for Semi-universal use and is suitable for fixing into the seat positions of the following cars:
| CAR FRONT SEAT REAR SEATS | |||
| all the vehicles with Side Centre | |||
| Anchorage No Yes No | |||
- Only suitable if the approved vehicles are fitted with 3 point approved to UN/ECE Regulation No. 16 or other equivalent standards.
- DO NOT place the child restraint in seating positions where an active frontal airbag is installed if your child is still in rear facing mode.
- DO NOT use forward facing mode before the child's weight exceeds 9kg.
text_image
AIRBAG No i eConcerns on Installation
text_image
AIR BAGThis child seat offers a variety of installation options. The following table indicates the types of installation for respective groups:
| Gr | Weight | Installation Method | Child Installation Method | Direction of installation |
| 0+1 | 0-18Kg | Vehicle 3 Point safety Belt | 5 Points Harness | rearward facing |
| 1 | 9-18Kg | Isofix Attachment + Top Teather | 5 Points Harness | forward facing |
| 1 | 9-18Kg | Vehicle 3 Point safety Belt | 5 Points Harness | forward facing |
| 2+3 | 15-36Kg | Vehicle 3 Point safety Belt + Isofix Attachment | Vehicle 3 Points Belt | forward facing |
| 2+3 | 15-36Kg | Vehicle 3 Point safety Belt | Vehicle 3 Points Belt | forward facing |
Recline Adjustment
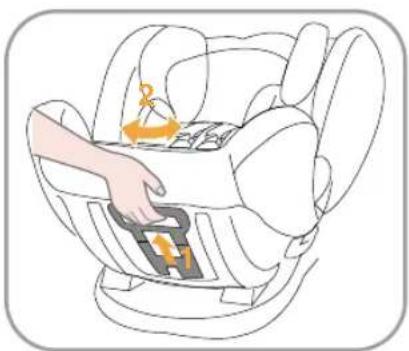
Press the recline adjustment handle, and adjust the child restraint to the proper position.
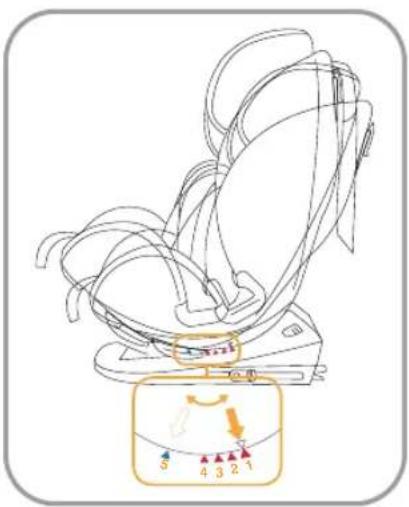
The recline angles are shown as There is 3 recline angle for rear facing baby mode, it is marked as blue triangle (0-18KG).
natural_image
Line drawing of a baby car seat with a hand inserting a belt into the seat (no text or symbols)There are four recline angles "1-4" for toddler mode Angle indication: with top and bottom triangles aligned (9-18KG).
There is one recline angle for 1 junior mode, it is marked as "1" red triangle (15-36KG).
Make sure that vehicle seat belt will be tight when adjusted in reclining position and vice versa if seat was already buckled up properly previously.
natural_image
Line drawing of a baby car seat with attached device (no text or symbols)Height Adjustment for Head Support and Shoulder Harnesses
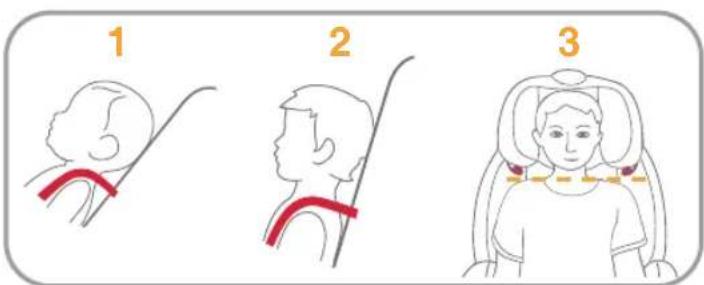
Please adjust the head support and shoulder harnesses to proper height according to the child's height.
text_image
1 2 3- When used in baby mode, the shoulder harness height must be even with child's shoulders.
- When used in toddler mode, the shoulder harness height must be even with child's shoulders.
- When used in junior mode, the shoulder belt guides must be even with child's shoulders.
If the shoulder harnesses are not at proper height, the child may be thrown from the child restraint when there is an accident.
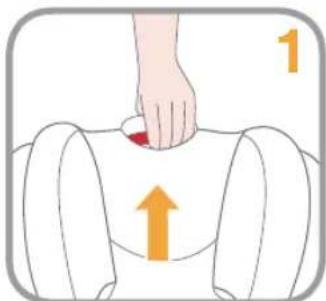
Squeeze the head support adjustment lever, meanwhile pull up or push down the head support until it snaps into one of the 11 positions.
The head support positions are shown as
text_image
1Baby mode
(Rearward Facing Mode/for Child under 18kg)
- Please install the child restraint on the rear vehicle seat and then put the child in the child restraint.
Installation for Baby Mode
- Please adjust the child restraint to proper angle (3 positions for babymode). Angle indication: With top triangle and blue triangle aligned.
- Make sure the shoulder harness is adjusted to proper height before installing this child restraint.
-
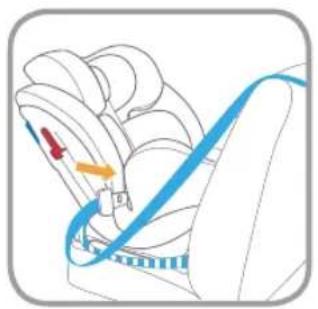
When installing and adjusting the safety belts, make sure that both the shoulder belt and the waist belt are not twisted and will not stop the safety belts from functioning properly.
-
Pass the waist belt over lap belt guidings, and then engage the vehicle buckle tongue into the buckle.
natural_image
Diagram of a car seatbelt with blue belt and orange belt, no text or symbols present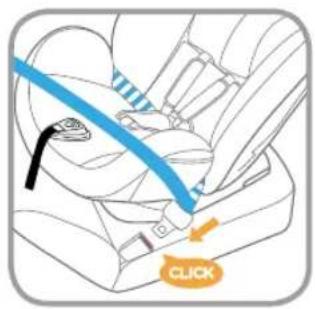
text_image
Diagram showing car seatbelt usage with a blue belt and an orange click button labeled 'CLICK'-
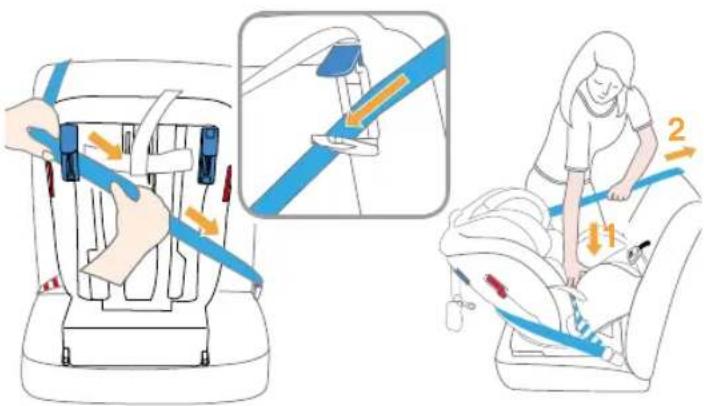
Fasten the shoulder belt in the two shoulder-belt slots at the back of the child restraint.
-
Shoulder belt must pass through the Lock-off.
- Ensure the belt lock off cover is completely closed when not in use to prevent injury, or damage to vehicle upholstery.
text_image
Illustration showing car seatbelt usage with numbered instructions for using a blue belt and a person.- While pressing the child restraint, pull t he belts to fasten the child restraint tightly and securely.
• The child restraint can not be used if the vehicle safety belt buckle (female buckle end) is too long to anchor the child restraint securely.
- Please check by moving the child restraint back and forth.
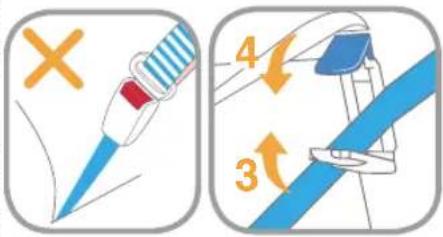
text_image
Diagram illustrating a medical or surgical procedure with labeled steps 3 and 4, showing tool insertion and alignment.Correctly assembled vehicle belt is shown as
- Waist belt passes through the lap belt guidings.
- Shoulder belt must passes through the shoulder-belt slots.
- The vehicle buckle tongue is engaged with the buckle correctly.
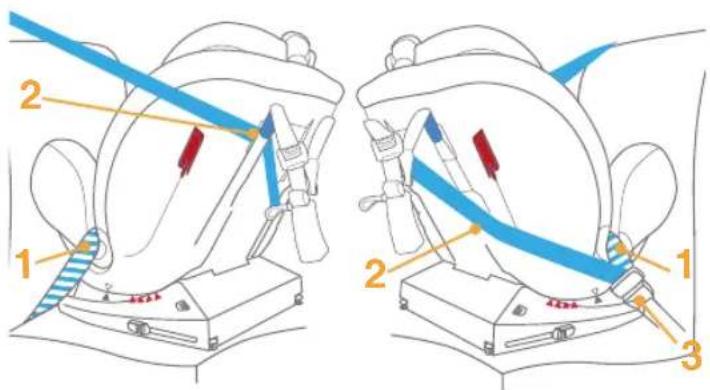
text_image
Technical diagram showing two mechanical assembly steps with labeled components and directional arrowsSecuring your Child in the Child Restraint Use Infant Insert
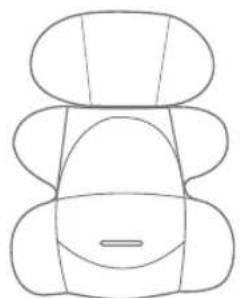
natural_image
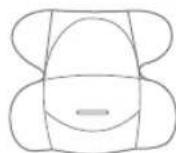
Abstract line drawing of stacked oval shapes with internal curved lines and a horizontal bar at the bottom (no text or symbols)We recommend using the full Infant insert while the baby is 0-9kg or until they outgrow the insert.
The infant insert increases side impact protection.
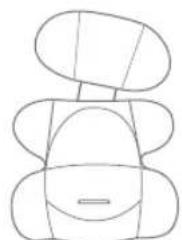
natural_image
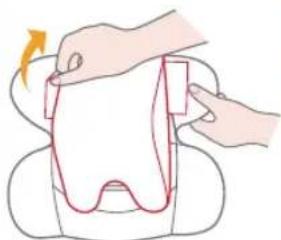
Simple line drawing of a robot-like figure with no text or symbolsDetach the snaps on the head support to remove the head portion of the insert.

Remove the head support portion of the infant insert when the child's head no longer fits comfortably.
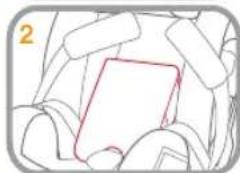
Remove the body portion of the infant insert when the infant's shoulders no longer fit comfortably.
natural_image
Illustration of a dental procedure with hands holding a tooth (no text or symbols)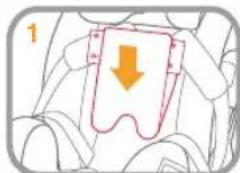
text_image
1Remove the infant insert cushion by detaching the snaps to allow more space when the infant does not fit comfortably.
natural_image
Simple line drawing of a person holding a rectangular object, no text or symbols presentThe cushion can be used separately without being attached to the insert tobolster the infant's back for more comfort.
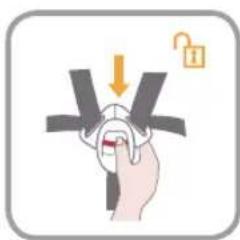
- While pressing the harness adjustment button, pull completely the two shoulder harnesses of the child restraint.
natural_image
Illustration of a hand holding a stylized object with arrows indicating motion (no text or symbols)- Press the red button to disengage the buckle.
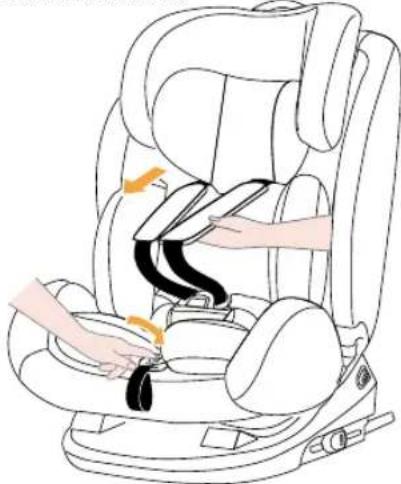
- Place the child in the child restraint and pass both arms through the harnesses.
natural_image
Line drawing of a car seat with hands adjusting the seatbelt (no text or symbols)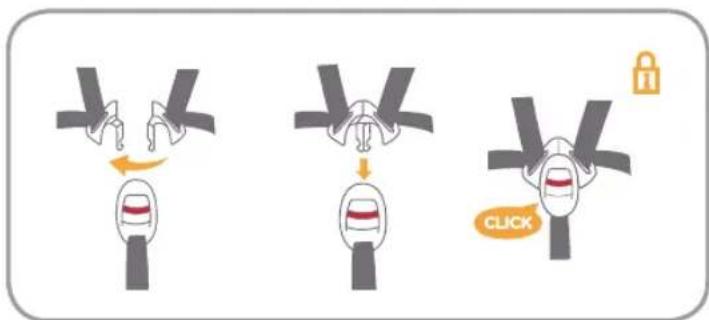
text_image
Diagram illustrating three steps of a car door lock operation: adding, adjusting, and clicking.-
Engage the buckle.
-
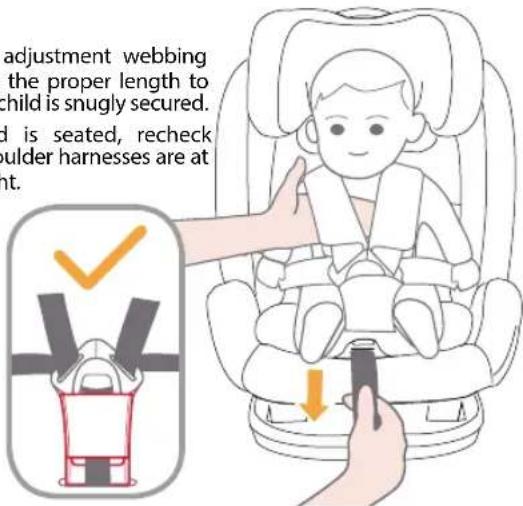
Pull down the adjustment webbing and adjust it to the proper length to make sure your child is snugly secured.
• After the child is seated, recheck whether the shoulder harnesses are at the proper height.
text_image
adjustment webbing the proper length to child is snugly secured. is seated, recheck ulder harnesses are at nt.- Make sure the space between the child and the shoulder harness is about the thickness of one hand.
Toddler Mode
(Forward Facing Mode/ for Child between 9-18kg)
- Please install the child restraint on the vehicle seat, and then put the child in the child restraint.
Installation for Toddler Mode
- Please adjust the child restraint to proper angle (4 positions for toddler mode). Angle indication: With top triangle and red triangle aligned.
- Please adjust the shoulder harnesses to proper height before installing the child restraint.
- When installing and adjusting the safety belts, make sure that both the shoulder belt and the waist belt are not twisted and will not keep the safety belts from being properly positioned.
For installation with 3-point-belt
- Thread the safety belt through two seat belt back slots at the back of the child restraint.
- Buckle the safety belt.
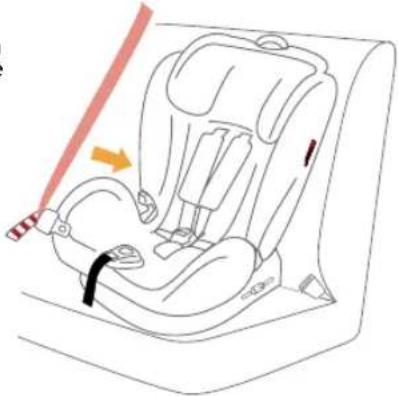
natural_image
Line drawing of a car seatbelt with a red belt and orange arrow indicating direction (no text or symbols)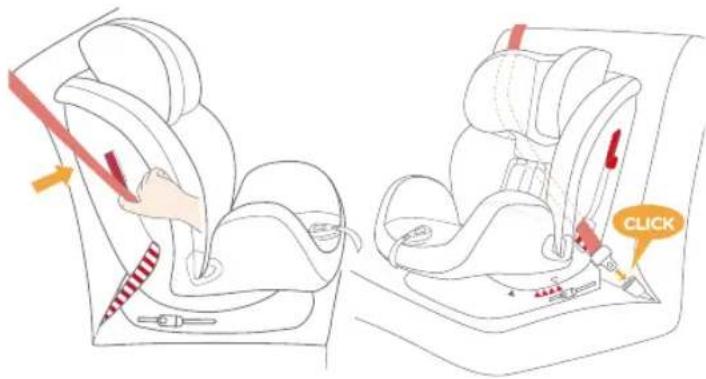
text_image
Diagram showing car seat assembly with a hand holding a red tool and a 'CLICK' button, indicating a click action.-
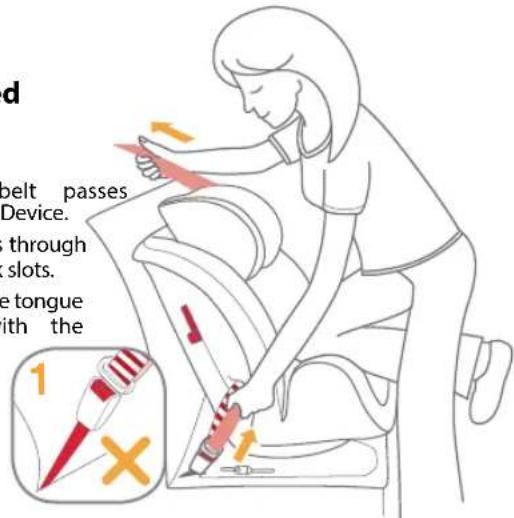
Open the lock-off device and insert the safety belt through it.
-
While pressing the child restraint, pull the belts to fasten the child restraint tightly and securely.
-
The child restraint can not be used if the vehicle safety belt buckle (female buckle end) is too long to anchor the child restraint securely.
- Please check by moving the child restraint back and forth.
The assembled safety belt is shown
- Shoulder belt passes through Lock-off Device.
- Waist belt passes through the seat belt back slots.
- The vehicle buckle tongue is engaged with the buckle correctly.
text_image
d pelt passes Device. through slots. te tongue with the 1 X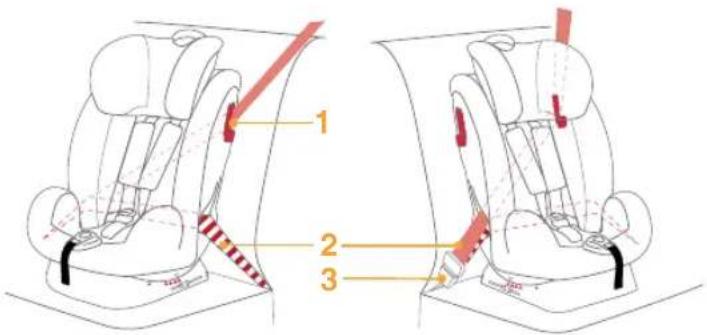
text_image
Diagram of car seat assembly showing three labeled parts with red arrows indicating movement or force vectorsFor installation with ISOFIX (ISOFIX attachments and top tether)
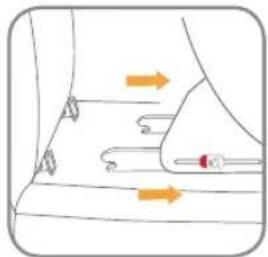
- Fit the ISOFIX attachments guides with the ISOFIX attachments anchor points. The ISOFIX attachments guides can protect the surface of the vehicle seat from being torn. They can also guide the ISOFIX attachments connectors.
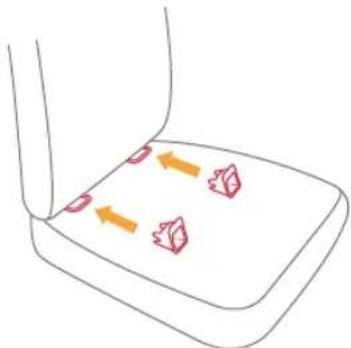
natural_image
Simple line drawing of a device with two orange arrows pointing to a white tray, no text or symbols present.- Extend the ISOFIX attachments connectors by depressing on the release button whilst pulling on the connector.
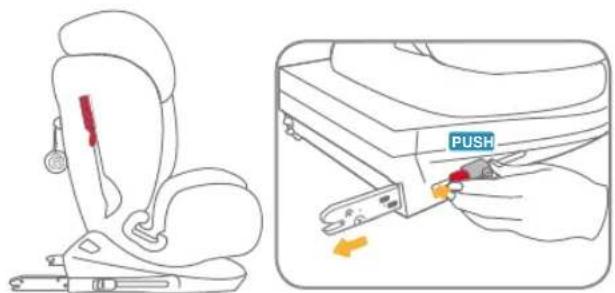
text_image
Diagram showing a car seat assembly and a hand holding a push button, with directional arrows indicating movement.- Make sure that both ISOFIX attachments connectors are securely attached to their ISOFIX attachments anchor points. The colors of the indicators on both ISOFIX attachments connectors should be completely green.
- The ISOFIX attachments connectors must be attached and locked onto the ISOFIX attachments anchor points.
- Check to make sure the child restraint is securely installed by pulling on the both ISOFIX attachments connectors.
- Select the desired recline position before moving back against the vehicle seat, as once the top tether is attached and tensioned, the recline angle will not be able to change without adjustment to the top tether.
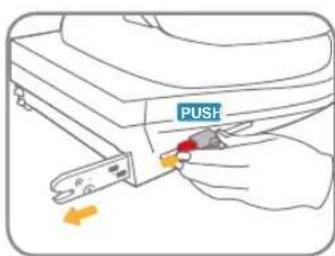
text_image
PUSH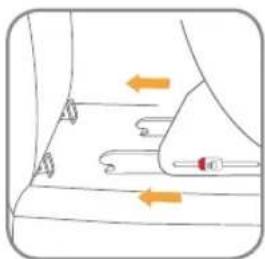
natural_image
Diagram of a medical procedure with arrows indicating movement or force (no text or symbols present)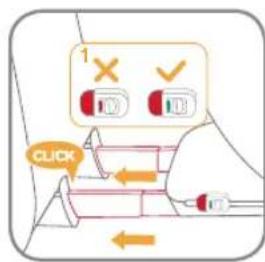
text_image
1 × ✓ CLICK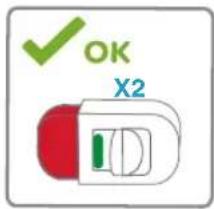
text_image
OK X2-
Press the ISOFIX attachments release button and push the child restraint back against the vehicle seat until tight.
-
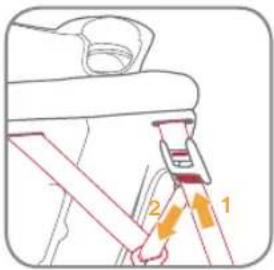
To extend Top Tether for use, press button on Tether. Adjuster and pull to lengthen.
-
Connect the tether hook securely to the anchorage fitting.
- USE Top Tether for toddler mode installation if vehicle is equipped with a Tether anchorage fitting and vehicle requirements are met (see vehicle owner's manual).
- Correctly assembled ISOFIX (ISOFIX attachments and top tether) is shown
- Make sure that tether hook are securely attached to the anchorage fitting. The colors of the indicators on tether strap adjuster should be completely green.
- If recline angle is adjusted, check the tension on the top tether, or loosen to adjust angle then re-tension.
text_image
Diagram showing a car seatbelt buckle with labeled parts 1 and 2, indicating seatbelt usage.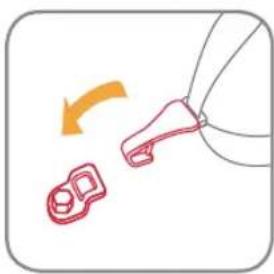
natural_image
Diagram showing a red outline of a mechanical component with an orange arrow indicating rotation (no text or symbols)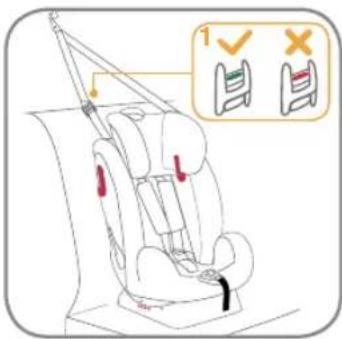
text_image
Diagram showing car seatbelt usage with checkmark and cross icons indicating safety instructions• To remove the ISOFIX
natural_image
Diagram of a medical procedure with arrows indicating movement or force direction (no text or labels)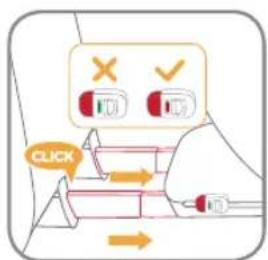
text_image
CLICK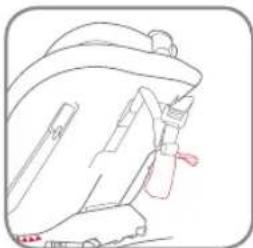
natural_image
Line drawing of a car seatbelt device (no text or symbols)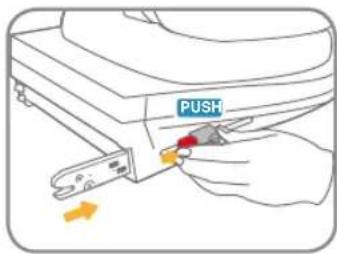
text_image
PUSH- attachments connectors, press the secondary lock button first and then the button before pull on the ISOFIX attachments connectors. The ISOFIX attachments is folded completely.
- When not in use, Top Tether MUST be properly stored. To make sure the top tether is properly stored away, remove any slack in strap to avoid the top tether swinging around when the vehicle is in progress.
- When the pocket is not used, please store it properly.
Securing your Child in the Child Restraint
- When installing the child restraint in the toddler mode, do not use the infant insert.
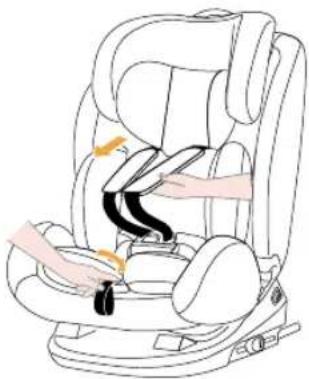
-
While pressing the harness adjustment button, pull completely the two shoulder harnesses of the child restraint.
-
Press the red button to disengage the buckle.
-
Place the child in the child restraint and engage the buckle.
natural_image
Line drawing of a car seat with hands adjusting the seatbelt (no text or symbols)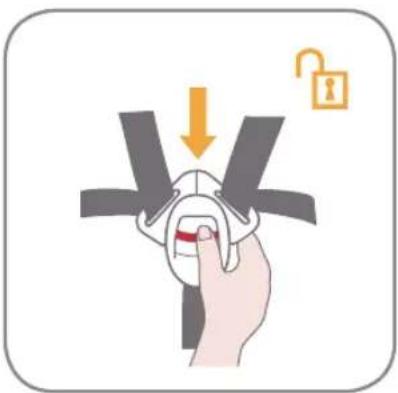
natural_image
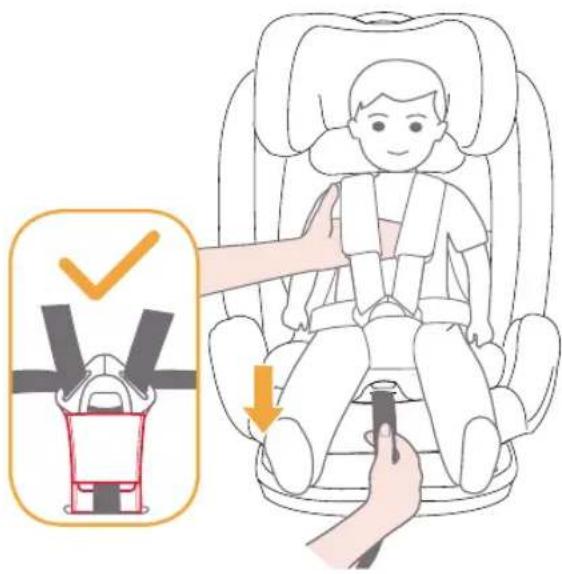
Illustration of a hand holding a device with a lock icon and downward arrow (no text or symbols)- Pull down the adjustment webbing and adjust it to the proper length so that your child is snugly secured.
• After the child is seated, recheck whether the shoulder harnesses are at proper height.
- Make sure the space between the child and the shoulder harness is about the thickness of one hand.
text_image
Illustration showing a child in a car seatbelt with a checkmark and arrow indicating the correct seatbelt replacement.Junior Mode
(Forward Facing Mode / for Child 15-36kg)
Installation for Junior Mode
- Just use the vehicle seat belt when installing the child restraint in the junior mode, do not use the infant insert or 5 point harness, please store the shoulder harnesses, buckle and buckle tongues in respective storage compartments.
- Please adjust the shoulder harnesses to proper length before store the shoulder harnesses and buckle in their storage compartments.
- Please adjust the child restraint to proper angle Angle indication: With top triangle and red triangle aligned.
- When installing and adjusting the safety belts, make sure that both the shoulder belt and the waist belt are not twisted and will not keep the safety belts from being properly positioned.
-
Press the red button to disengage the buckle.
-
Remove the infant insert and crotch pad.
- When installing the child restraint in the Junior mode, do not use the infant insert.
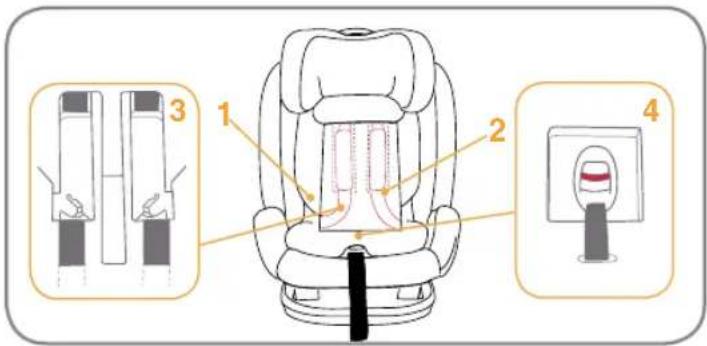
text_image
Diagram of a car seat assembly with labeled parts and exploded views showing internal components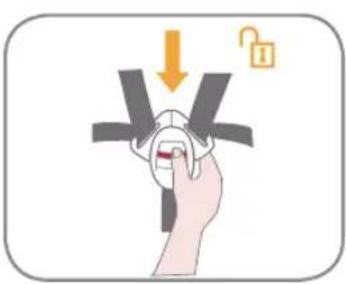
natural_image
Illustration of a hand holding a device with arrows indicating motion (no text or symbols)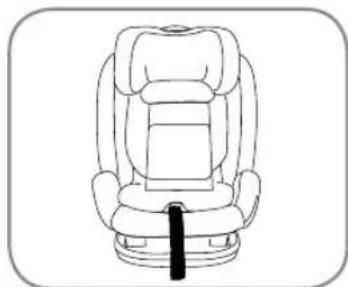
natural_image
Line drawing of a car seat with a black strap (no text or symbols)-
Detach the snaps.
-
Lift the upper flap upward and pull the lower flap forward, and then store the shoulder harnesses and buckle in their storage compartments.
-
Pull the buckle to the back of the seat pad, and then store the buckle and buckle tongues in respective storage compartments.
-
Do reattach the snaps to recover the seat pad. The reassembled seat pad is shown.
Securing your Child in the Child Restraint
For installation with 3-point-belt
- Place the child in the child restraint and check whether the shoulder belt guides are at proper height.
- Position shoulder belt through shoulder belt guide, Fasten buckle and pull the vehicle belt to tighten.
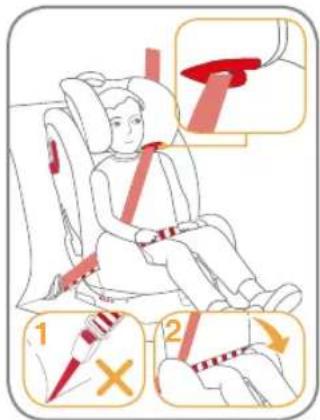
text_image
Illustration showing a child seated in a car seat with two labeled instructions for using a red belt, including a pencil and cross symbol.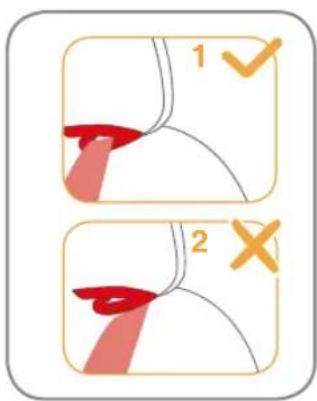
text_image
1 2- Shoulder belt must pass through shoulder belt guide.
- Waist belt must pass through lap belt guidings.
- The vehicle waist belt must cross through the middle of the crotch belt cover and then attach the loop and hook fasteners.
- The child restraint can not be used if the vehicle safety belt buckle is too long to anchor the child restraint securely.
- Do not use shoulder belt loose or positioned under arm.
- Do not use shoulder belt behind child's back.
- Do not allow child to slide down in the child restraint in case of strangulation.
For installation with 3-point-belt and ISOFIX attachments
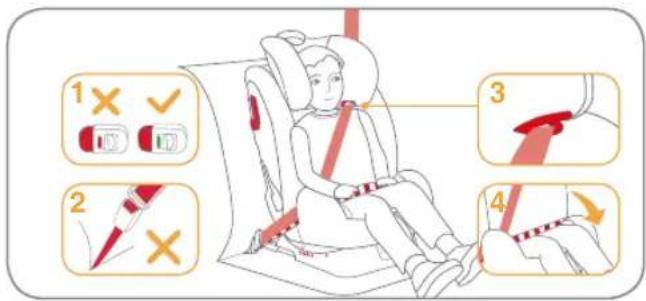
text_image
1 2 3 4- Installation with ISOFIX attachments is show.
- Place the child in the child restraint and check whether the shoulder belt guides are at proper height.
- Installation with 3-point-belt is show.
-
Correctly assembled 3-point-belt and ISOFIX attachments is show.
-
Make sure that both ISOFIX attachments connectors are securely attached to their ISOFIX attachments anchor points. The colors of the indicators on both ISOFIX attachments connectors should be completely green.
- Check to make sure the child restraint is securely installed by pulling on the both ISOFIX attachments connectors.
- Shoulder belt must pass through shoulder belt guide.
- The vehicle waist belt must cross through the middle of the crotch belt cover and then attach the loop and hook fasteners.
- Waist belt must pass through lap belt guiding.
- The child restraint can not be used if the vehicle safety belt buckle is too long to anchor the child restraint securely.
- Do not use shoulder belt loose or positioned under arm.
- Do not use shoulder belt behind child's back.
- Do not allow child to slide down in the child restraint in case of strangulation.
Detach Soft Goods
-
Press the red button to disengage the buckle.
-
Remove the infant insert and crotch strap.
-
Detach the elastic on the head support, and then remove the head support.
-
Detach the snaps on the seat pad, pull the buckle to the back of seat pad, and then remove the seat pad.
• To assemble soft goods, reverse the steps above.

natural_image
Line drawing of a car comfort seat with orange arrows indicating rotation or movement (no text or symbols)Maintenance
• After removing the foam of infant insert, please store it somewhere that the child can not access it.
- Please wash the soft goods with cold water under 30^ C .
- Do not iron the soft goods.
- Do not bleach or dry clean the soft goods.

text_image
30- Do not use undiluted neutral detergent, gasoline or other organic solvent to wash the child restraint. It may cause damage to the child restraint.
- Do not twist the soft goods to dry with great force. It may leave the soft goods with wrinkles.
- Please hang dry the soft goods in the shade.
- Please remove the child restraint from the vehicle seat if not in use for a long period of time. Put the child restraint in the shade and somewhere your child can not access it.
FR\_Français
text_image
Technical diagram of car seat assembly with numbered parts and labeled connectorsnatural_image
Line drawing of a baby car seat with hand placing seatbelt (no text or symbols)text_image
Diagram of a car seat assembly with labeled parts and a magnified inset showing internal components.text_image
Illustration showing a hand pressing down on a seated leg with an upward arrow indicating motion or pressure direction.Mode nourrisson
natural_image
Diagram of a car seatbelt with blue belt and orange belt, no text or symbols present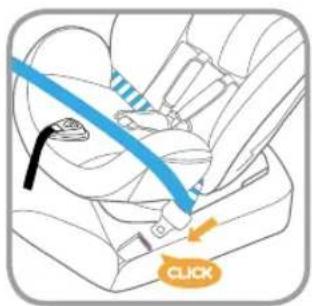
text_image
Diagram showing car seatbelt usage with a blue belt and an orange click button labeled 'CLICK'text_image
Illustration showing car seatbelt usage and patient seatbelting instructions with numbered arrows indicating steps.natural_image
Illustration of a syringe with a blue tip and red handle, marked with an 'X' symbol (no text or labels)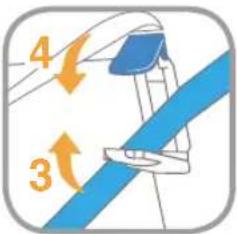
text_image
4 3text_image
Technical diagram of a mechanical device with labeled parts and directional arrows indicating motion or force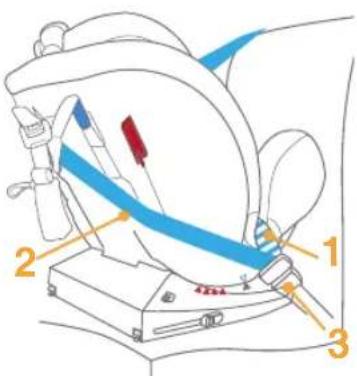
text_image
Technical diagram of a medical device with numbered components and labeled partsnatural_image
Simple line drawing of a symmetrical abstract shape with no text or symbolsnatural_image
Simple line drawing of a robot head with no text or symbolsnatural_image
Illustration of hands holding a medical device with a yellow arrow indicating motion (no text or symbols)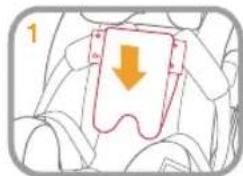
text_image
1natural_image
Simple line drawing of a person holding a rectangular object, surrounded by abstract shapes (no text or symbols)natural_image
Illustration of a hand holding a stylized object with arrows indicating motion or change (no text or symbols)natural_image
Illustration of a car seatbelt with hands adjusting the seatbelt (no text or symbols)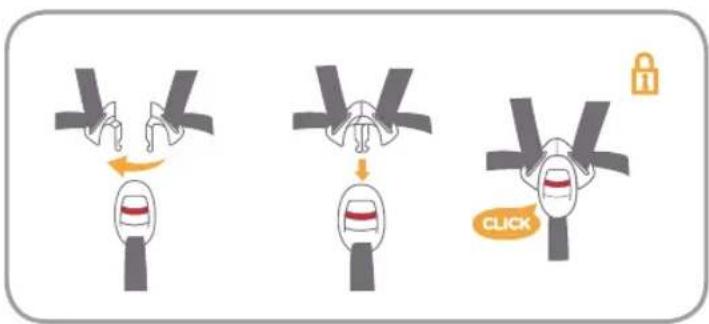
text_image
Diagram illustrating three steps of a vehicle door lock operation, showing how to press or click the valve.text_image
Diagram illustrating car seat usage and a click point on the seat, with labeled arrows and a 'CLICK' button.text_image
Technical diagram of car seat assembly with numbered parts and highlighted safety stripsnatural_image
Simple line drawing of a device with two orange arrows pointing to three red flame-like symbols on a base (no text or labels)text_image
Diagram showing a car seatbelt switch being inserted into a push device, with labeled buttons and directional arrows.text_image
PUSH 1 X ✓ OK X2 CLICKtext_image
Diagram showing a seatbelt buckle with labeled parts 1 and 2, indicating different seatbelt configurations.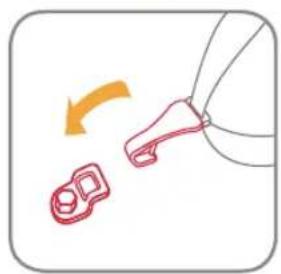
natural_image
Diagram showing a red outline of a device with an arrow indicating rotation (no text or symbols)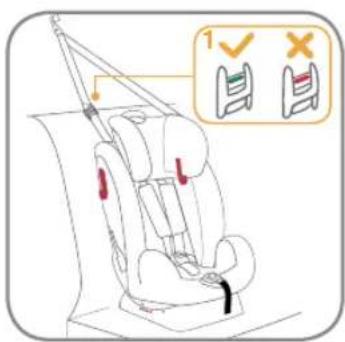
text_image
Diagram showing car seat assembly with checkmark and X mark indicating selection of seatsnatural_image
Diagram of a human torso with arrows indicating movement or force direction (no text or symbols)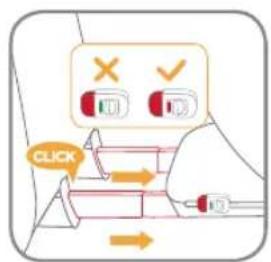
text_image
CLICK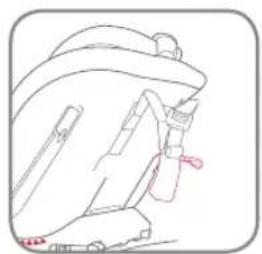
natural_image
Line drawing of a car seatbelt device (no text or symbols)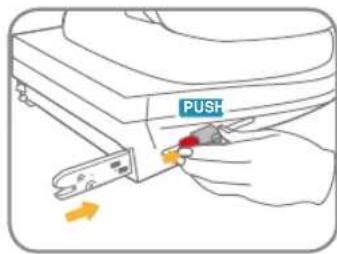
text_image
PUSHnatural_image
Illustration of a car seatbelt with hands adjusting the seatbelt (no text or symbols)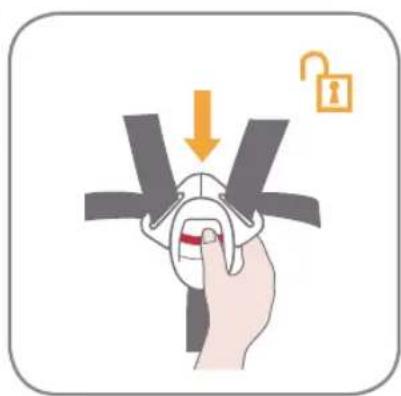
natural_image
Illustration of a hand holding a device with arrows indicating process (no text or symbols)text_image
Illustration showing a child in a car seat being adjusted to switch a seatbelt, with a checkmark and downward arrow indicating the correct or incorrect position.Mode junior
text_image
Diagram of car seat assembly with numbered parts and labeled parts in Chinese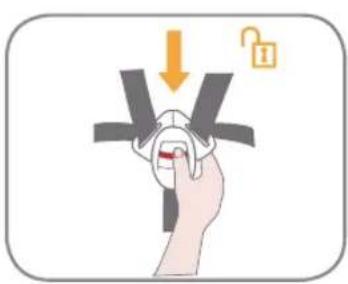
natural_image
Illustration of a hand holding a key with an open padlock symbol (no text or labels)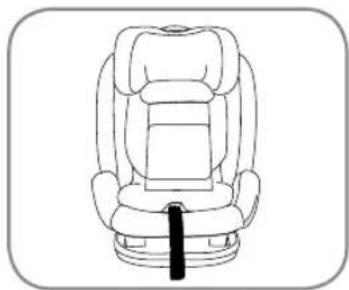
natural_image
Line drawing of a car seat with a black belt (no text or symbols)text_image
Illustration showing a child's seatbelt with two labeled diagrams (1 and 2) indicating different positions of the seatbelt.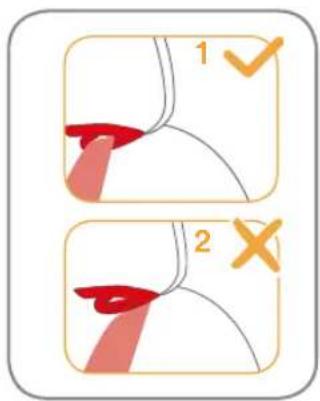
text_image
1 2natural_image
Line drawing of a car comfort seat with orange arrows indicating motion or movement (no text or symbols)Maintenance
text_image
Technical diagram of a car comfort seat with numbered parts and labeled connectorstext_image
AIRBAG NO NO A B C D E F G H I J K L M N O P Q R S T U V W X Y Znatural_image
Line drawing of a car seatbelt with hand holding seatbelt (no text or symbols)text_image
Diagram of a car seat with numbered indicators and a magnified view showing the number 3, 4, 3, 2, 1.natural_image
Diagram of a car seatbelt with blue belt and orange belt, no text or symbols present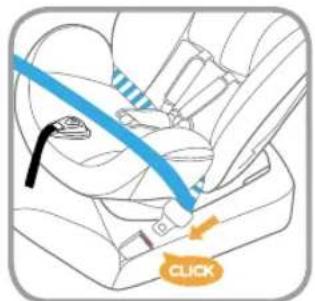
text_image
Diagram showing car seatbelt usage with a blue belt and orange click button labeled 'CLICK'text_image
Illustration showing car seatbelt usage and patient seatbelting instructions with labeled stepsnatural_image
Illustration of a syringe with a blue tip and red grip, marked with an 'X' symbol (no text or labels)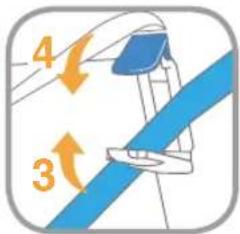
text_image
4 3text_image
Technical diagram of a sewing machine with labeled parts and directional arrows indicating motion or positioning.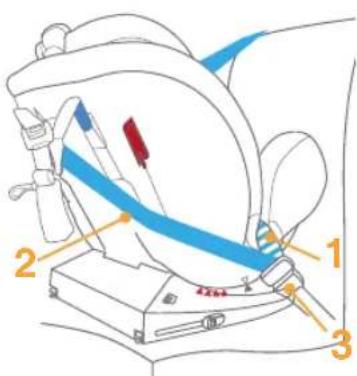
text_image
Technical diagram of a medical device with numbered components and labeled partsnatural_image
Abstract line drawing of stacked oval shapes with internal curved lines and a horizontal bar at the bottom (no text or symbols)natural_image
Simple line drawing of a robot-like figure with no text or symbolsnatural_image
Illustration of a dental procedure showing hands holding a tooth with a clip, no text or symbols present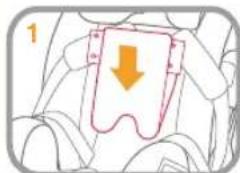
text_image
1natural_image
Simple line drawing of a person holding a rectangular object, no text or symbols presentnatural_image
Illustration of a hand holding a stylized object with arrows indicating motion (no text or symbols)natural_image
Illustration of a car seatbelt with hands adjusting the seatbelt (no text or symbols present)
text_image
Diagram illustrating three-step instructions for using a lock, with arrows indicating movement and a 'CLICK' button.text_image
Diagram showing car seat assembly with a hand using a screwdriver to adjust the seat, and a click button labeled 'CLICK' pointing to the seat.text_image
Technical diagram of car seat assembly with numbered parts and highlighted safety featuresnatural_image
Simple line drawing of a device with two orange arrows pointing to a red flame-like symbol on a base (no text or labels)natural_image
Line drawing of a car seat with a red bookmark and black clip (no text or symbols)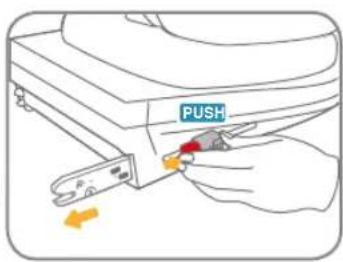
text_image
PUSHnatural_image
Diagram of a medical or anatomical structure with directional arrows indicating movement or force (no text or labels)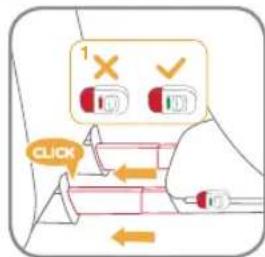
text_image
1 × ✓ CLICK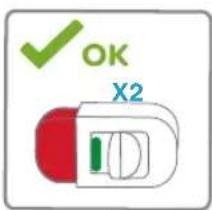
text_image
OK X2text_image
Diagram showing a car seatbelt buckle with labeled parts 1 and 2, indicating seatbelt usage.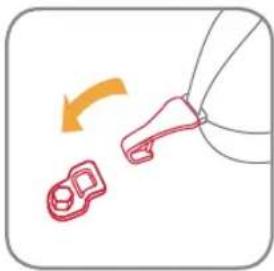
natural_image
Diagram showing a red outline of a device with an orange arrow indicating rotation or change (no text or symbols)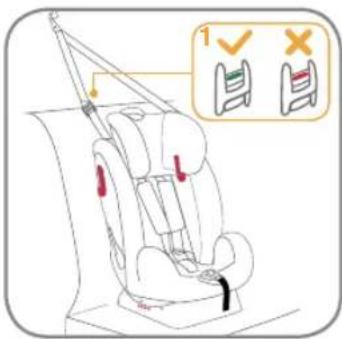
text_image
Diagram showing car seatbelt usage with checkmark and cross icons indicating safety instructionsnatural_image
Diagram of a medical procedure with arrows indicating movement or force direction (no text or labels)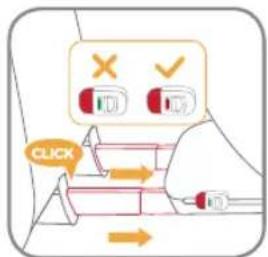
text_image
CLICK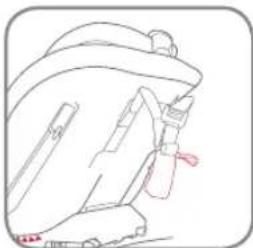
natural_image
Line drawing of a car seatbelt device (no text or symbols)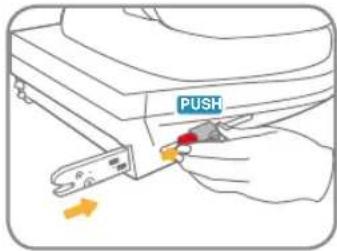
text_image
PUSHnatural_image
Illustration of a car seat with hands adjusting the seatbelt (no text or symbols)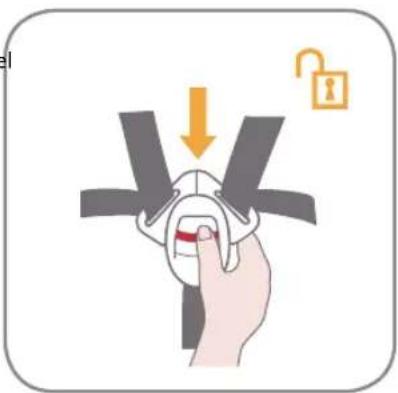
text_image
Illustration showing a hand holding a device with a lock icon and directional arrow indicating motion or sequence.text_image
Illustration showing a child in a car seatbelt with a checkmark and arrow indicating the correct seatbelt replacement.Modo Junior
text_image
Diagram of car seat assembly with numbered parts and labeled parts in Chinese
natural_image
Illustration of a hand holding a padlock with an open lock icon (no text or symbols)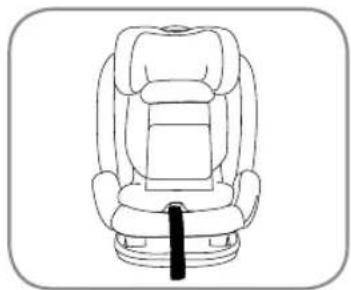
natural_image
Line drawing of a car seat with a black strap (no text or symbols)text_image
Illustration showing a child seated in a car seat with two instructional arrows indicating different positions of the seat.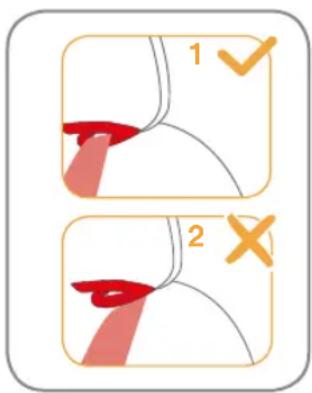
text_image
1 2text_image
Technical diagram of a car seat assembly with numbered parts and labeled featuresnatural_image
Line drawing of a car seat with hand inserting a belt switch (no text or symbols)text_image
Diagram of a car seat with labeled parts and a magnified inset showing internal components with numbers 1-5.natural_image
Diagram of a car seatbelt buckle with blue belt and orange belt (no text or symbols)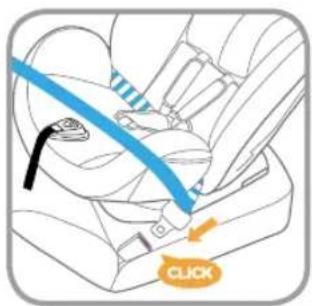
text_image
CLICKtext_image
Medical illustration showing a patient undergoing seatbelt insertion, with labeled steps and instructions in Chinese.natural_image
Illustration of a blue pen with a red handle and striped tip, marked with an 'den' and an 'X' symbol (no text or numbers present)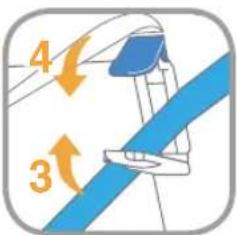
text_image
4 3text_image
Technical diagram of a sewing machine with labeled parts and a blue belt, showing mechanical components and base structure.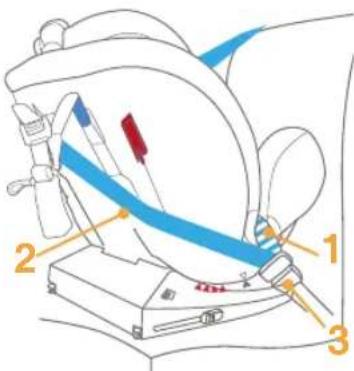
text_image
Technical diagram of a medical device with numbered components labeled 1, 2, and 3natural_image
Simple line drawing of a symmetrical abstract shape with no text or symbolsnatural_image
Simple line drawing of a robot head with no text or symbolsnatural_image
Illustration of hands holding a medical device with a yellow arrow indicating motion (no text or symbols)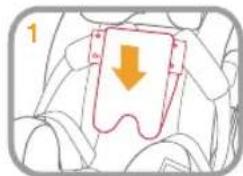
text_image
1natural_image
Simple line drawing of a person holding a rectangular object, no text or symbols presenttext_image
Diagram illustrating three steps of a vehicle door lock operation: before, after, and after click.text_image
itsgurt tze an es. gurt.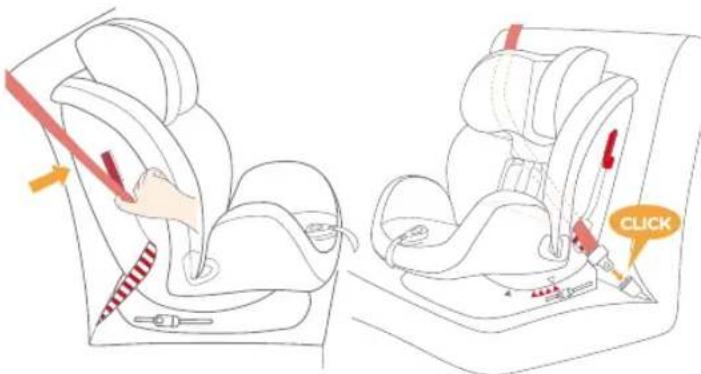
text_image
Diagram illustrating car seat usage and a click point on the seat, with labeled arrows and a 'CLICK' button.text_image
Illustration showing a person using a medical or surgical tool to adjust or install a patient's abdomen, with partial text labels visible.
text_image
1 2 3natural_image
Simple line drawing of a container with three orange arrows pointing inward, no text or symbols presenttext_image
Diagram showing a car seat assembly with a red inserted slot and a hand holding a push button, alongside a magnified view of the device's handle.text_image
Diagram showing a seatbelt buckle with labeled parts 1 and 2, indicating different seatbelt configurations.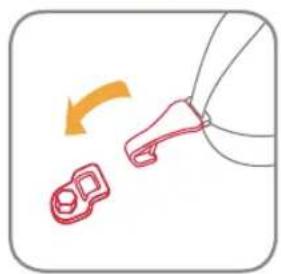
natural_image
Diagram showing a red outline of a device with an arrow indicating rotation (no text or symbols)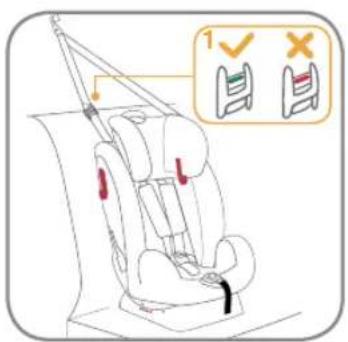
text_image
Diagram showing car seatbelt usage with checkmark and X mark instructionsnatural_image
Diagram of a medical procedure with arrows indicating movement or force direction (no text or labels)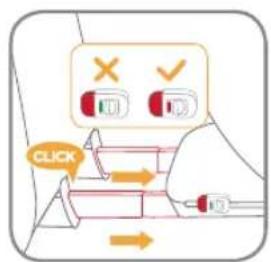
text_image
CLICK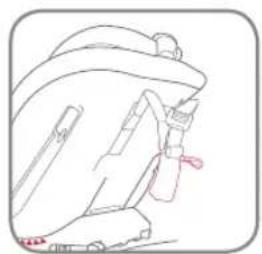
natural_image
Line drawing of a car seatbelt device (no text or symbols)
text_image
PUSHnatural_image
Illustration of a car seatbelt with hands adjusting the seatbelt (no text or symbols)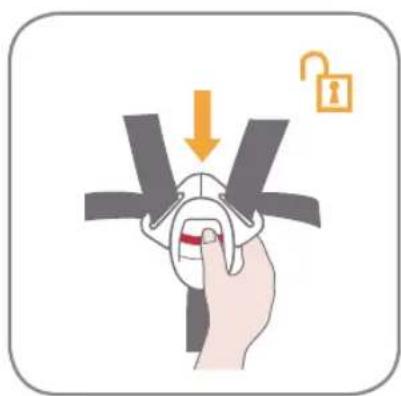
natural_image
Illustration of a hand holding a device with arrows indicating process (no text or symbols)text_image
Illustration showing a child in a car seat being adjusted to switch a seatbelt, with a checkmark and downward arrow indicating the correct or incorrect position.Junior-Modus
text_image
Diagram of a car seat assembly with labeled parts and exploded views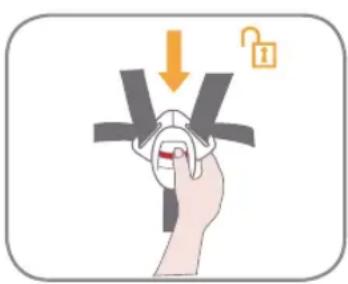
natural_image
Illustration of a hand holding a device with arrows indicating motion (no text or symbols)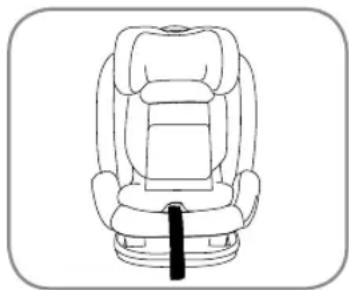
natural_image
Line drawing of a car seat with a black belt (no text or symbols)text_image
Diagram illustrating car seatbelt usage with numbered instructions and visual cues for lifting a seatbelt.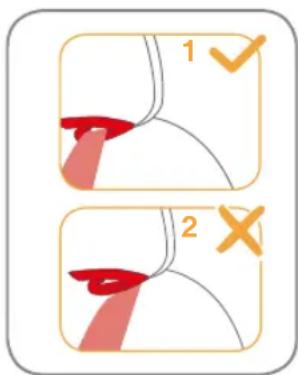
text_image
1 2natural_image
Line drawing of a car comfort seat with orange arrows indicating rotation or movement (no text or symbols)Pflege
text_image
Technical diagram of a car seat assembly with numbered parts and labeled parts in Chinesenatural_image
Two-panel illustration showing a white car seat with a red seatbelt, one marked with a checkmark and the other with an 'X' symbol (no text or labels present)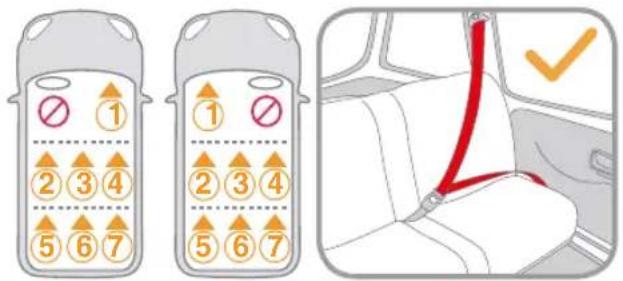
text_image
Diagram showing car seatbelt usage and seatbelt connection, with numbered slots and checkmark indicators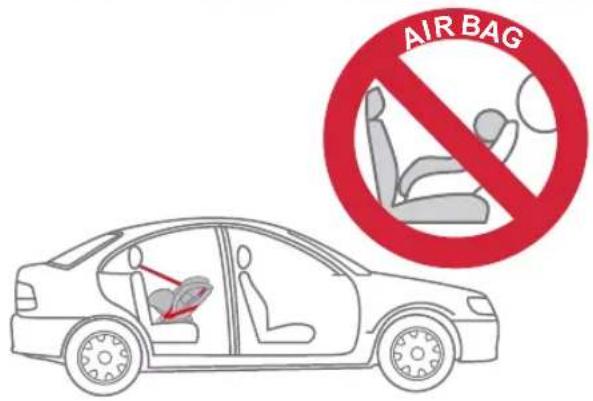
text_image
AIR BAGnatural_image
Line drawing of a baby car seat with a hand adjusting the seatbelt (no text or symbols)text_image
Diagram of a car seat assembly with numbered parts and a highlighted section showing motion indicators.text_image
Diagram showing car seatbelt usage with blue belt and orange click button, labeled in Englishtext_image
Medical illustration showing a car seatbelting technique with labeled instructions and directional arrows- Нажимая на детское
natural_image
Illustration of a blue pen with a red handle and a yellow 'X' symbol, no text or labels present.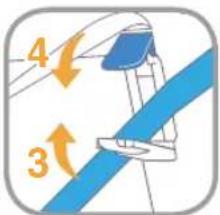
text_image
4 3text_image
Technical diagram of a mechanical device with labeled parts 1 and 2, showing a blue belt and adjustment mechanism.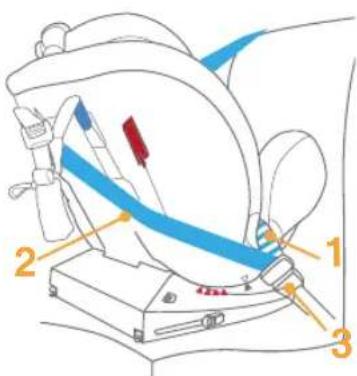
text_image
Technical diagram of a medical device with numbered components and labeled partsnatural_image
Simple line drawing of a symmetrical abstract shape resembling a stylized animal or robot head (no text or symbols)natural_image
Simple line drawing of a robot head with no text or symbolsnatural_image
Illustration of hands holding a medical device with a yellow arrow indicating motion (no text or symbols)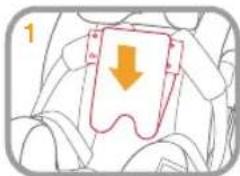
text_image
1natural_image
Simple line drawing of a person holding a rectangular object, no text or symbols presentnatural_image
Illustration of a hand holding a padlock with a lock icon, no text or symbols presenttext_image
Diagram illustrating three steps of a robot headset rotation, showing step 1 with motion arrows and step 2 with 'CLICK' button.natural_image
Illustration of a hand using a pen to lift a car seat (no text or symbols)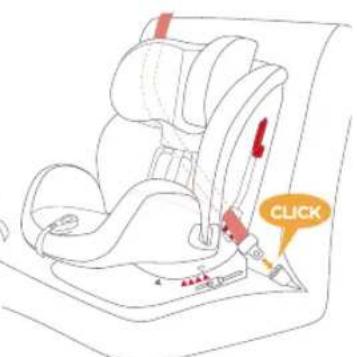
text_image
CLICKtext_image
Technical diagram showing car seat assembly with numbered parts and red arrows indicating motion or force directionsnatural_image
Simple line drawing of a container with three orange arrows pointing inward, no text or symbols presenttext_image
Diagram showing a car seat with a red trigger and a hand holding a push button, alongside a close-up of the device's handle.text_image
Diagram showing a car seatbelt buckle with labeled parts 1 and 2, indicating seatbelt usage.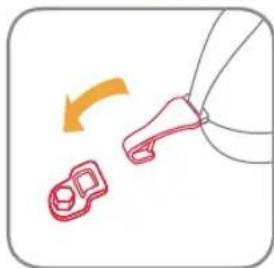
natural_image
Diagram showing a red outline of a mechanical component with an orange arrow indicating rotation (no text or symbols)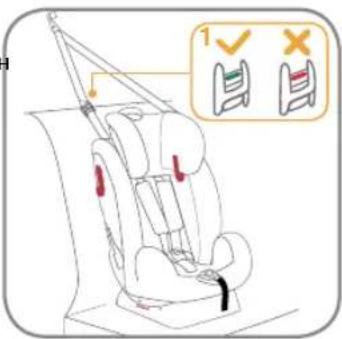
text_image
Diagram showing car seat assembly with checkmark and X mark indicating selection of seatsnatural_image
Diagram of a human abdomen with directional arrows indicating movement or force (no text or symbols)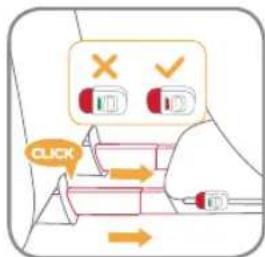
text_image
Diagram illustrating a medical procedure with checkmark and click instructions, showing action buttons and directional arrows.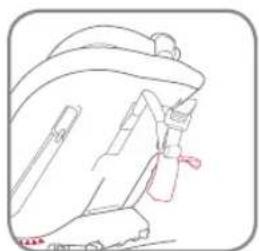
natural_image
Line drawing of a car seatbelt with a red belt (no text or symbols)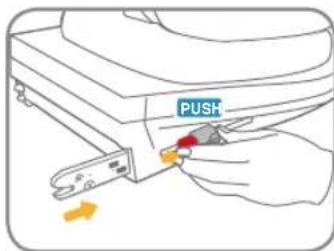
text_image
PUSHnatural_image
Illustration of a car seatbelt with hands adjusting the seatbelt (no text or symbols present)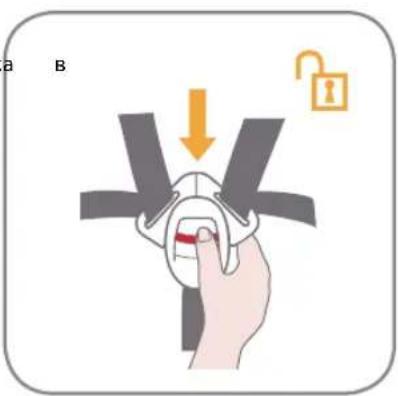
text_image
a Btext_image
Illustration showing a child in a car seat being lifted by a belt, with a checkmark and arrow indicating the correct or incorrect position.text_image
Diagram of car seat assembly with labeled parts and instructions in Chinese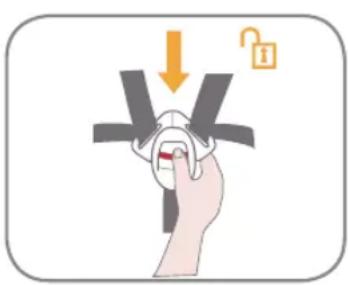
natural_image
Illustration of a hand holding a key with an open lock icon, no text or symbols present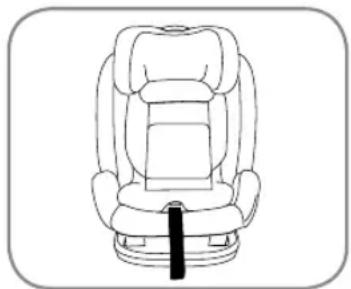
natural_image
Line drawing of a car seat with seatbelt and seat plate (no text or symbols)text_image
Illustration showing a child in a car seat with two instructions for using a red belt, labeled with steps 1 and 2.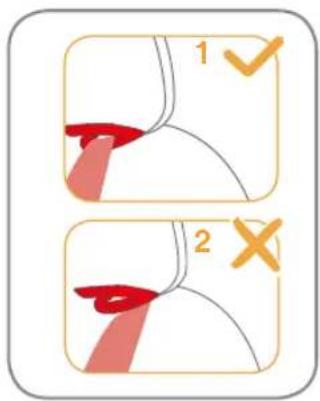
text_image
1 2All of the intellectual property rights for the contents of this instruction manual belong to Burigotto S.p.A. and are protected by the laws in force.
BAHIA
Burigotto