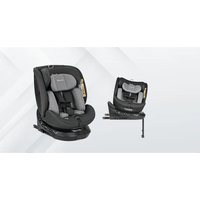
Boavista Spin - Child car seat Burigotto - Free user manual and instructions
Find the device manual for free Boavista Spin Burigotto in PDF.


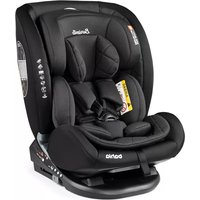
| Product Type | Child Car Seat |
| Brand | Burigotto |
| Model | Boavista Spin |
| Safety Standard | ECE R129/03 (i-Size) |
| Child Size (rear-facing) | 40-105 cm (up to 18 kg) |
| Child Size (forward-facing with harness) | 76-105 cm (up to 18 kg) |
| Child Size (forward-facing with belt) | 100-150 cm |
| Orientation | Rear-facing and forward-facing (rotating) |
| Installation | ISOFIX + support leg or 3-point belt |
| Restraint System | 5-point harness (removable for booster) |
| Rotation Function | Yes, 360° with lock |
| Newborn Insert | Included for children 40-75 cm |
| Headrest Adjustment | Yes, adjustable height |
| Recline Adjustment | 5 positions (rear and forward) |
| Support Leg | With floor contact indicator (green) |
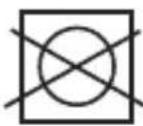
| Maintenance | Cover washable by hand or machine (follow label) |
| Included Accessories | Newborn insert, buckle pads, shoulder pads |
| Vehicle Compatibility | i-Size and ISOFIX seats (consult vehicle manual) |
| Minimum Age Forward-Facing | 15 months (mandatory) |
| Repairability | Spare parts available from the manufacturer |
Frequently Asked Questions - Boavista Spin Burigotto
User questions about Boavista Spin Burigotto
0 question about this device. Answer the ones you know or ask your own.
Ask a new question about this device
Download the instructions for your Child car seat in PDF format for free! Find your manual Boavista Spin - Burigotto and take your electronic device back in hand. On this page are published all the documents necessary for the use of your device. Boavista Spin by Burigotto.
USER MANUAL Boavista Spin Burigotto
EN Instructions for use
FR Notice d'emploi
This is an I-Size Enhanced Child Restraint System. It is approved according to UN Regulation No. 129, for use in, I-Size compatible vehicle seating position as indicated by vehicle manufacturers in the vehicle user's manual.
If in doubt, consult either the Enhanced Child Restraint System manufacturer or the retailer.
NOTICE
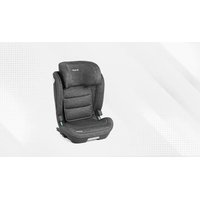
This is an I-Size booster seat Enhanced Child Restraint System. It is approved according to UN Regulation No. 129, for use primarily in "I-Size seating positions" as indicated by vehicle manufacturers in the vehicle user's manual.
If in doubt, consult either the Enhanced Child Restraint System manufacturer or the retailer.
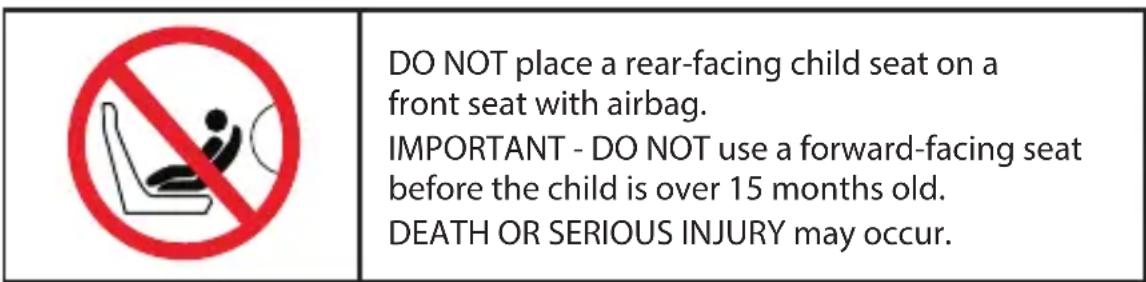
"IMPORTANT-DO NOT USE FORWARD FACING BEFORE THE CHILD'S AGE EXCEEDS 15 MONTHS(Refer to instruction)"
Only suitable for use in the listed vehicles fitted with 3 point belt which is approved to ECE Regulation No.16 Do not use them in seating positions where there is active airbag installed.
EN Instruction Manual
- Safety instructions 30
- Each component 32
- Notice for the vehicle use 34
- The adjustment and installation of child safety seat 35
4-1. The usage of buckle 35
4-2. Adjust the safety belt 37
4-3. Adjust the height of headrest 38
4-4. Adjust the angle reclining of car seat 39
4-5.New born cushion 40
4-6. Rotation function. 41
4-7. 5-point harness system to install the child. 42
4-8. The method to remove the 5-point seat belt system.....42
4-9. Installing method for ISOFIX attachment 44
4-10. Remove ISOFIX attachment and hide Support leg .........45
4-10-1. Removing the ISOFIX attachment. 45
4-10-2.Hide the Support leg 45
4-11. Release and storage of support legs 46
4-11-1. Release of support leg. 46
4-11-2.Support leg storage 46
4-12. Installation of support leg 47
- Installation method 48
5-1. Making rearward facing position by using ISOFIX attachment + Support leg(suitable for children height from 40-105cm) 48
5-2. Installing the child safety seat forward facing position by using ISOFIX attachment+ Support leg (children height from76 -105cm) 49
5-3 Installing the car seat forward facing position by using
ISOFIX attachment+ 3-point seat belt (suitable for children
height from100 -150cm). 50
5-4. Use 3-point seat belt to install the child safety seat in forward facing position (Suitable for children height from100-150cm). 51
- Installation of cloth cover 52
- Cleaning and maintenance 53
1. Safety instructions
- Read this instruction manual carefully.
- The correct fitting of the ISOFIX attachment and Support leg anchoring systems of 3-point belt is of vital importance for the safety of your child.
- For the future use of the seat, it is important that you keep the instruction manual carefully.
- Never leave your child unattended in the car.
- Do not use a child safety seat if the vehicle seat is equipped with a front airbags. This can be dangerous. This does not apply to so-called side airbags.
- Before use our product, please read the instruction manual carefully.
- The product is a safety product and is only safe when used in accordance with the instruction manual.
- The product must only be used on a forward facing seat that is fitted with the ISOFIX attachment and Support leg.
- The product may be used on either the front or the back seat. However, we recommend that it is fitted on the back seat.
- The product has been approved according to the strictest European safety standards (ECE R129/03) and is suitable for 40-105cm (mass limit 18kg) with the ISOFIX attachment and the Support leg; 76-105cm (mass limit 18kg) with the ISOFIX attachment and the Support leg; 100-150cm with 3-point belt; 100-150cm with 3-point belt and ISOFIX attachment.
- After an accident the seat may become unsafe due to damage that is not noticeable immediately. It should therefore be replaced.
- The safety of the seat can only be guaranteed by the manufacturer if it issued by the original owner.
- We advise you strongly that not to use a second-hand product, because you are not sure what has happened to it.
- The harness pads are important for the safety of your child, therefore use them at all the time.
- Ensure that all luggage and objects likely to cause injury in the event of an accident are properly secured.
- The moving parts of the car seat should not be lubricated in any way.
-
The baby car seat must not be used without the cover. Please use an original cover, as the cover contributes to the safety of the seat.
-
The seat must be secured with ISOFIX attachment, even when it not on use. An unsecured seat may injure other passengers in the car in an urgent stop.
- The rigid items and plastic parts of a child restraint must be so located and installed that they are not liable, during everyday use of the vehicle, to become trapped by a movable seat or in a door of the vehicle.
- Ensure that the seat is not damaged by the webbing between or underneath heavy luggage, adjustable seats or slamming the car door etc.
- No alterations may be made to the product as this could affect part or the overall safety of the seat.
- In hot weather the plastic and metal parts of the product will be hot. You should cover the seat when the car parked under the sun.
- In order to prevent damage to the cover, do not remove the product's logo.
- Use the seat even in s short journey, as this is when most accidents occur.
- Before the purchase, please check that the seat can be fitted correctly in your car.
Take a short break in long journey, So that your child has some time for the relaxation. - Set a good example your child and always wear your seat belt.
- Tell your child that he/she should be never play with the harness buckle.
- Make sure that any straps is properly fastened (worn low down) and not twisted.
- Any lap strap is worn low down, to keep the pelvis is firmly engaged.
2. Each component
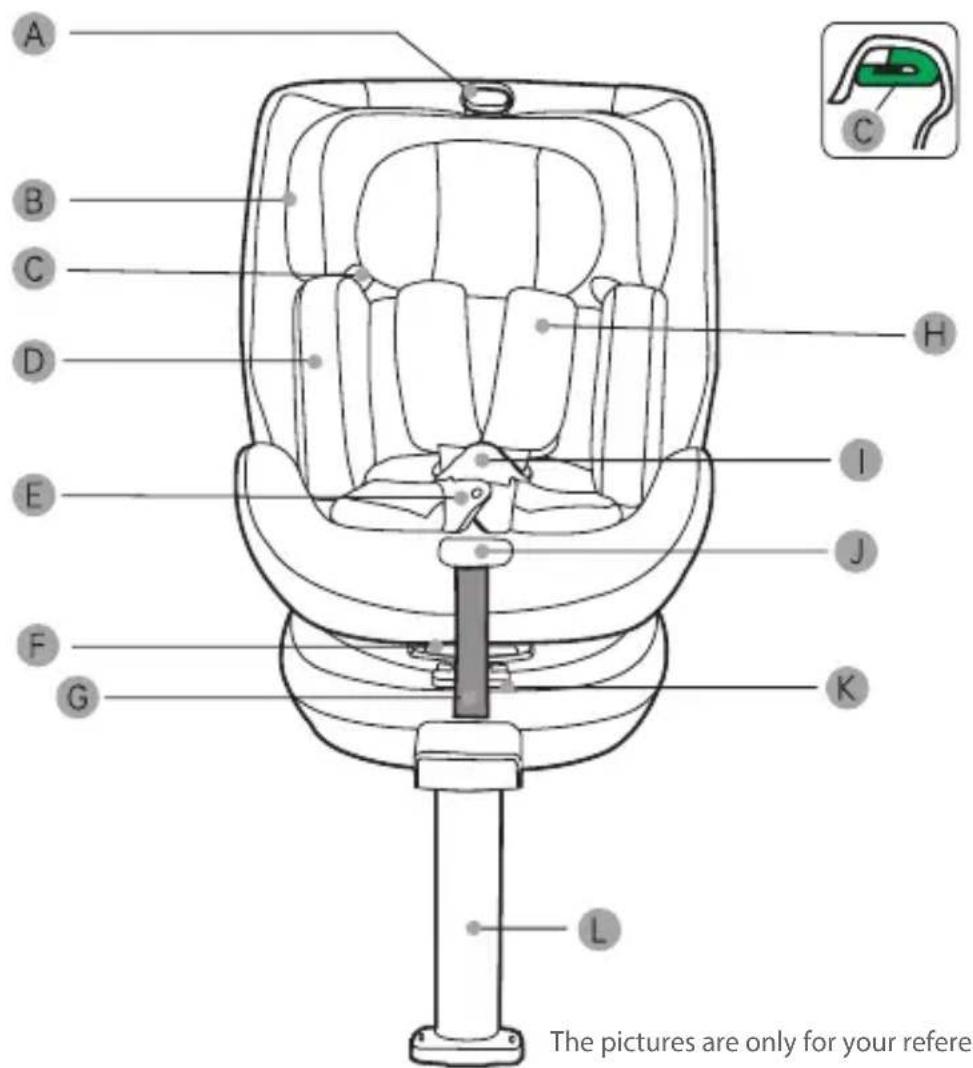
A. Handle For The Headrest
B. Headrest
C. Belt Guider
D. Newborn Cushion
E. Buckle Pads
F. Handle For Adjusting The Angle
G. Adjustment Belt
H. Shoulder Pads
I. Buckle
J. Button For The 5-points Harness System
K. Rotation Adjusting Handle
L. Support Leg
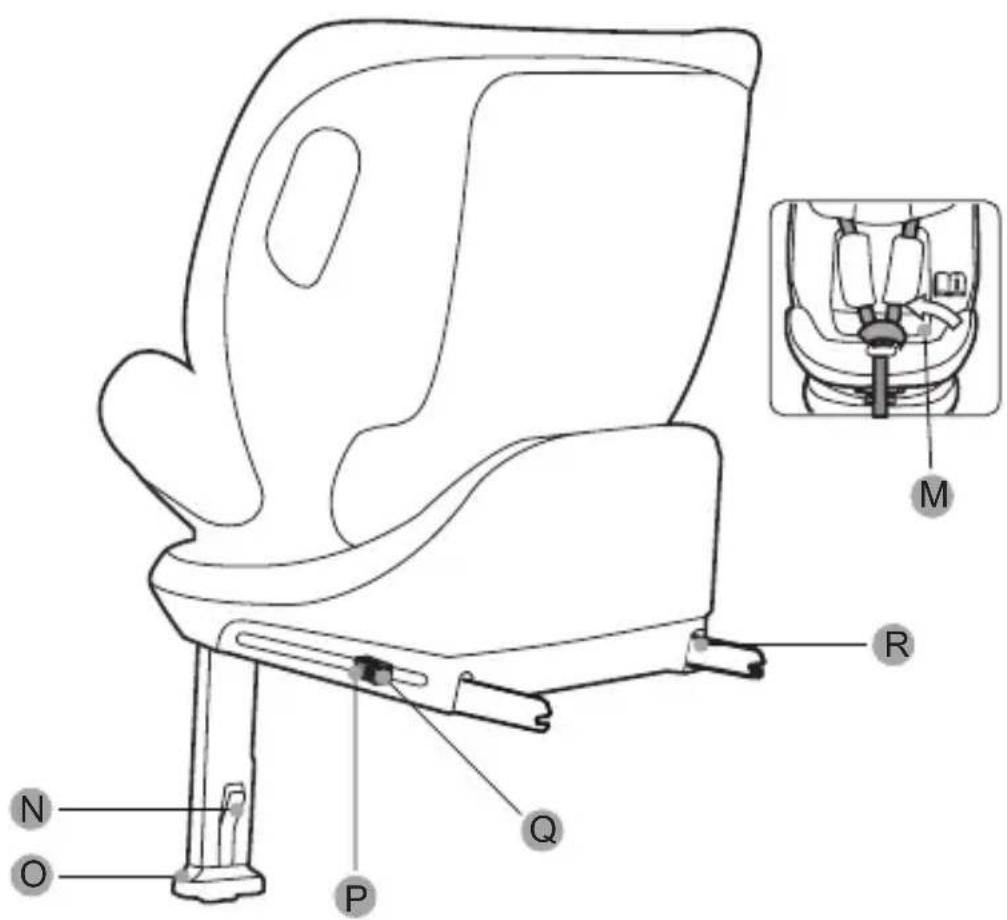
M. Instruction storage bag
N. Supporting Leg Adjustment Button
O. Supporting Leg Indicator
P. ISOFIX Attachment Second Lock
Q.ISOFIXAttachmentReleaseButton
R. ISOFIX Attachment
3. Notice for vehicle use

The baby car seat must not be used into the position of a seat where there has an airbag (airbags can be fatal to children). Please read the instructions carefully in order to properly use of child safety seats.
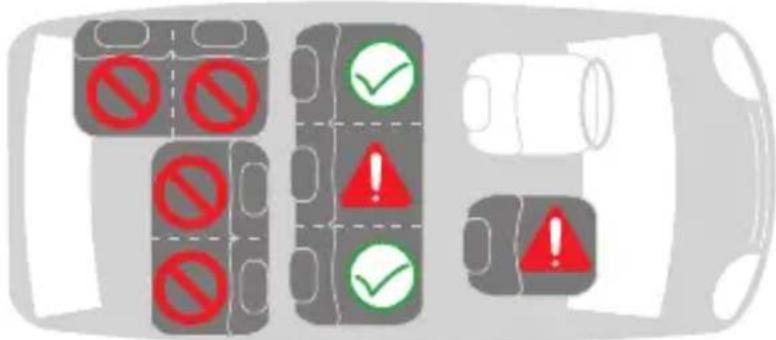

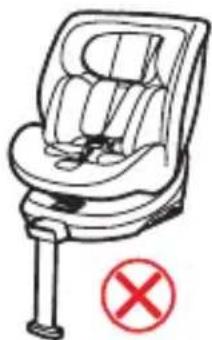
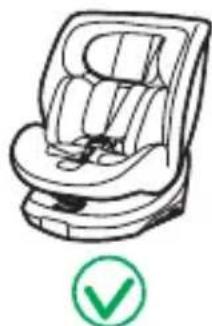
Correct device/suitable

Wrong device/ unsuitable device

Must not be used in the passenger seat where airbags have been activated.
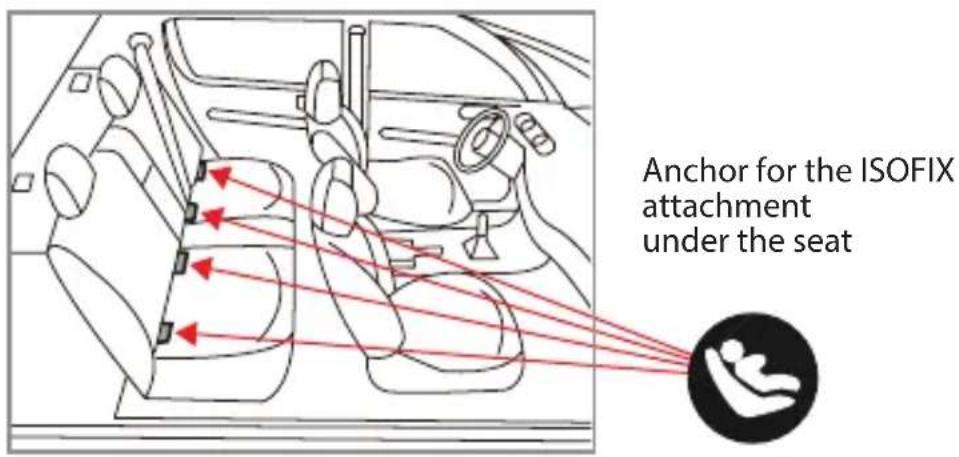
Baby car seat ISOFIX attachment
Read the car manual first and check whether the car seat is equipped with ISOFIX attachment fixed anchor points, and check the size of recommended ISOFIX attachment constraints on the system if it is matched our ISOFIX attachment size.
| Height Size facing direction | |
| 40-105cm ISO/R2 rearward facing | |
| 76-105cm ISO/F2X | forward facing |
| 100-150cm ISO/B2 |
4. The adjustment and installation of child safety seat
4.1 The usage of buckle
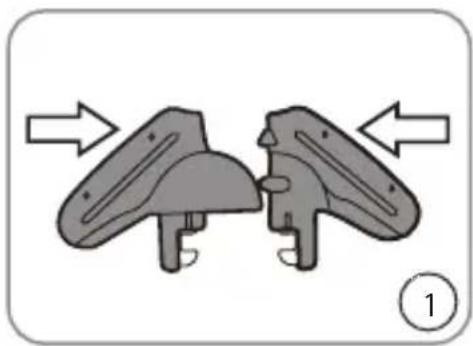
- Close the left and right latches of the buckle (as shown in Figure 1) and ensure that the concave and convex structures of the left and right latches are closed.
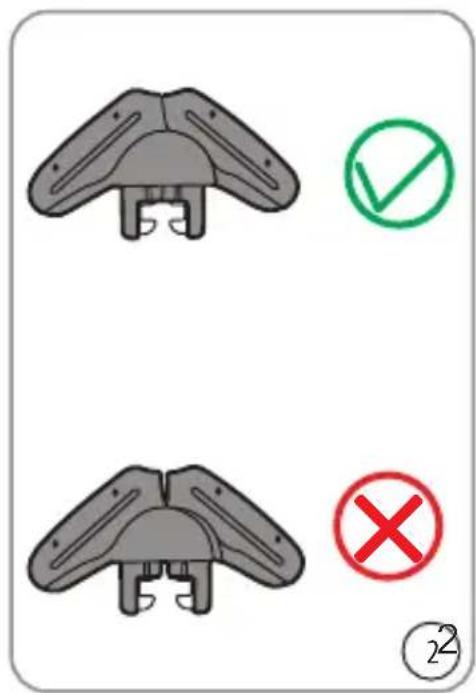
- Close the left and right latches without leaving a gap. Keep the latches facing up. (Figure 2).
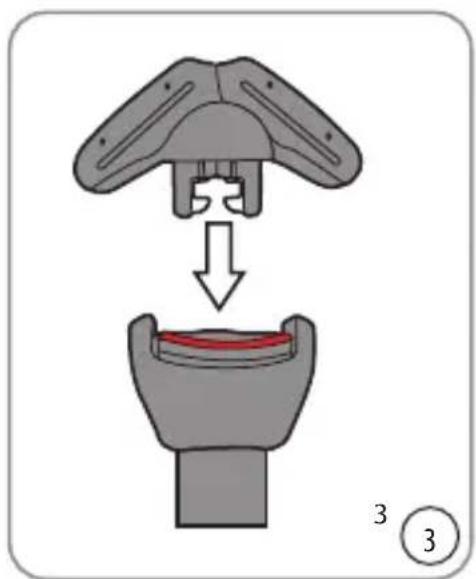
- Insert the closed latches into the slot of the buckle. (Figure 3).
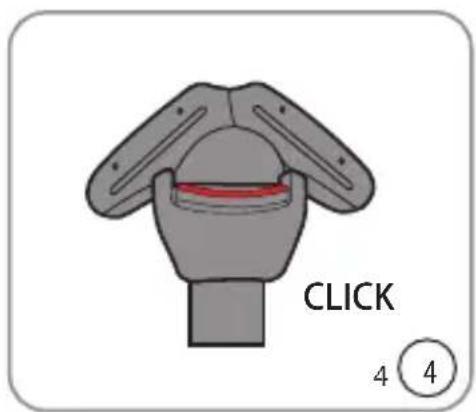
- If you hear "click" sound, it means that the buckle has been fastened. (Figure 4)
4.2 Adjust the safety belt.
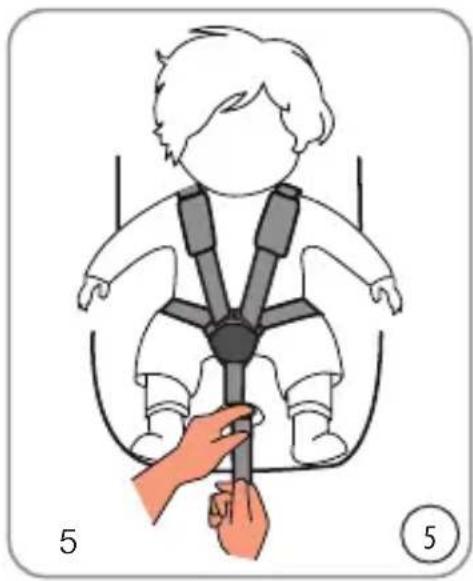
- Tighten your baby car seat belt Pull the shoulder strap up to tighten the loose part of the leg belt.
Then pull the adjustable belt to tighten the belt (Figure 5).
Keep your seat belt as tight as possible without causing discomfort. The leg belt should be as low as possible and should be near the crotch, not the belly
A finger space should t between the seat belt and the child.
A loose seat belt is dangerous. Check that the seat belt adjuster is working properly each time when you place a child in a car seat before tightening the seat belt.
- Loose the seat belt
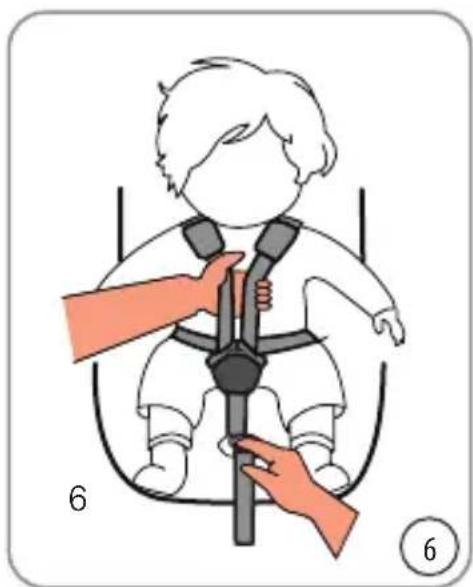
The seat belt can be loosened by pressing the 5-point seat belt adjustment button in front of the seat. While pressing down the 5-point seat belt adjustment button, hold the two straps under the shoulder guard with the other hand and pull them in front of the child to release the seat belt (Figure 6).
4.3 Adjust the height of headrest
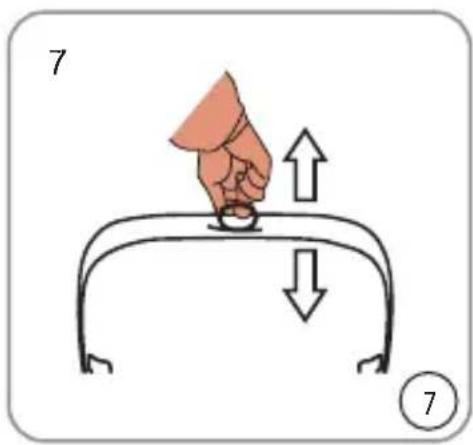
- Use the five-point seat belt adjustment button under the front of the seat to loosen the seat belt, unlock the buckle, pull the headrest adjustment handle up, move the headrest to the correct shoulder belt height, and then gently slide the headrest down to check that the headrest is properly hinged (Figure 7).
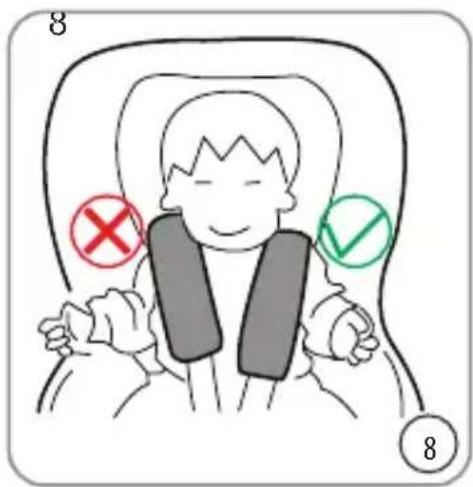
- Correctly adjusting the headrest can ensure the best protection for your child in the car seat; The headrest must be adjusted to the position that the shoulder strap is compatible with the height of a child's shoulders or slightly higher.
The straps must be located at shoulder height or slightly above the child's shoulder height. The shoulder strap should not be behind the child or at or above the ear (Figure 8).

Note: It is important to keep the headrest appropriate to the height of the child's head.
4.4 Adjust the angle reclining of car seat
The child safety seat can be adjusted to different reclining positions. You can adjust the reclining angle of the seat even when your child is in it.
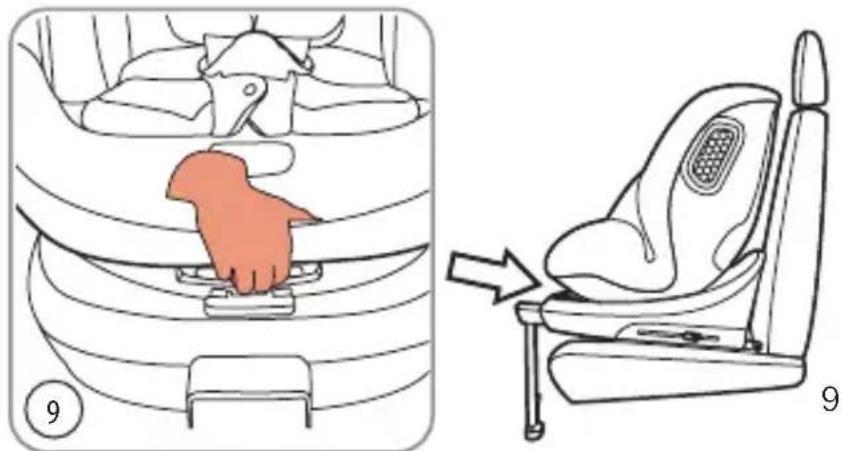
rearward :
Press the base part of the seat with one hand and pull the angle adjusting handle on the back of the seat with the other hand to adjust the seat to the appropriate position, 5 positions in total (Figure 9).

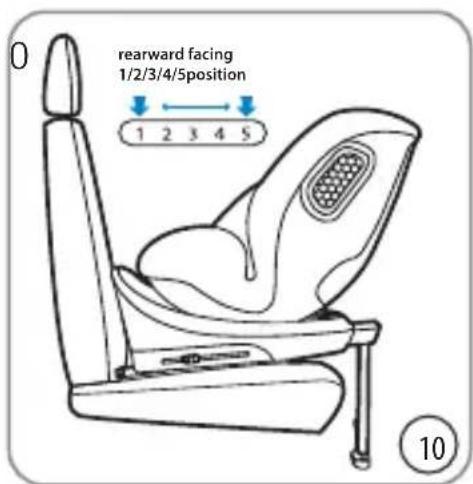
when the baby car seat is rearward facing;
Use 1,2,3,4,5 position (Figure 10)
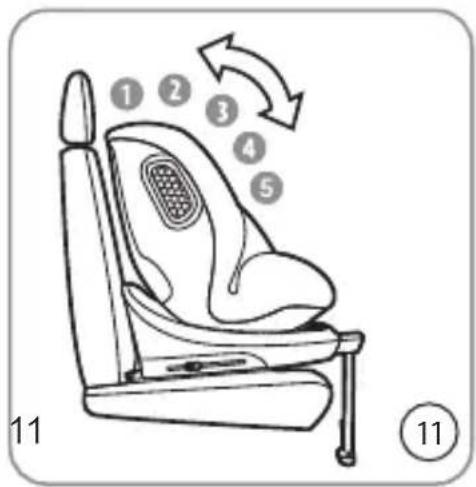
forward facing:
Press the base of the seat with one hand and pull the angle adjusting handle on the back of the seat with the other hand to adjust the seat to the appropriate position, a total of 5 positions.

when the baby car seat is rearward facing;
pls use 1,2,3,4,5 position (Figure 11);
4.5 New born cushion
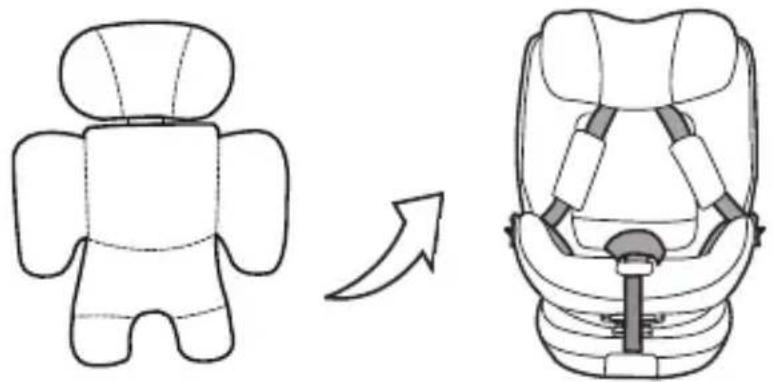

Notice:
When the height of baby is 40-75cm, please use the newborn baby's cushion.
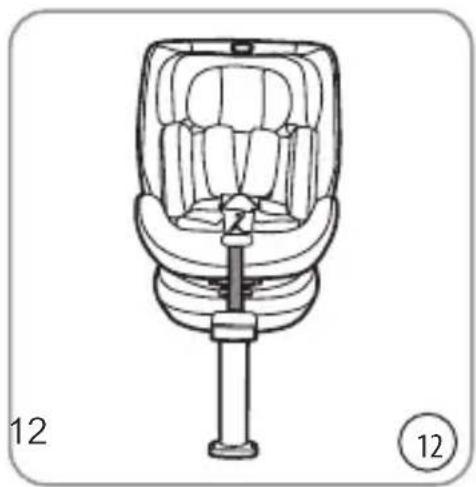
Place the new born cushion in the car seat, place the two shoulder pads on the new born cushion, and finally cover the buckle cushion on (Figure 12).
4.6 Rotation function
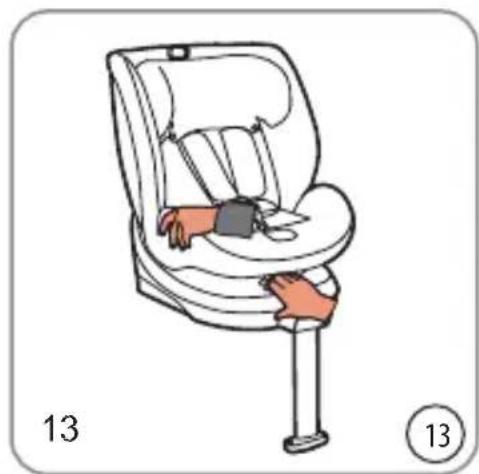
- Take the supporting leg out of the storage at the bottom of the base;
- Press the supporting leg expansion button and pull out the leg (Figure 13);
- Press the rotation button and rotate the seat (Figure 14).

Attention! Before each trip, pls make sure that the seat rotation is locked by turning the seat in both directions.

Attention! Before each trip, pls make sure that the seat rotation is locked by turning the seat in both directions.

Attention! Before each trip, pls make sure that the seat rotation is locked by turning the seat in both directions.
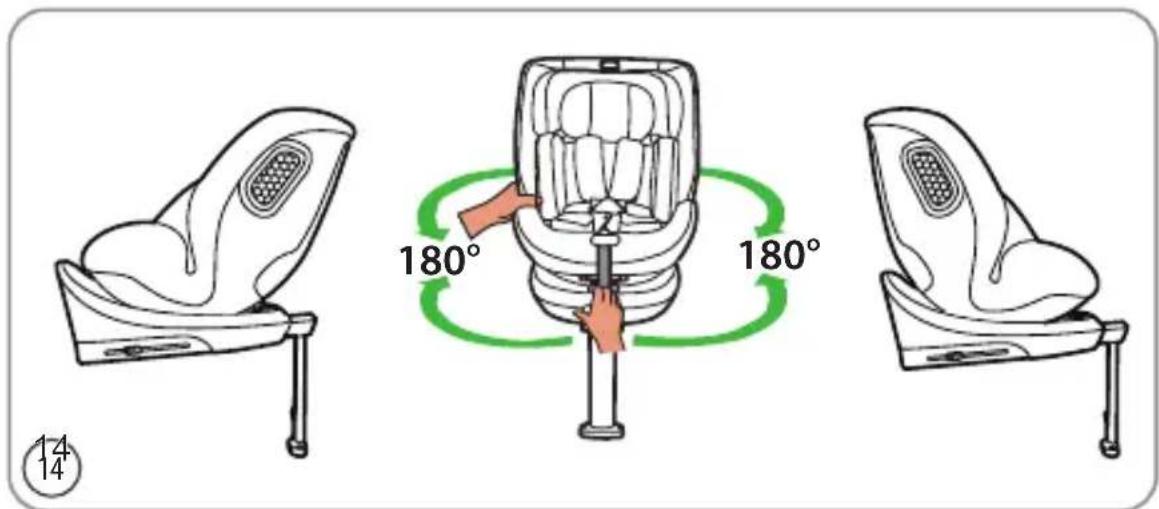
4.7 5-point harness system to install the child
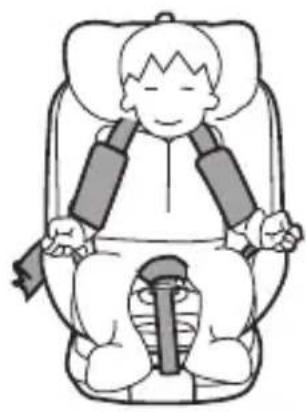
- Release the safety belt to the most loosely, then unlock the buckle and place it on both sides of the seat, as shown in the picture.
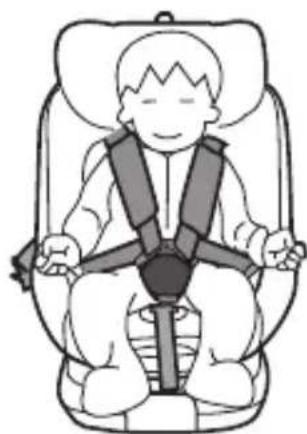
- Insert the left and right latches into the buckle and hear a "click" sound, indicating that the buckle is fastened. Press the adjustable belt button to adjust and tighten the shoulder strap, while ensuring that the child's shoulders are comfortable (a finger space should t between the seat belt and the child).
4.8 The method to remove the 5-point seat belt system
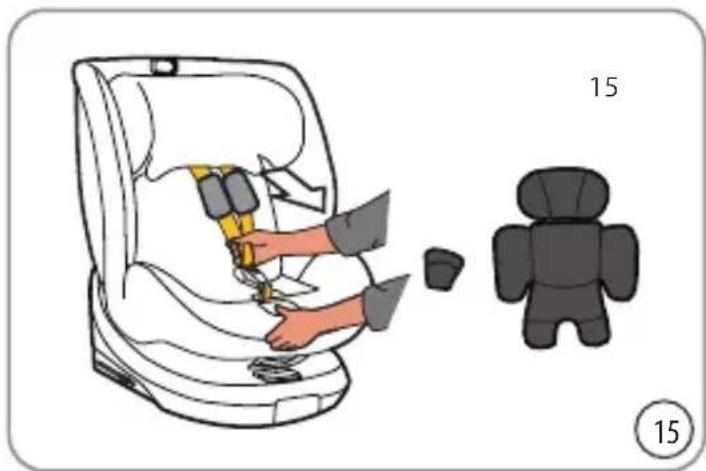
- Remove shoulder pads, buckle cover and new born cushion from the seat (Figure 15).
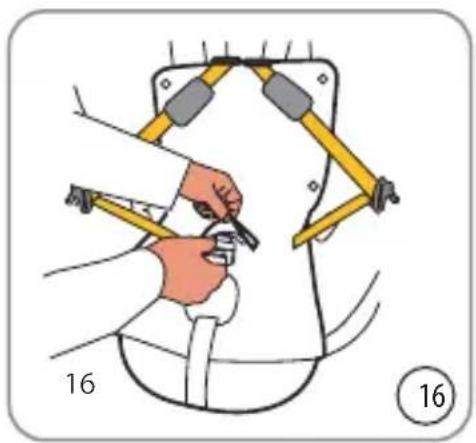
- Pass the buckle through the hole in the cloth sleeve, as shown in Figure 16.
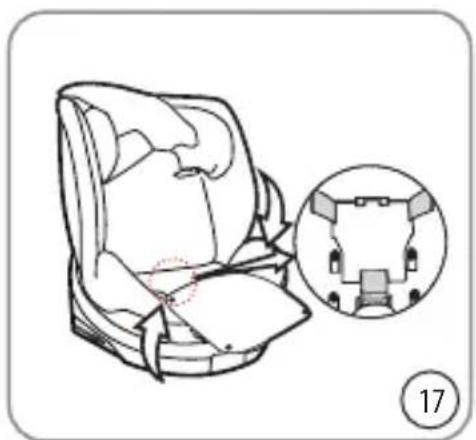
- Open the buttons of the seat cloth cover as shown. Insert the latches insert into the buckle.
Open the buckle cover at the bottom of the seat, place the buckle in, and finally close the cover (Figure 17).
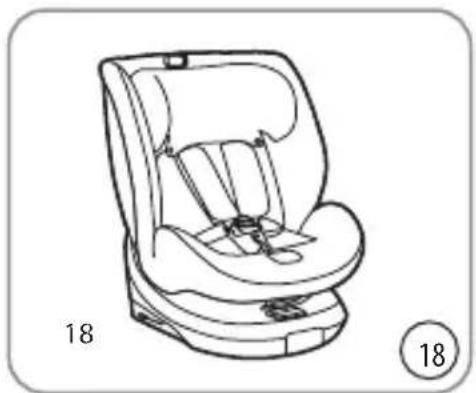
- Tidy up the cloth cover, as shown in Figure18.
4.9 Installing method for ISOFIX attachment

Notice: Child safety seats can also be used with the ISOFIX attachment guider.
The installation is more convenient, please clip the ISOFIX attachment guide on the ISOFIX attachment anchor point on the ISOFIX attachment fixed point of the automobile, and the make notch faces upward (Figure 19).
Notice: If your car seat can adjust the angle, pls adjust the car seat angle to the appropriate position, it will be more convenient for ISOFIX attachment installation.
-
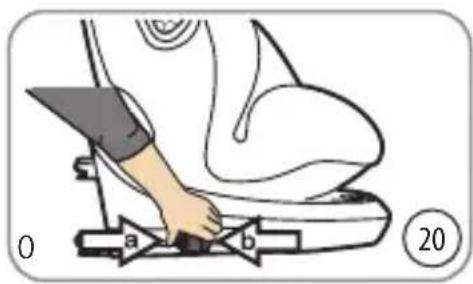
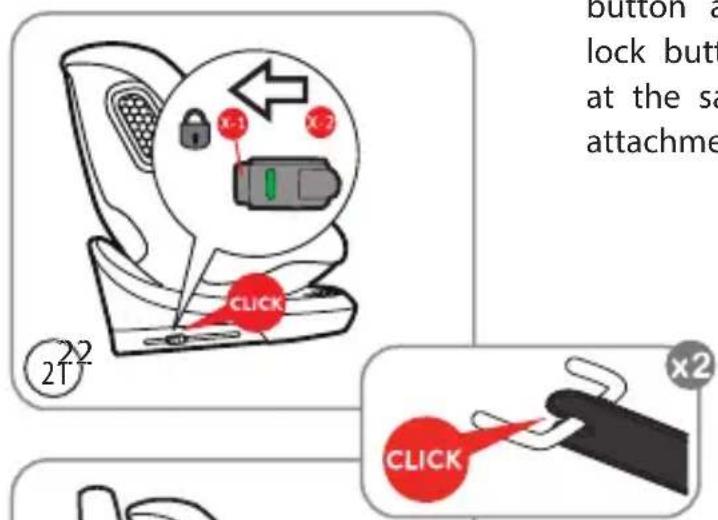
Press ISOFIX attachment lock released button and ISOFIX attachment 2nd lock button (as shown in Figure 20) at the same time, then push ISOFIX attachment out.
-
When the ISOFIX is locked, push the child safety seat vigorously in the direction of the arrow to make it t the back of the vehicle seat (figure 21).
When the ISOFIX is locked, pls push the child safety seat vigorously in the direction of the arrow to make it t the back of the car seat (figure 22).
4.10 Remove ISOFIX attachment and hide the Support leg
4-10-1 Removing the ISOFIX attachment
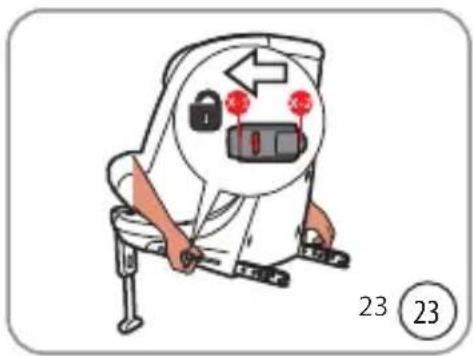
Press the "ISOFIX attachment unlock button", and hear "click" sound, ensure that both sides of the ISOFIX attachment are unlocked, then remove the seat (Figure 23).

Notice: ISOFIX attachment is unlocked correctly only when the left and right ISOFIX indicator show red.
4-10-2 Hide the support leg
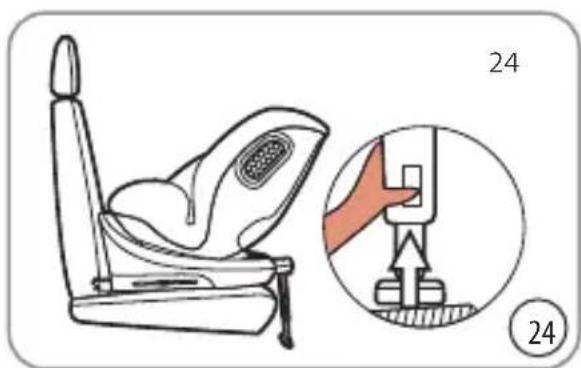
Press the supporting leg adjustment button and pull the Support leg up (Figure 24).
4.11 Release and storage of support legs
4-11-1 Release of support leg
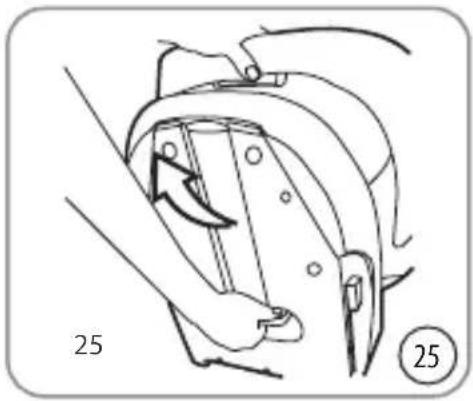
- Put the bottom of the seat in the displayed state as shown in the figure, and take out the supporting legs from the storage bin at the bottom of the base (Figure 25).
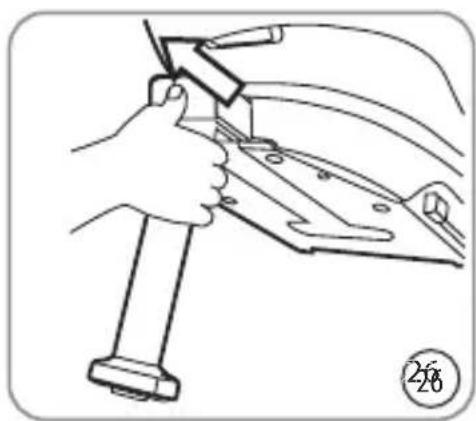
- Use your hands to support your legs and pull them out to the outside (Figure 26).
4-11-2 Support leg storage
Support leg storage According to the reverse operation of the release of the support leg.
The operation is OK.
4.12 Installation of Support leg
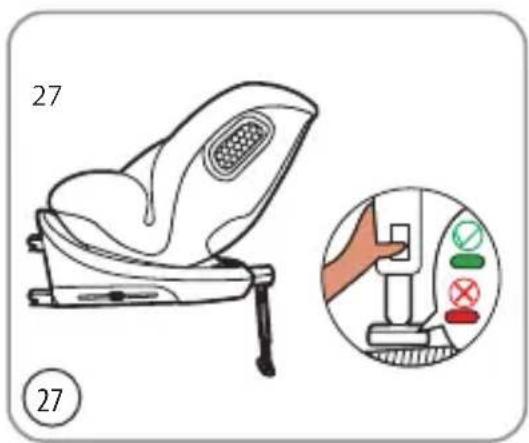
-
Take the Support leg out from the storage bin at the bottom of the base.
-
Press the expansion button to pull the support leg out.
-
Place child in car seat and secure with 5-point seat belt system.

Notice: when the Support leg touches the car surface, the Support leg indicator must be all green (as shown in the figure 27.

Notice:
- Check and tighten ISOFIX attachment, Support leg and 5-point seat belt system to ensure seat and child are firmly fixed.
- The 5-point seat belt should not be twisted or wound.
- When installing the car seat by rearward facing and children's height is less than 75cm , it must use new born cushion.
- We recommend to install car seat with ISOFIX attachment guider .
- The seat must be as close to (against) the back of the vehicle seat as possible
- The child restraint system should not be installed in the position where the airbag is installed in the rearward facing position.

The 100-150cm I-Size Booster seat cannot use the Support leg.
5. Installation method
5.1 Making rearward facing position by using ISOFIX attachment+ Support leg (suitable for children height from40-105cm).
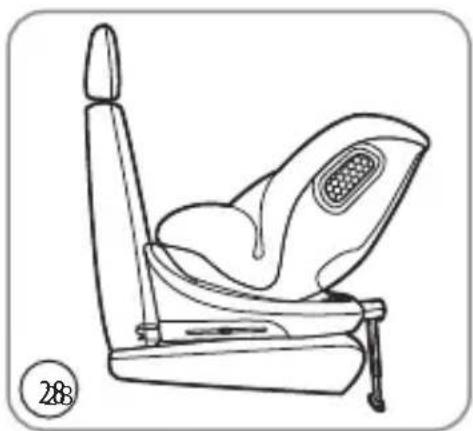
- When installing the child safety seat in the rearward facing position, take the Support leg out from the bottom of the seat according to method 4-11 and then rotate the seat to the rearward position according to method figure 28.
Then according to method 4-9, installing the ISOFIX attachment to the car seat firmly.
Attention! If your child's height is less than 105cm, pls use rearward facing.
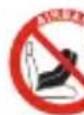

Warning: This child car seat must not be used in a vehicle seat where airbag has been activated.
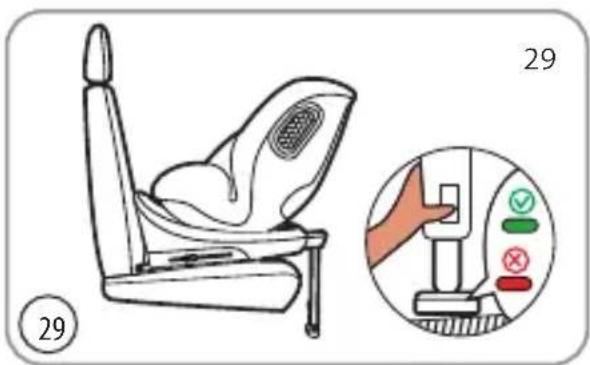
- Press the supporting adjustment button by your hand and pull the Support leg down until it touches the car surface.
- Place the child in car seat and secure with 5-point seat belt system.

Attention: When the supporting leg touches the car surface, the support leg indicator must be all green (as shown in the figure).
5.2 Installing the child safety seat forward facing position by using ISOFIX attachment+ Support leg (suitable for children height from 76-105cm).
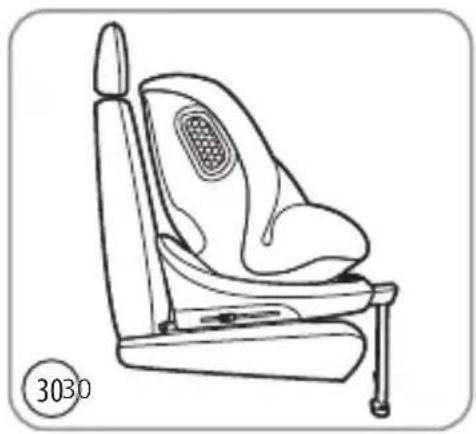
- When installing the child safety seat in the forward facing position, take the Support leg out from the bottom of the seat according to method 4-11, and then rotate the seat to the forward position according to method figure 30.
Then according to method 4-9, Installing the ISOFIX attachment to the car seat firmly.
-
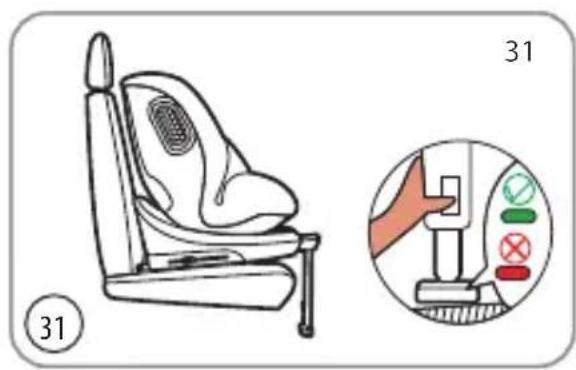
Press the Support leg adjustment button by your hand and pull the Support leg down until it touches the car surface (Figure 31).
-
Place the child in car seat and secure with 5-point seat belt system.

Attention: When the support leg touches the car surface, the support leg indicator must be all green (as shown in the figure).
5.3 Installing the car seat forward facing position by using ISOFIX attachment+ 3-point seat belt (suitable for children height from 100-150cm).
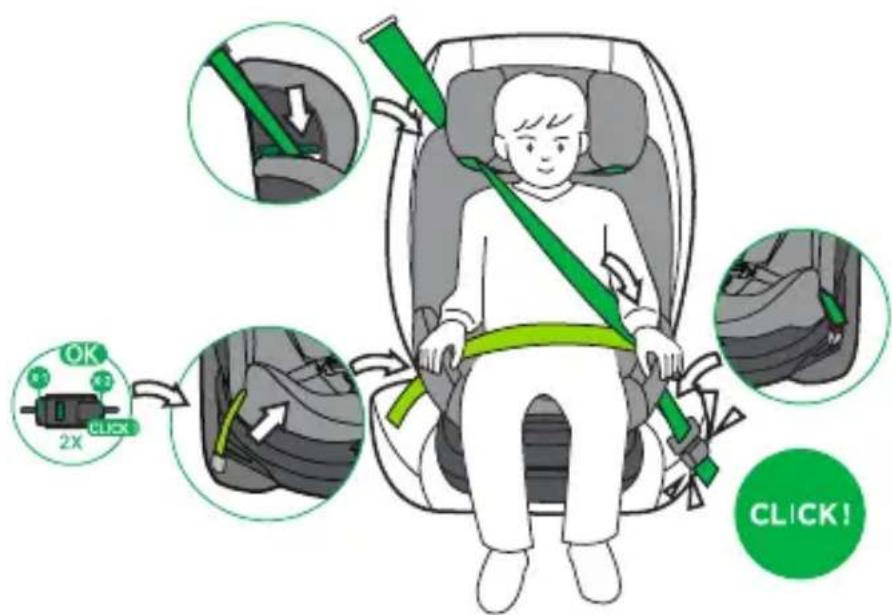
- Remove the 5-point safety belt system before placing the child in this way (method 4-8).
- Fasten the car seat through ISOFIX attachment and ISOFIX attachment anchor points on the vehicle seat according to the method 4-9.
- Place the child seat on the vehicle seat and adjust the seat to the appropriate position (method 4-4).
- The vehicle seat belt passes through the belt guider and pass the child's shoulder.
- Vehicle seat abdominal belt through the belt guider and pass the child's pelvis.
- Fasten your car seat belt.

The 100-150cm I-Size Booster seat cannot use the Support leg.
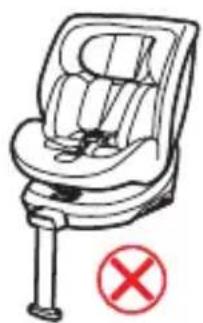
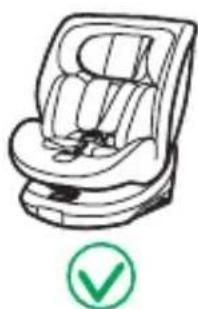
5.4 Use 3-point seat belt to install the child safety seat in forward facing position (Suitable for children height from 100-150cm).
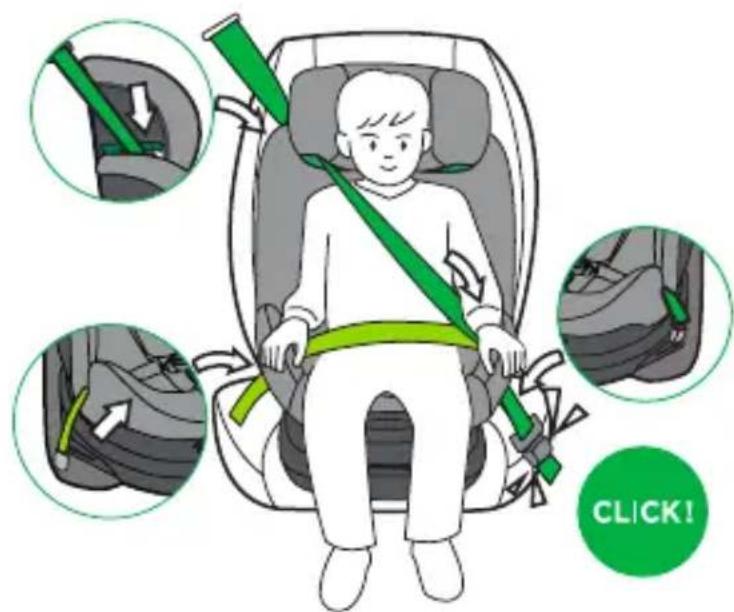
- Remove the 5-point safety belt system before placing the child in this way (method 4-8).
- Place the child seat on the vehicle seat and adjust the seat to the appropriate position (method 4-4).
- The vehicle seat belt passes through the belt guider and pass the child's shoulder.
- Vehicle seat abdominal belt through the belt guider and pass the child's pelvis.
- Fasten your car seat belt.

The 100-150cm I-Size Booster seat cannot use the Support leg.
6. Installation of cloth cover
Removal of the cloth cover
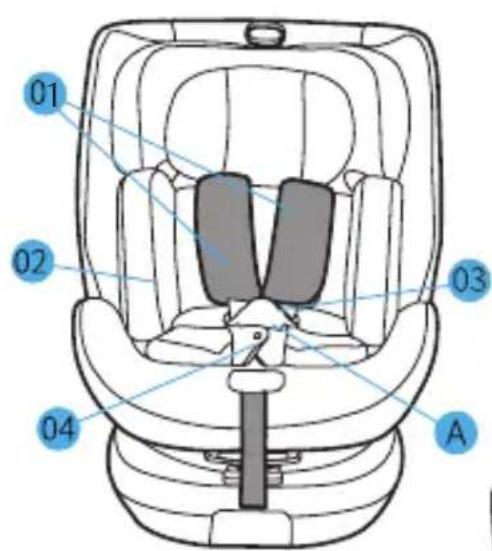
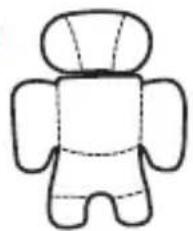
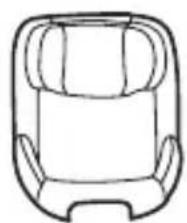
- Adjust the shoulder straps (01)
- Press the red button A on the buckle to open the buckle (03)
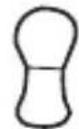
- Take out the inner liner (02) and snap pad (04)
- Carefully remove the headrest cover and seat cover from the seat.
7. Cleaning and maintenance
- In the daily using, it is necessary to regularly check the child safety seat,
- In case of accident, the safety seat must be replaced.
When the car seat is not in use, the child safety seat should be placed in a dry and ventilated place to avoid damp and mildew.
- If there is dust on the surface of the child safety seat, we can use a damp sponge to wipe and ventilate it to dry.
- If food or drink drops onto the seat belt by accident, pls remove the seat belt and rinse thoroughly with warm water and ventilate it to dry.
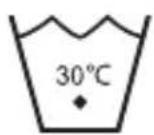
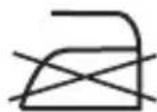
- To clean the entire seat cover, please refer to the washing instructions.
- Slight fading may occur during the first washing, which it is a normal situation.
Washing instructions:



Attention
AVIS
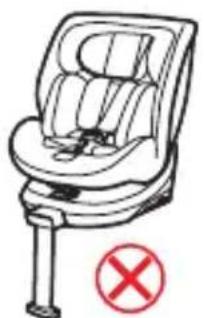
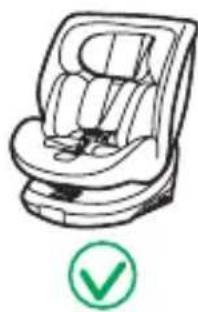
Installation cor- recte/adaptee

Installation incorrecte / inadaptee

All of the intellectual property rights for the contents of this instruction manual belong to PEG PEREGO S.p.A. and are protected by the laws in force.
- NOTICE
- EN INSTRUCTION MANUAL
- SAFETY INSTRUCTIONS
- EACH COMPONENT
- NOTICE FOR VEHICLE USE
- THE ADJUSTMENT AND INSTALLATION OF CHILD SAFETY SEAT
- 4.1 THE USAGE OF BUCKLE
- 4.2 ADJUST THE SAFETY BELT
- 4.3 ADJUST THE HEIGHT OF HEADREST
- 4.4 ADJUST THE ANGLE RECLINING OF CAR SEAT
- REARWARD
- FORWARD FACING
- 4.5 NEW BORN CUSHION
- 4.6 ROTATION FUNCTION
- 4.7 5-POINT HARNESS SYSTEM TO INSTALL THE CHILD
- 4.8 THE METHOD TO REMOVE THE 5-POINT SEAT BELT SYSTEM
- 4.9 INSTALLING METHOD FOR ISOFIX ATTACHMENT
- 4.10 REMOVE ISOFIX ATTACHMENT AND HIDE THE SUPPORT LEG
- 4-10-2 HIDE THE SUPPORT LEG
- 4.11 RELEASE AND STORAGE OF SUPPORT LEGS
- 4-11-1 RELEASE OF SUPPORT LEG
- 4-11-2 SUPPORT LEG STORAGE
- 4.12 INSTALLATION OF SUPPORT LEG
- INSTALLATION METHOD
- INSTALLATION OF CLOTH COVER
- CLEANING AND MAINTENANCE
- WASHING INSTRUCTIONS
- ATTENTION
- AVIS
Brand : Burigotto
Model : Boavista Spin
Category : Child car seat