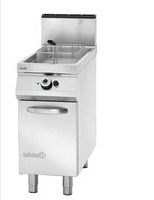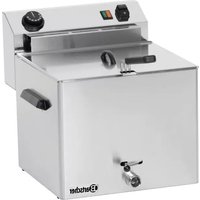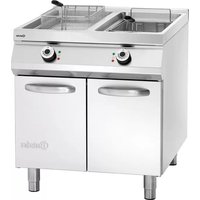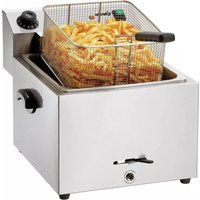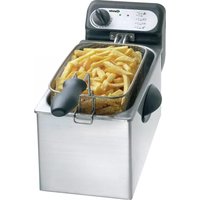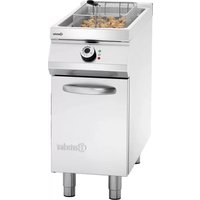
296630 - Deep fryer BARTSCHER - Free user manual and instructions
Find the device manual for free 296630 BARTSCHER in PDF.


| Product type | Professional deep fryer |
| Brand | Bartscher |
| Model | 296630 |
| Usage | Frying food products in gastronomic establishments |
| Power supply | 380-415V 3N~ 50-60Hz or 220-240V 3~ 50-60Hz |
| Power | Not specified (check rating plate) |
| Body material | Stainless steel |
| Thermostat | Adjustable with temperature indicator |
| Indicator lights | Green (power), White (heating), Red (safety) |
| Safety device | Overheat safety thermostat |
| Oil tank | Removable with min and max levels |
| Frying basket | Included (full capacity), half-capacity option |
| Lid | Included |
| Drain valve | Yes, for oil draining |
| Cleaning | Do not wash with water jet, use food-safe cleaning products |
| Installation | Minimum distance 5 cm from walls, adjustable feet |
| Electrical connection | By qualified technician, circuit breaker required |
| Optional accessories | Half-capacity basket, full capacity basket |
| Standards | CE, WEEE (recycling) |
| Repairability | Original spare parts, service by authorized technician |
| Maintenance | Daily cleaning of tank and accessories, thermostat check |
Frequently Asked Questions - 296630 BARTSCHER
User questions about 296630 BARTSCHER
0 question about this device. Answer the ones you know or ask your own.
Ask a new question about this device
Download the instructions for your Deep fryer in PDF format for free! Find your manual 296630 - BARTSCHER and take your electronic device back in hand. On this page are published all the documents necessary for the use of your device. 296630 by BARTSCHER.
USER MANUAL 296630 BARTSCHER
ELEKT RIS C H E F RITT EUSE
ELECTRIC FRYER
FRITEUSE ÉLECTRIQUE
FRIGGITRICE ELETTRICA
FREIDORA ELÉCTRICA
FRITADEIRA ELÉTRICA
natural_image
Exterior view of a stainless steel commercial kitchen with two side bays and control knobs (no visible text or symbols)INSTALLATION, OPERATING AND MAINTENANCE NSTRUCTIONS
MANUEL D'INSTALLATION, D'UTILISATION ET D'ENTRETIEN
Technical changes reserved!
FR
natural_image
Diagram of a two-woven food item with a dashed arrow labeled 'A' pointing to it (no text or symbols on the object itself)natural_image
Circular industrial control knob with numeric dial and explosion icon (no readable text or symbols)
text_image
150 145 130 120 110 105 90 80
B

C

D
natural_image
Diagram showing two circular components with curved arrows indicating direction, labeled 'A' (no text or symbols on the components themselves)natural_image
Technical line drawing of a mechanical device with labeled component A (no text or symbols beyond label)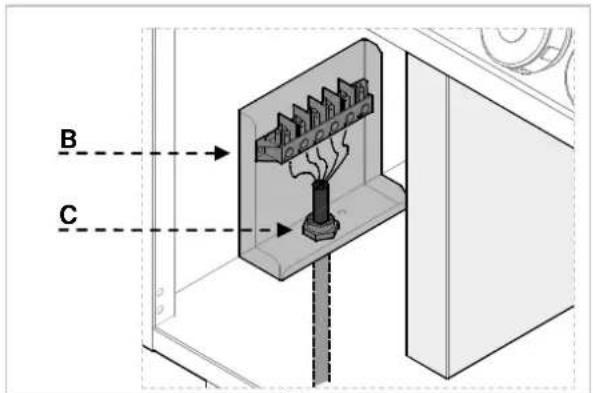
text_image
B Ctext_image
Technical diagram showing three mechanical assembly steps with labeled components and directional arrows indicating movement or force.8.5. Prüfung
- TABLE OF CONTENTS .... 1
- INDEX......2
- SAFETY 3
- GENERAL INFORMATION AND WARNINGS .... 4
4.1. General guidelines 4
4.2. Description of the appliance 4
4.3. Index plate 5
4.4. Exchange of components (service technician) 5
4.5. Elements and accessories 5
4.6. Protection devices....6
- USE AND OPERATION 6
5.1. Description of the controls 6
5.2. Switch the appliance on and off 7
5.3. Filling up the container 7
5.4. Draining the container 8
5.5. Guidelines on how to use the appliance 8
- CLEANING AND MAINTENANCE 9
6.1. Guidelines on cleaning and maintenance 9
6.2. Correct maintenance (service technician)....9
6.3. Cleaning the container 9
-
TROUBLESHOOTING 10
-
INSTALLATION....11
8.1. Packaging and unpacking 11
8.2. Installation (service technician) 11
8.3. Connection to the mains (service technician) 12
8.4. Installation of the appliance in a line 12
8.5. Check-up....13
- SETTINGS....13
10.APPLIANCE DISPOSAL 13
ATTACHMENTS....I
2. INDEX
A
APPLIANCE DISPOSAL 13
C
Check-up 13
Cleaning the container 9
Connection to the mains 12
Correct maintenance 9
D
Description of the appliance 4
Description of the controls 6
E
Elements and accessories 5
Exchange of components 5
G
General guidelines 4
Guidelines on cleaning 9
Guidelines on how to use the appliance 8
Guidelines on regular use of the appliance 8
|
Index plate 5
Installation 11
Installation of the appliance in a line 12
L
Longer interval in the use of the appliance 8
M
Maintenance 9
P
Packaging 11
Protection devices 6
S
SAFETY 3
Switch the appliance on and off 7
T
TROUBLESHOOTING 10
U
Unpacking 11
3. SAFETY

Read carefully the guidelines and actions in the instruction manual e you use the appliance.
The instruction manual contains general information on how to safely use and maintain the appliance. Retain the manual for future reference.

Electric installation conforms to CEI EN 5-1 and 60335-2-37 regulation.

To prevent any hazard, the damaged power cable may be replaced by the acturer or service personnel only.
The manufacturer took extra care when designing and manufacturing to prevent any safety or health hazard to the personnel operating the appliance.
Please read carefully the guidelines in the instruction manual and instructions placed directly onto the appliance. Above all, observe all the safety instructions.
Do not intervene in or remove the protective devices installed in the appliance. Non-compliance may lead to severe safety and health hazard against people. We recommend to perform a few tests to know the layout and main functions of the control panel, particularly those to switch the appliance on and off.
The appliance is intended only for the use it has been designed for and any other use is considered as the use not in compliance with the intended use.
The manufacturer is not liable for material damage or damage to person caused by misapplication or incorrect application of the appliance.
Any maintenance work that requires special technical licence or special skills may be performed by qualified personnel only.
To provide hygiene and protect foods from dirt, all the elements that have direct or indirect contact with the foods and all border areas must be thoroughly cleaned. Use only the cleaning agents intended for use in contact with food and avoid using flammable agents or harmful to health.
After each use of the appliance make sure that all the heating elements and control elements have been switched off and the cable unplugged.
In case of prolonged interval in using the appliance disconnect all power supply cables and thoroughly clean the inside and outside elements of the appliance.

In direct connection to the mains the switch should be supplied where wire dilation is large enough to secure connection in category III overvoltage, is in accordance with the installation

To avoid a risk of fire, check that the I is not below the minimum level in the container.

The oil change is recommended when colour is dark or when the smoke occurs in temperature 160 °C - 180 °C. The recently used oil has low ignition literature.

Remember that the food that is too or the load that is too high may cause to boil unexpectedly.

Use the oils or oil mixtures that are used for use in deep fryers.

Pay extra attention to the floor around pliance that may be slippery.

You must not clean the appliance with ect stream of water.
4. GENERAL INFORMATION AND WARNINGS
4.1. General guidelines
The manual has been edited by the manufacturer to provide the authorized personnel with the information necessary to work with the appliance. We recommend the intended readers to read the manual carefully and comply with the information. By reading the information contained in the manual, hazards against people health and safety may be prevented.
Retain the manual in an easily available place throughout the time of use of the appliance to have access and refer to the required information at any time.
Special symbols, described below, have been used to stress important information or draw attention to essential data: Caution - warning

Indicate important safety
instructions. You should acquire the proper conduct to prevent hazard against people health and safety or not to cause any damage.
Important
i Indicate essentials technical data that you cannot ignore.
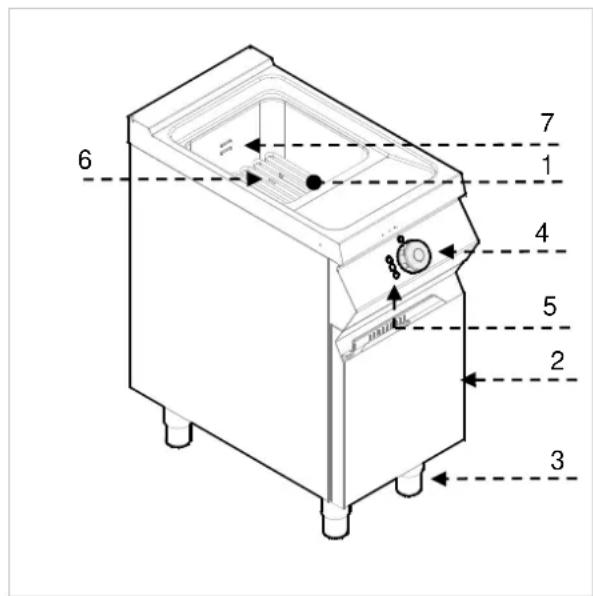
4.2. Description of the appliance
The appliance defined as the deep fryer has been designed and manufactured with the intended use to fry food in commercial food outlets. There is one or two-container option available depending on the need.
1) Container
2) Door
3) Height adjustable feet
4) Thermostat control knob to control oil temperature in the container
5) Controls
6) Heating coils: heating-up the oil in the container
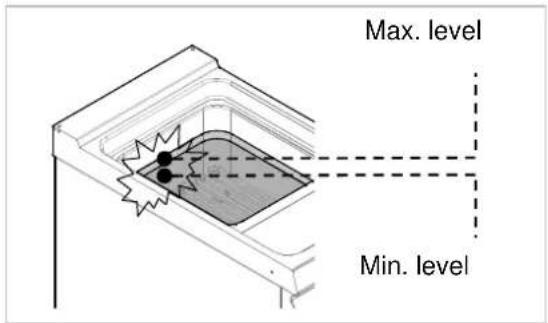
7) Minimum and maximum oil levels in the container.
text_image
6 7 1 4 5 2 34.3. Index plate
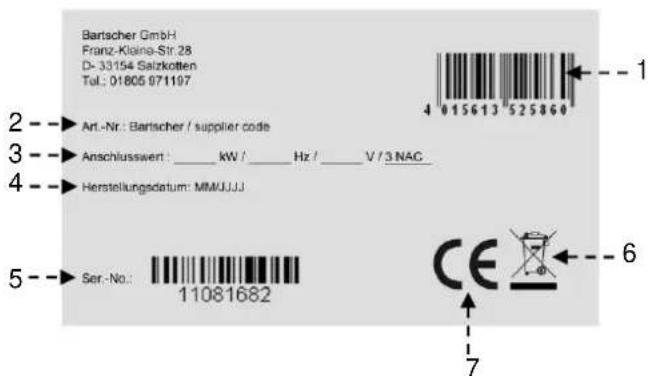
The index plate indicated in the drawing is mounted directly onto the appliance. There are all guidelines and information on the plate required for safe use.
1) EAN-No.
2) Code-No. / Model-No.
3) Connection: power / supply frequency / supply voltage
4) Date of production
5) Serial-No.
6) WEEE symbol
7) CE-marking
4.4. Exchange of components (service technician)

Before exchange of the component switch the existing protection devices.
In particular, switch off the electric supply with the electrical potential switch. If necessary, exchange the used components to the original spare parts.
We are not liable for personal injury or damage to the components that arise due to application of other spare parts than original or intervention into the appliance without the manufacturer's consent that may have altered the safety requirements.
4.5. Elements and accessories
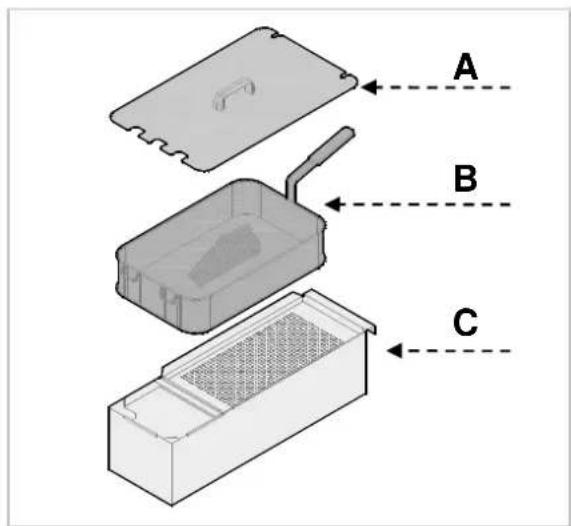
The appliance is delivered with the following elements:
A. Lid.
B. Frying basket.
C. Oil container.
text_image
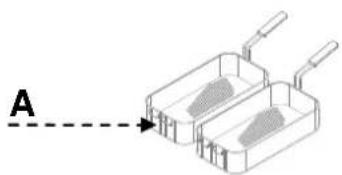
A B COn order, we can provide the following accessories:
A. Set - half capacity basket
B. Set - full capacity basket
natural_image
Diagram of two rectangular electronic components with handles, connected by a dashed line labeled 'A' (no text or symbols on the components themselves)4.6. Protection devices
The appliance is equipped with the following protection system:
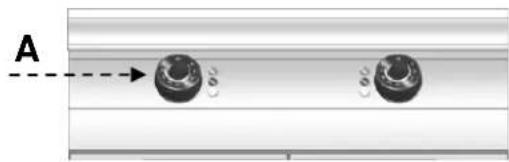
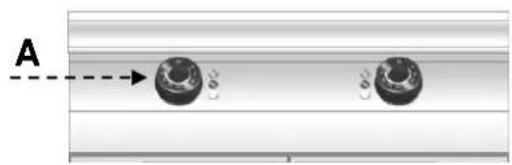
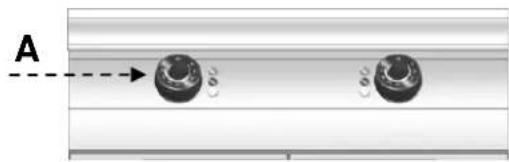
- Safety thermostat: it blocks the electric power supply in the case of over-heating. When the safety thermostat is on it is indicated by the red control light. The drawing shows the safety thermostats layout.
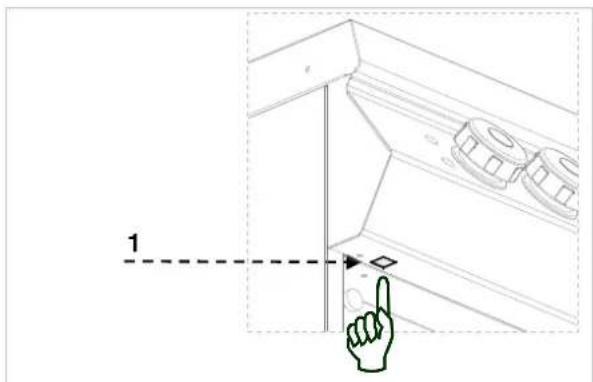
text_image
1
Check daily that the protection devices are d correctly and operational.
5. USE AND OPERATION
5.1. Description of the controls.
The elements controlling the essential functions are located on the control panel of the appliance.
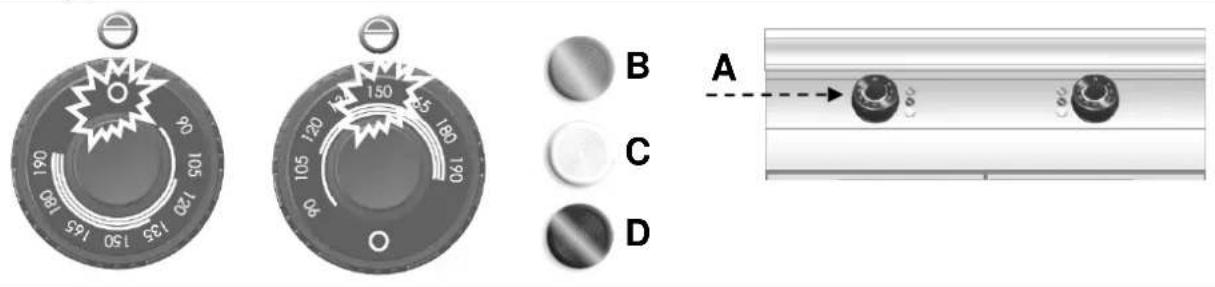
A) Temperature control: to switch the heating coils on and off.
B) Green control: indicates the power supply on.
C) White control: indicates that the deep foyer is being heated.
D) Red control: indicates the safety thermostats on.
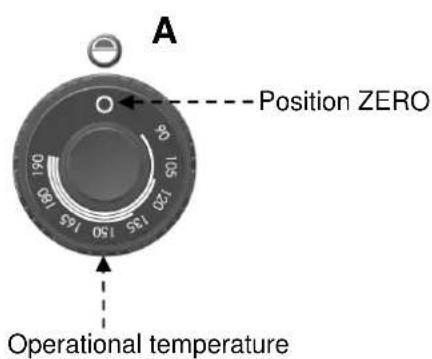
text_image
A Position ZERO Operational temperature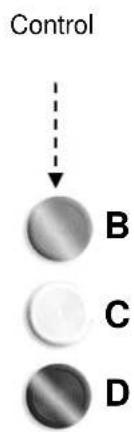
text_image
Control B C D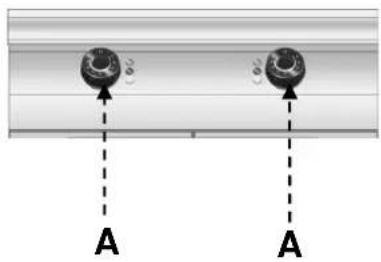
natural_image
Diagram showing two circular components with arrows pointing to a horizontal line, labeled 'A' at the bottom (no text or symbols on the components themselves)5.2. Switch the appliance on and off
ON
- Start the automatic switch-off to turn on the electrical connection.
- Fill up the container.
- Set the A control at the desired position. The green control (B) is on. The white
control C indicates heating up the oil. When the oil reaches the required temperature the white control C is off.
OFF
-
To switch off the electric heating coils set the knob A at the 0 position. The control (B) is off.
-
Start the automatic switch-off to turn off the electrical connection.
text_image
A B C D5.3. Filling up the container

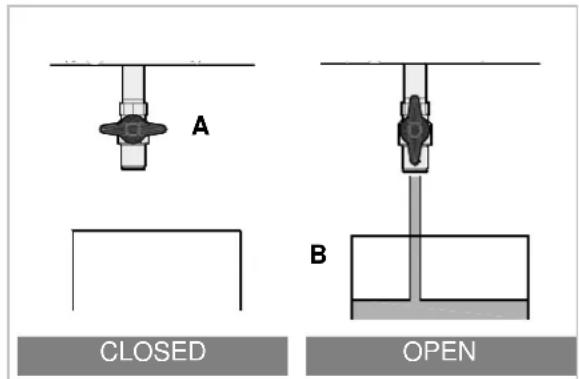
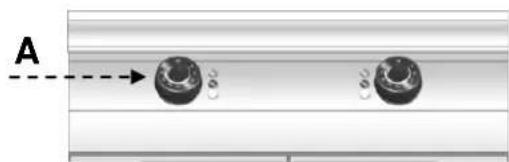
Before filling up the container check that let valve A is closed.

Avoid using the appliance with the er filled up with the oil below the marked m level.

We advise against the use of the appliance with the container filled up with the oil above the marked maximum level.

Never switch on the heating coils if there is no oil in the container. The appliance may be totally damaged.
text_image
Max. level Min. level5.4. Draining the container
Before draining the container, leave the appliance to cool down so that the oil is cold.
When draining the container follow the instructions below:
A. Open the door
B. Check that the oil container (B) is placed correctly under the outlet valve
C. Open the outlet valve (A)
D. Close the outlet valve (A) as soon as the oil container is full.
E. Remove the oil container (B)
F. Close the door.
text_image
A B CLOSED OPEN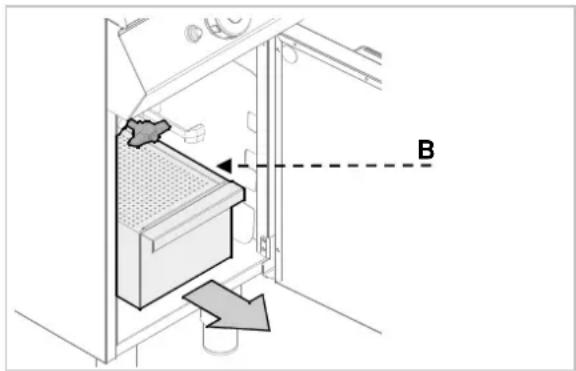
text_image
Diagram showing a door with labeled component B and directional arrows indicating movement or flowi Dispose the oil in accordance with the regulations binding in the where the appliance is in use.
5.5. Guidelines on how to use the appliance
Longer interval in the use of the appliance
When you plan not to use the appliance for the prolonged time, follow the instructions below:
- Turn on the automatic switch-off to disconnect from the mains.
- Thoroughly clean the appliance and surrounding areas.
- Apply the vaseline oil on the stainless steel surfaces.
- Perform all maintenance works;
- Do not cover the appliance and leave the container open.
When finished using the appliance, always empty the container.
Guidelines on regular use of the appliance
To ensure the correct use of the appliance, follow the guidelines below:
Use exclusively the accessories provided by the manufacturer;
▶ Use the frying baskets in the correct way;
Before filling up the container, check that the outlet valve is closed;
Make sure that the oil level is not below the minimum level marked in the container;
Before immersing the basket, check that the oil has reached the set temperature.
- Slowly immerse the basket to avoid excessive foam formation.
▶ Frequently filter the oil.
During the short breaks lower the temperature to reduce the oil consumption and slow down ageing the oil.
We recommend the change of oil when its colour is darker or when at the temperature 160 °C - 180 °C the smoke is forming. The old oil has a low ignition temperature.
Remember that the foods that are too moist or the load that is too high may cause the oil to boil unexpectedly.

Never use the appliance without the container. It may cause total age to the appliance.
When heating up the deep fryer, always remove the lid.
6. CLEANING AND MAINTENANCE
6.1. Guidelines on cleaning and maintenance

Before you start maintenance works, turn the mounted protective devices. In
particular, disconnect the electric power supply by means of the automatic switch-off.
6.2. Correct maintenance (service technician)
The correct maintenance covers everyday clearing of all the elements that are in contact with foods.
Careful maintenance ensures the best performance, longer life of the appliance and proper operation of the protective devices.
Never direct the water stream or high pressure jet towards the appliance.
To clean the stainless steel, do not use iron wool or iron brush as they may leave iron particles on the surface that form rust in result of oxidation.
Use the wooden or plastic spatula, or soft cleaning sponge to remove the dried remains.
In the case of prolonged intervals in the use of the appliance, apply the vaseline oil onto all the stainless steel surfaces.

Do not use any clearing agents that substances hazardous or harmful to (solvents, petrol. etc.).
At the end of the working day clean:
container
- frying baskets and other accessories
appliance.
Regularly instruct the specialist personnel to perform the following maintenance works:
▶ check the electric installation;
▶ check the safety thermostats.
6.3. Cleaning the container
Follow the guidelines.
➢ Turn off the appliance and leave to cool down.
➢ Turn on the switch-off to disconnect from the electrical supply.
➢ Empty the container and filter the oil.
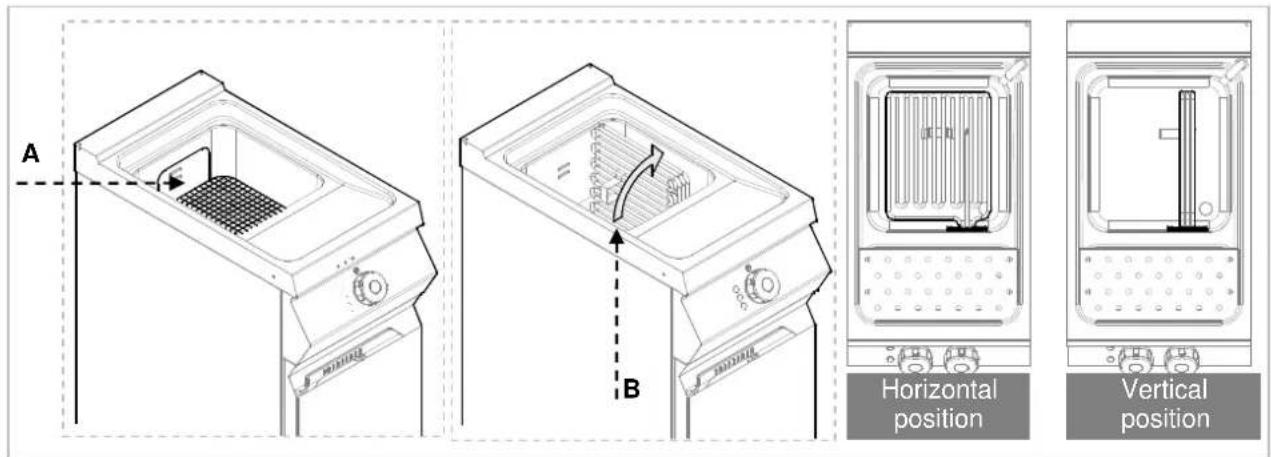
Remove and clean the frying baskets and basket handles (A).
➢ Place the heating coils (B) in the vertical position.
Clean the container inside using the cleaning agent intended for contact with foods.
➢ Rinse off with water and empty the container.
To remove the remaining cleaning agent the container can be sprinkled with a special agent or vinegar and water solution.
➢ Rinse off, empty and dry out the container.
When finished using the appliance, clean the elements with a proper agent to solve the fat. We recommend to wash the accessories in the dishwasher.
➢ Place the heating coils (B) in the horizontal position (operating position).
text_image
A B Horizontal position Vertical position7. TROUBLESHOOTING
The information below is provided to recognize and repair any failures that may occur when operating the appliance. Some of the failures can
be repaired by the user, others require thorough specialist knowledge. Such problems may be solved exclusively by the qualified personnel.
| Problem Cause Solution | ||
| The heating coils do not heat up. | The electrical connection is not correct. | Check the electrical connection. |
| Safety thermostats are on. | Reset the appliance (see the special chapter). | |
| Damaged heating coils switch. | Change the switch. ✗Inform the customer services. | |
8. INSTALLATION
8.1. Packaging and unpacking
During unloading and when installing the appliance follow the information from the manufacturer placed directly on the packaging and in this manual.
To lift and transport the product plan to use a fork lift or stacker, and pay attention to even weight distribution to avoid a risk of tilting of the packaging (avoid excessive incline!).

When using the lifting equipment pay attention to the mains cable, water supply and discharge pipes and feet position.
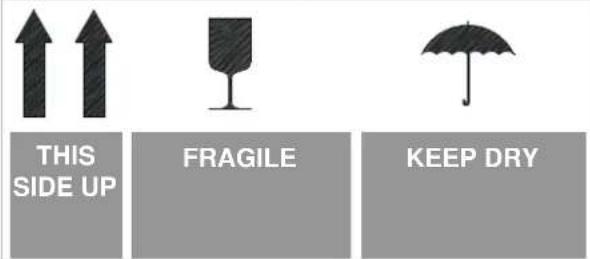
The packaging consists of the carton packaging and wooden pallet. There are symbols printed on the carton packaging that according to the international agreements inform about the regulations to follow when loading and unloading, transporting and storing the appliance.
text_image
THIS SIDE UP FRAGILE KEEP DRYWhen collecting the goods check if the packaging is complete and has not been damaged during transport.
Any damage should be immediately reported to the shipping company.
Unpack the appliance as soon as possible to check if the appliance is not damaged.
Do not use a sharp object to cut the carton box. It may damage the stainless steel inside the box.
Remove the carton packaging from bottom to top.
When unpacked check if the appliance is according to the order.
In case of any difference inform the sales agent immediately.

Do not store the packaging materials
(nylon bags, polystyrene foam, clips ...) in the reach of children!
Remove the protective PVC layer from the out and inner surfaces. If possible, do not use any metal tools.
8.2. Installation (service technician)
All the stages of the installation must be carefully planned.
The location should be equipped with all supply connections and production waste outlet. The location should also be properly lit and comply with all hygiene and sanitary requirements according to the binding regulations.
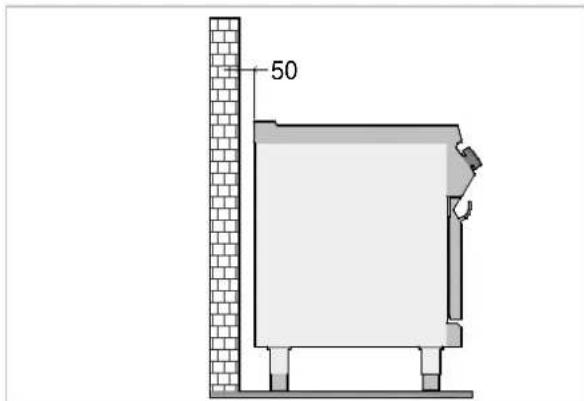
The appliance should be installed with the minimum 5 cm clearance from the wall, if the wall is not resistant to the minimum temperature of 150°C.
Locate the appliance in the horizontal position by adjusting the single feet.

To ensure the correct operation of the place, the appliance must be installed and in the thoroughly ventilated room only.
text_image
508.3. Connection to the mains (service technician)
The appliance may be connected to the mains exclusively by the authorized and qualified personnel and when the binding regulations are observed and when the proper material is used in accordance to the regulations.
The appliance is built to use the following power (see the attached table):
380-415V 3N\~ 50-60Hz
220-240V 3\~50-60Hz

To prevent any risks the damaged supply may be exchanged only by the acturer or expert.
The correct cross section of the cable is presented in the attachments and should be decided by the electrician.
To correctly connect the appliance, follow the following guidelines.
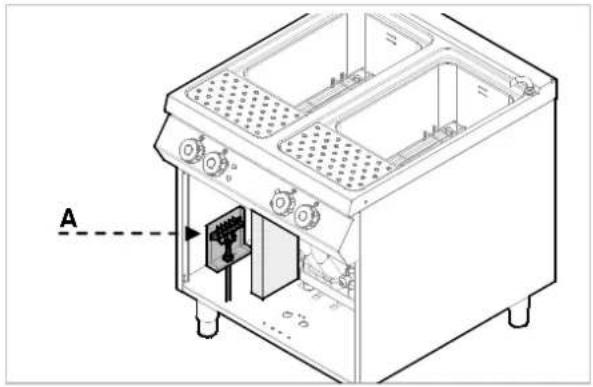
Remove the cover from term block (A).
Connect the switch-off to the term block (B) of the appliance, as shown in the drawing and block diagram (see the attachment). Preferably use cable H07RN-F type or better, which is resistant to high temperature min. up to 80°C.
▶ Tighten the cable endings (C).
Place the cover on the term.
natural_image
Technical line drawing of a mechanical device with labeled component A (no text or symbols beyond label)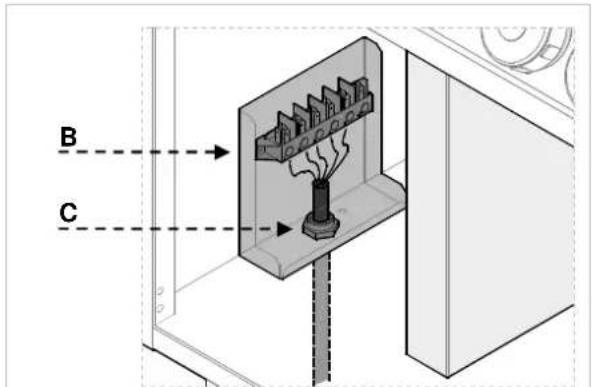
text_image
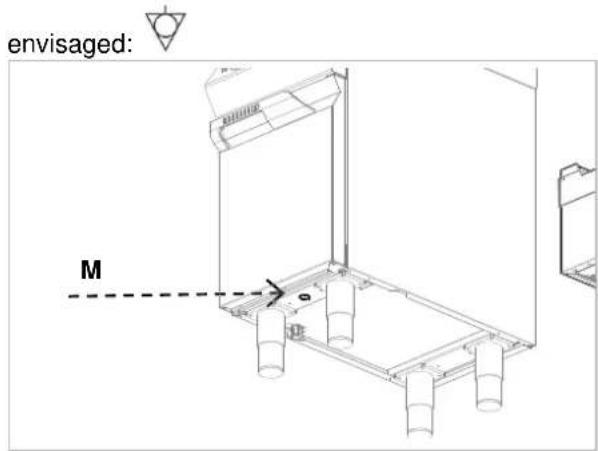
B CThe appliance is equipped with the equipotential clamp (M).
Respectively to the clamp used a special sticker is
text_image
envisaged: M8.4. Installation of the appliance in a line
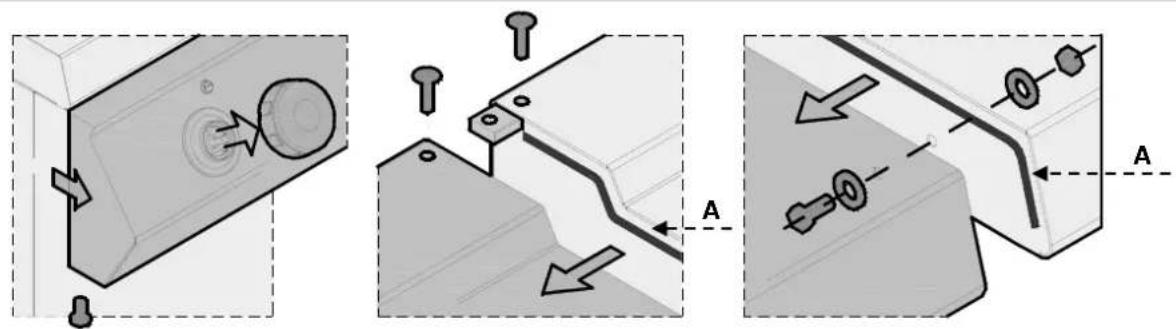
To fix the appliance in a line (neighbouring) follow the steps:
- Dismantle the control panel, and remove the cast iron frame from the chimney if necessary.
-
Apply the sealing tape (A) onto the joining sides.
-
Place the appliances next to each other and in a horizontal position (by adjusting the feet).
- Connect the appliances with the joining elements.
- Remove the excess of the sealant.
text_image
Technical diagram showing three mechanical assembly steps with labeled components and directional arrows indicating movement or force.8.5. Check-up
Before starting the appliance the installation check-up should be run to evaluate the working conditions of every single component and recognize any errors.
It is recommended to run the following check-ups:
- Check that the energy supply voltage is the same as of the appliance voltage.
- Turn on the automatic switch-off to check the electrical connections.
- Check that the protection devices work correctly.
9. SETTINGS
There are no special default settings of the appliance. The only settings are those set up by the user while using the appliance.
10. APPLIANCE DISPOSAL
The appliance is marked in conformity with the European Directive 2002/96/EG WASTE ELECTRICAL AND ELECTRONIC EQUIPMENT (WEEE).
By disposing the appliance in accordance with the regulations the user contributes towards prevention of adverse effects on environment and health.
The symbol on the product or attached manual indicates that the product cannot
be considered as ordinary household waste and should be transferred to a special collection point for electrical and electronic appliances for recycling.
Local waste management regulations should be observed.
Further information on procedure, reusing and recycling of the product is available in local offices, waste management unit or with the product sales agent.
1. SOMMAIRE
- SOMMAIRE .... 1
- INDEX....2
- SÉCURITÉ....3
- RÈGLES ET AVERTISSEMENTS GÉNÉRAUX 4
natural_image
Diagram of a two-woven food processor with a dashed arrow labeled 'A' pointing to the processor (no text or symbols on the diagram itself)text_image
Diagram showing airflow or ventilation inside a refrigerator with labeled component B and directional arrowsnatural_image
Technical line drawing of a mechanical device with labeled component A (no text or symbols beyond label)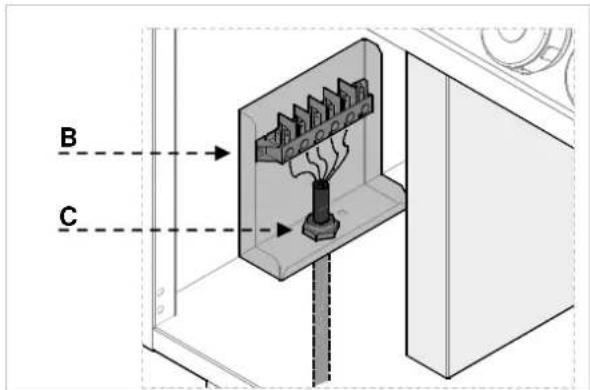
text_image
B Ctext_image
Technical diagram showing three mechanical assembly steps with labeled components and directional arrows indicating movement or force.8.5. Contrôle
natural_image
Diagram of two rectangular containers with handles and a dashed arrow labeled 'A' pointing to one container (no text or symbols on the containers themselves)natural_image
Close-up of a circular industrial control dial with numeric markings and a starburst pattern (no readable text or symbols)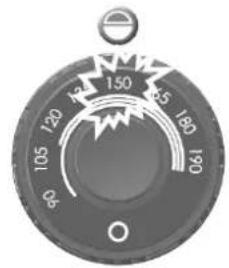
text_image
150 145 140 135 130 125 120 115 110 105 90 80
B

C

D
natural_image
Diagram showing two circular components on a horizontal surface with an arrow labeled 'A' pointing to one (no text or symbols present)5.3. Riempimento del serbatoio

text_image
Technical diagram showing a door mechanism with labeled component B and directional arrows indicating movement or flow.natural_image
Technical line drawing of a mechanical device with labeled component A (no text or symbols beyond label)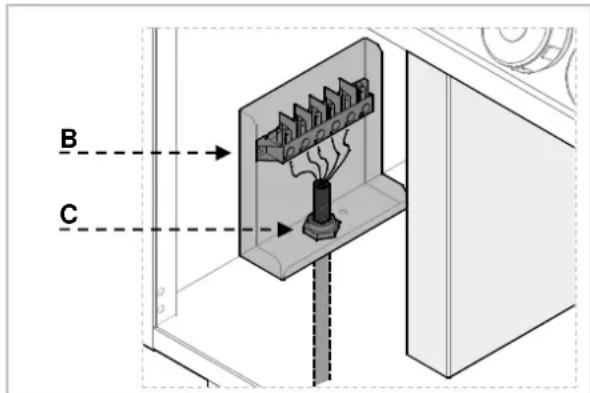
text_image
B Ctext_image
Technical diagram showing three mechanical assembly steps with labeled components and directional arrows indicating movement or force.8.5. Controllo
natural_image
Diagram of two rectangular wafers with handles, labeled A, showing a dashed line pointing to one (no text or symbols on the wafers themselves)4.6. Seguridades
natural_image
Circular industrial control knob with numeric scale and starburst pattern (no readable text or symbols)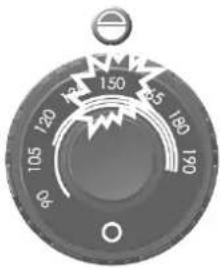
text_image
150 120 8 105 120 150 180 190
B

C

D
natural_image
Diagram showing two circular components with curved arrows indicating direction, labeled 'A' (no text or symbols on the components themselves)text_image
Technical diagram showing airflow or ventilation through a door with labeled component B and directional arrowsnatural_image
Technical line drawing of a mechanical device with labeled component A (no text or symbols beyond label)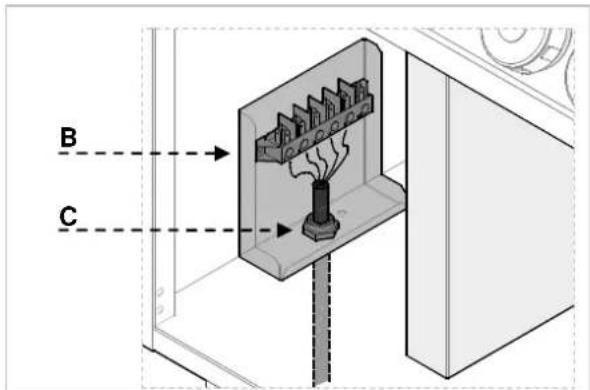
text_image
B Ctext_image
Technical diagram showing mechanical assembly steps with labeled components and directional arrows8.5. Inspección
natural_image
Diagram of a two-wet baking pan with handles and a dashed arrow labeled 'A' pointing to the pan (no text or symbols on the pan itself)4.6. Dispositivos de segurança
text_image
Diagram showing airflow or ventilation through a device with labeled component B and directional arrows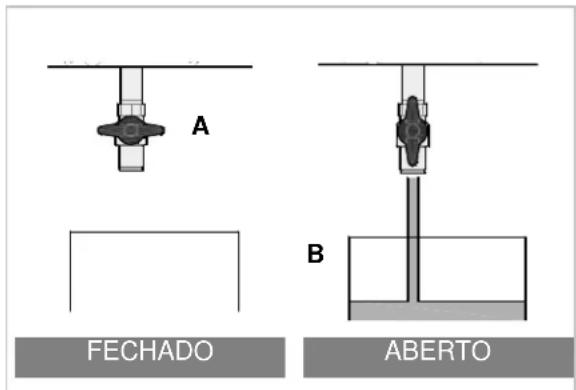
text_image
A B FECHADO ABERTOnatural_image
Technical line drawing of a mechanical device with labeled component A (no text or symbols beyond label)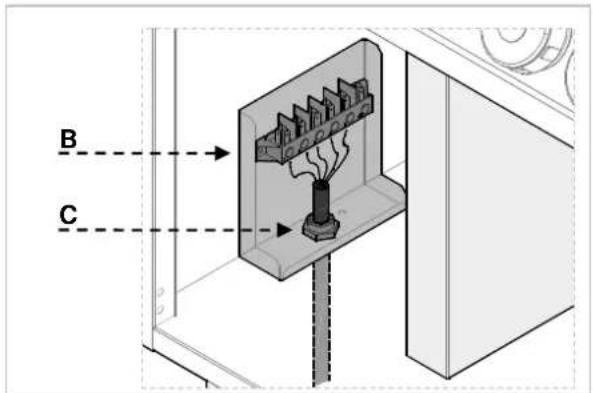
text_image
B Cnatural_image
Technical line drawing of a mechanical assembly with labeled component M (no text or symbols beyond label)text_image
Technical diagram showing three mechanical assembly steps with labeled components and directional arrows indicating movement or force.8.5. Controle
natural_image
Diagram of a two-wet baking pan with a labeled point A (no text or symbols on the diagram itself)natural_image
Diagram showing two circular components on a horizontal surface with an arrow labeled 'A' pointing to one (no text or symbols present)5.3. Bakje invullen

text_image
Diagram showing a door with labeled component B and directional arrows indicating movement or flownatural_image
Technical line drawing of a mechanical device with labeled component A (no text or symbols beyond label)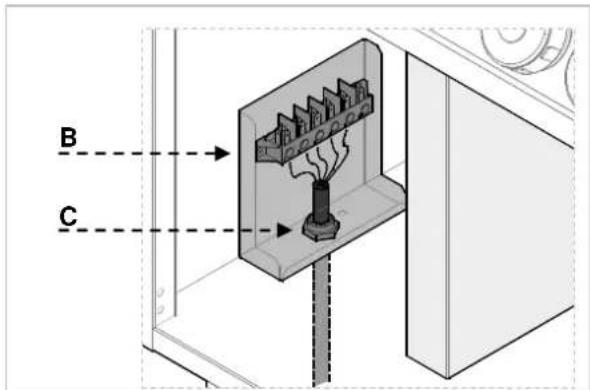
text_image
B Ctext_image
Technical diagram showing three mechanical assembly steps with labeled components and directional arrows indicating movement or force.8.5. Controle
natural_image
Diagram of two rectangular grating machines with handles, labeled A, showing a dashed line from left to right (no text or symbols on the machines themselves)natural_image
Diagram showing two circular components with arrows pointing to them, labeled 'A' at the bottom (no text or symbols on the components themselves)natural_image
Circular industrial control knob with numeric dial and starburst pattern (no readable text or symbols)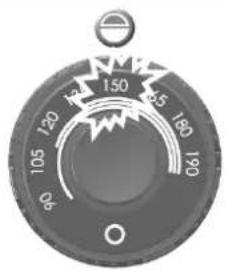
text_image
150 120 105 8 120 150 180 190
B

C

D
natural_image
Diagram showing two circular components on a horizontal surface with an arrow labeled 'A' pointing to one component (no text or symbols beyond label)text_image
Technical diagram showing a door with labeled component B and directional arrows indicating movement or flow.natural_image
Technical line drawing of a mechanical device with labeled component A and no visible text or symbols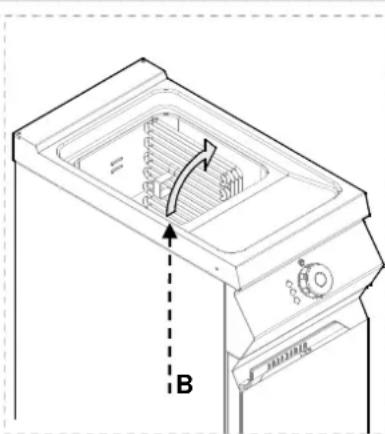
text_image
Technical diagram of a refrigerator with labeled parts and directional arrows indicating motion or movement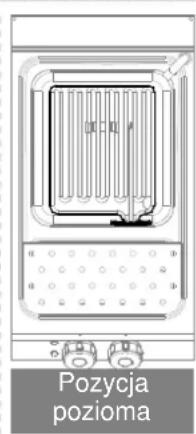
text_image
POZYCJA pozioma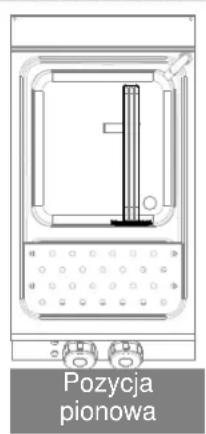
natural_image
Architectural cross-section diagram of a building facade with brick wall and vertical dimension label (50), no text or symbols present.natural_image
Technical line drawing of a mechanical device with labeled component A (no text or symbols beyond label)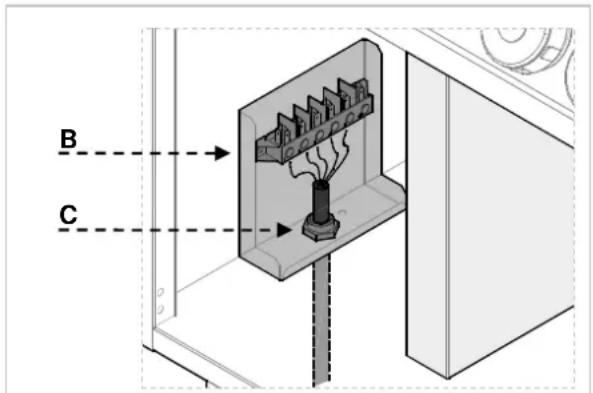
text_image
B Ctext_image
Technical diagram showing three mechanical assembly steps with labeled components and directional arrows indicating movement or force.8.5. Kontrola
IN COMPLIANCE WITH THE LAW IN FORCE, IT IS PROHIBITED TO REPRODUCE AND/OR DISTRIBUTE THIS MANUAL IN ANY WAY WITHOUT THE AUTHORISATION OF THE PROPRIETOR!
FR
AUX TERMES DE LA LOI, LA PROPRIETE DE CETTE NOTICE EST RESERVEE. IL EST DONC INTERDIT DE LA REPRODUIRE ET/OU DE LA DISTRIBUER SOUS QUELQUE FORME QUE CE SOIT SANS NOTRE AUTORISATION!