
Ceiling Fan LRC - Fan Eurom - Free user manual and instructions
Find the device manual for free Ceiling Fan LRC Eurom in PDF.

| Product Type | Ceiling fan with LED light |
| Brand | Eurom |
| Model | Ceiling Fan LRC |
| Dimensions (W x D x H) | 580 x 580 x 175 mm |
| Weight | 3.0 kg |
| Power Supply | 220-240 V~, 50/60 Hz |
| Fan Power | 50 W |
| LED Lighting Power | 40 W (non-replaceable) |
| Protection Rating | IP20 |
| Protection Class | Class I |
| Fan Speeds | 3 levels (low, medium, high) |
| LED Lighting | Dimmable (13 positions) and color temperature adjustable (13 positions from 3000K to 6500K) |
| Remote Control | Yes, with AAA 1.5 V batteries (not included) |
| Timer | Delayed shut-off 1 hour or 2 hours |
| Minimum Distance from Floor | 230 cm |
| Minimum Distance from Objects | 30 cm |
| Warranty | 24 months |
| Maintenance and Cleaning | Vacuum dust, wipe with damp cloth; do not immerse |
| Repairability | Repairs by a qualified professional; LED non-replaceable |
| Installation | Ceiling mount on support (screws not included), electrical connection by an electrician |
Frequently Asked Questions - Ceiling Fan LRC Eurom
User questions about Ceiling Fan LRC Eurom
0 question about this device. Answer the ones you know or ask your own.
Ask a new question about this device
Download the instructions for your Fan in PDF format for free! Find your manual Ceiling Fan LRC - Eurom and take your electronic device back in hand. On this page are published all the documents necessary for the use of your device. Ceiling Fan LRC by Eurom.
USER MANUAL Ceiling Fan LRC Eurom
Afbeelding 4
Afbeelding 5
Afbeelding 6
Verlengdraad
WAARSCHUWING
Afbeelding 7
Afbeelding 8
Afbeelding 9
Afbeelding 10
Afbeelding 11
Installatie

WAARSCHUWING
Afbeelding 12
Werking

WAARSCHUWING
Thank you for choosing this EUROM device. You have purchased a quality device that you will enjoy for many years. Using this device with respect and care will reduce the risk of personal injury or material damage.
CAUTION
It is important to read and understand this instruction manual before installing and using the device.
Introduction
This manual describes the correct and safe use of this device. Keep this manual for future reference. The manual is an essential part of the device and must be given to the new owner upon resale or exchange. This manual has been compiled with the utmost care. Nevertheless, we reserve the right to improve and adjust this manual at any time. The images used may differ.
The following symbols and terms are used in this manual to alert the reader on safety issues and important information:
WARNING
Indicates a hazardous situation which, if the safety instructions are not followed, can lead to injuries to the operator or bystanders, light and/or moderate damage to the product or to the environment.

CAUTION
Indicates a hazardous situation which, if the safety instructions are not followed, can lead to light and/or moderate damage to the product or to the environment.
Warranty
EUROM offers a 24-month warranty on this device from the date of purchase. The warranty does not cover wear and tear from normal use. The warranty expires if a defect is the result of unintentional or careless use of the device. The manufacturer, importer and supplier are not liable for incorrect connections.
Identification
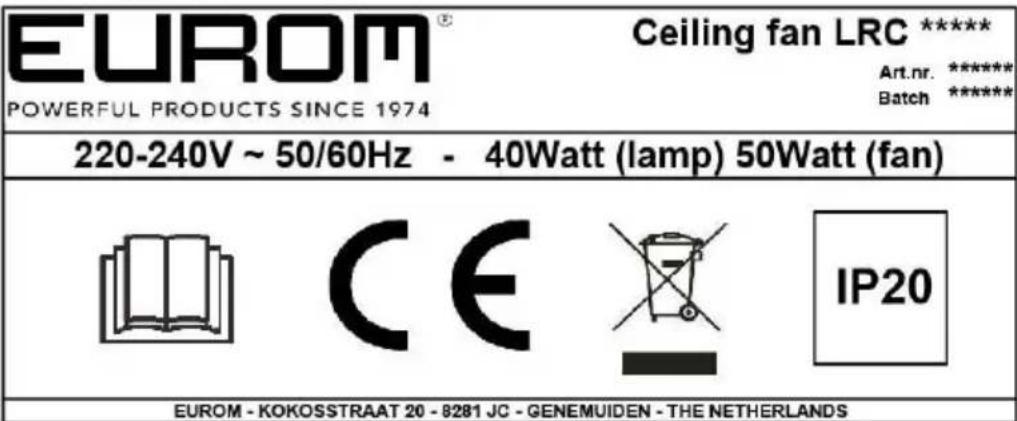
Figure 1
Specifications
| Product size: | 580 x 580 x 175 mm |
| Weight: | 3.0 kg |
| Voltage: | 220-240 V~ 50/60 Hz |
| Power fan: | 50 W |
| Power LED: | 40 W |
| Protection rating: | IP20 |
| Protective class: | Class I |
Description
The Ceiling Fan LRC is an easy-to-use ceiling fan for indoor use. The Ceiling Fan LRC consist of (Figure 2):
-
Remote control
-
Fan
-
LED lamp*
-
Safety grill
-
Base
-
Suspension bracket
* The LED lamp cannot be replaced.
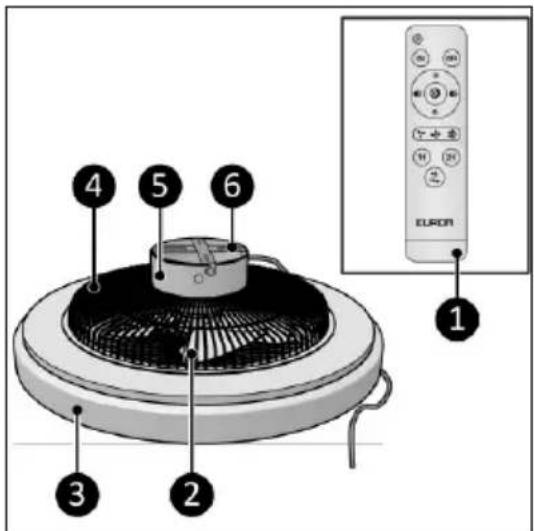
Figure 2
Remote control\*
-
Button without function
-
OFF button LED
-
Increase light button (13 positions)
-
Increase Kelvin button (13 positions)
-
Decrease light button (13 positions)
-
2 hour OFF timer
-
Stop fan button
-
1 hour OFF timer
-
Fan speed button
-
Decrease Kelvin button (13 positions)
-
Light quick select button
-
ON button LED
* Batteries are not included.
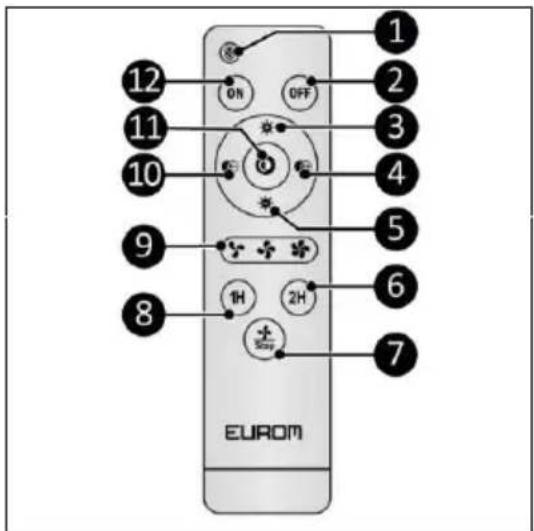
Figure 3
Safety
Please read and understand these safety instructions. Incorrect use can cause injury and will void EUROM's warranty.
This appliance can be used by children aged from 8 years and above and persons with reduced physical, sensory or mental capabilities or lack of experience and knowledge if they have been given supervision or instruction concerning use of the appliance in a safe way and understand the hazards involved.
Children shall not play with the appliance.
Cleaning and user maintenance shall not be made by children without supervision
Children should be supervised to ensure that they do not play with the appliance.
General safety instructions
WARNING
- Before carrying out any work on the fan, disconnect it from the electrical supply!
- Before obtaining access to terminals, all supply circuits must be disconnected.
- Means for disconnection must be incorporated in the fixed wiring in accordance with the wiring rules.
- Means for all poles disconnection having a contact separation that provide full disconnection under over voltage category III conditions must be incorporated in the fixed wiring in accordance with national wiring rules.
- Prevent splashing water on or in the device.
- Do not immerse any part of the device in water or other liquids.
- Never insert fingers or other objects into the openings of the device.
- Never spray products such as insect repellents or cleaning agents on or into the device.
- Do not expose the device to strong vibrations or mechanical stress.
- Fix the fan to the ceiling with screws. Do not attach the fan to the central ceiling junction box. The central ceiling junction box is not strong enough to hold the fan.
- Place the device with a minimum distance of 230 centimeters to the floor.
- The supplier accepts no responsibility for any physical injury or material damage resulting from incorrect use or installation of this fan. If you have the slightest doubt, please contact an electrician.
- Unauthorized use and technical modifications to the appliance can lead to danger to life and health.
CAUTION
Do not cover the device during usage. Keep textiles, curtains, clothing, hair at a minimum distance of 30 centimeter from the device.
Safety during operation
WARNING
Do not use the device:
- outdoors;
- if any parts are dirty or wet;
- near or in a humid environment, like a bathroom or laundry room;
- near a water source, like a bath, shower or swimming pool;
- near or in a dusty and dirty environment;
- near flammable materials, liquids or fumes;
- near heat sources and open fire;
• at temperatures above 40 °C; - with an appliance that automatically switches the device on, such as a timer, dimmer or any other device.
If the device and the electric cable shows damage or is malfunctioning, immediately take the appliance out of use and disconnect the power supply.
Transport and storage
- Clean the device before storing it.
- Transport the device in its original packaging.
• Store the device in its original packaging in a cool, dry and dust-free area. - Do not store the device near acids, alkalis, oil or other corrosive substances.
- Remove the batteries from the remote control prior to storage (Figure 12).
Assembly
The device is packed in one box. Remove all packaging material and check that the device is not damaged. Do not use the device if it is damaged, but always contact your supplier. Keep the packaging for safe storage and transport.
Power supply
WARNING
Before carrying out work on the fan and power circuits; switch of the corresponding circuit breaker.

CAUTION
Make sure that the main voltage is the same as indicated on the identification label of the device. The electrical installation and wiring must comply with national and local regulations. All electrical connections must stay dry under all circumstances.
There are two options for mounting the fan to the power supply:
• directly to a central ceiling junction box;
- at a distance from a central ceiling junction box. An extension cord must be placed between the fan and the central ceiling junction box.
Central ceiling junction box
WARNING
Fix the fan to the ceiling with screws. Do not attach the fan to the central ceiling junction box. The central ceiling junction box is not strong enough to hold the fan.
Install the device over a central ceiling junction box. Connect the ceiling hard wiring directly to the terminal box of the device.
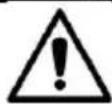
- Mark four holes on the ceiling for the suspension bracket. Make sure the holes are on a sturdy beam or on the concrete.
- Check with a wire detector for wires. Make sure not to hit any wiring when you drill the holes in the ceiling.
- Drill the four marked holes. Use a 5 mm drill bit.
- Place the plugs in the four holes (Figure 4, pos. 1).
- Use the Philips screws (Figure 4, pos. 3) and the rings (Figure 4, pos. 4) to attach the suspension bracket (Figure 4, pos. 2) to the ceiling.
-
Make sure you have both hands free to make the electrical connections:
-
use a rope or tie wraps to temporarily hang the fan on the suspension bracket, or;
-
another person holds the device up near the suspension bracket.
-
Connect the electric wires from the central ceiling junction box to the fan terminal box:
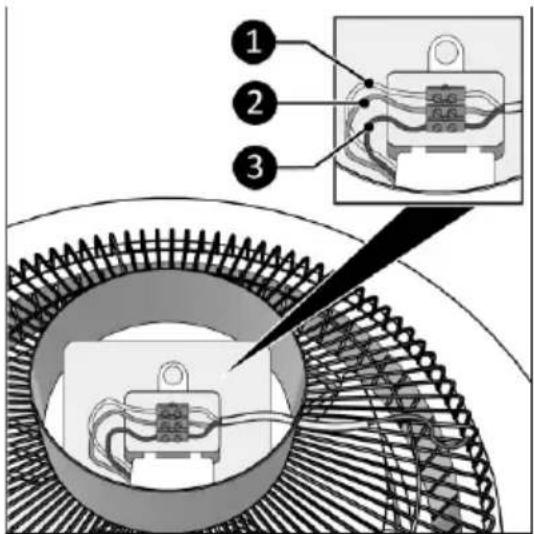
• Brown wire: live (Figure 5, pos. 3);
- Yellow green wire: earth (Figure 5, pos. 2);
- Blue wire: neutral (Figure 5, pos. 1).
8. Close the connection-box securely.
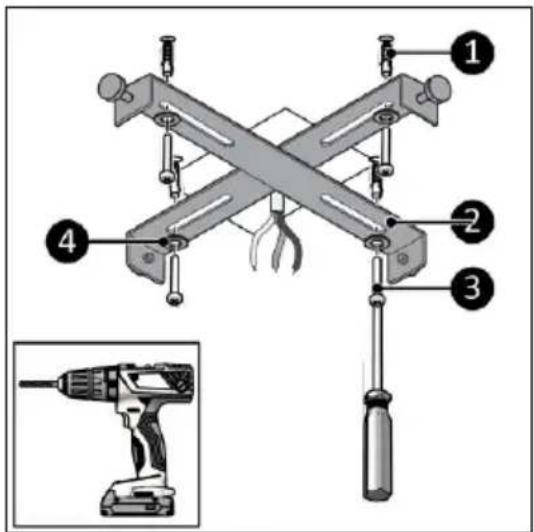
Figure 4

Figure 5
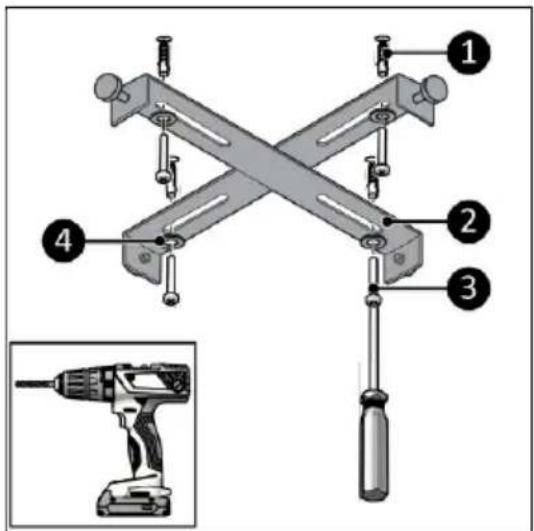
- Use the side screws (Figure 6, pos. 1) to attach the fan (Figure 6, pos. 2) to the suspension bracket.

Figure 6
Extension cord

WARNING
Fix the fan to the ceiling with screws.
The fan can be placed at a distance from the central ceiling junction box. An extension cord must be placed between the fan and the central ceiling junction box.
The minimum wire area for the extension cord is 3x 1,00 mm ^4 .
- Place the end of the extension cord (Figure 7, pos. 2) through the protection sleeve, (Figure 7, pos. 1) through the hole of the fan base.
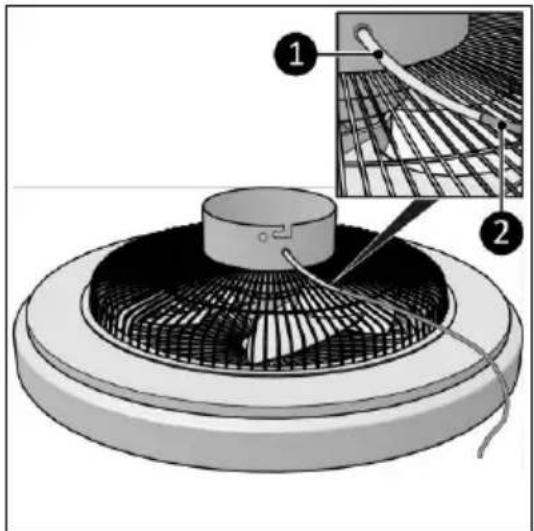
natural_image
Diagram of a circular fan or vent with internal mesh structure, showing two labeled parts (1 and 2) and a magnified inset of the grid pattern.Figure 7
-
Connect the electrical wires of your extension cord to the terminal block of the fan:
-
Brown wire: live (Figure 8, pos. 3);
- Yellow green wire: earth (Figure 8, pos. 2);
- Blue wire: neutral (Figure 8, pos. 1).
- Close the connection-box securely.

Figure 8
- Mark four holes on the ceiling for the suspension bracket. Mark the holes on a sturdy beam or on the concrete.
- Check with a wire detector for wires. Make sure not to hit any wiring when you drill the holes in the ceiling.
- Drill the four marked holes. Use a 5 mm drill bit.
- Place the plugs in the four holes (Figure 9, pos. 1).
- Use the Philips screws (Figure 9, pos. 3) and the rings (Figure 9, pos. 4) to attach the suspension bracket (Figure 9, pos. 2) to the ceiling.
- Use the side screws (Figure 10, pos. 1) to attach the fan (Figure 10, pos. 2) to the suspension bracket.

Figure 9
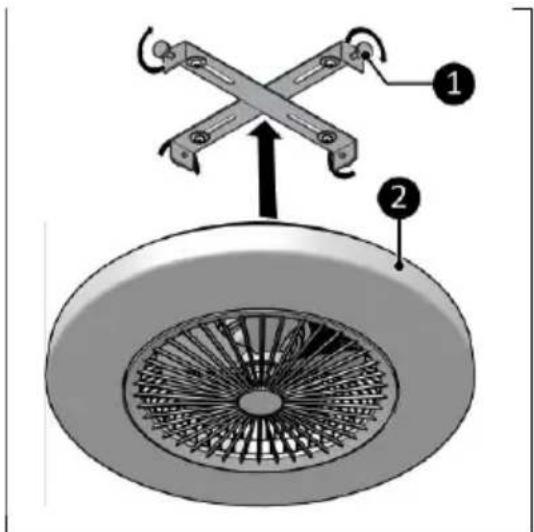
Figure 10
- Connect the electrical wires (of the other end) of your extension cord to the central ceiling junction box. Use a terminal block:
• Brown wire: live (Figure 11, pos. 1);
- Yellow green wire: earth (Figure 11, pos. 2);
- Blue wire: neutral (Figure 11, pos. 3).
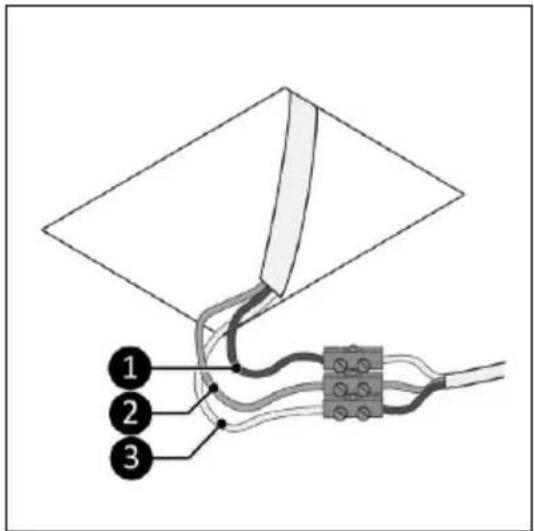
Figure 11
Installation
WARNING
Before switching on the circuit breaker, make sure all the electric connections are well done and safe.
- Switch on the circuit breaker for the corresponding power supply circuit.
- If present, turn the switch on.
Remote control
- Remove the cover (Figure 12, pos. 1).
- Remove the batteries (if present).
- Insert two batteries (AAA 1.5 V) (Figure 12, pos. 2) as indicated in the battery compartment. Make sure to insert the batteries correctly.
- Place the cover.
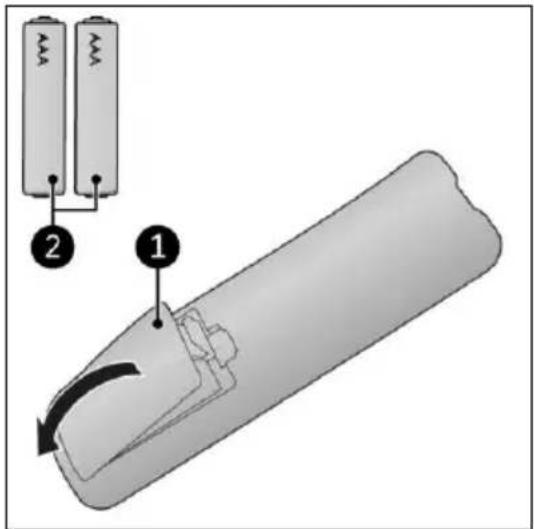
Figure 12
Operation
WARNING
Before every use, make sure that:
• the device is clean and dry;
• the device is not damaged.
Light setting
- Press the LED ON button (Figure 13, pos 4.).
- Adjust the desired light settings with the (Figure 13, pos. 1):
• light and Kelvin buttons
• light quick select button:
• 3000 Kelvin, maximum light level;
• 6500 Kelvin, maximum light level;
• 4000 Kelvin, maximum light level;
• 4000 Kelvin, 90% light level.
Fan setting
- Press the fan speed button until the desired fan speed is reached (Figure 13, pos. 3):
• level 1: low speed;
• level 2: medium speed;
• level 3: high speed.
Timer setting
- Use the 1H or 2H buttons to set the countdown timer (Figure 13, pos. 2).
Turn off the light
- Press the LED OFF button (Figure 14, pos. 1).
Turn off the fan
- Press the fan OFF button (Figure 14, pos. 2).
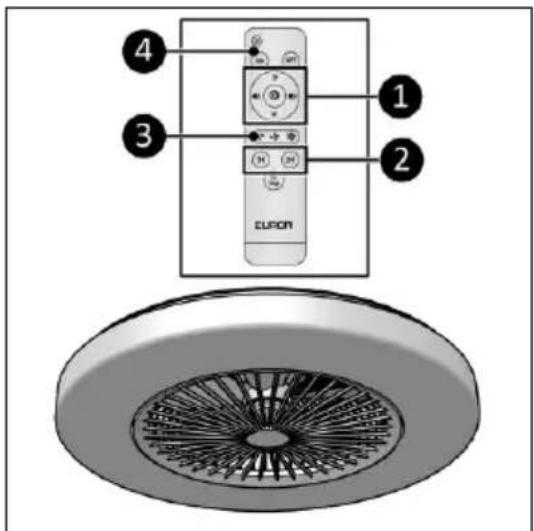
Figure 13
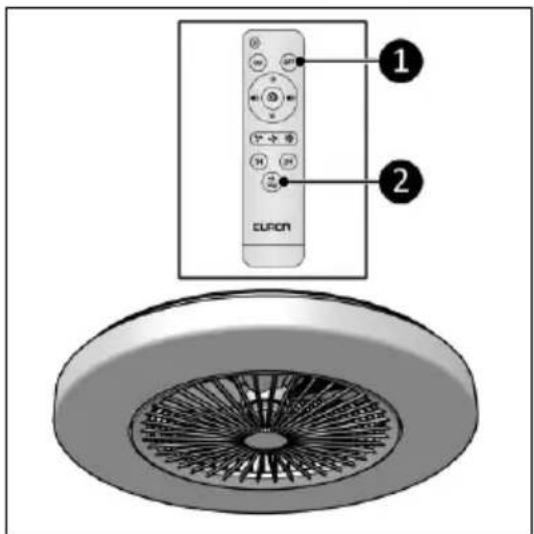
Figure 14
Maintenance
WARNING
Do not perform any repairs or modifications to this device.
Maintenance and repairs must be carried out by a EUROM authorized professional. If the electric cable is damaged it should be replaced by the manufacturer or its service employee or persons with similar qualifications to prevent risks.
Cleaning
CAUTION
Do not use:
- scouring pads;
- hard brushes;
- flammable, aggressive or chemical cleaning products.
Prevent water from entering the device. Do not immerse any part of the device in water or other liquids.
It is recommended to clean the device regularly and prior to storage:
- Carefully vacuum the openings to remove dust and dirt.
- Wipe the device with a damp, clean, soft, lint-free cloth or a soft brush.
- Let the device dry completely prior to use and storage.
Disposal

At its end of life, discard the device according to the local laws and regulations, or deliver the device to your supplier. Remove the batteries from the remote control for separate disposal.
Abbildung 4
Abbildung 5
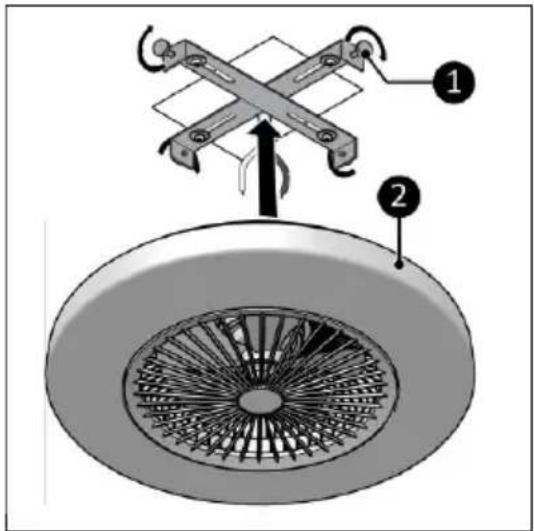
Abbildung 6
Verlängerungskabel
WARNUNG
natural_image
Diagram of a mechanical component with meshing and wire connection, showing internal structure (no text or symbols)Abbildung 7
Abbildung 8
Abbildung 9
Abbildung 10
Abbildung 11
Installation

WARNUNG
Abbildung 12
Betrieb
WARNUNG
Figure 4

Figure 5
Figure 6
Rallonge

AVERTISSEMENT
Figure 7
Figure 8
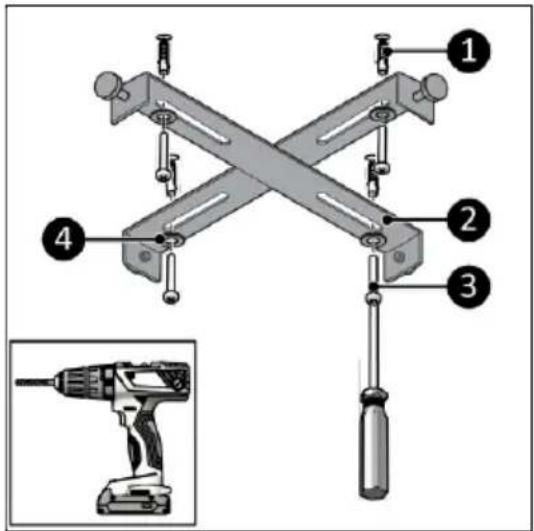
Figure 9
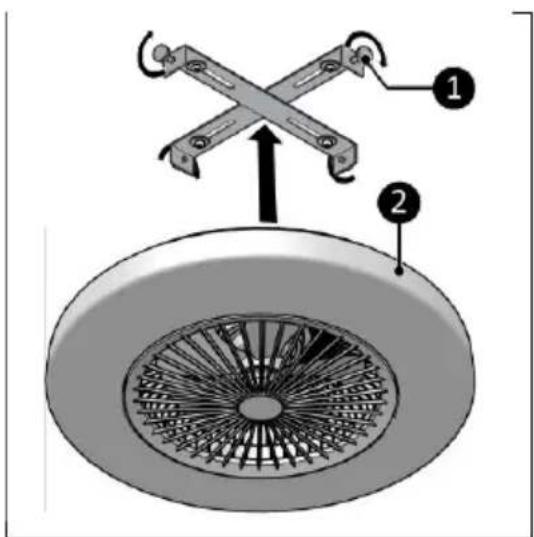
Figure 10
Figure 11
Installation

AVERTISSEMENT
Figure 12
Utilisation
AVERTISSEMENT
- Verlengdraad
- WAARSCHUWING
- Installatie
- Werking
- CAUTION
- Introduction
- WARNING
- Warranty
- Identification
- Description
- Remote control\*
- Safety
- General safety instructions
- Safety during operation
- Transport and storage
- Assembly
- Power supply
- Central ceiling junction box
- Extension cord
- Installation
- Remote control
- Operation
- Light setting
- Fan setting
- Timer setting
- Turn off the light
- Turn off the fan
- Maintenance
- Cleaning
- Disposal
- Verlängerungskabel
- WARNUNG
- Betrieb
- Rallonge
- AVERTISSEMENT
- Utilisation
Brand : Eurom
Model : Ceiling Fan LRC
Category : Fan