
Free Move FV9951 - Iron TEFAL - Free user manual and instructions
Find the device manual for free Free Move FV9951 TEFAL in PDF.

| Brand | Tefal |
| Model | Free Move FV9951 |
| Product type | Cordless iron with base |
| Power supply | 220-240 V, 50/60 Hz |
| Power | Approximately 2400 W (estimate) |
| Water tank capacity | 250 ml (approx., MAX mark) |
| Soleplate | Gliss/Glide Protect™ autoclean or Ultragliss® Diffusion (depending on model) |
| EasyFix system | Yes, base attachment to ironing board |
| Variable steam function | Yes, trigger under handle |
| Turbo function | Yes, button for powerful steam |
| Spray function | Yes, button to dampen laundry |
| Vertical steaming | Yes, with Turbo function |
| Auto-Off safety | Yes (depending on model): stops after 8 min of inactivity on base |
| Indicator lights | Green (ready), red (recharge needed), orange (Auto-Off) |
| Anti-scale rod | Yes, removable for cleaning |
| Self Clean | Yes, recommended once a month |
| Recommended water type | Tap water; if very hard, mix 50% demineralized water |
| Weight | Approximately 1.5 kg (iron only, estimate) |
| Dimensions (L x W x H) | Approximately 30 x 15 x 20 cm (estimate) |
| Soleplate care | Soft, damp cloth on warm soleplate; no abrasive pad |
| Storing the iron | Thermostat on MIN, unplug, empty tank, wrap cord |
Frequently Asked Questions - Free Move FV9951 TEFAL
User questions about Free Move FV9951 TEFAL
0 question about this device. Answer the ones you know or ask your own.
Ask a new question about this device
Download the instructions for your Iron in PDF format for free! Find your manual Free Move FV9951 - TEFAL and take your electronic device back in hand. On this page are published all the documents necessary for the use of your device. Free Move FV9951 by TEFAL.
USER MANUAL Free Move FV9951 TEFAL
natural_image
Exterior view of a Tefat iron (£) with steam iron, showing brand logo and model (no text-heavy elements)www.tefal.com
EN Please refer to safety booklet before using your appliance.
natural_image
Mechanical assembly diagram showing a device with a spring and adjustment lever (no text or symbols)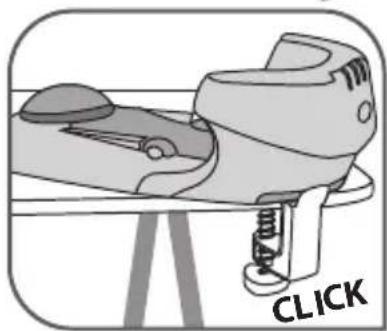
natural_image
Illustration of a mechanical device with a spring and lever, labeled 'CLICK' (no text or symbols on the device itself)Fig.1 Fig.2 Fig.3
natural_image
Diagram of a mechanical device with directional arrows indicating motion or force (no text or symbols)Fig.4
B - Using the appliance ^[2]
natural_image
Illustration of a person using a power iron to lift a car, with no visible text or symbols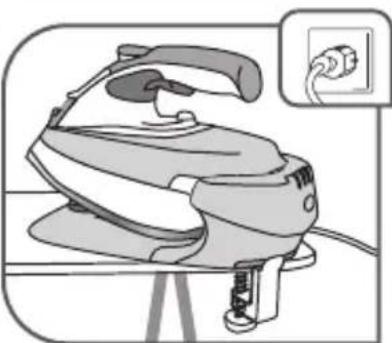
natural_image
Illustration of a steam iron on a stand with a close-up inset showing the electrical outlet (no text or symbols)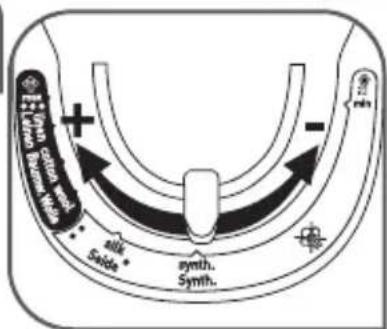
Fig.6Fig.7
Fig.5
natural_image
Illustration of a steam iron on a tripod, with an inset showing the same device (no text or symbols present)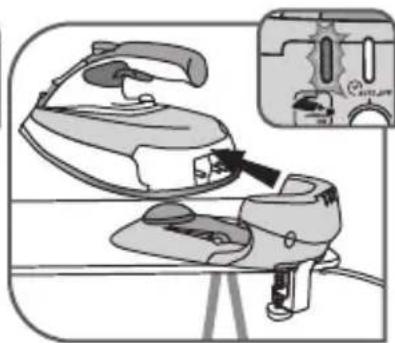
natural_image
Illustration of a steam iron being placed on a chair, with an inset showing the electrical switch (no text or symbols present)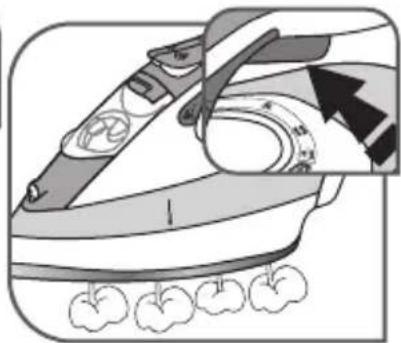
natural_image
Illustration of a steaming machine with apple-shaped base and blade, showing internal components (no text or symbols)Fig.8 Fig.9 Fig.10

natural_image
Illustration of a car being cleaned with a brush, showing the brush tip and paint level (no text or symbols)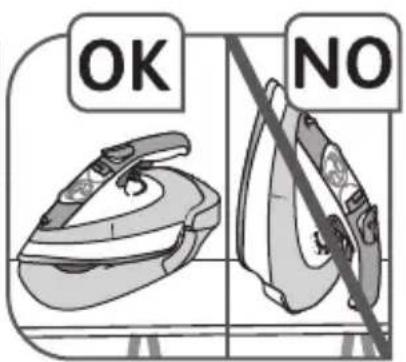
Fig.12
Fig.13
Fig.11
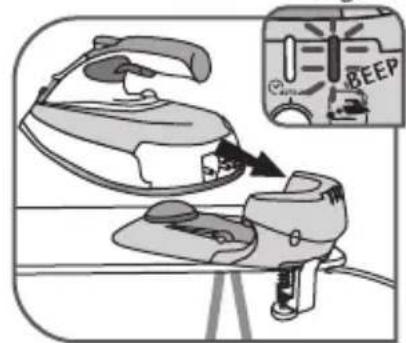
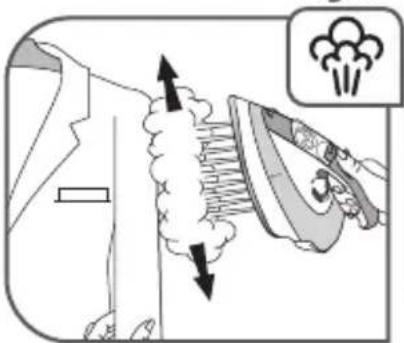
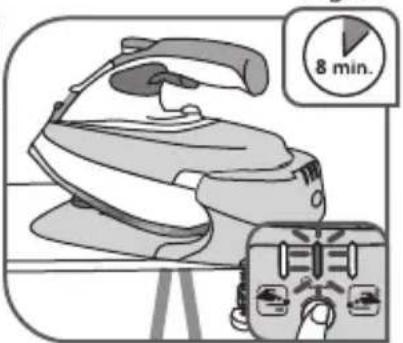
Fig.14
Fig.15
Fig.16*
C - Cleaning and maintenance ^(3)
natural_image
Illustration of a kitchen sink with an electric iron and a hand inserting a power switch (no text or symbols)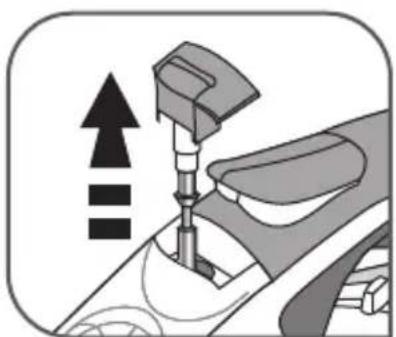
natural_image
Diagram of a car gear shift lever mechanism with no text or symbols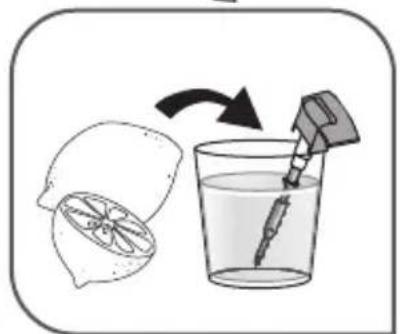
natural_image
Illustration of a lemon being poured into a glass with a pipette (no text or symbols)Fig.18
Fig.19
Fig.17
natural_image
Illustration of a hand using a tool to clean or repair a tiled wall surface (no text or symbols)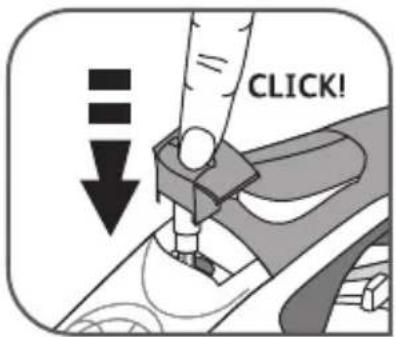
natural_image
Illustration of hands using a iron iron to wear a shoe (no text or symbols present)Fig.20
Fig.21
Fig.22
D - Storing the appliance (4)
natural_image
Illustration of a kitchen sink with a hand using a tool, showing cleaning and cleaning process (no text or symbols)Fig.23

natural_image
Illustration of a steam iron with attached straps (no text or symbols)Fig.24 Fig.25
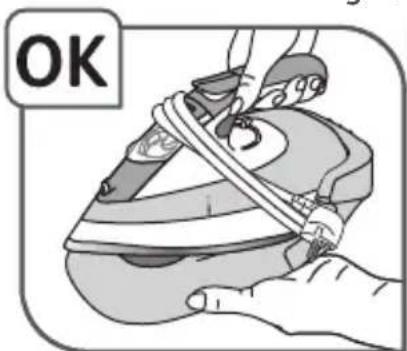
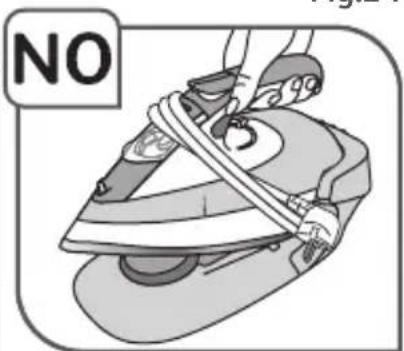
Fig.26 Fig.27
(1) DE Vorbereitung • FR Préparation • NL Voorbereiding • ES Preparación • PT Preparação • iT Preparazione • DA Forberedelse • SV Före användning • NO Forberedelse • Fi Valmistelu • EL Проセтоиμασία • hU Előkészítés • cS Příprava • Sk Príprava • SL Priprava • SR Priprema • hR Priprema • RO Pregătire • bg Подготовка • TR Hazirlik • Uk Підготовка до застосування • RU Подготовка к применению • PL Przygotowanie • ET Ettevalmistamine • LV Sagatavošana • LT Paruošimas
(2) DE Verwendung • FR Utilisation • NL Gebruik • ES Utilización • PT Utilização • iT Utilizzo • DA Brug • SV Användning • NO Bruk • Fi Käyttö • EL Xpnön • hU Használat • cS Použití • Sk Použivanie • SL Uporaba • SR Upotreba • hR Uporaba • RO Utilizare • bg Употреба • TR Kullanim • Uk Застосування • RU Применение • PL Używanie • ET Kasutamine • LV Izmantošana • LT Naudojimas
(3) DE Reinigung und Instandhaltung • FR Nettoyage et entretien • NL Schoonmaak en onderhoud • ES Limpieza y mantenimiento • PT Limpeza e manutenção • iT Pulizia e manutenzione • DA Rengöring og vedligeholdelse • SV Rengöring och underhåll • NO Rengjøring og vedlikehold • Fi Puhdistus ja huolto • EL Kaθαρισμός και συντήρηση • hU Tisztítás és karbantartás • cS Čištení a údržba • Sk Čistenie a údržba • SL Čiščenje in vzdrževanje • SR Čiščenje i održavanje • hR Čiščenje i održavanje • RO Curătare și întreținere • bg Почистване и поддръжка • TR Temizlik ve bakım • Uk Чищення та догляд • RU Чистка и уход • PL Czyszczenie i konserwacja • ET Puhastamine ja hooldus • LV Tīrīšana un apkope • LT Valymas ir priežiūra
(4) DE Aufbewahrung • FR Rangement • NL Opbergen • ES Recogida / almacenamiento • PT Arrumação • iT Come riporre l'apparecchio • DA Opbevaring • SV Förvaring • NO Oppbevaring • Fi Säilytys • EL Фúλαξη • hU Tárolás • cS Skladování • Sk Skladovanie • SL Shranjevanje • SR Odlaganje • hR Ćuvanje • RO Depozitare • bg Съхранение • TR Muhafaza • Uk Зберігання • RU Хранение • PL Przechowywanie • ET Hoidmine • LV Uzglabāšana • LT Laikymas
Description
- Spray nozzle
- Tank filling inlet
- Water tank filling flap
- Anti-scale valve
- Spray Button
- Turbo button
- EasyFix system
-
Variable steam trigger
-
Thermostat control
-
Water tank
-
Display panel
a. Auto-off restart button*
b. Green light "Iron ready"
c. Orange light "Auto-off on"*
d. Red light "Recharge iron"
- Base
- Gliss/Glide Protect ^™ autoclean soleplate (according to model) Ultraglide ^® Diffusion soleplate (according to model) Autoclean Catalys soleplate (according to model)
Before first use
- Please read these instructions carefully. Remove any labels from the soleplate before heating up the iron.
- Before using your iron's steam functions for the first time, we recommend that you activate the steam function in a horizontal position for a few moments away from your laundry. Switch the thermostat control to "MAX" or "●●●" and hold down the variable steam trigger. Under the same conditions, press the Turbo button several times.
- There may be a release of smoke, a harmless odour and a light spray of particles when you use your appliance for the first time. This has no effect on the use of the iron and will disappear quickly.
Preparation
Setting up
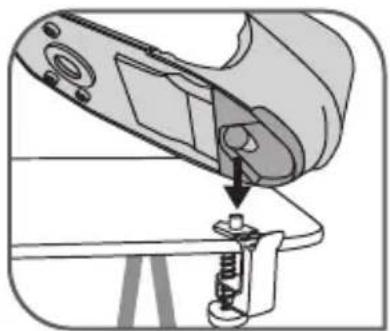
- Attach the EasyFix system onto the ironing board by turning the screw. It is normal that the small piece attached to the screw is mobile – fig.1.
- Click the base onto the EasyFix System – fig.2 and 3.
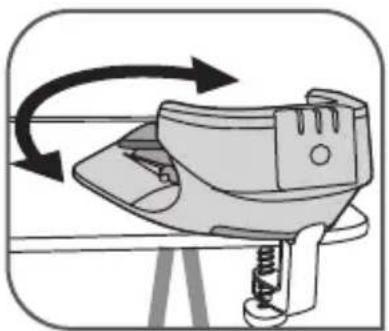
- Adjust the angle of the base on the board – fig.4. We recommend that the base is adjusted to a 45^ angle for greater comfort.
What water to use?
- Your appliance has been designed to operate using untreated tap water. However, it is necessary to operate the Self-Clean function regularly in order to eliminate hard water deposits from the steam chamber.
- Heat concentrates the elements contained in water during evaporation. The types of water listed below may contain organic waste, mineral or chemical elements that can cause spitting, brown staining or premature wear of the appliance: water from clothes dryers, scented or softened water, water from refrigerators, batteries, air conditioners, rain water, boiled, filtered or bottled water. These types of water should not be used in your iron. Also only use distilled or demineralised water as advised below.
- If your water is very hard, it is possible to mix untreated tap water with store-bought distilled or demineralised water in the following proportions: 50% tap water, 50% distilled or demineralised water.
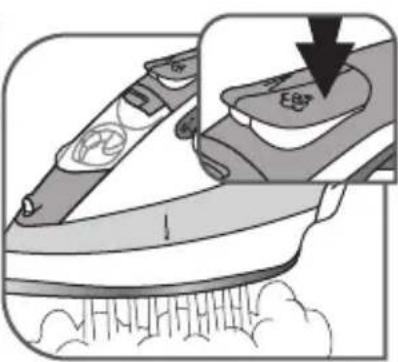
Filling the water tank
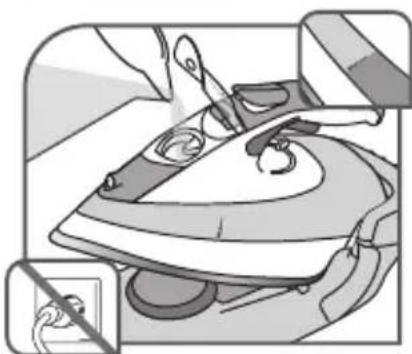
- Fill the tank up to the "MAX". Never fill the appliance by holding it directly under the tap. Do not remove the anti-scale valve to fill the water tank.
- Unplug the base from the socket.
- Place the iron on the base.
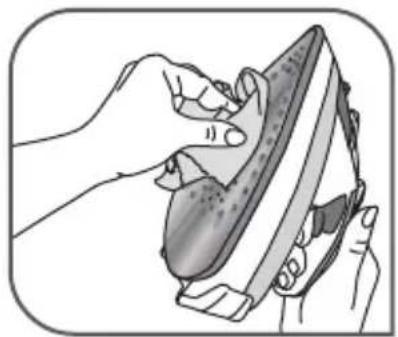
- Open the tank filling flap and fill the tank up to "MAX" – fig.5.
- Close the tank filling flap.
Using the appliance
Turning on
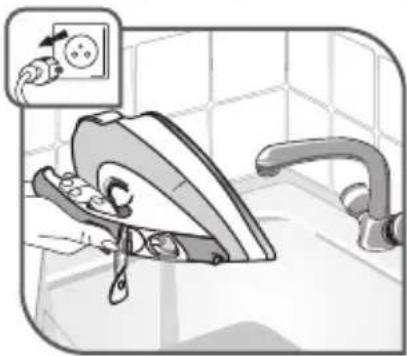
- Connect the base to a 220-240V socket— fig.6.
- Adjust the temperature – fig.7. Your iron has the Automatic steam function. Your iron automatically and accurately determines the exact temperature and steam flow that are suitable, in order to guarantee the best results.
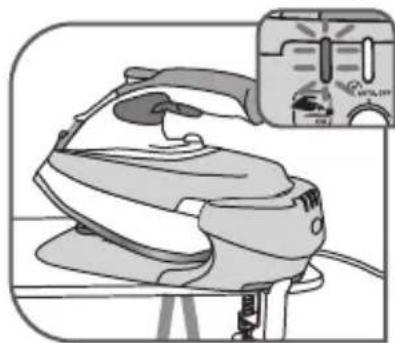
- The flashing green light – fig.8 located on the display panel on the back of the base indicates that the iron is heating up. When the light stops flashing – fig.9, the iron is ready to use.
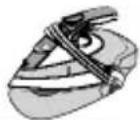
- Do not place the iron on its heel during the resting period, but on its base – fig.13.
Operation of the display panel
- Flashing green light: iron is heating up – fig.8.
- Fixed green light: iron is ready– fig.9.
- The flashing red light and beep sounds after around 30s when the iron is not on its base: the iron must be replaced on the base for recharging – fig.14.
- Flashing orange light (according to model): Auto-Off function activated (see the section "Auto-Off safety") – fig.16.

RECOMMENDATIONS
- Your iron heats up quickly: start with fabrics that are ironed at a low temperature and finish with those that require a higher temperature.
- If you lower the thermostat temperature, place the iron on its base and wait (around 10 minutes) until the temperature drops to avoid burning the fabric.
- If you are ironing a fabric with a mixture of fibres: adjust the ironing temperature to the most delicate fibre.
Steam / Dry Ironing
- Check if there is water in the tank before using the variable steam trigger or the TURBO and SPRAY functions.
- During your ironing session, hold down the trigger located under the handle (at least 5s at a time) to obtain a constant flow of steam and guarantee the best results— fig.10. When the trigger is released, the steam stops.
Using the TURBO and SPRAY function
- For the TURBO function, set the thermostat control to "MAX" or "●●●". Press the TURBO button from time to time – fig.12.
- When you dry or steam iron, press the SPRAY button several times to wet the fabric and remove resistant creases – fig.11.
Vertical steam ironing
- Hold the iron a few centimetres from the fabric to avoid burning delicate fabrics. Every five pulses return the iron to a horizontal position.
- Hang the garment on a hanger and hold the fabric slightly taut with one hand. The steam is very hot, so you should always do this with the garment on a hanger – never iron clothes which someone is wearing – fig.15.
- Set the thermostat control to “MAX”.
- Press the turbo button in pulses – fig.12 and move the iron from the top to the bottom – fig.15.
Additional functions
Gliss/Glide Protect autoclean - Autoclean Catalys soleplate (depending on model).
- Your iron is equipped with a catalytic self-cleaning soleplate.
- Its exclusive coating removes all impurities generated by normal use.
- It is recommended that you always rest your iron on its support base to preserve its self-cleaning coating.
Auto-Off safety (according to model)
- During normal use, the Auto-off light is off!
- The electronic system cuts the base power supply and the orange light located on the display panel flashes if the iron remains still for more than eight minutes on the base.
- To restart the iron, simply press the RÉSTART button on the display panel – fig.16.
Maintenance and cleaning
Cleaning the anti-scale valve (once a month)
- Be careful! Never touch the end of the rod. The iron will not function without the anti-scale valve.
- Disconnect the base and empty the tank – fig.17.
- To remove the anti-scale rod, set the thermostat at MAX, press the valve extraction button and pull gently upwards – fig.18.
- Let the rod soak for four hours in a glass of white vinegar or natural lemon juice – fig.19.
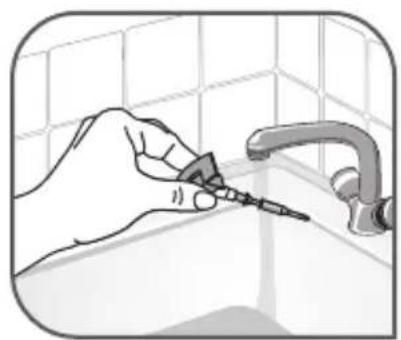
- Rinse the rod under tap water – fig.20.
- Reposition the anti-scale rod; push the valve until it clicks – fig.21.
Self-cleaning
- Self-cleaning delays scaling on the iron. To prolong the life of the iron, perform a self-clean once a month.
- Plug in the base and reconnect your iron.
- Allow the iron to heat up on the base, with the tank full and the thermostat set to maximum.
- When the green light on the display panel stops flashing, take the iron and place it over a sink. Remove the anti-scale valve (see previous chapter).
- Hold down the variable steam button and shake the iron gently and in a horizontal position, over the sink, until some of the water (and the impurities) have drained through the soleplate.
- At the end of this operation, put the anti-scale valve back in place; push down until it clicks – fig.21.
- Place the iron back on the base to dry the soleplate.
Cleaning the soleplate
Your iron has a self-clean soleplate (according to the model):
- Warning! Use of an abrasive cloth will damage the self-cleaning coating on the soleplate.

- Its exclusive active coating eliminates all impurities that can be generated under normal conditions of use. - Ironing with an incorrect program can however leave traces that may require manual cleaning. In this case, it is recommended that you use a soft damp cloth on the still warm soleplate so as not to damage the coating – fig.22.
Your steam iron is fitted with an Ultraglide soleplate (depending on model):
- Never use aggressive or abrasive products.
- When the soleplate is still warm, wipe with a damp cloth – fig.22.
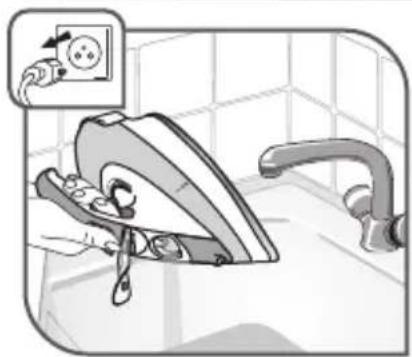
- Set the thermostat control to "MIN". Disconnect the base and empty the tank – fig.23.
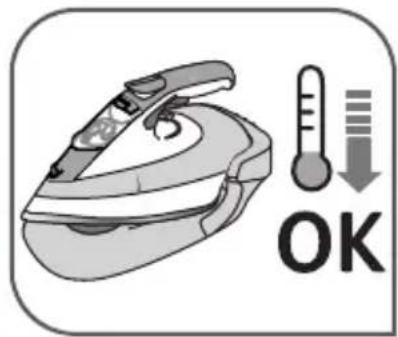
- Wait for the soleplate to cool – fig.24. Wind the cord around the iron and its base – fig.25.
- Carry the iron and the base with two hands – fig.26 and 27.
Environment protection first!
①Your appliance contains valuable materials which can be recovered or recycled.
Leave it at a local civic waste collection point.
If there is a problem
| PROBLEM | POSSIBLE CAUSES | SOLUTIONS |
| Brown streaks come through the holes in the soleplate and stain the linen. | You are using chemical descaling agents. | Do not add any descaling agents to the water in the water tank. |
| You are not using the right type of water. | Perform a self-cleaning operation and consult the section "What water to use?" | |
| Fabric fibres have accumulated in the holes of the soleplate and are burning. | Perform the self-cleaning operation and clean the soleplate with a damp sponge. Vacuum the holes of the soleplate from lime to lime. | |
| The soleplate is dirty or brown and can stain the linen. | You are ironing with an inappropriate setting (temperature too high). | Clean the soleplate as indicated above.Select the appropriate setting. |
| Your linen has not been rinsed sufficiently or you are using starch. | Clean the soleplate as indicated above. Always spray starch onto the reverse side of the fabric to be ironed. | |
| Your iron is releasing little or no variable/TURBO steam. | The water tank is empty. | Fill the water tank. |
| The anti-scale valve is dirty. | Clean the anti-scale valve. | |
| Your iron has a build-up of scale. | Clean the anti-scale valve and carry out a selfclean. | |
| Your iron has been used dry for too long. | Carry out a self-clean. | |
| Your iron needs recharging. | For optimum efficiency, place the iron on its base to be recharged at each resting period. | |
| You are not using the the variable steam trigger. | Hold the variable steam trigger down while you iron to obtain a constant flow of steam. | |
| The variable steam has not been activated. | Gently shake the iron in a horizontal position, while holding down the steam trigger until the steam output begins. | |
| The soleplate is scratched or damaged. | You have placed your iron flat on a metallic rest-plate or ironed over a zip. You have cleaned your soleplate with an abrasive or metal pad. | Always set your iron on its base. Try to avoid ironing over zips. Refer to the chapter "Clean the soleplate". |
| Your soleplate is releasing particles. | Scale is building up on the soleplate. | Carry out a self-clean operation. |
| Water is running out of the water tank flap. | You have not closed the water tank flap properly. | Check that the water tank flap is locked properly. |
| Water drips from the holes in the soleplate. | You have stored the iron horizontally, without emptying it and without setting it to MIN. | See the section "Storing your iron". |
| The red light on the display panel floshes when the iron is on the base. | Connection problem between the iron and the base. | Check that the iron is pushed back completely and connected to the base. |
| The spray does not spray. | There is not enough water in the water tank. | Fill up the water tank. |
| The base moves on the ironing board. | The base has not been properly connected to the EasyFix system or the EasyFix system is not properly fixed to the ironing board. | Check that the base is properly connected to the EasyFix system and that the EasyFix system is securely screwed onto the board. |
| Your iron is cooling down. | You are not placing it on its base regularly. | Place the iron on the base during each resting period while you change your item of clothing. |
If you have any problem or queries, please contact our Helpline: 0845 602 1454 – UK / (01) 677 4003 – ROI or consult our website – www.tefal.co.uk
Produktbeschreibung
-
Base
-
Såle Gliss/Glide Protect ™
Såle Autoclean Catalys